Fixing To use System Restore you must ...

There are cases when you want to undo some changes you’ve made to your computer and to do that you have to perform the System Restore task. However, if you encounter an error that states “To use System Restore you must specify which Windows installation to restore”, when doing so, read on as this post will help you fix the problem.

This kind of error in System Restore could be due to corrupted files in the system. There are also situations where you are not able to boot up once you encounter this error which could be a big problem. On the other hand, this error might have something to do with corrupted BCD files. Whatever the cause is, here are some potential fixes you have to try.

Option 1 – Try to run System File Checker offline

Like pointed out, since the error might be due to corrupted system files, you can try to run System File Checker offline. How? Refer to these steps:

  • You need to go to the Advanced Startup Options and from there select Troubleshoot.
  • Next, select the Advanced Options and then Command Prompt.
  • After opening Command Prompt, type the commands given below and tap Enter right after you type each one of them.
    • Cd /
    • Dir
  • If you can see the “Users” folder, that is your system’s drive. However, if you can’t see it, you can just change the drive-by assigning “D” as its alphabet volume.
  • Then execute this command where “C” is the system drive: sfc /scannow /offbootdir=C: /offwindir=C:Windows
  • Now repeat the given steps sequentially.

Option 2 – Try to run DISM tool

You can also run the DISM tool to repair the potentially corrupted system image. First, you have to check the health of the system like checking the integrity of the system files and Windows services. To run DISM, follow the given steps below sequentially.

  • Open Command Prompt from the Advanced Startup options.
  • After that, execute this command where “C:” is the system volume: DISM /Image:C:Windows /Cleanup-Image /RestoreHealth /Source:C:WindowsWinSxS
  • If you encounter an error after executing the given command, insert the Windows USB or DVD and then execute this next command where “E:” is the USB or DVD drive: DISM /Image:C:Windows /Cleanup-Image /RestoreHealth /Source:esd:E:SourcesInstall.esd:1 /limitaccess
  • In some cases, “install.esd” would be “install.wim” and in such case, you have to modify and execute this command: DISM /Image:C:Windows /Cleanup-Image /RestoreHealth /Source:wim:E:SourcesInstall.wim /limitaccess

Option 3 – Try to repair corrupted BCD

As mentioned, the error could also be due to corruption in BCD, and to fix it, you can use Bootrec.exe – a built-in command-line tool used to troubleshot issues related to boot up and Windows Startup. Before you run this tool, make sure that you have inserted a bootable USB or DVD into your computer. Once you have that covered, follow these steps:

  • You need to go to the Advanced Startup Options.
  • Then click on Troubleshoot.
  • Next, select the Advanced Options and then Command Prompt.
  • Once Command Prompt has been pulled up, enter each one of the following commands and in the sequence that they are given to rebuild BCD files and repair MBR files:
    • Bootrec /Fixmbr
    • Bootrec /FixBoot
  • After you execute the commands given above, you should see a confirmation message that says, “The operation completed successfully”.
  • Now type the “Bootrec /RebuildBCD” command to rebuild BCD.
  • Finally, close Command Prompt and then restart your computer to successfully apply the changes made.

Option 4 – Try to run the Automatic Repair Utility

You might also want to use Automatic Repair in fixing the error. To do so, follow the steps below.

  • You can start by creating and booting from a bootable Windows 10 USB Stick.
  • After that, click on Repair your computer located in the bottom left corner when you are on the initial Windows Startup screen.
  • Next, click on Troubleshoot, and then on the other screen, click the Startup Repair option.
  • Now select the operating system you want to repair. Once you do that, it will start to repair your operating system. Wait until the process is completed and then check if the problem’s now fixed.

Option 5 – Try to use the Windows Recovery Environment

If the four options given above didn’t help fix the problem, you could try running Windows Repair and a Windows bootable USB or DVD.

  • First, insert the bootable USB or DVD and boot into it, and select the “Repair your computer” option.
  • Next, once you see the manufacturer logo on your computer, tap the key to enter into Windows Recovery Environment.
  • After that, change the Boot sequence to DVD drive under the UEFI Firmware settings and restart your computer.
  • Once your computer has restarted, select the boot order and make changes accordingly as displayed in the BIOS.

Option 6 – Try running System Restore in Advanced Startup Options

Since you probably can’t boot into your Windows 10 computer, you can try to run System Restore again in the Advanced Startup Options.

  • Boot your computer into the Advanced Startup Options screen.
  • From there, you will see some options to troubleshoot when you can’t log in to Windows in the usual way.
  • Now select Troubleshoot > Advanced Options > Command Prompt.
  • After that, type “exe /OFFLINE:C:Windows” and hit Enter to execute the command which will start the System Restore process.

Note: You need to replace “C” with the drive where Windows Installation is located.

If you like to learn and find out more about various Windows errors, and how to repair them go to our vast archive or use search to find articles that will explain and help you in solving your issue.
However, if you prefer to do things fast and with automatization then we are proposing to use an automated solution for your issues. The application that we are recommending is Advanced System Repair Pro
Advanced System Repair utilizes multiple tools all in one to give you a quick, simple, reliable, and very thorough diagnosis of your PC. It brings you all the tools you need in one program to clean, fix, protect, optimize and boost your PC!
1-Click Maintenance
All the tools to make it simple and easy! It's like having a professional technician at the click of a mouse.

Junk Cleaner
Keeping your computer free from unnecessary clutter also helps make your computer last longer. Like any other machine, if you keep it clean and take care of it, it will serve you better for longer!

Optimize background apps
Optimize applications background activity with the built-in Application Optimizer feature.

Disk Defrag
With a simple 1-click, Advanced System Repair speeds up your PC by assembling fragmented files on your machine and organizing them more efficiently.

Malware Removal
Finds and removes all types of harmful malware including trojans, worms, bots, adware, spyware, PUPs, and more!

Privacy Cleaner
The all-in-one privacy suite to Clean Your Tracks & Protect Your Privacy! Make your computer safe, secure, and more efficient!

System Tweak/Optimizer
ASR will analyze your complete system and settings to adjust your PC to function at its maximum performance.

Registry Cleaner
Over time, as you install and uninstall applications, the registry can become cluttered with old entries and broken settings which can result in program crashes, and annoying messages and slow the computer down.
Visit our Advanced System Repair Pro Download page to inform yourself about all the benefits of this software and get a free trial copy of it.
advanced system repair pro

Advanced System Repair Pro

One-click automated PC repair solution
ASR logo
With Advanced System Repair Pro you can easily
Replace damaged files
Restore performance
Free disk space
Remove Malware
Protects WEB browser
Remove Viruses
Stop PC freezing
DOWNLOAD
Privacy Policy | Terms of Use | Uinstall
Advanced System Repair Pro is compatible with all versions of Microsoft Windows including Windows 11

Share this article:

You might also like

Business Email Etiquette
[vc_row][vc_column][vc_column_text]

Business Email Etiquette

Hello and welcome to our Business Email Etiquette. Most people have experience in writing emails at some point before in their lives. However, the emails an average person writes are probably personal emails and not mails for work purposes. Emails you send to friends are incredibly different in content and context to business emails you would send to customers or employers or even other colleagues in your workforce. So, if you have a job that involves you writing emails to people in business style, learning business email etiquette is an absolute must for you.

 1. Heading layouts

When you are sending emails to friends, you generally lay them out like a memo. This means there is very little detail in the layout besides basic greetings and paragraphs, usually starting with the greetings. However, with a business email, it is best to lay it out exactly like you would lay out a formal letter. You need to put the company’s address in the right-hand corner and the date as well. Only then must you go on to the greetings. This will make your email look more formal, making you seem like a professional who knows what they are doing as opposed to someone who just couldn’t be bothered spending the extra time to get the layout right.

 2. Proper greetings

 When you are sending an email to a friend, you usually greet them informally. If their name was Mary Johnson, you’d probably start your letter with a ‘Hey Mary’ or a ‘Hello Mary.’ However, this is not considered a professional way to write an email to a customer or other important person in your business. Again, you must use the proper method that you would greet someone with were you writing them a formal letter instead. If your customer is Mary Johnson again, you should greet her with respect. ‘Dear Ms. Johnson’ would be the most appropriate way to start off your letter’s actual body in this case. If you do not know the recipient’s name, then you should start with a simple ‘Dear Sir or Madam.’ Politeness will always get you incredibly far, no matter what line of work you are in.

 3. Informal language

 You should get straight to the point with your email. Don’t dawdle on with it like you would if chatting to a friend and don’t write it how you would speak either. You use language that sounds impressive and smart while not using such obscure language that your recipient doesn’t know what you are saying. All the time, you must keep it informal where possible, possible even impersonal as well. It will make you seem very professional in the long run.

 4. Signing off

When you are ending your email, you must end it as you would with a letter also. Don’t just say ‘Bye’ and your first name; that is too personal. You need to say ‘yours sincerely if you know the name of the recipient and ‘yours faithfully’ if you do not. Then you should end with your full name and whatever position you have at the company. (CEO, technical staff etc.) So there you have it! All you need to do now is to show your boss that you can handle the emails from now on![/vc_column_text][/vc_column][/vc_row]
Read More
Fix DRIVER_VERIFIER_DMA_VIOLATION Error
In case you don’t know, Driver Verifier is a built-in utility in the Windows 10 operating system. It is the one that ensures the integrity of all the drivers in the system. It can detect any suspicious behaviors of the drivers and if it finds the driver signature of some suspicious activity during runtime, it stops the suspected action by triggering a BSOD or Blue Screen of Death error and one of these Stop errors is the DRIVER_VERIFIER_DMA_VIOLATION error. When you encounter such an error, you will see the following message on your screen:
“Your PC ran into a problem that it couldn’t handle, and now it needs to restart. If you’d like to know more, you can search online later for this error: DRIVER_VERIFIER_DMA_VIOLATION”
There are several ways you can fix this error. You can try to disable the Driver Verifier or run the Hardware troubleshooter. You could also try to update, roll back or uninstall the drivers on your computer. For more details, refer to each one of the options provided below.

Option 1 – Try to disable the Driver Verifier Manager

The Driver Verifier Manager is another tool in Windows that could help you fix driver-related issues.
  • Type in the keyword “Verifier” in the Cortana search box to search for Verifier in Windows 10.
  • After that, select the option “Create custom settings”.
  • Make sure that you have checked everything except the options “DDI compliance checking” and “Randomized low resources simulation”.
  • Next, select the option “Select driver names from a list” option.
  • Afterward, you have to select all the drivers from any unofficial or third-party provider. To simply put it, you have to select all the drivers that are not supplied by Microsoft.
  • Then click on the Finish button.
  • Open Command Prompt as administrator and execute this command – verifier /querysettings
  • The command you just executed will display the Driver Verifier settings so if you see any of the flags enabled boot your Windows 10 PC into Safe Mode.
  • Open the Command Prompt as admin again and run this command – verifier /reset
  • The command will reset the Driver Verifier. Once the process is done, restart your PC and check.

Option 2 – Try to reinstall or update device drivers of recently installed hardware

If the first few options didn’t work for you, then it’s time to either update or roll back the device drivers. It is most likely that after you updated your Windows computer that your driver also needs a refresh. On the other hand, if you have just updated your device drivers then you need to roll back the drivers to their previous versions. Whichever applies to you, refer to the steps below.
  • Open the Devices Manager from the Win X Menu.
  • Then locate the device drivers and right-click on them to open the Properties.
  • After that, switch to the Driver tab and click on the Uninstall Device button.
  • Follow the screen option to completely uninstall it.
  • Finally, restart your computer. It will just reinstall the device drivers automatically.
Note: You can install a dedicated driver on your computer in case you have it or you could also look for it directly from the website of the manufacturer.

Option 3 – Try running the Blue Screen Troubleshooter

The Blue Screen troubleshooter is a built-in tool in Windows 10 that helps users in fixing BSOD errors like DRIVER_VERIFIER_DMA_VIOLATION. It can be found in the Settings Troubleshooters page. To use it, refer to these steps:
  • Tap the Win + I keys to open the Settings panel.
  • Then go to Update & Security > Troubleshoot.
  • From there, look for the option called “Blue Screen” on your right-hand side and then click the “Run the troubleshooter” button to run the Blue Screen Troubleshooter and then follow the next on-screen options. Note that you might have to boot your PC into Safe Mode.
Note: You could also run the Hardware and Devices troubleshooter as it could also help in fixing the DRIVER_VERIFIER_DMA_VIOLATION error.

Option 4 – Try running Microsoft’s online Blue Screen Troubleshooter

If running the built-in Blue Screen Troubleshooter didn’t work, you can also try running Microsoft’s online Blue Screen Troubleshooter. All you have to do is go to Microsoft’s website and from there, you will see a simple wizard that will walk you through the troubleshooting process.
Read More
Fix CAS System Was Unable to Initialize in WoW
After so many years World of Warcraft is still among the most played MMORPG games in the world. It is still constantly updated with new content and tweak graphically in order to be relevant and fresh. But even the best or most popular ones can still have some minor issues and bugs from time to time. CAS System Was Unable to Initialize is the error that was reported lately by WOW players all around the globe and it happens in multiple Windows systems. In this guide, we will take with this issue and provide you with solutions on how to fix it so you can get back to enjoying the game itself.
    1. Repair WOW

      In battle.NET launcher select WOW and click on Options Click on Scan and Repair Let the process finish and then launch the game again
    2. Clean Windows registry

      Windows cleaning registry operation is a complex task and we will not cover manually each possible scenario here, instead of trying manually to find issues and clean registry download and install third party registry cleaner software. We recommend RESTORO as a universal meaning and optimizing Windows tool. Follow RESTORO instructions at bottom of the article to see how easy it is to install and use it.
    3. Run WOW with command line argument

      One of the solutions for this particular error is to run WOW with a specific command line switch: Run battle.NET client as administrator by right-clicking on it and choosing run as administrator If you are not signed in, sign in now Click on World of Warcraft to select it Click on options Click on Game settings Check the box associated with Additional command-line arguments When the box is selected you should've able to add inline argument or switch, add -uid wow_engb and confirm Run World of Warcraft
    4. Enable Secondary logon service inside Windows

      It was reported that enabling this service can fix the issue. Press ⊞ WINDOWS + R to open the run dialog Inside run dialog type in services.msc to open services windows Locate the Secondary Logon service Right-click on Properties from the context menu Inside the properties, screen click on the general tab Change the Startup type to Automatic and hit Apply to save the changes Run World of Warcraft
    5. Delete the cache folder

      Both indices and cache folder needs to be deleted in order to reset corrupted data. Make sure that both World of Warcraft and battle.NET are fully closed For this step to work, you will need to go into the folder where you have installed the World of Warcraft game. By default this is in C:/Program Files/World of Warcraft/ but if you have used another folder go there via file explorer. Once you are inside the folder locate the indices folder and delete it After that locate and delete the cache folder as well Restart your computer and start battle.NET
    6. Remove read-only attribute from WoW folder

      Another reason for CAS System Was Unable to Initialize error is because the World of Warcraft folder has been set to read-only and since the client does not have write privileges it will throw this error. To remove the read-only attribute from the folder go to your World of Warcraft installation folder but do not enter it Right-click on it instead and choose properties Under properties uncheck the read-only box and confirm. Run World of Warcraft
Read More
Fix Windows Update Error 0x80240034
There are cases when you encounter some issues while updating your Windows 10 computer. One of these issues is the error 0x80240034. This particular error is a Windows Update Error that appears on the Windows Update pane every time an update fails to install. When this happens, your Windows Update will only get stuck at 1% and nothing happens afterward and eventually fails. If you click on the View Installed Update History, you will see the error code 0x80240034 for the failed updates. You will see this error each time you try to update your Windows PC. Take note that this issue doesn’t only happen to a specific version of the Windows Update but on various different Windows builds based on many users. What’s more, is that some users are also seeing a different error code when their Windows Update fails but they still end up seeing the error code 0x80240034 when they check the Windows Update history. At the time of writing, it isn’t determined yet what really causes this error but it’s most likely due to some corrupted files in the computer which is why the most common solution you can try is resetting the Windows Update cache. On the other hand, other users also resolved the issue by using the ISO and selecting the “Do not keep previous settings” option during the Windows Update so it might be something to do with transferring the previous settings through the update client. For clear instructions in fixing this issue, refer to the two options provided below.

Option 1 – Try to clear the Windows Update Cache/Distribution Folder

As mentioned earlier, a lot of users tried clearing the Windows Update cache to fix the problem and so far it has worked. Like them, you can try clearing the Windows Update cache by simply deleting the contents of the folder named “SoftwareDistribution” since Windows apparently can’t clear and re-download the update contents once they are corrupted. Thus, deleting the contents of this folder will make Windows download the contents again which will fix the problem. To do that, follow the steps below.
  • Step 1: Tap the Windows key once.
  • Step 2: Next, type in “command prompt” in the Windows Start Search, and from the search results that appear, right-click on Command Prompt and select the “Run as administrator” option from the context menu.
  • Step 3: After opening Command Prompt, type in “net start wuauserv” and hit Enter.
  • Step 4: Then type in “rmdir %windir%SoftwareDistribution /S /Q” and hit Enter.
  • Step 5: Now type in “net start wuauserv” and hit Enter. Once it’s done, try updating your Windows PC again, it should now work just fine.

Option 2 – Update Windows via ISO file

If option 1 didn’t work for you, you can try this second option of updating your Windows 10 computer using an ISO file which means that you will have to create a Windows 10 bootable media and use it to install the latest Windows 10 version. The most user reported that this option works and the reason why it does have something to do with the Windows Update client since the Windows Updates downloaded from the regular Windows Update client seems to create issues such as the error 0x80240034. However, issues like this one don’t occur when the very same Windows Updates are downloaded and installed via an ISO file. Take note that when using a Windows ISO file, you will be asked to choose what you want to do with the previous settings and apps. A lot of users opted for the “Not to keep the old Windows settings” option which has resolved the issue. So if you want to keep the previous settings then you must try to update Windows first while keeping the old settings. However, if it doesn’t work, you have to try installing the latest version of Windows without keeping the previous settings.
  • Step 1: Click this link and then click the Download Tool Now button.
  • Step 2: Next, click the “Use the tool to create installation media (USB flash drive, DVD, or ISO file)…” option and follow the next given instructions on the screen.
  • Step 3: Now select the ISO file option in step 5.
  • Step 4: After that, you should now have an ISO file.
  • Step 5: Next, go to the location where you’ve downloaded the ISO file.
  • Step 6: Then right-click on the Windows 10 ISO file and select the Open with an option and then select File Explorer.
  • Step 7: Now click on “setup.exe” and follow the next instructions that appear on the screen. When asked, you have to select either: Nothing (clean install) or Keep personal files only option. Take note that you must not select the “Keep personal files, apps, and Windows settings since it doesn’t really work.
Read More
Microsoft removed password as a requirement
ms password gone
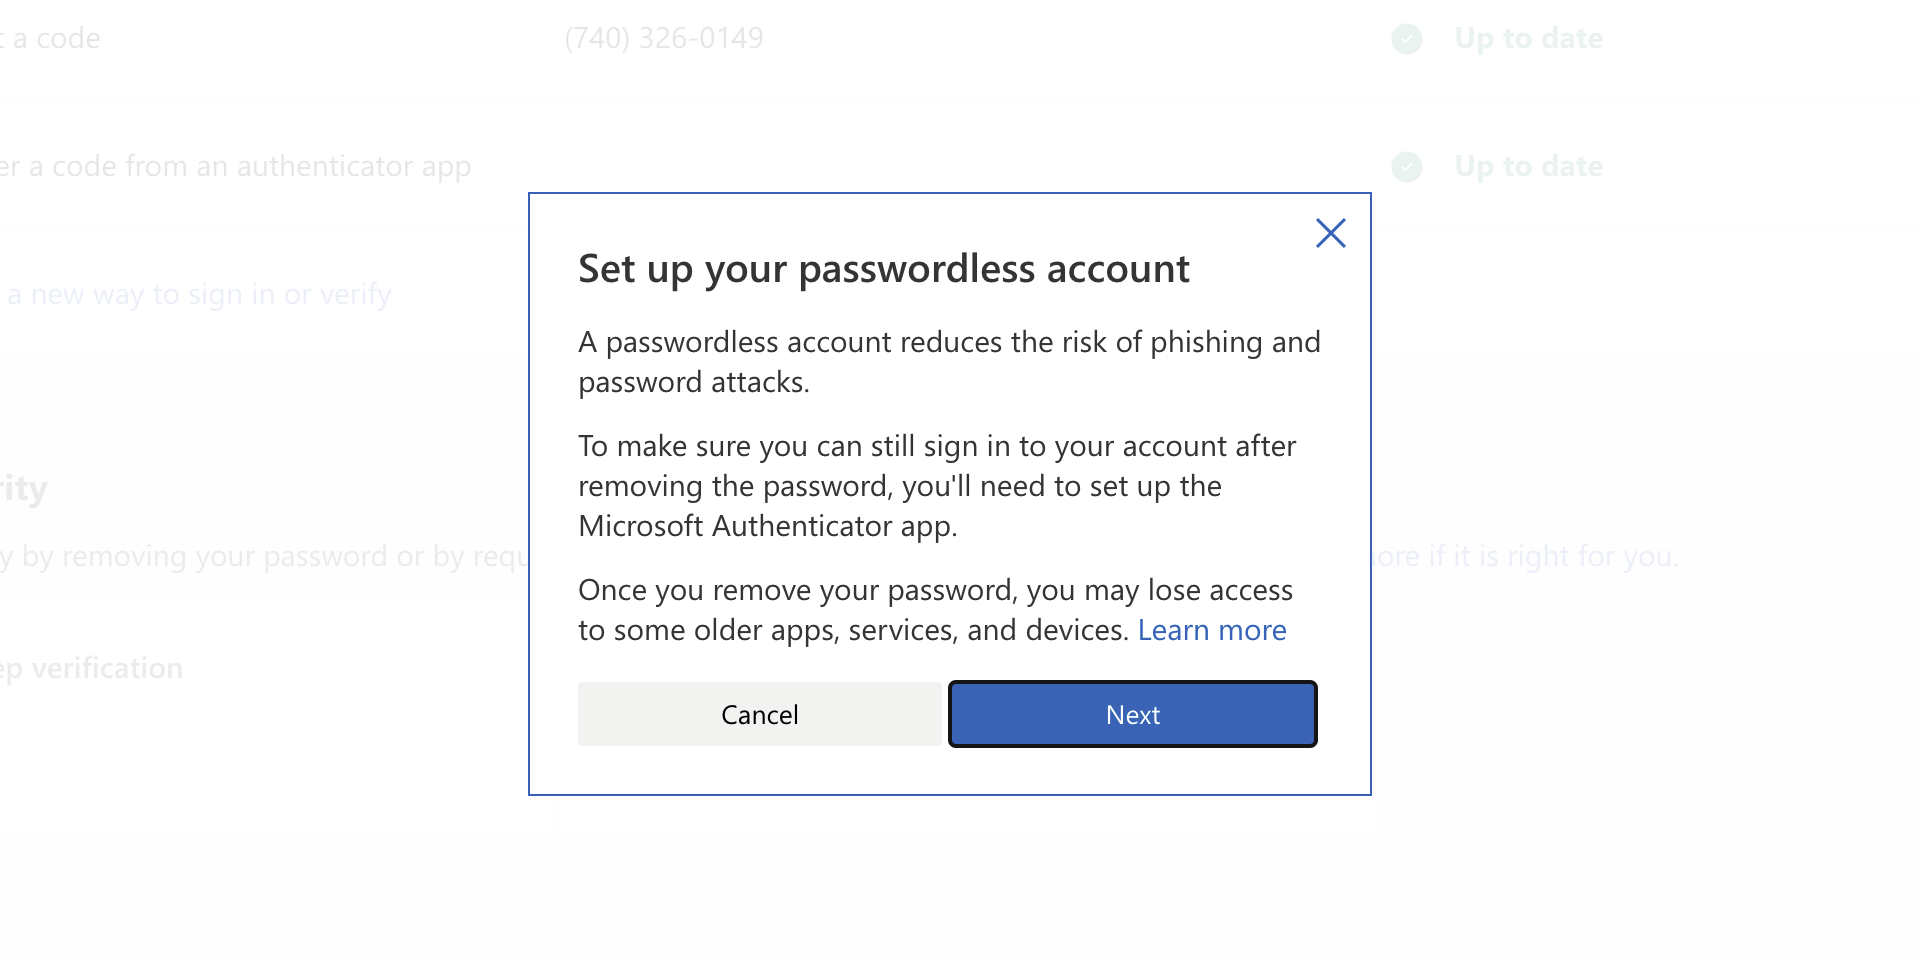
As of the time of writing this article you no longer need or are required to have a password if you plan to log in to your Microsoft account. Microsoft explored various options for account security and came to the conclusion that passwords are obsolete. Microsoft is letting you access your account through the Microsoft Authenticator app, Windows Hello, a security key, SMS verification, or email verification code. All of these methods are way better in terms of security than passwords.

How to turn these features on?

To get rid of your Microsoft password, the process is simple. You simply need to go to your Microsoft account, click “advanced security options,” then “enable passwordless accounts” under the Additional security section.
Read More
Fix ERR_SSL_VERSION_INTERFERENCE on Chrome
If you encounter the ERR_SSL_VERSION_INTERFERENCE error on your Google Chrome browser then this means that the browser is trying to load a website with SSL protocol but is not able to do so. This error can occur for many reasons and in this post, you will be given potential fixes that could help you in resolving the problem. But bear in mind that these potential fixes are not that straightforward forward so if you encounter an option you don’t understand much, just skip to the options you have the knowledge of. There is no direct fault in the browser for the ERR_SSL_VERSION_INTERFERENCE error as there are issues with caching the website data locally on your computer. Moreover, this kind of error can also appear when a website is coded incorrectly or if there are conflicting browser extensions installed in the browser that prevents the website to function properly. Refer to the suggestions given below to fix the ERR_SSL_VERSION_INTERFERENCE error in Chrome on Windows 10.

Option 1 – Try clearing browser data

There are times when some data in the browser is conflicting with the loading of the website and triggers errors like ERR_CACHE_MISS. And so you can try to clear your browser’s data. This might be a very basic solution but oftentimes it works in fixing this kind of error in Google Chrome. Follow the steps below to clear the data in your browser.
  • Open your Google Chrome browser.
  • After that, tap the Ctrl + H keys. Doing so will open a new panel that allows you to delete the browsing history and other data in your browser.
  • Now select every checkbox that you see and click on the Clear browsing data button.
  • Then restart your Chrome browser and check if you can now open any website or not.

Option 2 – Try disabling TSL 1.3

If clearing the browser data didn’t fix the problem, you can also try to disable TSL 1.3 in Chrome. To do so, refer to these steps:
  • Open Google Chrome.
  • Next, type in “chrome://flags/#tls13-variant” in the address bar and tap Enter.
  • After that, you should see the experimental features page for Google Chrome where you can set TSL 1.3 to disabled.
  • After disabling TSL 1.3, restart your computer and check if the problem is fixed or not.

Option 3 – Reset Winsock, TCP/IP & Flush DNS cache

Resetting Winsock, TCP/IP, and flushing DNS might help in resolving the ERR_SSL_VERSION_INTERFERENCE error just follow these steps:
  • Right-click on the Start button and click on Command Prompt (administrator) so you can pull up an elevated Command Prompt.
  • After that, execute each one of the commands listed below. And after you typed in one after the other, you have to hit Enter.
  1. netsh winsock reset – type in this command to reset Winsock
  2. netsh int ip reset resettcpip.txt – type in this command to reset TCP/IP
  3. ipconfig /flushdns – type in this command to flush the DNS cache
  • Next, restart your PC and check if the problem’s fixed.

Option 4 – Get rid of any conflicting browser extensions

  • Open Chrome and press Alt + F keys.
  • Go to More tools and click Extensions to look for any suspicious browser extensions or toolbars.
  • Click the Recycle bin and select Remove.
  • Restart Chrome and press Alt + F keys again.
  • Proceed to On Startup and mark Open a specific page or set of pages.
  • To check if the browser hijacker is still active, click Set pages, if it is active, overwrite the URL.

Option 5 – Reset Google Chrome

Resetting Chrome can also help you get rid of the error. Resetting Chrome will restore its default settings, disabling all the extensions, add-ons, and themes. Aside from that, the content settings will be reset as well and the cookies, cache, and site data will also be deleted. To reset Chrome, here’s what you have to do:
  • Open Google Chrome, then tap the Alt + F keys.
  • After that, click on Settings.
  • Next, scroll down until you see the Advanced option, once you see it, click on it.
  • After clicking the Advanced option, go to the “Restore and clean up option and click on the “Restore settings to their original defaults” option to reset Google Chrome.
  • Now restart Google Chrome.
Read More
How to Fix ntdll.dll crash Error on Windows
DLL files, also known as Dynamic Link Libraries are external parts of applications that run on Windows as well as other operating systems. Almost all applications are not complete in themselves and store code in different files. In this post, we will be discussing one DLL file called ntdll.dll. It is described as “NT Layer DLL” which means that it contains some Kernel functions that help in the normal functioning of the Windows operating system. It is created by Windows in the System32 folder when the OS gets installed. This file can serve different programs simultaneously by providing them with different Kernel functions which support the programs’ performance. However, if you encounter the ntdll.dll file error on your Windows 10 computer, read on as this post will guide you in fixing the problem.

Option 1 – Try to re-register the ntdll.dll file

You may have to re-register the ntdll.dll file using the regsvr32.exe before you can successfully install the program and fix ntdll.dll file crash error. The Regsvr32 tool is a command-line utility that can be used to register and un-register the OLE controls like DLL and ActiveX (OCX) control in the Windows operating system. Follow the steps below to use it.
  • Open Command Prompt as admin from the WinX menu.
  • Next, type the following commands in the elevated Command Prompt and hit Enter to execute the command. This will re-register the affected DLL file using the Windows operating system tool, regsvr32.exe.
    • exe /u ntdll.dll
    • exe ntdll.dll
  • You should see a message saying, “DllRegisterServer in vbscript.dll succeeded” if the Regsvr32 tool was able to run successfully. After that, try to install the program again and see if it now works.

Option 2 – Disable problematic Internet Explorer add-ons

There are instances when some add-ons in the Internet Explorer browser can cause the ntdll.dll file crash error. Thus, you need to disable some add-ons in Internet Explorer and then check if it fixes the problem.

Option 3 – Try running the DISM tool

You might want to repair potentially corrupted files in your system as having them could also trigger the ntdll.dll file crash error. To repair these corrupted system files, you can run the DISM commands:
  • Tap the Win + X keys and click on the “Command Prompt (Admin)” option.
  • After that, input each one of the commands listed below sequentially to execute them:
    • Dism /Online /Cleanup-Image /CheckHealth
    • Dism /Online /Cleanup-Image /ScanHealth
    • Dism /Online /Cleanup-Image /RestoreHealth
  • Once you’ve executed the commands given above, restart your computer and check if the DCOM error is now fixed.

Option 4 – Try to run the Program Compatibility Troubleshooter

You might also want to run the Program Compatibility Troubleshooter. This built-in troubleshooter is available in the Windows Update & Security section. From there, select Troubleshoot. This will find a list of programs for you and since you have already downloaded the driver files, just click on Not Listed located at the top of the program list. After that, browse and select the driver files and then let the program do its job.

Option 5 – Try to replace the DLL file with a trusted source

  • First, you need to get the new DLL file from another computer with preferably the same file version number.
  • After that, you need to boot your PC into Safe Mode and navigate to the paths listed below and then replace the file using a USB drive or other external storage devices.
    • x86: This PC > C:WindowsSystem32
    • x64: This PC > C:WindowsSysWOW64
  • Next, type “cmd” in the Cortana search box and right-click on Command Prompt, and select “Run as administrator” to open it with administrator privileges.
  • Now type the “regsvr32 ntdll.dll” command and hit Enter.
  • Restart your PC and check if the error is now fixed.

Option 6 – Try scanning your computer using Windows Defender

The ntdll.dll file crash error might also be infected with malware or virus and to eliminate it, you have to scan your computer using security programs like Windows Defender.
  • Tap the Win + I keys to open Update & Security.
  • Then click on the Windows Security option and open Windows Defender Security Center.
  • Next, click on Virus & threat protection > Run a new advanced scan.
  • Now make sure that Full Scan is selected from the menu and then click the Scan Now button to get started.
Read More
Recent Items aren't visible under Taskbar
In this post, you will be guided on what to do if the Recent Items are no longer visible in the Taskbar icons in Windows 10. This can be quite inconvenient especially if you work simultaneously on many files and documents together and would require you to visit them regularly to incorporate changes. Thus, if you find that the Recent items are not visible in the Windows Taskbar, read on. In order for the Recent Items to appear on the taskbar icons in Windows 10 again, there are four potential fixes you can check out. You can try to show the recently opened items via Settings or clear the cache of the recent items. You could also make some changes in the Windows Registry or use the Group Policy Editor. But before you proceed with these potential fixes, it’s best if you create a System Restore Point first just in case something goes wrong after you made changes in the system. The System Restore Point allows you to undo these changes and bring back the previous state of your computer. Thus, you need to create one and then carefully follow the given options below.

Option 1 – Show the recently opened items via Settings

The first thing you can do to fix the problem is to show the recently opened items through the Settings app.
  • Open the Settings app and select Personalization.
  • From there, select the Start option and scroll down until you see the “Show recently opened items in Jump Lists on Start or the taskbar” option.
  • Make sure that its toggle button is turned on.

Option 2 – Try to clear the Recent Items cache

  • Tap the Win + E keys to open File Explorer.
  • Next, copy and paste this link on the address bar: %AppData%Microsoftwindowsrecentautomaticdestinations
  • Once you’re in the given location, you should see multiple files. Now select all these files and completely delete them.
Note: These files are automatically recreated when you interact with the system like performing tasks such as opening apps or accessing files.
  • After that, go to this next location: %AppData%Microsoftwindowsrecentcustomdestinations
  • Once there, delete all of its files and restart your computer. This should resolve the problem.

Option 3 – Try making changes via Registry Editor

The next thing you can do to fix the problem is to apply some tweaks in the Registry by following these steps:
  • Tap the Win + R keys to open the Run dialog box and type “Regedit” in the field and hit Enter to open the Registry Editor.
  • Next, navigate to this registry sub-path: HKEY_CURRENT_USERSoftwareMicrosoftWindowsCurrentVersion
  • From there, select the Policies Explorer folder located in the left pane.
  • Then move to the right pane and look for the “NoRecentDocsHistory” entry and right-click on it.
  • Now delete this entry.
Note: This entry is the one that stores the Group Policy setting for “Do not keep the history of recently opened documents. The Group Policy adds this entry to the registry with a value of 1 if you enable the “Do not keep the history of recently opened documents” policy. On the other hand, if you disable the policy by setting it to “Not configured” or deleting it, the Group Policy will delete the entry from the registry, and the system will act as though the value is 0 – for instance, it keeps the history of the recently opened files in your computer.

Option 4 – Try to use the Group Policy Editor

  • Tap the Win + R keys to open the Run utility and type “gpedit.msc” in the field and tap Enter to launch the Group Policy Editor.
  • Next, navigate to User Configuration > Administrative Templates > Start Menu and Taskbar.
  • Afterward, double click on the “Do not keep a history of recently opened documents” policy located on the right panel. This is the policy that lets you enable or disable recent items and frequent places.
  • Now to enable the recent items, as well as the frequent places, feature, click on the “Disabled” or the “Not Configured” option.
  • Once you’re done, close the Group Policy Editor and restart your PC.
Note: If you choose to enable this setting, the system and Windows programs will not create shortcuts to documents opened while the setting is in effect. Aside from that, they also stay but won’t display the existing document shortcuts and the system will empty the Recent Items menu on the Start menu and the Windows programs won’t also display shortcuts in the Start Menu. In addition, the Taskbar won’t also show the recently opened or frequently used folders, files, or websites.
Read More
Can’t connect to this network Windows issue
Can’t connect to this network Internet connectivity issues present a complex problem with simple solutions for PC and laptop users. First, it is usually recommended that users rule out problems with the internet connection, router, and Wi-Fi settings before proceeding to troubleshoot settings on your PC/laptop. Once the rest are ruled out, we can then proceed with the following troubleshooting steps and guidelines to fix your wifi connection issue: The first step is to update your windows network adapter driver. Connectivity problems may arise if your network driver is not updated or if it is incompatible with the network adapter. To do so, you may resort to any third-party driver scanning and installing programs found online. This solution should have resorted if users don’t want the hassle of perusing through windows settings that users may not be familiar with. However, this solution requires a pre-existing internet connection other than wifi, so it is recommended you have a backup internet connection via ethernet.

The second step is to uninstall the driver for your network adapter. This solution is to be reported if there is an issue with the driver as restarting the PC after the following steps let windows reinstall the driver again:

  • Open the quick access menu on your keyboard by pressing the Windows key and X key at the same time and select “Device Manager” from the menu list.
  • From the list of devices, select “Network Adapters”
  • Usually on the top of the list is the Wireless Network Adapter
  • Right-click the Wireless Network Adapter and select the option to “Uninstall device”
  • You will be given a confirmation in a new separate window to proceed. Click “Uninstall” to proceed.
  • After completing the previous steps, try rebooting your Windows PC and reconnecting to see if it works.

A third step is to disable the 802.1 1n modes of your network adapter by following the next steps:

  • First press the Windows logo key and the X key at the same time to bring up the quick-access menu. And like the previous step, select “Device Manager”
  • From the list of devices, select “Network Adapters”
  • Right-click the Wireless Network Adapter from the drop-down menu and select properties
  • Under properties, select the “Advanced” tab then select the 802.1 1n Mode. To the right drop-down menu change the option to  “Disabled” and click “Ok”
  • After, try to re-establish the connection to see if the steps have worked.
In the event that any of the preceding did not fix your problem, it helps to take a second look at the router and network settings using the interface provided by your ISP. A simple reset to the back of your router often fixes the issue. Also, try to check if you have any other administrative capabilities over the network to determine whether your device, in particular, has been MAC filtered or if the frequency of your wireless adapter is not compatible with the broadcast frequency of your router.
Read More
How to Use and Configure Active Hours
The issue with the abrupt system reboots to force Windows 10 updates on a computer has been lessened with Active Hours. This feature keeps a record of the hours during which a system remains active and prevents the installation of updates during such hours. For example, when a system restart is needed to complete the installation of an update, Active Hours delays the update and allows you to finish what you’re doing on your computer. Thus, if you haven’t heard of this feature, then now is the time you do, read this post to configure and use Active Hours in your Windows 10 computer. There are three ways you can configure Active Hours. The first one is for general users, whereas the rest of the two methods are for users who knows their way about the Windows Registry and Group Policy. To get started, refer to every given option below.

Option 1 – Configure Active Hours via Windows 10 Settings

  • Go to Settings > Update & Security. From there, click on the “Change active hours” option under the Windows Update section.
  • Next, you can select a time (“Start time” and “End time”) during which the restart can occur.
  • After that, click on the Save button and exit.
Note: Keep in mind that the values you’ve entered indicate the hours during which your system is in use, namely, ACTIVE. It is important for your active hour’s interval period and it can be anything between 1 and 18 hours since you can’t go beyond 18 hours. In addition, there is no option to configure different active hours on different days and you can’t specify different active hours for weekends and weekdays as well. On the other hand, Windows 10 also offer users an option to override Active Hours. All you have to do is go to Settings > Update & Security > Windows Update > Restart Options. From there, you can choose a custom restart time when your computer will restart to install the updates but this is only a one-time setting.

Option 2 – Configure Active Hours via Registry Editor

  • Tap the Win + R keys to open the Run utility and type “Regedit” in the field and tap Enter or click OK to open the Registry Editor.
  • Next, navigate to this registry path: HKEY_LOCAL_MACHINESOFTWAREMicrosoftWindowsUpdateUXSettings
  • In the given registry path, you can choose to change “ActiveHoursStart” and “ActiveHoursEnd”.
Note: There are no extra settings available in the Registry Editor but you can change the remote computer’s Active hours settings using the Registry Editor.

Option 3 – Configure Active Hours via Group Policy

Note that this option is available for the Windows 10 Pro and Educational or Enterprise versions. It is mostly used by computers in Business or through remote access. To get started, follow these steps:
  • Tap the Win + R keys to launch Run and type “gpedit.msc” in the field and tap Enter or click OK to open the Group Policy Editor.
  • Next, navigate to this group policy setting: Local Computer Policy > Computer Configuration > Administrative Templates > Windows Components > Windows Updates.
  • From there, look for a policy labeled “Turn off auto-restart for updates during active hours” and double click on it. This will open a new window.
  • Click on the Enabled radio button to enable Active Hours. You also have the option to choose active hours just like in the first given option above. It works just fine except when the following policies don’t override:
    • No Auto-restart with logged-on users for scheduled automatic updates installations.
    • Always automatically restart at the scheduled time.
  • Since Group Policy allows you to reduce the range of active hours, you can configure it if you want it to be less than 18 hours. Just find the policy setting labeled “Specify Active hours range for auto -restarts. The minimum is 8 hours”.
  • After you set the Active Hours, click the Apply and OK buttons to save the changes made.
Read More
1 2 3 162
Logo
Copyright © 2022, ErrorTools. All Rights Reserved
Trademarks: Microsoft Windows logos are registered trademarks of Microsoft. Disclaimer: ErrorTools.com is not affiliated with Microsoft, nor claim direct affiliation.
The information on this page is provided for information purposes only.
DMCA.com Protection Status