Installation failed in the SAFE_OS phase

If you are trying to install a Windows 10 upgrade but was interrupted with an error saying, “0x80070003 – 0x2000D, The installation failed in the SAFE_OS phase with an error during MIGRATE_DATA operation”, then you’ve come to the right place as this post will help you sort this problem out.

When you get this kind of error while trying to upgrade your computer, although there could be various reasons for this, the primary one is that when you upgrade from one update to another, something stopped the upgrade process to migrate the user data. To fix this error, you can try to run both the DISM tool and the System File Checker to automatically repair any corrupted system files. You could also try checking the free storage space of your primary drive and if you have any file lock apps like BitLocker, consider disabling them for they could also be the reason why you’re getting the error.

Option 1 – Run the DISM tool

Running the DISM Tool helps in repairing the Windows System Image as well as the Windows Component Store in Windows 10 which might be the reason behind the Windows Upgrade error 0x80070003 – 0x2000D. Using this built-in tool, you have various options such as the “/ScanHealth”, “/CheckHealth”, and “/RestoreHealth”.

  • Open the Command Prompt as admin.
  • Then type in this command: exe /Online /Cleanup-image /Restorehealth
  • Do not close the window if the process takes a while as it will probably take a few minutes to finish.
  • Once it’s done, restart your computer and then check if the issue is resolved or not on the next startup.

Option 2 – Run the SFC scan

The SFC or System File Checker scan could detect and automatically repair damaged system files that could be causing the Windows Upgrade error to appear. SFC is a built-in command utility that helps in restoring corrupted files as well as missing files. It replaces bad and corrupted system files to good system files. To run the SFC command, follow the steps given below.

  • Tap Win + R to launch Run.
  • Type in cmd in the field and tap Enter.
  • After opening Command Prompt, type in sfc /scannow and hit Enter.

The command will start a system scan which will take a few whiles before it finishes. Once it’s done, you could get the following results:

  1. Windows Resource Protection did not find any integrity violations.
  2. Windows Resource Protection found corrupt files and successfully repaired them.
  3. Windows Resource Protection found corrupt files but was unable to fix some of them.
  • Reboot your PC.

Option 3 – Try checking the free storage space on your primary drive

The next option you can try to resolve the error is to see if you have enough free storage space on the primary drive because if you don’t then it’s probably the reason why you’re getting this error. To fix it, you need to free up some storage space by following these steps:

  • Open Setting > System > Storage from the WinX Menu.
  • From there, you will see a list of all the local and connected storage devices along with the details on the free space.
  • Now make sure that the Storage Sense feature is turned On then go find a link that says “Free Up Space” and click it to open.
  • After that, a screen which is the built-in program in Windows 10 will appear and will scan your computer for the following junk files so you can free up disk space:
  • Windows Upgrade Log Files
  • System created Windows Error Reporting Files
  • Thumbnails
  • Temporary Internet Files
  • Previous Windows Installation Files
  • Delivery Optimisation Files
  • DirectX Shader Cache

Note: Once you’re done freeing up space on your drive, try to run the setup file again.

Option 4 – Try disabling BitLocker and other file lock apps

If you are using BitLocker or other file lock apps, then it could be the reason why you’re getting the error. Usually, file lock apps don’t cause any kind of issue, however, if you have something that works on file level like BitLocker, you can try to disable it. Once you’ve disabled it, try to install the Windows 10 Upgrade again and after you do, enable BitLocker again. This should fix the problem.

If you like to learn and find out more about various Windows errors, and how to repair them go to our vast archive or use search to find articles that will explain and help you in solving your issue.
However, if you prefer to do things fast and with automatization then we are proposing to use an automated solution for your issues. The application that we are recommending is Advanced System Repair Pro
Advanced System Repair utilizes multiple tools all in one to give you a quick, simple, reliable, and very thorough diagnosis of your PC. It brings you all the tools you need in one program to clean, fix, protect, optimize and boost your PC!
1-Click Maintenance
All the tools to make it simple and easy! It's like having a professional technician at the click of a mouse.

Junk Cleaner
Keeping your computer free from unnecessary clutter also helps make your computer last longer. Like any other machine, if you keep it clean and take care of it, it will serve you better for longer!

Optimize background apps
Optimize applications background activity with the built-in Application Optimizer feature.

Disk Defrag
With a simple 1-click, Advanced System Repair speeds up your PC by assembling fragmented files on your machine and organizing them more efficiently.

Malware Removal
Finds and removes all types of harmful malware including trojans, worms, bots, adware, spyware, PUPs, and more!

Privacy Cleaner
The all-in-one privacy suite to Clean Your Tracks & Protect Your Privacy! Make your computer safe, secure, and more efficient!

System Tweak/Optimizer
ASR will analyze your complete system and settings to adjust your PC to function at its maximum performance.

Registry Cleaner
Over time, as you install and uninstall applications, the registry can become cluttered with old entries and broken settings which can result in program crashes, and annoying messages and slow the computer down.
Visit our Advanced System Repair Pro Download page to inform yourself about all the benefits of this software and get a free trial copy of it.
advanced system repair pro

Advanced System Repair Pro

One-click automated PC repair solution
ASR logo
With Advanced System Repair Pro you can easily
Replace damaged files
Restore performance
Free disk space
Remove Malware
Protects WEB browser
Remove Viruses
Stop PC freezing
DOWNLOAD
Privacy Policy | Terms of Use | Uinstall
Advanced System Repair Pro is compatible with all versions of Microsoft Windows including Windows 11

Share this article:

You might also like

How to Fix Error 1007

Correct Error 1007

Error Code 1007 - What is it?

This is a typical system error.  This error means the requested operation cannot be performed in full-screen mode. It hampers your ability to run your desired program on Windows PC. It is displayed on computer screens in the following format:
"ERROR_FULLSCREEN_MODE" and/or as the hexadecimal value 0x3EF.”

Solution

Restoro box imageError Causes

The system error code 1007 can be triggered due to several reasons. This includes but is not limited to:
  • Windows registry damage or corruption
  • Device driver conflicts
  • Spyware or viral infection
  • Hardware malfunction
  • Software file damage or corruption
Unlike the blue screen of death error codes, this error is not fatal. But it may hamper your ability to run and work on your desired program. To avoid the inconvenience, it is advisable to fix it immediately.

Further Information and Manual Repair

Try these easy and effective do it yourself methods to repair the system error code 1007 on your PC:

Method 1 - Scan Your System for Viruses

If the underlying cause of error 1007 on your system is viral and spyware infection, then it is advisable to download a powerful antivirus and scan your entire PC. An antivirus not only detects but also removes all types of viruses including spyware, Trojans and adware. Once removed, try running your desired program again, if the program runs successfully, this means the error is resolved.

Method 2 - Update the Drivers

When the error code 1007 occurs due to driver conflict, then it is advisable to update the drivers. To do so simply use the driver update wizard from within Device Manager. The wizard will guide you through the entire driver update process, making it extremely simple for you to update the drivers in minutes.

Method 3 - Clean and Repair the Registry

You may experience the error 1077 because of registry damage or corruption. If this is the reason, then it is suggested you download Restoro. This is a user-friendly and multi-functional PC Fixer deployed with a powerful registry cleaner. It scans your entire system for registry related errors and issues, removes all unnecessary and obsolete files like cookies, junk files and bad registry entries, notorious for registry corruption. In addition to this, it also repairs the registry and damaged system files, thereby resolving the system error code 1007 immediately. Click here to download Restoro on your PC and fix system error code 1007 today!
Read More
How to Fix (1058) ERROR_SERVICE_DISABLED Error in Windows 10
This post will guide you in fixing the (1058) ERROR_SERVICE_DISABLED error you can encounter when trying to launch various games. Usually, this error pops up during startup and prevents you from running the game. In fact, this error has become quite a headache for many users. Some of the games it affects are Smite, Paladins, Far Cry, and many more. In most cases, this error is caused by missing or corrupted game files. It could also be caused by the anti-cheat utility you might have installed along with your games. Whichever the cause is, you can try to check out the possible fixes given below to resolve the (1058) ERROR_SERVICE_DISABLED error.

Option 1 – Verify the Integrity of the Game files

This is the first option you can try no matter what kind of issues you are having with Steam games.
  • Double click on the game’s icon located on your Desktop and then go to the Library tab in the Steam window.
  • From there, look for GTA V from the list of games installed in your library.
  • Next, right-click on its entry and select Properties.
  • After that, navigate to the Local Files tab and click the “Verify Integrity of Game Files” button.
  • Now, wait for the tool to complete checking the game’s integrity. You should see that some of the files may have been downloaded.
  • Reopen the game and see if it now runs properly without crashing.

Option 2 – Apply some tweaks in the Service’s startup settings

As pointed out earlier, the error can also occur due to the anti-cheat tools that were installed alongside the game. These tools are usually used by games to check if you are running something which might give you an unfair advantage over other players. These anti-cheat tools include but are not limited to BattlEye, EasyAntiCheat, and PunkBuster. The error might occur if the service’s startup settings are not correctly configured which is why you can apply some tweaks in order to resolve the problem.
  • Tap the Win + R keys to open the Run dialog box.
  • Next, type “services.msc” in the field and hit Enter or click OK to open Services.
  • From the list of Services, look for any of the services mentioned above such as BattlEye, EasyAntiCheat Service, or PunkBuster Service. Then right-click on the service and select Properties from the context menu.
  • After that, check if the service is started by checking the Service status. If it is started, click on the Stop button to stop the service and if it is already stopped, leave it as it is, at least for now.
  • Next, make sure that the Startup type menu in the Service’s properties is set to Automatic before you go on.
  • Now confirm any dialog boxes that may appear as you set the Startup type and then click on the Start button located in the middle before you exit Properties.
Note: You might get the following error message when you click on the Start button:
“Windows could not start the service on Local Computer. Error 1079: The account specified for this service differs from the account specified for other services running in the same process.”
If you got the error message above, then here’s how you can fix it:
  • Tap the Win + R keys to open the Run dialog box.
  • Next, type “services.msc” in the field and hit Enter or click OK to open Services.
  • From the list of Services, look for any of the services mentioned above such as BattlEye, EasyAntiCheat Service, or PunkBuster Service. Then right-click on the service and select Properties from the context menu.
  • Now go to the Log On tab and click on the “Browse…” button.
  • After that, type in your account’s name under the “Enter the object name to select” box and click on Check Names then wait for the name to be recognized.
  • Then click OK once you’re done and type in the password in the Password field when you are prompted to do so. This should resolve the issue.

Option 3 – Try reinstalling the Anti-cheat program

If the first two options did not work out, you can try reinstalling the anti-cheat program.
  • Open Steam from your Desktop or by searching for it in the Start menu.
  • After opening the Steam client, go to the Library tab in the Steam window and then look for the Rust entry from the list.
  • Next, right-click on the game’s icon in the library and select Properties.
  • Now go to the Local Files tab under Properties and click the Browse Local Files button.
  • From there, look for BattlEye, EasyAntiCheat, or PunkBuster folder depending on the game, and then double click on it to open the folder.
  • Then right-click on EasyAntiCheat_setup.exe or the BattlEye installed file in the folder or PunkBuster and select the Run as administrator option.
  • Exit the Steam client by clicking Steam > Exit from the menu located at the top.
Read More
Webpage was blocked (ERR_BLOCKED_BY_CLIENT)
If you are browsing the web but suddenly encountered the ERR_BLOCKED_BY_CLIENT error on your Chrome browser in Windows 10, read on as this post will guide you in fixing this problem. This kind of error has already been reported by a number of Chrome users and it seems that the problem has something to do with a plugin or extension. Here’s the exact content of the error:
“This webpage was blocked by an extension (ERR_BLOCKED_BY_CLIENT)”
This kind of error, as pointed out, could be caused by an extension or plugin on Chrome that is blocking the web page. It is also possible that the version of Chrome is obsolete or that there could be more than 100 bookmarks in the Bookmark Manager. Before you troubleshoot the problem, make sure that you download the latest version of Google Chrome and see if it fixes the error. If it didn’t, then you can try opening a web page in Incognito Mode or disable and remove the extension that’s causing the problem. You could also try to remove any surplus bookmarks.

Option 1 – Try to open the web page in Incognito Mode

The first thing you can do to fix the problem is to try opening the web page in Incognito Mode. When your browser is in this mode, it will work without extensions. This would help in fixing the problem especially if it was caused by some extension or toolbar in your browser. All you have to do is open any web page in Chrome and tap the Ctrl + Shift + N key combination to open a window in Incognito Mode.

Option 2 – Try to disable and get rid of the problematic extension

After you’ve isolated the problem and have determined that an extension is the one that’s causing it, then the next thing you have to do is to disable or get rid of that extension.
  • Open Chrome and press Alt + F keys.
  • Go to More tools and click Extensions to look for any suspicious browser extensions or toolbars.
  • Click the Recycle bin and select Remove.
  • Restart Chrome and press Alt + F keys again.
  • Proceed to On Startup and mark Open a specific page or set of pages.
  • To check if the browser hijacker is still active, click Set pages, if it is active, overwrite the URL.
Note: If removing the browser extensions or toolbars didn’t work, you can also try to reset your Google Chrome browser.
  • Open Google Chrome, then tap the Alt + F keys.
  • After that, click on Settings.
  • Next, scroll down until you see the Advanced option, once you see it, click on it.
  • After clicking the Advanced option, go to the “Restore and clean up option and click on the “Restore settings to their original defaults” option to reset Google Chrome.
  • Now restart Google Chrome.

Option 3 – Try removing surplus bookmarks

If your Chrome browser is already supporting more than 100 bookmarks, you might want to consider deleting them as it could also be one of the reasons why you’re getting the ERR_BLOCKED_BY_CLIENT error. To remove these bookmarks, just open the bookmark library by typing this address “chrome://bookmarks/” in the address bar of Chrome and tap Enter and press Shift and then select the surplus bookmarks by using the arrow keys. After that, click Delete to get rid of them.

Option 4 – Try clearing browser data

There are times when some data in the browser is conflicting with the loading of the website and triggers errors like ERR_BLOCKED_BY_CLIENT. And so you can try to clear your browser’s data. This might be a very basic solution but oftentimes it works in fixing this kind of error in Google Chrome. Follow the steps below to clear the data in your browser.
  • Open your Google Chrome browser.
  • After that, tap the Ctrl + H keys. Doing so will open a new panel that allows you to delete the browsing history and other data in your browser.
  • Now select every checkbox that you see and click on the Clear browsing data button.
  • Then restart your Chrome browser and check if you can now open any website or not.
Read More
How to Fix Windows 10 Update Error Code 80004002

How to Fix Windows 10 Update Error Code 80004002

Error Code 80004002 - What is it?

Error code 80004002 will be encountered when there are absent registry keys. These missing registry keys will hinder an update process when initiated. However, this error code can be averted once the user makes a reinstall of the Windows Update Client. The steps will be highlighted throughout the article.

Solution

Restoro box imageError Causes

Error code 80004002 might occur for various valid reasons. In cases of installing programs, a user might mistakenly install a new program over another, that was not properly (completely) uninstalled. This could cause a stack-up of registry keys and error messages. Additionally, error code 80004002 might be a consequence of malware, viruses, and adware.

Further Information and Manual Repair

If left unchecked, error code 80004002 could amount to system freezes and crashes, slow computer performance, error codes upon installation, and even blue screen errors. To fix this error code, you might want to attempt one or all the methods below. This is due to the fact that the problem might stem from various reasons.

Method 1: Safe Mode

Ensure to boot your computer in safe mode. This is to ensure that you are properly able to troubleshoot Windows update error code 80004002. To load your computer in safe mode, turn on the computer, press F8 before it fully loads to the ‘sign in’ screen.

Method 2: Update Outdated Drivers

One of the many reasons why you’ll encounter error code 80004002 is in light of the fact that your drivers might have been outdated. To check if your driver is outdated, Right click on the Start menu, select the Device Manager option. From there, you’ll be able to tell which device(s) is corrupted and needs updating.

Method 3: Reinstall Windows Update Client

To perform this process, follow the steps below:
  1. Locate “My Computer” or “This PC” on your device.
  2. Select the “Properties” option.
  3. Under the System option, determine whether your System type is 64-bit or 32-bit version of Windows.
  4. Use the links below to install the Windows Update client:

Click for 32-bit Operating System

Click for 64-bit Operating System

  1. After installation, search for Windows Update from the Search option.
  2. Select the Check for Updates option.
  3. Once any updates are found, hit Install Updates.

Method 4: Use An Automated Tool

If you wish to always have at your disposal a utility tool to fix these Windows 10 and other related issues when they do arise, download and install a powerful automated tool.
Read More
CHKDSK cannot continue in read-only mode
As you know, the CHKDSK utility is proven to be one of the useful tools to fix any issues that concerns file system, storage, and disk. However, as useful as it may be, it is still not immune to issues as you could encounter errors when running it. One of these errors is the “One such error is the CHKDSK cannot continue in read-only mode” error. If you receive such an error message while running CHKDSK, then you’ve come to the right place as this post will help you sort the problem out. It is possible that the drive is read-only or that the Write Protection is enabled. It could also be that the drive is already being used and scanned by a different program or utility. To get rid of this error, there are a couple of suggestions you need to check out. You can try to run the CHKDSK utility from Recovery or run it on Boot. You could also try to disable Write Protection. For more detailed steps, follow the given instructions below.

Option 1 – Try to run the CHKDSK utility from Recovery

The first thing you can do to resolve the error in CHKDSK is to run the CHKDSK utility from Recovery. How? Follow these steps:
  • First, boot into the installation environment for Windows 10 from a Windows installation media.
  • Next, click on the “Repair your computer” option.
  • After that, select Troubleshoot > Advanced options > Command Prompt.
  • After opening Command Prompt, type this command and tap Enter: chkdsk <Partition Letter>: /r /f
  • Wait until the disk error checking process is completed.
  • Once it’s done, exit the Command Prompt window and restart your computer and then see if the error is fixed.

Option 2 – Try running the CHKDSK utility on Boot

On the other hand, you can also try to run the CHKDSK utility on Boot so you can fix the error and recover any damaged segments of the drive.
  • Open an elevated Command Prompt and enter this command: chkdsk /r
  • After that, you will a message that says, “Chkdsk cannot run because the volume is in use by another process. Would you like to schedule this volume to be checked the next time the system restarts? (Y/N)”
  • Type Y and tap Enter to schedule a CHKDSK scan once your computer reboots next time.

Option 3 – Try to remove the Write Protection from the drive

As mentioned, removing the Write-Protection on the concerned drive could also help you fix the problem and there are two ways to get rid of the write protection – you can either use the Diskpart utility or the Registry Editor. How? Refer to the following steps.

Via Diskpart utility:

  • Open Command Prompt with admin privileges and then type the “diskpart” command and tap Enter to execute it.
  • Next, type “list disk” and tap Enter to get the list of all the Disk connects or all the partitions that are formed on those disks.
  • After that, you need to choose one command depending on the list of commands you entered. Type “select disk #” and tap Enter to select the disk or partition you want to select.
  • Then type “attribute disk clear readonly” and tap Enter to Disable the Write Protection on the selected disk or partition.

Via Registry Editor:

  • Tap the Win + R keys to open the Run utility and type “Regedit” in the field and then tap Enter to open the Registry Editor.
  • Next, navigate to the following registry key:
ComputerHKEY_LOCAL_MACHINESYSTEMCurrentControlSetControlStorageDevicePolicies
  • After that, look for the DWORD named “WriteProtect” and double click on it, and then set its Value Data to “0”.
  • Now restart your computer and see if the problem is now fixed or not.
Read More
IW Unicorn and Scorpion PC Chair cockpits
Recently on errortools.com, we were talking about Cooler Master’s Orb X gaming chair that is an absolute beast and an amazing product. One downside of Orb X is its price. IW product line is somewhat competing with Orb X with a much more affordable price aiming to probably take customer base with lower income but offering them a great experience as well. The first thing you will notice is a different design and somewhat feeling of cheaper quality if you compare it to Orb X but that is quite reasonable considering the chair itself is around 3.5 times cheaper than Orb X which really puts it in range of everyone can get it. But does a much cheaper price means low quality? Let’s explore.

IW Unicorn

IW unicorn
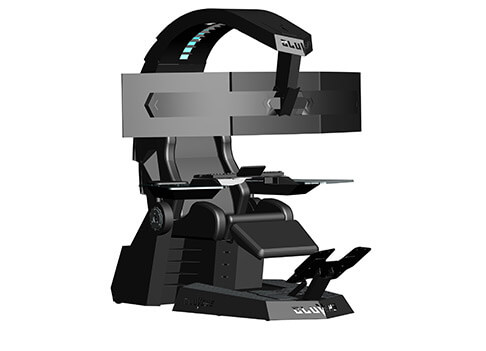
The 2021 CLUVENS BRAND newly issued model UNICORN has fully electrical tilting capabilities to 160 degrees, Reading light-two LED & RGB illumination lighting, manual open/close keyboard tray, and armrests. This model is suitable for home and office, and also gaming computer work environments. It offers functions that enable the user to experience unprecedented comfort and quasi total immersion through strategically positioned 1-3 monitors, audio systems, and accessories. The result is a complete computer office, ergonomically optimized, with a minimal footprint that improves overall performance and productivity and health and comfort. Sitting on a chair can help a lot for relieving health problems like lower back pain, herniated discs, sciatica, and neck pain and also enhance performance and viewing effects.

More Luxury and More comfortable:

Equipped with Luxury feeling reclining Gaming chair made with high-density Mold Shaping Foam and superior quality PU leather with very comfortable texture, electrical recline to 128 degrees, and more to 160 degrees for the flat position for the user.

More High-End Setting and more High-tech:

Manual push for open / close of big sized (87x34cm) Self-Balancing Keyboard tray, adjustable with 20cm distance range with Electrical control for the height of roof arm & monitors. Electrical control for reclining Zero Gravity position or even flat position, Manual adjusted Feet pedal for a more comfortable position for feet. Using a High-Quality PU leather Gaming chair that has Heat/Massage functions with it! The IW-Unicorn monitor mounts allow the use of a single monitor up to Ultra-wide 49” or 43” in size or triple monitor setups up to 3 x 29” other monitors configurations are available upon request. (VESA standard)

IW Scorpion

IW scorpion
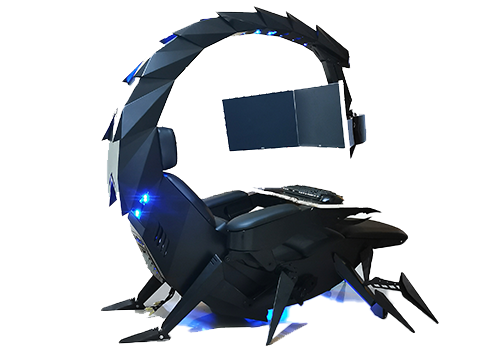
Scorpion is basically a premium version of Unicorn with being able to hold more weight, having cup holders on the armrest, etc. The look is also similar with Scorpion being more sinister-looking but overall Steel frame and chair are the same.

Conclusion

Sadly I have not personally experienced neither of these products including Orb X but from all information I have found and looked over, I would say these products are not trying to compete with each other. Although Products are similar in nature, Orb X is aimed at hi end-users focusing on privacy and robustness while IW is filling the gap of users that would like an advanced chair but are not willing or ready to shell hi amount of money for it offering advanced chairs with advanced features in somewhat affordable price.
Read More
Disabling the Recently Opened Files in Windows
The Windows 10 operating system comes with a user-friendly interface as well as better security features compared to its previous versions. One of these new features is the “Recently Opened Files” feature which displays all the files you’ve opened recently in File Explorer. Although it might seem useful, some users see this as a privacy concern especially if there are other users that use the same computer. If you are one of these users, read on as this post will guide you on how you can disable the “Recently Opened Files” feature in Windows 10. There are three ways you can disable the “Recently Opened Files” feature. You can manually clear the recent files, or disable the feature via Control Panel. You can also do it using the Group Policy Editor.

Option 1 – Manually clear the recent files

The first thing you can do is to clear the recent files manually. Since the information about the recently opened files is stored in the form of cached data, you can locate this data and delete it manually, from time to time. To do that, follow these steps:
  • Tap the Win + R keys to open the Run utility and copy this address in the field: %AppData%MicrosoftWindowsRecent
  • Next, tap the Ctrl + A keys to select all the items and then tap the Shift + Delete keys simultaneously.
  • After that, a prompt will appear where you have to click on Yes. This will delete all the recently opened files in the File Explorer the next time you open it.

Option 2 – Disable the feature via Control Panel

The next option you can try to disable the feature is via Control Panel. Refer to these steps to do so:
  • First, click on the Start Menu button and select the Settings icon.
  • After that, click on Personalization and then on Start located on the left pane.
  • Next, scroll down until you see the “Show recently opened items” in Jump Lists on the Start or the Taskbar and click on it and then toggle it off.

Option 3 – Disable the feature using the Group Policy Editor

If you are using the Windows 10 Pro version, then you have access to edit the functions in the Group Policy. The Group Policy function has the option that can disable all the default services of Windows 10. Note that in this step, you will permanently disable the “Recently Opened Files” feature. So before you proceed, make sure that you really want to disable this feature permanently and not in the meantime.
  • Tap the Win + R keys to open the Run dialog box and type “gpedit.msc” in the field and click OK or tap Enter to open the Group Policy Editor.
  • Next, on the left side pane, click on the “User Configuration” option and then click the “Administrative Templates” option.
  • After that, select the “Start Menu and Taskbar” option and select the “Don’t keep the history of recently opened documents” option in the right pane.
  • Now double click on this option and check the “Enabled” option and then click on Apply and OK buttons to save the changes made.
Read More
Disabling File Grouping in Explorer in Windows
Browsing your files on a computer seamlessly is made possible by the File Explorer in Windows 10 as it provides users with a great sense of customization for both listing and performing operations on a file. You have the option to arrange the folders and files being browsed by their name, type, date, size, and so on. Moreover, files that share a common attribute can be also be grouped accordingly using the grouping feature. However, there are times when instead of helping, it causes some problems for some users. This is why in this post, you will be guided on how you can disable the File Grouping feature in the File Explorer in Windows 10. There are two methods you need to consider in disabling the File Grouping feature in Windows 10. First, you can disable it for only one folder or you can disable it for all the folders on your computer. For more details, follow the instructions given below.

Option 1 – Disable File Grouping in only one folder

This first option is relatively straightforward and simple which will work if you only want to disable File Grouping in one folder.
  • First, open File Explorer, and go to the folder you want to disable File Grouping.
  • Next, right-click anywhere on that folder.
  • And then select Group by > None. This will disable File Grouping for only that particular folder.

Option 2 – Disable File Grouping in all the folders

If you wish to disable File Grouping in all the folders on your computer, then you need to follow this option. If you have already tried the first one, then continue with the given steps below.
  • Tap the Alt + V key combination.
  • Then tap the Alt + Y keys and then tap Alt + O keys.
  • After that, navigate to the View tab, and under the Folder views section, select Apply to Folders.
  • Now click on the Apply and OK buttons to save the changes made. This will disable File Grouping in all the folders listed in the File Explorer.
Read More
An Easy Guide to Fixing Error Code 800b0100

An easy guide to Fixing Error Code 800b0100

Error Code 800b0100 - What is it?

800b0100 is a typical Windows Update error. This error message occurs when you try to install the latest updates from Microsoft Updates and Windows Updates. The error message is displayed in the following format:
“Code 800B0100 Windows Update encountered an unknown error.”

Solution

Restoro box imageError Causes

Error code 800b0100 may pop up on your computer screen due to different reasons. However, some of the common causes include:
  • The file needed by Windows Update is corrupt or missing
  • Security software conflict such as Firewall
  • Incorrect Registry keys
  • Windows security .dll files are registered incorrectly

Further Information and Manual Repair

To resolve error code 800b0100 on your system, you don’t have to hire a professional. This error is quite easy to repair and requires no technical expertise. In other words, you don’t need to be a computer programmer or technically sound to repair this issue. Here are some of the easy and effective DIY methods that you can try to resolve error code 800b0100 on your system:

Method 1

Download System Update Readiness Tool from Microsoft’s website on your PC. This tool can help you fix this problem that might prevent Windows Updates from installing. Typically it will take 15 minutes or less to scan your entire PC.  The System Update Readiness Tool will scan your computer for inconsistencies that may cause errors to occur.

Method 2

Disable Security Software on your PC for example if you use Windows Vista then you will have Firewall already built in. Disable it to resolve error 800b0100. To do this, simply go to the start menu and open the control panel and then select security. Now locate the option Windows Firewall and upon finding, simply choose the option Turn Windows Firewall on or off. Select off (not recommended) option, then click Apply and OK to reset and confirm changes. After that, go back to the Windows Update screen and then click the try again button. The download and installation would start. After the installation is complete, restart your PC to activate changes. Once the updates are successfully installed, not re-enable the Firewall, to ensure your PC is not exposed to potential security threats or viruses.

Method 3

Remove Invalid Keys from the Registry by downloading Restoro. This is a PC Fixer deployed with a registry cleaner. It scans your entire PC and removes all the obsolete and unnecessary files like cookies, bad and invalid registry keys. It cleans and repairs the registry in a few clicks. Click here to download Restoro.
Read More
Fix Windows Cannot Find a System Image
If you have encountered the “Windows Cannot Find a System Image on This Computer” error while you are trying to restore a system image, then read on as this post will guide you in resolving this problem. A system image is basically a backup of your whole data in the system. For instance, it can be the backup data of your hard disk or the whole hard disk itself, or one of the volumes. This is really useful in some cases like when you are not able to get back into your system for some reason or when your system has been corrupted. In such cases, you can utilize this feature and get going safe and sound. However, not all things go the way as expected like when you make a system image of a drive for instance, or use that backup to restore data and you suddenly encounter the “Windows Cannot Find a System Image on This Computer” error. This kind of error occurs due to a number of reasons but worry not for your data is safe and you can fix this error easily. This error is most likely triggered by changing the name of the “WindowsImageBackup” folder. Renaming this folder will certainly be an issue since it is the one that stores all your data. Aside from renaming the WindowsImageBackup folder, renaming the sub-folders can also cause this error which means that renaming the sub-folders of the WindowsImageBackup folder can trigger the error. To fix this error, here are some suggestions that might help:

Option 1 – Try putting the WindowsImageBackup folder in the Root directory

Windows will have issues finding the WindowsImageBackup folder if it isn’t in the root directory of the drive so if it is not there, the “Windows Cannot Find a System Image on This Computer” error will pop up. When a folder is in a root directory, it means that it shouldn’t be stored within a folder but in the main directory instead.  Thus, you need to put the WindowsImageBackup folder in the root directory to fix the error.

Option 2 – Don’t add any sub-folders in the WindowsImageBackup folder

Another cause of the error is when you add sub-folders in the WindowsImage Backup folder. Adding any sub-folders in this folder will only trigger the error so you should leave the folder as it is and you must not make any modifications to it. So if you have added sub-folders in it, make sure to remove them right away.

Option 3 – Make sure that there is one system image per USB drive

The error can also appear if you’ve stored multiple images inside a single USB drive as it could confuse Windows and will trigger the “Windows Cannot Find a System Image on This Computer” error. Note that storing system images of different volumes of your hard disk in a single USB will prevent you from restoring your data.

Option 4 – Try renaming the System Image folder

If you’ve just changed the name of the System Image folder after you store it on a USB stick or other external device, then it’s no wonder why you’re getting the “Windows Cannot Find a System Image on This Computer” error. Windows search for the default name, “WindowsImage Backup” folder when restoring your data so if it is not able to find it, it throws up this error instead. To fix the error, you need to change the folder back to its default name which is “WindowsImageBackup”.

Option 5 – Check the WindowsImageBackup sub-folders

As mentioned earlier, renaming sub-folders in the WindowsImageBackup folder can trigger the error so if you have renamed sub-folders in this folder, you need to change them back to their default names so that you can restore your data peacefully.
Read More
1 2 3 162
Logo
Copyright © 2022, ErrorTools. All Rights Reserved
Trademarks: Microsoft Windows logos are registered trademarks of Microsoft. Disclaimer: ErrorTools.com is not affiliated with Microsoft, nor claim direct affiliation.
The information on this page is provided for information purposes only.
DMCA.com Protection Status