Fix The group or resource is not in the ...

A couple of Windows 10 users recently reported getting an error that says, “The group or resource is not in the correct state to perform the requested operation” while opening UWP Applications as well as accessing the File Explorer.

You can encounter this kind of error mostly on File Explorer, Microsoft Store application, and other UWP applications. This indicates that this error occurs during both the Windows Classic Application and the Universal Windows Platform Applications.

There are several ways to fix this error. You can try to run a System File Checker scan, or run the DISM tool or the Program Compatibility troubleshooter or Windows Store Apps troubleshooter or try to reset or reinstall Windows 10 or the affected application that's not working. However, before you do any of these troubleshooting tips, you can try to perform System Restore first as it could undo the changes you’ve made in the system which might have caused the error.

  • Tap the Win + R keys to open the Run dialog box.
  • After that, type in “sysdm.cpl” in the field and tap Enter.
  • Next, go to the System Protection tab then click the System Restore button. This will open a new window where you have to select your preferred System Restore point.
  • After that, follow the on-screen instructions to finish the process and then restart your computer and check if the problem is fixed or not.

If System Restore wasn’t able to fix the error, then you can refer to each one of the following options.

Option 1 – Try to use the DISM tool

You might want to repair potentially corrupted files in your system as having them could also trigger the “The group or resource is not in the correct state to perform the requested operation”. To repair these corrupted system files, you can run the DISM commands:

  • Tap the Win + X keys and click on the “Command Prompt (Admin)” option.
  • After that, input each one of the commands listed below sequentially to execute them:
    • Dism /Online /Cleanup-Image /CheckHealth
    • Dism /Online /Cleanup-Image /ScanHealth
    • Dism /Online /Cleanup-Image /RestoreHealth
  • Once you’ve executed the commands given above, restart your computer and check if the DCOM error is now fixed.

Option 2 – Run the System File Checker Scan

Aside from the DISM tool, you can also run a System File Checker scan. It is another built-in command utility that helps in restoring corrupted files as well as missing files. It replaces bad and corrupted system files to good system files that might be the cause why you’re getting the error. To run the SFC command, follow the steps given below.

  • Tap Win + R to launch Run.
  • Type in cmd in the field and tap Enter.
  • After opening Command Prompt, type in sfc /scannow

The command will start a system scan which will take a few whiles before it finishes. Once it’s done, you could get the following results:

  1. Windows Resource Protection did not find any integrity violations.
  2. Windows Resource Protection found corrupt files and successfully repaired them.
  3. Windows Resource Protection found corrupt files but was unable to fix some of them.
  • Reboot your computer.

Option 3 – Try to run the Program Compatibility Troubleshooter

You might also want to run the Program Compatibility Troubleshooter. This built-in troubleshooter is available in the Windows Update & Security section. From there, select Troubleshoot. This will find a list of programs for you and since you have already downloaded the driver files, just click on Not Listed located at the top of the program list. After that, browse and select the driver files and then let the program do its job. In addition, you can try to run the Windows Store apps troubleshooter as it can also help you resolve the problem.

Option 4 – Reset your computer

  • Tap the Win key or click on the Start button located in the Taskbar.
  • Then click on the Power button at the bottom right portion of the screen.
  • Next, press and hold the Shift key on your keyboard and then click on Restart. This will restart your Pc into the Advanced Startup options.

Note: Once you have access to the Advanced Startup options, you have to go to the setting which allows you to Reset your Windows 10 PC. All you have to do is select Troubleshoot > Reset this PC to reach the following screen

  • Afterward, select either the “Keep my files” option and then proceed to the next on-screen instructions that follow to reset your Windows 10 computer without losing your files.
If you like to learn and find out more about various Windows errors, and how to repair them go to our vast archive or use search to find articles that will explain and help you in solving your issue.
However, if you prefer to do things fast and with automatization then we are proposing to use an automated solution for your issues. The application that we are recommending is Advanced System Repair Pro
Advanced System Repair utilizes multiple tools all in one to give you a quick, simple, reliable, and very thorough diagnosis of your PC. It brings you all the tools you need in one program to clean, fix, protect, optimize and boost your PC!
1-Click Maintenance
All the tools to make it simple and easy! It's like having a professional technician at the click of a mouse.

Junk Cleaner
Keeping your computer free from unnecessary clutter also helps make your computer last longer. Like any other machine, if you keep it clean and take care of it, it will serve you better for longer!

Optimize background apps
Optimize applications background activity with the built-in Application Optimizer feature.

Disk Defrag
With a simple 1-click, Advanced System Repair speeds up your PC by assembling fragmented files on your machine and organizing them more efficiently.

Malware Removal
Finds and removes all types of harmful malware including trojans, worms, bots, adware, spyware, PUPs, and more!

Privacy Cleaner
The all-in-one privacy suite to Clean Your Tracks & Protect Your Privacy! Make your computer safe, secure, and more efficient!

System Tweak/Optimizer
ASR will analyze your complete system and settings to adjust your PC to function at its maximum performance.

Registry Cleaner
Over time, as you install and uninstall applications, the registry can become cluttered with old entries and broken settings which can result in program crashes, and annoying messages and slow the computer down.
Visit our Advanced System Repair Pro Download page to inform yourself about all the benefits of this software and get a free trial copy of it.
advanced system repair pro

Advanced System Repair Pro

One-click automated PC repair solution
ASR logo
With Advanced System Repair Pro you can easily
Replace damaged files
Restore performance
Free disk space
Remove Malware
Protects WEB browser
Remove Viruses
Stop PC freezing
DOWNLOAD
Privacy Policy | Terms of Use | Uinstall
Advanced System Repair Pro is compatible with all versions of Microsoft Windows including Windows 11

Share this article:

You might also like

What to do if Remote Desktop is not working or won’t connect in Windows 10
One of the biggest annoyances in Windows 10 is that it’s upgrading from one version to another. Although these upgrades are necessary to fix some bugs or improve user experience, some of them actually bring bugs into the computers instead. And in one of the recent Windows 10 updates, a lot of issues were found especially for users who use Remote Desktop on a daily basis. The error stacks up as Windows 10 Remote Desktop Protocol client is not working or won’t connect and can’t find the computer HOSTNAME generally. Based on the reports by users who experienced this issue, there are two cases around it:
  1. Users who try to reach a specific website or folder on the network
Some users encounter this error when they try to run the Network Troubleshooter. Even when they add the server name inside it, it still won’t identify the problem, and unpredictably, the driver seems to appear and disappear every now and then. And even after connecting, the network commands don’t work at all. This is really troublesome for users who have lots of PCs and all the other systems do not appear on the network.
  1. Remote Desktop isn’t able to find the computer HOSTNAME
Some other users reported that the error appeared when they use the classic remote desktop software. It keeps on failing and throwing the error message, “Remote Desktop can’t find the computer “HOSTNAME”. If this is the same scenario you are having, it means that “HOSTNAME” does not belong to the specified network. So you need to verify the computer name and domain where you are trying to connect to. There are times when it used to work after some users tried connecting to the domain a couple of times. However, when users try to use the UWP version of Remote Desktop, it seems to connect most of the time. This kind of problem is definitely a DNS issue. It could be that there are two different records on the DNS server which is why it connects and other times it doesn’t. When it is able to resolve the correct address, the drives connect to the PC however, after a couple of minutes, they will suddenly go missing. Using “nslookup” for the hostname, multiple times, you can check this and see if you’ll get identical results all the time.
nslookup [–SubCommand …] [{ComputerToFind| [–Server]}]
If you’ve determined that the drives disappear each time, you may have to change the DNS server or ask your admin to resolve the problem for you. Alternatively, you can also check out another option that has worked for a lot of users. This second option is disabling the IPv6 on the network adapter. In case you don’t know, Windows 10 prefers IPv6 over IPv4 so if you now have issues using IPv6 to connect to the servers, you can change your computer’s settings so that it’ll only use IPv4 instead of IPv6. To do so, follow these instructions:
  • Open Settings > Network and Internet > Ethernet > Change Adapter options.
  • From there, right-click on the adapter for where you want to disable it and then select Properties.
  • Next, look for the checkbox labeled, “Internet Protocol Version 6 (TCP/IPv6)” then uncheck it.
  • Now click on OK and restart your PC to save the changes made.
Read More
Windows Update service could not be stopped
If you are running the Windows Update service but decided to stop it but you encountered an error message instead that says, “The Windows Update service could not be stopped”, read on as this post will help you fix the problem. This kind of error appears when you use the Command Prompt to stop the Windows Update service, especially if you are using cmd without admin privileges. A lot of users reported that they were not able to disable the automatic Windows Update in Windows 10 using Command Prompt. The command used to stop the Windows Update service is the “net stop wuauserv” command. However, when some users executed this command, they got the error message. So if you are one of these users that can’t stop the Windows Update Service via Command Prompt, you can try to fix that using PID as well as checking the Service dependencies. For more details, follow the given options below.

Option 1 – Try to stop the Windows Update service via PID

In case you don’t know, each running service or process has its own unique ID or PID and you can find it in the Task Manager. You can use it to stop the Windows Update service. How? Refer to these steps:
  • Tap the Ctrl + Shift + Esc keys to open the Task Manager.
  • Next, go to the Services tab and look for the service named “wuauserv” and get its PID.
  • After that, type “cmd” in the Windows Start search and right-click on Command Prompt from the search results and then select the “Run as administrator” option.
  • After opening Command Prompt with admin privileges, execute this command: taskkill /f /pid <PID>
Note: You need to replace “<PID>” with the PID of the “wuauserv” service. For instance, the PID is 6676, then this is how the command should be “taskkill /f /pid 6676”.
  • After you execute the command, you will this message on your screen, “SUCCESS: The process with PID 6676 has been terminated” which indicates that you have stopped the Windows Update service successfully.

Option 2 – Try to check the Service dependencies

Dependencies of a Windows Service in Windows 10 are when windows services depend on other services. Such is the case with the Windows Update service – it also depends on three different services such as the Remote Procedure Call or RPC service, DCOM Server Process Launcher, and the RPC Endpoint Mapper. Meaning to say, if two of these services are not working as expected, then the dependant service will also be affected. This could be the reason why the Windows Update service could not start.
  • Tap the Win + R keys to open the Run dialog box.
  • Next, type “services.msc” in the field and hit Enter to open Windows Services.
  • From the list of Services, look for the following services:
    • Remote Procedure Call (RPC) Service
    • DCOM Server Process Launcher
    • RPC Endpoint Mapper
  • After you find these services, double click on each one of them and check whether the Startup type for all is set to Automatic and the Service status is set to Running or not.
  • If the service status is not running, then click the Start button. Afterward, check if you can now run the Windows Update service.
Read More
How to Fix (1058) ERROR_SERVICE_DISABLED Error in Windows 10
This post will guide you in fixing the (1058) ERROR_SERVICE_DISABLED error you can encounter when trying to launch various games. Usually, this error pops up during startup and prevents you from running the game. In fact, this error has become quite a headache for many users. Some of the games it affects are Smite, Paladins, Far Cry, and many more. In most cases, this error is caused by missing or corrupted game files. It could also be caused by the anti-cheat utility you might have installed along with your games. Whichever the cause is, you can try to check out the possible fixes given below to resolve the (1058) ERROR_SERVICE_DISABLED error.

Option 1 – Verify the Integrity of the Game files

This is the first option you can try no matter what kind of issues you are having with Steam games.
  • Double click on the game’s icon located on your Desktop and then go to the Library tab in the Steam window.
  • From there, look for GTA V from the list of games installed in your library.
  • Next, right-click on its entry and select Properties.
  • After that, navigate to the Local Files tab and click the “Verify Integrity of Game Files” button.
  • Now, wait for the tool to complete checking the game’s integrity. You should see that some of the files may have been downloaded.
  • Reopen the game and see if it now runs properly without crashing.

Option 2 – Apply some tweaks in the Service’s startup settings

As pointed out earlier, the error can also occur due to the anti-cheat tools that were installed alongside the game. These tools are usually used by games to check if you are running something which might give you an unfair advantage over other players. These anti-cheat tools include but are not limited to BattlEye, EasyAntiCheat, and PunkBuster. The error might occur if the service’s startup settings are not correctly configured which is why you can apply some tweaks in order to resolve the problem.
  • Tap the Win + R keys to open the Run dialog box.
  • Next, type “services.msc” in the field and hit Enter or click OK to open Services.
  • From the list of Services, look for any of the services mentioned above such as BattlEye, EasyAntiCheat Service, or PunkBuster Service. Then right-click on the service and select Properties from the context menu.
  • After that, check if the service is started by checking the Service status. If it is started, click on the Stop button to stop the service and if it is already stopped, leave it as it is, at least for now.
  • Next, make sure that the Startup type menu in the Service’s properties is set to Automatic before you go on.
  • Now confirm any dialog boxes that may appear as you set the Startup type and then click on the Start button located in the middle before you exit Properties.
Note: You might get the following error message when you click on the Start button:
“Windows could not start the service on Local Computer. Error 1079: The account specified for this service differs from the account specified for other services running in the same process.”
If you got the error message above, then here’s how you can fix it:
  • Tap the Win + R keys to open the Run dialog box.
  • Next, type “services.msc” in the field and hit Enter or click OK to open Services.
  • From the list of Services, look for any of the services mentioned above such as BattlEye, EasyAntiCheat Service, or PunkBuster Service. Then right-click on the service and select Properties from the context menu.
  • Now go to the Log On tab and click on the “Browse…” button.
  • After that, type in your account’s name under the “Enter the object name to select” box and click on Check Names then wait for the name to be recognized.
  • Then click OK once you’re done and type in the password in the Password field when you are prompted to do so. This should resolve the issue.

Option 3 – Try reinstalling the Anti-cheat program

If the first two options did not work out, you can try reinstalling the anti-cheat program.
  • Open Steam from your Desktop or by searching for it in the Start menu.
  • After opening the Steam client, go to the Library tab in the Steam window and then look for the Rust entry from the list.
  • Next, right-click on the game’s icon in the library and select Properties.
  • Now go to the Local Files tab under Properties and click the Browse Local Files button.
  • From there, look for BattlEye, EasyAntiCheat, or PunkBuster folder depending on the game, and then double click on it to open the folder.
  • Then right-click on EasyAntiCheat_setup.exe or the BattlEye installed file in the folder or PunkBuster and select the Run as administrator option.
  • Exit the Steam client by clicking Steam > Exit from the menu located at the top.
Read More
Radeon Settings are currently not available
One of the most common brands of GPUs that comes in a large number of computers is AMD’s Radeon Graphics processing units. AMD included the Radeon Settings panel so that users can control how the hardware functions. However, as of late, a lot of users reported that the Radeon Settings panel throws an error that says, “Radeon Settings are currently not available. Please try again after connecting AMD graphics” when they try to use it. This kind of error in the Radeon Settings panel is most likely caused by either corrupted drivers or incompatible drivers. If you are one of the users who are facing this problem, worry not for this post will guide you in fixing this error. You can either use the Device Driver Uninstaller or change the driver version. For more details, make use of the options provided below.

Option 1 – Try to use the Device Driver Uninstaller

The first thing you can do to fix the problem is to uninstall the AMD Radeon drivers by using the Device Driver Uninstaller software. After you’ve uninstalled the AMD Radeon drivers using this software, go to the official website of AMD to download the AMD Radeon drivers. Once you’ve downloaded them, you can install them by simply running the executable file. Once the installation of the new AMD Radeon drivers is done, try to open the Radeon Settings panel and see if the error is now fixed or not. If not, refer to the next given option below.

Option 2 – Try changing the Driver version

If you have followed the instructions in the first option then you can proceed to the next given steps below.
  • Now that you’ve completely uninstalled the AMD Radeon drivers and reinstalled their latest working versions, check if the drivers are still updating. If they are, you need to stop them.
  • To disable the drivers being automatically updated, you need to go to the Group Policy Editor by tapping the Win + R keys to open the Run utility and then type “gpedit.msc” in the field and tap Enter or click OK.
  • After opening the Group Policy Editor, navigate to this policy setting: Computer Configuration > Administrative Templates > System > Device Installation > Device Installation Restrictions
  • From there, double click on the “Prevent installation of devices that match any of these device IDs” policy setting to open a new window, and from this window, you will see the following description of the setting:
“This policy setting allows you to specify a list of Plug and Play hardware IDs and compatible IDs for devices that Windows is prevented from installing. This policy setting takes precedence over any other policy setting that allows Windows to install a device. If you enable this policy setting Windows is prevented from installing a device whose hardware ID or compatible ID appears in the list you create. If you enable this policy setting on a remote desktop server the policy setting affects the redirection of the specified devices from a remote desktop client to the remote desktop server. If you disable or do not configure this policy setting devices can be installed and updated as allowed or prevented by other policy settings.”
  • Now set the radio button of the policy setting to “Enabled”. This will turn off the delete confirmation prompt. Note that setting the radio button to either Not Configured or Disabled will turn off the driver being automatically updated.
  • Next, click on the Show button under the Options section. And in the field that pops up, type in the Hardware ID of your GPU and click OK. You can find the GPU’s Hardware ID under this location: Device Manager > <DEVICE NAME> Properties > Details > Hardware IDs
  • Once you’re done, click the Apply and OK buttons to save the changes made.
  • Close the Group Policy Editor and restart your PC and see if the “Radeon Settings are currently not available. Please try again after connecting AMD graphics” error is now fixed.
Read More
Windows Search not searching the entire PC
There are times when the Windows Search results do not include what you want to search. However, if you are trying to search for something that’s located on your desktop and Libraries, they would appear right away on the search results. Actually, the issue is not with the search but with the list of files and folders that Windows can index. If you encounter this issue, read on as this post will guide you on how to fix it. The Windows 10 operating system, ever since Windows v1903 was released, offers two kinds of searches – the classic and the enhanced search. You may have to add more folders to the classic search or use the enhanced mode to resolve the issue. In other words, to fix the problem with the Start Menu Search, you can try to enable the Enhanced Mode or add folders to the Class Search or remove the excluded folders, as well as run the Search and Indexing troubleshooter. For more information, refer to each one of the options provided below.

Option 1 – Try to enable the Enhanced Mode

To fix the problem, you have to enable the Enhanced Mode search and configure the folders you want to be indexed. How? Follow these steps:
  • First, you have to go to Settings > Search > Searching Windows.
  • Next, select the radio button for the Enhanced option.
  • After that, select the folders you want the Windows Indexer to exclude from the Enhanced Search mode.

Option 2 – Try to add folders to the Class Search

If you don’t want to enable the Enhanced search mode, then you might want to add folders that are important to you. All you have to do is configure the Search Indexing Options by following these steps:
  • Go to Settings > Search > Classic and from there, click on the “Customize search locations” option.
  • Next, click on Modify in the pop-up window that appears.
  • Then add drives and folders that are important to you. Once the indexing is completed, Windows will be able to find the file and display it in the search results.

Option 3 – Try removing the excluded folders

If you have already enabled the Enhanced mode but your files still don’t appear, then you might want to check out the excluded folder list.
  • The first thing you have to do is go to Search and from there, you will find a list of folders under the Excluded folder list.
  • Next, click on the excluded folder that you want to remove by clicking on the “Remove Excluded folders” button.
  • If you are using the Classic search, you have to check if the index has restrictions on the file type. You can find it in Advanced options > File Types.
Note: If you want to search in Documents, you could also enable the Index Properties and File Contents. This should resolve the problem.

Option 4 – Try to run the Search and Indexing troubleshooter

You might also want to run the Search and Indexing troubleshooter in Windows 10 as it checks whether the settings for the Windows Start Search are in place and automatically corrects any issues if the update or software installation has changed the settings. To run it just click on the Start button and select Settings > Updates and Security > Troubleshoot. From there, select the Search and Indexing Troubleshooter.
Read More
How to Fix Windows Upgrade error 0xa0000400
If you encounter an error code of 0xa0000400 while trying to upgrade your Windows 10 computer using the Windows 10 Upgrade Assistant or the Windows 10 Media Creation Tool, then you might find this post useful as it will guide you in resolving this problem. When you get this error, you will see the following error message:
“Something went wrong You can contact Microsoft support for help with this error. Here is the error code 0xa0000400.”
As you know, keeping your computer up to date with all the Windows Updates is important and is imperative especially if you are experiencing a couple of issues like the Windows Upgrade error 0xa0000400. At the time of writing, there is no specific cause that has been found for this error. However, there are some potential fixes that might help you. You can try to recreate the Windows 10 installation USB and get the ISO files or you could also get a newer version of the Windows Media Creation Tool, or turn off your internet connection at a specific time or run the Windows Update troubleshooter. For more details, refer to the options given below.

Option 1 – Try to recreate the Windows 10 installation USB

Recreating the Windows 10 installation USB might help in fixing the problem. You can use a USB drive to do so but make sure that it has a great read-write speed. Follow the steps below to recreate Windows 10 installation USB”
  • Click this link and then click the Download Tool Now button.
  • Next, click the “Use the tool to create installation media (USB flash drive, DVD, or ISO file)…” option and follow the next given instructions on the screen.
  • Now select the ISO file option in step 5.
  • After that, you should now have an ISO file.
  • Next, go to the location where you’ve downloaded the ISO file.
  • Then right-click on the Windows 10 ISO file and select the Open with option and then select File Explorer.
  • Now click on “setup.exe” and follow the next instructions that appear on the screen. When asked, you have to select either Nothing (clean install) or Keep personal files only option. Take note that you must not select the “Keep personal files, apps, and Windows settings since it doesn’t really work.

Option 2 – Try turning off the Internet connection at a specific time

You might want to turn off your internet connection at a specific time. This option can be quite tricky so what you need to do is to disconnect the internet connection when the update is downloaded using the Windows Upgrade tool. It’s actually okay since all the files you need would be downloaded safely and the Windows Upgrade tool will be the one to install the newer updates using those files.

Option 3 – Try to get a newer version of the Windows Media Creation tool

You can also fix the Windows Upgrade error 0xa0000400 by using the latest version of the Windows Media Creation tool. And so if what you have is an older version, you need to update it in order to resolve the error and upgrade your Windows 10 computer.

Option 4 – Run the Windows Update Troubleshooter

Running the built-in Windows Update troubleshooter is one of the things you can first check out as it is known to automatically resolve any Windows Update or upgrade errors like error code 0x800701E3. To run it, go to Settings and then select Troubleshoot from the options. From there, click on Windows Update and then click the “Run the troubleshooter” button. After that, follow the next on-screen instructions and you should be good to go.

Option 5 – Try running Disk Cleanup

You might want to run the Disk Cleanup utility as it is a useful tool that could delete temporary and useless files in your computer.
  • Tap the Win + R keys to open the Run dialog box and then type “cleanmgr” in the field and hit Enter to open the Disk Cleanup window.
  • After that, select the drive you want to clean.
  • Now click OK to clean the disk and restart your computer.
Read More
Rebuild Search Index in Windows 10
If by any chance your search result in Windows is misleading, missing, or incorrect then it is a high probability that your search index is out of date. To repair this issue follow this guide step by step. Please take note that rebuilding the whole search index can take a long time on some systems depending on the size of the index itself, CPU speed, HD speed, etc. Sometimes it can take even hours on large drives. First, press ⊞ WINDOWS + R to open the run dialog and type in it Control panel to open the control panel. keyboard with windows and r markedrun dialog with control panel typed in Once you are in the control panel, switch your view to large icons and locate Indexing options. Control panel with indexing options selected
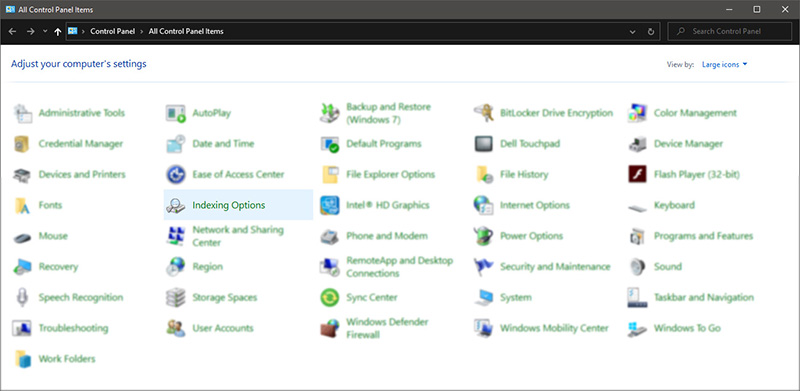
Inside indexing options, click on advanced. indexing options advanced button marked
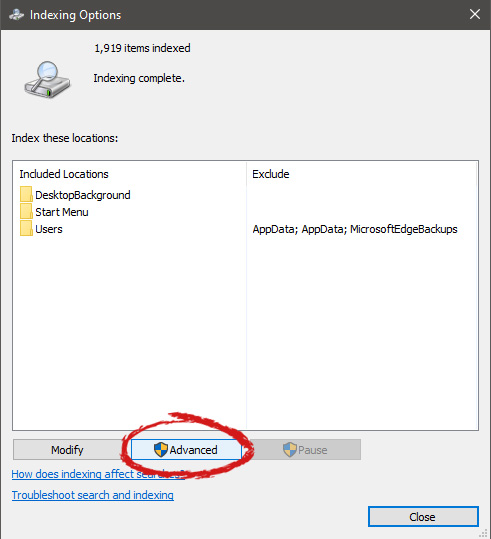
In advanced options click on the rebuild and confirm. indexing options rebuild button marked
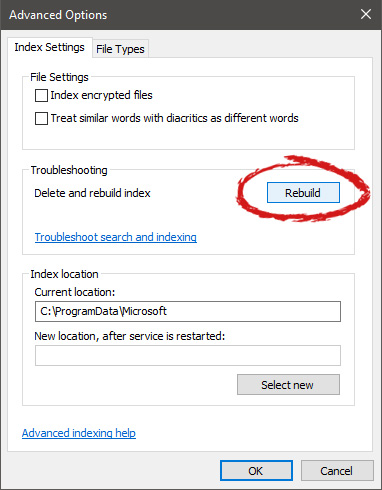
Leave your computer to finish and your searches should be working fine now.
Read More
Fix Chassis Intruded…Fatal Error…System Halted
When you encounter an error message that says, Chassis Intruded…Fatal Error…System Halted on your monitor then it indicates that the Chassis or the cabinet that holds the CPU, GPU, motherboard, and many more is open. It is a security feature offered by OEMs wherein a connector that is found in the motherboard can detect if the chassis component has been replaced or removed. There are a few OEMs that offer onboard speaker or PC chassis speaker which goes off in this kind of situation. Obviously, the problem has something to do with the hardware and in most cases, you have to put the jumper back on the motherboard with the pin-labeled chassis signal and ground. There are times when some OEMs offer a simple switch that is armed automatically when you properly close the chassis. Thus, you need to check if this switch has something to do with the error. If there is no switch or if it doesn’t resolve the issue, although you may be able to get into Windows with a warm boot, the normal Windows boot won’t really work unless you fix the problem. It is rather false positive and has something to do with the RTC RAM state or the BIOS. You might need to completely disable the Chassis intrusion feature to fix the error. Refer to the suggestions given below to try and fix the “Chassis Intruded, Fatal Error … System Halted” error.

Option 1 – Try to clear CMOS

You can easily clear CMOS by shorting two pins which can be found side by side on the motherboard. Keep in mind that it may vary from OEM to OEM although the basics are still the same to clear CMOS. In addition, you might also have to download the manual from the OEM’s website so that you’ll know its exact location.

Option 2 – Try booting into the BIOS

You can also try booting into the BIOS. All you have to do is tap either the DEL or F2 keys to get there. Note that everything will be set back to their default setting after you reset the CMOS.

Option 3 – Try disabling Chassis intrusion

In this option, you have to look for the Chassis intrusion feature in your BIOS. It might be located under security. From there, disable it and check if the problem’s fixed.

Option 4 – Try to reconfigure the BIOS

Once you have disabled the Chassis feature, you need to reconfigure the BIOS the way you expect it to be or to what it was before the reset.
Read More
Deleting a User Account in Windows
There are instances when there are multiple accounts which is the result when there are a lot of users who use the computer. Some may use it more often, while others may seldom use it. Having multiple accounts can be quite confusing and inconvenient especially if it takes a lot of space. Thus, in this post, you will be guided on how you can delete a User Account on your Windows 10 computer, as well as how you can create a backup of the existing profile data and files. All the data of user accounts can be found at C:/Users, where its folder name will be exactly the same as the name of the user. You can check the exact user’s name by simply using the “net user” command either via Command Prompt or Windows PowerShell. Once you delete a user account, its folder, along with its files, will also be deleted. You can also create a backup for user files and the best way to do that is by copying the folder to other partitions or to an external drive. Here are two methods you can check out to delete a user account in Windows 10 – you can do it via Windows Account settings or via the command line. For more details, follow each one of the options provided below.

Option 1 – Delete the user account using Windows Account settings

  • First, go to Settings > Accounts > Family & other users.
  • Next, select the account you want to delete and click on the Remove button. This will open a confirmation window along with a warning message and two buttons that say, “Delete account & data” and “Cancel”.
  • Click on the Delete account & data button to delete the user account.
Note: Once you remove a user account, it will also remove all its corresponding data such as items like Documents, Photos, Music, Desktop, and other related folders. Thus, if you have not created a backup, then you won’t be able to recover those files.

Option 2 – Delete the user account using the command line

If you want to delete several user accounts, then doing it via Command Prompt or Windows PowerShell is a lot quicker. To get started, follow these steps:
  • In the Start Search, type “command prompt” and from the search results that appear, right-click on Command Prompt and select the “Run as administrator” option.
  • Next, type the “net user” command and hit Enter to execute it. This will show you the exact usernames on the computer.
  • After that, type the “net user <username> /delete” command and hit Enter to execute it. This will delete the account and all of its data without any warning. You have to replace “<username>” with the name of the user account.
Read More
There was a problem resetting your PC
If you’ve tried resetting your Windows 10 computer using the Reset This PC option in order to restore your computer’s factory settings and the process suddenly fails for some reason and you got an error message instead stating, “There was a problem resetting your PC, No changes were made on your Windows 10 computer”, then this post might help you resolve the problem. Carefully follow each one of the options given below to resolve the “There was a problem resetting your PC error on Windows 10.

Option 1 – Try renaming the System and Software hive

  • If you’re still able to boot to the desktop of your Windows 10 PC, open an elevated Command Prompt from the WinX menu.
  • Now use the CD command and change the directory to Windows\System32\config folder. Simply type in the following command and hit Enter:
cd %windir%system32config
  • After that, you have to rename the System and Software registry hives to “System.001” and “Software.001”, respectively. To do that, just type each one of the following commands and hit Enter after you type each of them.
    • ren system system.001
    • ren software software.001
On the other hand, if your Windows 10 PC isn’t able to boot to the desktop, you can just access Command Prompt from the Advanced Startup options or you can also boot into Sage Mode and open Command Prompt from there and then run the given commands above. Note: If you only want to use the Refresh your PC option, you must only rename System hive and not Software hive. On the other hand, if the Software hive is really corrupted, you might not be able to use the Refresh your PC option in such a case. Thus, you really need to rename the Software hive as well. Once you’ve renamed the Software hive, you won’t be able to use the Refresh your PC option but only the Reset your PC option.
  • Type “exit” to close the Command Prompt and then restart your PC and try resetting your PC again.

Option 2 – Try to disable and re-enable the Windows Recovery Environment

If the first option didn’t help, you can try disabling the Windows Recovery Environment and then enable it back again. To configure a Windows Recovery Environment or Windows RE boot image and recovery options, you have to use the REAgentC.exe tool.
  • Tap the Win + S key and type “REAgentC.exe” to open the REAgentC.exe tool.
  • After that, type the following command and hit Enter to disable the Windows RE:
reagentc /disable
  • After disabling the Windows RE, you need to enable it back by typing the following command:
reagentc /enable

Option 3 – Try to boot the USB recovery drive

If the two previous options failed, you need to try another workaround which is to boot to the USB recovery drive > Troubleshoot > Recover from a drive. From there, follow the on-screen instructions and you should be good to go.
Read More
1 2 3 162
Logo
Copyright © 2022, ErrorTools. All Rights Reserved
Trademarks: Microsoft Windows logos are registered trademarks of Microsoft. Disclaimer: ErrorTools.com is not affiliated with Microsoft, nor claim direct affiliation.
The information on this page is provided for information purposes only.
DMCA.com Protection Status