Setup has failed to determine install choices

Running the Windows Setup does not always go smoothly as you could encounter some errors along the way. One of these errors is the “Something happened, Setup has failed to determine supported install choices” error. The only given option in such cases is to click the Close button and exit the setup.

This kind of error in Windows setup can occur when you try to downgrade to the previous version of Windows using the built-in mechanism. This error could be caused by a corrupted image or it is also possible that the set of files are incomplete. Aside from that, it could also be due to compatibility issues or that the module used to downgrade the Windows operating system is not configured properly. To fix this error, you have to run the Windows Setup program in compatibility mode so that you can downgrade Windows. You could also use the image for the lower version of Windows that’s available on the official site of Microsoft. But before you do any of these, make sure that you’re logged in as an administrator.

To fix the “Something happened, Setup has failed to determine supported install choices” error, follow the given options below sequentially.

Option 1 – Try to run the Installer of the downgraded version in Compatibility Mode

This is the first thing you can try to resolve the issue instead of going right ahead on making a bootable device. So if you are downgrading Windows, you can try to run the installer in the compatibility mode for that specific Windows version.

  • Look for the setup file.
  • Once you find it, right-click on it and select Properties from the context menu.
  • After that, go to the Compatibility tab and mark the checkbox for “Run this program in compatibility mode for:” and from the drop-down list, select either Windows 7 or Windows 8.
  • You also have to check the “Run as administrator” option.
  • Now click the Apply button and then click OK to save the changes made and check if it has resolved the issue or not.

Option 2 – Try to troubleshoot compatibility

This option is almost the same as the first one except it is an alternative way of fixing the “Setup has failed to determine supported install choices” error in case the first one didn’t work. In this option, you will troubleshoot the compatibility issue.

  • Look for the setup file.
  • Then right-click on it and select the “Troubleshoot compatibility” from the context menu.
  • After that, click on the “Try recommended setting” option. Once the process is done, the error message should be gone.

Option 3 – Run the DISM tool

You can run the DISM tool as well to help fix the error code 0x80244022 during Windows Update. Using this built-in tool, you have various options such as the “/ScanHealth”, “/CheckHealth”, and “/RestoreHealth”.

  • Open the Command Prompt with admin privileges.
  • Then type in the following commands and make sure to hit Enter right after you type each one of them:
    • Dism /Online /Cleanup-Image /CheckHealth
    • Dism /Online /Cleanup-Image /ScanHealth
    • exe /Online /Cleanup-image /Restorehealth
  • Do not close the window if the process takes a while as it will probably take a few minutes to finish.

Option 4 – Try using the image from the official site of Microsoft

If none of the options given above worked, you can try to use the image from Microsoft’s official site. This would help, especially if the error is caused by a corrupted image or image folder with incomplete files.

If you like to learn and find out more about various Windows errors, and how to repair them go to our vast archive or use search to find articles that will explain and help you in solving your issue.
However, if you prefer to do things fast and with automatization then we are proposing to use an automated solution for your issues. The application that we are recommending is Advanced System Repair Pro
Advanced System Repair utilizes multiple tools all in one to give you a quick, simple, reliable, and very thorough diagnosis of your PC. It brings you all the tools you need in one program to clean, fix, protect, optimize and boost your PC!
1-Click Maintenance
All the tools to make it simple and easy! It's like having a professional technician at the click of a mouse.

Junk Cleaner
Keeping your computer free from unnecessary clutter also helps make your computer last longer. Like any other machine, if you keep it clean and take care of it, it will serve you better for longer!

Optimize background apps
Optimize applications background activity with the built-in Application Optimizer feature.

Disk Defrag
With a simple 1-click, Advanced System Repair speeds up your PC by assembling fragmented files on your machine and organizing them more efficiently.

Malware Removal
Finds and removes all types of harmful malware including trojans, worms, bots, adware, spyware, PUPs, and more!

Privacy Cleaner
The all-in-one privacy suite to Clean Your Tracks & Protect Your Privacy! Make your computer safe, secure, and more efficient!

System Tweak/Optimizer
ASR will analyze your complete system and settings to adjust your PC to function at its maximum performance.

Registry Cleaner
Over time, as you install and uninstall applications, the registry can become cluttered with old entries and broken settings which can result in program crashes, and annoying messages and slow the computer down.
Visit our Advanced System Repair Pro Download page to inform yourself about all the benefits of this software and get a free trial copy of it.
advanced system repair pro

Advanced System Repair Pro

One-click automated PC repair solution
ASR logo
With Advanced System Repair Pro you can easily
Replace damaged files
Restore performance
Free disk space
Remove Malware
Protects WEB browser
Remove Viruses
Stop PC freezing
DOWNLOAD
Privacy Policy | Terms of Use | Uinstall
Advanced System Repair Pro is compatible with all versions of Microsoft Windows including Windows 11

Share this article:

You might also like

Scroll bar in Chrome is missing in Windows
If you find that the scroll bar in your Google Chrome browser is missing all of a sudden, and it becomes difficult for you to scroll down the web page and see its content, worry not for this post will guide you on what you can do to resolve this problem. Usually, when the mouse cursor stays hidden in the corner and only appears when you point it to the edge of the screen. However, there are instances when it won’t appear which makes navigating the web page you are visiting quite impossible. So if you encounter this kind of strange behavior on your Google Chrome browser, there are several suggestions you can check out to resolve it. In most cases, updating the browser resolves the problem, but if it does not, you can try restoring the browser’s settings to their default state by resetting Chrome or you could also disable hardware acceleration or disable the overlay scrollbars flag. For more information, follow each one of the options provided below.

Option 1 – Reset Google Chrome

Before you proceed, make sure that the Chrome browser is not running anywhere in the background via Task Manager. Once you’ve made sure that it’s no longer running, refer to these steps:
  • Tap the Win + R keys to open the Run dialog box.
  • Then type “%USERPROFILE%AppDataLocalGoogleChromeUser Data” in the field and tap Enter to open this location.
  • From there, look for the Default folder and then tap the Shift + Delete button and if a confirmation prompt appears, click on Yes.
  • After deleting the Default folder, open Google Chrome and click on the three vertical dots icon located in the top-right corner to open the menu.
  • Next, click on Settings and scroll down and then click on Advanced to open the Advanced Settings.
  • Then scroll down until you see the “Reset and clean up” section and click the “Restore Settings to their original defaults” option.
  • After that, you will see a confirmation box and from there, click on the Reset settings button to reset your Google Chrome browser.

Option 2 – Try to disable the Hardware Acceleration

For better performance, Google Chrome uses the Hardware Acceleration by default. Unfortunately, there are just some cases when your hardware, GPU to be specific, might not be able to cope with the requirements, resulting in the black screen issue. And if this is your case, you should try to disable the hardware acceleration from your Google Chrome browser settings panel. To do so, follow the steps below.
  • Open the Google Chrome settings page.
  • Click on the Advanced button to get more options.
  • Look for the option called “Use hardware acceleration when available” and then disable it by toggling the button to the left.
  • After that, check if the screen flickering issue in Chrome is fixed.

Option 3 – Try to disable “Smooth Scrolling” in Chrome

Disabling “Smooth Scrolling” in Chrome might also help you fix the issue. To do so, follow these steps:
  • Open Chrome and type “chrome://flags” and hit Enter.
  • Next, look for a flag named “Smooth Scrolling”. You can scroll down until you find it or search it in the Search Flag bar. Note that Smooth Scrolling is enabled by default in the newer versions of Chrome.
  • After that, select the drop-down menu and select Disabled.
  • Then click on the “Relaunch Now” button.
Read More
Fix Chrome is Waiting for cache in Windows
There are times when you may encounter some glitches on your Google Chrome browser in your Windows 10 computer. One of these glitches is when the connection status of Chrome keeps on saying “Waiting for cache” which is displayed at the bottom-left side of the browser in the Status bar. At the time of writing, it isn’t clear yet what could be causing this problem. Although it is possible that it’s caused by browser cache, some extensions in the browser. On the other hand, it could also be caused by the browser profile or due to some fragmented files or that the SSD is occupied. Whatever the cause is, you can check out each one of the given options below to fix the problem.

Option 1 – Try clearing browser cache

There are times when some data in the browser is conflicting with the loading of the website and triggers some problems like “Waiting for cache”. And so you can try to clear your browser’s data. This might be a very basic solution but oftentimes it works in fixing this kind of error in Google Chrome. Follow the steps below to clear the data in your browser.
  • Open your Google Chrome browser.
  • After that, tap the Ctrl + H keys. Doing so will open a new panel that allows you to delete the browsing history and other data in your browser.
  • Now select every checkbox that you see and click on the Clear browsing data button.
  • Then restart your Chrome browser and check if you can now open any website or not.

Option 2 – Try to disable writing of Cache files to the SSD

You can also disable the writing of Cache files to the SSD to stop Google Chrome’s dependency on the SSD to gather all the cache files.

Option 3 – Delete the User Profile in Chrome

You can also try deleting the User Profile folder in Chrome. To do so, follow these steps:
  • You need to first end every single process of Google Chrome. To do so, right-click on the Taskbar then select the Task Manager. And if the Task Manager is not responding, you can just use the Alt + Ctrl + Del keys and then select the Task Manager.
  • After opening the Task Manager, under Processes, look for Google Chrome’s process which would most likely be named “chrome.exe”.
  • Right-click on Google Chrome’s process and then select the End task option.
  • Next, tap the Win + R keys to open the Run dialogue box.
  • Then copy and paste “%USERPROFILE%AppDataLocalGoogleChromeUser Data” and hit Enter.
  • From there, look for a folder named “Default folder” and then copy the folder to another drive as a backup.
  • After creating a copy of the folder, delete the Default folder.
  • Next, open Google Chrome again and go to Settings > Advanced > Reset.

Option 4 – Reset Chrome

Resetting Chrome can also help you fix the error. This means that you will be restoring its default settings, disabling all the extensions, add-ons, and themes. Aside from that, the content settings will be reset as well and the cookies, cache, and site data will also be deleted. To reset Chrome, here’s what you have to do:
  • Open Google Chrome, then tap the Alt + F keys.
  • After that, click on Settings.
  • Next, scroll down until you see the Advanced option, once you see it, click on it.
  • After clicking the Advanced option, go to the “Restore and clean up option and click on the “Restore settings to their original defaults” option to reset Google Chrome.
  • Now restart Google Chrome.

Option 5 – Try to clean reinstall Chrome

There are instances when programs leave files behind after you’ve uninstalled them and the same thing can happen to Chrome so before you reinstall Chrome, you have to make sure that you have deleted the User Data folder. To do so, refer to the following steps:
  • Hit the Win + R keys to open the Run dialog box.
  • Next, type “%LOCALAPPDATA%GoogleChromeUser Data” in the field and hit Enter to open the User Data folder.
  • From there, rename the default folder and name it something else, e.g. “Default.old”.
  • After that, install Google Chrome again and check if the issue is now fixed.
Read More
Fix System doesn’t have any USB boot option
Lately, some users reported getting an error that says, “System doesn’t have any USB boot option, Please select other boot option in Boot Manager Menu” when they tried to reinstall the Windows 10 operating system on their PCs or boot from an installation media. If you have the same problem, then this post should help. This kind of error is applicable to multiple devices by various OEMs and is mostly due to the Secure boot being enabled, or the Legacy or CSM support being disabled. It could also be that the bootable USB device was not correctly made and so on. Whatever the cause may be, here are some suggestions you need to check out to resolve the “System doesn’t have any USB boot option, Please select other boot option in Boot Manager Menu” error and reinstall Windows 10 successfully.

Option 1 – Disable the Secure Boot in the BIOS

Disabling the Secure Boot in the BIOS settings is definitely recommended to resolve the error. To disable Secure Boot, here’s what you have to do:
  • First, boot your computer into Windows 10.
  • Next, go to Settings > Windows Update. From there, check if there is anything that you have to download and install if you see any available updates. Usually, OEMs send and update the list of trusted hardware, drivers, and operating systems for your computer.
  • After that, go to the BIOS of your computer.
  • Then go to Settings > Update & Security > Advanced Startup options. If you click on Restart Now, it will restart your computer and give you all the advanced options.
  • Next, select Troubleshoot > Advanced Options. As you can see, this screen offers you further options including System restore, Startup repair, Go back to the previous version, Command Prompt, System Image Recovery, and UEFI Firmware Settings.
  • Select the UEFI Firmware Settings which will take you to the BIOS.
  • From there, go to the Security > Boot > Authentication tab where you should see Secure Boot. Note that every OEM has its own way of implementing the options so it varies.
  • Next, set Secure Boot to Disabled and set Legacy Support to On or Enabled.
  • Save the changes made and exit. Afterward, your computer will reboot.

Option 2 – Try to reset the BIOS or the UEFI Settings

If updating the BIOS didn’t help in fixing Error 0199, you can try to reset the BIOS instead.
  • Start your computer and tap the F10 key during the booting process to enter the BIOS. If it does not work, you can try tapping the F1 or F2 key as well as the Del key.
  • Once you’re already in the BIOS, tap the F9 key to get the prompt to RestoreLoad default configuration now for the BIOS.
  • Next, click on Yes and then follow the next on-screen instructions that appear to set the BIOS back to its default settings.
  • Once you’re done restoring the default settings of the BIOS, restart your computer and then check if it now boots properly.

Option 3 – Make a proper bootable USB Drive/Stick

To make a proper bootable USB drive, you need to use the Windows Media Creation tool. The Media Creation tool in Windows allows you to use the ISO installation file to make a bootable device that you can use to install Windows on your PC. Note that this is kind of different from the usual installation process as it could erase your computer’s current settings and data on the primary drive. Thus, before you proceed, you need to backup all your data into some removable drive and then use the Media Creation Tool to make a bootable drive.
  • After making the bootable drive, you need to plug it into your computer and then reboot.
  • Next, tap the F10 or Esc key to open the boot options.
  • Now set the boot priority of the removable drive the highest. Once the setup comes forth, follow the next onscreen instructions and install Windows without any problems.

Option 4 – Try enabling Legacy or CSM boot support

If the Legacy or CSM boot support is disabled, then it’s no wonder why you’re getting an error. Thus, you need to enable it by following these steps:
  • Open Settings and go to Update & Security > Advanced Startup options.
  • Next, click on Restart Now to reboot your computer.
  • After that, select Troubleshoot > Advanced Options where, you will see more options such as System Restore, Startup Repair, Go back to the previous version, Command Prompt, System Image Recovery, and UEFI Firmware Settings.
  • From there, enable Legacy Support and then save the changes and exit. This will restart the computer.
  • Once your computer has restarted, check if the error is now fixed.
Read More
Enable or Disable Optional Windows Features
As you know, Windows operating system comes with tons of features. Some of which are not intended to be used by normal customers or users directly which means that only a small percentage of the huge user base of the operating system leverages the use of such features. However, they’ve added some major value to the feature list of the operating system. You can find these features under the “Turn Windows Features on and off” option. This indicates that if you want to, you can just type in “Turn Windows Features on and off” in the search box and then enable any feature that you want to enable. Aside from that, there are other ways you can disable or enable the optional Windows Features in your Windows 10 computer.

Option 1 – via Control Panel

  • Open Control Panel and select Uninstall a Program.
  • After that, select the “Turn Windows features On or Off” option on the left side.

Option 2 – via Command Prompt

  • Tap the Win + X combination on your keyboard or right-click on the Start button and then click on Command Prompt (Admin). Alternatively, you can also type “cmd” in the Cortana search box and right-click on the Command Prompt icon, and select the “Run as administrator” option.
  • If a User Account Control or UAC prompt appears, click on Yes.
  • Next, type in the following command to see the list of the available features.
DISM /online /get-features /format:table | more
  • Now all you have to do is copy the name of the feature that you want to enable and for you to do that, you need to execute the following command:
DISM /online /enable-feature /featurename:[Enter the name of the feature here] –All
Note: Now if you want to disable a feature that’s already enabled in your computer, refer to these sub-steps:
  • First, you need to check what features are enabled, and for you to find out, enter this command: DISM /online /get-features /format:table | find “Enabled" | more
  • And if you want to check the detailed information about a particular feature, you can enter this command: DISM /online /get-featureinfo/featurename:[Enter the name of the feature here]

Option 3 – via Windows Powershell

As you know, the Windows Powershell is a very important tool in Windows 10, and a powerful one at that since you can do a lot of things using this command line. So while you use this tool you need to populate the list of available features first and then you have to download the feature your desired feature.
  • Search for PowerShell in the Cortana search box and then run it with administrator privileges.
  • Next, type in the following command to populate the list of available features:
Get-WindowsOptionalFeature –Online
  • After that, enter the following command to install any feature you want to enable from the list of available features:
Get-WindowsOptionalFeature -Online -FeatureName *Type feature name*
  • Now enter the following command to enable your desired feature:
Enable-WindowsOptionalFeature -Online -FeatureName “Type feature name” –all
  • And if you want to disable any enabled feature, just enter the following command:
Disable-WindowsOptionalFeature -Online -FeatureName “Type feature name”

Option 4 – via an external installation source

You also have the option to fetch the latest features from an updated offline source. The source could be an ISO any other type of image or just a folder. So you need to decide if you want to use Windows Powershell or Command Prompt.
  • If you want to use Command Prompt, just enter this command: exe /online /enable-feature /featurename:< /All /Source:<Enter the path of the feature here>
  • If you want to use Windows Powershell, use this command: Install-WindowsFeature –Source “<Enter the path of the feature here>”
Note: If you want to get the latest features, you need to get the latest version of the image of the operating system that you are trying to install the feature from.
Read More
Fix Print Spooler Service Error 1068
There is one service in the Windows operating system that is responsible for managing all the print jobs as well as handles the interaction with the printer. This service is known as the Print Spooler service. However, if it stops running, then you won’t be able to print anything on your computer. In such a case, you can try to restart the Print Spooler service, and to do that, you have to open the Windows Services Manager and look for the Print Spooler Service. Once you found it, right-click on it and select Restart. If it isn’t running, select Start and if the Service starts working again, then good but if not and you got an error message instead that says, “Windows could not start the Print Spooler service on Local Computer, Error 1068, The dependency service or group failed to start”, then read on as this post will give you a couple of suggestions you can try to resolve the issue. The reason why you could not start the service is most likely because the Print Spooler service is dependent on other services which might not be properly running. If the following services are not running then it’s no wonder why you’re getting the error.
  • HTTP Service
  • Remote Procedure Control (RPC) Service
You might not see the RPC service which means that the Print Spooler Service does not recognize its dependency on the RPC service. In such a case, you have to manually configure the dependency by following the options given below.

Option 1 – Try configuring the dependency via CMD

The first thing you have to do is to configure the dependency using CMD. Refer to the steps below to do so:
  • Open an elevated Command Prompt.
  • Then type in “sc config spooler depend= RPCSS” and hit Enter.
  • After the command has been executed, restart your computer and then check if it fixed the problem. If not, proceed to the next given option below.

Option 2 – Fix dependency via the Registry Editor

You can also resolve dependency using the Registry Editor. How? Refer to these steps:
  • Tap the Win + R keys to open the Run dialog box.
  • Then type “Regedit” in the field and hit Enter to open the Registry Editor.
  • After that, navigate to this key: HKEY_LOCAL_MACHINESYSTEMCurrentControlSetServicesSpooler
  • Next, right-click on the “DependOnService” entry located on the right pane and select Modify.
  • Now change its value data to “RPCSS” and click OK to save the changes made and then exit the Registry Editor.
  • Reboot your computer and see if the issue is resolved.

Option 3 – Try running the Printer Troubleshooter

Another option you can check out is the Printer Troubleshooter. This built-in troubleshooter in Windows 10 can help you fix most print issues. It checks if you have the latest printer drivers and then tries to fix and update them automatically. Aside from that, it also checks if you have connectivity issues or if the Print Spooler and the required Services are running fine. To run it, follow the steps below.
  • Tap the Win + R keys to open the Run dialog box.
  • Next, type “exe /id PrinterDiagnostic” in the field and click OK or hit Enter to open the Printer Troubleshooter.
  • Then click the Next button and follow the next on-screen instructions to fix the issue with the printer.
Read More
New calculator features in Windows 11 and more
Calculator GraphingWindows 11 will bring some old applications in new looks and some will get additional features as well. One of the old apps that will get new stuff is a calculator. The calculator was always a way to go application for quick calculations but Microsoft aims to expand on that and make the calculator a little more useful. The first thing that you will notice is the calculator look, the calculator has now an application theme setting that allows you to change the look of the application. It comes in standard and professional mode as usual but this time calculator will come with features that will enable it to handle some programming and engineering tasks. 
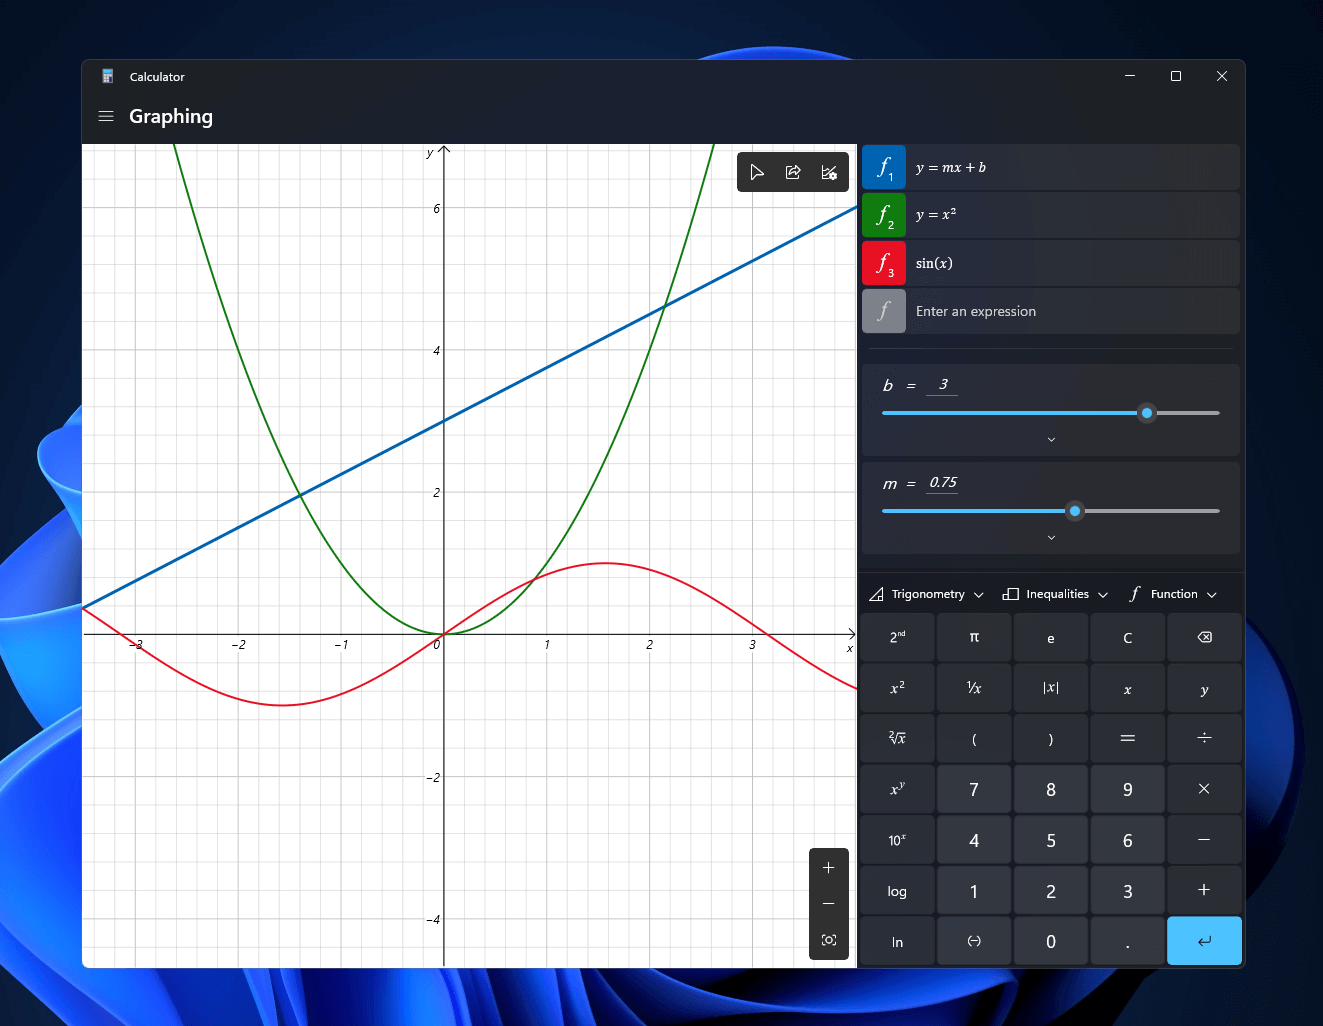
The new calculator features a full graphing mode that lets you visually analyze a graph to identify key features. It also packs a deep converter that can switch between more than 100 units and currencies.

Other Windows 11 apps

A new snipping tool will be delivered with this latest update as well packed with new functionality. We have covered new features of the snipping tool in another article, if you are interested you can find the article here: https://errortools.com/windows/new-snipping-tool-redesigned-in-windows-11/ Mail and Calendar apps will also get a redesign, sadly all redesign that they will include will be of visual nature to fit in the overall Windows 11 theme, functionality will remain the same.
Read More
Moving Start Menu to the Second Monitor
One of the most important User Interface elements in a Windows 10 operating system is the Start Menu. Not too long ago, Microsoft has added some new features and redesigned the Start Menu a couple of times as well. Thus, it is not uncommon for Windows 10 users to use several monitors. That’s why in this post, you will be guided on how you can move the Start Menu to your second monitor in Windows 10. There are a lot of advantages in using more than one monitor like a better and widescreen as well as help in improving and increasing productivity. Usually, the Start Menu and the taskbar is present in the original monitor only. In most cases, it helps users in moving the Start Menu to the second monitor and helps users in segregating tasks, and uses separate monitors for each kind of task. There are two simple steps to move the Start Menu to the second monitor. You have the option to unlock and drag the taskbar, as well as make adjustments in the settings. To get started, refer to each one of the following options to move the Start Menu to the second monitor.

Option 1 – Move the second monitor by unlocking and dragging the taskbar

The first option you can try to move the Start Menu to the second display is to simply unlock and then drag the taskbar. To do so, follow these steps:
  • First, click on the Taskbar and unlock it.
  • Next, uncheck the Lock the taskbar feature in the menu of the Taskbar Settings. This will free the taskbar so you can move or drag it around.
  • After that, push the Start Menu to the furthermost corner of the screen and then transfer it to the second monitor.

Option 2 – Move the second monitor using the keyboard

  • The first thing you have to do is to tap the Windows key to open the Start Menu.
  • Next, close the Start Menu by tapping the Esc key.
  • After that, the controls will shift back to the taskbar.
  • Now open the context menu of the taskbar by tapping the Alt + space bar together. This will move the Start Menu to the second monitor.

Option 3 – Move the Start Menu to the second monitor via Settings

If you find that the Taskbar is moving to the wrong monitor automatically or if the program does not start on the same monitor as the taskbar, then you can try this option.
  • Click on Start first and click Run.
  • Then type “desk.cpl” in the field and click OK.
  • Alternatively, you could also right-click on the desktop and select the Screen Resolution option from the drop-down menu.
  • After that, click on the monitor that you want to use as the primary monitor and select the checkbox labeled “Make this my main display”.
  • Once done, you have to choose the “Show desktop” on only 1 from the drop-down menu of Multiple displays.
  • Now click the Keep Changes option and select the Extend these displays from the Multiple displays drop-down menu and then click on the Apply button to save the changes made.
  • Afterward, click the Keep changes option once the dialog box pops up.
Read More
Disable Touchscreen in Windows 11
The touchscreen feature inside Windows 11 is a pretty good thing but sometimes can be very impractical. The screen can easily and constantly get dirty due to fingers touching it all the time and there are users that do not wish or want to have this feature at all. touchscreen windows 11If you are one of the mentioned users and for any reason, you do not wish to have a touchscreen-enabled then sit back and relax, we have you covered in this tutorial on how to fully disable touchscreen inside Windows 11.

Turn off touchscreen via device manager

  1. Click on the Windows Search icon in the taskbar
  2. Type Device Manager
  3. Click on Device Manager from the list of results
  4. Inside locate Human Interface Devices and click on the right arrow
  5. In the list, find HID-Compliant Touch Screen and select Disable Device
  6. Click on Yes to confirm

Disable it via Windows Terminal

  1. Right-click on the Windows icon in the taskbar
  2. Click on Windows Terminal (admin)
  3. Inside run this command: Get-PnpDevice | Where-Object {$_.FriendlyName -like '*touch screen*'} | Disable-PnpDevice -Confirm:$false

Conclusion

No matter which method you prefer, both of them will disable the touch screen inside Windows 11. Thank you for reading trough article and I hope to see you again. Take care.
Read More
How to do Disk cleanup in Windows 10
Disk cleanup is part of Windows 10 tools and it is essential in keeping your computer up and running in optimal settings and to free so much needed space as well as remove temporary files that can accumulate over time. Using disk cleanup from time to time is recommended and a very useful habit that will save you some headaches and optimize your computer running time, speed up boot sequence, etc. Think of it like cleaning up your desk, from time to time it can get too overwhelmed with junk and non-important things and if you are keeping it tidy all the time each time you need to find something it will be much faster and easier, same goes with computers, so if you do not have it, try to develop a habit that once per month you start disk clean up and remove trash from your hard drive. In order to do so, press ⊞ WINDOWS + E to bring File Explorer up Keyboard with windows and e markedOnce File Explorer is up and running right-click on the hard drive you wish to run disk cleanup on and click on properties. file explorer hd propertiesProperties Windows will open on the general tab, on that tab you have disk cleanup on the lower right part of properties, click on it. local disk properties cleanupWait for Windows to gather information about your hard drive and files on it. After it is finished you will be greeted with the next screen: disk cleanup section chooserHere you can thick and mark which items you would like to get rid of and which ones you would like to keep. Note that you can freely tick all of them and remove them since removing these files will not break WIndows in any way. make your choices and click on ok. You can also click on Clean up system files to run system files cleaner and get rid of junk there, you will not be able to choose any options there, Windows will alone clean up what is not needed. After disk cleanup is finished least thing you will have is more free disk space, but like mentioned, keeping your Windows and computer healthy goes a long way in its usability, speed, and performance.
Read More
Fix Minecraft Won’t Launch in Windows 10
Minecraft has taken the world by the storm, it was an indie project game and it went mainstream. Dream of every game developer I guess. The dream of every gamer on the other hand is to double click on the game and to play it and not to deal with various issues, especially if they are launch issues. Luckily for all of you gamers, here at errortools we game as well and we are happy to bring you a solution on how to fix Minecraft won't launch issue. So sit back, relax and keep on reading, and hopefully enough you will be gaming again in no time. Follow the guide presented step by step, point by point how it is presented for the quickest way to get back in Minecraft. This guide also presumes that your hardware configurations meet at least the minimum system requirements for running Minecraft.
  1. Disable antivirus and firewall

    90% of the time this is the issue why Minecraft is not working, your antivirus or firewall has detected it as a false positive, and access to system internet, etc has been cut. Try disabling it and if everything is working fine add it to the antivirus or the firewall exception list.
  2. Run Minecraft as admin

    Minecraft will sometimes refuse to run if it does not has administrator privileges. To make sure this is the case locate the Minecraft executable, right-click on it and choose properties. Go to the compatibility tab and check Run as Administrator box.
  3. End Minecraft process

    It came to knowledge that even if Minecraft is not running it can have its processes active in the background. Press CTRL + SHIFT + ESC to open task manager Locate if Minecraft has a process running If you find the Minecraft process right-click on it and choose End Task
  4. Run Minecraft in compatibility mode

    If Minecraft still refuses to start try running it in compatibility mode in the previous Windows version Locate Minecraft executable file in its install location Right-click on it and choose properties In the properties, windows go to the compatibility tab Check run this program in compatibility mode for: Select previous version of the operating system, try Windows 8 or Windows 7
  5. Update graphic card driver

    The best bet is to go to your GPU manufacturer's website and download the latest version of the driver of your GPU.
  6. Remove mods, plugins, texture packs

    Mods, plugins, texture packs are all great but sometimes they can cause GPU overloads and other issues to see if this is the case try running Minecraft in Vannila mode without anything installed, just pure and clean Minecraft as it was just downloaded and installed.
  7. Reinstall Minecraft

    If everything else failed, reinstall Minecraft. There might be a chance that some DLL file was deleted or corrupted by mistake or that some crucial files are missing. Clean reinstallation will fix all of these issues.
Read More
1 2 3 162
Logo
Copyright © 2022, ErrorTools. All Rights Reserved
Trademarks: Microsoft Windows logos are registered trademarks of Microsoft. Disclaimer: ErrorTools.com is not affiliated with Microsoft, nor claim direct affiliation.
The information on this page is provided for information purposes only.
DMCA.com Protection Status