A Quick Guide to Resolving Error 1512

How to Fix Error 1512

Error 1512 - What is it?

Error 1512 is a type of runtime error code. This error may hamper your ability to run and load your desired programs on Windows PC. There are increased chances of runtime error 1512 occurring when system files go missing or get corrupt.

Symptoms of this error code include:

  • Slow PC speed
  • Window System freeze

Solution

Restoro box imageError Causes

There are several for the occurrence of runtime error 1512. These include:

  • Faulty or outdated drivers
  • Poor Program installation
  • Damaged Windows Registry
  • Viruses tampering the system settings/memory
  • Broken or incorrect Registry entries
  • Damaged Windows registry

Further Information and Manual Repair

To resolve this issue you don’t have to hire a professional and spend hundreds of dollars to get it fixed. Here are some of the best and easy do-it-yourself methods to repair error 1512 on your system in a few minutes.

These methods are very easy to work around and do not require any kind of technical expertise.

Method 1 - Uninstall and then reinstall the Same Program

Sometimes this runtime error may pop up due to poor program installation. In such an event, it is advisable to uninstall the program and then reinstall it again properly. To do so, go to the start menu, and click on control panel.

Now select the program & features option. Here you will find the option Add/Remove Program. Remove the program causing error 1512. Once the program is removed, reinstall it again.

Method 2 - Run an Antivirus Program

Computer viruses are capable of tampering with system settings. Due to this reason you might experience runtime errors like 1512 on your PC. These malicious programs usually enter the system through phishing emails or website downloads.

To resolve the issue, you need to run a powerful antivirus program. An antivirus removes all sorts of malicious programs hiding in your PC like malware, spyware, and malware that are responsible for generating runtime errors.

Method 3 - Update the Outdated Drivers on your PC

If the error still persists, then it is suggested to update outdated drivers. Faulty and outdated drivers can also trigger runtime error 1512. To do this, go to the Device Manager. Here use the Driver update wizard to make updates.

Method 4 - Remove the Invalid Registry Entries and Repair the Damaged Registry

The best way to perform both tasks is to download Restoro. It is embedded with a registry cleaner that is quite easy to use.

The registry cleaner removes all invalid entries in seconds, cleans the cluttered registry by wiping out all the redundant and unnecessary files. The damaged registry is then repaired and resumes its normal function.

Click here to download Restoro and resolve runtime error 1512.

If you like to learn and find out more about various Windows errors, and how to repair them go to our vast archive or use search to find articles that will explain and help you in solving your issue.
However, if you prefer to do things fast and with automatization then we are proposing to use an automated solution for your issues. The application that we are recommending is Advanced System Repair Pro
Advanced System Repair utilizes multiple tools all in one to give you a quick, simple, reliable, and very thorough diagnosis of your PC. It brings you all the tools you need in one program to clean, fix, protect, optimize and boost your PC!
1-Click Maintenance
All the tools to make it simple and easy! It's like having a professional technician at the click of a mouse.

Junk Cleaner
Keeping your computer free from unnecessary clutter also helps make your computer last longer. Like any other machine, if you keep it clean and take care of it, it will serve you better for longer!

Optimize background apps
Optimize applications background activity with the built-in Application Optimizer feature.

Disk Defrag
With a simple 1-click, Advanced System Repair speeds up your PC by assembling fragmented files on your machine and organizing them more efficiently.

Malware Removal
Finds and removes all types of harmful malware including trojans, worms, bots, adware, spyware, PUPs, and more!

Privacy Cleaner
The all-in-one privacy suite to Clean Your Tracks & Protect Your Privacy! Make your computer safe, secure, and more efficient!

System Tweak/Optimizer
ASR will analyze your complete system and settings to adjust your PC to function at its maximum performance.

Registry Cleaner
Over time, as you install and uninstall applications, the registry can become cluttered with old entries and broken settings which can result in program crashes, and annoying messages and slow the computer down.
Visit our Advanced System Repair Pro Download page to inform yourself about all the benefits of this software and get a free trial copy of it.
advanced system repair pro

Advanced System Repair Pro

One-click automated PC repair solution
ASR logo
With Advanced System Repair Pro you can easily
Replace damaged files
Restore performance
Free disk space
Remove Malware
Protects WEB browser
Remove Viruses
Stop PC freezing
DOWNLOAD
Privacy Policy | Terms of Use | Uinstall
Advanced System Repair Pro is compatible with all versions of Microsoft Windows including Windows 11

Share this article:

You might also like

Intel's open-source Clear Linux* Project
clear linux project
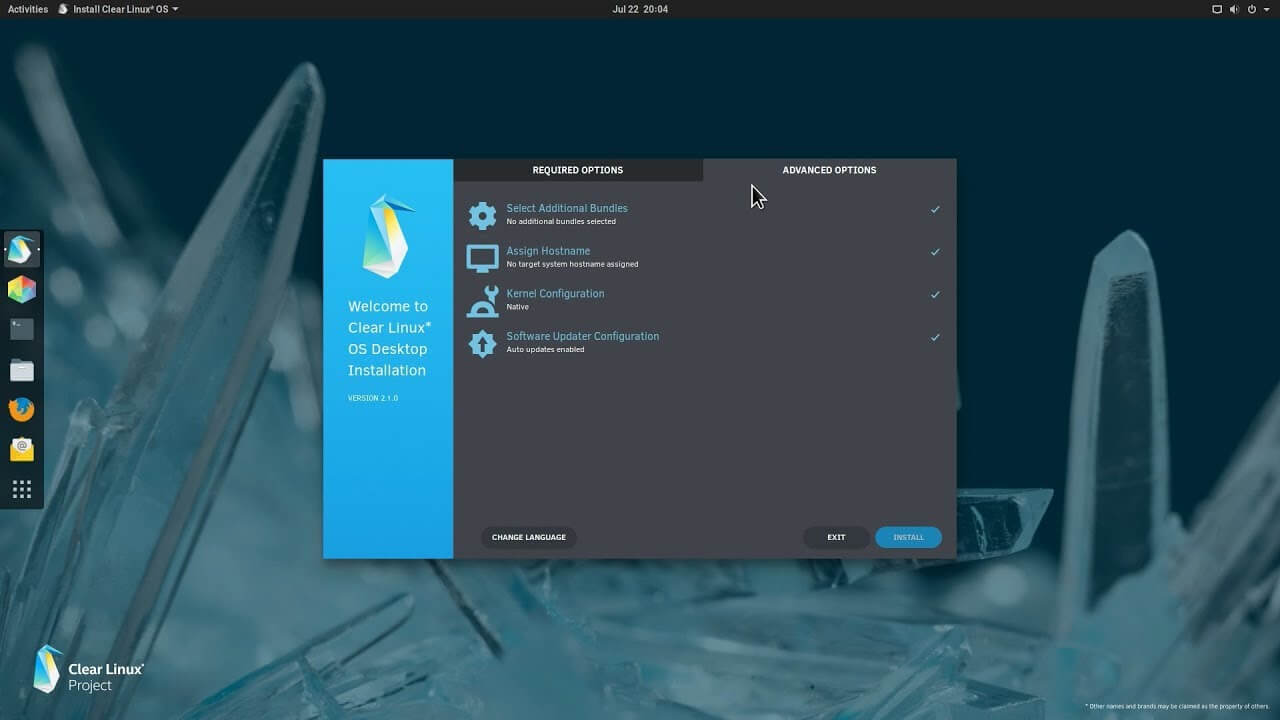
The Clear Linux Project creates an operating system and software stack that offers highly optimized performance, security, versatility, and manageability. Clearly optimized for Intel CPUs and based on GNOME it will offer you incredible speeds if you are on Intel CPU. The big news, though, is that Clear Linux sports the shiny new Gnome 40. This is a fresher Gnome than you'll find even on Ubuntu's more experimental 21.04 release. The only big names that let you test drive Gnome 40 are Fedora and Arch Linux.

Packages only when you need them

Installation of packages is used by Swupd, a Clear Linux* package management tool. It is easy to use and pretty straightforward.
  • "bundle-list" for showing what's installed
  • "bundle-info" for details on installed bundles (such as owned files via the "‑‑files" flag)
  • "search" for repository searching
  • "bundle-add" for installation
  • "bundle-remove" for uninstallation
The only problem here is the packages themselves. Clean Linux* has been imagined as a developer distro focusing mostly on well-development tolls. In intel’s words: “A Linux OS built for Linux developers”, so some things will be left out. Strangely enough some things as FFmpeg which if you want to have and blast some youtube videos while you work will have to complete manually by yourself.

Clear Linux* modular philosophy

Everything in Clear Linux* is based on a modular philosophy approach. There is no /etc/fstab file, the /boot directory is totally empty. Every partition to be mounted is enabled as a systemd "mount unit." Intel reaping the benefits of systemd's modular philosophy, where everything is a unit. If you know your way around systemd, intermediate-level configuration tasks should be straightforward. Any advanced configuration likely demands deep systemd knowledge.

Clear Linux* performance

As stated earlier this is Intel’s distro, optimized for Intel hardware meaning that Intel as the developer has every possible tool at its disposal to make use of hardware to its maximum potential and it shows. Distro almost leaves other ones two times in speed performance. So if you are looking for a distribution that will deliver you speed and it is aimed for developer Clear Linux* is for you.

Conclusion

Clear Linux* is a really interesting distro and seeing how Intel is adding new software packages on its official website it might have a bright future. But as always, be the judge for yourself and see if it can fit your needs. Go get it at: https://clearlinux.org/
Read More
Repair Windows 10 Error Code 0xC1900208, 0x4000C

Repair Windows 10 Error Code 0xC1900208, 0x4000C

Code 0xC1900208 0x4000C, What is it?

The Error Code 0xC1900208 – 0x4000C is an error that is caused by an installed application or program on your computer that is not compatible with Microsoft Windows 10. The incompatible application prevents you from being able to complete the upgrade to Microsoft Windows 10 and will continue to do so until the issue is resolved. Common symptoms include:
  • You receive a dialog box displaying Error Code 0xC1900208 – 0x4000C
  • You are unable to successfully complete the Microsoft Windows 10 upgrade process.

Solution

Restoro box imageError Causes

Error Code 0xC1900208 – 0x4000C is caused by a non-compatible application or program that is currently installed on your computer, and is not allowing the Microsoft Windows 10 upgrade to finish the installation and update process.
  • The upgrade is stopped due to an incompatible app or program.
  • Out of date or no longer supported software can cause this error to occur.
  • Device drivers that are not up to date or no longer compatible.
  • The computer might pick up malware along the way and might be preventing the upgrade. If error code 0xC1900208 – 0x4000C is not rectified, you’ll not be able to proceed with your Windows 10 upgrade.

Further Information and Manual Repair

The good news is, error code 0xC1900208 – 0x4000C is a relatively common problem that is usually easily fixed by the user at home, though it can be a little time-consuming. To elude this time-consuming process, use a powerful tool to rectify the issue in no time (TSC). Before making any attempts to repair this error, ensure to perform a compatibility test.
  • Check the compatibility of applications and programs installed on your computer to locate and remove, or fix the one that is incompatible. (Don't stop at the first one you find, there could be multiple incompatibility issues.)
  • Check to ensure all programs and software are not outdated or no longer supported, and remove or fix any outdated or unused, unnecessary programs or software. (This is also a great way to free up space and clean your computer up a bit.)
  • Check to ensure that all of your device drivers are current, up to date, and compatible with Microsoft Windows 10, and replace or update where necessary.

Method 1:

Use the get Microsoft Windows 10 application on your computer to check its compatibility, follow the steps below to run the check.
  1. Look at the taskbar, to the right; you will see an icon for Microsoft Windows 10, right-click the icon. Locate the option in the menu to check the status of your upgrade. This will open an app for getting Microsoft Windows 10.
  2. Next, you will see 3 lines on top of one another on the upper left side, this will open a drop-down menu, once you have this menu open, locate the option to check the compatibility of your computer.
  3. Microsoft Windows will then run a check of your entire computer to check for compatibility with Microsoft Windows 10. Once it has finished its check, a pop-up window will display whether or not your computer will work with Microsoft Windows 10, and will also display a list of any hardware and software that are not compatible with the upgrade.
  4. This may not catch everything and there may still be incompatible programs so the previous steps, though time-consuming may still be necessary.

Method 2:

Once the incompatible applications are discovered, use the control panel to remove/uninstall them. The steps are below:
  1. Locate your computer’s Control Panel.
  2. Choose the option that says “Programs”
  3. From the options available, select the ‘Programs and Features’ link.
  4. Locate the app in the queue or menu.
  5. Right-click and choose the uninstall option.
… another option
You can also locate the app on the ‘app homepage’, right-click and choose the ‘uninstall’ option. If after following these steps the problem is still not corrected, download and install an automated tool for a quick fix.
Read More
How to Resolve Dsound.dll Error Code

Patch Dsound.dll Error

Dsound.dll Error Code - What is it?

Dsound.dll is a type of Dynamic Link Library. This is one of the many files that are associated with DirectX software. And DirectX software is used by most Windows-based games. Dsound.dll contains small programs that help run and load Windows-based games on your system. The Dsound.dll error pops when Windows-based games are unable to load and run on the computer. The error code appears on the screen in one of the following formats:
  • "The file dsound.dll is missing"
  • "File dsound.dll not found"
  • "Dsound.dll not found. Reinstalling might help fix this."
  • "Dsound.DLL Not Found"

Solution

Restoro box imageError Causes

Dsound.dll error is generated due to multiple reasons. These include:
  • Corrupt, damaged, or missing Dsound.dll file
  • Malware infection
  • Outdated drivers
To play the games on your computer, it is important to fix the Dsound.dll error immediately.

Further Information and Manual Repair

To resolve Dsound.dll error at home on your own without hiring a professional and spending hundreds of dollars in repair, here are some methods you can try:

Method 1 - Restart Your PC to Resolve

Sometimes the error may be a fluke and can be resolved by simply restarting your PC. So, before you try other methods, it is recommended that you restart your system first. If it resolves the issue, then that’s great. If it doesn’t, then try other methods given below!

Method 2 - Reinstall the Deleted Dsound.dll File

Since DLL files are shared files, there is a possibility that while uninstalling a game on your PC, you might have accidentally deleted this file too. If so, check your recycle bin and search for the deleted file. If you locate it, simply restore it. But if you can’t, then download the Dsound.dll file from a reliable DLL website. Make sure that the site is authentic because the last thing you want is to download malware instead of a DLL file.

Method 3 - Update Driver for Your Video Card

If Dsound.dll error occurs because of outdated drivers, then update them to resolve. You can do this by using a driver update wizard from within Device Manager. The wizard will guide you through the process, making updates simple.

Method 4 - Remove Malware

Download a powerful antivirus to scan and remove malware from your system. A malware infection can trigger a Dsound.dll error too.

Method 5 - Uninstall the Game and then reinstall it again

Try uninstalling the game during which you experienced this error. Sometimes the error may pop because of improper game installation. Uninstall it and then reinstall it. Once you’ve reinstalled it, try accessing it again. If it is accessible, the error is resolved.

Method 6 - Repair the Registry

DLL errors are also related to the registry. These files can get damaged if the registry gets loaded with junk files and cookies. In such as situation clean and repair the registry. You can do this manually but it can be time-consuming and tricky if you are not technically sound. Therefore download Restoro. It is a powerful and user-friendly PC Fixer embedded with a registry cleaner. The registry cleaner scans and removes all junk files clean the registry and repairs damaged DLL files immediately. Click here to download Restoro and resolve error Dsound.dll today!
Read More
How to Fix Error 118

Repair Error 118

Error 118 - What is it?

Error 118 is a typical Google Chrome error. It pops up when Google Chrome fails to load websites like Facebook. It is usually displayed in the following format:
‘Error Message: Error 118 (net::ERR_CONNECTION_TIMED_OUT): The operation timed out.’

Solution

Restoro box imageError Causes

Error 118 may be triggered due to several reasons. This includes:
  • Problems with DNS setting
  • IP Address is filtering websites
  • Cookies and invalid registry entries

Further Information and Manual Repair

To ensure smooth internet browsing on Google Chrome, it is advisable to repair the error 118. If error 118 is not resolved you will be unable to load and access your desired websites. To avoid inconvenience and resolve the issue immediately, try the methods suggested below. These are easy and effective do-it-yourself methods that require no technical skills.

Method 1 - Change Proxy Settings

If your IP address is filtering websites, then you might experience error 118 while using Google Chrome. When this is the error cause, then it is advisable to add a proxy for your PC. To change proxy settings and add a new proxy, simply click on Customize and Control Google Chrome menu. Now click the options button. Under the Google Chrome Options window select the Under the Hood tab. After that in the Network, section click the change proxy settings button. Check Show Suggestions for navigation errors and Use DNS pre-fetching to improve page load performance boxes. Now under Internet Properties, click LAN Settings. Under LAN settings you will see the Proxy Server box, check it, and enter your new proxy settings. Click OK to confirm and save settings. This will hopefully resolve the issue.

Method 2 - Change to Google DNS

When the error is related to DNS settings then try this method to resolve it. Simply set DNS to use Google DNS. Here’s how it’s done:
  1. Go to the start menu, click Windows Control Panel, Network and Internet, and change adapter settings. Here you will see Local Area Connection.
  2. Right click to select properties at the bottom.
  3. Check Internet Protocol Version 4 and click properties.
  4. Now check the ‘Obtain an IP address automatically’ box and also select the option that says ‘Use the following DNS server addresses’.
  5. Change Preferred DNS to 8.8.4.4 and Alternate DNS server to 8.8.8.8 now click OK to confirm.

Method 3 - Remove the Bad Entries and Cookies Damaging the Registry

Bad entries and cookies saved in the registry can also trigger error 118. To fix the issue immediately download Restoro. This is PC Fixer with multiple utilities including a registry cleaner. The registry cleaner removes all bad entries and cookies in seconds and repairs the damaged registry. Click here to download Restoro and resolve error 118.
Read More
Guide to Correcting Error Code 46

Guide for Solving Error Code 46

Error Code 46 – What is it?

Error Code 46 is a device driver error that occurs when Windows fails to access the connected peripheral device to the computer as Windows is in a process of shutting down.

Users experience this error on any Windows 2000 and later operating system versions and usually see a pop-up with the following message:

“Windows cannot gain access to this hardware device because the operating system is in the process of shutting down. (Code 46)”

Solution

driverfix boxError Causes

Error Code 46 is caused when there is a temporary problem with windows system files which prompts that the system is undergoing a shut down when in fact is it not.

This prevents access to the connected devices. This error may also be caused by a registry issue in which case it has either become corrupted or damaged.

Further Information and Manual Repair

Unlike all other Windows error codes, code 46 is relatively easy to fix with the right knowledge and does not pose any serious threat to the well-being of your PC. Here is how you can do it.

Method 1 – Restart your PC

The simplest method to resolve Error Code 46 is to run a restart of your computer.

The error is most commonly a temporary registry glitch that prevents you from accessing the device connected to your computer. Upon restarting your computer, it will resume working properly as before.

There is no need to run a troubleshooting wizard, use system restore, or run anti-virus software to scan and remove malware or spyware. A simple restart is all that is needed.

Method 2 – Install DriverFIX

Although the error code can be resolved upon restarting the computer, there’s a possibility of damaged or corrupted Windows registry files. This can be fixed by using a program like DriverFIX.

DriverFIX, with its user-friendly approach to help you fix your PC issues, comes with an integrated database that detects which drivers you need to reconfigure within just a few seconds and downloads it automatically.

It further ensures that your drivers are installed in their entirety leaving no room for any corrupted or damaged registry.

Error Code 46 may not be much of an issue, however, to prevent any risk of a Windows system corruption can be disastrous for your computer.

DriverFIX helps you fix your PC registry and device driver problems with user-friendly software and an integrated database. The database which consists of detailed information on what device driver needs to be installed will automatically download the required device driver without you need to refer to your hardware instruction manual.

Registry problems resulting from incomplete program installations and viruses such as malware and spyware damaged registry files. This affects your PC in serious ways.

DriverFIX further has an automatic backup and restoration system that helps create system ‘checkpoints’ which allow you to roll back to a healthier state and resume operations. This can help you avert any Windows error codes in the future.

Click here to download DriverFIX now!

Read More
Intel’s GPU ARC coming aimed at AMD & Nvidia
intel ARC
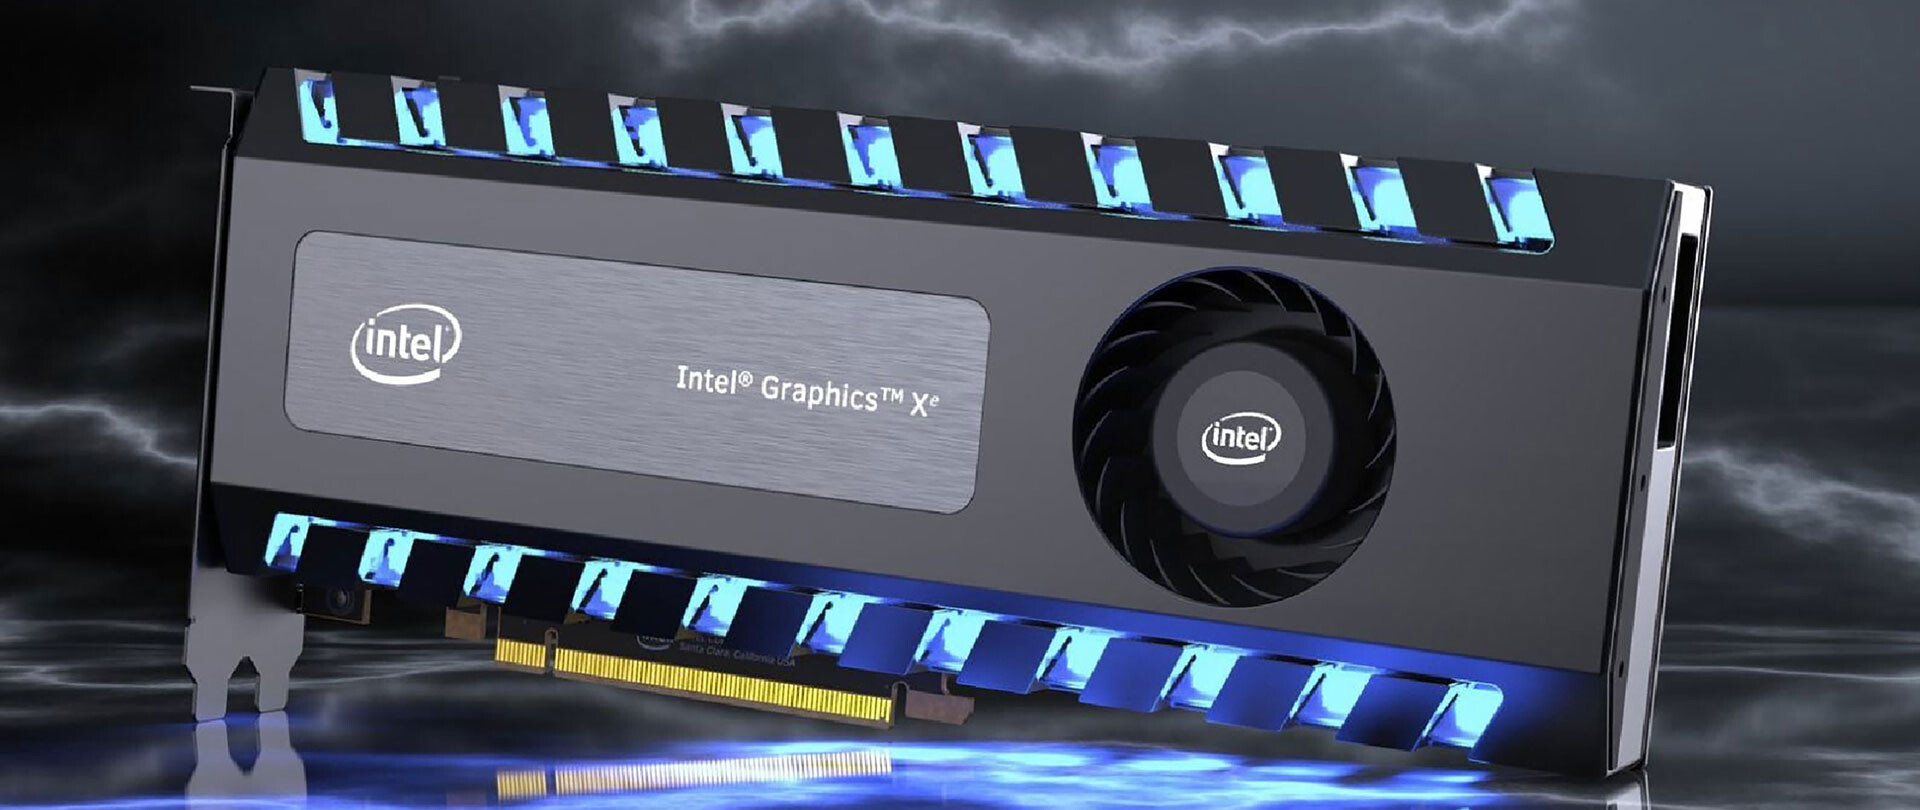
This is not the first time that Intel is trying to enter the GPU field but its adventures so far were, well let us agree not so good. All of that is hoping to be changed with the upcoming ARC GPU. The first generation of Arc graphics, code-named Alchemist and previously known as DG2, will support desktop PCs and laptops and is set to arrive in the first quarter of 2022. Alchemist will have hardware-based Ray tracing and AI-driven supersampling. This indicates that GPU is aimed to compete in the Hi-end spectrum and battle side by side with Nvidia and AMD on the market. Alchemist will also pack full DirectX 12 Ultimate support. Intel also released names for the next upcoming future generations of ARC GPUs: Battlemage, Celestial & Druid. More information about ARC products will be released later this year. “Today marks a key moment in the graphics journey we started just a few years ago. The launch of the Intel Arc brand and the reveal of future hardware generations signifies Intel’s deep and continued commitment to gamers and creators everywhere,” Roger Chandler, Intel vice president, and general manager of client graphics products and solutions.
Read More
How to Fix Failed to load DLL file Error
If your operating system cannot or is not able to load a required DLL file on your Windows startup and you encounter a message saying, “Failed to load DLL”, then you’ve come to the right place as this post will guide you in fixing this problem. When you encounter this kind of issue, you will see either of the following error messages on your screen:
“The dynamic library dll failed to load.” “Failed to load dll library.”
This kind of error can occur when your Windows operating system fails to locate the DLL library which the system needs to access during startup. It can also occur when the DLL file is not in a directory specified in the path or when the DLL file is corrupted or has gone missing. Moreover, you can also encounter this error if the DLL file is infected with some malware. Whatever the case is, here are some suggestions you have to check out to resolve the problem.

Option 1 – Try to reinstall the program

The first thing you can do is to reinstall the program that’s giving you this error. Once you’ve uninstalled the program, download its latest setup file from its official site and then install it again.

Option 2 – Try checking the startup programs

You might also want to check the startup programs on your computer, especially the Windows Registry startup paths, and then remove the startup entry to the concerned DLL file.

Option 3 – Try to re-register the problematic DLL file

You may have to re-register the ntdll.dll file using the regsvr32.exe before you can successfully install the program and fix the ntdll.dll file crash error. The Regsvr32 tool is a command-line utility that can be used to register and unregister OLE controls like DLL and ActiveX (OCX) control in the Windows operating system. Follow the steps below to use it.
  • Open Command Prompt as admin from the WinX menu.
  • Next, type the following commands in the elevated Command Prompt and hit Enter to execute the command. This will re-register the affected DLL file using the Windows operating system tool, regsvr32.exe.
    • exe /[DLL file]
    • exe [DLL file]
Note: Replace “[DLL file]” with the name of the DLL file that was pointed out in the error.
  • After you execute the given commands, you should see a message saying, “DllRegisterServer in vbscript.dll succeeded” if the Regsvr32 tool was able to run successfully. After that, try to install the program again and see if it now works.

Option 4 – Try to replace the DLL file with a trusted source

  • First, you need to get the new DLL file from another computer with preferably the same file version number.
  • After that, you need to boot your PC into Safe Mode and navigate to the paths listed below and then replace the file using a USB drive or other external storage devices.
    • x86: This PC > C:/Windows/System32
    • x64: This PC > C:/Windows/SysWOW64
  • Next, type “cmd” in the Cortana search box and right-click on Command Prompt, and select “Run as administrator” to open it with administrator privileges.
  • Now type the “regsvr32 ntdll.dll” command and hit Enter.
  • Restart your PC and check if the error is now fixed.

Option 5 – Try checking the details in the Event Viewer

Checking the details in the Event Viewer can also help you find out the root cause of the problem as the Event Viewer usually contains detailed information about the error.

Option 6 – Try running the DISM tool

You might want to repair potentially corrupted files in your system as having them could also trigger the “Failed to load DLL” error. To repair these corrupted system files, you can run the DISM commands:
  • Tap the Win + X keys and click on the “Command Prompt (Admin)” option.
  • After that, input each one of the commands listed below sequentially to execute them:
    • Dism /Online /Cleanup-Image /CheckHealth
    • Dism /Online /Cleanup-Image /ScanHealth
    • Dism /Online /Cleanup-Image /RestoreHealth
  • Once you’ve executed the commands given above, restart your computer and check if the “Failed to load DLL” error is now fixed.

Option 7 – Try scanning your computer using Windows Defender

The DLL file might also be infected with malware or virus and to eliminate it which could explain why you’re getting the “Failed to load DLL” error. Thus, you have to scan your computer using security programs like Windows Defender.
  • Tap the Win + I keys to open Update & Security.
  • Then click on the Windows Security option and open Windows Defender Security Center.
  • Next, click on Virus & threat protection > Run a new advanced scan.
  • Now make sure that Full Scan is selected from the menu and then click the Scan Now button to get started.
Read More
Fix UNEXPECTED STORE EXCEPTION in Windows 10
Blue Screen of Death or Stop errors are definitely one of the most difficult issues to face in your Windows computer. One of them is the UNEXPECTED STORE EXCEPTION BSOD error. When you encounter this Stop error on your Windows 10 computer, this means that the store component has caught an unexpected exception. There are many potential causes for this error, but we’ve narrowed it down to a few specific causes – for one, this error could be caused by your antivirus program installed on your computer, two, it could also be caused by outdated hardware drivers on your computer, it could also be an error in the file system as well as some issue with the lock screen app, or even output to an unexpected port. Whichever the cause may be, you can use a couple of fixes laid out below. Make sure to carefully follow them.

Option 1 – Try to update your Display driver

  • First, boot your computer into Safe Mode.
  • After that, tap the Win + R keys to launch Run.
  • Type in devmgmt.msc into the box and tap Enter or click OK to open the Device Manager.
  • After that, a list of device drivers will be displayed. From there, look for the Display Adapters and click on them.
  • After that, right-click on each entry under the Display Adapters and select the “Uninstall Device” option from the menu.
  • Now restart your computer.
  • After restarting your computer, go to the Settings app and Check for Updates in the Windows Update section.
Note: You also have the option to go directly to the website of your graphics card manufacturers like NVIDIA, Intel, or AMD and go to the section called Drivers then check if there’s a new available update – if there is, download and install it.

Option 2 – Run both the System File Checker scan and DISM tool

If the problem is caused by corrupted system files, then you can use both the System File Checker and the DISM tool. To use them, follow the instructions below.
  • Tap the Win + X keys or right-click on the Start button and click the “Command Prompt (Admin)” option. Alternatively, you can also search for “cmd” in the Cortana search box and right-click on Command Prompt from the search results, and select the “Run as administrator” option.
  • After that, if a User Account Control prompt pops up, click on Yes to proceed.
  • Once the Command Prompt window is pulled up, type the following command and hit Enter:
DISM.exe /Online /Cleanup-image /Restorehealth
  • Wait for the process to be completed. Once it’s done, type the following command and hit Enter:
sfc /scannow
  • The command will start a system scan which will take a few whiles before it finishes. Once it’s done, you could get the following results:
  1. Windows Resource Protection did not find any integrity violations.
  2. Windows Resource Protection found corrupt files and successfully repaired them.
  3. Windows Resource Protection found corrupt files but was unable to fix some of them.
  • Restart your PC.
Note: You should see the “Windows Resource Protection found corrupt files and successfully repaired them. Details are included in the CBS.Log %WinDir%LogsCBSCBS.log” message on your screen. On the other hand, if you see the “Windows Resource Protection found corrupt files but was unable to fix some of them. Details are included in the CBS.Log %WinDir%LogsCBSCBS.log” message instead, then you should run the following command in Command Prompt:
findstr /c:"[SR]" %windir%LogsCBSCBS.log >"%userprofile%Desktopsfclogs.txt"
The command you entered will open up the logs on your Desktop where you can look for files that are causing the error on your computer manually.

Option 3 – Disable Fast Start-up

If you want your computer to boot faster, then you might have enabled Fast Start-up. This feature is ideal for computers that are using a hard disk drive. However, turning on this feature also means that when the computer boots, it might lag some drivers that are loaded when it initially boots up. Thus, it might be the potential cause of the UNEXPECTED STORE EXCEPTION BSOD error. Thus, you need to disable Fast Start-up. To do that, follow these steps:
  • Boot your PC into Safe Mode.
  • Then tap the Win + R keys to open the Run dialog box.
  • Next, type in “control” to open Control Panel.
  • After that, select Hardware and Sound and click on Power Options.
  • Select “Choose what the power buttons do” from the left side menu pane and click on Change settings that are currently unavailable.
  • Afterward, uncheck the “Turn on fast startup (Recommended)” entry and click on Save Changes.
  • Now restart your PC for the changes to take effect and then check if the problem’s fixed afterward.

Option 4 – Try to run the Chkdsk utility

You can also run the Chkdsk utility to resolve the UNEXPECTED STORE EXCEPTION BSOD error. If your hard drive has issues with integrity, the update will really fail as the system will think that it’s not healthy and that’s where the Chkdsk utility comes in. The Chkdsk utility repairs hard drive errors that might be causing the problem.
  • Open Command Prompt with admin privileges.
  • After opening Command Prompt, execute the following command and hit Enter:
chkdsk /f /r
  • Wait for the process to be completed and then restart your computer.
Read More
Parallels Desktop 17 brings Windows 11 to MAC
Parallels Desktop 17
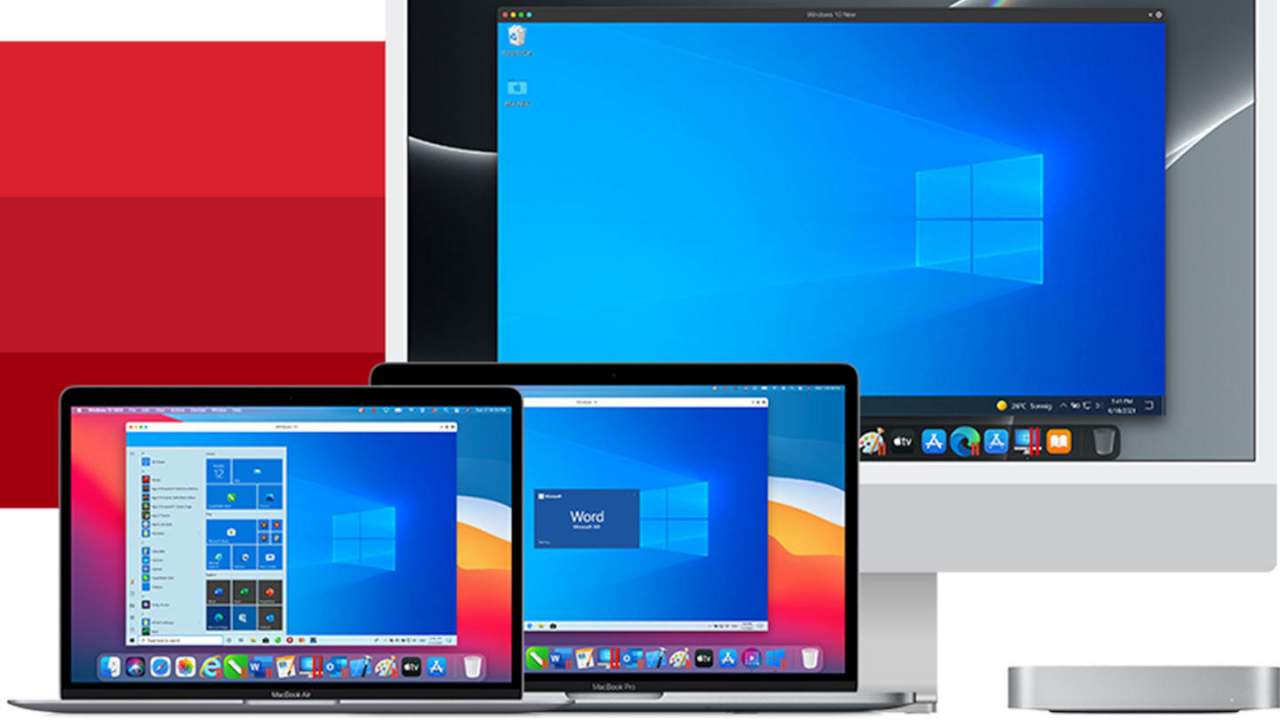
Parallels is an application developer for MAC OS mostly known for its PC virtualization software Parallels Desktop, a PC virtualization software running on Macs enabling running Windows and Linux with respective software on your MAC. With its latest Desktop 17 version, the software can run natively on both Intel-based and M1-based MACs. Thanks to this feature MAC users will be able to benefit from various speed improvements while running both Windows 10 or Windows 11 preview. On both Intel and M1 setups, Parallels resumes Windows and Linux up to 38% faster, provides an up to 25% bump in 2D graphics and a six-time increase in OpenGL graphics processing. M1-centric stats include 33% faster Windows start-up times, up to 28% faster DirectX 11 performance, and up to 20% better disk performance on Windows 10 Insider Preview. Parallels Desktop 17 delivers a set of fresh features including a new video driver that enhances video and game playback and boosts Windows UI responsiveness. An improved Coherence mode lets users run Windows apps within the Mac environment, cutting down on distracting changes in appearance during Windows sign-in, shut down, and software updates. Drag-and-drop operations are also improved, with support for text and graphics between Mac and Windows applications. This function works well with MAC OS Monterey's Quick Note feature, which can accept content from any Windows app. USB support, disk management, copy and paste unformatted text, and automatic virtual machine optimization also receive upgrades.
Read More
How to see your Wi-Fi password in Windows 11
Each time you connect to a Wi-Fi network your PC saves that network password. If for any reason you need to see this password or passwords there are ways you can do it and we are here to show you how. Wi-Fi passwordHello and welcome to error tools where we aim to help you with all of your Windows problems and issues, where we offer our insight on various topics and sometimes go offroad and write something crazy. This time we will offer you a way on how to easily and quickly see how can you find out your memorized Wi-Fi password.

Find your W-Fi password

  1. Make sure that you are connected to the Wi-Fi network you wish to find out the password of
  2. Open Windows Settings app by pressing ⊞ WINDOWS + I
  3. On the left side choose Network & Internet and click on it
  4. Click on Advanced Network Settings
  5. Inside Advanced Network Settings go to Related Settings
  6. Select More Network Adapted Options
  7. Right-click on your adapter and select Status
  8. Click on Wireless Properties
  9. Click on the Security tab
  10. Click on enable on Show Character box beneath Network Security key to reveal Wi-Fi password
Read More
1 2 3 162
Logo
Copyright © 2022, ErrorTools. All Rights Reserved
Trademarks: Microsoft Windows logos are registered trademarks of Microsoft. Disclaimer: ErrorTools.com is not affiliated with Microsoft, nor claim direct affiliation.
The information on this page is provided for information purposes only.
DMCA.com Protection Status