If an error suddenly pops up that states, “A problem prevented the document from being scanned” when you’re scanning a document in your computer, then you’ve come to the right place as this post will guide you on how exactly you can fix the problem.
A lot of users have reported that they receive a two-layer error message when they try to scan their documents – the first screen throws an error message that says, “Error applying Settings to Driver” while the next error message states, “A problem prevented the document from being scanned”. As a result, the scanning won’t be completed which defeats the whole process of buying a printer with a scanner. As you can see the two error messages point to two different situations, while the other one is pointing at the driver, the second one points to the scanning problem. To resolve these issues, there are several suggestions you need to check such as follows:
One of the first basic troubleshooting you can perform to resolve the printer issue is running the Printer Troubleshooter. This built-in troubleshooter can detect and automatically fix the problem for you. To use it, follow these steps:
You might also want to try updating your printer drivers. All you have to do is locate the USB Composite Device. For complete details, follow the steps below.
Note: You also have the option to download the latest version of your Printer from the manufacturer’s website.
If none of the two options given above worked, you can try to either reset the printer settings or reinstall the printer so that it can go back to its default state. However, if it doesn’t work, you can try to uninstall the printer as well as its related drivers. To do so, follow these steps:
In case you don’t know, Windows has Registry settings for the Still Image devices like Scanners and Printers. And these devices have vendor-specific settings that if ended up getting corrupted or misconfigured then you will most likely encounter errors like “A problem prevented the document from being scanned”. Thus, to fix this error, you can try modifying the Still Image devices registry settings, and to do that, you need to follow the instructions below but before that, make sure that you create a System Restore Point first.

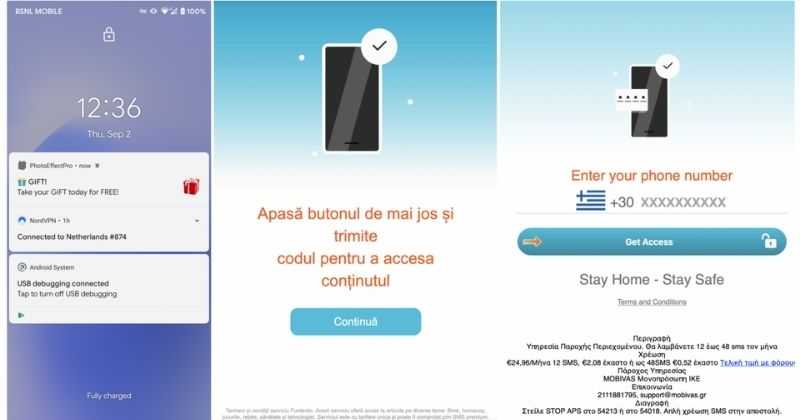 According to Zimperium zLabs, this malware that was recently detected has been doing its scams and attacks even in November of 2020 and has thus far accumulated hundreds of thousands of dollars in its scam.
On the surface it looks very harmless, asking for typical permissions like internet access, calls, and other related needed functions, and then it waits. After few months the real attack happens when users get charged with premium service they never subscribed to in the first place.
According to Zimperium zLabs, this malware that was recently detected has been doing its scams and attacks even in November of 2020 and has thus far accumulated hundreds of thousands of dollars in its scam.
On the surface it looks very harmless, asking for typical permissions like internet access, calls, and other related needed functions, and then it waits. After few months the real attack happens when users get charged with premium service they never subscribed to in the first place.

“The remote computer that you are trying to connect to requires network level authentication (NLA), but your windows domain controller cannot be contacted to perform NLA. If you are an administrator on the remote computer, you can disable NLA by using the options on the Remote tab of the System Properties dialog box.”Or you could also see this error message instead:
“The remote computer requires Network Level Authentication, which your computer does not support. For assistance, contact your system administrator or technical support.”Before you proceed in troubleshooting the problem using the options provided below, you need to create a backup for your data or system restore point as well as make a copy of any registry entries you are going to modify.
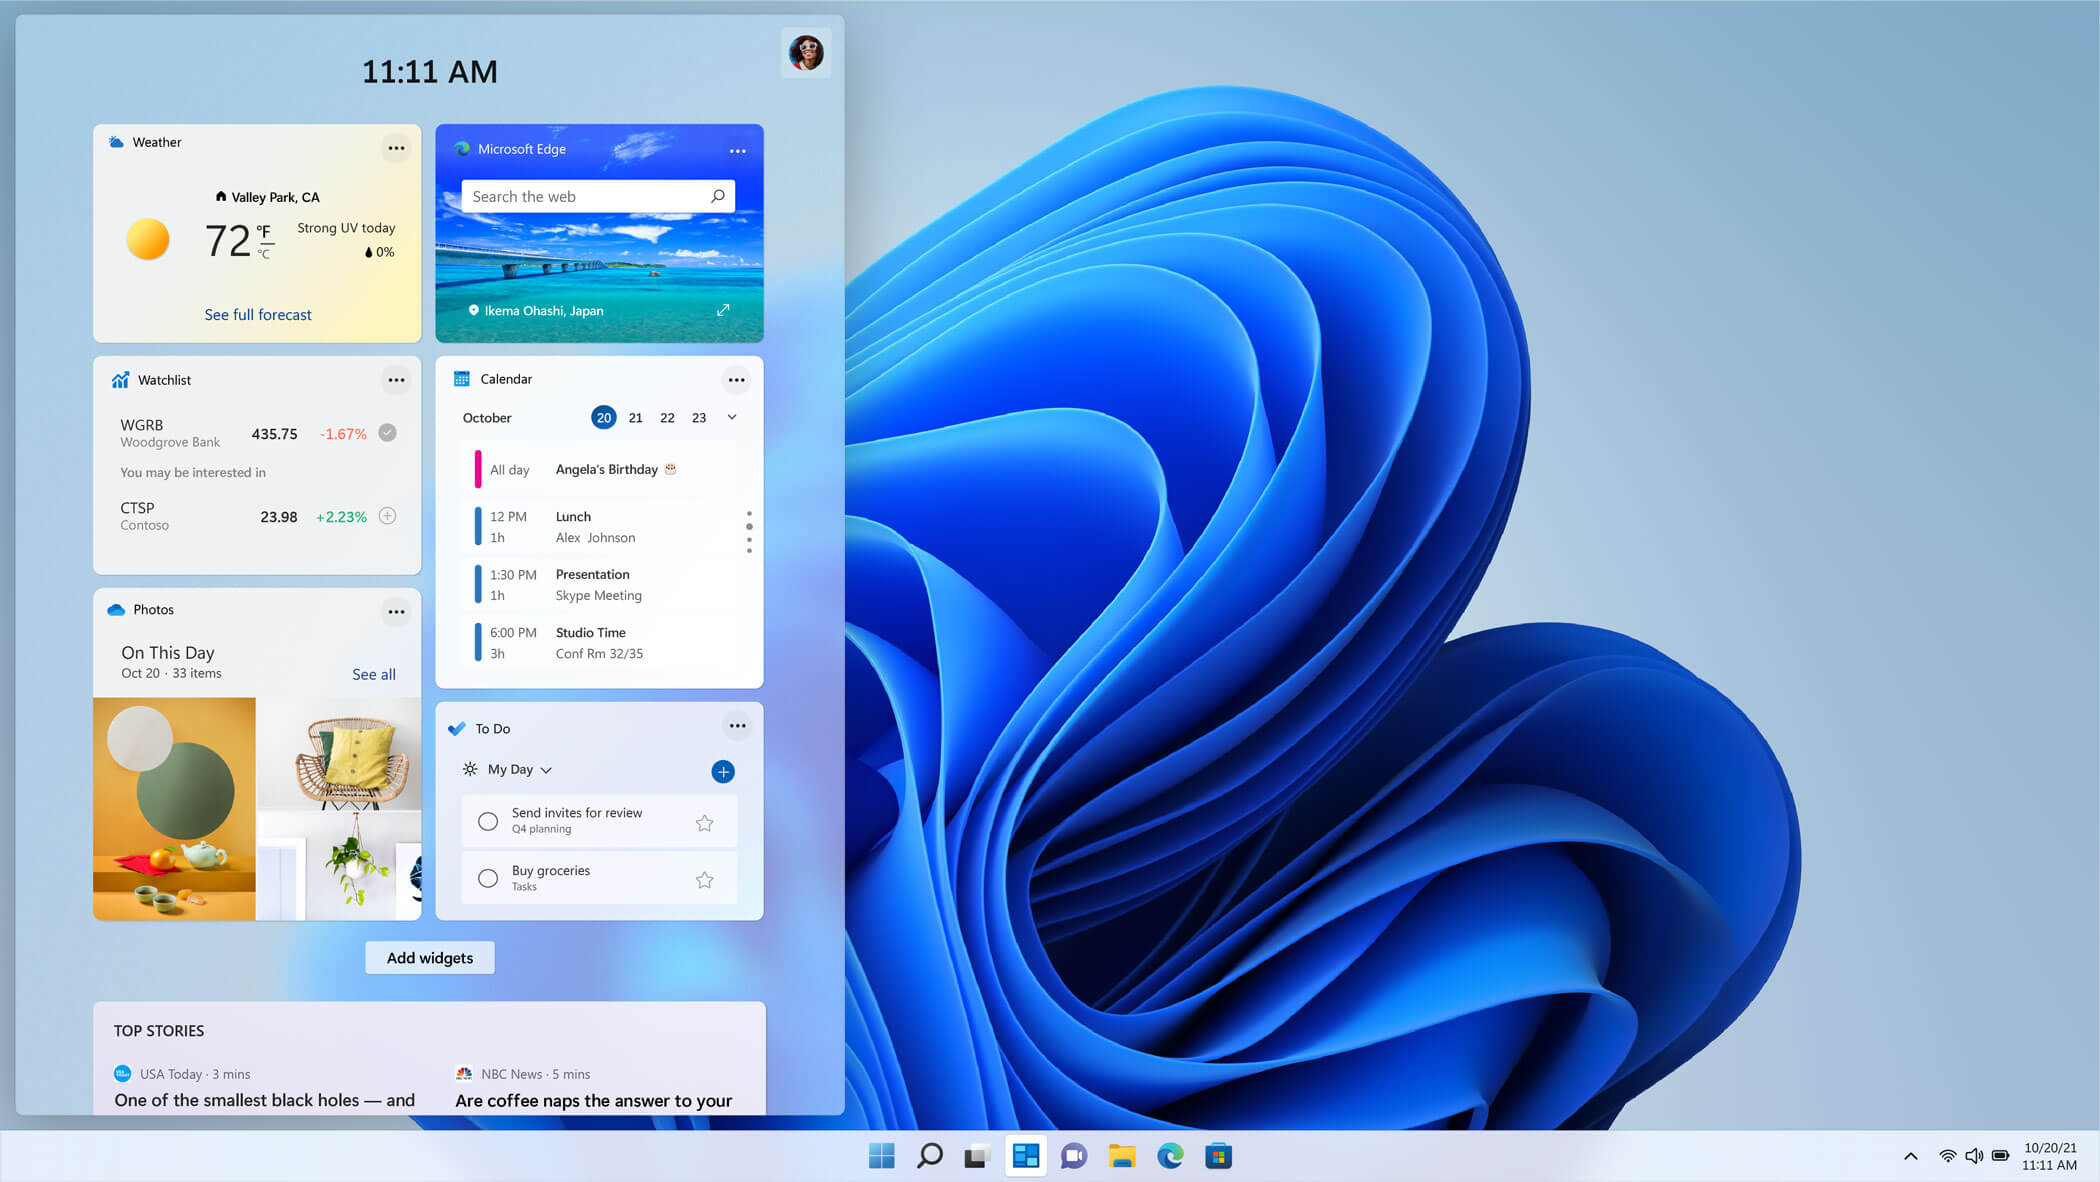 The new widget's menu inside Windows 11 is generally met with a positive attitude but there are still users which prefer not to have it. Luckily for them, Microsoft included a very easy way to turn the widgets menu on or off. Follow this easy guide to see how.
Right-click on the widget button in the taskbar and click on Hide from Taskbar and that’s it
Alternatively, you can also turn it off via the setting app.
Go to the settings app and navigate to Personalization > Taskbar > Taskbar Items and flipping the switch beside Widgets to Off.
Please note that both methods will only hide the button to toggle widgets menu, at the current state there is no really a way to actually turn it off, only hide it and make it not available to bring it up.
The new widget's menu inside Windows 11 is generally met with a positive attitude but there are still users which prefer not to have it. Luckily for them, Microsoft included a very easy way to turn the widgets menu on or off. Follow this easy guide to see how.
Right-click on the widget button in the taskbar and click on Hide from Taskbar and that’s it
Alternatively, you can also turn it off via the setting app.
Go to the settings app and navigate to Personalization > Taskbar > Taskbar Items and flipping the switch beside Widgets to Off.
Please note that both methods will only hide the button to toggle widgets menu, at the current state there is no really a way to actually turn it off, only hide it and make it not available to bring it up. Error Code 0x80070017 is an error code that is most often associated with Windows 10 installations, although it has also been encountered by users on previous versions of the Windows operating systems. It is usually encountered as users attempt to install a new version of the software on their machine.
Common symptoms include:
While it can be hard to tell what the exact cause of Error Code 0x80070017 is on your specific device, the good news is that there are two primary methods that can be used to fix the problem and to allow you to proceed with your installation. These two methods do require some degree of technical knowledge and/or skill, so if you don’t feel like you have the ability to undertake them on your own, be sure to get in touch with a trusted computer repair professional to assist you.
 Error Causes
If you purchased a physical disk version of the installation files for your Windows operating system, remove the disk from your drive and clean it using a microfiber or other lint-free cleaning cloth. As you wipe down the disk, do not use any chemicals, and be sure to wipe gently from the center towards the outside edge rather than the other direction, as failure to do so can damage the disk irreparably.
In some cases, you may need to contact Windows support if you believe that there is an error on the disk itself, such as a scratch, that would prevent the disk from being used as needed in the installation process. They may be able to offer you a replacement disk or you may be able to download a digital copy of the version that you are attempting to install on your machine.
To determine if there may be an error within the disk drive itself, place the installation disk into the drive and restart the system. Go through the prompts until you see the option to “repair your computer.” Choose the operating system that you are using, go into the menu for System Recovery, and type in the words “Chkdsk/r” to begin to use the tool.
Whenever you run a tool like Chkdsk on your computer, it is important to restart your machine afterward to ensure that any changes that have been made are able to be fully applied and accepted by the operating system that you are running.