An Easy Guide to Resolve Xpcom.dll Error

How to Fix Xpcom.dll Error

Xpcom.dll Error Code - What is it?

To understand the Xpcom.dll error better, first, you need to know what Xpcom.dll file is. Xpcom.dll is basically a typical DLL (Dynamic Link Library) file. It is associated with Firefox developed by Mozilla Foundation for the Windows Operating System.

DLL file contains small programs similar to exe (executable) files. Just like any other DLL file, Xpcom.dll helps loads and run programs smoothly. Xpcom.dll functions as a shared file that can be used to run multiple programs on your PC.

Xpcom.dll error code occurs when Windows cannot properly load the xpcom.dll file. The error may pop up on the screen in any one of the following formats:

  • "Xpcom.dll not found."
  • "The file xpcom.dll is missing."
  • "Cannot register xpcom.dll."
  • "Cannot find C:\Windows\System32\xpcom.dll."
  • "This application failed to start because xpcom.dll was not found. Re-installing the application may fix this problem."
  • "Xpcom.dll Access Violation."
  • "Cannot start Firefox. A required component is missing: xpcom.dll. Please install Firefox again."

The xpcom.dll error can occur during program installation or while rebooting your PC or when shutting it down.[/section]

Solution

Restoro box imageError Causes

It is difficult to narrow down a single cause of this error code simply because the Xpcom.dll error code may be triggered due to several reasons. Some of the common causes include:

  • Invalid or corrupt xpcom.dll registry entry
  • Viral infection
  • Outdated PC drivers
  • Another program overwrote the required version of xpcom.dll
  • Xpcom.dll file is accidentally deleted or uninstalled
  • Mozilla Foundation hardware failure

Further Information and Manual Repair

Here are the best, quick and easy DIY methods to resolve Xpcom.dll error code on your system within minutes:

Method 1: Update Window Drivers

To resolve the xpcom.dll error on your system, try updating Window drivers. To do this simply use the driver update wizard from within Device Manager.

The driver update wizard walks you through the entire drive update process, making it easy and hassle-free for you to update drivers.

Method 2: Download and Install Xpcom.dll File

Since DLL are shared files and used to run and load multiple programs, it is possible that you might have accidentally removed this file while uninstalling a program on your system. This is the reason why the Xpcom.dll file goes missing.

To retrieve the Xpcom.dll file simply go to the recycle bin. Reinstall the deleted program. However, if it still doesn’t resolve the error, then it is advisable to download and install the Xpcom.dll file from a trusted DLL file website over the internet.

Method 3: Scan for Viruses and Repair the Registry

If the error code occurs due to malware infection or is related to registry issues, then simply download Restoro. This is a user-friendly and multi-functional PC Fixer deployed with 6 scanners including a powerful antivirus and a registry cleaner.

It is compatible with all Windows versions. Simply run it to remove all types of viruses infecting your system and clean/repair the registry.

Click here to download Restoro and resolve the Xpcom.dll error on your PC.

If you like to learn and find out more about various Windows errors, and how to repair them go to our vast archive or use search to find articles that will explain and help you in solving your issue.
However, if you prefer to do things fast and with automatization then we are proposing to use an automated solution for your issues. The application that we are recommending is Advanced System Repair Pro
Advanced System Repair utilizes multiple tools all in one to give you a quick, simple, reliable, and very thorough diagnosis of your PC. It brings you all the tools you need in one program to clean, fix, protect, optimize and boost your PC!
1-Click Maintenance
All the tools to make it simple and easy! It's like having a professional technician at the click of a mouse.

Junk Cleaner
Keeping your computer free from unnecessary clutter also helps make your computer last longer. Like any other machine, if you keep it clean and take care of it, it will serve you better for longer!

Optimize background apps
Optimize applications background activity with the built-in Application Optimizer feature.

Disk Defrag
With a simple 1-click, Advanced System Repair speeds up your PC by assembling fragmented files on your machine and organizing them more efficiently.

Malware Removal
Finds and removes all types of harmful malware including trojans, worms, bots, adware, spyware, PUPs, and more!

Privacy Cleaner
The all-in-one privacy suite to Clean Your Tracks & Protect Your Privacy! Make your computer safe, secure, and more efficient!

System Tweak/Optimizer
ASR will analyze your complete system and settings to adjust your PC to function at its maximum performance.

Registry Cleaner
Over time, as you install and uninstall applications, the registry can become cluttered with old entries and broken settings which can result in program crashes, and annoying messages and slow the computer down.
Visit our Advanced System Repair Pro Download page to inform yourself about all the benefits of this software and get a free trial copy of it.
advanced system repair pro

Advanced System Repair Pro

One-click automated PC repair solution
ASR logo
With Advanced System Repair Pro you can easily
Replace damaged files
Restore performance
Free disk space
Remove Malware
Protects WEB browser
Remove Viruses
Stop PC freezing
DOWNLOAD
Privacy Policy | Terms of Use | Uinstall
Advanced System Repair Pro is compatible with all versions of Microsoft Windows including Windows 11

Share this article:

You might also like

How to Fix Windows 10 Error 0xc00000fd

How to Fix Windows 10 Error 0xc00000fd

Error Code 0xc00000fd - What is it?

In its most basic essence, Error Code 0xc00000fd appears when a program can not be initiated. It can occur when a file or program is corrupted, incompatible with the current version of the operating system, or out of date.

This error code occurs primarily in Windows but is also present in previous editions of the operating system. The symptoms of this error and the resolution methods for each of these systems are essentially resolved in the same way.

Common symptoms include:

  • Failure of programs to open properly, even if they were able to be opened in the past
  • The appearance of an error message stating that the application couldn’t be started correctly

There are several different things that Windows 10 users can do to try to fix the appearance of Error Code 0xc00000fd on their machine. Some of these methods are fairly simple for the average user, while others may require advanced knowledge and comfort with diving into the deeper tools and settings of the Windows operating system. If you have difficulty in implementing the methods below, contact a qualified Windows repair technician to assist you in the resolution of the error code.

Solution

Restoro box imageError Causes

Error Code 0xc00000fd can arise when program files are not recognized properly by the operating system, when the operating system is no longer compatible with the program being run, when files are missing or corrupted, or when the program has been changed in a substantial way. Each of these causes requires a different method of resolution.

Further Information and Manual Repair

Several methods can be used to attempt to resolve Error Code 0xc00000fd on your computer. Basic users can use some of these methods, while others require familiarity with advanced tools and options in Windows. If you have trouble implementing the steps below, contact a qualified professional to assist you. Here are the top ways to deal with Error Code 0xc00000fd on your machine:

Method One:  Check for Updates using the Windows Update Tool

In some cases, compatibility issues can be resolved through updates and patches available directly from Microsoft via the Windows Update tool. This is most likely the case if you have not kept up with regular updates on your machine over time. In your settings, open up the Windows Update tool and run a scan to see if there are any required updates available for your programs or for the operating system itself. If there are updates, install them, then reboot your computer to make sure that all updates are able to be fully applied to your operating system. Attempt to open the program that caused the error after you are finished to see if this method addressed the problem fully or if an additional method needs to be used.

Method Two:  Roll Back to an Earlier Version of the Updates

Sometimes, an update can cause a compatibility issue. If you have previously been able to open the program in question without any problems, but have recently installed an update on your computer, that update may have been the source of the problem. If this is the case, roll your system back to an earlier stage of updates to see if that fixes the problem. If so, you may need to wait to reinstall the updates until Microsoft corrects the issue.

Method Three:  Run Scans on Your Registry, Antivirus Software, Drivers, and Update Troubleshooters

If there truly is a corrupted or missing file within the program that you are trying to run, you can open up several tools to scan for the file that may be causing the trouble and attempt to fix it. Run the following tools to try to fix the problems:
  • Windows Registry Repair Tool (this particular tool may take some time to complete)
  • Windows Update Troubleshooting Wizard
  • Windows Drivers Updates
  • Antivirus software or Microsoft Security Essentials
After running each of these tools, restart your computer to allow any necessary changes to be applied to your system. If the above methods do not fix error Code 0xc00000fd on your particular device or if you do not have the confidence and knowledge to implement these steps on your own, get in touch with a Windows repair professional who can help you to resolve the problem.

Method 4: Use An Automated Tool

If you wish to always have at your disposal a utility tool to fix these Windows 10 and other related issues when they do arise, download and install a powerful automated tool.
Read More
Fix Windows Update Error 0xc1900403
Running the Windows Update service does not always go well as from time to time, you could encounter some errors when using it. One of these errors is the Windows Update Error 0xc1900403. In such cases, you will see the following error message under the Windows Update section:
“There were problems installing some updates, but we’ll try again later, If you keep seeing this and want to search the web or contact support for information, this may help – 0xc1900403”
The log files displayed in the error message may include, “0XC1900403 – MOSETUP_E_UA_CORRUPT_PAYLOAD_FILES”. This indicates that the payload files are corrupted which is why you’re getting the Windows Update Error 0xc1900403 and to fix it, you can try to restart your computer and install the updates again or reset the Windows Update-related folders. You could also run the Windows Update troubleshooter or use either the Standalone Installer or the Media Creation tool. For more details, refer to each one of the options provided below.

Option 1 – Restart your computer and try installing the Updates again

Restarting your computer can also help in fixing the Windows Update failed to install error 0x80240034. There are cases where the issue resolves on its own as it could just be some simple network or PC error.

Option 2 – Delete the contents in the Software Distribution folder and Catroot2 folder

  • Open the WinX Menu.
  • From there, open Command Prompt as admin.
  • Then type in the following command – don’t forget to hit Enter right after typing each one of them.
net stop wuauserv net start cryptSvc net start bits net start msiserver
  • After entering these commands, it will stop the Windows Update Service, Background Intelligent Transfer Service (BITS), Cryptographic, and the MSI Installer
  • Next, go to the C:/Windows/SoftwareDistribution folder and get rid of all the folders and files thereby tapping the Ctrl + A keys to select them all and then click on Delete. Note that if the files are in use, you won’t be able to delete them.
After resetting the SoftwareDistribution folder, you need to reset the Catroot2 folder to restart the services you just stopped. To do that, follow these steps:
  • Type each one of the following commands.
net start wuauserv net start cryptSvc net start bits net start msiserver
  • After that, exit Command Prompt and restart your computer, and then try to run Windows Update once more.

Option 3 – Try running the Windows Update troubleshooter

You might also want to run the Windows Update Troubleshooter as it could also help in fixing Windows Update Error 0xc1900403. To run it, go to Settings and then select Troubleshoot from the options. From there, click on Windows Update and then click the “Run the troubleshooter” button. After that, follow the next on-screen instructions and you should be good to go.

Option 4 – Try to use the Media Creation tool

The Media Creation tool in Windows allows you to use the ISO installation file to make a bootable device that you can use to install Windows on your PC. Note that this is kind of different from the usual installation process as it could erase your computer’s current settings and data on the primary drive. Thus, before you proceed, you need to backup all your data into some removable drive and then use the Media Creation Tool to make a bootable drive.
  • After making the bootable drive, you need to plug it into your computer and then reboot.
  • Next, tap the F10 or Esc key to open the boot options.
  • Now set the boot priority of the removable drive the highest. Once the setup comes forth, follow the next onscreen instructions and install Windows without any problems.
Read More
How to Fix Error 1321 on Your PC

Troubleshoot Error 1321

Error 1321 - What is it?

Error 1321 is a Windows PC error. This occurs when you try to install a Microsoft Office suite or program on your PC. The set-up program stops responding and the error message is displayed on the computer screen in the following format:
‘Error 1321. Setup cannot modify the file file_name. Verify that the file exists in your system and that you have sufficient permissions to update it.’
When this error occurs you cannot roll back the installation of the Office Suite or use the Add/Remove program option to remove the installed program.

Solution

Restoro box imageError Causes

Common causes of the occurrence of error 1321 are:
  • Encrypt contents to secure data settings are enabled on the folder in which you are trying to install the Office suite/ program.
  • PC infected by viruses
  • Bad Registry Entries

Further Information and Manual Repair

The good news is that this error code is not fatal and besides it is also easy to resolve. Here are some easy do it yourself methods for you to repair this error on your system in a few minutes:

Method 1: Disable Encrypt Contents to Secure Data

To resolve this error code, make sure the encrypted contents to secure data settings are not enabled. To do so, simply right-click the folder in which you want to install the MS Office Suite or program. Now click properties and then the General tab. Now go to the Advanced option. In the Advanced Attributes dialog box, make sure that the Encrypt contents to secure data check box under Compress or Encrypt Attributes is disabled. If it is not then un-check to disable.

Method 2: Remove Viruses

Viral infection can also trigger error 1321. If this is the reason, then simply install and run a powerful antivirus on your system. An antivirus detects all types of malicious viruses such as malware, adware, spyware, and Trojans. Remove them to resolve the issue.

Method 3: Download Restoro.

If the issue is related to bad registry entries, then it is advisable to download Restoro on your PC. This is a user-friendly and powerful PC Fixer deployed with a registry cleaner. The registry cleaner scans your entire PC and wipes away all the bad entries cluttering and damaging the registry in seconds. Click here to download Restoro and resolve error code 1321 today.
Read More
Valve Steam Deck is Compatible with Windows 11
Steam Deck
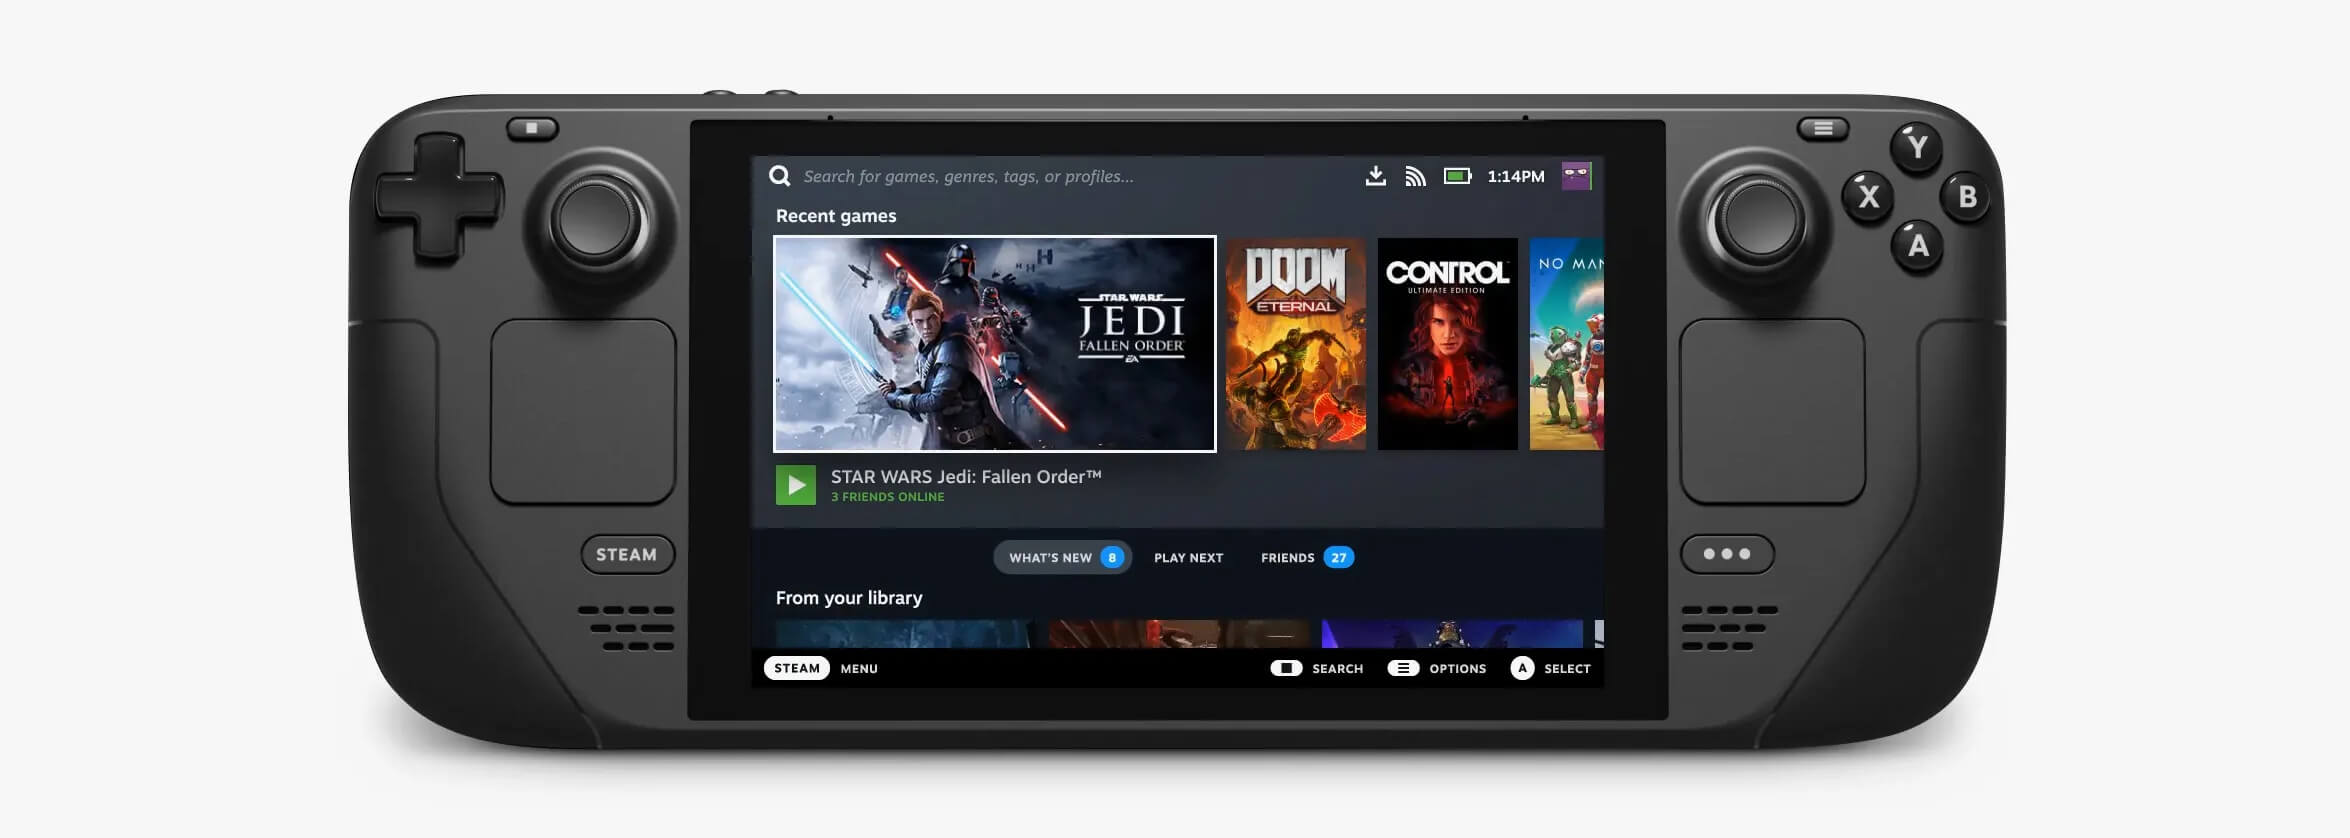
Valve has officially announced that Steam Deck will be compatible with Windows 11 despite TPM 2.0 Microsoft requirements. From the beginning, Deck was announced like a mini handheld PC device. Powered with new Steam OS 3.0 based on Linux. However, besides out-of-the-box OS it was also stated that Deck will be a personal device meaning that other PC-based operating systems could be installed on it and even run your typical applications in it. Since Microsoft announced Windows 11 hardware requirements, specifically the TPM 2.0 requirement many users voiced concern that Steam Deck will not be able to connect to Windows 11 TPM 2.0 is something that Microsoft requires for every internal and hardware component that is to connect on a Windows 11 device. This is to ensure that only trusted devices would be included in the array of a PC setup and avoid any problems like malicious hardware injecting software into a system. This would also minimize the compromise Windows would have, as unverified or untrusted devices connect to a Windows PC. However, Valve and AMD are ensuring us that Deck will not have any issue connecting to a PC running Windows 11 or even if you wish to transform Deck itself into a Device running Windows 11.
Read More
Razer Hazel, an RGB mask for max protection
Razer Hazel
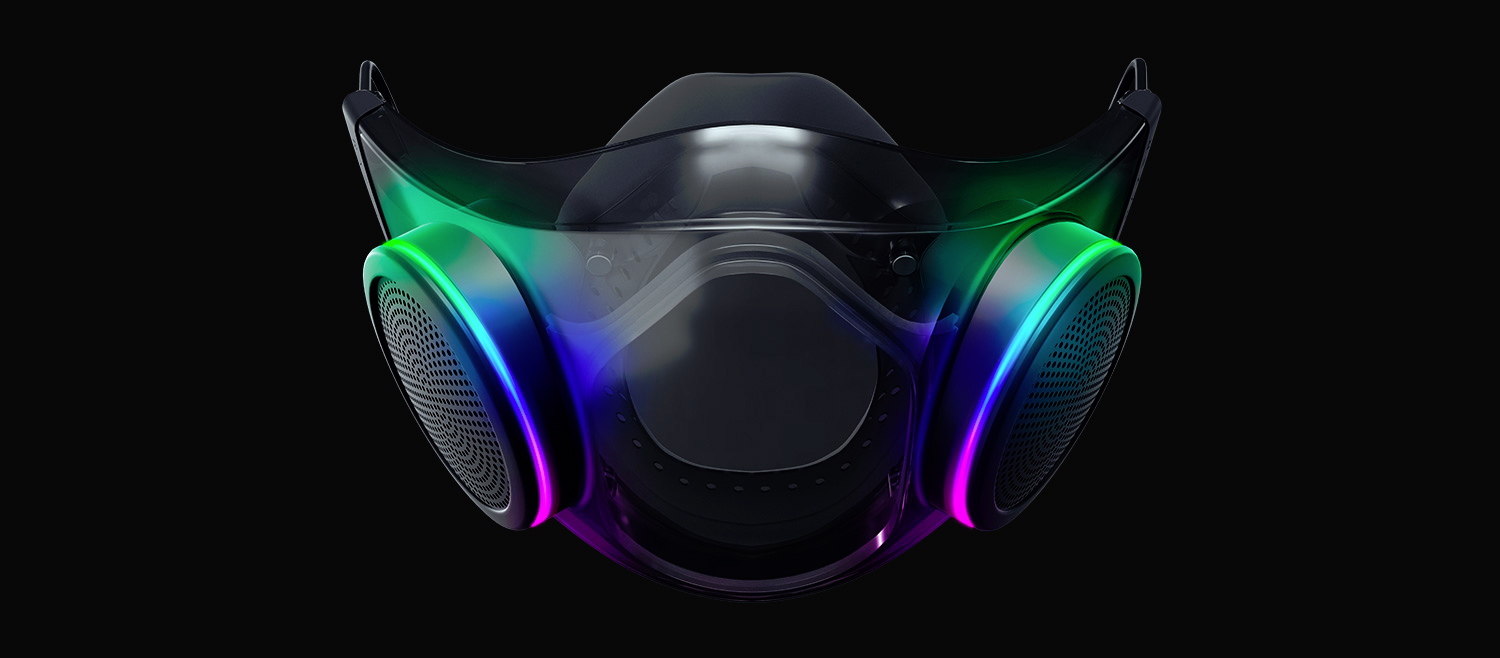
The world today is still sadly under pandemic and by the looks of it, COVID-19 is here to stay, well at least for some time in the near future. Razer seems to think so as well since their upcoming gear is not really what you would expect. Enter Hazel, a new and upcoming Razer smart mask.

Protection

Hazel mask has a high bacterial surgical N95 filter with fluid resistance that will protect you against large droplets and splashes. A detachable active ventilator regulates airflow and is capable of filtering around 95% of airborne particles. Mask comes with a special charging case that has an auto sterilization UV light that will kill bacteria and viruses inside the case interior while it charges. When the mask is recharging it will change color from red to green visually showing the level of the current charge. Mask of course has easy to replace filters inside ventilators and Razer is standing by that fully charged mask will last enough for full-day use. An active ventilation system brings cool air while releasing breathing heat at the same time drastically reducing CO2 inside the mask that could produce dizziness and headache. Silicon guard is on its edge gluing to around your face in order to prevent exterior air sneaking inside the mask and positioning it firmly so it does not rest on your lips in order for easier and clearer communication.

Hazel personalization and technical features

Hazel has a clear and transparent design making it better for social interaction since other people will be able to see your lips and smiles thus making it more natural. A low light mode that turns on automatically when it is dark outside is also aimed for easier communication. Speaking of communication, the mask comes with voice Amp technology that has a built-in mic and amplifier thus making your voice lines clear so you are not muffled when wearing the mask itself. Your friends and other people will be able to hear you like you are not wearing a mask at all. Thicker air loops apply less pressure on ears and can be adjusted for a more secure fit, while the mask itself can be custom-made to fit your face shape. And of course Hazel comes with 16.8 million colors and a suite of effects with Razer Chroma RBG
Read More
A Quick Guide to Fixing JavaScript Void 0 Error

Correct JavaScript Void 0 Error

JavaScript Void 0 Error - What is it?

JavaScript is a computer programming language used to make a website work smoothly with the internet. It helps to display visual effects, animations, and other web page functions. You may come across the JavaScript Void (0) error message when there is a problem in loading JavaScript from a web page or the internet browser.

Error Causes

JavaScript Void (0) error is triggered by multiple reasons such as:
  • It can be due to a simple random Windows application glitch.
  • You are visiting an unsafe website that contains malware
  • JavaScript’s web browser implementation  is broken due to poor program installation
  • Active X controls, Java applets, and active scripting, the key components of JavaScript are disabled
  • Registry issues like invalid or misconfigured registry keys

Further Information and Manual Repair

For JavaScript Void (0) error-free web surfing, it is advisable to repair the issue without any delays. Let’s take a look at different methods to resolve this error on your system.

Cause: Simple Random Glitch

Solution: If the cause for the JavaScript Void 0 error is a simple glitch, then it is advisable to restart your system and then run the program again.

Cause: JavaScript’s web browser implementation is broken

Solution: If you experience the JavaScript Void 0 error message after the installation of the new browser on your system, then poor installation of the program or program conflict is most likely to be the deep-rooted cause of this error code. To resolve it, uninstall the program and undo the recent changes.

Cause: Active X controls, Java applets, and active scripting, the key components of JavaScript are disabled

Solution: You should know that components including Active X controls, Java applets, and active scripting are all essential to JavaScript in order to make your browsers run properly. If these are disabled, you may come across the JavaScript Void (0). To fix it open your browser and select the Tools tab. Then click the options button and select content. Here check the ‘enable JavaScript’ check box and click Ok to enable these components.

Cause:  Registry Issues

Solution: If after performing all the solutions discussed above, you still come across JavaScript Void (0) error code, then you should know that the problem is bigger than what you expected. It triggers registry issues. Either the cause of the error is misconfigured or invalid registry keys. To reconfigure the registry keys setting may be a challenging task and complex if you are not a computer programmer. Congratulations, you have just fixed JavaScript Void 0 Error in Windows 10 all by yourself. If you would like to read more helpful articles and tips about various software and hardware visit errortools.com daily. Now that’s how you fix JavaScript Void 0 Error in Windows 10 on a computer. On the other hand, if your computer is going through some system-related issues that have to get fixed, there is a one-click solution known as Restoro you could check out to resolve them. This program is a useful tool that could repair corrupted registries and optimize your PC’s overall performance. Aside from that, it also cleans out your computer for any junk or corrupted files that help you eliminate any unwanted files from your system. This is basically a solution that’s within your grasp with just a click. It’s easy to use as it is user-friendly. For a complete set of instructions in downloading and using it, refer to the steps below Perform a full system scan using Restoro. To do so, follow the instructions below.
      1. Download and install Restoro from the official site.
      2. Once the installation process is completed, run Restoro to perform a full system scan. restoro application screen
      3. After the scan is completed click the “Start Repair” button. restoro application screen
Read More
Steam 2021 Winter sale official date
Each year Steam makes a couple of large sales, and each year there are speculations and leaks on the date when the sale is going to happen and when it is starting. It seemed that Steam has become aware that these leaks will not stop and that store really cannot hide that kind of important date from the public so in the latest news Steam Purley has just given the date of this year's big winter sale. steam winter saleProbably tired of even trying to hide it, Steam has released that this year's big Steam Winter sale is officially starting on December 22nd, 2021, and closing on January 5th, 2022. So if you have someone to buy a gift or just want to drop a few great games in your library at a low price this is the time when you should do it.
Read More
Patch for Windows Error Code 41

Repair Windows Error Code 41

Code 41 - What is it?

Poor PC maintenance can lead to error message pop-ups like error code 41. Code 41 is one of the several Device Manager Error codes.

This error indicates 2 things: issues with the device driver for the hardware you wish to use, or the hardware device is not properly attached to your system.

The error code 41 is usually displayed in the following format:

“Windows successfully loaded the device driver for this hardware but cannot find the hardware device.” Code 41

Solution

driverfix boxError Causes

For successful installation of a new hardware piece, it is imperative to follow the installation routine correctly and allow it to complete properly, especially with USB devices.

This is important largely because if installation is not followed and executed properly, code 41 can pop up.

Code 41 is also related to device driver problems. It can occur if your system device drivers are outdated. Also, if the device is a CD/DVD drive, code 41 can occur due to conflicts with 3rd party disc burning software.

Although Device Manager Error code 41 is not detrimental, it is still advisable to repair it as quickly as you can. Code 41 can negatively affect your PC. It can:

  • Lower your PC’s Performance
  • Limit your ability to use your desired piece of hardware device

Further Information and Manual Repair

As compared to the blue screen of death errors, Device Manager Error codes are much easier to resolve.

Here are some of the best, effective and easy-to-resolve methods to help you fix code 41 on your PC, in a few minutes.

To work around these methods, you don’t have to be a technical whiz or a computer programmer. Simply follow these steps to resolve:

Method 1 - Uninstall Faulty Drivers and then Reinstall

To repair code 41 on your system, try uninstalling problematic drivers and then reinstalling new drivers. To do this, follow these instructions:

  • Click the start button
  • Then type Device Manager in the search bar and press enter
  • Once the Device Manager opens, look for problematic devices
  • Click on the device whose driver you wish to uninstall
  • Double click to uninstall
  • Windows will prompt you to confirm the device removal
  • Accept changes and confirm by clicking on OK
  • Now reboot your PC to activate changes
  • The next step is to reinstall the driver properly. To do this, simply follow the same steps. Once you access the Device Manager,
  • Click on the Action tab in the toolbar
  • After that select the option ‘Scan for Hardware Changes’

This will hopefully resolve error code 41 on your system and you will be able to use your desired hardware device without any hassle. Nonetheless, if the error code continues to persist, try other methods illustrated below.

Method 2 - Replace the Hardware or Try Reattaching it to your System

Sometimes the error may pop up due to poorly configured devices. This is common if it is a plug-and-play device. The best way to resolve is to remove the device, reattach it properly, and then try using it again.

However, if the problem is with the hardware, then it is advisable to replace the hardware with a new device compatible with your Windows version.

Method 3 - Update the Drivers Manually

If the underlying cause for error code 41 is outdated or corrupted drivers, then it is advisable to update the drivers.

However, when updating drivers and ensuring that the newly installed drivers work perfectly, make sure you install versions that are compatible with your device and Windows. Incompatible drivers are no good.

You will continue to face Device Manager Errors if you install incompatible drivers.

To update drivers, here’s what you have to do:

  • Identify the problematic drivers
  • Go to the Device Manager and locate all drivers with yellow exclamation marks
  • Now install new and compatible driver versions from the manufacturers’ site

Method 4 - Download Driver Assist to Update Drivers Automatically

Updating drivers manually will take time, so perform this task when you are free and have nothing else on your mind. However, if you wish to resolve the issue immediately and have the time to invest in manual updates, then consider downloading DriverFIX.

DriverFIX is a feature-rich and an innovative software program deployed with an intelligent programming system and intuitive technology.

It is exclusively designed to resolve PC device driver problems. Once installed on your system, it scans your PC and identifies problematic drivers.

After that it matches latest and compatible driver versions and updates them  immediately within a few seconds. DriverFIX updates drivers both automatically and on a regular basis.

Click here to download DriverFIX to update drivers and repair error code 41.

Read More
Completely Uninstall and Remove Flash
Google Chrome, Microsoft Edge, Mozilla Firefox are some of the leading browsers commonly used these days and they all include an embedded copy of the Adobe Flash Player. So if you are running a Windows 10 PC then you can have up to 4 copies of Adobe Flash Player; one for Microsoft Edge, one for Internet Explorer, one for Opera, one for Firefox. You might also experience cases wherein two flash players are simultaneously running, i.e. one installed in Chrome as a single plug-in and another one installed in Windows, trying to parse the data. And in such cases, you might consider removing or uninstalling one of the versions of Adobe Flash Player. If you do, then you’ve come to the right place as this post will guide you in disabling the embedded Adobe Flash Player in Windows 10. Before you get started in removing the Adobe Flash Player in Internet Explorer & Microsoft Edge browser, you need to sign in with your administrative account even if don’t use it or set it as the default browser. After you’ve signed in to your administrative account, follow the steps below. Step 1: Open your browser, if you are using Edge then open it. Step 2: After opening your browser, go to its Settings and select Advanced Settings. Step 3: Next, Move the slider against the “Use Adobe Flash Player” option to off. Step 4: After that, open File Explorer and navigate to this address, “C:/Windows/servicingPackages” and from there, check on the following entries:
  • Adobe-Flash-For-Windows-Package~31bf3856ad364e35~amd64….(version number of the Flash Player)
  • Adobe-Flash-For-Windows-WOW64-Package~31bf3856ad364e35~amd64….(version number of the Flash player #)
  • Adobe-Flash-For-Windows-onecoreuap-Package~31bf3856ad364e35~amd64…(version number of the Flash Player)
Step 5: Take note of all the listed package names of Adobe Flash Player and tap the Win + R keys to open the Run dialog box and type “Regedit” in the field and hit Enter to open the Registry Editor. Step 6: Next, right-click on the three keys which have the name of the packages you listed and select “Permissions” one after the other. Step 7: Then check “Allow” to enable full control for the Administrators account and click OK to save the changes made. Step 8: Select the three keys one after the other and select Visibility DWORD located on the right side and then right-click on Visibility and change the Value data from 2 to 1. Step 9: Go over the same procedures again for the other keys. Once you’ve completed then you should now be able to remove packages using the DISM tool. Step 10: Simply open an elevated Command Prompt and execute the following commands:
  • dism /online /remove-package /packagename:Adobe-Flash-For-Windows-Package~31bf3856ad364e35~amd64-10.0.17134.1
  • dism /online /remove-package /packagename:Adobe-Flash-For-Windows-WOW64-Package~31bf3856ad364e35~amd64-10.0.17134.1
  • dism /online /remove-package /packagename:Adobe-Flash-For-Windows-onecoreuap-Package~31bf3856ad364e35~amd64-10.0.17134.1
Keep in mind that the numbers at the end could be different on your computer due to the difference of version number so you have to use the numbers on your system. After that, reboot your computer.
Read More
Fix Gah, Your tab just crashed in Firefox
If you notice that your tabs in your Firefox browser keep on crashing recently, then there might be something wrong with your browser. Every time any of your tabs crashes, you might encounter an error message saying, “Gah, Your tab just crashed”. If you encounter this kind of error message then it is most likely that your Firefox Profile is having some issues with the existing installation of Firefox. The “Gah, Your tab just crashed” error rarely happens but when it does, it can get quite annoying as you won’t get to browse the internet peacefully. So to fix it, here are some suggestions you could check out.

Option 1 – Try disabling multi-process tabs in Firefox

Since Mozilla has one process for Firefox itself, while one process handles all the tabs, you have the option to disable these multi-process tabs in Firefox. To do that, follow these steps:
  • In the address bar of Firefox, type “about: config” and hit Enter.
  • Next, look for the following configurations and set them to false.
    • tabs.remote.autostart = false
    • tabs.remote.autostart.2 = false
  • After that, double-click on the toggle switch between true and false.

Option 2 – Try checking your Add-ons

In this option, you need to start Firefox in Safe Mode and then check if the problem is fixed. If it is, you may have to check your Firefox add-ons as well as extensions as one of them might be the one that's causing the “Gah, Your tab just crashed” error.

Option 3 – Downgrade the Firefox version you’re using

It could be that the current version of Firefox you’re using has some issues so you might have to downgrade it, especially if you are already using the latest version. To downgrade your Firefox browser, go to the directory of the other versions and languages and select an older version that worked for you. After that, you have to disable automatic Firefox updates.
  • First, click the menu button and select Preferences.
  • Next, go to the Firefox Updates section under the General panel.
  • Then select the radio button labeled “Check for updates but let you choose to install them”. This will ensure that you will not have the same issue with the new update.
Note that this is only a temporary fix since updating your programs, including browsers.

Option 4 – Try sending Crash Reports

You might want to send crash reports to Mozilla. This way, Mozilla might come up with some fix to resolve the problem. All you have to do is type “about: crashes” in the address bar. This will list all the crash reports. Now send it to Mozilla using the built-in interface. Although this won’t instantly fix the problem, a lot of user finds it useful. And besides, the issue will get fixed in future releases or with minor updates.
Read More
1 2 3 162
Logo
Copyright © 2022, ErrorTools. All Rights Reserved
Trademarks: Microsoft Windows logos are registered trademarks of Microsoft. Disclaimer: ErrorTools.com is not affiliated with Microsoft, nor claim direct affiliation.
The information on this page is provided for information purposes only.
DMCA.com Protection Status