Windows 10 won't upgrade to a newer version

If when hovering over the upgrade icon on the taskbar you get:

Your version of Windows 10 would reach the end of service soon, Click to download a newer version of Windows 10 to stay supported.

or

An unsupported version of Windows will no longer receive software updates from Windows Update. These updates include security updates that can help protect your PC from harmful viruses, spyware, and other malicious software which can steal your personal information. Windows Update also installs the latest software updates to improve the reliability of Windows—such as new drivers for your hardware.

and you are unable to perform updates then this guide is for you. There are several things you can do to fix this issue presented here, it is advisable to follow them in a way how they are presented for best performance and system safety.

  1. Run setupdiag

    Download and run Setupdiag from the official MICROSOFT website. SetupDiag is a standalone diagnostic tool that can be used to obtain details about why a Windows 10 upgrade was unsuccessful. It works by examining Windows Setup log files to determine the root cause of a failure to update or upgrade the computer. Once the scan is completed, check the generated log files. The SetupDiagResults.log will be generated and saved in the same folder where you downloaded Setupdiag. Open SetupDiagResults.log using Notepad. You may need to take a look at these folders:

    • \Windows\Panther
    • \$Windows.~bt\sources\panther
    • \$Windows.~bt\Sources\Rollback
    • \Windows\Panther\NewOS

    If there are any issues or conditions that are blocking the upgrade, they will be listed here.

  2. Edit TargetReleaseVersionInfo Registry key

    Press ⊞ WINDOWS + R to open the run dialog
    In run dialog type Regedit and press ENTER
    Locate: HKLM\SOFTWARE\Policies\Microsoft\Windows\WindowsUpdate
    Locate two DWORD files, if they do not exist, create them as:
    TargetReleaseVersion
    TargetReleaseVersionInfo
    Set the value of TargetReleaseVersion to 1
    If you are stuck on Windows 10 1909 and want to upgrade to Windows 10 20H2 now, you need to set the value for TargetReleaseVersionInfo to 20H2
    Reboot the computer

  3. Use Windows 10 update assistant

    Visit Microsoft.com and hit the ‘Update now’ button visible on the page
    Download tool and run it
    Click on Update now to start the upgrade process

If you like to learn and find out more about various Windows errors, and how to repair them go to our vast archive or use search to find articles that will explain and help you in solving your issue.
However, if you prefer to do things fast and with automatization then we are proposing to use an automated solution for your issues. The application that we are recommending is Advanced System Repair Pro
Advanced System Repair utilizes multiple tools all in one to give you a quick, simple, reliable, and very thorough diagnosis of your PC. It brings you all the tools you need in one program to clean, fix, protect, optimize and boost your PC!
1-Click Maintenance
All the tools to make it simple and easy! It's like having a professional technician at the click of a mouse.

Junk Cleaner
Keeping your computer free from unnecessary clutter also helps make your computer last longer. Like any other machine, if you keep it clean and take care of it, it will serve you better for longer!

Optimize background apps
Optimize applications background activity with the built-in Application Optimizer feature.

Disk Defrag
With a simple 1-click, Advanced System Repair speeds up your PC by assembling fragmented files on your machine and organizing them more efficiently.

Malware Removal
Finds and removes all types of harmful malware including trojans, worms, bots, adware, spyware, PUPs, and more!

Privacy Cleaner
The all-in-one privacy suite to Clean Your Tracks & Protect Your Privacy! Make your computer safe, secure, and more efficient!

System Tweak/Optimizer
ASR will analyze your complete system and settings to adjust your PC to function at its maximum performance.

Registry Cleaner
Over time, as you install and uninstall applications, the registry can become cluttered with old entries and broken settings which can result in program crashes, and annoying messages and slow the computer down.
Visit our Advanced System Repair Pro Download page to inform yourself about all the benefits of this software and get a free trial copy of it.
advanced system repair pro

Advanced System Repair Pro

One-click automated PC repair solution
ASR logo
With Advanced System Repair Pro you can easily
Replace damaged files
Restore performance
Free disk space
Remove Malware
Protects WEB browser
Remove Viruses
Stop PC freezing
DOWNLOAD
Privacy Policy | Terms of Use | Uinstall
Advanced System Repair Pro is compatible with all versions of Microsoft Windows including Windows 11

Share this article:

You might also like

An Easy Guide to Resolving Code 18

An Easy Guide to Resolving Error Code 18

Code 18 - What is it?

Code 18 is a typical Device Manager error code that occurs when the device driver is damaged. Device Manager is an important tool that allows Windows PC users to have an overall look at the connected hardware.

Furthermore, it also allows diagnostic testing. It is vital too and errors associated with the Device Manager such as error code 18 should and must be resolved quickly.

Error code 18 is usually presented in the following formats:

“The drivers for this device are not installed. (Code 18)” Or “Reinstall the drivers for this device.”

Solution

driverfix boxError Causes

Error code 18 may be triggered due to several reasons such as:

  • Outdated drivers
  • Corrupted drivers
  • Improperly configured drivers

Error code 18 may cause a great deal of inconvenience. It may hamper your ability to use certain devices on your PC.

For example, if code 18 pops up due to a corrupted or improperly configured keyboard driver, then it may hamper your ability to use your keyboard and work on your PC.

Further Information and Manual Repair

The good news is that Device Manager error codes like error code 18 are easy to resolve. Below are some of the easiest and effective methods to repair error code 18 on your PC. Try one of these methods to repair error code 18 in no time:

Method 1 - Uninstall and Reinstall Device Drivers

One of the easiest ways to repair error code 18 and to ensure that this error doesn’t pop up on your PC again is to uninstall the problematic driver. For this, simply:

  • Go to the start menu
  • Type Device Manager and press enter
  • Now click on the device whose driver you want to uninstall.
  • Press right-click and then click on uninstall. Windows will prompt you to confirm the removal of the driver.
  • Click OK to confirm and then reboot your PC to activate changes.
  • Now scan for new hardware and follow the same process to reinstall the uninstalled device driver.

Method 2 - Update Drivers Automatically

Finding problematic drivers and then updating them individually can be frustrating and a time-consuming process. It can take a lot of time to perform updates and resolve the error code on your PC.

If you have projects to work on with pressing deadlines, then updating drivers on your PC separately can cause you a great deal of inconvenience and waste your precious time.

However, to avoid this situation, we advise you to set your drivers to update automatically. Automatic update installation requires only a few seconds.

And to update drivers automatically, it is recommended you download DriverFIX.

As the name suggests, this software is designed to assist programmers to upgrade device drivers automatically. In just a few clicks, you can update all your outdated drivers and repair error code 18.

DriverFIX is easy to use and an advanced program that is smoothly integrated with an intelligent programming system. This system identifies and detects all the problematic drivers on your PC and then updates each driver automatically to their latest versions.

It continues to update drivers regularly ensuring that you never come across device driver problems on your system.

Click here to download DriverFIX and repair error code 18 today!

Read More
Delete last 15 min of browsing history on phone
google browsing 15min history delete
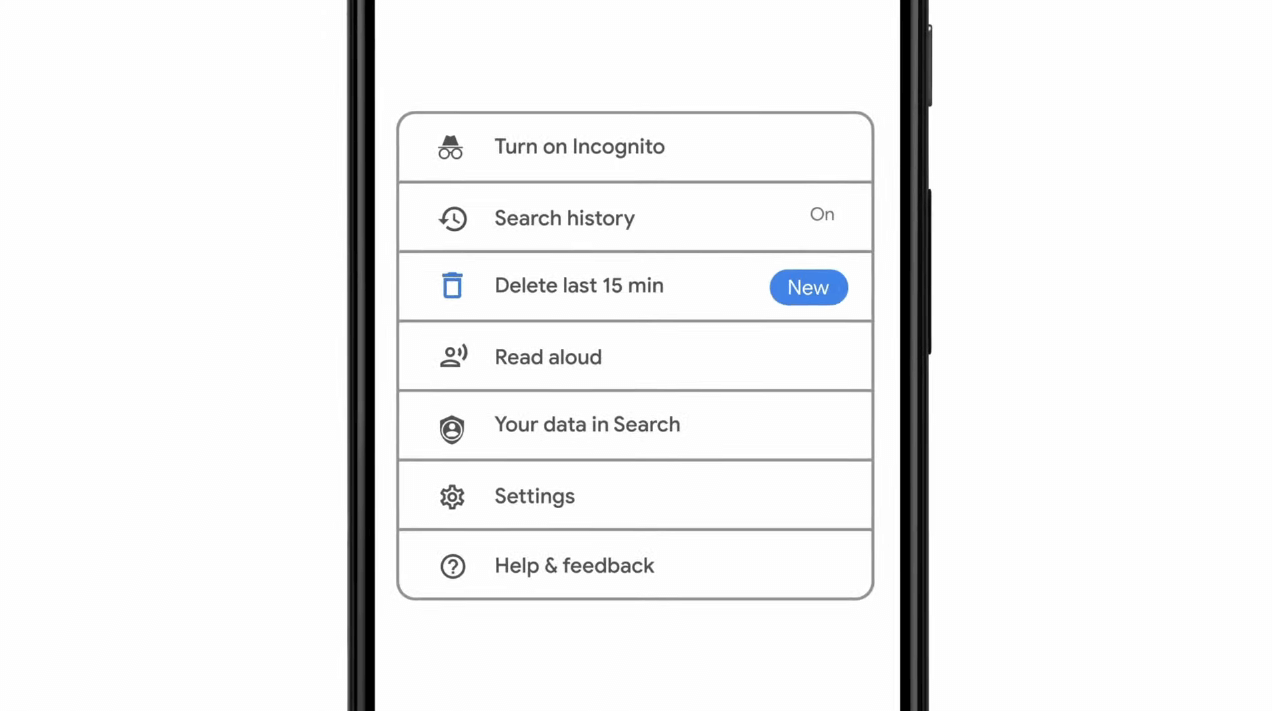
As previously announced by Google feature to quickly delete the last 15min of browsing history via one button is rolling out now. For now, only Apple users will be available to use this feature but the Android update is scheduled for later this year, a strange move by Google but it is what it is. For anyone who is unfamiliar with this feature, basically, Google wants a quick way to remove the last 15min of browsing history as a supposedly stated request to make deleting browsing history much easier. Google came up with this idea so you can keep the previous history intact but remove just 15min time frame, no additional explanation was given on why 15 but I presume it is some round number that came up as the middle one with research, read telemetry info. Using quick delete requires being signed into Search with a Google account. Users can access the option by simply tapping on the avatar icon to access the settings then choosing "Delete last 15 minutes."
Read More
Cortana can’t connect to the Internet
One of the most sophisticated Artificial Intelligence or AI assistants there is in the market is Cortana. However, no matter how sophisticated this AI assistant may be, there are still times when you encounter issues with it. So if your Cortana is not connecting to the internet, worry not for this post will guide you in fixing the problem. This connection issue in Cortana might have something to do with the settings, network connectivity, or your Microsoft account. In addition, it could also be that the Firewall or antivirus program interferes with its connection. Whichever the case is, here are some possible solutions that could help you resolve the problem.

Option 1 – Try to power cycle the modem, router, and computer

  • Connect the modem, router, and the PC hard-wired and then switch all of these three devices off.
  • Turn on the modem and wait for 30 seconds.
  • Turn on the router and wait for 30 seconds as well.
  • Finally, turn on the computer and check if you can now successfully connect to the internet.

Option 2 – Check if your router or ISP is properly working

Since the basis for this issue is that Cortana is not connecting to the internet even though you are able to access websites using your browser, you might want to check your router or ISP (Internet Service Provider) and see if they’re functioning properly.

Option 3 – Try changing your internet connection

You can also try changing your internet connection and see if it fixes the problem. If you are using Ethernet, you can try connecting to a Wi-Fi connection and see if Cortana is able to connect or not.

Option 4 – Try to run the Search and Indexing troubleshooter

You might also want to run the Search and Indexing troubleshooter in Windows 10 as it checks whether the settings for Cortana are in place and automatically corrects any issues if the update or software installation has changed the settings. To run it just click on the Start button and select Settings > Updates and Security > Troubleshoot. From there, select the Search and Indexing Troubleshooter. Note: You can also run the Network Troubleshooter as it can also help in resolving the issue especially if the problem is in the network.

Option 5 – Try to remove Proxy

Removing the Proxy might also help you in fixing the connection issue in Cortana. Here’s how you can do it:
  • Tap the Win + R keys to open the Run dialog box.
  • Then type “inetcpl.cpl” in the field and hit Enter to pull up the Internet Properties.
  • After that, go to the Connections tab and select the LAN settings.
  • From there. Uncheck the “Use a Proxy Server” option for your LAN and then make sure that the “Automatically detect settings” option is checked.
  • Now click the OK and the Apply buttons.
  • Restart your PC.
Note: If you are using a third-party proxy service, you have to disable it.

Option 6 – Verify your Microsoft account

In some cases, Cortana might not be able to connect to the internet because your Microsoft account is no longer verified. This usually happens when you use a two-step authentication system with your Microsoft account. To verify it, just open Settings and click on Accounts. After that, check if you have a Verify hyperlink under your Microsoft account or not then click on Verify. Afterward, follow the next on-screen prompts to verify your Microsoft account. Once your account is verified, restart your computer.

Option 7 – Try resetting Cortana

  • Open Cortana and go to the Settings section where you’ll see the “Turning off Cortana clears what Cortana knows on this device, but won’t delete anything from the Notebook. After Cortana is off, you can decide what you’d like to do with anything still stored in the cloud” option. Turn this option off.
  • Restart your PC.
  • After your computer boots, launch Cortana again and check.

Option 8 – Try to reinstall Cortana

If none of the options given above works, you must consider reinstalling Cortana.
  • First, right-click on the Start button and click on the Windows Powershell (Admin) option from the list.
  • Next, type the following command and hit Enter to execute it:
Get-AppXPackage -Name Microsoft.Windows.Cortana | Foreach {Add-AppxPackage -DisableDevelopmentMode -Register "$($_.InstallLocation)AppXManifest.xml"}
  • Restart your computer and check if Cortana is now able to connect.
Read More
Outlook 2013 Preview

Outlook 2013 preview and sneak peek

Hello and welcome to our Outlook 2013 Preview. Everyone has heard of sneak peeks when it comes to new movies and games that are coming out soon. That is what advertisements and test reels are for to get the audience interested and excited before the piece of media even comes out. It serves to entertain the target audience in the months, maybe even years, up until the release date of this thing they want to play or see and it keeps it in the public mind. It is also great for the viewers because it is a hint to what they will expect when it comes out and it keeps them wanting more excitedly. However, did you know that sometimes computer software’s release previews and sneak peeks too?

Outlook 2013

Well, they do and Microsoft has released some sneak peeks and previews of their new Outlook, Outlook 2013! This is probably to get consumers ready for when it comes out next year; people are going to be getting excited about this new makeover that Microsoft Office, with Outlook, has given itself, people from Microsoft even saying it is ‘the most ambitious’ version of Office yet! The new orange color scheme and logo design look promising enough for the consumer without even checking the new features and special things that have been revealed about it yet!

Outlook 2013 Features

The best part of this new Outlook is that you can move widgets around in it. If you don’t like the fact that your inbox is placed over your outbox, you can move it- simple as that! It will be really handy for people who like messing around with layouts and will also be handy for people who tend to overlook things at the bottom of the pile like spam and trash if they can move them to a more noticeable location for themselves. Another great thing is that the new Microsoft Office that Outlook comes with has a cool new stylus option, allowing you to personalize things with your own handwriting or even drawings. This can then be used as your email signature on Outlook which can give a really nice and personal feel to emails you are sending. Another new thing is their labeling of drafts. Like Gmail, Google’s own email service, a red-lettered ‘draft’ will now appear over composing messages you have not yet sent.

Handy Email Tools in Outlook 2013

This is handy because you know where your message has been saved as opposed to how it could be saved in your outbox or be sent to the trash. Also, there are new links with Facebook that allow you to see what your friends are doing through Outlook. You can also converse with Facebook friends through Outlook now, which is a big step forward in this age of social media. You can get an email from a person and, at a click of a button, also read all their Facebook posts. However, there is not an option for Twitter or Tumblr or even Myspace, which is a shame I suppose, but maybe in the next update. So, I think Outlook 2013 will be worth looking at, don’t you?
Read More
DDR5 what we know so far about it
DDR5 memory module
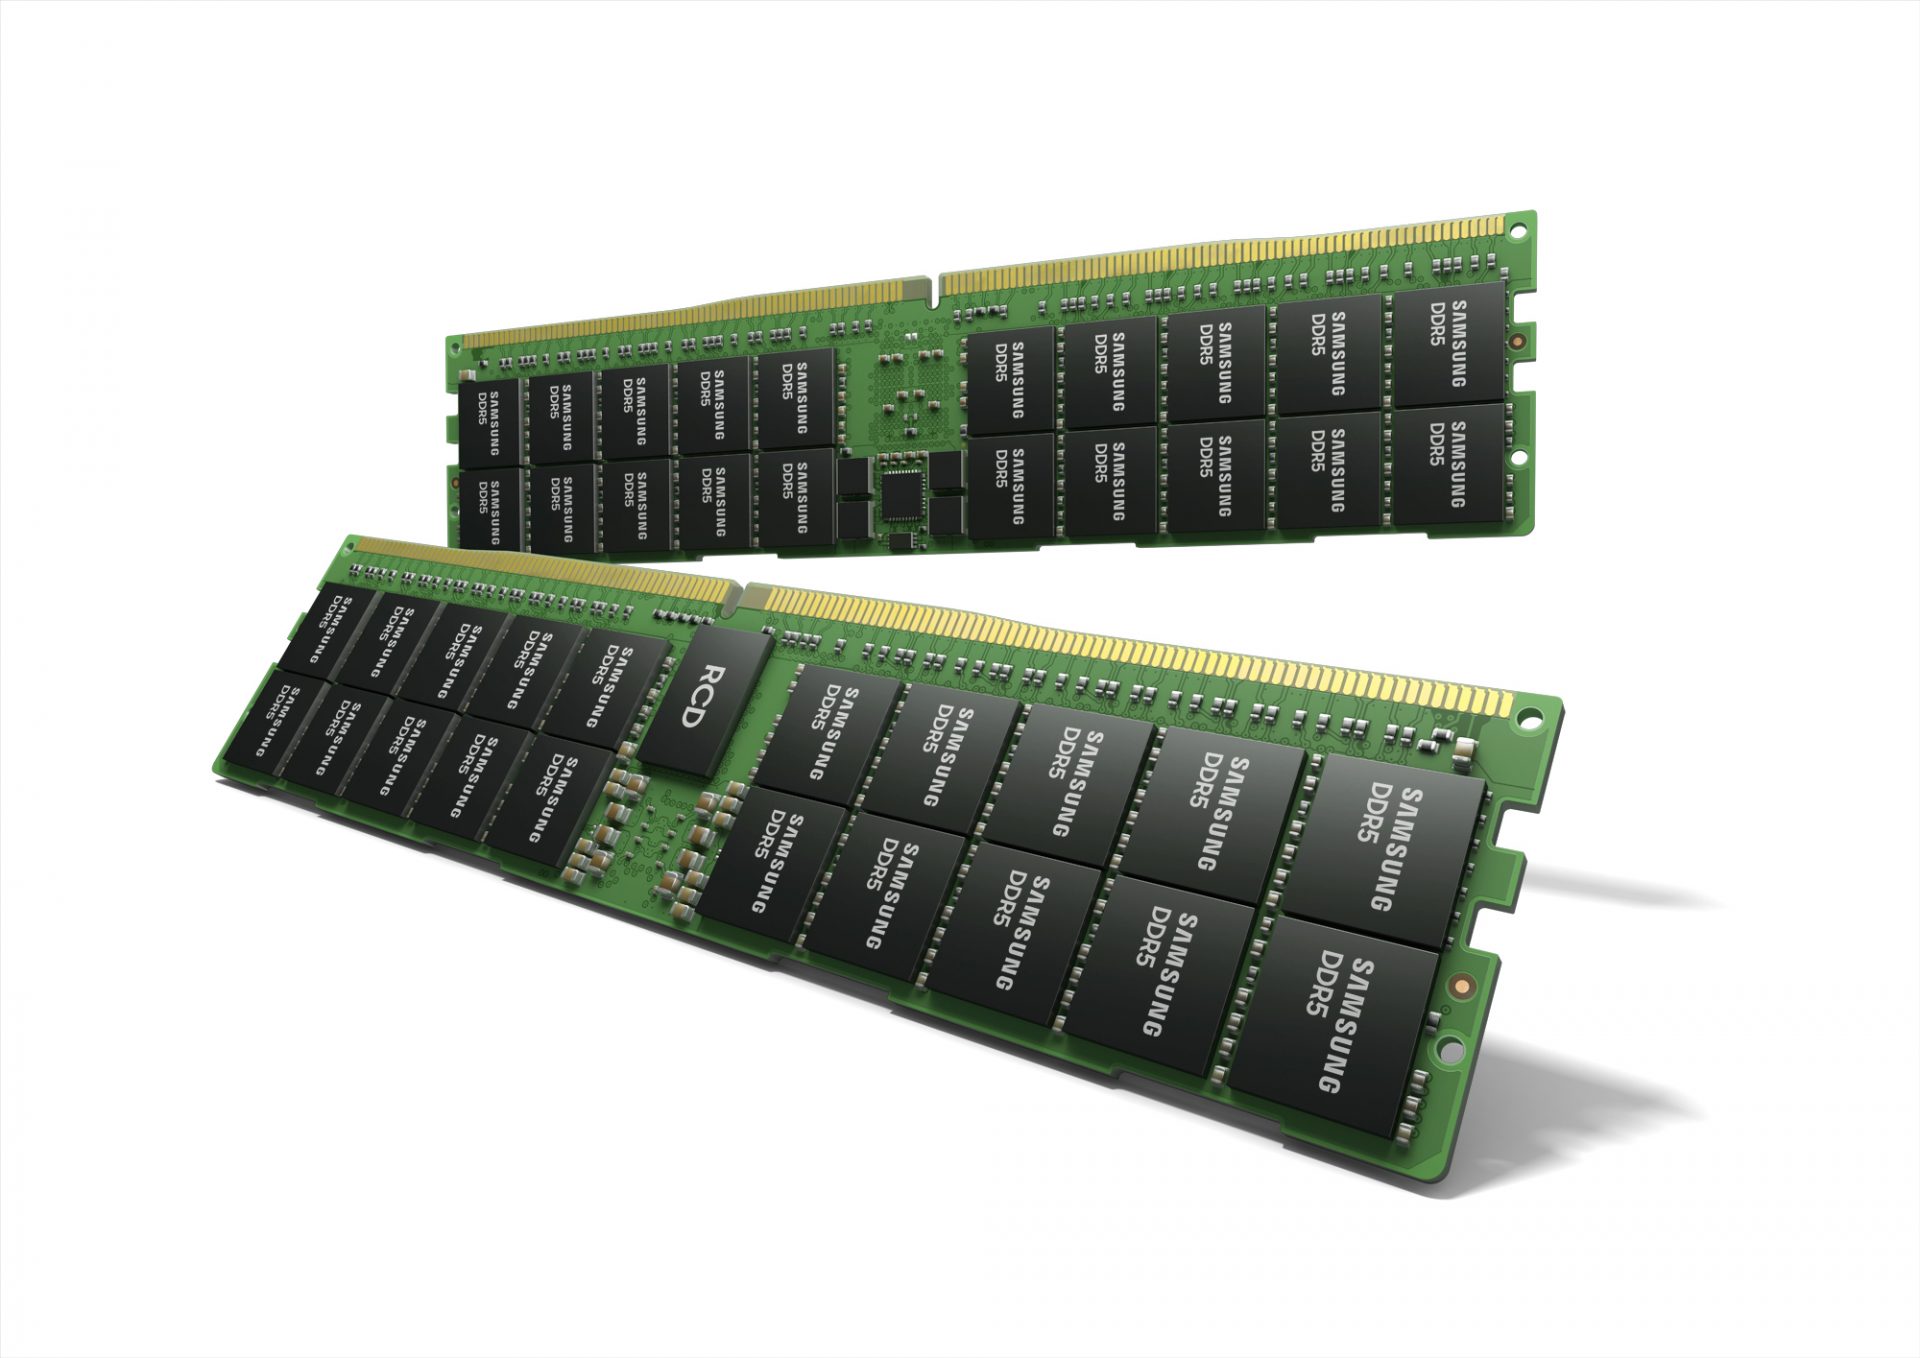
Next-generation of RAM, DDR5 supposed to hit shelves around late summer or fall in 2021if everything goes as planned. Its goal is to increase speed and efficiency, wants to pack more memory in a single stick, and have better power management.

Hardware requirements for DDR5

Using the latest memory technology will require other hardware to follow certain standards and the first ones that will need to follow are CPUs and Motherboards. Intel is already prepared with its Alder Lake CPUs that suppose to come out also later this year. AMD on other hand has not stated anything at the time of this writing but it is a bet that their next generation that will come in 2022 will have full support. It is speculated that bot companies and their respective CPUs will have both support for DDR4 and DDR5. A story about motherboards is a little different. Motherboards will support DDR4 or DDR5 memory banks, not both, so make sure that your motherboard will support the memory you plan on getting.

Capacity of memory

The goal and aim for the DDR5 memory stick are to reach a whopping 126GB per stack. This will be done by using a dual in-line module or DIMM enabling larger capacity. That being said, the first modules that we will see are more likely to be 16GB as standard and 8GB as low entry ones.

Power consumption of DDR5 memory

The standard voltage that DDR4 operates under is 1.2V. DDR5 wants to lower this to 1.1V without sacrificing speed. Voltage regulation on modules themselves will be now integrated on memory banks instead of leaving that to motherboards which will help to detect memory errors directly on the memory bank.

Speed of memory

The most common speed of DD4 memory banks is 2,666MHz, more expansive ones go from 3,600 to 4,000MHz. DD5 aims to raise this bar to 4,800MHz and offers greater speed.

Should you get it right away?

Hardware is ever-evolving, we have PCIe 3.0 to PCIe 4.0, and taking into account that sometimes the newest tech can cause some unexpected behavior it is always the best strategy to wait for a little. Price for the newest tech has also been in its heist just when it is released and seeing how DDR5 will benefit mostly servers mostly since even today memory, processors, and other available equipment can tackle all daily tasks.
Read More
How to Fix Socket Error 10013

Repair Error 10013

Socket Error 10013 - What is it?

Socket error 10013 is an error code that often pops on the screen when you try to access the server. This error code restricts your permission to access. It shows that your permission request was denied. The error message is displayed in the following format:
“Socket.error: [Errno 10013] an attempt was made to access a socket in a way forbidden by its access permissions”

Solution

Restoro box imageError Causes

Narrowing down a particular reason for the cause of socket error 10013 is difficult, typically because this error code can be generated due to several reasons. Here are some of the common reasons for its occurrence on your PC:
  • High-security set up- Firewall or an antivirus program
  • Too many functions tied to the same driver confuses the socket
  • Outdated drivers
  • Malware
The good news is that the socket error 10013 is not fatal. However, it is advisable to fix and resolve the issue to avoid inconvenience.

Further Information and Manual Repair

Here are some of the best, quickest and easiest methods to work around the problem and resolve socket error 10013 without any hassle or delay.

Method 1 - Turn off Firewall

Believe it or not, a high level of internet security measures like Firewalls and anti-virus programs are a common cause of socket error 10013. Firewalls are made to protect a computer from harmful connections but sometimes it may also restrict server connections, considering them as a threat to your system security. Due to this, permission access is adamantly denied. To resolve this issue on your PC, the best way to go about is to turn off your Firewall or any other anti-virus programs installed on your system. Once you turn off these programs, try accessing the server again. The majority of the time the issue is resolved by carrying this step. Nonetheless, if the error still persists, try the methods given below.

Method 2 - Check the Permissions section of the Firewall Program

Another way to resolve this is to check the permission section of the Firewall program and check for the server. If the server is not listed, contact the Internet Service Provider (ISP) and ask for help in adding the server to the list.

Method 3 - Update Drivers

The outdated driver may sometimes be the reason for the socket error 10013.  The socket may no longer use the drivers installed on your PC which is why permission to access the server is not granted. When this is the reason, try updating the drivers to resolve. For new drivers, visit the software manufacturers’ website, download, and install.

Method 4 - Scan for Viruses and Malware

Another alternative is to scan for viruses and malware. Sometimes the cause for the error is a viral infection. Therefore, remove them to resolve. The best way is to download Restoro. This is a user-friendly and next-generation PC Fixer embedded with 6 scanners including a powerful anti-virus. It scans your entire PC and removes all types of viruses including malware, adware, spyware, and Trojans in seconds. Click here to download Restoro.
Read More
Fix The backup application could not start
Windows comes with a built-in backup solution. However, if it failed because of an internal error, you will encounter an error message saying, “The backup application could not start due to an internal error, Server execution failed (0x80080005)”. When you get this kind of error, it means that it did not start and the process failed with a Server execution error. If you got this kind of error worries not for this post will guide you in fixing the problem in your Windows 10 computer. The Windows Backup service is an excellent feature in Windows that only works on the NTFS file system and if you want to use this make sure that you have formatted your files system to NTFS. It is performed by the Volume Shadow Copy, all you have to do is right-click on any folder and if you see the “Previous versions” option, this means that a backup process runs from time to time and can bring back old files when needed. To resolve the “The backup application could not start due to an internal error”, here are two suggestions you can check out.

Option 1 – Check if the Volume Shadow Copy service is running and restart it

The first thing you need to do is check if the Volume Shadow Copy service. To do that, refer to the following steps:
  • Click on Start and type “cmd” and right-click on Command Prompt from the search results.
  • Then select the “Run as administrator” option to open Command Prompt with admin privileges.
  • After that, type “net stop sdrsvc” and hit Enter to execute the command in stopping the Volume Shadow Copy service.
  • Next, type the “net start sdrsvc” command and hit Enter to start the service again.
Note: You can also restart the service using the Windows Services Manager.
  • In the Cortana search box, type “services” and click on the Services icon to open the Services Manager. Alternatively, you can also tap the Win + R keys to launch the Run prompt and then type “services.msc” in the field and hit Enter to open the Services Manager.
  • From there, look for the Volume Shadow Service (sdrsv) from the list of services. Its Startup type should be set to Manual by default.
  • Restart the service and if you don’t encounter any error while you turn it on, re-run the backup service and see if the backup process runs successfully.

Option 2 – Try to run the Volume Shadow Copy Service in a Clean Boot State

If the first option didn’t work and the service still keeps on failing even though the service is running, you can try putting your computer in a Clean Boot State and then try to run Windows Backup again.
  • Log onto your PC as an administrator.
  • Type in MSConfig in the Start Search to open the System Configuration utility.
  • From there, go to the General tab and click “Selective startup”.
  • Clear the “Load Startup items” check box and make sure that the “Load System Services” and “Use Original boot configuration” options are checked.
  • Next, click the Services tab and select the “Hide All Microsoft Services” check box.
  • Click Disable all.
  • Click on Apply/OK and restart your PC. (This will put your PC into a Clean Boot State. And configure Windows to use the usual startup, just simply undo the changes.)
  • Now try to run the Volume Shadow Copy service again and see if the process goes smoothly.
Note: You might also want to delete all the files in the backup solution if you want to start fresh with the backup solution. Just go to C:/System/Volume/Information/Windows Backup and take ownership of the folder. After that, make sure to stop the Volume Shadow Copy service and then delete all the files inside it.
Read More
Software review series: HWiNFO
HWiNFO (Hardware Information) is a professional hardware information and diagnostic tool supporting the latest components, industry technologies, and standards. It's targeted to recognize and extract the most possible amount of information about computer hardware which makes it suitable for users searching for driver updates, computer manufactures, system integrators, and technical experts too. Retrieved information is presented in a logical and easily understandable form and can be exported into various types of reports. System health monitoring and basic benchmarking available too. If you would like to read more helpful articles and tips about various software and hardware visit errortools.com daily.
Read More
Creating a new Windows 10 user account
When we purchase a computer, usually it is meant to be used by one person. Sometimes we would like to share our computer with other people, with friends and family members but we would also like to keep some privacy for ourselves in the process. Lucky for us Windows 10 will let us create multiple user accounts which then can be used by other persons with their own settings, documents, etc. The only requirement is to already have one user account which is automatically created when Windows is installed. This guide will lead you step by step in the creation of a new user account within Windows 10, so grab your favorite drink, and let's begin.

Creating new account

First thing is to click on the windows icon on the bottom left and open start menu, from start menu click once on settings. Windows 10 Star menu with marked settings iconWhen the settings window opens, choose ACCOUNTS on it. Windows settings accounts section selectedWindows will then go to the accounts settings page. Within that page, click on the Family & other users to open the setting for the chosen section on right. On the right settings, screen navigate to the lower section and click once with the left button on add someone else to this PC When add someone else to this PC is clicked, pop up window will appear which will ask you to provide the persons email address and later on the password of his/her Microsoft account, after the required information is provided you are done, a new user has been added and he can use his Microsoft credentials on the login screen to use this computer.

Setting up a user without Microsoft ID

However, if you do not wish to add a new user via his Microsoft login credentials or the person does not have them, on the pop-up window click on I don't have this person's sign-in information. User account no informationThis will open yet another pop-up giving you the option to create a Microsoft account for this person, to use a phone number instead of a Microsoft account, or to create a new email address for the user. Any of these options will create a new user for this computer with provided credentials but there is the last option at bottom of the pop-up which will allow you to create a local user only without a Microsoft account. This user will be able to use this computer, will not be able to transfer his document through various devices like he/she would if using a valid Microsoft account but it could use the computer and personalize it fully to his/her liking. user account new account without ms idOnce the link is clicked, you will be presented with a floating window requiring you to input needed information in order for the account to be created. You will need to provide username, password, and answers to 3 security questions. user account create an accountOnce all information has been provided, click on next and your new non-Microsoft local user has been created. Now when you click on Family & other users you will see that Windows has added a new user with the provided name to this computer. If you wish, you can add another user in the same manner, following the previous steps. Microsoft Windows does not have a limit for how many users can be on one computer so feel free to create as many as you like.

User account options

Now, clicking on the existing created user will open user options. From there you will have options to remove the user, therefore removing him/her from this computer, note that removing the local user will remove permanently his/her settings and they would not be able to be restored, or you can change the user account type. User account new accountClick on Change account type. User account account typeUnder account type, you will have the option to promote this user to an administrator if you wish or you can leave it as a standard user.
Read More
Error 0x8007002C - 0x4001E, installation failed in the SECOND_BOOT phase
Recently, a lot of users reported getting several error messages when they upgraded their Windows 10 computers. One of these error messages users encountered during a Windows 10 upgrade is the Error 0x8007002C-0x4001E. if you are one of the users who is facing this error, read on as this post will help you fix it. When you encounter this error, you will see the following error message on your screen:
“We couldn’t install Windows 10 We’ve set your PC back to the way it was before you started installing Windows 10 0x8007002C-0x4001E, The installation failed in the SECOND_BOOT phase with an error during PRE_OOBE operation.”
To resolve the 0x8007002C-0x4001E, The installation failed in the SECOND_BOOT phase error, here are some suggestions that might help.

Option 1 – Try flushing the SoftwareDistribution and Catroot2 folders

You have to stop a couple of services such as BITS, Cryptographic, MSI Installer, and Windows Update Services. And to do that, you need to flush the contents in the SoftwareDistribution folder. The Software Distribution folder in the Windows operating system is a folder that can be found in the Windows directory and is used to store files temporarily which might be required to install the Windows Update on your PC. Thus, it is required by the Windows Update and maintained by WUAgent. Aside from that, it also contains all the Windows Update History files and once you delete them, you will most likely lose the Update history. As a result, the next time you run the Windows Update, it may result in a longer detection time.
  • Open the WinX Menu.
  • From there, open Command Prompt as admin.
  • Then type in the following command – don’t forget to hit Enter right after typing each one of them.
net stop wuauserv net start cryptSvc net start bits net start msiserver
  • After entering these commands, it will stop the Windows Update Service, Background Intelligent Transfer Service (BITS), Cryptographic, and the MSI Installer
  • Next, go to the C:\Windows\SoftwareDistribution folder and get rid of all the folders and files thereby tapping the Ctrl + A keys to select them all and then click on Delete. Note that if the files are in use, you won’t be able to delete them.
After flushing the SoftwareDistribution folder, you need to reset the Catroot2 folder to restart the services you just stopped. To do that, follow these steps:
  • Type each one of the following commands.
net start wuauserv net start cryptSvc net start bits net start msiserver
  • After that, exit Command Prompt and restart your computer, and then try to run Windows Update once more.

Option 2 – Select the Keep your files option

You can also select the option to perform an in-place upgrade and opt for the “Keep my files” option during an installation as it might make the process a lot smoother and if you need to perform a clean install, you can do so once the setup is completed.

Option 3 – Try to run the Windows Update Troubleshooter

Running the built-in Windows Update troubleshooter could also help you resolve the 0x8007002C-0x4001E, The installation failed in the SECOND_BOOT phase error. To run it, go to Settings and then select Troubleshoot from the options. From there, click on Windows Update and then click the “Run the troubleshooter” button.

Option 4 – Try to run Microsoft’s online troubleshooter

Aside from the Windows Update Troubleshooter, you can also run the online troubleshooter of Microsoft as it can help you with Windows 10 upgrade errors.

Option 5 – Perform a clean install

If none of the options worked, you can try to clean install Windows 10. Just make sure that you have the ISO from the official Microsoft Website and then a bootable USB drive to install Windows 10 again. Take note that this will delete all the data from your drive where Windows 10 was installed previously.
Read More
1 2 3 162
Logo
Copyright © 2022, ErrorTools. All Rights Reserved
Trademarks: Microsoft Windows logos are registered trademarks of Microsoft. Disclaimer: ErrorTools.com is not affiliated with Microsoft, nor claim direct affiliation.
The information on this page is provided for information purposes only.
DMCA.com Protection Status