How to Fix Windows 10 Error 0xc0000005

How to Fix Windows 10 Error 0xc0000005

Error Code 0xc0000005 - What is it?

Error Code 0xc0000005 can be a frustrating error that occurs when you attempt to use programs within Windows 10. While it is most often associated with Windows 10, this particular error has also made an appearance in previous versions of the Windows operating system. In each case, the error works in the same ways and is generally caused by the same things.

Common symptoms include:

  • Inability to run programs as designed
  • Inability to start programs

While it can be hard to have to deal with an error like Error Code 0xc0000005 on your Windows machine, there are at least three different strategies that you can use to attempt to resolve the problem at hand. If you do not feel like you have the skill or ability to complete these steps on your own, get in touch with a professional who is familiar with the Windows 10 operating system that can assist you. Please note, if this error code is not rectified, you could be exposing your computer to other error messages such as error code 0xC1900101 -0x20017.

Solution

Restoro box imageError Causes

The most common causes of Error Code 0xc0000005 on Windows 10 machines include interference with other programs that are running on the computer, such as antivirus programs, problems encountered within the registry entries made on the operating system, or faulty drivers that cause bad interactions between the system and the program in question.

Fortunately, there are several methods that can be used to resolve these specific issues.

Further Information and Manual Repair

There are three main ways that you can try to resolve Error Code 0xc0000005 on your Windows machine. Depending on your degree of technical ability and confidence, it may be easy to moderately difficult to follow these steps, so if you feel like you are not able to complete the methods below on your own, be sure to get in touch with a qualified computer repair technician to aid you in the process.

Here are the best ways to resolve Error Code 0xc0000005 on your Windows machine:

Method One:  Disable Any Anti-Virus Processes

In some cases, an antivirus program can cause interference with your programs. If you believe that this is the primary culprit of your issue, try temporarily disabling the software that you are running to see if you are then able to use the program that experienced the error correctly.

Always be sure to keep on other security software, such as Windows Defender, while you disable your antivirus programs, ensuring that your computer is still protected from malicious software. In general, this is usually the best security tool that you can run on your computer, without interfering with other programs.

Method Two:  Run a Registry Cleaner

In some cases, the error code can appear when a registry entry is either seen to be missing or faulty by the system. If you believe this is the primary cause of your problem, use a trusted registry cleaning software to scan the files and attempt to automatically fix the problem.

Always be sure to check out the provider of the registry cleaning tool that you use, as not every tool that you can download from the Internet is safe. When possible, always try to use registry tools that are directly available from the Microsoft website, rather than ones that you do a simple search for online.

Once the registry scan is complete, take the time to reboot your computer to ensure that every change that has been made can be recognized and applied by your operating system and devices.

Method Three:  Check Your Drivers

If your drivers aren’t communicating properly with your hardware, it can cause the error code to appear. To fix this, open up your device manager software and choose to update your driver software. You can run an automatic search for updates to your drivers to make things easier.

When the driver updates have been downloaded and installed, make sure that you take the time to reboot your computer, which can allow your computer to apply and recognize any changes that have been made.

Method Four: Use An Automated Tool

If you wish to always have at your disposal a utility tool to fix these Windows 10 and other related issues when they do arise, download and install a powerful automated tool.

If you like to learn and find out more about various Windows errors, and how to repair them go to our vast archive or use search to find articles that will explain and help you in solving your issue.
However, if you prefer to do things fast and with automatization then we are proposing to use an automated solution for your issues. The application that we are recommending is Advanced System Repair Pro
Advanced System Repair utilizes multiple tools all in one to give you a quick, simple, reliable, and very thorough diagnosis of your PC. It brings you all the tools you need in one program to clean, fix, protect, optimize and boost your PC!
1-Click Maintenance
All the tools to make it simple and easy! It's like having a professional technician at the click of a mouse.

Junk Cleaner
Keeping your computer free from unnecessary clutter also helps make your computer last longer. Like any other machine, if you keep it clean and take care of it, it will serve you better for longer!

Optimize background apps
Optimize applications background activity with the built-in Application Optimizer feature.

Disk Defrag
With a simple 1-click, Advanced System Repair speeds up your PC by assembling fragmented files on your machine and organizing them more efficiently.

Malware Removal
Finds and removes all types of harmful malware including trojans, worms, bots, adware, spyware, PUPs, and more!

Privacy Cleaner
The all-in-one privacy suite to Clean Your Tracks & Protect Your Privacy! Make your computer safe, secure, and more efficient!

System Tweak/Optimizer
ASR will analyze your complete system and settings to adjust your PC to function at its maximum performance.

Registry Cleaner
Over time, as you install and uninstall applications, the registry can become cluttered with old entries and broken settings which can result in program crashes, and annoying messages and slow the computer down.
Visit our Advanced System Repair Pro Download page to inform yourself about all the benefits of this software and get a free trial copy of it.
advanced system repair pro

Advanced System Repair Pro

One-click automated PC repair solution
ASR logo
With Advanced System Repair Pro you can easily
Replace damaged files
Restore performance
Free disk space
Remove Malware
Protects WEB browser
Remove Viruses
Stop PC freezing
DOWNLOAD
Privacy Policy | Terms of Use | Uinstall
Advanced System Repair Pro is compatible with all versions of Microsoft Windows including Windows 11

Share this article:

You might also like

Computer boots to the BIOS when you turn it on
A number of users reported lately that their Windows 10 PCs automatically boots into the BIOS whenever they start their computers. And when they tried to exit the BIOS and restart their computers, it still boots into the BIOS. If you are one of the users who experience the same problem, worry not for this post will walk you through what you can do to resolve the problem. Each time a Windows 10 computer boots, it goes through a lot of processes and one of them is where it checks the computer for any hardware issue such as hard drives, peripherals, as well as external devices. So if it finds some issue, the computer will halt the boot process and will boot into the BIOS. To fix this, there are several suggestions you can try. You have to check if you’ve pressed any key, especially the F2 or F12, or Del keys. You also have to check the peripherals and external devices in your computer or update the BIOS or reset it. For more information, make sure to follow each one of the options laid out below.

Option 1 – Try to check for any pressed key

The first thing you can do is to check for any pressed key. This might not make any sense but a pressed key can actually cause this problem. So you have to check if you have the F2 or F12 or Del buttons pressed since these are hardware keys that are usually set by the OEM to boot into the BIOS.

Option 2 – Try checking the physical device connections

You might also want to try checking if there are other devices that are connected to your PC. This is because the configuration of the BIOS or UEFI might be configured in a way that any external device connected to the computer has a higher boot priority compared to the hard disk.  And if it’s really the case, the externally attached disk might be the drive your computer is trying to boot into and not the hard disk. In such cases, Pen Drives, USB storage devices, CDs, DVDs, and so on, are included in this category of physical device connections.

Option 3 – Try to set a proper boot device

If the Boot Manager wasn’t able to locate a proper boot device, then it could be the reason why your computer boots into the BIOS when you turn it on. Thus, you have to check if there is an available proper boot device. You can usually find it under the Boot priority section. However, if you’re unable to locate your hard drive or SSD under the Boot device, then you have to change the hard drive but you have to check first if it is properly plugged in and that it works on other computers. If it works on other PCs, then the problem lies in the motherboard of your computer, and in that case, you have to consult its manufacturer.

Option 4 – Try to update the BIOS

Updating the BIOS can help you fix the issue but as you know, BIOS is a sensitive part of a computer. Even though it is a software component, the functioning of the hardware depends on it largely. Thus, you must be careful when modifying something in the BIOS. So if you don’t know much about it, it’s best if you skip on this option and try the other ones instead. However, if you are well-versed in navigating the BIOS, then follow the steps below.
  • Tap the Win + R keys to open the Run dialog box.
  • Next, type “msinfo32” in the field and press Enter to open System Information.
  • From there, you should find a search field on the bottom where you have to search for the BIOS version and then press Enter.
  • After that, you should see the developer and version of the BIOS installed on your PC.
  • Go to your manufacturer’s website and then download the latest version of BIOS on your computer.
  • If you are using a laptop, make sure that you keep it plugged in until you have updated the BIOS.
  • Now double click on the downloaded file and install the new BIOS version on your computer.
  • Now restart your computer to apply the changes made.
Note: If updating the BIOS didn’t help, you might want to consider resetting it instead.

Option 5 – Try resetting the BIOS/UEFI configuration

You might also want to reset the BIOS configuration which will lead to arranging the boot configuration since it is intended by the manufacturer. Note that this will get rid of any blockage in the boot process. All you have to do is take out the CMOS battery for a couple of seconds and then put it back again. After that restart, your computer and will be booted directly into Windows. Resetting the BIOS would also get rid of any password set for BIOS and you need to change your CMOS battery in case it didn’t work.
Read More
Software review series: KRITA
Krita Desktop is a free and open-source painting application. Krita is a full-featured free digital painting studio for artists who want to create professional work from start to end. Krita is used by comic book artists, illustrators, concept artists, matte and texture painters, and in the digital VFX industry. Krita has been in development for over 10 years and has had an explosion in growth recently. It offers many common and innovative features to help the amateur and professional alike. Krita has a user-friendly interface. The dockers and panels can be moved and customized for your specific workflow. Once you have your setup, you can save it as your own workspace. You can also create your own shortcuts for commonly used tools. In addition to painting, Krita comes with vector, filter, group, and file layers. Combine, order, and flatten layers to help your artwork stay organized. There are also three different views on how to see the layers. Krita supports full color management through LCMS for ICC and OpenColor IO for EXR, allowing you to incorporate Krita into your existing color management pipeline. Open PSD files that even Photoshop cannot open. Load and save to PSD when you need to take your artwork across different programs. Krita is the only dedicated painting application that lets you open, save, edit and author HDR and scene-referred images. Furthermore, with OCIO and OpenEXR support, you can manipulate the view to examine HDR images, and use it in the most cutting-edge workflows from the film and visual effects industries.
Read More
Error 0x8007002C - 0x4001E, installation failed in the SECOND_BOOT phase
Recently, a lot of users reported getting several error messages when they upgraded their Windows 10 computers. One of these error messages users encountered during a Windows 10 upgrade is the Error 0x8007002C-0x4001E. if you are one of the users who is facing this error, read on as this post will help you fix it. When you encounter this error, you will see the following error message on your screen:
“We couldn’t install Windows 10 We’ve set your PC back to the way it was before you started installing Windows 10 0x8007002C-0x4001E, The installation failed in the SECOND_BOOT phase with an error during PRE_OOBE operation.”
To resolve the 0x8007002C-0x4001E, The installation failed in the SECOND_BOOT phase error, here are some suggestions that might help.

Option 1 – Try flushing the SoftwareDistribution and Catroot2 folders

You have to stop a couple of services such as BITS, Cryptographic, MSI Installer, and Windows Update Services. And to do that, you need to flush the contents in the SoftwareDistribution folder. The Software Distribution folder in the Windows operating system is a folder that can be found in the Windows directory and is used to store files temporarily which might be required to install the Windows Update on your PC. Thus, it is required by the Windows Update and maintained by WUAgent. Aside from that, it also contains all the Windows Update History files and once you delete them, you will most likely lose the Update history. As a result, the next time you run the Windows Update, it may result in a longer detection time.
  • Open the WinX Menu.
  • From there, open Command Prompt as admin.
  • Then type in the following command – don’t forget to hit Enter right after typing each one of them.
net stop wuauserv net start cryptSvc net start bits net start msiserver
  • After entering these commands, it will stop the Windows Update Service, Background Intelligent Transfer Service (BITS), Cryptographic, and the MSI Installer
  • Next, go to the C:\Windows\SoftwareDistribution folder and get rid of all the folders and files thereby tapping the Ctrl + A keys to select them all and then click on Delete. Note that if the files are in use, you won’t be able to delete them.
After flushing the SoftwareDistribution folder, you need to reset the Catroot2 folder to restart the services you just stopped. To do that, follow these steps:
  • Type each one of the following commands.
net start wuauserv net start cryptSvc net start bits net start msiserver
  • After that, exit Command Prompt and restart your computer, and then try to run Windows Update once more.

Option 2 – Select the Keep your files option

You can also select the option to perform an in-place upgrade and opt for the “Keep my files” option during an installation as it might make the process a lot smoother and if you need to perform a clean install, you can do so once the setup is completed.

Option 3 – Try to run the Windows Update Troubleshooter

Running the built-in Windows Update troubleshooter could also help you resolve the 0x8007002C-0x4001E, The installation failed in the SECOND_BOOT phase error. To run it, go to Settings and then select Troubleshoot from the options. From there, click on Windows Update and then click the “Run the troubleshooter” button.

Option 4 – Try to run Microsoft’s online troubleshooter

Aside from the Windows Update Troubleshooter, you can also run the online troubleshooter of Microsoft as it can help you with Windows 10 upgrade errors.

Option 5 – Perform a clean install

If none of the options worked, you can try to clean install Windows 10. Just make sure that you have the ISO from the official Microsoft Website and then a bootable USB drive to install Windows 10 again. Take note that this will delete all the data from your drive where Windows 10 was installed previously.
Read More
Cooler Master's Orb X upcoming gaming chair
The newest piece of hardware for PC or console users is not really what anyone has expected and for sure not from a company like Cooler Master. orb x black and whiteI going to admit right here that I am a big fan of Cooler Master PC cases, I like them and they are always one of the things that I consider when building a new PC, overall I like their ideas and quality so personal for me it was quite a surprise to see that they are one that is making a new generation gaming chair. Now truth to be told Orb X is not your typical gaming chair as you can clearly see from the pictures. The chair itself will come in two colors: white or black and RGB lighting looks to be prominently featured throughout. orb x back
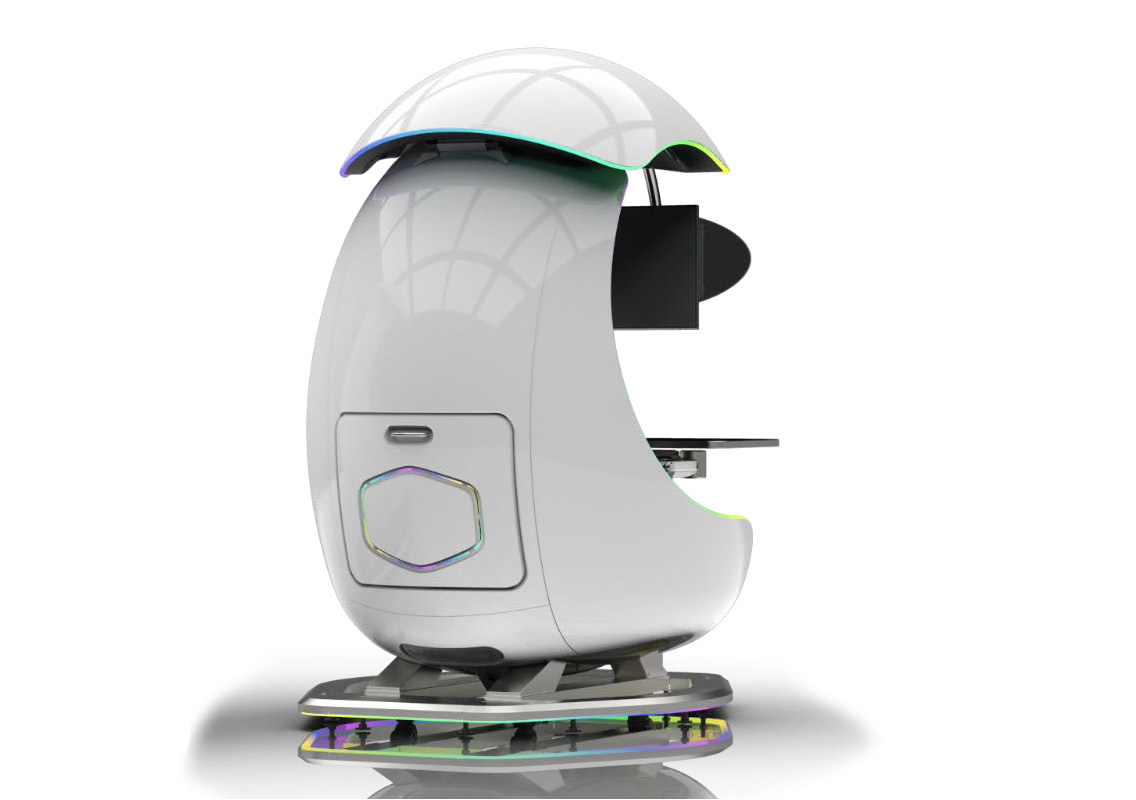
The chair itself is advertised as both meant and aimed for professional and gaming crowds but I believe the gaming crowd is in general more interested in this hardware piece. Hardware is enclosed in a fully motorized shuttle dome which aims to maximize your privacy, it supports a single 49inch display or three 27inch monitors along with surround speakers if you do not wish to use headphones. Orb x side
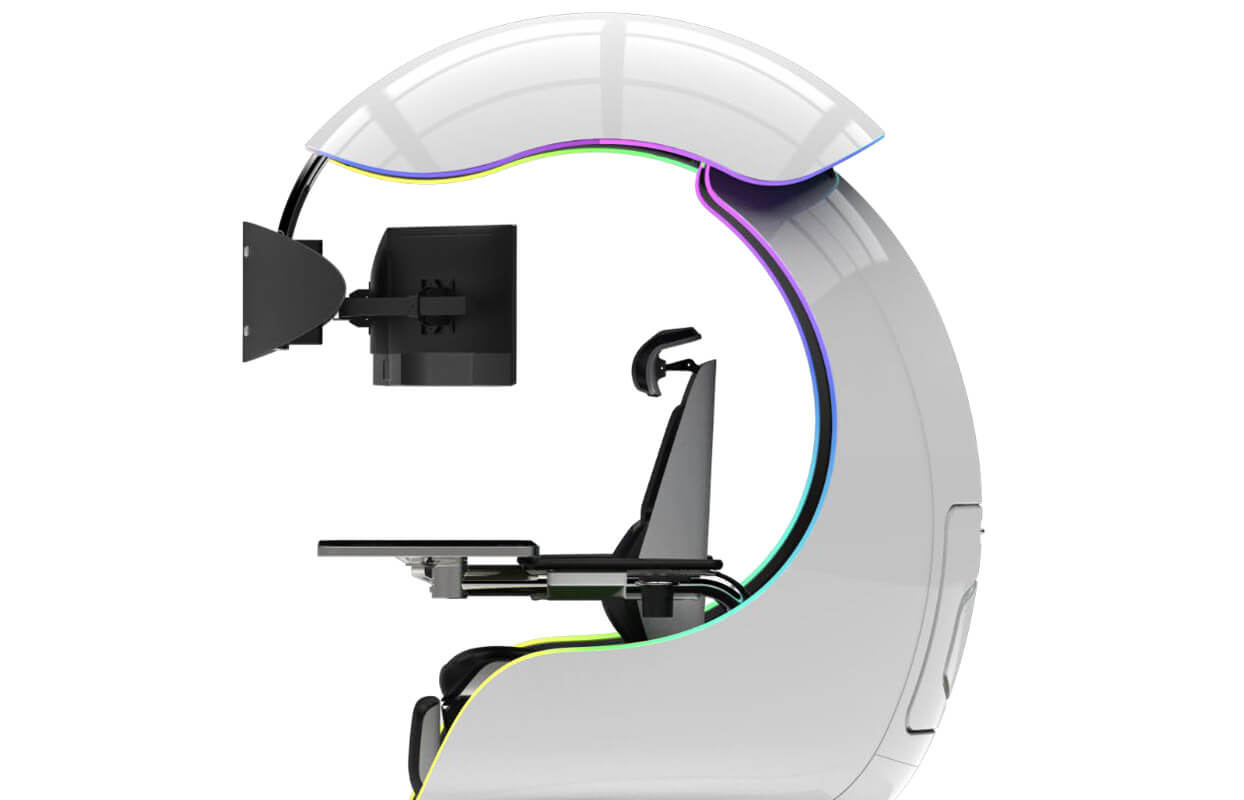
It offers an adjustable headrest, lumbar support, and footrest so you can spend some time in it and be comfortable. Controls on the chair itself allow you to raise or lower the dome for easier getting in and out of it. Orb X also has a compartment in its backside, it folds out and has a sliding tray designed to hold your PC or console. Everything is enclosed so wiring is not the issue. Overall Orb X seems really like the computer chair of the future, Cooler Master expects to release the Orb X by December 2021, priced around $12,000-$14,000.
Read More
Configuring Snapping feature in Windows 11
The Snapping feature was introduced as an essential part of Windows 11 and I like it very much, it lets you organize your opened windows much faster and with more control. However, some people do not like the feature, worry not because you can turn it off, or if you prefer you can just remove the showing layout option that is shown when hovering over Minimize/Maximize button.

Snapping feature windows 11Removing options all together

To completely turn off Snap layout in Windows 11 follow these steps
  1. Open Windows 11 settings by pressing ⊞ Windows + I
  2. Select System on the left part of the screen
  3. In System options select Multitasking
  4. At the top of Multitasking Click on the switch next to Snap Windows
  5. Close settings
Changes will be automatically applied and you will no longer have Snap layout functionality.

Removing layout graphic from Snapping feature

If you like the snap Layouts feature but are not very fond of the layout graphic that is popping up each time you hover over Minimize/Maximize button do not worry, there is an option to turn just that off and keep the feature itself.
  1. Open Windows 11 settings by pressing ⊞ Windows + I
  2. Select System on the left part of the screen
  3. In System options select Multitasking
  4. Click on the Snap Windows menu
  5. Deactivate Show Snap Layouts When I Hover over a Window’s Maximize button
  6. Close settings
Now you will be able to use the Snap Layout feature without layout graphics showing. If you want to reverse any of these options and go back to standard-setting, just follow the steps and turn features ON.
Read More
a New browser from DuckDuckGo is coming
DuckGoGo a popular private search engine is releasing its first browser soon that is focused on privacy like its search engine. duckduckgo browserFrom the recent blog, Gabriel Weinberg, CEO of DuckDuckGo, has stated:
“Like we’ve done on mobile, DuckDuckGo for desktop will redefine user expectations of everyday online privacy,”
From everything that we have learned so far, the browser will be focused on making privacy super easy and simple, eliminating tons of different settings about privacy, and making the whole environment robust privacy protection all set by default. Settings will be applied in all fields, across search, browsing, email, and more. Gabriel also said that aim of the browser is not just a privacy browser, it is meant to be built and used as your everyday browser, for everyday use that protects your privacy as a bonus. One interesting thing that was stated is that browser itself is built upon OS-provided rendering engines instead of typical Chromium. DuckDuckGo says this approach will strip away a lot of the unnecessary cruft and clutter that's accumulated over the years in major browsers. Also, the company stated that when compared to Chrome, the DuckDuckGo app desktop is cleaner, way more private and that early tests have found out that it is significantly faster as well. Is this just corporate advertising or reality? We will see once the browser is released, or once it is released for public testing. Until then take care and happy holidays.
Read More
Razer Iskur gaming chair for healthy gaming
Razer Iskur
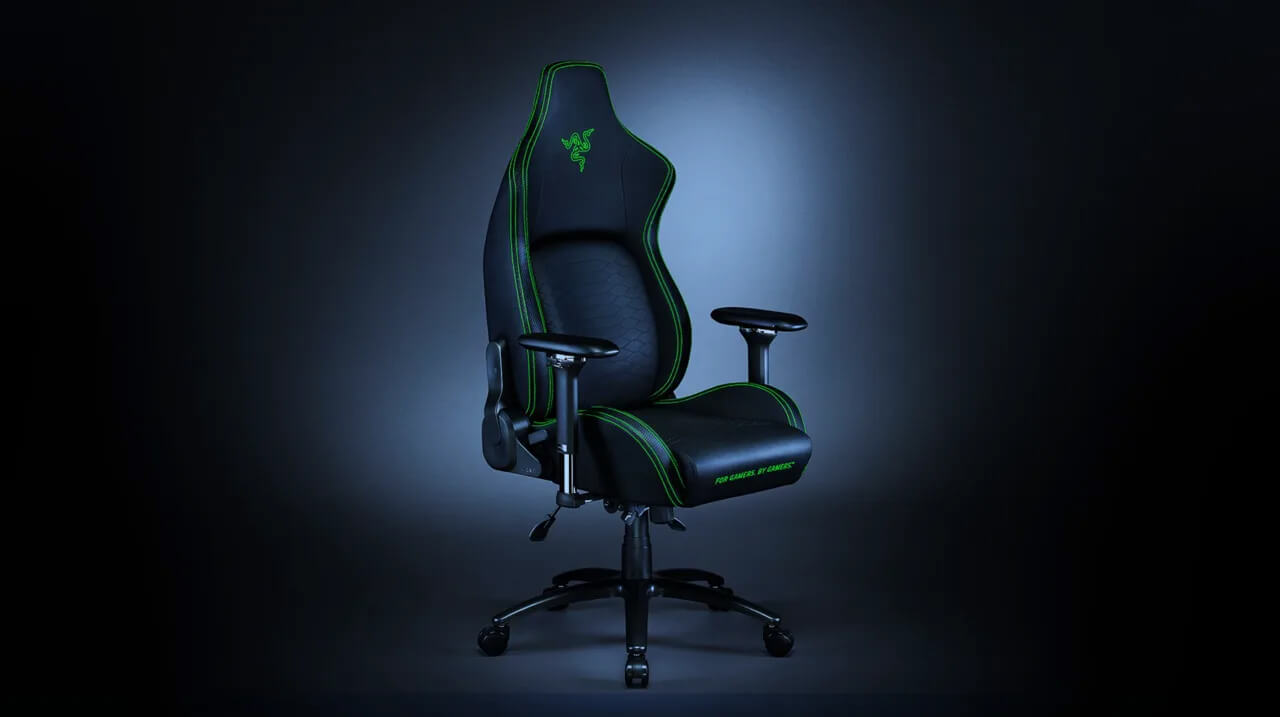
It seems that last few days we were riding some Razer bandwagon but rest assured that we are not sponsored by them in any way, truth is that simply they come up with some interesting accessories which I believe are worth covering. Gaming Chair itself comes in two colors, fully black and green black combination and it is not really an entry-level chair if we are talking about price. The chair itself is around 600USD depending on the distributor and considering that price range it is placed in more top cream of gaming chairs but it is worth every dime.

Iskur Specifications

Iskur is made of a steel frame with a reinforced plywood lumbar support frame for added weight tolerance. Frame and lumbar support are surrounded with memory foam and all of that is wrapped in cotton and polyester layer which is again wrapped in multi-layer synthetic leather making the chair very durable for long hours of daily use. The chair also comes with a memory foam head cushion which is detachable and removable if you do not wish to use it. On the Razer website among specifications, it stands that the chair is best suited for persons from 5’6” – 6’2” (170 – 190cm) height and up to 299lbs (136kg).

Features

The chair has, of course, height adjustment as any gaming chair and surprisingly it has great control for the armrest. The armrest can be adjusted in 4 different ways: up & down, left & right, forward & backward, and inward & outward. The backrest can be also tilted up to 26 degrees angle. All of these features are great and good but there is one more feature that really makes this chair stand out from rest and it is Lumbar support. Iskur has an adjustable lumbar support system on the lower part of the backrest. With your lumbar support secured, you can then make the necessary tweaks to optimize the rest of your posture using the Razer Iskur’s adjustable height, backrest, and armrests.

Conclusion

Razer Iskur is neither cheapest nor perhaps the best gaming chair you can buy, but it is a really good one. It is well manufactured and made to feel and look like a premium product that actually it is.
Read More
Watch Marvel Universe in chronological order
marvelSo far I believe each person on this planet has at least heard of Marvel superhero movies, perhaps even watched a few of them, and no wonder. Movies are spawning now over 20 titles and they are not really released as events described in them. Throw into mix TV series and you can get confused pretty fast. Now it was officially stated that all TV series that were released before Wanda vision is no canon in Marvel cinematic universe which simplify thing a little but there are still series that are.

So without further blabbering around here is a list of Marvels films and TV series in chronological order:

  • Captain America: The First Avenger
  • Captain Marvel
  • Iron Man
  • Iron Man 2
  • The Incredible Hulk
  • Thor
  • The Avengers
  • Iron Man 3
  • Thor: The Dark World
  • Captain America: The Winter Soldier
  • Guardians of the Galaxy
  • Guardians of the Galaxy Vol. 2
  • Avengers: Age of Ultron
  • Ant-Man
  • Captain America: Civil War
  • Spider-Man: Homecoming
  • Doctor Strange
  • Black Panther
  • Thor: Ragnarok
  • Ant-Man and The Wasp
  • Black Widow
  • Avengers: Infinity War
  • Avengers: Endgame
  • WandaVision
  • The Falcon and The Winter Soldier
  • Spiderman: Far From Home
  • Loki
And there you go, if you have someone who has not yet seen movies or you would like to view that as the story is revealed and not by the date they were released now you can easily with this list.
Read More
There is a system repair pending
If you are running a System File Checker scan but got an error message instead that says, “There is a system repair pending which requires reboot to complete, Restart Windows and run SFC again”, worry not for this post will walk you through how you can fix the problem. This kind of error can be addressed and fixed with several potential fixes which will be provided in this post. You can try to restart your computer and run a System File Checker scan again or delete the pending .xml file or use the “revertpendingactions” parameter for the DISM tool. For more information, refer to each one of the options given below.

Option 1 – Try restarting your computer and run the SFC again

The first thing you can do to fix the problem is to restart your computer and let the pending process be completed. After your computer restarted, try to run System File Checker again and see if the error is now fixed or not. If not, refer to the other options below.

Option 2 – Try deleting the pending .xml file

The next thing you can do to fix the problem is to delete the pending .xml file. How? All you have to do is navigate to this location at CWindowsWinSxS and from there, look for a pending .xml file and rename it or delete it. This will get rid of any pending tasks and will build a fresh new check.

Option 3 – Try to use the “revertpendingactions” parameter for the DISM tool

If the two options given above didn’t work, you can try using the revertpendingactions parameter for the DISM tool. If you’re not able to boot into Windows, then run Command Prompt from the Recovery Console and execute the given command below.
dism.exe /image:C: /cleanup-image /revertpendingactions
After you execute the command, restart your computer and try to run System File Checker again and see if it has fixed the problem or not.
Read More
Windows computer doesn’t recognize second GPU
A lot of Windows users, use a second GPU for their computer systems, especially gamers above the dedicated graphics card. The operating system is set such that the dedicated high-end graphics card is set to default but there are times when the system does not recognize or detect the second graphics card. Even though every computer system comes with an integrated graphics card, for the most part, it is insufficient for graphics-intensive games and software which is why if you have an extra dedicated graphics card and your computer does not seem to detect or recognize it, then this post is for you. It could be that the dedicated graphics card has failed or it could also be an issue with the drivers and so on. Follow the suggested options below to resolve the problem.

Option 1 – Update your Graphics drivers

  • First, boot your computer into Safe Mode.
  • After that, tap the Win + R keys to launch Run.
  • Type in msc into the box and tap Enter or click OK to open the Device Manager.
  • After that, a list of device drivers will be displayed. From there, look for the Display Adapters and click on them.
  • After that, right-click on each entry under the Display Adapters and select the “Uninstall Device” option from the menu.
  • Now restart your computer.
  • After restarting your computer, go to the Settings app and Check for Updates in the Windows Update section.
Note: You also have the option to go directly to the website of your graphics card manufacturers like NVIDIA, Intel, or AMD and go to the section called Drivers then check if there’s a new available update – if there is, download and install it.

Option 2 – Update the BIOS

Take note that you have to be careful when modifying something in the BIOS. So if you don’t know much about it, it’s best if you skip on this option and try the other ones instead. However, if you are well-versed in navigating the BIOS, then follow the steps below.
  • Tap the Win + R keys to open the Run dialog box.
  • Next, type “msinfo32” in the field and press Enter to open System Information.
  • From there, you should find a search field on the bottom where you have to search for the BIOS version and then press Enter.
  • After that, you should see the developer and version of the BIOS installed on your PC.
  • Go to your manufacturer’s website and then download the latest version of BIOS on your computer.
  • If you are using a laptop, make sure that you keep it plugged in until you have updated the BIOS.
  • Now double click on the downloaded file and install the new BIOS version on your computer.
  • Now restart your computer to apply the changes made.

Option 3 – Try changing the GPU settings

  • Right-click on any empty space on your Desktop and select Graphics Properties. Note that the Graphics Properties screen depends on the graphics drivers installed on your computer and are system-specific as they may be different for other systems but they aren’t hard to find.
  • After that, make sure that the dedicated Graphics card is selected as Default under the Select Display drop-down.
  • If the Graphics card isn’t set as Default, set it and click Apply and Exit.

Option 4 – Try disabling the driver for the integrated Graphics card

  • Tap the Win + R keys to open the Run dialog box.
  • Next, type “devmgmt.msc” in the field and hit Enter to open the Device Manager.
  • From there, expand the list of Display Adapters and then right-click and select Disable device for the Integrated Graphics card. However, if the dedicated Graphics card fails, the display won’t work so you need to restart the system and enable it.
Read More
1 2 3 162
Logo
Copyright © 2022, ErrorTools. All Rights Reserved
Trademarks: Microsoft Windows logos are registered trademarks of Microsoft. Disclaimer: ErrorTools.com is not affiliated with Microsoft, nor claim direct affiliation.
The information on this page is provided for information purposes only.
DMCA.com Protection Status