How to Fix Windows 10 Error Code 0x80070570

Error Code 0x80070570 - What is it?

Error Code 0x80070570 is a common Windows 10 error code that generally is seen by users who are attempting to install a new version of the operating system. While it is most often associated with Windows 10, variations on this same error code have been present in previous versions of the operating system, going all the way back to Windows 7.

Common symptoms include:

  • Inability to run through the installation process to completion when attempting to install a new version of the operating system
  • Error message regarding corrupt or missing files

While it is frustrating to encounter an error like Error Code 0x80070570 as you try to install a new operating system version on your device, there are several methods that can be used to try to resolve the issue. If you do not feel like you have the skill or knowledge necessary to successfully apply the steps below, be sure to get in touch with a trusted computer repair technician that is competent in the repair of Windows 10 errors.

Solution

Restoro box imageError Causes

In some cases, Error Code 0x80070570 arises erroneously when the system isn’t able to find a particular file that it needs. Other times, it happens when there is a conflict with the antivirus software that you are running and the installation software. Finally, there may be a faulty source of RAM in your computer that needs to be removed before the installation can be completed.

Regardless of what you believe to be the cause behind the error code, there are at least two different methods that you can use to try to resolve Error Code 0x80070570 on your device. The first is fairly simple and easy to follow, while the second requires a little bit more knowledge of your hardware in order to complete it successfully.

Further Information and Manual Repair

There are two common ways that users can attempt to get around Error Code 0x80070570 on their devices. Each requires a little more skill and technical knowledge than the last. If you don’t feel like you have the skill, time, or ability to invest in the methods below, be sure to get in touch with a Windows repair technician who can help you to complete the necessary steps in the right ways.

Here are the best ways to attempt to resolve Error Code 0x80070570 on your Windows device:

Method One:  Reattempt Installation

In some cases, when Error Code 0x80070570 appears on your computer, you can simply click on the OK button and then go back to the screen immediately proceeding where your installation has left off, choosing to restart the process of installation. For some users, repeating this method at least four times has allowed them to bypass the error without undertaking more serious and time-consuming methods to resolve the issue at hand.

Method Two:  Check Your Various Sources of RAM

If you have more than one source of RAM in your computer, first remove one of the sources, then re-attempt installation. If you are still encountering Error Code 0x80070570 after removing one of the sources, continue to remove each until you are down to a single source, then trade that last source for one of the ones that have been pulled.

If you have a bad source of RAM, this can help you to figure out which input is causing the error to appear and to address the problem appropriately. Once you have determined which specific source is causing the problem, you can reboot your computer and attempt to run the installation process one more time.

If your RAM sources are not specifically causing the issue, you may still need to run diagnostics tests on your hardware to identify the source of the problem at hand.

Method Three: Use An Automated Tool

If you wish to always have at your disposal a utility tool to fix these Windows 10 and other related issues when they do arise, download and install a powerful automated tool.

If you like to learn and find out more about various Windows errors, and how to repair them go to our vast archive or use search to find articles that will explain and help you in solving your issue.
However, if you prefer to do things fast and with automatization then we are proposing to use an automated solution for your issues. The application that we are recommending is Advanced System Repair Pro
Advanced System Repair utilizes multiple tools all in one to give you a quick, simple, reliable, and very thorough diagnosis of your PC. It brings you all the tools you need in one program to clean, fix, protect, optimize and boost your PC!
1-Click Maintenance
All the tools to make it simple and easy! It's like having a professional technician at the click of a mouse.

Junk Cleaner
Keeping your computer free from unnecessary clutter also helps make your computer last longer. Like any other machine, if you keep it clean and take care of it, it will serve you better for longer!

Optimize background apps
Optimize applications background activity with the built-in Application Optimizer feature.

Disk Defrag
With a simple 1-click, Advanced System Repair speeds up your PC by assembling fragmented files on your machine and organizing them more efficiently.

Malware Removal
Finds and removes all types of harmful malware including trojans, worms, bots, adware, spyware, PUPs, and more!

Privacy Cleaner
The all-in-one privacy suite to Clean Your Tracks & Protect Your Privacy! Make your computer safe, secure, and more efficient!

System Tweak/Optimizer
ASR will analyze your complete system and settings to adjust your PC to function at its maximum performance.

Registry Cleaner
Over time, as you install and uninstall applications, the registry can become cluttered with old entries and broken settings which can result in program crashes, and annoying messages and slow the computer down.
Visit our Advanced System Repair Pro Download page to inform yourself about all the benefits of this software and get a free trial copy of it.
advanced system repair pro

Advanced System Repair Pro

One-click automated PC repair solution
ASR logo
With Advanced System Repair Pro you can easily
Replace damaged files
Restore performance
Free disk space
Remove Malware
Protects WEB browser
Remove Viruses
Stop PC freezing
DOWNLOAD
Privacy Policy | Terms of Use | Uinstall
Advanced System Repair Pro is compatible with all versions of Microsoft Windows including Windows 11

Share this article:

You might also like

Fix Windows 11 not using the whole RAM
It has been reported that there are systems out there with Windows 11 operating systems that do not use the whole RAM memory installed in the system. If by any chance you are one of the unfortunate users that has encountered this issue, fear not, we have a solution for you.

RAM memoryRun the Windows Memory Diagnostic tool

  1. Press ⊞ WINDOWS + S to open the search menu
  2. Type in Windows Memory Diagnostic tool
  3. Click on the found app
  4. Select Restart now and check for problems
  5. Wait for the tool to finish
Memory Diagnostic tool is a built-in tool in Windows, it was designed to automatically find and repair memory issues and should be your first step toward resolving this issue.

Check page file

  1. Press ⊞ WINDOWS + S to open the search menu
  2. Type in View advanced system settings
  3. Click on the search result
  4. Click on settings under performance
  5. Click on the Advanced tab
  6. Click on Change under Virtual memory
  7. Uncheck the box for Automatically manage paging file size for all drives
  8. Then select the drive and check the No paging file option
  9. Click on Set
  10. Repeat for all drives on the system
  11. Reboot the system for changes to take effect
If after reboot system still does not see and use whole available RAM, repeat this process and turn back ON paging. After you are done move to the next solution.

Modify usable RAM

  1. Press ⊞ WINDOWS + S to open the search menu
  2. Type in System configuration
  3. Click on the search result
  4. Go to the Boot tab and click on Advanced options
  5. Check the box for Maximum memory
  6. Enter the installed RAM on your system in the field box and click on OK
  7. Confirm once again on the OK and close the System configuration window
  8. Restart the system
If the provided solution has not worked, uncheck the Maximum memory checkbox and save the changes. Move to the next solution.

Change and modify the registry

  1. Press ⊞ WINDOWS + R to open the run menu
  2. Type in Regedit and press the OK button or hit ENTER
  3. Click on YES if prompted by UAC
  4. Locate the HKEY_LOCAL_MACHINE\SYSTEM\CurrentControlSet\Control\Session Manager\Memory
  5. On the right side find and double click on the ClearPageFileAtShutdown DWORD
  6. Enter 1 under Value data and click on OK to save the changes
  7. Close the registry and reboot the system

Enable memory remapping inside BIOS

In order to do this fix, you will need to enter BIOS on your system. How entering BIOS is different from system to system depending on your manufacturer, especially if it is a laptop this step you will have to do alone. Go to your motherboard manufacturer or laptop manufacturer and see how to enter BIOS.
  1. Enter BIOS (80% of the time this can be done by pressing DEL or F12 while the system is turned ON)
  2. Locate System Agent Configuration option
  3. Select Memory Remap Feature and Enable it
Your BIOS might be different from ours and you might not have the System Agent Configuration option, in this case, go through the setting and try to locate Memory Remap Feature. If this feature is missing as well move to the next step.

Rearrange RAM modules on the motherboard

Sometimes RAM memory cannot be slotted properly or just purely switching them in slots can solve the issue. Take RAM out, clean memory slots, clean motherboard connectors for them, and place them back in a different order. If by any chance none of the methods worked, then the issue might be in the hardware itself, either memory banks themselves, motherboard, power supply, etc. If this is sadly the case, you will have to locate the issue and replace the faulty part. If you are not technical enough for this adventure, the best solution is to take a PC to a computer repair shop.
Read More
How to Fix win32kfull.sys BSOD Error in Windows 10
The win32kfull.sys file is one of the kernel-mode device drivers in your Windows 10 operating system. In case you don’t know, there are two kinds of device drivers – the first ones are the normal drivers that communicate between your hardware and the operating system while the second ones are the kernel-mode drivers. The latter is necessary for booting your OS. And there are times when you encounter the win32kfull.sys error while booting your PC. Here’s the full context of the win32kfull.sys error:
“SYSTEM_SERVICE_EXCEPTION (win32kbase.sys) APC_INDEX_MIXMATCH PAGE_FAULT_IN_NONPAGED_AREA”
This error could be caused by corrupted or outdated drivers with incomplete files or it could be caused by some driver or software installed on your computer. To fix this error, here are some troubleshooting options you need to check out.

Option 1 – Try updating all the Drivers

As pointed out, the win32kfull.sys error can be due to outdated or corrupted drivers that are not compatible with your hardware. These drivers include but are not limited to display, network, sound, hard drive, and more. If you are not able to access the internet, you can just manually download the update using another PC. To update your drivers, here’s what you need to do:
  • Tap the Win + R keys to launch Run.
  • Type in devmgmt.msc into the box and tap Enter or click OK to open the Device Manager.
  • After that, a list of device drivers will be displayed. If you see a red or yellow sign that shows up against the driver, right-click on the driver’s name and select “Update Driver Software” or “Uninstall”. And if you find any “Unknown device”, you need to update it as well.
  • Select the “Search automatically for updated driver software” option and then follow the instructions to complete the process.
  • Restart your PC.
Note: You also have the option to go directly to the website of your graphics card manufacturer and check if there’s a new update – if there is, download it. After that, you could also check if there’s a new update of the game you’re getting the issue of the black bar.

Option 2 – Identify and uninstall problematic programs by putting your PC in a Clean Boot State

One of the main causes of BSOD errors like win32kfull.sys is a problematic program that could clash with your existing operating system as well as computer architecture. There are tons of programs that are either incompatible or conflict with the existing drivers or software in your system. To identify such programs, you need to put your PC in a Clean Boot state. How? Follow these steps:
  • Log onto your PC as an administrator.
  • Type in MSConfig in the Start Search to open the System Configuration utility.
  • From there, go to the General tab and click “Selective startup”.
  • Clear the “Load Startup items” checkbox and make sure that the “Load System Services” and “Use Original boot configuration” options are checked.
  • Next, click the Services tab and select the “Hide All Microsoft Services” checkbox.
  • Click Disable all.
  • Click on Apply/OK and restart your PC. (This will put your PC into a Clean Boot State. And configure Windows to use the usual startup, just simply undo the changes.)
After putting your PC in a Clean Boot State, try creating a system restore point and see if the problem still occurs. Clean Boot troubleshooting is designed to help you isolate the problem. For you to execute a clean boot troubleshooting, you must do a couple of actions (the steps are given above) and then restart your PC after every action. You might have to disable one third-party app after the other to really isolate the issue. And once you’ve narrowed down the problem, you can either disable the third-party app that’s causing the problem or remove it. Note that you must switch your PC back into the Normal Startup mode after you’re done troubleshooting the problem. Here’s how you can do it:
  • From the “Start” menu, go to System Configuration.
  • After that, switch to the General tab and click the option for “Normal Startup”.
  • Next, go to the Services tab and clear the checkbox for “Hide all Microsoft services”.
  • Then find and click “Enable all” and if prompted, you have to confirm.
  • Afterward, go to the Task Manager and enable all the Startup programs and confirm the action.
  • Restart your PC when prompted.
Once you have identified the program causing the problem, uninstall it right away from your Control Panel.

Option 3 – Perform an SFC scan

The SFC or System File Checker scan could detect and automatically repair damaged system files that could be causing the win32kfull.sys error. SFC is a built-in command utility that helps in restoring corrupted files as well as missing files. It replaces bad and corrupted system files to good system files. To run the SFC command, follow the steps given below.
  • Tap Win + R to launch Run.
  • Type in cmd in the field and tap Enter.
  • After opening Command Prompt, type in sfc /scannow
The command will start a system scan which will take a few whiles before it finishes. Once it’s done, you could get the following results:
  1. Windows Resource Protection did not find any integrity violations.
  2. Windows Resource Protection found corrupt files and successfully repaired them.
  3. Windows Resource Protection found corrupt files but was unable to fix some of them.
Read More
Microsoft Office Windows 11 edition
Microsoft has officially announced details about the newest upgrades to its office 365 suite moving forward along with its new OS release. It seems that Microsoft has listened to its user base and feedback since Word, Excel, and PowerPoint are getting much-needed redesign taking into account many suggestions from the community. The new office should feel more like an application suite guiding focus on the interconnection of applications themselves providing users with a much more natural experience of using them.

The new office features so far

From Microsoft themselves:
“This Office visual refresh is based on feedback from customers who asked for a more natural and consistent experience within and between your applications, specifically on Windows. With this update, we deliver an intuitive, coherent, and familiar user interface, using the Fluent Design principles, across all your applications: Word, Excel, PowerPoint, OneNote, Outlook, Access, Project, Publisher, and Visio. We aligned this visual refresh with the design of Windows 11 to provide seamless experiences on your PC.”
It is always refreshing to hear when a company listens to its user base and actually does what is needed instead of trying to invent the wheel.

office appsHow to switch

Since beta is already rolling and if you have an active 365 subscription to office suite visual refresh will be automatically available to all Office insiders running beta channel builds. It can be turned on and off using the coming soon feature in the top right corner of the menu in any application. Just click on the megaphone icon to open the coming soon pane and apply settings to all office apps. Note that The Coming Soon feature is not available in Access, Project, Publisher, or Visio. If you turn on the visual refresh in any of the 4 apps mentioned above (Work Excel, PowerPoint, or OneNote), it will also be available in these 4 apps.

Difference themselves

The Home tab menu still has a familiar look with a few tweaks. For example, accessing frequently used Word commands will be a lot easier. By navigating to Designer > Show Quick Access Toolbar, users can add a customizable shortcut ribbon to Word that houses conveniently placed options. Also, the office will not match your Windows operating system color theme so if you have a dark theme enabled, the office will also have a dark color theme. Color palettes are more neutral, corners are a bit softer but customizable ribbons are a win here for me.

office dark modeConclusion

There was not much said other than visual upgrades and small tweaks that were supposed to make your life easier but then again Windows 11 itself is in the same boat. I am not sure if this is a great update offering just some visual tweaks and focus on workflow mechanics or just being plain lazy and trying to cash in visuals as a completely new product.
Read More
Webpage was blocked (ERR_BLOCKED_BY_CLIENT)
If you are browsing the web but suddenly encountered the ERR_BLOCKED_BY_CLIENT error on your Chrome browser in Windows 10, read on as this post will guide you in fixing this problem. This kind of error has already been reported by a number of Chrome users and it seems that the problem has something to do with a plugin or extension. Here’s the exact content of the error:
“This webpage was blocked by an extension (ERR_BLOCKED_BY_CLIENT)”
This kind of error, as pointed out, could be caused by an extension or plugin on Chrome that is blocking the web page. It is also possible that the version of Chrome is obsolete or that there could be more than 100 bookmarks in the Bookmark Manager. Before you troubleshoot the problem, make sure that you download the latest version of Google Chrome and see if it fixes the error. If it didn’t, then you can try opening a web page in Incognito Mode or disable and remove the extension that’s causing the problem. You could also try to remove any surplus bookmarks.

Option 1 – Try to open the web page in Incognito Mode

The first thing you can do to fix the problem is to try opening the web page in Incognito Mode. When your browser is in this mode, it will work without extensions. This would help in fixing the problem especially if it was caused by some extension or toolbar in your browser. All you have to do is open any web page in Chrome and tap the Ctrl + Shift + N key combination to open a window in Incognito Mode.

Option 2 – Try to disable and get rid of the problematic extension

After you’ve isolated the problem and have determined that an extension is the one that’s causing it, then the next thing you have to do is to disable or get rid of that extension.
  • Open Chrome and press Alt + F keys.
  • Go to More tools and click Extensions to look for any suspicious browser extensions or toolbars.
  • Click the Recycle bin and select Remove.
  • Restart Chrome and press Alt + F keys again.
  • Proceed to On Startup and mark Open a specific page or set of pages.
  • To check if the browser hijacker is still active, click Set pages, if it is active, overwrite the URL.
Note: If removing the browser extensions or toolbars didn’t work, you can also try to reset your Google Chrome browser.
  • Open Google Chrome, then tap the Alt + F keys.
  • After that, click on Settings.
  • Next, scroll down until you see the Advanced option, once you see it, click on it.
  • After clicking the Advanced option, go to the “Restore and clean up option and click on the “Restore settings to their original defaults” option to reset Google Chrome.
  • Now restart Google Chrome.

Option 3 – Try removing surplus bookmarks

If your Chrome browser is already supporting more than 100 bookmarks, you might want to consider deleting them as it could also be one of the reasons why you’re getting the ERR_BLOCKED_BY_CLIENT error. To remove these bookmarks, just open the bookmark library by typing this address “chrome://bookmarks/” in the address bar of Chrome and tap Enter and press Shift and then select the surplus bookmarks by using the arrow keys. After that, click Delete to get rid of them.

Option 4 – Try clearing browser data

There are times when some data in the browser is conflicting with the loading of the website and triggers errors like ERR_BLOCKED_BY_CLIENT. And so you can try to clear your browser’s data. This might be a very basic solution but oftentimes it works in fixing this kind of error in Google Chrome. Follow the steps below to clear the data in your browser.
  • Open your Google Chrome browser.
  • After that, tap the Ctrl + H keys. Doing so will open a new panel that allows you to delete the browsing history and other data in your browser.
  • Now select every checkbox that you see and click on the Clear browsing data button.
  • Then restart your Chrome browser and check if you can now open any website or not.
Read More
Enable or Disable Auto-Mounting in Windows
Every time a new drive or any storage device is connected to a Windows 10 computer, the operating system tends to allot a drive letter to it automatically. Not only that, as the OS also maps the location of the drive which helps it point the letter to the exact port location of the drive and serve requests from the user. As a result, it builds up a bit of cache as per the pattern in which the user uses the storage of the computer. This whole process is known as “Auto Mounting” which works for hard disks or optical drive readers that are connected using the SATA ports and even for USB drives that are connected using the USB ports. There are several ways you can enable or disable the Auto-Mount feature in Windows 10. You can do it using the MountVol tool or the Registry Editor or the Diskpart utility. Before you proceed, it is recommended that you create a System Restore point first so that you can always undo the changes you made in case anything goes wrong.

Option 1 – Enable or disable Auto Mounting via MountVol tool

In this option, you will be using the mountvol command in the Command Prompt. Refer to the steps below.
  • Tap the Wins key once and type in “command prompt” in the field.
  • From the search results, right-click on Command Prompt and select the “Run as administrator” option to run it with admin privileges.
  • Next, type the following command and tap Enter to enable the Auto Mount feature:
mountvol /E
  • On the other hand, if you want to disable the Auto Mount feature, type the following command instead:
mountvol /N
  • After that, type the command below to remove all the previously assigned drive letters:
mountvol /R
  • Finally, restart your computer.

Option 2 – Enable or disable Auto Mounting via Registry Editor

  • Tap the Win + R keys to open the Run dialog box.
  • Then type “Regedit” in the field and tap Enter to open the Registry Editor.
  • After that, navigate to this registry key: ComputerHKEY_LOCAL_MACHINESYSTEMCurrentControlSetServicesmountmgr
  • Next, look for a DWORD named “NoAutoMount”. If you can’t find a DWORD with that name then simply create a new DWORD with the same name and make sure that the base is selected to Hexadecimal.
  • Now double click on that DWORD and change its value to 0 if you want to enable it, otherwise, input 1 as its value to disable it.
  • Restart your computer.

Option 3 – Enable or disable Auto Mounting via Diskpart utility

  • Tap the Wins key once and type in “command prompt” in the field.
  • From the search results, right-click on Command Prompt and select the “Run as administrator” option to run it with admin privileges.
  • After opening Command Prompt as admin, type the following command and hit Enter to launch the Diskpart utility:
diskpart
  • After that, a User Account Control prompt will appear. Just click on the Yes button.
  • Next, type the following command and hit Enter:
automount
  • Following the command you entered, you will an output that either says, “Automatic mounting of new volumes enabled” or “Automatic mounting of new volumes disabled” which means you can use it to check the status of Auto Mount.
  • Now if you want to enable the Auto Mount feature, type the following command and tap Enter:
automount enable
  • And if you want to disable the Auto Mount feature, just enter the following command:
automount disable
  • To remove all the assigned letter and history of drives that were connected previously, type the following command:
automount scrub
  • Finally, restart your computer.
Read More
Fix the HTTP Error 304 Not modified
When you get the “HTTP Error 304 Not modified” error in Google Chrome, Mozilla Firefox, or Microsoft Edge, there can be lots of reasons why you’re getting this error. The HTTP Error code 304 means redirection, technically. It could be that the DNS has some issues or the cache is already reusing the existing information to look for a website or it could also be that your browser might be infected. In this post, we will show you what you can do to fix the “HTTP Error 304 Not modified” error when you are not able to open a website on your browser. Here are the exact details of the error message:
“This status code is returned if the client has already downloaded resources since the last visit and is displayed to notify the client browser that the requested resources is already stored in the browser cache which hasn’t been modified.”
Follow each one of the given fixes below to resolve the issue.

Option 1 – Clear the browsing data on your browsers

The first thing you can try is clearing the browsing data on your browsers.

Microsoft Edge:

  • Open Microsoft Edge.
  • Then click on the three horizontal dots to open the menu.
  • From there, click on Settings. And under Settings, click the “Choose what to clear” button under the Clear browsing data section.
  • Next, check all the checkboxes and then click the Clear button to clear the browsing data in the Edge browser.
  • Restart Edge.

Google Chrome:

  • Open Chrome and then click on the three vertical dots located at the top of the window.
  • Then click on Settings.
  • After that, click on Advanced. And from the Privacy and Security section, click on the “Clear browsing data” option.
  • Now click on the CLEAR DATA button.
  • Restart Chrome.

Mozilla Firefox:

  • Open Firefox and then click on the three horizontal lines to open the menu.
  • From there, click on Options.
  • Next, select Privacy & Security.
  • After that, click on the Clear Now button under the Cached Web Content section and then click the Clear All Data button under the Site Data section.
  • Restart Firefox.

Option 2 – Flush DNS and reset the TCP/IP

There are some websites that don’t resolve since the DNS in your computer still remembers that old IP address. And so you need to flush the DNS as well as reset the TCP/IP on your computer.
  • Click the Start button and type in “command prompt” in the field.
  • From the search results that appear, right-click on Command Prompt and select the “Run as administrator” option.
  • After opening Command Prompt, you have to type each one of the commands listed below. Just make sure that after you type each command, you hit Enter
    • ipconfig /release
    • ipconfig /all
    • ipconfig /flushdns
    • ipconfig /renew
    • netsh int ip set dns
After you key in the commands listed above, the DNS cache will be flushed and the TCP/IP will reset.

Option 3 – Try using the Google Public DNS

Changing your DNS to Google Public DNS might also help you in fixing the “HTTP Error 304 Not modified” error. To do so, follow the steps below.
  • The first thing you have to do is right-click on the network icon in the Taskbar and select Network and Sharing Center.
  • Next, click on the “Change Adapter Settings” option.
  • After that, search for the network connection that you are using to connect to the internet. Note that the option might be “Wireless Connection” or “Local Area Connection”.
  • Right-click on your network connection and click on Properties.
  • Then select the new window to choose the “Internet Protocol 4 (TCP/IPv4)” option.
  • After that, click on the Properties button and click the checkbox in the new window for the option “Use the following DNS server addresses”.
  • Type in “8.8.8.8” and “8.8.4.4” and click OK and exit.

Option 4 – Run Cleanup Tool and disable Extensions

You might also want to run the Cleanup Tool in Chrome if you are using this browser as well as disable all the extensions as some of them, if not all, might be the reason why you’re getting the “HTTP Error 304 Not modified” error.
Read More
New focus sessions in Windows 11
focus session
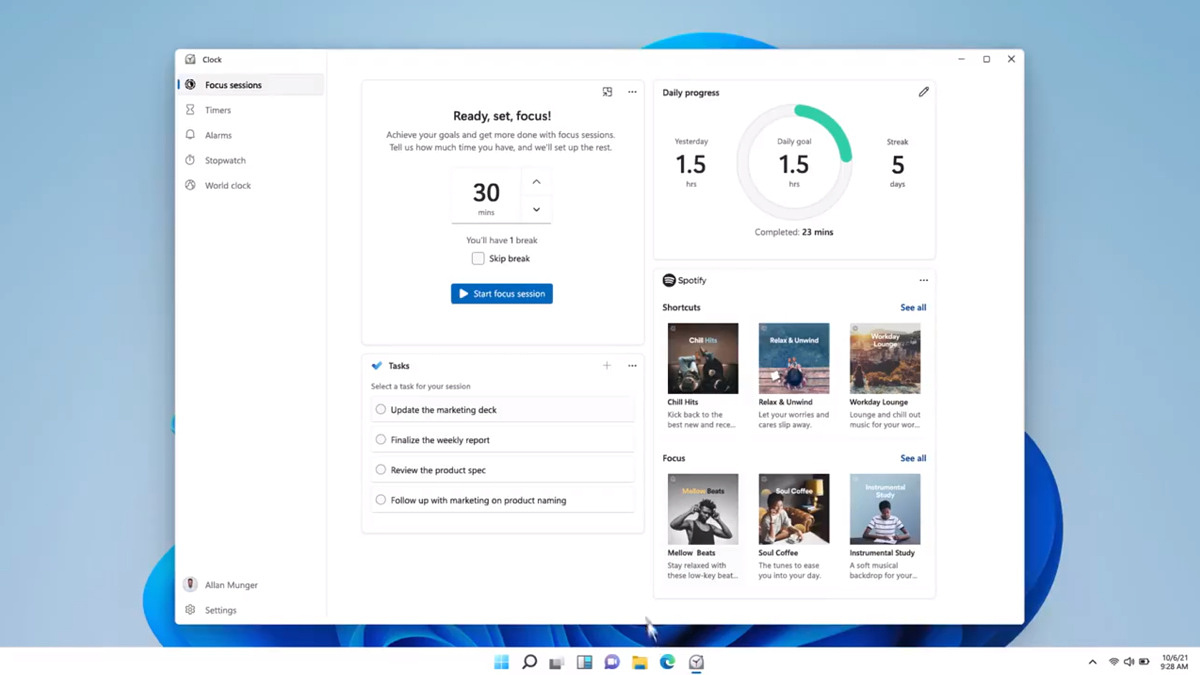
Windows and Devices chief Panos Panay has revealed new focus sessions feature that will be in Windows 11 on his Twitter account today. He himself is referring to it as a game-changer especially with Spotify integration.

So what is a focus session?

From the video clip provided on Twitter, we can see that focus session users will be able to choose a specific task from the previously made task list, choose songs that will play in the background while the task is active, and set a timer for the chosen task with breaks. Maybe the best comparison and explanation would be a desktop google calendar task with music, basically, that’s it. A neat and good organizer inside your Windows 11 operating system. I think that this is generally a good idea and for sure it will find its audience.
Read More
The executable program that ...
If you are trying to start a service using the Windows Services Manager but you got an error message stating, “The executable program that this service is configured to run in does not implement the service”, then you’ve come to the right place as this post will provide you instructions on how you can fix this error. Since almost all program requires service to run on your computer, if the service is not listed in the corresponding registry key, then you will most likely encounter this error on your Windows 10 computer. Here’s the entire content of the error message:
“Windows could not start the service on Local Computer. Error 1083: The executable program that this service is configured to run in does not implement the service.”
To fix this error, you have to add the service name in the respective host in the Registry Editor, and to do that, here are some steps you need to take on. Step 1: The first thing you have to do is to take note of the service name that’s given in the error message. For instance, you get the “Windows Management Service. Step 2: Next, you need to open the Services Manager by tapping the Win + R keys and typing “services.msc” in the Run dialog box, and then tapping Enter. Step 3: After opening the Services Manager, look for the Windows Management Service and once you see it, double click on it. This will open a new mini window. Step 4: From the newly opened window, copy the Service name and the Path to executable under the General tab. If the path to the executable is displayed as “C:/Windows/system32/svchost.exe -k netsvcs –p”, you need the “netsvcs” part only. Note that it can be different for different services and you need the part that comes after “-k”. Step 5: Now tap the Win + R keys again to open Run utility and type “Regedit” in the field and click OK to open the Registry Editor. Step 6: After that, navigate to the following registry path:
ComputerHKEY_LOCAL_MACHINESOFTWAREMicrosoftWindows NTCurrentVersionSvchost
Step 7: From the given registry path, look for a key named “REG_MULTI_SZ” located on your right-hand side. This key is named after the “Path to executable” part. For instance, you should see “netsvcs”. Step 8: Double click on the REG_MULTI_SZ key and enter the Service name that you’ve copied earlier and then write it down at the end of the preset list. Step 9: Now save the changes you’ve made and try to open the program or run the service again.
Read More
Fix Errors 0x80070001, 0x81000037, 0x80070003
Windows has a built-in Backup and Restore system so if the Windows Backup or Restore fails and you receive any of the errors 0x80070001, 0x81000037, 0x80070003, worry not for this post will guide you in fixing the problem. You might not be able to browse to the folders and files that you want to restore in the File Restore Wizard. The cause of the error could vary depending on what error code you receive:
  • 0x80070001 – If you got this particular error code when trying to back up a specific library or when you accept the default settings in Windows Backup and Restore.
  • 0x81000037 – If you got this kind of error code when you try to read from the shadow copy on one of the volumes being backed up.
  • 0x80070003 – If you got this error code when trying to restore the folders or files in a library by using the Windows Backup and Restore.
  • On the other hand, you cannot use the Browse for files or the Browse for folders functionality.
Note that the Windows Backup or Restore failed, Errors 0x80070001, 0x81000037, 0x80070003 Error code 0x80070001, 0x81000037 occurs during backup while Error code 0x80070003 and “Browse for Files” issue occurs when you try to restore files. Whichever error codes you got, here are some possible fixes that might help.

Option 1 – Fix Windows Backup error codes 0x80070001, 0x81000037

The reason for the Windows Backup error codes 0x80070001, 0x81000037, as mentioned above, is when there is a volume that uses a FAT file system (0x80070001) and when a volume contains compressed files (0x81000037). To fix these errors, you need to remove the “reparse point” also known as SYMBOLIC LINK, and select the absolute path of this location in the Windows Backup configuration user interface. Refer to these steps to remove the reparse point.
  • Tap the Win + R keys to open the Run dialog box.
  • Then type “cmd” in the field and hit Enter to open Command Prompt.
  • Next, type the following command and hit Enter:
DIR /AL /S
  • After you enter the command, it will display the JUNCTION list.
  • Now to delete the mounted volume reparse point, you have to locate the reparse point you found and right-click on the reparse point icon, and click on Properties.
  • Confirm that the folder Type is Mounted Volume in the General tab and then delete this folder.

Option 2 – Fix the Windows Restore Error 0x81000037

When you try to restore a deleted backed-up directory, it fails and the Error code 0x81000037 pops up. You can also encounter this error when you select to restore the files to their original subfolders check box in the File Restore Wizard and you try to restore folders or files to an alternative location, then you will encounter error code 0x81000037 which will be displayed in an error message as shown below: To fix this error, you need to re-create the missing directory using the following steps:
  • Take note of the path for which the error occurs.
  • Then create the corresponding folder.
  • Now perform the restore operation again.
And since you might have subfolders in the deleted folder, click to clear the “Restore the files to their original subfolders” checkbox when you run the File Restore Wizard.

Option 3 – Cannot use the Browse for files or the Browse for folders functionality

There is no proper fix for this particular error but if you remember the name of the files, you can just search for them. Click on the Search button when using the File Restore functionality and then type the name of the file and when that file appears, select and click on it to restore it.
Read More
Fix This device is currently in use, USB Error
USB storage devices, peripherals, and other devices are almost used on a daily basis. And as you know, when removing the USB storage devices, it is recommended to always use the “Safely remove the USB storage device” option in order to prevent data corruption in the USB storage device. However, there are times when you may see the following error message after you use the “Safely remove the USB storage device” option:
“Problem ejecting USB Mass Storage – This device is currently in use, close any programs or windows that might be using this device, and then try again.”
This kind of error message occurs when the device is still interacting with the operating system in the background. There are several ways you can fix this error but before you check them out below, you need to close all the open windows and programs that may be using the USB storage device and then wait for a couple of seconds and then try safely removing it again. However, if you are still getting the same error message, then here are some tips you should try:

Option 1 – Try to use the Task Manager

  • Tap the Ctrl + Shift + Esc keys on your keyboard to open the Task Manager.
  • After that, look for the running processes and programs hogging on your USB Storage device. The error could be due to a program or process that’s using the USB device. This program or process will hog onto some Disk or CPU while transferring data and interacting with the device.
  • Once you find the culprits, right-click on each one of them and select End Process or End Task. You could also try to restart the process for “Explorer.exe” and see if it fixes the problem.

Option 2 – Try using DISKPART

The next thing you can try to resolve the issue is to use DISKPART. Refer to the given steps below to do so.
  • Tap the Win + R keys to launch Run and then type “cmd” in the field and tap Enter or click OK to open an elevated Command Prompt.
  • Next, type and enter this command to execute it: diskpart
  • The command you entered will initiate the DISKPART utility. After that, type and enter this second command: list disk
  • Next, type and enter this third command: list volume
  • The commands you just executed will help you in either listing all the Disk connects or all the partitions on those disks formed and from there, you need to select one command depending on the “list” command you entered. You can execute either of the two following commands:
    • select disk #
    • select volume #
  • After that, it will select the Disk or Partition you want to select.
  • Now type either one of the following commands:
    • offline disk #offline volume #
  • The command you entered will mark the selected disk is Offline. Afterward, try to safely remove your USB Storage device. Just remember that when you plug it back in again, you have to carry out the same method except for the last given command as this time you will have to enter either of these commands in order to get your USB storage device back online:
    • online disk #
    • online volume #

Option 3– Try using the Disk Management utility

  • Tap the Win + R keys to open Run.
  • Then type “diskmgmt.msc” in the field and hit Enter to open the Disk Management utility.
  • Next, look for the entry for your USB Storage device and once you’ve found it, right-click on it and select Offline.
  • After that, try to safely remove your USB Storage device again and see if the error is fixed. Note that you need to go over the same steps again if you want to plug your USB Storage device back in but make sure to select the Online option instead of Offline to get your device back online.
Read More
1 2 3 162
Logo
Copyright © 2022, ErrorTools. All Rights Reserved
Trademarks: Microsoft Windows logos are registered trademarks of Microsoft. Disclaimer: ErrorTools.com is not affiliated with Microsoft, nor claim direct affiliation.
The information on this page is provided for information purposes only.
DMCA.com Protection Status