How to Fix Windows 10 Error 0x8007001

How to Fix Windows 10 Error 0x8007001

Error Code 0x8007001 - What is it?

Error Code 0x8007001 occurs during installations that take place in Windows 10.  Various versions of this same error have also been present in previous editions of the software and the methods to resolve the error across these versions are the same

Common symptoms include:

  • Inability to complete the installation process for updates, programs, and system versions.
  • Installations quitting out in the middle of the process, particularly as the files are unpacked.

Several solutions for Error Code 0x8007001 require the user to complete semi-complex tasks. If you aren’t comfortable with the processes necessary to finish the methods below, make sure that you get in touch with a certified professional who is familiar with the Windows operating system to assist you in the resolution of the error code.

Solution

Restoro box imageError Causes

In many cases, Error Code 0x8007001 is caused by an installation disk that is not functioning properly or installation files that have been corrupted or changed. When this is the case, the operating system will not be able to begin actually installing the files and will instead hang up as the files are unpacked from the installation set.

Further Information and Manual Repair

For Error Code 0x8007001 to be repaired properly, the missing or corrupted installation files need to be repaired or the system needs to be able to recognize the files that it is missing. This can require some advanced computing knowledge. If you don’t feel comfortable with the idea of undertaking the methods below on your own, contact a computer repair technician who can assist you in following these steps.

Method One:  Load the Install Files on an Alternative Disk

In some cases, the operating system simply cannot recognize the installation files that are present on the disk in question, whether it is on a hard drive, a set of downloaded files, or files from a flash drive. If this is the case on your particular machine, the simplest way to work around the problem is to load the installation files onto an alternative disk source, whether it be a flash drive, CD, DVD, or secondary hard drive. After these files have been properly loaded onto that alternative disk, attempt to run the installation from the alternative source instead.

If this method is successful, it means that the system may have had trouble recognizing the files involved in the installation from the first source, but that the files themselves were not corrupted or changed.

Make sure that you save the alternative disk source after your installation is complete in case you ever need to do a fresh installation on your machine.

Method Two:  Clean Your Disc and Your Drive

If you are installing files from a DVD or CD, check to make sure that the back of the disc is free from scratches and dust. If there are no visible marks on the disc, you may need to open up your disk drive to see if there is a build-up of dust or debris inside of the drive. If this is the case, simply clean your drive and re-attempt your installation process from the included disk.

Method Three:  Run the Windows Update Troubleshooter and Update Your Programs

If the error code is still appearing on your machine, you can open up your Windows Update tool and run the troubleshooting wizard, which will then scan your machine to see if there are any potential problems that it can fix. Next, run the Update tool itself if there are any updates that need to be performed. Sometimes, this can resolve the error at hand. Make sure to restart your computer after any updates or changes have been made so that you can ensure that they are applied by the operating system appropriately.

Method Four: Use An Automated Tool

If you wish to always have at your disposal a utility tool to fix these Windows 10 and other related issues when they do arise, download and install a powerful automated tool.

If you like to learn and find out more about various Windows errors, and how to repair them go to our vast archive or use search to find articles that will explain and help you in solving your issue.
However, if you prefer to do things fast and with automatization then we are proposing to use an automated solution for your issues. The application that we are recommending is Advanced System Repair Pro
Advanced System Repair utilizes multiple tools all in one to give you a quick, simple, reliable, and very thorough diagnosis of your PC. It brings you all the tools you need in one program to clean, fix, protect, optimize and boost your PC!
1-Click Maintenance
All the tools to make it simple and easy! It's like having a professional technician at the click of a mouse.

Junk Cleaner
Keeping your computer free from unnecessary clutter also helps make your computer last longer. Like any other machine, if you keep it clean and take care of it, it will serve you better for longer!

Optimize background apps
Optimize applications background activity with the built-in Application Optimizer feature.

Disk Defrag
With a simple 1-click, Advanced System Repair speeds up your PC by assembling fragmented files on your machine and organizing them more efficiently.

Malware Removal
Finds and removes all types of harmful malware including trojans, worms, bots, adware, spyware, PUPs, and more!

Privacy Cleaner
The all-in-one privacy suite to Clean Your Tracks & Protect Your Privacy! Make your computer safe, secure, and more efficient!

System Tweak/Optimizer
ASR will analyze your complete system and settings to adjust your PC to function at its maximum performance.

Registry Cleaner
Over time, as you install and uninstall applications, the registry can become cluttered with old entries and broken settings which can result in program crashes, and annoying messages and slow the computer down.
Visit our Advanced System Repair Pro Download page to inform yourself about all the benefits of this software and get a free trial copy of it.
advanced system repair pro

Advanced System Repair Pro

One-click automated PC repair solution
ASR logo
With Advanced System Repair Pro you can easily
Replace damaged files
Restore performance
Free disk space
Remove Malware
Protects WEB browser
Remove Viruses
Stop PC freezing
DOWNLOAD
Privacy Policy | Terms of Use | Uinstall
Advanced System Repair Pro is compatible with all versions of Microsoft Windows including Windows 11

Share this article:

You might also like

0x80071771, The specified file could not ...
If you are tried encrypting or decrypting a file using the default EFS engine but you receive an error message instead saying, “Error Applying Attributes, An error occurred applying attributes to the file: The specified file could not be decrypted”, read on as this post will help you sort out the problem. If you encounter this error you can use the error code in it. You will most likely get error code 0x80071771. This kind of error occurs when the File Explorer’s copy and paste feature was not able to read the source file being encrypted or decrypted. It could also occur if you try to access a file that has been on another computer previously.

To fix error code 0x80071771 when decrypting or encrypting a file, refer to the instructions provided below.

Step 1: You need to check first if you can decrypt the files encrypted by EFS. However, if you can’t, just proceed and then take full control of the file. Step 2: To take control of the file, open File Explorer and right-click on the partition, and then click on Properties. Step 3: After that, click on the Edit button under the Security tab. Step 4: Next, make sure that “Everyone” is selected under the Group or user names section. Step 5: Afterwards, the Permissions for Everyone section will be activated. Just make sure that all the checkboxes for Allow are checked and then click on the Apply button. Step 6: Once you’re done, click on the Advanced button. This will open a new window labeled Advanced Security Settings. From there, click on the Change link under the Owner section. Step 7: Now type your account name in the field and click on Check Names to verify the account name and click OK. Step 8: After that, select the “Replace owner on sub-containers and objects” option and then click OK. Step 9: Next, select Administrators in the Group or User names list and select Full Control in the Permissions for Administrators panel and click OK.
Read More
How to Fix Windows Activation Error Code 0xc004f050

Fix Windows Activation Error Code 0xc004f050

Error Code 0xc004f050 – What is it?

Error code 0xc004f050 refers to a problem with activating the Windows key. The problem appears when you try to activate a copy of Windows by using Windows Activation wizard. This happens when the system becomes unstable and critical system files start missing. Though Windows 10 is a free upgrade for Windows 7/Windows 8/Windows 8.1 users, the activation error is still an issue. If you already had Windows 7/Windows 8/Windows 8.1 activated and did an upgrade successfully, then there should be no problem. This Problem Occurs only when you do a clean install.

Symptoms

When you try to activate a copy of Windows Vista or Windows 7 by using the Windows Activation wizard, you receive an error similar to the one below:
An error has occurred Code: 0xC004F050 Description: The Software Licensing Service reported that the product key is invalid

Solution

Restoro box imageError Causes

  • This causes due to an invalid product key.
  • This problem may occur if the license validity interval has expired, or if the license is not signed correctly.
  • Error Code 0xc004f050 occurs when the system becomes unstable and critical system files start missing.
  • Improper way of installing, deletion of some very important system files, misconfigured system files, etc. may also cause this error.
  • When you do a clean install, it wipes everything from the Primary Drive and after the install, windows can't find the Hardware ID which is used to verify your license.
  • For Windows 7, Windows Server 2008, and Windows Vista-based computers, this error may occur if you have entered the key for a beta version of the operating system while using the released version of the operating system.

Further Information and Manual Repair

This error is not something that can be fixed in seconds but will require some time and technical knowledge.

Method 1:

Re-insert the product key by using the Change Product Key tool:
  1. Click Start, click Computer, and then click System properties on the toolbar.
  2. In the Windows activation section, click Change product key.
  3. If you are prompted for an administrator password, type the password or click Continue.
  4. In the Product key box, type the product key, and then click Next.
  5. Follow the steps in the Windows Activation Wizard to complete the activation process.

Method 2:

Activate Windows by using the automated telephone system:
  1. Click Start, and then click Computer.
  2. Click System properties on the toolbar, and then click Click here to activate Windows now in the Windows activation
  3. If you are prompted for an administrative password, type it and click Continue.
  4. Click Show me other ways to Activate.
  5. Click Use the automated phone system and follow the instructions.

Method 3:

  1. Clean install Windows 7/Windows 8/Windows 8.1 using the installation disk and activate your copy.
  2. Now, download all the updates to see the Windows 10 Upgrade notification or download Windows Media Creation Tool and use the option Upgrade this PC to get Windows 10 right away.
  3. Once the upgrade is done, check the Activation Status. It will be fully activated as it should be. The Error code 0xc004f050 should not appear anymore.
If you want to get rid of the old Windows installation folder, then use the Windows Media Creation Tool to create a Flash Drive. Clean Install Windows 10. Now, every time when it asks for a product key, skip it. After installation is complete, Windows will automatically identify and activate your Copy. NOTE: Clean Install will make Sure you cannot roll back to your previous Windows 7 or Windows 8. So do it only if you are confident of using Windows 10 from here on. To verify the Windows activation status, follow these steps:
  • Click the Start button, and then click Computer.
  • Click System properties on the toolbar, and then view the activation status in the Windows activation section.
Read More
Disable widgets menu inside Windows 11
windows 11 widgets menu
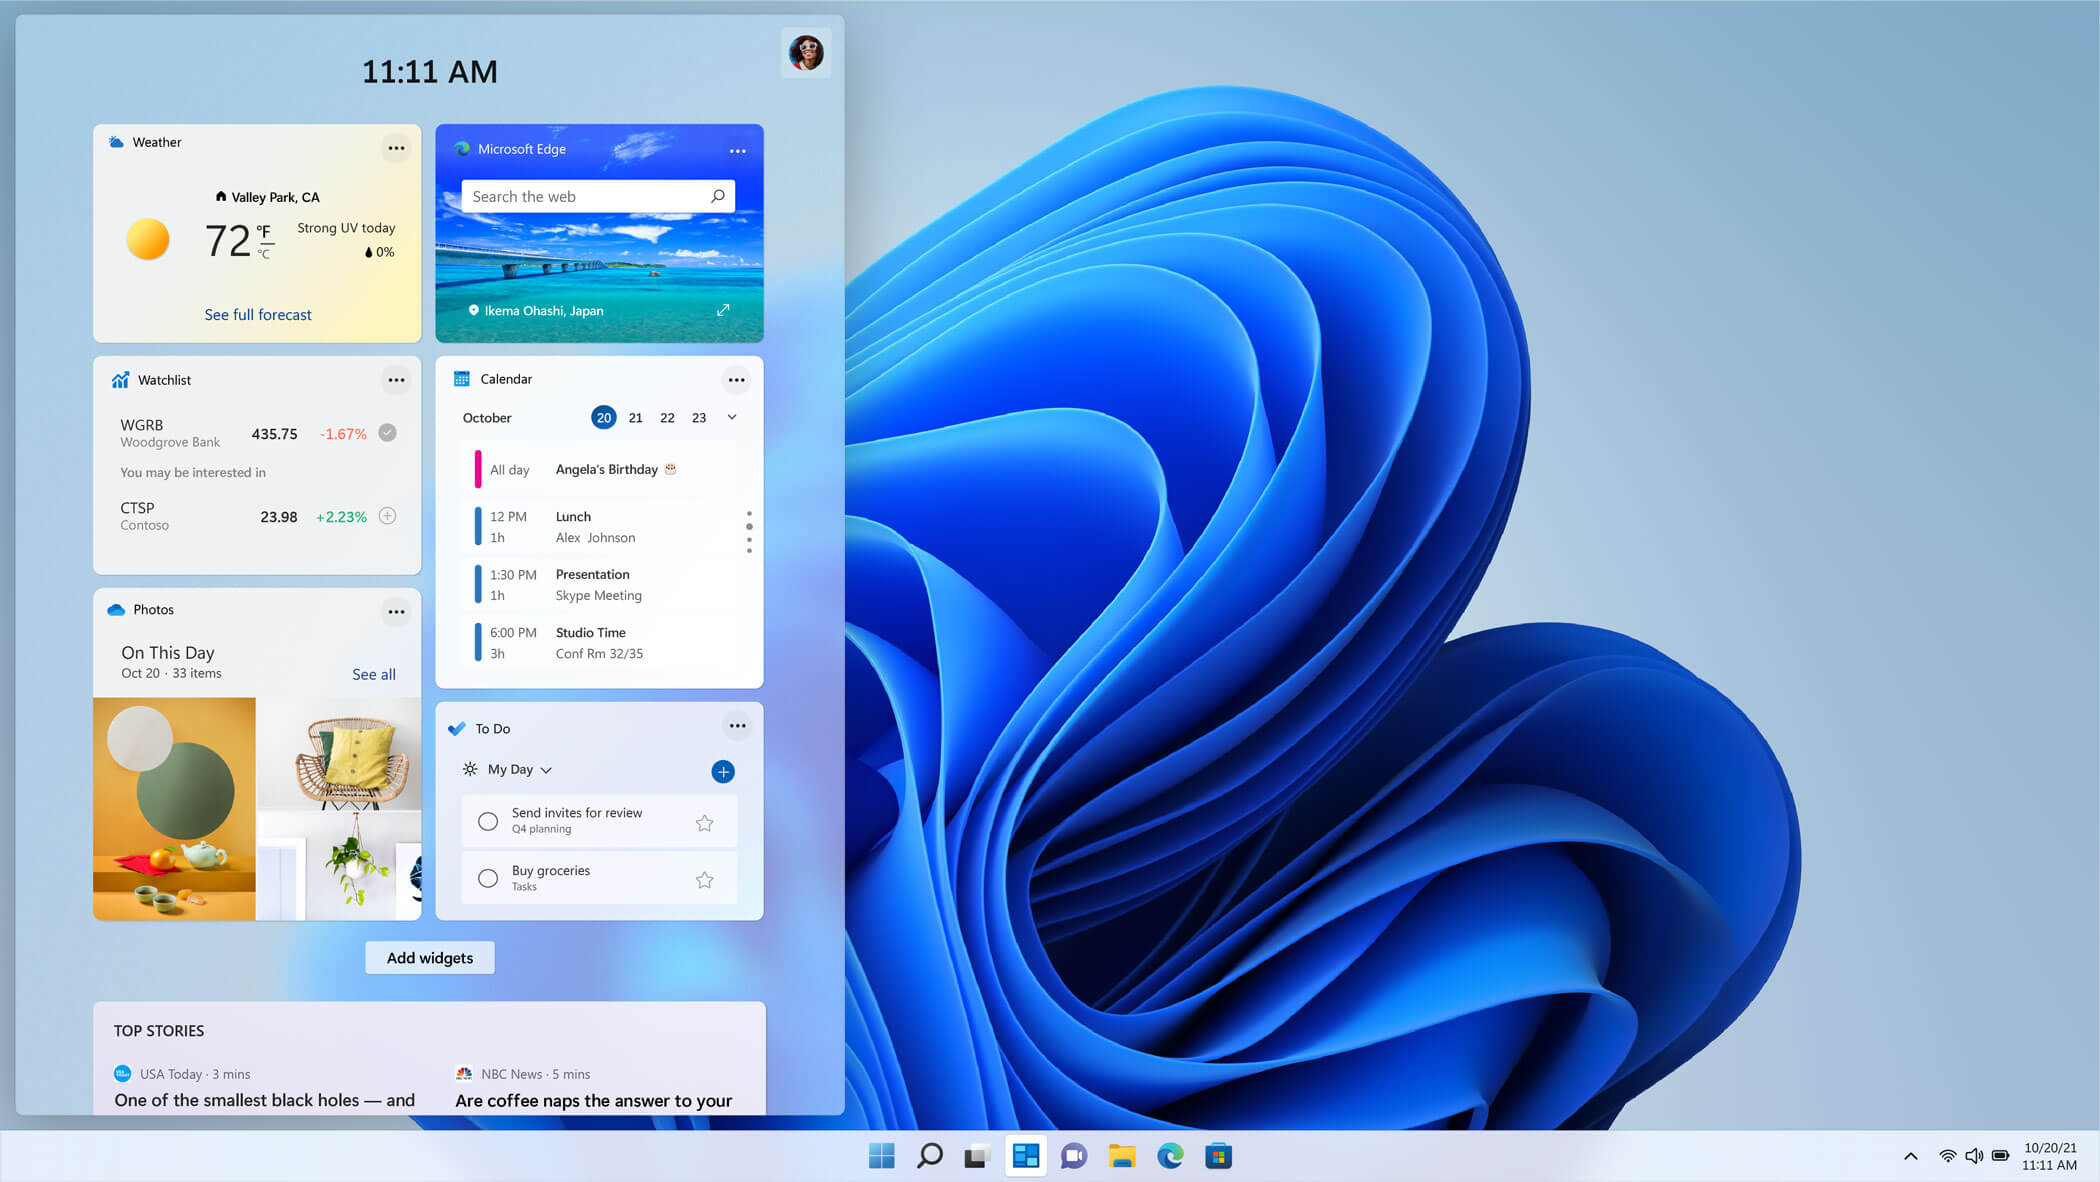
The new widget's menu inside Windows 11 is generally met with a positive attitude but there are still users which prefer not to have it. Luckily for them, Microsoft included a very easy way to turn the widgets menu on or off. Follow this easy guide to see how. Right-click on the widget button in the taskbar and click on Hide from Taskbar and that’s it Alternatively, you can also turn it off via the setting app. Go to the settings app and navigate to Personalization > Taskbar > Taskbar Items and flipping the switch beside Widgets to Off. Please note that both methods will only hide the button to toggle widgets menu, at the current state there is no really a way to actually turn it off, only hide it and make it not available to bring it up.
Read More
Fix Libmysql.dll is Missing Error in Windows
Libmysql.dll is missing or not found error appears in Windows when the user is trying to open and run the application. In this guide, we will offer you solutions on how to fix and remove this annoying error.
  1. Check recycle bin

    Some applications or purely by accident itself libmysql.dll gets deleted. If you have not turned recycle bin off go to it and check to see if the file is by any chance there. If you find it, right-click on it, choose restore, the error will be gone.
  2. Update drivers

    Press ⊞ WINDOWS + X to open the Windows menu and click on Device manager In device manager locate device which has alert mark next to it Right-click on it and choose update driver Reboot your computer
  3. Run SFC scan

    Press ⊞ WINDOWS + X and choose command prompt (admin) In command prompt type in sfc /scannow and press ENTER wait for the operation to complete and Reboot your system
  4. Reinstall application

    if you are getting an error only on one application or an error has started to appear after the installation of a particular application go to Windows applications, uninstall it and then install it again. There is a chance that the file has been corrupted during the installation process.
Read More
Fix HAL INITIALIZATION FAILED Error 0x0000005C
When your computer boots up or when it just woke up from sleep but it suddenly encounters a Blue Screen of Death error, saying, “HAL INITIALIZATION FAILED error with STOP CODE 0x0000005C”, then read on as this post will give you some fixes that might help in resolving the problem. You will see the following error message on your computer’s screen when this error pops up:
“Your PC ran into a problem and needs to restart. We’re just collecting some error info, and then we’ll restart for you. If you’d like to know more, you can search online later for this error: HAL_INITIALIZATION_FAILED HAL INITIALIZATION FAILED 0x0000005C”
This kind of Blue Screen error indicates that there is a hardware or device driver problem in your PC. Aside from that, it also signifies that the initialization of the Hardware Abstraction Layer or HAL has failed. This happens only during the relatively short period that the Windows operating system is being initialized, specifically during phase 4 of Windows startup. What’s worse about this kind of Stop error is that it does not just go away after a computer reboot. You may have to boot your computer into Safe mode with Networking using the Advanced startup options which you can access by tapping the F2 or F8 key. Once you’ve accessed the Advanced startup options, follow the fixes prepared below.

Option 1 – Run CHKDSK command to repair hard disk errors

Running the Chkdsk utility could help you resolve the HAL INITIALIZATION FAILED error with STOP CODE 0x0000005C. If your hard drive has issues with integrity, the update will really fail as the system will think that it’s not healthy and that’s where the Chkdsk utility comes in. The Chkdsk utility repairs hard drive errors that might be causing the problem.
  • After you access the Advanced Startup options, select Command Prompt by using the arrow keys on your keyboard.
  • After opening Command Prompt, execute the following command and hit Enter:
chkdsk /f /r
  • The command you entered will scan the hard disk for any errors and will automatically fix it if it finds some issues. Wait for the process to be completed and then restart your computer.

Option 2 – Run the DISM tool

If the first option didn’t work, then running the Deployment Imaging and Servicing Management tool can help you resolve the HAL INITIALIZATION FAILED error as it will repair the Windows System Image as well as the Windows Component Store in Windows 10.
  • After you access the Advanced Startup options, select Command Prompt by using the arrow keys on your keyboard.
  • Next, type in this command: DISM /Online /Cleanup-Image /RestoreHealth
  • Do not close the window if the process takes a while as it will probably take a few minutes to finish.

Option 3 – Update the Device drivers

  • Tap the Win + R keys to launch Run.
  • Type in msc into the box and tap Enter or click OK to open the Device Manager.
  • After that, a list of device drivers will be displayed. Look for the device driver you and then select either “Update driver” or “Uninstall device”. And if you find any “Unknown device”, you need to update it as well.
  • Select the “Search automatically for updated driver software” option and then follow the instructions to complete the process.
  • If you have chosen to uninstall the driver, follow the screen options to complete the process and then restart your PC.
  • Connect the device and Scan for hardware changes – you can see this option under Device Manager > Action.

Option 4 – Try removing any external hardware

You might also want to remove any connected devices and external hardware in your computer as it might help in fixing the BSOD error.

Option 5 – Disable Fast Start-up

If you want your computer to boot faster, then you might have enabled Fast Start-up. This feature is ideal for computers that are using a hard disk drive. However, turning on this feature also means that when the computer boots, it might lag some drivers that are loaded when it initially boots up. Thus, it might be the potential cause of the UNEXPECTED STORE EXCEPTION BSOD error. Thus, you need to disable Fast Start-up. To do that, follow these steps:
  • Boot your PC into Safe Mode.
  • Then tap the Win + R keys to open the Run dialog box.
  • Next, type in “control” to open Control Panel.
  • After that, select Hardware and Sound and click on Power Options.
  • Select “Choose what the power buttons do” from the left side menu pane and click on Change settings that are currently unavailable.
  • Afterward, uncheck the “Turn on fast startup (Recommended)” entry and click on Save Changes.
  • Now restart your PC for the changes to take effect and then check if the problem’s fixed afterward.

Option 6 – Disable your antivirus program

There are times when the antivirus program installed in your computer blocks file access and even disk access. Thus, disabling the antivirus program or any security software installed in your computer is always a good idea you can try when the Windows Update process does not go smoothly. So before you try updating your computer again, make sure to disable the antivirus or security program and once the Windows Update is done, don’t forget to enable the antivirus program back again.

Option 7 – Perform a Clean Boot

There are some instances that some conflicting programs installed in your computer might be the one that’s causing the HAL INITIALIZATION FAILED error. To identify which program is causing the problem, you need to put your computer in a Clean Boot State. To do so, follow the steps below.
  • Log onto your PC as an administrator.
  • Type in MSConfig in the Start Search to open the System Configuration utility.
  • From there, go to the General tab and click “Selective startup”.
  • Clear the “Load Startup items” check box and make sure that the “Load System Services” and “Use Original boot configuration” options are checked.
  • Next, click the Services tab and select the “Hide All Microsoft Services” check box.
  • Click Disable all.
  • Click on Apply/OK and restart your PC. (This will put your PC into a Clean Boot State. And configure Windows to use the usual startup, just simply undo the changes.)
  • From there, start to isolate the problem by checking which one of the programs you installed recently is the root cause of the problem.
Read More
Fix volsnap.sys failed BSOD Error in Windows
The Volsnap.sys is a Windows operating system file that is related to the Volume Shadow Copy Service or VSS. It is known to cause a Blue Screen of Death error. The main cause of the Volsnap.sys Blue Screen errors include conflicts with the RAM, issues with the hard disk, incompatible firmware, corrupted drivers, malware infection, and many more. Despite its many possible causes, its fixes are quite straightforward so won’t have any problem following them. The Blue Screen errors that are related to the Volsnap.sys file are:
  • KMODE EXCEPTION NOT HANDLED
  • PAGE FAULT IN A NONPAGED AREA
  • SYSTEM THREAD EXCEPTION NOT HANDLED
  • IRQL NOT LESS OR EQUAL
You might want to try performing System Restore as it could resolve Blue Screen errors like the ones related to the Volsnap.sys before you proceed with the troubleshooting tips given below. To run System Restore, follow these steps:
  • Tap the Win + R keys to open the Run dialog box.
  • After that, type in “sysdm.cpl” in the field and tap Enter.
  • Next, go to the System Protection tab then click the System Restore button. This will open a new window where you have to select your preferred System Restore point.
  • After that, follow the on-screen instructions to finish the process and then restart your computer and check if the problem is fixed or not.
If System Restore didn’t help in fixing the Blue Screen error, now’s the time for you to resort to the troubleshooting tips provided below but before you get started, make sure that you create a System Restore point first.

Option 1 – Check if the Volume Shadow Copy service is running and restart it

The first thing you need to do is check if the Volume Shadow Copy service. To do that, refer to the following steps:
  • Click on Start and type “cmd” and right-click on Command Prompt from the search results.
  • Then select the “Run as administrator” option to open Command Prompt with admin privileges.
  • After that, type “net stop sdrsvc” and hit Enter to execute the command in stopping the Volume Shadow Copy service.
  • Next, type the “net start sdrsvc” command and hit Enter to start the service again.
Note: You can also restart the service using the Windows Services Manager.
  • In the Cortana search box, type “services” and click on the Services icon to open the Services Manager. Alternatively, you can also tap the Win + R keys to launch the Run prompt and then type “services.msc” in the field and hit Enter to open the Services Manager.
  • From there, look for the Volume Shadow Service (sdrsv) from the list of services. Its Startup type should be set to Manual by default.
  • Restart the service and if you don’t encounter any error while you turn it on, re-run the backup service and see if the backup process runs successfully.

Option 2 – Try checking the Memory for the Errors using Memory Diagnostic Tool

The Memory Diagnostic tool in windows can help resolve the Volsnap.sys Blue Screen error by checking and automatically fixing any memory-based issues. To run it, refer to these steps:
  • Tap the Win + R keys to open Run and type mdsched.exe and hit Enter to open the Windows Memory Diagnostic Tool.
  • After that, it will give two options such as:
    • Restart now and check for problems (Recommended)
    • Check for problems the next time I start my computer
  • Once your computer has restarted, perform a basic scan or you could also go for the “Advanced” options such as “Test mix” or “Pass count”. Simply tap the F10 key to start the test.
Note: After you select your preferred option, your computer will restart and check for memory-based issues. If it finds any issues, it will automatically fix them and if there’s no issue found, then it’s most likely not a memory-based issue so you should try the other options given below.

Option 3 – Try to update or rollback your device drivers

If the first option didn’t work for you, then it’s time to either update or rollback the device drivers. It is most likely that after you updated your Windows computer that your driver also needs a refresh. On the other hand, if you have just updated your device drivers then you need to roll back the drivers to their previous versions. Whichever applies to you, refer to the steps below.
  • Open the Devices Manager from the Win X Menu.
  • Then go to the section of IDE ATA/ATAPI controllers as well as Storage Controllers and right-click on them to open the Properties.
  • After that, switch to the Driver tab and click on the Uninstall Device button.
  • Follow the screen option to completely uninstall it.
  • Finally, restart your computer. It will just reinstall the device drivers automatically.
Note: You can install a dedicated driver on your computer in case you have it or you could also look for it directly from the website of the manufacturer.

Option 4 – Try to run the CHKDSK utility

Running the CHKDSK utility might also help you resolve the Volsnap.sys Blue Screen error. If your hard drive has issues with integrity, the update will really fail as the system will think that it’s not healthy and that’s where the CHKDSK utility comes in. The CHKDSK utility repairs hard drive errors that might be causing the problem.
  • Open Command Prompt with admin privileges.
  • After opening Command Prompt, execute the following command and hit Enter:
chkdsk /f /r
  • Wait for the process to be completed and then restart your computer.

Option 5 – Run the System File Checker Scan

System File Checker or SFC is a built-in command utility that helps in restoring corrupted files as well as missing files. It replaces bad and corrupted system files with good system files. To run the SFC command, follow the steps given below.
  • Tap Win + R to launch Run.
  • Type in cmd in the field and tap Enter.
  • After opening Command Prompt, type in sfc /scannow
The command will start a system scan which will take a few whiles before it finishes. Once it’s done, you could get the following results:
  1. Windows Resource Protection did not find any integrity violations.
  2. Windows Resource Protection found corrupt files and successfully repaired them.
  3. Windows Resource Protection found corrupt files but was unable to fix some of them.
  • Restart your computer.

Option 6 – Run the Blue Screen Troubleshooter

The Blue Screen troubleshooter is a built-in tool in Windows 10 that helps users in fixing BSOD errors like Volsnap.sys. It can be found on the Settings Troubleshooters page. To use it, refer to these steps:
  • Tap the Win + I keys to open the Settings panel.
  • Then go to Update & Security > Troubleshoot.
  • From there, look for the option called “Blue Screen” on your right-hand side and then click the “Run the troubleshooter” button to run the Blue Screen Troubleshooter and then follow the next on-screen options. Note that you might have to boot your PC into Safe Mode.
Read More
Software review series: Tor Browser
Back in the mid-'90s, when the US Navy was looking into ways to securely communicate sensitive intelligence information, a mathematician and two computer scientists emerged from the Naval Research Lab with something called "onion routing." It was a new kind of technology that would protect your internet traffic with layers of privacy. By 2003, The Onion Routing project, acronym Tor, was in the hands of the public, where its vast network of users the engine enabling Tor has since continued to grow. Today, thousands of volunteers all over the world are connecting their computers to the internet to create the Tor network by becoming "nodes" or "relays" for your internet traffic.

What is Tor?

At a basic level, Tor is a type of internet-connected network with its own internet browser. Once you connect to the internet with the Tor browser, your internet traffic is stripped of its first layer of identifying information as it enters the Tor network and is then sent bouncing through those relay nodes, which serve to encrypt and privatize your data, layer by layer like an onion. Finally, your traffic hits an exit node and leaves the Tor network for the open web. Once you're in the Tor network, it's nearly impossible for others to track your traffic's manic pinballing path across the globe. And once you leave the Tor network via an exit node, the website you view (assuming it has HTTPS in front of its address) isn't sure which part of the world you're hailing from, offering you more privacy and protection. Because Tor is a volunteer-run network, speed can often be an issue. As your traffic moves from node to node, you're likely to notice more speed loss than you would, for instance, with most commercial virtual private networks. This becomes particularly noticeable if you try to watch streaming Netflix content over Tor or make voice-over-IP phone calls or video calls with an app like Zoom. Tor technology isn't necessarily built to provide seamless audio-video experiences.

Tor and plugins

Speaking of videos, there are also limits to the amount of privacy Tor can offer you if you enable certain browser media plugins like Flash. Likewise, your browser's JavaScript plug-in which enables you to view a lot of websites' embedded media can still leak your IP address information. Torrenting files with Tor also exposes you to privacy risks. Because of these risks, Tor's privacy settings have these kinds of plug-ins disabled by default. If you're just looking to do general, daily internet perusal using a browser that will better hide your traffic from spying eyes, Tor probably isn't the best choice due to its slow speeds and incompatibility with most embedded media. But if you're concerned enough about privacy around a particular topic of internet research (and you don't have a VPN), Tor is probably the best choice for you.
If you would like to read more helpful articles and tips about various software and hardware visit errortools.com daily.
Read More
Fix Origin code 10.0 Error in Windows 10
Gaming on the computer has become one of the most used past-time activities among people of all ages. And since we are still in pandemic it has only risen as activity. People can acquire a lot of games at various discounts on various platforms and enjoy them at the leisure of their home. Among many game platforms and stores, Electronic art's Origin is one of the bigger ones, and having some titles that could not be found anywhere else coupled with the ability to have access to almost the whole game catalog with one monthly subscription make it one of the most used clients. Sadly as with every piece of software Origin's client is not perfect by any means and it can behave strangely from time to time. Hello everyone and welcome to errortools.com, today we will fix Origin error code 10 which oddly enough can appear out of nowhere and can even appear on the very end of installation for the chosen game. If you have managed to come by this error you are in luck to be here because we have a couple of fixes for it. I know that you might be excited to play the game so let's go and do some fixing

Check Server status

Before diving into technicality and before we start deleting files and fixing things you should check the Server status. This seems maybe like something you should not do but if the server has experienced some kind of downtime or it is in maintenance Origin will throw this error in the client. Unexpected situations can cause various server issues all of a sudden and the first thing is to check are servers online and working. There are various ways to check server status from official origin website to Electronic arts twitter channel to Reddit and many more online server status websites. If it turns out that the server is to be blamed for this error then sit back and wait for EA to resolve the issue, there is not much you can do anyway.

Delete OriginThinSetupInternal.exe

  • After some research, it has come to light that originthinsetupinternal.exe can cause this specific error. The best solution is to delete the file and then run Origin as administrator so the file is remade new.
  • First, make sure that Origin is fully closed, check the taskbar and if it lurks there right-click on it and click on quit
  • Run file explorer and go into the folder where Origin is installed, by default it is C:\Program Files (x86)\Origin
  • Locate OriginThinSetupInternal.exe and delete it
  • Then locate origin.exe and right-click on it and then click on Run as administrator

Reinstall Origin client

If the previous solution has not solved the issue then Origin might have some corrupted files inside it. It is known that the Origin client can produce some bad files if the installation has been forcefully canceled. The best thing is to reinstall the completely whole client.
  • Press ⊞ WINDOWS + R to open the run dialog
  • Inside run dialog type in Control panel and press ENTER
  • In the control panel locate programs and features group and double click on it
  • Locate Origin, click to select it, and on top click on uninstall
  • After uninstall process is completed start file explorer and go to the folder where Origin was installed, by default it is C:\Program Files (x86). Locate the Origin folder and delete it.
  • Go to the official origin website and download the new client installation.
  • After the download is finished double click on it and follow onscreen instructions.

Disable antivirus

If every solution so far has not been able to remove error then obviously something else is interfering with the origin client and installation functioning. Altho not advisable, turn OFF your security suite including both firewall and antivirus and try installing the game again. There is the possibility that the origin client or some game file has been marked as false positive by security software thus preventing it from executing properly.
Read More
How to Fix Windows 10 Error 0x8007007b

How to Fix Windows 10 Error 0x8007007b

Error code 0x8007007b - What is it?

Error code 0x8007007b will present itself when Windows users are trying to activate Windows. You may try to activate it through the update and security option, but it is likely that you will receive the same error code. Error code 0x8007007b may be presented when Windows 7 and Windows 8.1 users try to upgrade and activate Windows 10 on their computer.

Common symptoms include:

  • An error message will display that says Windows cannot be activated. The KMS host cannot be located in the DNS, please have the system administrator verify that the KMS is published correctly in DNS.
  • Error 0x8007007b will be displayed, stating that the file or directory name or the volume label syntax is not correct.

Solution

Restoro box imageError Causes

There are multiple causes for the user to see this error code, including if a user is using volume-licensed media while installing a number of various Windows operating systems. This error may also be caused because the activation wizard cannot connect to a KMS host computer. It is likely that if the user has a volume-licensed form of media, they were likely given a MAK (multiple activation keys).

Further Information and Manual Repair

There are several ways to go about repairing error code 0x8007007b. It is important to try all of the methods, but if it is too difficult or you do not know what you are doing, please do contact a Windows repair technician. They will likely be able to fix the problem with ease.

Method One: Instead of KMS activation, use a Multiple Key Activation

When KMS activation is not used, and when there is not a KMS server, the product key type should then be changed to a MAK. For MSDN (Microsoft Developer Network) or TechNet, the SKUs that are listed on the media are generally volume-licensed media, and that means that the product key that is supplied is a Multiple Activation Key.

To change the KMS to a MAK, click Start, All Programs, Accessories, and then right-click on Command Prompt. Click Run as Administrator. If prompted for a password or confirmation, enter it now.

When the command prompt opens, type in the following command, and press enter after:

slmgr -ipk xxxxx-xxxxx-xxxxx-xxxxx (these x's are representative of the MAK product key).

Method Two

While on the desktop, press the Windows key and R. The Run window should appear, and then you should enter the following command: Slui 3. Press Enter and then wait for the window to appear. This window will ask for the operating system activation product key. Enter the product key and then press the Activate button. Reboot the computer. Now the Error Code 0x8007007b should be gone.

Method Three

Open the Command Prompt with access as administrator as mentioned previously. Enter the following command: sfc /scannow. The command will then complete its task. This will take a good bit of time, so leave the computer to do its work. The sfc must finish the scan. When the scan has finished, reboot the computer. Now you can check for activation. The error code should be gone.

Method Four: When the client can't locate a KMS host on the network to complete activation

This method for correction should be used when the network does have a KMS host computer setup, and the client is not able to locate the KMS host on the network to complete activation.

To verify that the computer does in fact have the KMS host installed. Click Start, All Programs, Accessories, and then right-click on Command Prompt. Run as administrator. If you are now prompted to enter a password or confirmation, do so. When the command prompt box comes up, type in the following command, and then press Enter: nxlookup -type=all_vlmcs._tcp>kms.txt

The command will generate a file, open this KMS file. The file will contain one or more entries. As a default, the KMS host server will dynamically register a DNS SRV server evidence once every 24 hours. In order to check the registry to ensure that this is happening, follow these steps:

  • Click Start, type in regedit, and then press Enter.
  • Locate the key HKEY_LOCAL_MACHINESOFTWAREMicrosoftWindows NTCurrentVersionSL and then click on it.
  • The DisableDnsPublishing subkey should be present and have a value of 1. If it is missing, create a DWORD value by right clicking DisableDnsPublishing, click Modify, in the Value Data box type in 0, and then click Okay.

Method Five: Use An Automated Tool

If you wish to always have at your disposal a utility tool to fix these Windows 10 and other related issues when they do arise, download and install a powerful automated tool.

Read More
MyImageConverter Removal Guide for Windows

This toolbar/web browser extension is ad/search-supported that is typically installed as an optional offer, users generally have this bundled with 3rd party software. During setup, this toolbar will modify the home page and new tab pages to the affiliate search portal MyWay.com using a primary search engine to collect shared search revenue. It will also modify the default search provider as well. While this extension is installed users will experience a display of additional ads and sponsored content throughout their browsing sessions, as well as the possibility of pop-up ads. Several anti-virus scanners have marked this extension as a Browser Hijacker and it is recommended to remove it from your computer.

About Browser Hijackers

Browser hijacking means that a malicious code has taken control over and altered the settings of your internet browser, without your consent. They are designed to interfere with browser programs for a variety of purposes. Usually, it’ll drive users to predetermined websites that are looking to increase their advertising campaign income. Though it may seem naive, all browser hijackers are damaging and thus always regarded as security risks. In a worst-case scenario, your internet browser can be hijacked to download malicious software that can do a great deal of damage to your laptop or computer.

How to know if your internet browser has been hijacked

The common symptoms that indicate having this malicious software on your PC are: 1. home page is modified 2. bookmark and the new tab are likewise modified 3. default online search engine is changed 4. you’re getting new toolbars you have never found before 5. your internet browser displays endless pop-up ads 6. your web browser has become unstable or starts running slowly 7. you can’t visit certain websites like homepages of anti-malware software.

Exactly how browser hijacker finds its way onto your computer system

Browser hijackers can enter a computer by some means or other, including via downloads, file sharing, and e-mail also. They may also come from any BHO, extension, add-on, toolbar, or plug-in with malicious intent. Browser hijackers sneak into your pc in addition to free software application downloads that you unintentionally install alongside the original. Some of the most popular hijackers are MyImageConverter, Conduit Search, Babylon Toolbar, Sweet Page, OneWebSearch, and CoolWebSearch.

Learn how to get rid of browser hijackers

Certain hijackers could be removed by just uninstalling the related freeware or add-ons through the Add or Remove Programs in the Windows control panel. In some cases, it could be a difficult job to find and remove the malicious piece because the associated file could be running as part of the operating system process. Besides, browser hijackers can modify the Windows registry so it can be quite tough to restore all the values manually, especially when you are not a very tech-savvy person. You can choose automatic browser hijacker removal by just installing and running an efficient anti-malware program. SafeBytes Anti-Malware detects all types of hijackers – including MyImageConverter – and eliminates every trace quickly and efficiently. In addition to anti-virus software, a PC optimizer program, like Total System Care, can help you fix Windows registry errors, remove unwanted toolbars, secure your internet privacy, and boost overall computer performance.

What to Do if Virus Stops You From Downloading Or Installing Antivirus?

Practically all malware is bad, but certain types of malware do much more damage to your PC than others. Some malware variants alter web browser settings by adding a proxy server or change the PC’s DNS configuration settings. In such cases, you’ll be unable to visit some or all of the websites, and therefore not able to download or install the required security software to clear out the computer virus. If you are reading this now, you might have perhaps realized that virus infection is a reason behind your blocked net connectivity. So how to proceed if you need to install an anti-virus software like Safebytes? Follow the instructions below to remove malware by alternate methods.

Download the software in Safe Mode with Networking

The Windows operating system comes with a special mode referred to as “Safe Mode” in which only the minimum required programs and services are loaded. In the event the malware is blocking internet connection and affecting your computer, running it in Safe Mode enables you to download anti-virus and run a diagnostic scan whilst limiting potential damage. To get into Safe Mode or Safe Mode with Networking, press F8 while the system is booting up or run MSCONFIG and locate the “Safe Boot” options in the “Boot” tab. Once you are in safe mode, you can try to install your anti-malware application without the hindrance of the malware. Now, you can run the antivirus scan to get rid of viruses and malware without hindrance from another malicious application.

Download the security software using an alternate internet browser

Some malware only targets particular web browsers. If this sounds like your situation, utilize another web browser as it might circumvent the virus. If you seem to have a trojan attached to Internet Explorer, then switch to an alternate web browser with built-in safety features, such as Firefox or Chrome, to download your preferred anti-malware program – Safebytes.

Install anti-malware on a USB drive

Another option would be to make a portable antivirus program on your USB flash drive. To run anti-malware from a USB pen drive, follow these simple measures: 1) On a virus-free computer, download and install Safebytes Anti-Malware. 2) Plug the USB drive into the clean computer. 3) Double-click on the downloaded file to open the installation wizard. 4) Select the drive letter of the flash drive as the location when the wizard asks you exactly where you want to install the antivirus. Follow the on-screen instructions to finish the installation process. 5) Transfer the flash drive from the uninfected computer to the infected computer. 6) Double-click the Safebytes Anti-malware icon on the USB drive to run the software. 7) Hit the “Scan” button to run a full computer scan and remove viruses automatically.

Protect Your PC and Privacy With SafeBytes Anti-Malware

Are you looking to install the best anti-malware software program for your PC? You can find many applications on the market which come in free and paid versions for Windows systems. A few of them do a great job in eradicating malware threats while some will affect your PC themselves. You should look for a product that has obtained a good reputation and detects not only viruses but other types of malware as well. While considering the highly regarded applications, Safebytes AntiMalware is certainly the highly recommended one. SafeBytes anti-malware is trustworthy software that not only secures your PC completely but is also quite user-friendly for people of all ability levels. Through its cutting-edge technology, this software will help you protect your computer against infections caused by various kinds of malware and similar internet threats, including adware, spyware, viruses, worms, trojans, keyloggers, ransomware, and potentially unwanted program (PUPs).

SafeBytes anti-malware offers an array of advanced features which sets it aside from all others. Let’s take a look at a few of them below:

Real-time Threat Response: SafeBytes provides real-time active supervision and protection from all known computer viruses and malware. It’ll inspect your personal computer for suspicious activity regularly and its unrivaled firewall protects your computer from illegal access by the outside world. World-class AntiMalware Protection: Using a critically acclaimed anti-malware engine, SafeBytes offers multilayered protection which is designed to catch and get rid of viruses and malware that are hidden deep inside your computer’s operating system. Web protection: SafeBytes inspects the hyperlinks present on a webpage for possible threats and notifies you if the site is safe to visit or not, through its unique safety ranking system. Light-weight: This application is not “heavy” on the computer’s resources, so you’ll not see any performance troubles when SafeBytes is working in the background. 24/7 Customer Support: Support service is readily available 24 x 7 x 365 days through email and chats to answer your concerns. SafeBytes has developed a great anti-malware solution to help you conquer the latest malware threats and virus attacks. You can be sure that your computer will be protected in real-time once you put this tool to use. So if you’re looking for the absolute best malware removal application out there, and if you don’t mind paying out a few bucks for it, opt for SafeBytes Anti-Malware.

Technical Details and Manual Removal (Advanced Users)

To get rid of MyImageConverter manually, navigate to the Add or Remove programs list in the Control Panel and choose the program you want to get rid of. For web browser extensions, go to your browser’s Addon/Extension manager and choose the plug-in you intend to disable or remove. You may also want to reset your home page and search engine providers, and also delete temporary files, browsing history, and cookies. If you opt to manually delete the system files and Windows registry entries, utilize the following checklist to make sure you know precisely what files to remove before performing any actions. But bear in mind, editing the Windows registry is usually a difficult task that only advanced users and professionals should attempt to fix the problem. In addition, some malware is capable of replicating or preventing removal. It is highly recommended that you carry out the removal procedure in Windows Safe Mode.
Files: %PROGRAMFILES(x86)%4zUninstall MyImageConverter.dll %SystemDrive%\Users\wsierra\AppData\Roaming\Mozilla\Firefox\Profiles\pe3eufs0.default\extensionszffxtbr-bs@MyImageConverter_4z.com\content\MyImageConverter.exe %LOCALAPPDATA%\MyImageConverter_4z %PROGRAMFILES%\MyImageConverter_4z %UserProfile%\Local Settings\Application Data\amailnkkmeeoijlkjdgloiclaiifpojf %LOCALAPPDATA%\amailnkkmeeoijlkjdgloiclaiifpojf %ProgramFiles%\MyImageConverter %UserProfile%\Local Settings\Application Data\Google\Chrome\User Data\Default\Sync Extension Settings\oeabadoffdnkmmecmhpknaklgmabippp %ProgramFiles(x86)%\MyImageConverter %UserProfile%\Local Settings\Application Data\Google\Chrome\User Data\Default\Extensions\ikgjglmlehllifdekcggaapkaplbdpje %LOCALAPPDATA%\Google\Chrome\User Data\Default\Extensions\ikgjglmlehllifdekcggaapkaplbdpje %LOCALAPPDATA%\Google\Chrome\User Data\Default\Sync Extension Settings\ikgjglmlehllifdekcggaapkaplbdpje %UserProfile%\Local Settings\Application Data\Google\Chrome\User Data\Default\Sync Extension Settings\ikgjglmlehllifdekcggaapkaplbdpje %UserProfile%\Local Settings\Application Data\MyImageConverterTooltab %LOCALAPPDATA%\MyImageConverterTooltab Registry: HKEY_CURRENT_USER\HKEY_CURRENT_USER\Software\ HKEY_CURRENT_USER\Software\AppDataLow\Software\MyImageConverter_4z HKEY_CURRENT_USER\Software\MyImageConverter_4z HKEY_LOCAL_MACHINE\SOFTWARE\Classes\MyImageConverter_4z.DynamicBarButton HKEY_LOCAL_MACHINE\SOFTWARE\Classes\MyImageConverter_4z.DynamicBarButton.1 HKEY_LOCAL_MACHINE\SOFTWARE\Classes\MyImageConverter_4z.FeedManager HKEY_LOCAL_MACHINE\SOFTWARE\Classes\MyImageConverter_4z.HTMLPanel HKEY_LOCAL_MACHINE\SOFTWARE\Classes\MyImageConverter_4z.HTMLPanel.1 HKEY_LOCAL_MACHINE\SOFTWARE\Classes\MyImageConverter_4z.MultipleButton HKEY_LOCAL_MACHINE\SOFTWARE\Classes\MyImageConverter_4z.MultipleButton.1 HKEY_LOCAL_MACHINE\SOFTWARE\Classes\MyImageConverter_4z.PseudoTransparentPlugin HKEY_LOCAL_MACHINE\SOFTWARE\Classes\MyImageConverter_4z.PseudoTransparentPlugin.1 HKEY_LOCAL_MACHINE\SOFTWARE\Classes\MyImageConverter_4z.Radio HKEY_LOCAL_MACHINE\SOFTWARE\Classes\MyImageConverter_4z.ScriptButton HKEY_LOCAL_MACHINE\SOFTWARE\Classes\MyImageConverter_4z.ScriptButton.1 HKEY_LOCAL_MACHINE\SOFTWARE\Classes\MyImageConverter_4z.SettingsPlugin HKEY_LOCAL_MACHINE\SOFTWARE\Classes\MyImageConverter_4z.SettingsPlugin.1 HKEY_LOCAL_MACHINE\SOFTWARE\Classes\MyImageConverter_4z.SkinLauncher HKEY_LOCAL_MACHINE\SOFTWARE\Classes\MyImageConverter_4z.SkinLauncher.1 HKEY_LOCAL_MACHINE\SOFTWARE\Classes\MyImageConverter_4z.SkinLauncherSettings HKEY_LOCAL_MACHINE\SOFTWARE\Classes\MyImageConverter_4z.SkinLauncherSettings.1 HKEY_LOCAL_MACHINE\SOFTWARE\Classes\MyImageConverter_4z.ToolbarProtector HKEY_LOCAL_MACHINE\SOFTWARE\Classes\MyImageConverter_4z.ToolbarProtector.1 HKEY_LOCAL_MACHINE\SOFTWARE\Classes\MyImageConverter_4z.UrlAlertButton HKEY_LOCAL_MACHINE\SOFTWARE\Classes\MyImageConverter_4z.UrlAlertButton.1 HKEY_LOCAL_MACHINE\SOFTWARE\Classes\MyImageConverter_4z.XMLSessionPlugin HKEY_LOCAL_MACHINE\SOFTWARE\Classes\MyImageConverter_4z.XMLSessionPlugin.1 HKEY_CURRENT_USER\Software\Microsoft\Internet Explorer\Approved Extensions, value: 312F84FB-8970-4FD3-BDDB-7012EAC4AFC9 HKEY_CURRENT_USER\Software\Microsoft\Internet Explorer\Approved Extensions, value: 48586425-6BB7-4F51-8DC6-38C88E3EBB58 HKEY_LOCAL_MACHINE\SOFTWARE\Wow6432Node\Google\Chrome\Extensions\adldappccjhelkmbkpiibilgnnjakieg HKEY_LOCAL_MACHINE\SOFTWARE\Wow6432Node\Microsoft\Internet Explorer\Low Rights\ElevationPolicy\3d429207-4689-492d-a0e5-cdc5dfbb5005 HKEY_LOCAL_MACHINE\SOFTWARE\Wow6432Node\Microsoft\Internet Explorer\Low Rights\ElevationPolicy\66d59105-fe06-43a4-b292-eb0097e9eb74 HKEY_LOCAL_MACHINE\SOFTWARE\Wow6432Node\Microsoft\Internet Explorer\Low Rights\ElevationPolicy\9103c314-c4e2-4463-8934-b19bcb46236d HKEY_LOCAL_MACHINE\SOFTWARE\Wow6432Node\Microsoft\Internet Explorer\Low Rights\ElevationPolicy\97cef41c-5055-474a-855a-892d4fe3e596 HKEY_LOCAL_MACHINE\SOFTWARE\Wow6432Node\Microsoft\Internet Explorer\Low Rights\ElevationPolicy\d375ee64-f893-498a-a0e9-0e9829c88c3d HKEY_LOCAL_MACHINE\SOFTWARE\Wow6432Node\Microsoft\Tracing\MyImageConverterCrxSetup_RASAPI32 HKEY_LOCAL_MACHINE\SOFTWARE\Wow6432Node\Microsoft\Tracing\MyImageConverterCrxSetup_RASMANCS HKEY_LOCAL_MACHINE\SOFTWARE\Wow6432Node\Microsoft\Windows\CurrentVersion\Ext\PreApproved\1f6f39c1-00a8-4752-a94c-d0ea92d978b6 HKEY_LOCAL_MACHINE\SOFTWARE\Wow6432Node\Microsoft\Windows\CurrentVersion\Ext\PreApproved\38122a36-83b2-46b8-b39a-ec72a4614a07 HKEY_LOCAL_MACHINE\SOFTWARE\Wow6432Node\Microsoft\Windows\CurrentVersion\Ext\PreApproved\5354d921-3f52-47c5-938d-77a2fb6defe7 HKEY_LOCAL_MACHINE\SOFTWARE\Wow6432Node\Microsoft\Windows\CurrentVersion\Ext\PreApproved\71144427-1368-4D18-8DC9-2AE3CC4C4F83 HKEY_LOCAL_MACHINE\SOFTWARE\Wow6432Node\Microsoft\Windows\CurrentVersion\Ext\PreApproved\99e1f6fd-2e94-4cf6-8344-1ba63cd3bd9b HKEY_LOCAL_MACHINE\SOFTWARE\Wow6432Node\Microsoft\Windows\CurrentVersion\Ext\PreApproved\a86782d8-7b41-452f-a217-1854f72dba54 HKEY_LOCAL_MACHINE\SOFTWARE\Wow6432Node\Microsoft\Windows\CurrentVersion\Ext\PreApproved\ed345812-2722-4dca-9976-d01832db44ee HKEY_LOCAL_MACHINE\SOFTWARE\Wow6432Node\MozillaPlugins\@MyImageConverter_4z.com/Plugin HKEY_LOCAL_MACHINE\SOFTWARE\Microsoft\Internet Explorer\Low Rights\ElevationPolicy\9103c314-c4e2-4463-8934-b19bcb46236d HKEY_LOCAL_MACHINE\SOFTWARE\Microsoft\Internet Explorer\Low Rights\ElevationPolicy\97cef41c-5055-474a-855a-892d4fe3e596 HKEY_LOCAL_MACHINE\SOFTWARE\Microsoft\Internet Explorer\Low Rights\ElevationPolicy\d375ee64-f893-498a-a0e9-0e9829c88c3d HKEY_LOCAL_MACHINE\SOFTWARE\Microsoft\Tracing\MyImageConverterCrxSetup_RASAPI32 HKEY_LOCAL_MACHINE\SOFTWARE\Microsoft\Tracing\MyImageConverterCrxSetup_RASMANCS HKEY_LOCAL_MACHINE\SOFTWARE\Microsoft\Windows\CurrentVersion\explorer\Browser Helper Objects\312f84fb-8970-4fd3-bddb-7012eac4afc9 HKEY_LOCAL_MACHINE\SOFTWARE\Microsoft\Windows\CurrentVersion\explorer\Browser Helper Objects\c547c6c2-561b-4169-a2a5-20ba771ca93b HKEY_LOCAL_MACHINE\SOFTWARE\Microsoft\Windows\CurrentVersion\Ext\PreApproved\1f6f39c1-00a8-4752-a94c-d0ea92d978b6 HKEY_LOCAL_MACHINE\SOFTWARE\Microsoft\Windows\CurrentVersion\Ext\PreApproved\71144427-1368-4D18-8DC9-2AE3CC4C4F83 HKEY_LOCAL_MACHINE\SOFTWARE\Microsoft\Windows\CurrentVersion\Ext\PreApproved\99e1f6fd-2e94-4cf6-8344-1ba63cd3bd9b HKEY_LOCAL_MACHINE\SOFTWARE\Microsoft\Windows\CurrentVersion\Ext\PreApproved\a86782d8-7b41-452f-a217-1854f72dba54 HKEY_LOCAL_MACHINE\SOFTWARE\Microsoft\Windows\CurrentVersion\Ext\PreApproved\ed345812-2722-4dca-9976-d01832db44ee HKEY_LOCAL_MACHINE\SOFTWARE\MozillaPlugins\@MyImageConverter_4z.com/Plugin HKEY_LOCAL_MACHINE\SOFTWARE\Microsoft\Windows\CurrentVersion\Run, value: MyImageConverter Search Scope Monitor HKEY_LOCAL_MACHINE\SOFTWARE\Wow6432Node\Microsoft\Windows\CurrentVersion\Uninstall\VDC_is1 HKEY_LOCAL_MACHINE\SOFTWARE\Google\Chrome\Extensions\adldappccjhelkmbkpiibilgnnjakieg HKEY_LOCAL_MACHINE\SOFTWARE\MyImageConverter HKEY_LOCAL_MACHINE\SOFTWARE\Wow6432Node\MyImageConverter_4z HKEY_LOCAL_MACHINE\SOFTWARE\Classes\MyImageConverter.ScriptHelper HKEY_LOCAL_MACHINE\SOFTWARE\Classes\MyImageConverter.ScriptHelper.1 HKEY_LOCAL_MACHINE\SOFTWARE\Wow6432Node\Microsoft\Internet Explorer\SearchScopes\cf6e4b1c-dbde-457e-9cef-ab8ecac8a5e8 HKEY_LOCAL_MACHINE\SOFTWARE\Wow6432Node\Microsoft\Windows\CurrentVersion\Uninstall\MyImageConverter HKEY_LOCAL_MACHINE\SOFTWARE\MozillaPlugins\@MyImageConverter_ScriptHelper.com/Plugin HKEY_LOCAL_MACHINE\SOFTWARE\Microsoft\Windows\CurrentVersion\Run, value: MyImageConverter_4z Browser Plugin Loader HKEY_LOCAL_MACHINE\SOFTWARE\Wow6432Node\Microsoft\Windows\CurrentVersion\Run, value: MyImageConverter_4z Browser Plugin Loader HKEY_LOCAL_MACHINE\SOFTWARE\Microsoft\Internet Explorer\LowRegistry\DOMStorage\MyImageConverter.dl.tb.ask.com HKEY_CURRENT_USER\Software\Microsoft\Internet Explorer\DOMStorage\MyImageConverter.dl.myway.com HKEY_LOCAL_MACHINE\SOFTWARE\Microsoft\Internet Explorer\DOMStorage\MyImageConverter.com HKEY_LOCAL_MACHINE\SOFTWARE\Microsoft\Internet Explorer\LowRegistry\DOMStorage\www.MyImageConverter.com HKEY_CURRENT_USER\Software\Microsoft\Internet Explorer\DOMStorage\free.MyImageConverter.com HKEY_LOCAL_MACHINE\HKEY_CURRENT_USER\Software\[APPLICATION]\Microsoft\Windows\CurrentVersion\Uninstall..Uninstaller
Read More
1 2 3 162
Logo
Copyright © 2022, ErrorTools. All Rights Reserved
Trademarks: Microsoft Windows logos are registered trademarks of Microsoft. Disclaimer: ErrorTools.com is not affiliated with Microsoft, nor claim direct affiliation.
The information on this page is provided for information purposes only.
DMCA.com Protection Status