How Critical is the Toolbar.Dll Error?

Fix Toolbar.Dll Error

What Exactly Is Toolbar.Dll?

Toolbar.Dll is one of the most destructive software you will encounter on your Personal Computer.

For every report out there you read about threats to your Windows PC, a significant number speak about Toolbar.Dll. Technically, this is non-essential to the functioning of your computer yet poses great dangers to your computer's security. It can cause massive destruction if not properly resolved.

Solution

Restoro box imageError Causes

As suggested below, the sources of Toolbar.Dll are many and broad:

a) Misconfigured System: Nothing causes this malfunction on your own Computer a lot more than having a misconfigured system. You ought to anticipate this malfunction and repair the situation before it gets worse.

Especially if you have Toolbar.Dll files on your computer. More often than not the situation can only get worse.

b) Broken Windows OS File: the 2nd trigger of Toolbar.Dll, and that is linked to the primary aforementioned one, is a broken Windows OS file. Fix it as soon as you realize its existence.

c) Installation Issues: If you poorly install Windows on your PC, you generate a loophole by which Toolbar.Dll malfunction might appear. You essentially provide a massive possibility to the Toolbar.dll error to affect your Computer, if you neglect to finish an install or uninstall procedure.

d) Removing Programs and Hardware Incorrectly: When you decide to remove programs and hardware, you need to exercise caution. Should you be rash with this specific procedure, you raise the odds of striking the Toolbar.Dll malfunction on your Personal Computer.

e) Incorrect Shut-Down: unless you want to strike this malfunction, ensure that you shut down your Computer procedurally. Regardless of what hurry you might be in, always power down your computer correctly.

Further Information and Manual Repair

In the event you strike the Toolbar.Dll malfunction on your Personal Computer, you shouldn't get frightened. But, prior to starting considering of ways that to fix this malfunction, you should look for the signs, to be able to recognize it.

The malfunction exists in your Computer in circumstances where software programs can't load properly.

The situation might be repaired in numerous methods, as revealed below:

  • Switch on your computer, and log in as the superuser/admin. Next, select All Programs, subsequently go to Accessories. Under Accessories, choose System Tools. Click on System Restore from the menu.
  • A fresh window will appear. In the new window, find the choice designated "Restore My Pc To An Earlier Time", before you click next.
  • Search for the newest System Restore update from "On This List, Click a Restore Point" before you click Next once more.
  • Pick Next when a verification window appears on the screen. After the complete procedure is done, reboot the pc and the Toolbar.Dll malfunction will soon be no further.

Each of the measures suggested previously, are for advanced pc users. You must obtain the very best software on the web to eliminate this malfunction, in case you are a non-techie. Alternately, contact a tech to help fixing the problem.

If you like to learn and find out more about various Windows errors, and how to repair them go to our vast archive or use search to find articles that will explain and help you in solving your issue.
However, if you prefer to do things fast and with automatization then we are proposing to use an automated solution for your issues. The application that we are recommending is Advanced System Repair Pro
Advanced System Repair utilizes multiple tools all in one to give you a quick, simple, reliable, and very thorough diagnosis of your PC. It brings you all the tools you need in one program to clean, fix, protect, optimize and boost your PC!
1-Click Maintenance
All the tools to make it simple and easy! It's like having a professional technician at the click of a mouse.

Junk Cleaner
Keeping your computer free from unnecessary clutter also helps make your computer last longer. Like any other machine, if you keep it clean and take care of it, it will serve you better for longer!

Optimize background apps
Optimize applications background activity with the built-in Application Optimizer feature.

Disk Defrag
With a simple 1-click, Advanced System Repair speeds up your PC by assembling fragmented files on your machine and organizing them more efficiently.

Malware Removal
Finds and removes all types of harmful malware including trojans, worms, bots, adware, spyware, PUPs, and more!

Privacy Cleaner
The all-in-one privacy suite to Clean Your Tracks & Protect Your Privacy! Make your computer safe, secure, and more efficient!

System Tweak/Optimizer
ASR will analyze your complete system and settings to adjust your PC to function at its maximum performance.

Registry Cleaner
Over time, as you install and uninstall applications, the registry can become cluttered with old entries and broken settings which can result in program crashes, and annoying messages and slow the computer down.
Visit our Advanced System Repair Pro Download page to inform yourself about all the benefits of this software and get a free trial copy of it.
advanced system repair pro

Advanced System Repair Pro

One-click automated PC repair solution
ASR logo
With Advanced System Repair Pro you can easily
Replace damaged files
Restore performance
Free disk space
Remove Malware
Protects WEB browser
Remove Viruses
Stop PC freezing
DOWNLOAD
Privacy Policy | Terms of Use | Uinstall
Advanced System Repair Pro is compatible with all versions of Microsoft Windows including Windows 11

Share this article:

You might also like

Error Code 0xc00000e9
If Error Code 0xc00000e9 appears on your screen, there is no cause to panic yet as there are different ways to fix this. Here, I will list down different methods to get your computer back on track:
  1. Check peripheral connections
  2. Check your SATA cables
  3. Check your hard drive
  4. Check your BIOS settings

Quick Fix 1. Check Peripheral Connections

  1. Turn off your computer.
  2. After the computer has been shut down, take off all the peripherals or the USB cables that are connected to your USB ports. This includes even the keyboard and the mouse. We just need to have only the monitor plugged in for this one.
  3. Turn on your computer and see if it starts as it normally does.
  4. If it does, try connecting back your external devices or peripherals one by one until you find the one that causes the error.
  5. Once you trace the device that’s causing the error, you will have to change its USB cable and update its driver to support your operating system.

Quick Fix 2. Check your SATA cables

It is possible that what causes a barrier between your operating system and your hard drive from communicating is the SATA cable used. For example, if you’re using an older SATA with a SATA III port, there might not be adequate support for the transfer of data from one another. Or, the problem might be a loose SATA cable which would still require you to buy a new one to replace your loose or damaged cable. To check if your SATA cables are causing the error, simply follow these steps:
  1. Turn off your computer.
  2. Carefully open its case.
  3. Check the hard drive and the SATA port where it’s connected.
  4. Try to use a newer cable and connect it to your SATA port. (If you used a SATA II cable, you can see if a SATA III cable is more compatible.)
  5. Replace your SATA cable with a newer one if Step 4 proves to be successful.

Quick Fix 3. Check your hard drive.

  1. Try to use a different hard drive and see if error code 0xc00000e9 still appears.
  2. If it works out just fine, then the problem might be physical damage to your hard drive and would need to be repaired depending on the case. Just simply take it to a technician and let him know about the issue.

Quick Fix 4. Check your BIOS settings

  1. Restart your computer.
  2. Once your computer starts, press and hold the ESC, F2, F12, or DEL key to go to BIOS settings.
  3. You will then be redirected to the BIOS Setup Utility screen. From here, go to Boot options.
  4. In the Boot Options, see if your first boot device is your hard drive. If it isn’t, press the arrow key to select the hard drive and move it to the top of the boot device list.
  5. Save the settings.
  6. Reboot your computer.
Note: If all the methods above do not work, the problem might be on your drivers and you might need to update them. You can update your driver in two ways: Manual driver update and Automatic driver update. You can find procedures online in updating your drivers.
Read More
Screen of death colors in Windows 10
Receiving a screen of death is not a pleasant experience at all and most users would agree that they would very much like not to face one during their work with the computer. Sadly PC is not a perfect machine and it is not working in a perfect environment so errors happen. The most famous and well-known death screen is blue which is also the most common one, my bet would be that there is not a user which has not been faced with this blue error screen. There is no simple explanation why these stop errors occur as several factors can be involved. However, it is known that the malfunctioning of hardware drivers or drivers that are installed by third-party software drive this unwanted change. But did you know that there is more colors for infamous death screens and not just blue one? Microsoft has coded different errors to different colors in the goal for the technical team to be aware right away of what type and kind of error they are dealing with. Color for screen errors are: Blue, Black, Pink, Brown, Yellow, Red, Orange, Green and White If you are interested in what color represents what keep reading.

BLUE

blue screen of deathA stop error or exception error commonly called the blue screen of death (BSoD) or blue screen, is an error screen displayed on Windows computers following a fatal system error. It indicates a system crash, in which the operating system has reached a condition where it can no longer operate safely. This is caused by many different problems, such as a general hardware failure or a crucial process terminating unexpectedly.

BLACK

black screen of deathOn Windows 10 systems, a Black Screen of Death can be caused by an unfinished Windows Update. To resolve this problem, simply hold the power button down on your PC or laptop to switch off the computer. A cold start should result in the system booting properly.

PINK

pink screen of deathIt is a diagnostic screen with a white type on a pink background. Pink Screen is mainly seen when the VMkernel of an ESX/ESXi host experiences a critical error, becomes inoperative, and terminates any virtual machines that are running. It is not fatal and generally considered more of a developer testing issue. When encountered, it can be fixed quickly by following the simple action of pressing and holding your computer’s power button to shut down the device.

BROWN

brown screen of deathThe Microsoft Windows 10 Operating System Brown Screen of Death is an on-screen fatal error notification with bug check codes which is seen when a computer crashes due to graphics hardware or software-related problems (failing graphics drivers).

YELLOW

yellow screen of deathIt affects the functioning of a browser, particularly Mozilla Firefox. The Yellow Screen of Death makes the appearance with a weird buzzing sound in the background when the XML parser refuses to process an XML document causing a parsing error and a weird buzzing sound. The issue persists unless the computer is manually rebooted.

RED

red screen of deathCommonly the Windows 10 red screen is caused due to the hardware error, particularly if you overclock your Windows PC/laptop. Despite this, sometimes the red screen of death is also caused by outdated or incompatible drivers or due to BIOS issues.

ORANGE

orange screen of deathThe Orange Screen of Death on Windows occurs due to fatal hardware errors. Multiple reasons have been reported for the Orange Screen of Death. Some had this issue when watching a YouTube video, some were not able to boot into Windows. It can even occur when waking up from Sleep.

GREEN

green screen of deathThe green screen of death only appears when you're running an Insider Preview version of Windows 10. It's the same as the blue screen of death, and it will show the same error messages. ... If you see a green screen of death (GSOD) on your PC, that's a sign you're using an Insider Preview build of Windows 10.

WHITE

white screen of deathThe White Screen on Windows is also an error where the screen of the computer just turns white and freezes. There can be several things that can cause the white screen to appear on the Windows laptop monitor. But the main issue could be because of malfunctioning of the graphics hardware.
Read More
Fix WIFI not asking for password
Windows has tendencies to remember WIFI passwords so it can reconnect automatically to them. But from time to time we change passwords and Windows does not let us change it since he has network remembered. In this case, we will not be able to connect to the internet. In this helpful guide, we will let you know which steps you will need to take in order to solve this issue and to be able to connect to the internet again.
  1. Restart Modem

    First thing first, restart your modem. Windows might see it as a new network and offer you to type in the password for it.
  2. Update driver

    Sometimes the issue could be due to driver problems, open device manager and update WIFI driver or reinstall it.
  3. Reset WIFI password

    Press ⊞ Windows + R type “Control” > hit Enter. Now click Network and Internet > Network and Sharing Center > Change adapter settings. Right-click on the connected Wifi and select Status. Click Wireless Properties, change the password from the Network security key section, and then click OK to reset your WiFi password.
  4. Forget the network

    Click on Start > Settings > Network & Internet > Wi-Fi. Click the Manage known networks link Select the network you are looking for Select Forget.
  5. Delete your WIFI profile

    Press ⊞ Windows + X to open the secret menu and click on Command prompt (admin) In command prompt windows type: netsh wlan show profile netsh wlan delete profile name=<profile name> Reboot
Read More
Fixing netio.sys Blue Screen error in Windows
One of the most important components of a computer in the network. The network, with the help of network devices, makes it possible for all kinds of devices to exchange information. One of the files associated with the network driver is the netio.sys file. It is a system file used by third-party programs to interact with the devices on the network. If you encounter a Blue Screen of Death error that’s related to the netio.sys file then you’ve come to the right place as this post will guide you in fixing it. Here are some of the Blue Screen errors related to the netio.sys file:
  • KMODE EXCEPTION NOT HANDLED
  • PAGE FAULT IN A NONPAGED AREA
  • IRQL NOT LESS EQUAL
  • SYSTEM_SERVICE_EXCEPTION
  • DRIVER IRQL NOT LESS OR EQUAL
  • SYSTEM THREAD EXCEPTION NOT HANDLED
To fix the netio.sys Blue Screen errors on your Windows 10 computer, you can check out each one of the following suggestions.

Option 1 – Try to use the System File Checker

One of the built-in tools in Windows that you can use to fix Blue Screen errors is the System File Checker. This built-in command utility can help you restore corrupted or missing files as well as replace bad and corrupted system files. Chances are, the netio.sys file might be corrupted so to fix it, use System File Checker.
  • First, right-click on the Start button and click on the “Command Prompt (Admin) option.
  • Next, type in the sfc /scannow command and hit Enter to execute it.
The command will start a system scan which will take a few whiles before it finishes. Once it’s done, you could get the following results:
  1. Windows Resource Protection did not find any integrity violations.
  2. Windows Resource Protection found corrupt files and successfully repaired them.
  3. Windows Resource Protection found corrupt files but was unable to fix some of them.
  • Finally, restart your computer.

Option 2 – Try checking the Memory for any errors

The first thing you can do to check the memory for errors is to run the CHKDSK utility. The CHKDSK utility repairs hard drive errors that might be causing the problem.
  • You need to open “This PC” first.
  • And then right-click on your operating system partition for Windows.
  • Next, click on Properties and navigate to the Tools tab.
  • After that, click on the Check button under the Error Checking section.
  • A new mini window will appear and from there, click on Scan drive.
  • Now let it scan your disk drive partition to check for errors and then restart your computer.
After running the CHKDSK utility, it’s now time to fix issues with your RAM by running the Memory Diagnostic tool. This tool in windows can help resolve the Blue Screen errors related to the netio.sys file by checking and automatically fixing any memory-based issues. To run it, refer to these steps:
  • Tap the Win + R keys to open Run and type mdsched.exe and hit Enter to open the Windows Memory Diagnostic Tool.
  • After that, it will give two options such as:
    • Restart now and check for problems (Recommended)
    • Check for problems the next time I start my computer
  • Once your computer has restarted, perform a basic scan or you could also go for the “Advanced” options such as “Test mix” or “Pass count”. Simply tap the F10 key to start the test.
Note: After you select your preferred option, your computer will restart and check for memory-based issues. If it finds any issues, it will automatically fix them and if there’s no issue found, then it’s most likely not a memory-based issue so you should try the other options given below.

Option 3 – Try to update or rollback or disable Network drivers

You might also want to update, roll back or disable your Network drivers to resolve the netio.sys Blue Screen errors.
  • Tap the Win + R keys to launch the Run window and then type in the “mdsched.msc” command and hit Enter to open the Device Manager window.
  • Under the Device Manager, you will see a list of drivers. From there, look for the Network Adapters and expand it.
  • Then right-click on each one of the Network drivers and depending on your preference, you can either select “Update driver”, “Disable device” or “Uninstall device”.
  • After that, restart your PC and see if it helped in fixing the netio.sys Blue Screen error.

Option 4 – Perform System Restore

Performing System Restore can also help fix BSOD errors, including the ones related to the netio.sys file. To run System Restore, follow the steps below.
  • First, tap the Win + R keys to open the Run dialog box.
  • After that, type in “sysdm.cpl” in the field and tap Enter.
  • Next, go to the System Protection tab then click the System Restore button. This will open a new window where you have to select your preferred System Restore point.
  • After that, follow the on-screen instructions to finish the process and then restart your computer and check if the problem is fixed or not.

Option 5 – Run the Blue Screen Troubleshooter

Troubleshooting Blue Screen of Death errors wouldn’t be complete without the Blue Screen troubleshooter. As you know, it is a built-in tool in Windows 10 that helps users in fixing BSOD errors like Storport.sys. It can be found on the Settings Troubleshooters page. To use it, refer to these steps:
  • Tap the Win + I keys to open the Settings panel.
  • Then go to Update & Security > Troubleshoot.
  • From there, look for the option called “Blue Screen” on your right-hand side and then click the “Run the troubleshooter” button to run the Blue Screen Troubleshooter and then follow the next on-screen options. Note that you might have to boot your PC into Safe Mode.
Read More
Fix Feature Update failed, error 0x8007000e
In every task carried out in the Windows 10 operating system, some of them don’t go smoothly and it could encounter a couple of errors along the way. One of these errors you could encounter is the Windows Update error code 0x8007000e. This particular error was reported to occur a lot when downloading and installing a Feature update via Windows Updates. And recently, it has been reported to occur a couple of times for the Windows 10 1903 May 2019 update. According to security experts, this error could be caused by a lack of memory or disk space as well as issues in the Windows Update mechanism. Whatever the cause is, troubleshooting this problem shouldn’t be hard as this post will give you some potential fixes you can check out. To fix this error, here are some options you need to consider:

Option 1 – Clear up temporary or junk files

The error could be caused by some temporary or junk files in your computer and so you need to clear them up to fix the problem. You can achieve that using the Storage Sense feature.
  • Open Setting > System > Storage from the WinX Menu.
  • From there, you will see a list of all the local and connected storage devices along with the details on the free space. Make sure that Storage Sense is on.
  • Next, find a link that says “Free Up Space” and click it to open.
  • After that, a screen which is the built-in program in Windows 10 will appear and will scan your computer for the following junk files so you can free up disk space:
    • Windows Upgrade Log Files
    • System created Windows Error Reporting Files
    • Thumbnails
    • Temporary Internet Files
    • Previous Windows Installation Files
    • Delivery Optimisation Files
    • DirectX Shader Cache
  • Choose the files you want to get rid of and then click on the remove files option. Note that you’ll have an idea of the total size as you select any of the junk files listed above.
  • Now go to the “Free Up Space Now” section and click the Clear Now button. This will get rid of all the temporary or junk files in your computer and should hopefully fix the Windows Update error 0x8007000e.

Option 2 – Reset the Windows Update components

If by any chance that the second option didn’t work, resetting the Windows Update components could also help you resolve the problem. How? Refer to the following steps:
  • Open Command Prompt with admin privileges.
  • After that, type each one of the following commands and hit Enter after you key in one after the other.
    • net stop wuauserv
    • net stop cryptsvc
    • net stop bits
    • net stop msiserver
Note: The commands you entered will stop the Windows Update components such as Windows Update service, Cryptographic services, BITS and MSI Installer.
  • After disabling WU components, you need to rename both the SoftwareDistribution and Catroot2 folders. To do that, type each one of the following commands below and don’t forget to hit Enter after you type one command after the other.
    • ren C:/Windows/SoftwareDistribution/SoftwareDistribution.old
    • ren C:/Windows/System32/catroot2/Catroot2.old
  • Next, restart the services you’ve stopped by entering another series of commands. Don’t forget to hit Enter after you key in one command after the other.
    • net start wuauserv
    • net start cryptsvc
    • net start bits
    • net start msiserver
  • Close Command Prompt and reboot your PC.

Option 3 – Try configuring the Windows Update-related Services

  • Tap the Win + R keys to open the Run dialog box.
  • Then type “cmd” in the field and tap Enter to open an elevated Command Prompt.
  • Next, execute the following commands. Note that you have to type and enter each the command one after the other.
    • SC config wuauserv start= auto
    • SC config bits start= auto
    • SC config cryptsvc start= auto
    • SC config trustedinstaller start= auto
  • The commands you executed will make sure that the Windows Update-related services are available. Once it’s done, restart your computer and see if the Windows Update error is now fixed.

Option 4 – Try running the Windows Update troubleshooter

Windows 10 have various troubleshooters that can help you resolve many system issues. So if you’re dealing with Windows Update errors like Error 0x8007000e, you can run the Windows Update troubleshooter to resolve it. To run it, go to Settings and then select Troubleshoot from the options. From there, click on Windows Update and then click the “Run the troubleshooter” button. After that, follow the next on-screen instructions and you should be good to go.

Option 5 – Try to use the Media Creation tool

The Media Creation tool in Windows allows you to use the ISO installation file to make a bootable device that you can use to install Windows on your PC. Note that this is kind of different from the usual installation process as it could erase your computer’s current settings and data on the primary drive. Thus, before you proceed, you need to backup all your data into some removable drive and then use the Media Creation tool to make a bootable drive.
  • After making the bootable drive, you need to plug it in your computer and then reboot.
  • Next, tap the F10 or Esc key to open the boot options.
  • Now set the boot priority of the removable drive the highest. Once the setup comes forth, follow the next onscreen instructions and install Windows without any problems.
Read More
Fix Windows Update Error Code 0x8e5e0147
As you already know, the Windows Update mechanism in Windows 10 is a bit complex as it depends on thousands of files and services in order to properly function. There are DLL files and services that support this mechanism’s proper functioning. And so if there is any malfunction with any of these files or services, it will result in some errors when running Windows Update. One of these errors is the error code 0x8e5e0147 which has the following error message: “There was a problem installing some updates, but we’ll try again later. If you keep seeing this and want to search the web or contact support for information, this may help – Error 0x8e5e0147” To fix this error, there are several methods you can try. You can run the Windows Update troubleshooter or reset the Windows Update components manually or clear the SoftwareDistribution folder and install the update manually. You could also reset the Windows Update Agent to default using a command in PowerShell.

Option 1 – Try to run the Windows Update troubleshooter

The first thing you can do to fix the Windows Update error code 0x8e5e0147 is to run the Windows Update Troubleshooter. To run it, go to Settings and then select Troubleshoot from the options. From there, click on Windows Update and then click the “Run the troubleshooter” button. After that, follow the next on-screen instructions and you should be good to go.

Option 2 – Try to reset the Windows Update components

If by any chance that the third option didn’t work, you can also try resetting the Windows Update components as it could also help you resolve the Windows Update error. How? Refer to the following steps:
  • Open Command Prompt with admin privileges.
  • After that, type each one of the following commands and hit Enter after you key in one after the other.
    • net stop wuauserv
    • net stop cryptsvc
    • net stop bits
    • net stop msiserver
Note: The commands you entered will stop the Windows Update components such as Windows Update service, Cryptographic services, BITS and MSI Installer.
  • After disabling WU components, you need to rename both the SoftwareDistribution and Catroot2 folders. To do that, type each one of the following commands below and don’t forget to hit Enter after you type one command after the other.
    • ren C:/Windows/SoftwareDistribution/SoftwareDistribution.old
    • ren C:/Windows/System32/catroot2/Catroot2.old
  • Next, restart the services you’ve stopped by entering another series of commands. Don’t forget to hit Enter after you key in one command after the other.
    • net start wuauserv
    • net start cryptsvc
    • net start bits
    • net start msiserver
  • Close Command Prompt and reboot your PC.

Option 3 – Try downloading and installing the Windows Updates manually

Windows Update error code 0x8e5e0147 might be due to a Windows Update that has failed. So if it is not a feature update and only a cumulative update, you can download the Windows Update and install it manually. But first, you need to find out which update has failed, and to do so, refer to the following steps:
  • Go to Settings and from there go to Update and Security > View Update History.
  • Next, check which particular update has failed. Note that Updates that have failed to install will be displayed under the Status column which has a label of “Failed”.
  • After that, go to the Microsoft Download Center and look for that update using its KB number and once you find it, download and then install it manually.
Note: You can also use the Microsoft Update Catalog, a service from Microsoft that provides a list of software updates that can be distributed over a corporate network. With the help of this service, it can be easier for you to find Microsoft software updates, drivers as well as fixes. Option 4 – Try to reset the Windows Update Agent Since you can’t update the Windows Update Agent on your Windows 10 computer manually, you can try resetting it instead and you can do it using the Reset Windows Update Agent tool which you can download from the official Microsoft website. This tool allows you to:
    • Scan all protected system file and replace the corrupted one’s (sfc /scannow)
    • Scan, detect, and repair corruptions in Windows system image
    • Clean up superseded components
    • Reset Windows Update components
  • Change invalid values in Windows Registry
  • Delete temporary files
Moreover, this tool also allows you to carry out these operations:
  • Open Internet Explorer settings
  • Search for Windows Updates
  • Explorer for local or online solutions
  • Restart your computer
Read More
Fixing Error 0x80070057 in Windows 10
Whether you’re using Windows Update or upgrading or installing on your Windows 10 computer, you can’t really tell if things will go smoothly as there are times when you might encounter some issues that prevent you from completing the update or upgrade or the installation. One of the errors you can encounter is error 0x80070057. Usually, when you receive this error, it means that one or more arguments are not valid. You can encounter this error in the following cases:
  • Windows Update, Upgrade, or Installation
  • Windows Backup, The parameter is incorrect
  • Partitioning a Disk
  • System Image Restore error 0x80070057
  • Downloading Windows Store apps
Keep in mind that the troubleshooting steps you need to take will depend on the scenarios you are in. Thus, you need to go over each one of the troubleshooting options given below and make sure to carefully follow each one of them but before you proceed, you have to create a System Restore Point first.

Option 1 – Run the Windows Update Troubleshooter

The first thing you can do to fix error 0x80070057 is by running the Windows Update Troubleshooter. It is a built-in tool in Windows that helps users resolve any issues with Windows Update. All you need to do to run it is go to Settings and then select Troubleshoot from the options. From there, click on Windows Update and then click the “Run the troubleshooter” button.

Option 2 – Use the Registry Editor

If you get the error 0x80070057 during Windows Backup, then you need to make some modifications to the Windows Registry. To do so, follow these steps:
  • Tap the Win + R keys to open the Run dialog box.
  • Type “Regedit” in the field and hit Enter to open the Registry Editor.
  • Next, navigate to the following registry key:
HKEY_LOCAL_MACHINESOFTWAREPoliciesMicrosoftSystem
  • Then create a new DWORD value and input “CopyFileBufferedSynchronousIo” as its name and put “1” as its value.
  • Close the Registry Editor and restart your computer then check if the error is fixed or not.

Option 3 – Run the DISM tool

Running the DISM Tool helps in repairing the Windows System Image as well as the Windows Component Store in Windows 10. Using this built-in tool, you have various options such as the “/ScanHealth”, “/CheckHealth”, and “/RestoreHealth”.
  • Open the Command Prompt with admin privileges.
  • Then type in the following commands and make sure to hit Enter right after you type each one of them:
    • Dism /Online /Cleanup-Image /CheckHealth
    • Dism /Online /Cleanup-Image /ScanHealth
    • exe /Online /Cleanup-image /Restorehealth
  • Do not close the window if the process takes a while as it will probably take a few minutes to finish.
Note: If it happens that the Windows Update client is broken, you need to run the following command to repair it then restart your PC and click on Update once again.
DISM.exe /Online /Cleanup-Image /RestoreHealth /Source:C:RepairSourceWindows /LimitAccess

Option 4 – Flush the contents of the SoftwareDistribution folder

You have to stop a couple of services such as BITS, Cryptographic, MSI Installer, and Windows Update Services. And to do that, you need to flush the contents in the SoftwareDistribution folder. The Software Distribution folder in the Windows operating system is a folder that can be found in the Windows directory and is used to store files temporarily which might be required to install the Windows Update on your PC. Thus, it is required by the Windows Update and maintained by WUAgent. Aside from that, it also contains all the Windows Update History files and once you delete them, you will most likely lose the Update history. As a result, the next time you run the Windows Update, it may result in a longer detection time.
  • Open the WinX Menu.
  • From there, open Command Prompt as admin.
  • Then type in the following command – don’t forget to hit Enter right after typing each one of them.
net stop wuauserv net start cryptSvc net start bits net start msiserver
  • After entering these commands, it will stop the Windows Update Service, Background Intelligent Transfer Service (BITS), Cryptographic, and the MSI Installer
  • Next, go to the C:/Windows/SoftwareDistribution folder and get rid of all the folders and files thereby tapping the Ctrl + A keys to select them all and then click on Delete. Note that if the files are in use, you won’t be able to delete them.

Option 5 – Reset Windows Store Cache

  • Right-click on the start button and click on Command Prompt (administrator).
  • Next, type in the command, “wsreset.exe” and tap Enter. Once you do, the command will clear the cache for the Windows Store app.

Option 6 – Run SFC scan

Running the SFC scan or System File Checker might also help in fixing error 0x80070057.
  • Tap Win + R to launch Run.
  • Type in cmd in the field and tap Enter.
  • After opening Command Prompt, type in sfc /scannow and hit Enter.
The command will start a system scan which will take a few whiles before it finishes. Once it’s done, you could get the following results:
  1. Windows Resource Protection did not find any integrity violations.
  2. Windows Resource Protection found corrupt files and successfully repaired them.
  3. Windows Resource Protection found corrupt files but was unable to fix some of them.
Read More
The Extended Attributes Are Inconsistent Error
One of the most critical errors inside your Windows operating system is The Extended Attributes Are Inconsistent error. This error means that your operating system has been corrupted and it may produce many annoying issues like for example time lags, random crashes, and even freezing of the system when running multiple applications. There are a lot of reasons for this error, from the registry to faulty application installations to sometimes even hardware issues like bad RAM memory or bad hard drive. Mostly issue is due to corrupted files inside Windows and most often people only think that resetting the PC or complete reinstallation is the only way to fix this problem. Although reinstalling the system or resetting the PC will solve this error for sure there are other less time-consuming ways to fix this error. The Extended Attributes Are Inconsistent Error
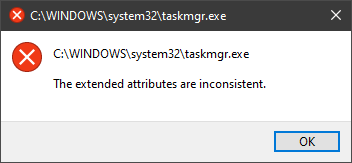
In this guide, we will show you common ways in fixing Extended Attributes are inconsistent errors inside your Windows that are easy to do and less time-consuming than complete reinstallation of the system.

Fixing Extended Attributes Are Inconsistent error

Run SFC scan

  1. Press ⊞ WINDOWS + X to open the hidden menu
  2. Click on command prompt (admin)
  3. In command prompt type in SFC /scannow and press ENTER
  4. Wait for the operation to complete
  5. Reboot your PC

Use System Image Repair Tool

  1. Press ⊞ WINDOWS + X to open the hidden menu
  2. Click on command prompt (admin)
  3. In command prompt type in Dism /Online /Cleanup-Image /RestoreHealth and press ENTER
  4. Wait for the operation to complete
  5. Reboot your PC

Change all user accounts to the administrator

  1. Press ⊞ WINDOWS + R to open the run dialog
  2. Type in netplwiz and press ENTER
  3. Select a first user account and click on Properties
  4. Click on the Group Membership tab
  5. Choose Others from the options
  6. Select administrator (if all accounts are already administrators change all to users)
  7. Repeat process for all other accounts
  8. Click OK to save settings

Change Windows Sound scheme to default

  1. Right-click on the sound icon in the taskbar
  2. Click on Sound options
  3. Go to the Sounds tab
  4. In Sound Scheme click and choose Windows Default
  5. Under Program Events choose Windows User Account Control
  6. Click on the drop-down menu and choose None
  7. Click on Apply
  8. Click on OK

Downgrade the Sound driver

  1. Press ⊞ WINDOWS + X to open the hidden menu
  2. Click on Device Manager
  3. Find your Audio driver and right-click on it
  4. Click on uninstall and then on OK
  5. Reboot your system

Do System Restore

If none of the provided solutions have worked, perform a system restore to the last point where everything was working fine.

Reset PC

If even system restore has not solved the issue or you do not have valid point in system restore time, perform Reset this PC and hopefully, the error will be finally fixed.

Conclusion

If all of the provided methods have not managed to repair this error that checks your hardware, your computer might have some faulty components if after complete PC reset error persists.
Read More
Fix KMODE EXCEPTION NOT HANDLED e1d65x64.sys
KMODE_EXCEPTION_NOT_HANDLED seems to be connected primarily to a third-party driver, e1d65x64.sys associated with the Intel(R) Gigabit adapter, NIC/Wired network NDIS (Network Driver Interface Specification) 6.x driver. Error is known to produce the dreaded blue screen of death or BSOD. Most usually error is connected with gaming on Windows 10 computer and it manifests itself during gaming sessions. If you are unlucky and you are faced with this unfortunate error we will be happy to try to help you and present with tips and tricks in order for you to find a solution for it. Before you proceed with the provided solutions, be sure you have sufficient disk space on the Windows drive, run Disk Cleanup and then run CHKDSK.

1) Run the Blue Screen Online Troubleshooter

Open Control Panel, change the view setting to icons. Click Troubleshooting, and click “View all” in the tasks pane. Click “Blue Screen”. This opens the Blue Screen Troubleshooter.

2) Run Driver Verifier

  1. Start a Command Prompt window by selecting Run as an administrator, and type verifier to open Driver Verifier Manager.
  2. Select Create standard settings (the default task), and select Next. You can also choose to Create custom settings to select from predefined settings, or to select individual options. For more information, see Driver Verifier options and rule classes and Selecting Driver Verifier Options.
  3. Under Select what drivers to verify, choose one of the selection schemes described in the following table.
    Driver verifier table:
    Option Recommended use
    Automatically select unsigned drivers Useful for testing on computers that are running versions of Windows that do not require signed drivers.
    Automatically select drivers built for older versions of Windows Useful for testing driver compatibility with newer versions of Windows.
    Automatically select all drivers installed on this computer Provides maximum coverage in terms of the number of drivers that are tested on a system. This option is useful for test scenarios where a driver can interact with other devices or drivers on a system. This option can also exhaust the resources available for Special Pool and some resource tracking. Testing all drivers can also adversely affect system performance.
    Select driver names from a list In most cases, you will want to specify which drivers to test. Selecting all drivers in a device stack allows the Enhanced I/O Verification option to track objects and check compliance because an I/O request packet (IRP) is passed between each of the drivers in the stack, which allows for a greater level of detail to be provided when an error is detected. Select a single driver if you are running a test scenario that measures system or driver performance metrics, or if you want to allocate the greatest number of resources available for detecting memory corruption or resource tracking issues (such as deadlocks or mutexes). The Special Pool and I/O Verification options are more effective when used on one driver at a time.
  4. If you chose Select driver names from a list, select Next, and then select one or more specific drivers.
  5. Select Finish, and then restart the computer.

3) Update network device drivers

Go to the official Intel website and try to find newer versions of drivers, if there are none perhaps you will need to revert back to the previous version.

4) Scan memory for issues

Run a memory test on your system, sometimes these errors can be traced back to a faulty RAM bank.

5) Stop over-clocking your PC

If you have overclocked your PC please reverse it back to its original state and see if that would solve the issue

6) Perform System Restore to the previous restore point

If none of the previous solutions have bared fruit, roll back to a previous restore point and that should solve the issue.
Read More
How to Resolve Socket Error 10060

Fix Socket Error 10060

Socket Error 10060 - What is it?

Socket Error 10060 is basically a connection time-out error. This error occurs when the remote FTP server does not respond to CuteFTP. This time-out error occurs after an FTP session is established but even the server doesn’t respond. The error message is displayed in the following format:
‘Connection timed out. A connection attempt failed because the connected party did not properly respond after a period of time, or established connection failed because connected host failed to respond.’

Solution

Restoro box imageError Causes

Socket Error 10060 may occur due to multiple reasons including:
  • Blocked port
  • Data connection incorrect settings
  • When the web proxy connection setting does not allow enough time to receive a response from the destination website and therefore the connection is timed-out.
  • Registry issues
  • Viral infection

Further Information and Manual Repair

Here are some of the best and quick DIY methods to resolve Socket Error 10060 on your PC.

Method 1: Troubleshoot the Web Proxy Connection

This method is workable and effective if Socket Error 10060 occurs only when the web proxy service is used. To execute it, here’s what you need to do: install the Winsock Proxy Client on your PC. Disable the web proxy settings under the LAN settings on the Connections tab of the internet options. Once you disable the settings, then try to go to the website that you giving you the error. If the site is accessible, the error is resolved.

Method 2: Increase Web Proxy Time out Settings

If disabling the web proxy settings doesn’t work, then try increasing time-out settings. To do so, you will also have to modify the registry. Remember serious problems may occur if you modify the registry incorrectly.
  • Here’s what you need to do, click start, run and then type Regedit in the dialogue box.
  • Navigate to the following registry subkey: HKEY_LOCAL_MACHINESYSTEMCurrentControlSetServicesW3ProxyParameters.
  • On the right side of the Registry Editor, right-click Request TimeoutSecs and then click Modify.
  • Click decimal, they type the number of seconds that you want the proxy service to wait until the session times out.
  • To confirm changes, click OK.
  • Now restart WWW publishing service by going to start, run and type cmd. Click OK to continue.
  • Type net stop iisadmin/y and then press enter. After that type net start iisadmin /y and then press enter. Test the new settings by going to the website that displayed the Socket Error 10060 message.

Method 3: Switch from Passive Mode to Active Port Mode

This method is effective if the error occurs due to incorrect data connection settings. CuteFTP uses passive mode by default so to ensure the error is resolved, you may have to switch from passive mode to active port mode. To make this switch, open the site manager and then click once on the name of the problem website. Now on the Type tab change the data connection type to use the port.

Method 4: Configure Firewall Settings

Sometimes the error may also occur due to Firewall.  To resolve, configure Firewall settings to allow FTP protocol.

Method 5: Download Restoro

Whether the error occurs due to viral infection or registry issues, it is advisable to download Restoro. This is an advanced and multi-functional PC fixer embedded with multiple utilities like antivirus and a registry cleaner. The registry cleaning utility removes junk files, cookies, and invalid entries damaging the registry. It cleans, repairs, and restores the registry while the antivirus removes all types of viruses like spyware and Trojans in seconds thereby resolving socket error code 10060. It is safe, user-friendly, and compatible with all Windows versions. Click here to download Restoro today.
Read More
1 2 3 162
Logo
Copyright © 2022, ErrorTools. All Rights Reserved
Trademarks: Microsoft Windows logos are registered trademarks of Microsoft. Disclaimer: ErrorTools.com is not affiliated with Microsoft, nor claim direct affiliation.
The information on this page is provided for information purposes only.
DMCA.com Protection Status