Fix Rstrui.exe error in Windows 10

Fix Rstrui.exe error in Windows 10

Rstrui.exe is a service assigned to controlling system restore, it is considered an essential part of the Windows system and without it working you will not be able to perform a system restore operation.

Without system restore working you will not be able to "rewind" Windows into a working state if needed which can create in itself many new complications. Luckily we have working solutions for this specific problem, so get ready, and let's start.

SFC scan

Sfc scan is a built-in Windows tool that scans and repairs system corrupted and missing files. To run it open up the command prompt in administrator mode and type in it:

SFC /SCANNOW

then, let the whole process finish, do not interrupt it, and reboot after it is done.

DISM scan

Similar to SFC scan, DISM is also a built-in tool for fixing files linked to Windows essential working. Start a command prompt in administrator mode and type in:

DISM /Online /Cleanup-Image /RestoreHealth

Again let the process completely finish and then reboot your system.

Scan for viruses and other malware

Viruses and other malware can seriously damage the system and with it rstrui.exe along with it. Scan your system with Windows defender or even better with some other dedicated security suite to eliminate malicious threats if they exist.

Update Windows

Keeping Windows updated can bring you more good than harm, it is very advisable to keep it up to date all the time so all security leaks and bugs are repaired and that you have your OS in top-notch working order. Updating can also fix corrupted system files or replace them with newer versions so if your Windows is not updated go to update central and do it.

Use automated solution

If you do not wish to go through manual fixing of issues, try an automatic repair solution like RESTORO, where you can fix this and many other issues with just a simple click.

Congratulations, you have just Fixed the Rstrui.exe error in Windows 10 all by yourself. If you would like to read more helpful articles and tips about various software and hardware visit errortools.com daily.

Now that’s how you fix the Rstrui.exe error in Windows 10 on a computer. On the other hand, if your computer is going through some system-related issues that have to get fixed, there is a one-click solution known as Restoro you could check out to resolve them.

This program is a useful tool that could repair corrupted registries and optimize your PC’s overall performance. Aside from that, it also cleans out your computer for any junk or corrupted files that help you eliminate any unwanted files from your system. This is basically a solution that’s within your grasp with just a click. It’s easy to use as it is user-friendly. For a complete set of instructions in downloading and using it, refer to the steps below

Perform a full system scan using Restoro. To do so, follow the instructions below.

  1. Download and install Restoro from the official site.
  2. Once the installation process is completed, run Restoro to perform a full system scan.
    restoro application screen
  3. After the scan is completed click the “Start Repair” button.
    restoro application screen
If you like to learn and find out more about various Windows errors, and how to repair them go to our vast archive or use search to find articles that will explain and help you in solving your issue.
However, if you prefer to do things fast and with automatization then we are proposing to use an automated solution for your issues. The application that we are recommending is Advanced System Repair Pro
Advanced System Repair utilizes multiple tools all in one to give you a quick, simple, reliable, and very thorough diagnosis of your PC. It brings you all the tools you need in one program to clean, fix, protect, optimize and boost your PC!
1-Click Maintenance
All the tools to make it simple and easy! It's like having a professional technician at the click of a mouse.

Junk Cleaner
Keeping your computer free from unnecessary clutter also helps make your computer last longer. Like any other machine, if you keep it clean and take care of it, it will serve you better for longer!

Optimize background apps
Optimize applications background activity with the built-in Application Optimizer feature.

Disk Defrag
With a simple 1-click, Advanced System Repair speeds up your PC by assembling fragmented files on your machine and organizing them more efficiently.

Malware Removal
Finds and removes all types of harmful malware including trojans, worms, bots, adware, spyware, PUPs, and more!

Privacy Cleaner
The all-in-one privacy suite to Clean Your Tracks & Protect Your Privacy! Make your computer safe, secure, and more efficient!

System Tweak/Optimizer
ASR will analyze your complete system and settings to adjust your PC to function at its maximum performance.

Registry Cleaner
Over time, as you install and uninstall applications, the registry can become cluttered with old entries and broken settings which can result in program crashes, and annoying messages and slow the computer down.
Visit our Advanced System Repair Pro Download page to inform yourself about all the benefits of this software and get a free trial copy of it.
advanced system repair pro

Advanced System Repair Pro

One-click automated PC repair solution
ASR logo
With Advanced System Repair Pro you can easily
Replace damaged files
Restore performance
Free disk space
Remove Malware
Protects WEB browser
Remove Viruses
Stop PC freezing
DOWNLOAD
Privacy Policy | Terms of Use | Uinstall
Advanced System Repair Pro is compatible with all versions of Microsoft Windows including Windows 11

Share this article:

You might also like

How to share games on Steam with someone
Sharing is caring, an old saying says. I completely agree and that is reason enough for this article filled with sharing goodness. Holidays are coming and I hope that the holiday spirit is strong with you, that you will spend them in peace and with loved ones. All that being said wouldn’t it be great if you can spend some joy with close ones and share some of your games on their account so they can enjoy them as well? steam libraryWell, you can and it is not complicated as well. Follow this easy guide to see how can you get someone’s account up and running with some of your games.

The steam Family sharing feature

The family Sharing feature inside Steam will let you share your games to another account so owners of that account can play games that you have purchased without the need to buy themselves. You can allow up to 5 accounts and 10 devices to play your library games, and owners of these accounts will have their own achievements. Be aware that enabling this option will place your entire library on the share, you will not be able to choose which games you would like to share and therefore any kind of parental controls are not applying here. Also know that once the game is running on one device, others will have to wait for one playing to finish before they can get a spin on it. Only the owner of the game can play whenever he wants as a priority but others will have to wait for the game to be not run by someone else.

How to Share Your Game Library

In order to share your game library have a person, you wish to share games with at his device on ready to go and enable steam guard on your account. To enable steam guard login into your account and on the top left corner click on Steam and then on Settings. Inside settings click on the Manage Steam Guard Account Security button. Choose the way of authentication either by mail or steam guard mobile app. Check Get Steam guard codes by email radio button and re-login into account.

Sharing Games on another Steam account

Now that Steam Guard is enabled on the primary account let’s share some games!!! Inside client again, in the top left click on Steam and again on settings. In the left panel choose and click on Family. Inside Family section check box beside Authorize Library Sharing on This Computer. Log out of your account and login into the client user account credentials you wish to share your library with (this is your friend or cousin account, they need to log in to Steam client on your computer but with their credentials). After they have successfully logged in, log them out and re-log with your account again. Now go again into Steam > Family and now you should see an account in the box at the bottom with the user name or your friend or relative. Confirm that this is an account that you wish to share the library with by clicking on the checkbox next to the name. Now let users login into the desired device with their credentials and they will have access to your entire library. Happy gaming!
Read More
Fix False Notifications in Action Center
There is a central location in Windows 10 that allows users to view all the notifications from its Action Center. Aside from viewing notifications, users can also manage them and take necessary actions in just one single place. Notifications in Windows 10 look similar to a message icon but can be at variance in function. However, recently, a number of users reported that even though they receive notifications about new actions but when opening them, they see nothing. In other words, the notification is false, and to fix this, read on as this post will provide you a couple of workarounds. The Windows 10 Notifications and Action Center notification messages might show a mismatch. For instance, Windows 10 may say that you have some notifications but when you open Action Center, you find it empty and there are actually no notifications there. Take the case of the following screenshot, the Windows 10 Notification says that there are 6 new notifications available for viewing but the Action Center says otherwise. Before you troubleshoot the problem, you might want to run System Restore especially if you’ve made some changes in your computer prior to this issue which might have messed with the Windows 10 Notifications and Action Center. To perform System Restore, refer to these steps:
  • First, press the Win + R keys to open the Run dialog box.
  • After that, type in “sysdm.cpl” in the field and tap Enter.
  • Next, go to the System Protection tab then click the System Restore button. This will open a new window where you have to select your preferred System Restore point.
  • After that, follow the on-screen instructions to finish the process and then restart your computer and check if the problem is fixed or not.
If the problem wasn’t fixed and you’re still getting false notifications, you might want to troubleshoot the problem further using the options given below.

Option 1 – via Windows PowerShell

  • In the Start search, type “PowerShell” in the field and hit Enter to pull up the Windows PowerShell window.
  • Next, copy and paste this command and hit Enter to execute it: Get-AppxPackage | % { Add-AppxPackage -DisableDevelopmentMode -Register “$($_.InstallLocation)AppxManifest.xml” -verbose }
  • After that, reboot your computer and check if the false notifications are now gone.

Option 2 – Try renaming the Usrclass.dat file

DAT errors like the ones that are associated with the Usrclass.dat file, most likely occur during computer startup, program startup, or while you try to use a specific function in your program. Even so, it can easily be fixed. How? Refer to the given steps below.
  • Tap the Win + R keys to open the Run dialog box.
  • Then type %localappdata%MicrosoftWindows and hit Enter to get to the location of the UsrClass.dat file.
  • After that, look for a file named UsrClass.dat and once you’ve found it, right-click on it and select the Rename option.
  • Now rename the file to UsrClass.old.dat and then restart your computer and see if the problem is now fixed or not.
Read More
The system found unauthorized changes
If your Windows computer is not booting up and displays Secure Boot Violation – The system found unauthorized changes on the firmware, operating system, or UEFI drivers error message on the screen, then you can follow this tutorial to troubleshoot the problem. When you encounter this kind of problem on your computer, you will get the following error message on your screen:
“Secure Boot Violation The system found unauthorized changes on the firmware, operating system, or UEFI drivers. Press [OK] to run the next boot device or enter directly to BIOS Setup if there are no other boot devices installed. Go to BIOS Setup > Advanced > Boot and change the current boot device into other secured boot devices.”
This kind of error message pops up due to the Secure Boot that protects your computer from running any non-OEM signed boot software during startup. In other words, the Secure Boot firmware is the one that scans for non-signed boot software each time your computer boots up and if it detects anything strange, it will block the boot and will display the error message. To fix this error, there are two things you can try. You can try to disable the Secure Boot or try using a System Restore Point. For more detailed instructions, refer to each one of the options provided below.

Option 1 – Disable the Secure Boot in the BIOS

Disabling the Secure Boot in the BIOS settings is definitely recommended to resolve the issue. To disable Secure Boot, here’s what you have to do:
  • First, boot your computer into Windows 10.
  • Next, go to Settings > Windows Update. From there, check if there is anything that you have to download and install if you see any available updates. Usually, OEMs send and update the list of trusted hardware, drivers, and operating systems for your computer.
  • After that, go to the BIOS of your computer.
  • Then go to Settings > Update & Security > Advanced Startup options. If you click on Restart Now, it will restart your computer and give you all the advanced options.
  • Next, select Troubleshoot > Advanced Options. As you can see, this screen offers you further options including System restore, Startup repair, Go back to the previous version, Command Prompt, System Image Recovery, and UEFI Firmware Settings.
  • Select the UEFI Firmware Settings which will take you to the BIOS.
  • From there, go to the Security > Boot > Authentication tab where you should see Secure Boot. Note that every OEM has its own way of implementing the options so it varies.
  • Next, set Secure Boot to Disabled and set Legacy Support to On or Enabled.
  • Save the changes made and exit. Afterward, your computer will reboot.

Option 2 – Try running System Restore in Advanced Startup Options

Since you probably can’t boot into your Windows 10 computer, you can try to run System Restore again in the Advanced Startup Options.
  • Boot your computer into the Advanced Startup Options screen.
  • From there, you will see some options to troubleshoot when you can’t log in to Windows in the usual way.
  • Now select Troubleshoot > Advanced Options > Command Prompt.
  • After that, type “rstrui” and hit Enter to execute the command which will start the System Restore process.

Option 3 – Make a proper bootable USB Drive/Stick

To make a proper bootable USB drive, you need to use the Windows Media Creation tool. The Media Creation tool in Windows allows you to use the ISO installation file to make a bootable device that you can use to install Windows on your PC. Note that this is kind of different from the usual installation process as it could erase your computer’s current settings and data on the primary drive. Thus, before you proceed, you need to backup all your data into some removable drive and then use the Media Creation Tool to make a bootable drive.
  • After making the bootable drive, you need to plug it into your computer and then reboot.
  • Next, tap the F10 or Esc key to open the boot options.
  • Now set the boot priority of the removable drive the highest. Once the setup comes forth, follow the next onscreen instructions and install Windows without any problems.
Read More
Run Windows Updates from Command Line
As you know, one of the most highlighted features of Windows 10 is Windows Updates. It was offered to the customers as a service rather than a product with the release of Windows 10 under the scenario of Software as a Service which led to Windows Updates being set by default on Windows 10 and without an option for any users to disable it. Although not all users are happy with what Microsoft did, this is an ultimate step towards the greater good of all its customers since Windows Updates helps users in keeping their computers secured against all kinds of threats as well as provide them with the greatest and latest updates from Microsoft. So if you are one of those users who approved of the Windows Updates service, then read on as this post will guide you in running Windows Updates from Command Line either via Command Prompt or Windows PowerShell. For the complete set of instructions, refer to the options given below.

Option 1 – Run Windows Update via Command Prompt

Command Prompt in the Windows operating system exists for a very long time now compared to the comparatively new Windows PowerShell. That’s why it has similar capabilities to run Windows Updates. However, the highlighting point here is that you don’t have to download any module for Windows Updates. To get started running Windows Updates using Command Prompt, refer to the steps below.
  • First, type “cmd” in the Cortana search box, and from the search results, right-click on Command Prompt and select the Run as Administrator option to open it with Administrator privileges.
  • If a User Account or UAC prompt appears, just click on Yes to proceed.
  • Next, type in the commands listed below, and don’t forget to tap Enter right after you type each one of them.
    • UsoClient StartScan – use this command to start checking for updates.
    • UsoClient StartDownload – use this command to start downloading updates.
    • UsoClient StartInstall – use this command to start installing the downloaded updates.
    • UsoClient RestartDevice – use this command to restart your computer after you install.
    • UsoClient ScanInstallWait – use this command to check, download and install updates.
Note: Keep in mind that the commands in Command Prompt listed above are only meant for Windows 10. On the other hand, if you are using an older Windows version, you can try using the following commands instead:
  • wuauclt /detectnow – use this command to start checking for updates.
  • wuauclt /updatenow – use this command to start installing the updates detected.
  • wuauclt /detectnow /updatenow – use this command to check, download and install updates.

Option 2 – Run Windows Updates via Windows PowerShell

If you run Windows Updates in the Windows PowerShell, it will require you to install the Windows Update module manually. Hence, you have to get the Windows Updates downloaded and install Windows Updates.
  • Search for PowerShell in the Cortana search box and then run it with administrator privileges.
  • Once you’ve opened the Windows PowerShell, type the following command and hit Enter.
    • Install-Module PSWindowsUpdate – use this command to install the Windows Update module for Windows PowerShell.
    • Get-WindowsUpdate – use this command to connect to the servers of Windows Update and download the updates if found.
    • Install-WindowsUpdate – use this command to install the Windows Updates you’ve downloaded to your computer.
Read More
Fix Windows Update Error 0x80004005
As you know, Microsoft is consistent in pushing updates to its supported versions of the Windows operating systems in order to make it better and defend it from different kinds of vulnerabilities. And pushing billions of active Windows computers every now and then is really not an easy thing to do since it calls for a complex Windows Update delivery module. These complexities often give rise to various errors like the Windows Update error code 0x80004005. When you encounter this kind of Windows Update error, you will see the following error message on your screen:
“There were problems installing some updates, but we’ll try again later. If you keep seeing this and want to search the web or contact support for information, this may help 0x80004005.”
This kind of Windows Update error occurs due to an issue while either installing or downloading an update. There are several ways you can fix the problem. You can try to replace the dpcdll.dll file, reset the Windows Update-related services, run the Windows Update troubleshooter or manually install the Windows Updates. For more details, check out the options given below.

Option 1 – Try to replace the DLL file with a trusted source

The first thing you can do is to replace the dpcdll.dll file with a trusted source.
  • First, you need to get the new dpcdll.dll file from another computer with preferably the same file version number as your computer.
  • After that, you need to boot your PC into Safe Mode and navigate to the paths listed below and then replace the file using a USB drive or other external storage devices.
    • For x86: This PC > C:/Windows/System32
    • For x64: This PC > C:/Windows/SysWOW64
  • Next, type “cmd” in the Cortana search box and right-click on Command Prompt, and select “Run as administrator” to open it with administrator privileges.
  • Now type the “regsvr32 dpcdll.dll” command and hit Enter.
  • Restart your PC and check if the error is now fixed.

Option 2 – Try to reset the Windows Update components

If by any chance that the third option didn’t work, you can also try resetting the Windows Update components as it could also help you resolve the Windows Update error. How? Refer to the following steps:
  • Open Command Prompt with admin privileges.
  • After that, type each one of the following commands and hit Enter after you key in one after the other.
    • net stop wuauserv
    • net stop cryptsvc
    • net stop bits
    • net stop msiserver
Note: The commands you entered will stop the Windows Update components such as Windows Update service, Cryptographic services, BITS and MSI Installer.
  • After disabling WU components, you need to rename both the SoftwareDistribution and Catroot2 folders. To do that, type each one of the following commands below and don’t forget to hit Enter after you type one command after the other.
    • ren C:WindowsSoftwareDistribution SoftwareDistribution.old
    • ren C:WindowsSystem32catroot2 Catroot2.old
  • Next, restart the services you’ve stopped by entering another series of commands. Don’t forget to hit Enter after you key in one command after the other.
    • net start wuauserv
    • net start cryptsvc
    • net start bits
    • net start msiserver
  • Close Command Prompt and reboot your PC.

Option 3 – Run the Windows Update Troubleshooter

You might also want to run the Windows Update Troubleshooter as it could also help in fixing Windows Update error 0x80004005. To run it, go to Settings and then select Troubleshoot from the options. From there, click on Windows Update and then click the “Run the troubleshooter” button. After that, follow the next on-screen instructions and you should be good to go.

Option 4 – Try downloading and installing the Windows Updates manually

Windows Update Error 0x80004005 might be due to a Windows Update that has failed. So if it is not a feature update and only a cumulative update, you can download the Windows Update and install it manually. But first, you need to find out which update has failed, and to do so, refer to the following steps:
  • Go to Settings and from there go to Update and Security > View Update History.
  • Next, check which particular update has failed. Note that Updates that have failed to install will be displayed under the Status column which has a label of “Failed”.
  • After that, go to the Microsoft Download Center and look for that update using its KB number and once you find it, download and then install it manually.
Note: You can also use the Microsoft Update Catalog, a service from Microsoft that provides a list of software updates that can be distributed over a corporate network. With the help of this service, it can be easier for you to find Microsoft software updates, drivers as well as fixes.
Read More
Fix oobesettings error inside Windows 11
oobesettings
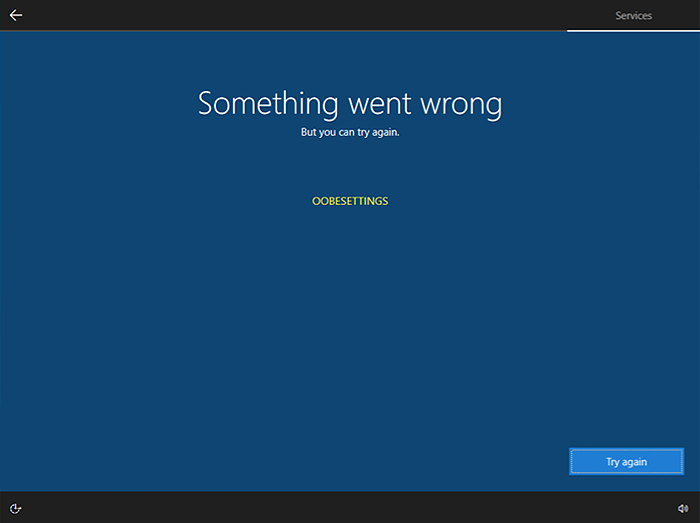
Oobesttings error is the blue screen of death error caused by some faulty settings inside the Windows registry. The good news is that this is not a hard error to fix and if by any chance you are one of the unfortunate people getting this dreaded annoying error, please do keep reading because we have several things that you can do in order to eliminate this issue from your computer.

Reboot your system

This is the easiest and straightforward solution and can work sometimes since if the system has not been properly rebooted in a while memory could be filled with various processes and it can trigger oobesettings error. A simple restart of the system can solve the issue by decluttering files and emptying memory.

Scan and repair with SFC

If rebooting the system was not helpful and sadly you still receive an error then let's scan and repair system files by using Windows built-in tool SFC. In order to use this, we will have to run the command prompt in elevated administrator mode. Follow instructions closely. First click on the search icon on the taskbar and type in CMD The command prompt will show as a search result, on the right side click on Run as administrator. Once it opens type in following command: sfc /scannow and press ENTER Wait for the process to finish completely and restart your device after.

Repair the system registry

If the SFC scan has not repaired the issue then we will move to the next solution that involves repairing the system registry itself. Please note that you need to follow step-by-step for provided instructions since playing with the system registry can cause some serious issues if not done properly and can even render the system unstable. That being said, let's begin: Press ⊞ WINDOWS + R to open Windows run dialog Type inside regedit and press ENTER Inside registry editor locate the following key: HKEY_LOCAL_MACHINE/SYSTEM/CurrentControlSet/Control/Session Manager/ Memory Management. and click on it to see properties Inside the properties right-click on CommitLimit value and choose delete. Confirm with yes. Close registry editor and reboot your computer.

Reset Windows 11

If even clearing key inside the registry editor has not helped next step would be to reset the system itself. Press ⊞ WINDOWS + I to open Windows settings and click on System on the left. Inside on the right part click on Recovery In recovery click on the button next to Reset this PC that says Reset PC Choose between keep my files and remove everything (a better option is remove everything, but be sure that you have all your files on a separate drive backed up) Choose between Cloud Download or Local reinstall. Click on next to confirm choices and after that on Reset to start the reset process. Follow onscreen instructions until it is fully done.
Read More
Fix Windows is still setting up ... Code 56
If your internet suddenly stops working on your Windows 10 computer and you get an error message saying, “Windows is still setting up the class configuration for this device (Code 56)”, then read on as this post will show you what you can do to resolve it. This kind of issue has something to do with the Network Adapter and you can see this error message in the Properties menu of the corresponding Network Adapter under the Device Manager. This kind of issue could be caused by many things. For one, it could be caused by your VPN connection if you are using one or it could also be due to an outdated driver. Whatever the cause may be, here are some suggestions you have to check out to fix the error.

Option 1 – Check your VPN

When you install a virtual machine or VPN software on your computer, a new setup will be added in the Network Connection settings and helps your computer in using that adapter setting each time the VPN is turned on. Assuming that you are using an Ethernet connection but your system is trying to use another adapter or settings, that’s when issues occur and one of them is the “Windows is still setting up the class configuration for this device” error. To fix it, you can try to disable your VPN temporarily and see if the error is resolved or not and if turns out that your VPN is the culprit, you have to uninstall it and install a new one or its latest version. To uninstall it, follow the steps below.
  • Tap the Win + R keys to open the Run dialog box
  • Then type “appwiz.cpl” in the field and hit Enter to open the Programs and Features in Control Panel.
  • From there, look for the VPN service you are using, select it and then click on Uninstall to remove it.
  • After that, restart your computer and try to install the latest version of the program again. It should work now. If not, proceed to the next available option below.

Option 2 – Try to update or rollback or uninstall the Network Adapter drivers

You might also want to update, roll back or disable your Network drivers to fix the “This operation failed as no adapter is in the state permissible for this operation” error.
  • Tap the Win + R keys to launch the Run window and then type in the “devmgmt.msc” command and hit Enter to open the Device Manager window.
  • Under the Device Manager, you will see a list of drivers. From there, look for the Network Adapters and expand it.
  • Then right-click on each one of the Network drivers and depending on your preference, you can either select “Update driver”, “Disable device” or “Uninstall device”.
  • After that, restart your PC and see if it helped in fixing the netio.sys Blue Screen error.

Option 3 – Try to run the Network Adapter troubleshooter

To run the Network Troubleshooter, refer to these steps:
  • Open the Search bar on your computer and type in “troubleshoot” to open the Troubleshoot settings.
  • Next, scroll down and select the “Network Adapter” option from the right pane.
  • Then click on the Run Troubleshooter” button.
  • After that, your computer will check for any possible errors and will pinpoint the root cause of the problem if possible.
  • Restart your computer.

Option 4 – Try to reset the Network

You might perform a Network Reset to resolve the problem if none of the three given options above worked. This will reset the entire network configuration including your IP address. To perform Network Reset, follow these steps:
  • Tap the Win + I keys to open Settings.
  • From there, go to the Network and Internet section.
  • Next, scroll down and look for “Network Reset” under the status pane.
  • After that, click on Network Reset and then on Reset now to start resetting the network configuration. Once done, check if it is able to fix the error or not.
Read More
How to Fix DCOM Error 1084 on Windows
Distributed Component Object Model or DCOM is a module on Windows computers that allows computers to run programs over a network to another computer. It is a software component from Microsoft that allows COM objects to communicate with each other while that program is remotely running over the network. The COM Model is another extension of the DCOM model which both work together in order for the intended task to be executed. To make this module work, there are three components needed such as the Class Identifier or CLSID, the Programmatic Identifier or PROGID, and the Application Identifier or APPID. However, DCOM does not always work as expected as it could still encounter some errors. One of them is error 1084. Because of this error, the execution of programs in a remote computer on the network would be interrupted. So if you encounter the DCOM error 1084 when you try to start a service like running the DISM tool or in other scenarios on your Windows 10 computer, then this post could help you. Refer to the instructions given below to start troubleshooting the problem.

Option 1 – Try checking the status of DCOMLAUNCH Service or DCOM Server Process Launcher and its 3 dependencies

The DCOM Server Process Launcher service launches both COM and DCOM servers in response to object activation requests. This is why if this service is stopped or disabled, the programs that are using COM and DCOM won’t properly function. So you need to make sure that the DCOMLAUNCH service is running.
  • In the Cortana search box, type “services” and click on the Services icon to open the Services Manager. Alternatively, you can also tap the Win + R keys to launch the Run prompt and then type “services.msc” in the field and hit Enter to open the Services Manager.
  • Next, check the following services:
    • DCOM Service Process Launcher
    • Background Tasks Infrastructure Service
    • Local Session Manager
    • Remote Procedure Call (RPC)
  • Then right-click on each one of the services and click on their Properties.
  • After that, select Automatic from the drop-down menu of Startup Type and make sure that all the aforementioned services are Running.
  • Now click OK for each one of the services.

Option 2 – Troubleshoot the problem in a Clean Boot State

There are instances that some conflicting programs installed in your computer might be the one that’s causing DCOM error 1084. To identify which program is causing the problem, you need to put your computer in a Clean Boot State. To do so, follow the steps below.
  • Log onto your PC as an administrator.
  • Type in MSConfig in the Start Search to open the System Configuration utility.
  • From there, go to the General tab and click “Selective startup”.
  • Clear the “Load Startup items” check box and make sure that the “Load System Services” and “Use Original boot configuration” options are checked.
  • Next, click the Services tab and select the “Hide All Microsoft Services” check box.
  • Click Disable all.
  • Click on Apply/OK and restart your PC. (This will put your PC into a Clean Boot State. And configure Windows to use the usual startup, just simply undo the changes.)
  • From there, start to isolate the problem by checking which one of the programs you installed recently is the root cause of the problem.

Option 3 – Try to use the DISM tool

You might want to repair potentially corrupted files in your system as having them could also trigger the DCOM error 1084. To repair these corrupted system files, you can run the DISM commands:
  • Tap the Win + X keys and click on the “Command Prompt (Admin)” option.
  • After that, input each one of the commands listed below sequentially to execute them:
    • Dism /Online /Cleanup-Image /CheckHealth
    • Dism /Online /Cleanup-Image /ScanHealth
    • Dism /Online /Cleanup-Image /RestoreHealth
  • Once you’ve executed the commands given above, restart your computer and check if the DCOM error is now fixed.

Option 4 – Reset your computer

  • Tap the Win key or click on the Start button located in the Taskbar.
  • Then click on the Power button at the bottom right portion of the screen.
  • Next, press and hold the Shift key on your keyboard and then click on Restart. This will restart your Pc into the Advanced Startup options.
Note: Once you have access to the Advanced Startup options, you have to go to the setting which allows you to Reset your Windows 10 PC. All you have to do is select Troubleshoot > Reset this PC to reach the following screen Afterward, select either the “Keep my files” option and then proceed to the next on-screen instructions that follow to reset your Windows 10 computer without losing your files.
Read More
Fix NMI_HARDWARE_FAILURE in Windows
If you encounter the NMI_HARDWARE_FAILURE Blue Screen error while using your Windows 10 computer, then read on as this post will guide you in resolving this kind of Blue Screen of Death error. NMI HARDWARE FAILURE or “Non-Maskable Interrupt” Blue Screen error occurs when there is some hardware malfunction in your computer. When you encounter this Blue Screen error, you may get a stop code of 0x00000080 which can randomly occur while you use your computer. However, a lot of users reported encountering this error while they were trying to update or install their Graphics Card drivers. The stop code that you may get for this BSOD error is 0x00000080. The error can occur randomly during your usage of the computer – but a large number of users have reported this error while they are updating or installing their Graphics Card drivers. In this post, we will be covering all the possible fixes for this error. NMI_HARDWARE_FAILURE error on Windows The NMI_HARDWARE_FAILURE bug check has a value of 0x00000080. This bug check indicates that a hardware malfunction has occurred. There are various hardware malfunctions that can cause this kind of Blue Screen error. However, pinpointing the exact cause is quite difficult. Worry no more for the following fixes provided below can help you resolve the NMI_HARDWARE_FAILURE Blue Screen error no matter what the cause of the problem is.

Option 1 – Try removing hardware or drivers that you’ve installed recently

If you have recently installed some hardware or drivers, you might want to disable or remove them since external devices are proven to be one of the factors that trigger Blue Screen errors like NMI_HARDWARE_FAILURE. All you have to do is physically disconnect any external devices that are connected to your computer and then check if it fixes the BSOD error or not.

Option 2 – Try to rollback, update, or disable the Graphics card drivers

Since the NMI_HARDWARE_FAILURE Blue Screen error has something to do with Graphics card drivers, you can either roll back, update or disable them depending on your preference in order to resolve the error.
  • First, boot your computer into Safe Mode.
  • After that, tap the Win + R keys to launch Run.
  • Type in devmgmt.msc into the box and tap Enter or click OK to open the Device Manager.
  • After that, a list of device drivers will be displayed. From there, look for the Display Adapters and click on them.
  • After that, right-click on each entry under the Display Adapters and select the “Uninstall Device” option from the menu.
  • Now restart your computer.
  • After restarting your computer, go to the Settings app and Check for Updates in the Windows Update section.
Note: You also have the option to go directly to the website of your graphics card manufacturers like NVIDIA, Intel, or AMD and go to the section called Drivers then check if there’s a new available update – if there is, download and install it.

Option 3 – Make sure that all memory modules have the same type

This third option is quite technical and tricky. If you often use multiple physical RAMS on your Windows 10 computer, then you have to check first if they are of the same frequency. After that, the first thing you should verify is if the chip is properly compatible or not. And if the sockets are attached using some kind of adapter or non-recommended device, it could cause some issues while giving a performance hit to your computer.  If you were able to find such a setup, you have to undo it or install the proper and recommended as well as compatible hardware.

Option 4 – Try to run the Blue Screen Troubleshooter

As you know, the Blue Screen troubleshooter is a built-in tool in Windows 10 that helps users in fixing BSOD errors like the NMI_HARDWARE_FAILURE error. It can be found on the Settings Troubleshooters page. To use it, refer to these steps:
  • Tap the Win + I keys to open the Settings panel.
  • Then go to Update & Security > Troubleshoot.
  • From there, look for the option called “Blue Screen” on your right-hand side and then click the “Run the troubleshooter” button to run the Blue Screen Troubleshooter and then follow the next on-screen options. Note that you might have to boot your PC into Safe Mode.
Read More
SYSTEM_THREAD_EXCEPTION_NOT_HANDLED CMUSBDAC.sys
If you encounter a Blue Screen error that points out to the CMUDA.sys, read on as this post will guide you in fixing it. The CMUDA.sys file is a Windows operating system driver file that is related to the USB Device Audio capabilities of a computer. There are times when this file causes Blue Screen error due to some conflicts in RAM or some incompatible firmware or hard disk issues, corrupted drivers or malware infection, and so on. There are various Blue Screen errors that are related to the CMUDA.sys file such as:
  • KMODE EXCEPTION NOT HANDLED
  • PAGE FAULT IN A NONPAGED AREA
  • IRQL NOT LESS OR EQUAL
  • SYSTEM THREAD EXCEPTION NOT HANDLED (CMUSBDAC.sys)
In most cases, the CMUDA.sys file usually triggers the SYSTEM_THREAD_EXCEPTION_NOT_HANDLED Blue Screen error. Although this Blue Screen error may seem complicated, its workarounds are straightforward so you won’t have any problems in following them.

Option 1 – Try to update or rollback your device drivers

If the first option didn’t work for you, then it’s time to either update or roll back the device drivers. It is most likely that after you updated your Windows computer that your driver also needs a refresh. On the other hand, if you have just updated your device drivers then you need to roll back the drivers to their previous versions. Whichever applies to you, refer to the steps below.
  • Open the Devices Manager from the Win X Menu.
  • After opening the Device Manager, locate the device drivers that are marked with a small yellow exclamation mark icon and right-click on each one to open their Properties. On the other hand, you can also look for sub-entries under Sound, video, and game controllers like the C-Media USB Audio Class
  • After that, switch to the Driver tab and click on the Uninstall Device button.
  • Follow the screen option to completely uninstall it.
  • Finally, restart your computer. It will just reinstall the device drivers automatically.
Note: You can install a dedicated driver on your computer in case you have it or you could also look for it directly from the website of the manufacturer. You can download the as C-Media USB Audio Class driver from the cmedia.com website.

Option 2 – Try to recreate the CMUDA.sys file

The first thing you can try is to recreate the CMUDA.sys file. Every time your Windows 10 PC boots up, it looks for all the system drivers in place and if it is unable to find them, it tries to create them. Which is why if you remove your corrupt driver file, chances are, you might get a fixed file recreated just for you. How? Refer to the steps below.
  • Boot your Windows 10 PC in Safe Mode.
  • Then open File Explorer and navigate to this location: C:/Windows/System32/drivers
  • From there, look for the file named sys and rename it to CMUDA.old.
Note: As you can see, the file’s extension has changed from .sys to .old.
  • Now restart your computer and check if the CMUDA.sys Blue Screen error is now fixed.

Option 3 – Run the Blue Screen Troubleshooter

The Blue Screen troubleshooter is a built-in tool in Windows 10 that helps users in fixing BSOD errors. It can be found on the Settings Troubleshooters page. To use it, refer to these steps:
  • Tap the Win + I keys to open the Settings panel.
  • Then go to Update & Security > Troubleshoot.
  • After that, look for the option called “Blue Screen” on your right-hand side and then click the “Run the troubleshooter” button to run the Blue Screen Troubleshooter and then follow the next on-screen options. Note that you might have to boot your PC into Safe Mode.
On the other hand, you can also try running the online Windows 10 Blue Screen troubleshooter from Microsoft. It is a wizard that could help you fix any Stop errors related to the CMUDA.sys file and will offer you helpful links as you use it.

Option 4 – Try running the DISM tool

You can try running the Deployment Imaging and Servicing Management or DISM tool to fix the Wdf01000.sys Blue Screen error. Using this built-in tool, you have various options such as the “/ScanHealth”, “/CheckHealth”, and “/RestoreHealth”.
  • Open the Command Prompt with admin privileges.
  • Then type in the following commands and make sure to hit Enter right after you type each one of them:
    • Dism /Online /Cleanup-Image /CheckHealth
    • Dism /Online /Cleanup-Image /ScanHealth
    • exe /Online /Cleanup-image /Restorehealth
  • Do not close the window if the process takes a while as it will probably take a few minutes to finish.

Option 5 – Run System Restore

Running System Restore might also help in fixing Blue Screen errors related to the CMUDA.sys file.
  • Tap the Win + R keys to open the Run dialog box.
  • After that, type in “sysdm.cpl” in the field and tap Enter.
  • Next, go to the System Protection tab then click the System Restore button. This will open a new window where you have to select your preferred System Restore point.
  • After that, follow the on-screen instructions to finish the process and then restart your computer and check if the problem is fixed or not.
Read More
1 2 3 162
Logo
Copyright © 2022, ErrorTools. All Rights Reserved
Trademarks: Microsoft Windows logos are registered trademarks of Microsoft. Disclaimer: ErrorTools.com is not affiliated with Microsoft, nor claim direct affiliation.
The information on this page is provided for information purposes only.
DMCA.com Protection Status