How to Fix R6025 Pure Virtual Function Call

Correct R6025 Pure Virtual Function Call

What is R6025 Pure Virtual Function Call Error?

R6025 pure virtual function call’ is a runtime error that occurs suddenly on the screen and disrupts the program being run prior to it. This error display indicates that the program has been corrupted. R6025 runtime error usually occurs with the Visual C++ framework.

Solution

Restoro box imageError Causes

This error occurs when the C++ program crashes which is usually because of the malfunctioning or missing of the device driver or incomplete device driver files.

It happens because your application indirectly calls a pure virtual member function in a context where a call to the function is invalid. Most of the time, the compiler detects it and reports it as an error when building the application. R6025 error is usually detected at run time.

Further Information and Manual Repair

To fix the R6025 pure virtual function call error, you need to find the call to the pure virtual function. After you find the call, you need to rewrite the code so that it is not called again.

There are 2 ways to do this:

Alternative 1

One way to fix the R6025 pure virtual function call is to replace the function with an implementation that calls the Windows API function DebugBreak. The DebugBreak causes a hard-coded breakpoint.

Once the code stops running at this breakpoint, it is easy for you to view the call stack. By viewing the call stack you can identify the place where the function was actually called.

Alternative 2

Another quick way to find a call to a pure virtual function to fix the R6025 error is to set a breakpoint on the _purecall function that is usually found in PureVirt.c.

By breaking this function you can trace the problem occurring and rewrite the call to ensure the error does not occur and the program you are trying to develop on the Visual C++ framework is easily developed.

If R6025 Error is related to Windows Registry Problem Then here’s how you can fix the problem:

To fix the runtime error R6025, run registry cleaner software to scan and fix all errors.  This alternative is suitable if the R6025 error is related to the Windows registry problem and where the error has occurred due to corrupted or malicious registry entries.

You can download the registry cleaner repair tool for free. Run it to scan errors and then click the fix error button to repair the problem immediately.

If you like to learn and find out more about various Windows errors, and how to repair them go to our vast archive or use search to find articles that will explain and help you in solving your issue.
However, if you prefer to do things fast and with automatization then we are proposing to use an automated solution for your issues. The application that we are recommending is Advanced System Repair Pro
Advanced System Repair utilizes multiple tools all in one to give you a quick, simple, reliable, and very thorough diagnosis of your PC. It brings you all the tools you need in one program to clean, fix, protect, optimize and boost your PC!
1-Click Maintenance
All the tools to make it simple and easy! It's like having a professional technician at the click of a mouse.

Junk Cleaner
Keeping your computer free from unnecessary clutter also helps make your computer last longer. Like any other machine, if you keep it clean and take care of it, it will serve you better for longer!

Optimize background apps
Optimize applications background activity with the built-in Application Optimizer feature.

Disk Defrag
With a simple 1-click, Advanced System Repair speeds up your PC by assembling fragmented files on your machine and organizing them more efficiently.

Malware Removal
Finds and removes all types of harmful malware including trojans, worms, bots, adware, spyware, PUPs, and more!

Privacy Cleaner
The all-in-one privacy suite to Clean Your Tracks & Protect Your Privacy! Make your computer safe, secure, and more efficient!

System Tweak/Optimizer
ASR will analyze your complete system and settings to adjust your PC to function at its maximum performance.

Registry Cleaner
Over time, as you install and uninstall applications, the registry can become cluttered with old entries and broken settings which can result in program crashes, and annoying messages and slow the computer down.
Visit our Advanced System Repair Pro Download page to inform yourself about all the benefits of this software and get a free trial copy of it.
advanced system repair pro

Advanced System Repair Pro

One-click automated PC repair solution
ASR logo
With Advanced System Repair Pro you can easily
Replace damaged files
Restore performance
Free disk space
Remove Malware
Protects WEB browser
Remove Viruses
Stop PC freezing
DOWNLOAD
Privacy Policy | Terms of Use | Uinstall
Advanced System Repair Pro is compatible with all versions of Microsoft Windows including Windows 11

Share this article:

You might also like

Choosing default browser in Windows 11
Default applications in previous Windows versions were a pretty straightforward process. The user went to the settings application and picked for each category which application he would like to choose from the list of installed ones. In Windows 11 things are little changed. In this article, we will show you how to choose the default internet browser inside Windows 11, and sadly it is a more tedious task than in previous versions.

windows 11 default browser
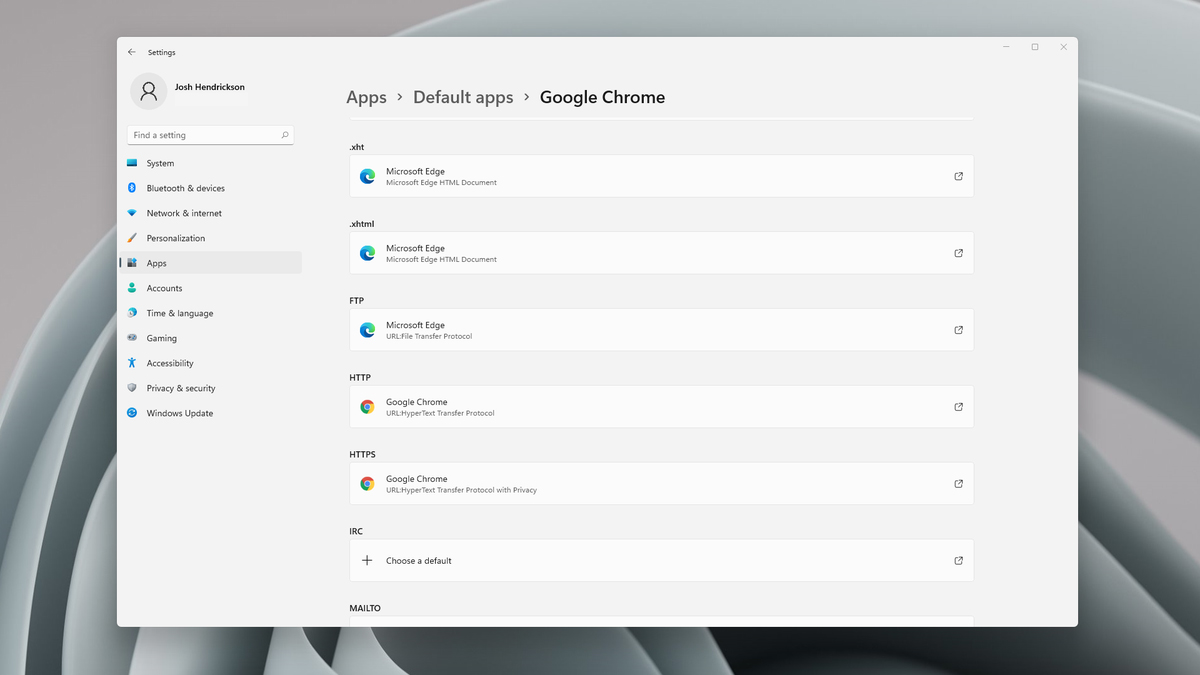
Choosing default browser in settings

As in previous versions of the Windows operating system you will need to use the settings application in order to change your default Internet browser. Previously, in Windows 10, a variety of general categories like email, web browser, and photo viewer were all listed under the Default Apps section of the Settings panel. It was easy to click on one of those categories and click on the option you like best from the small pop-up suggestion window. In the Windows 11 Insider Build, you’ll see a gauche list of an individual file or link types that you’ll need to specify your preferred browser for. The types include: HTM, HTML, PDF, SHTML, SVG, WEBP, SHT, FTP, HTTP, and HTTPS. There are additional optional types you can specify your preferred browser for as well. The issue here is in order to use a single browser which most users do you will have to go through each file type and set your preferred one. I am really not sure why this was introduced or why it has to be this way, all I can do is hope that in the final release of Windows 11 this feature will be rolled back as it used to be and that you could set your default browser in just one simple click.
Read More
DiskPart has encountered an error
As you know, Diskpart is a useful utility that helps in managing the disks in a computer. It is a very useful tool that even when the GUI-based disk management tools in Windows 10 operating system fails, the Diskpart utility still tends to work. However, it also does not mean that this utility does not experience issues as it still does, from time to time. One of the issues you may encounter when using the Diskpart utility is when you encounter an error message that says, “DiskPart has encountered an error, Access is denied”. This kind of error in the Diskpart utility could be caused by a number of factors. For one, it could be that the Write-Protection is enabled on the drive where the operating is being performed or it could also be that the Command Prompt terminal does not have administrator-level permissions to carry out the command. Thus, you can try to run the Diskpart utility again but this time with admin privileges or you could also remote the Write-Protection from the concerned drive. For more details, refer to the instructions given below.

Option 1 – Try running Command Prompt with Administrator-level permissions

  • In the Start Search, type “command prompt” and from the search results that appear, look for Command Prompt.
  • Once you found it, right-click on it and select the “Run as administrator” option.
  • After that, try to execute the Diskpart operation once again and see if you still encounter the same error.

Option 2 – Try to remove the Write Protection from the drive

As mentioned, removing the Write-Protection on the concerned drive could also help you fix the problem and there are two ways to get rid of the write protection – you can either use the Diskpart utility or the Registry Editor. How? Refer to the following steps.

Via Diskpart utility:

  • Open Command Prompt with admin privileges and then type the “diskpart” command and tap Enter to execute it.
  • Next, type “list disk” and tap Enter to get the list of all the Disk connects or all the partitions that are formed on those disks.
  • After that, you need to choose one command depending on the list of commands you entered. Type “select disk #” and tap Enter to select the disk or partition you want to select.
  • Then type “attribute disk clear readonly” and tap Enter to Disable the Write Protection on the selected disk or partition.

Via Registry Editor:

  • Tap the Win + R keys to open the Run utility and type “Regedit” in the field and then tap Enter to open the Registry Editor.
  • Next, navigate to the following registry key:
ComputerHKEY_LOCAL_MACHINESYSTEMCurrentControlSetControlStorageDevicePolicies
  • After that, look for the DWORD named “WriteProtect” and double click on it, and then set its Value Data to “0”.
  • Now restart your computer and see if the problem is now fixed or not.
Read More
How to Turn Bluetooth ON in Windows 11
Windows 11 Bluetooth
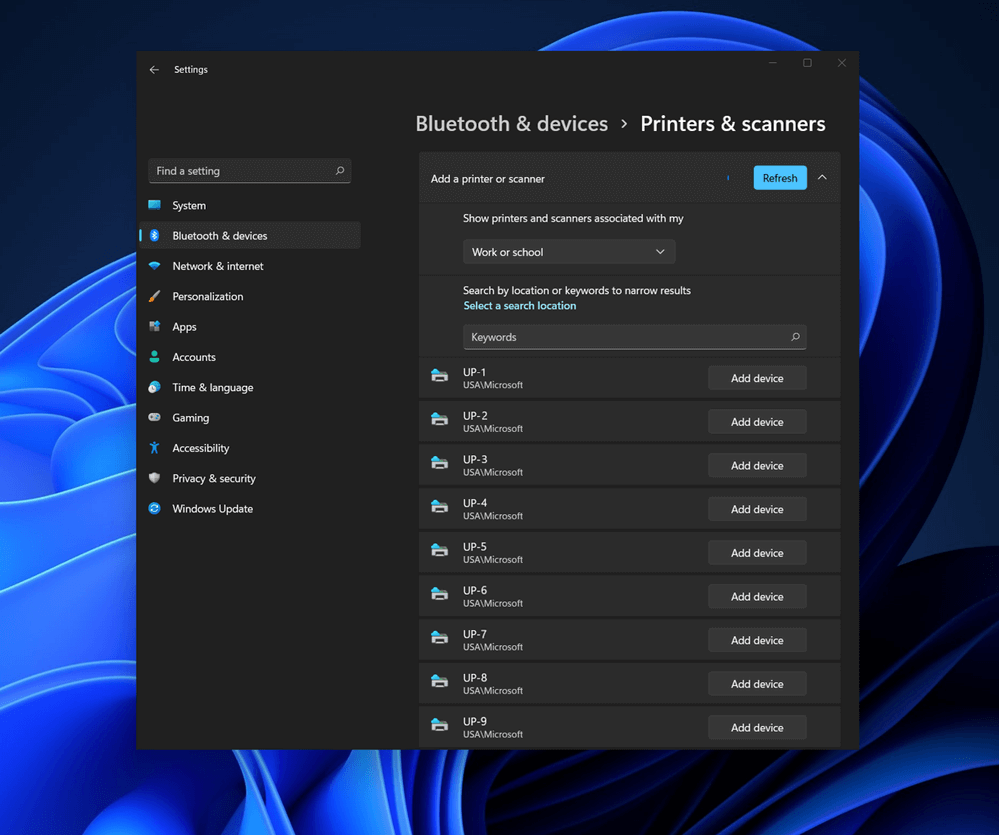
Bluetooth perhaps is slowly becoming an outdated feature but sometimes you can really used it and need it. By default, in Windows 11 Bluetooth is turned OFF so if you need it, you will need to turn it ON first. Luckily turning it ON is easy and we will guide you through the process

Turning Bluetooth using the Quick Settings menu

The easiest and fastest way to turn the Bluetooth ON is using the quick setting menu:
  1. Click on indicator icons located left of date and time in Taskbar
  2. Click on the Bluetooth icon (if the icon is not displayed, click on the pencil icon, then click on Add and add Bluetooth icon from the list)
  3. Right-click on the Bluetooth icon and select go to Settings
  4. Go to Adding a Bluetooth Device to Windows 11 section

Switch it ON via Windows Settings

  1. Open Windows settings by using ⊞ WINDOWS + I combination
  2. Click on Bluetooth & Devices
  3. Inside settings turn Switch to ON beside Bluetooth
  4. Click + Add Device large button on top
  5. Click Bluetooth
  6. Select device in the list of found devices (make sure device is turned ON, it has Bluetooth sharing ON, and that it is in pairing mode)
  7. If the device needs the password, type it in
  8. When the message Your device is ready to go is showed on the screen click on the Done

Advice on Bluetooth devices

Note that the Bluetooth devices you connect to Windows 11 stay linked to your PC unless you pair them with a different PC, smartphone, or tablet later. After a time, most Bluetooth devices power down automatically to save battery life. To continue where you left off, either power the Bluetooth device up (if it has a power button) or press a button on a keyboard or mouse, and it should automatically turn on and reconnect with your PC. If you’re having trouble connecting your Bluetooth device, make sure that Windows 11 is fully updated and that you’ve installed any drivers that came with your device. Make sure that the device is fully charged or that it has a fresh set of batteries. while Windows is searching. You’ll need to remove the device from Windows 11 first and then attempt to pair it with your PC again.

Removing devices

If you need to remove (un-pair) a Bluetooth device, just open Windows Settings and navigate to Bluetooth & Devices. Locate the name of the device that you want to remove, click the three dots button in the corner of its square and select Remove Device.
Read More
Fix “Diskpart failed to clear disk attributes”
If you encounter the “Diskpart failed to clear disk attributes” error when you try to change the read-only state of a storage device using the Diskpart application and the request is denied, worry not for this post will give you a couple of fixes to resolve the problem. As you know, Diskpart is used for resolving read-only storage devices by changing their attribute via the command line. So if it is not able to change the attribute of the storage device, then you will most likely encounter an error such as this one. This kind of error is not uncommon and as long as there are no damaged physical attributes, you can resolve it right away. There are tons of reasons why you’re getting this error while using Diskpart, it could be that the storage device has a physical write-protected switch or the disk is hidden or has bad sectors. It could also be because the storage drive might be in RAW format or that you are running the Diskpart application without admin privileges. Whatever the cause may be, here are some options you can try to fix the problem but before you proceed, make sure that you log on to your PC as an administrator.

Option 1 – Check if there is a physical switch on the storage device

There are some USB devices and SD card readers that have a write-protected physical switch that disables all the writable options on the storage device and so if it is turned on, Diskpart won’t be able to change the disk attribute to writable. To check, simply look for the physical switch on both sides of the device and once you found it, make sure that it is toggled off and then plug the storage device back in then try running Diskpart once again.

Option 2 – Modify the WriteProtected key in the Registry Editor

Before you proceed, you have to create a System Restore Point first.
  • Tap the Win + R keys to open Run and type “Regedit” in the field and hit Enter to open the Registry Editor.
  • Next, navigate to the following path:
HKEY_LOCAL_MACHINESYSTEMCurrentControlSetControlStorageDevicePolicies
  • After that, look for the “WriteProtect” registry entry which is located on the left side of the window, and then double click on it.
  • Change its value to “0” and click OK to save the changes made and exit the Registry Editor.

Option 3 – Run CHKDSK to check the drive for errors

When it comes to some issues concerning the hard drive or removable devices, there is a utility in Windows that might help which is called “chkdsk”. This error check utility can help with several issues in the system including the “Diskpart failed to clear disk attributes” error.
  • Tap the Win + S keys to open the Search box.
  • Then type “command prompt” in the field and from the search results that appear, right-click on Command Prompt and select “Run as administrator”.
  • After opening an elevated command prompt, copy and paste the following command and hit Enter:
CHKDSK [volume [[path] filename]] [/F] [/V] [/R] [/X] [/C] [: size]]
Note: In the command given above, “[/F]” will try to fix the system errors while “[/R]” will be the one to fix the bad sectors.
  • Now if you are prompted to run CHKDSK after your reboot your PC, just tap Y and reboot your PC.
  • If CHKDSK is not able to find any errors, tap the Win + E keys and navigate the access window. From there, right-click on the concerned drive and click on Properties.
  • After opening Properties, click on the tab Tools and then click on the “Check” button under the Error-checking section.
  • Wait until the process is completed and then restart your computer.

Option 4 – Clear the attributes on RAW

  • Tap the Win + S keys then type “diskpart” in the field.
  • Click the Diskpart application and if a User Account Control dialog box pops up, click Yes to proceed.
  • After opening an elevated Command Prompt, type in the commands listed below and make sure to tap Enter right after you key in one command after the other.
    • list volume
    • select volume ‘n’ (In this command, you have to replace ‘n’ with the volume number of the drive)
    • format fs=fat32 quick (In this command you also have the flexibility to change the format to ‘ntfs’ or ‘exfat’)
  • After executing the commands given, unplug the removable storage device and wait for a couple of seconds and then plug it back in.
  • Now try any normal write operations and see if the error no longer appears.

Option 5 – Try checking the hardware components

On the other hand, it is also possible that the issue has something to do with a hardware problem and so you need to check the hardware components on your computer to determine that.
Read More
Steps to Fixing Error Code 38

Repair and Solve Error Code 38

Error Code 38 – What is it?

Error Code 38 is a device driver error that users encounter on any Windows 2000 operating system and its following versions.

It occurs when the peripheral device that you connect to your PC cannot be accessed due to an inability of the Windows system to acknowledge the driver as a previous record of the driver being loaded is found in its memory.

It is a common error that users come across and appears on your PC with the following message:

“Windows cannot load the device driver for this hardware because a previous instance of the device driver is still in memory. (Code 38)”

Solution

driverfix boxError Causes

Error Code 38 is prompted when incomplete program files are left in the Windows system which damage or corrupt its files. There are various factors that contribute to this, some of which are:

  • An incomplete program installation
  • An incomplete program uninstallation
  • Hardware is not removed properly
  • System recovery from viruses
  • An improper system shut down

The above triggers are very likely to create incomplete files within the Windows registry thereby leading to its damage and corruption.

This is especially true in the case of your PC when it has recovered from viruses when using anti-virus software. The anti-virus in its effort to remove the virus also could remove the files which contain them thereby increasing the risk of the error code.

These damaged files can severely impact the health of your PC and are imperative to fix it immediately to prevent further problems.

Further Information and Manual Repair

Although this error code may pose serious problems for your PC, thankfully, it is very similar to other PC driver errors and thus is an easy one to get rid of. Here are various methods that you can use to get your PC running smoothly again.

Method 1 – Restart your PC

The easiest method you can use to solve your PC error code is to simply restart your PC. It may be that the error prompted upon connecting the device you have connected is merely a temporary problem, and upon restart, will resume functioning smoothly.

Method 2 – Run the Troubleshooting Wizard

If restarting your PC does not help, you will have to find the exact nature of the problem by running the troubleshooting wizard for the device and then address the problem accordingly. To do this, proceed with the following steps:

  1. Run Device Manager on your PC
  2. Click on the program under the installed programs that is creating problems for you
  3. Click on the ‘General’ Tab
  4. Click ‘Troubleshoot’
  5. Upon opening, the Troubleshooting Wizard will ask a series of questions regarding the error. Answer the questions and follow its directions for solving the error code.

After following the directions of the Troubleshooting wizard, make sure to restart your PC for the changes to take effect. Now check if your device is still causing problems.

Method 3 – Use System Restore

If the error persists, you can use system restore to eliminate the problem. Here is how to do so:

  1. Log in using an Administrator account
  2. Click ‘Start’ button and select All Programs > Accessories > System Tools > System Restore
  3. Click ‘Restore my computer to an earlier time’ and click ‘Next’
  4. Select the last Windows to restore point from the ‘On this list, click a restore point’ list, and click ‘Next’
  5. Click ‘Next’ on the confirmation window to proceed
  6. Restart your PC after restoration is complete

By restoring the system via a last saved system checkpoint, you can obtain undamaged Windows system files that can help resolve the error code.

Method 4 – Manually uninstall and reinstall the device driver

If using system restore does not work either, you may have to resort to manually uninstalling and then reinstalling the device driver causing the problem.

This would be necessary since the remaining incomplete files due to a partial removal or installation of programs are responsible for the error code. By uninstalling and reinstalling the device driver program, it would lead to the completion of the files.

You can do this by firstly logging in as Administrator and opening Device Manager. Select the device that is causing the problem and double click it; make sure that the peripheral is connected properly to the PC.

Upon opening, click on the ‘Driver’ tab and then select ‘Update Driver’. Make sure to refer to the system documentation that you received with your PC or computer to check for the motherboard details and driver specifics.

Method 5 – Use software to automatically download the driver

Manually uninstalling and reinstalling the driver will do the trick; however, it may be time-consuming especially when you would have to resort to your hardware user manual.

Using a program such as DriverFIX can save you a lot of time and frustration in having your device to work properly on your computer.

DriverFIX, with its user-friendly approach to help you fix your PC issues, comes with an integrated database that detects which drivers you need to reconfigure within just a few seconds and downloads it automatically.

It further ensures that your drivers are installed in their entirety leaving no room for any incomplete files to remain that create Error Code 38, or any other driver-related errors for that matter.

It also has the added advantage of being able to backup and restores your files should there be the slightest possibility of system file damage. DriverFIX is the answer to fixing your PC error codes accurately and quickly.

Click here to download DriverFIX to fix Error Code 38 quickly and effectively!

Read More
How to Remove iWinGames - PUP Removal Tutorial

iWin is a self-published games platform that offers users to download and play free games. It is classified as potentially unwanted, primarily because it often comes bundled with the iWin Toolbar, which is an adware supported browser extension by Conduit. The iWin Toolbar is heavily flagged as malware or unwanted by numerous Antiviruses. iWin Games is not malicious in itself, though due to its bundling and common inclusion of the toolbar, many users wish to remove it.

About Browser Hijackers

Browser hijack is a very common type of online fraud where your web browser configurations are altered to allow it to do things you never intend. Basically, most browser hijackers are made for marketing or advertising purposes. It redirects you to the sponsored sites and injects advertisements on the browser that helps its creator generate income. Most people assume that these kinds of websites are legitimate and harmless but that is incorrect. Nearly every browser hijacker poses an actual threat to your online safety and it is necessary to categorize them under privacy risks. When the program attacks your computer or laptop, it starts to mess things up a whole lot that slows your computer down to a crawl. In the worst-case scenario, you may be pushed to deal with serious malware threats as well.

How one can know whether the web browser is hijacked?

There are plenty of signs that indicate your internet browser has been highjacked: the browser’s homepage is changed; you find new unwanted bookmarks or favorites added, usually directed to ad-filled or pornography sites; The default search page of web browser is altered; you’ll see many toolbars on the web browser; your internet browser displays constant pop-up ads; your web browser starts running slowly or presents frequent glitches; You can’t access certain sites, particularly anti-virus websites.

How they invade computers

Browser hijackers infect PCs in numerous ways, including via a drive-by download, a file-share, or an infected e-mail. Many browser hijackings originate from add-on programs, i.e., browser helper objects (BHO), toolbars, or plug-ins added to web browsers to provide them extra capabilities. Also, some shareware and freeware can put the hijacker in your computer through the “bundling” technique. A good example of some popular browser hijackers includes Anyprotect, Conduit, Babylon, SweetPage, DefaultTab, Delta Search, and RocketTab, but the names are constantly changing. Browser hijackers could record user keystrokes to collect potentially important information that leads to privacy concerns, cause instability on systems, severely disrupt the user experience, and ultimately slow down the computer to a point where it becomes unusable.

How to repair a browser hijack

Some hijackers can be easily removed by uninstalling the free software they were included with or by deleting any extension you have recently added to your computer system. However, most browser hijackers are hard to get rid of manually. Irrespective of how much you try to eliminate it, it may return over and over. And there’s no denying the very fact that manual repairs and removal can be quite a difficult job for a beginner computer user. Furthermore, there are many risks associated with tinkering around with the pc registry files.

What To Do If You Cannot Install Any Antivirus?

Malware could cause many different types of damage to computer systems, networks, and data. Some malware variants modify internet browser settings by including a proxy server or modify the computer’s DNS settings. In these cases, you’ll be unable to visit some or all of the sites, and thus not able to download or install the required security software to remove the computer virus. If you’re reading this article right now, you may have perhaps recognized that virus infection is the cause of your blocked net connectivity. So what to do when you want to install an anti-virus application like Safebytes? Refer to the instructions below to remove malware through alternative ways.

Make use of Safe Mode to fix the issue

In the event the malware is set to load at Windows startup, then booting in safe mode should avoid it. Only minimal required applications and services are loaded whenever you boot your laptop or computer in Safe Mode. Here are the steps you should follow to boot into the Safe Mode of your Windows XP, Vista, or 7 computers (visit Microsoft website for instructions on Windows 8 and 10 computers). 1) Press the F8 key continuously as soon as your system boots, but before the large windows logo comes up. This will bring up the Advanced Boot Options menu. 2) Use the arrow keys to choose Safe Mode with Networking and press ENTER. 3) Once you get into this mode, you will have an internet connection once again. Now, use your browser to download and install an anti-malware application. 4) Right after the software program is installed, let the scan run to remove viruses and other threats automatically.

Obtain the antivirus software using an alternate internet browser

Certain malware might target vulnerabilities of a specific web browser that obstruct the downloading process. The ideal way to overcome this issue is to go with an internet browser that is well known for its security measures. Firefox has built-in Malware and Phishing Protection to help keep you safe online.

Create a bootable USB antivirus drive

Another way is to download and transfer an antivirus application from a clean PC to run a scan on the infected computer. To run anti-malware from a USB pen drive, follow these simple measures: 1) Use another virus-free computer system to download Safebytes Anti-Malware. 2) Insert the pen drive onto the same computer. 3) Double-click the Setup icon of the anti-malware software package to run the Installation Wizard. 4) When asked, select the location of the pen drive as the place where you would like to store the software files. Follow the activation instructions. 5) Now, transfer the pen drive to the infected PC. 6) Run the Safebytes Anti-malware directly from the pen drive by double-clicking the icon. 7) Click on “Scan Now” to run a scan on the infected computer for malware.

Protect Your Computer & Privacy With SafeBytes Anti-Malware

To help protect your PC from many different internet-based threats, it is important to install an anti-malware program on your laptop. But with countless numbers of anti-malware companies in the market, nowadays it is hard to decide which one you should buy for your computer. A few of them are good, some are decent, while some will harm your PC themselves! You need to purchase a product that has gained a strong reputation and detects not just viruses but other kinds of malware as well. When considering commercial anti-malware tool options, most people opt for well-known brands, such as SafeBytes, and they are quite happy with it. SafeBytes anti-malware is a trustworthy tool that not only secures your PC permanently but is also extremely user-friendly for people of all ability levels. Through its cutting-edge technology, this software protects your personal computer against infections caused by various kinds of malware and similar threats, including adware, spyware, trojans, worms, computer viruses, keyloggers, potentially unwanted programs (PUPs), and ransomware. SafeBytes has a plethora of great features that can help you protect your PC from malware attacks and damage. Listed below are some of the best ones: Robust, Anti-malware Protection: Built upon a highly acclaimed antivirus engine, this malware removal application is able to identify and get rid of various stubborn malware threats like browser hijackers, potentially unwanted programs, and ransomware that other typical antivirus programs will miss. Live Protection: Malware programs attempting to get into the system are discovered and stopped as and when detected by the SafeBytes active protection shields. This tool will always monitor your PC for any suspicious activity and updates itself regularly to keep abreast of the constantly changing threat scenarios. Web Protection: Safebytes assigns all websites a unique safety rating that helps you to get an idea of whether the webpage you’re just about to visit is safe to browse or known to be a phishing site. High-Speed Malware Scanning Engine: SafeBytes’s virus scan engine is among the fastest and most efficient in the industry. Its targeted scanning considerably increases the catch rate for viruses which is embedded in various computer files. Lowest CPU and RAM Usage: SafeBytes is a lightweight and user-friendly anti-virus and antimalware solution. Since it uses very low computer resources, this program leaves the computer’s power exactly where it belongs to: with you actually. 24/7 Live Expert Support: For any technical concerns or product support, you may get 24/7 expert assistance through chat and email.

Technical Details and Manual Removal (Advanced Users)

If you wish to manually get rid of iWin Games without the use of an automated tool, it might be possible to do so by removing the program from the Windows Add/Remove Programs menu, or in cases of browser extensions, going to the browsers AddOn/Extension manager and uninstalling it. You may even want to reset your home page and search providers, and also delete browsing history, temporary files, and cookies. Lastly, examine your hard drive for all of the following and clean your computer registry manually to get rid of leftover application entries after uninstalls. Please be aware that this is for advanced users only and could be difficult, with wrong file removal causing additional PC errors. Moreover, certain malware is capable of replicating or preventing removal. You’re suggested to do this process in Safe Mode.
Files: C:DOCUME1USER1LOCALS1Tempnsu1.tmp C:e8bfb44ebc51cebadf4410cb35e993837a67e31b69a243ebac9de76160c97ac6 C:DOCUME1USER1LOCALS1Tempnsu2.tmp C:DOCUME1USER1LOCALS1Tempnsu2.tmpSystem.dll C:DOCUME1USER1LOCALS1Tempnsu2.tmpftdownload.dat C:e8bfb44ebc51cebadf4410cb35e993837a67e31b69a243ebac9de76160c97ac6 C:DOCUME1USER1LOCALS1Tempnsu2.tmpSystem.dll C:DOCUME1USER1LOCALS1Tempnsu2.tmpftdownload.dat C:DOCUME1USER1LOCALS1Tempnsu2.tmp C:DOCUME1USER1LOCALS1Tempnsu1.tmp C:DOCUME1USER1LOCALS1Tempnsu2.tmp C:DOCUME1USER1LOCALS1Tempnsu2.tmpftdownload.dat C:DOCUME1USER1LOCALS1Tempnsu2.tmpSystem.dll Directory %COMMONAPPDATAiWin Games. Directory %LOCALSETTINGSTempiWinGames. Directory %PROGRAMFILESiWin Games. Directory %PROGRAMSiWin Games. Registry: Key HKEY_CLASSES_ROOT named iWinGamesInstaller.CoInServ.1 Key HKEY_CLASSES_ROOT named iWinGamesInstaller.CoInServ Key 495874FE-4A82-4AD1-9476-0B957E0B95EB at HKEY_CLASSES_ROOTTypeLib. Key 4B55700F-DB51-4891-8B28-6136A48A0105 at HKEY_CLASSES_ROOTAppID. Key 4B55700F-DB51-4891-8B28-6136A48A0105 at HKEY_CLASSES_ROOTCLSID. Key CA5E2E62-8612-4942-84A0-A94090D166AA at HKEY_CLASSES_ROOTInterface. Key E3ED53C5-7AD5-4DF5-9734-AFB6E7E5D9DB at HKEY_CLASSES_ROOTInterface. Key 4301AEBD288588A40833184CFEC0AF92 at HKEY_CLASSES_ROOTInstallerFeatures. Key 4301AEBD288588A40833184CFEC0AF92 at HKEY_CLASSES_ROOTInstallerProducts. Key 80F08842F9EA1BE4BA4922DA74CDB698 at HKEY_CLASSES_ROOTInstallerUpgradeCodes. Key ForseRemove at HKEY_CLASSES_ROOTAppID. Key iWinArcade at HKEY_CURRENT_USERSoftware. Key iWinArcade at HKEY_LOCAL_MACHINESOFTWARE. Key iWinGamesInstaller.EXE at HKEY_CLASSES_ROOTAppID. Key iWinGamesInstaller at HKEY_LOCAL_MACHINESYSTEMControlSet001Services. Key iWinGamesInstaller at HKEY_LOCAL_MACHINESYSTEMControlSet002Services. Key iWinGamesInstaller at HKEY_LOCAL_MACHINESYSTEMControlSet003Services. Value %PROGRAMFILESiWin GamesiWinGames.exe at HKEY_LOCAL_MACHINESYSTEMControlSet001ServicesSharedAccessParametersFirewallPolicyStandardProfileAuthorizedApplicationsList. Value %PROGRAMFILESiWin GamesWebUpdater.exe at HKEY_LOCAL_MACHINESYSTEMControlSet001ServicesSharedAccessParametersFirewallPolicyStandardProfileAuthorizedApplicationsList.
Read More
OneDrive thumbnails are not showing
A lot of users prefer to use Microsoft OneDrive when it comes down to cloud storage as it does not only come with the seal of approval from Microsoft but it’s also primarily good and better compared to other cloud storage services. However, that doesn’t mean that OneDrive isn’t without any issues. For one, you might encounter an issue where the OneDrive thumbnails do not show in File Explorer in Windows 10. If you are currently experiencing this problem, read on as this post will help you fix it. As you know, you can add OneDrive to your Windows 10 computer and have all the files locally synchronize to the cloud and so on. This means that whatever is available in the cloud will be seen on your computer. It is smooth and definitely saves you a lot of time which is why a lot of users prefer to use it. So if you suddenly not see any thumbnails in OneDrive, then that would be a problem. You are actually not the only one having this problem as there are other users who reported getting the same issue recently about the picture thumbnails that no longer show up in the OneDrive folders in the File Explorer. At the time of writing, it isn’t clear yet what the cause of the issue really is. Even so, there are still potential fixes you can check out to resolve it, and the sooner you do it, the better as this can be a major problem. To get started, refer to the instructions given below.

Option 1 – Try to disable Files on Demand

The first thing you can do to fix the problem is to disable the Files on Demand. This is what you have to do to get things under control.
  • First, right-click on the OneDrive icon located in the taskbar and go-to of OneDrive.
  • After that, click on More and Settings. This will open a new window where you have to click on the Settings tab and uncheck the “Files on Demand” service.
  • Once done, restart your computer and check if you can now see the thumbnails in the OneDrive folder. However, if it didn’t work, then proceed to the next given option below.

Option 2 – Try to change the icon view

The next thing you can do to fix the problem is to change the icon view. It is possible that the problem might have something to do with the size of the icons than anything else. So you have to change the icon view and to do that, follow these steps:
  • First, open Control Panel in Windows 10.
  • Next, in the search box, type “folder” and then click on the File Explorer Options.
  • From there, click on the View tab and uncheck the “Always show icons” option, and make sure that showing thumbnails is active.
  • Now go back to Control Panel and type “system” in the search box. This will open a new window where you have to select the “View advanced system settings” option.
  • Then under the Performance section, click on Settings and click on the option that allows you to show the thumbnails instead of icons.
Read More
Experiencing Error Code 36, We Have A Solution!

The solution to Error Code 36

Error Code 36 – What is it?

This is a common Device Manager Error Code that users encounter. It is commonly found on all Windows 2000 and later versions of Windows operating systems. Error Code 36 is usually prompted by the following message:

"This device is requesting a PCI interrupt but is configured for an ISA interrupt (or vice versa). Please use the computer's system setup program to reconfigure the interrupt for this device. (Code 36)"

Solution

driverfix boxError Causes

Error Code 36 occurs when there is a failure in IRQ translation due to your Windows operating system getting corrupted. This is caused due to a number of triggers, such as:

  • An excess of startup entries
  • Errors in registries
  • RAM or hardware failure
  • Excessive unnecessary installed programs
  • Malware or spyware

When programs are removed excessively, some programs are not removed completely and create problems in your computer’s registry.

Also, due to the presence of malware and spyware and other causes mentioned above, your computer registry builds up errors with the time that leads to slowing your PC, time lags, and even result in crashes and freezes.

Error Code 36 can cause internal and external components to malfunction or experience time lags such as DVD drive or printer and hence can severely affect your entire PC.

Further Information and Manual Repair

Error Code 36 is a severe PC error and any attempt at fixing the error must be approached with extreme caution for your PC to start functioning properly again. Here are two methods to fixing your PC.

Method 1 – Change IRQ reservation settings

Changing the IRQ reservation settings is the best way you can rely on to fix the error code. You can do this by changing the BIOS settings of your PC.

The BIOS stands for ‘Basic Input/Output System’ and is the program of your PC’s microprocessor that allows your PC to boot after you switch it on.

Caution needs to be exercised before changing the BIOS settings of your PC. This is because every PC’s BIOS version differs from another and any wrong attempt to change the settings may make matters worse.

It is therefore recommended to refer to hardware documentation that you received with your PC or motherboard and check for the model number and details of your PC’s motherboard.

Only after you have checked and confirmed all the details, should you use the specific BIOS settings required to configure your IRQ reservations?

Method 2 – Install DriverFIX

Error Code 36 isn’t an easy error to remove.

While changing the BIOS settings can work to restore your PC, it may create a whole lot of inconvenience for finding the time and effort to check the hardware documentation details and attempting to change the specific settings and especially, if your PC does not support the options to change IRQ reservations.

Given the high risks of fixing such an error, you can also install software that enables you to fix your slow PC at the click of a few buttons.

Programs such as DriverFIX can enable you to download and replace your outdated drivers with new updated ones without you having to look for them. It will detect which drivers to download based on your PC’s motherboard version from the program’s database and can get rid of error code 36.

Click here to download DriverFIX and remove error code 36 and any other type of Device Manager error from your PC.

Read More
DirectX function GetDeviceRemovedReason
DirectX function GetDeviceRemovedReason error is a DirectX error that comes up during playing games on Windows 11 operating system. Usually, the error occurs in gaming systems powered by AMD and very rarely if any times at all on Nvidia or intel platforms. DirectX function GetDeviceRemovedReason error
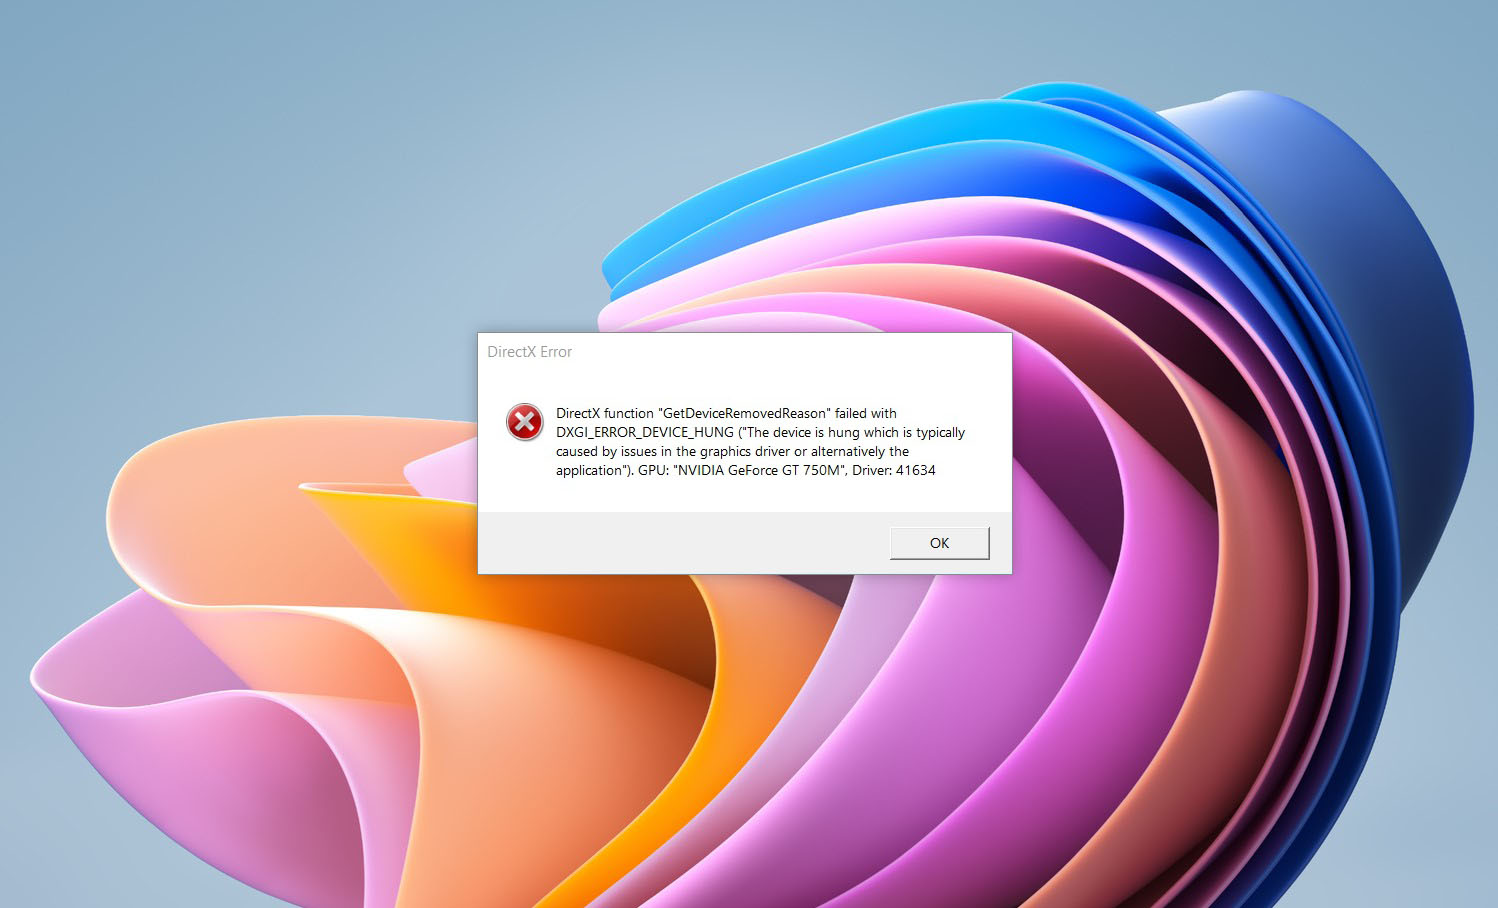
If you are one of the gamers affected by this error, fear not because we have a solution for you. Follow provided fix guide in order to correct this error and get back to gaming asap.

1. Update drivers

The first thing of course is to update your graphic card driver, you can do this with your graphic cards panel software or directly in Windows itself but the best practice and one that I would recommend is to go to your graphic card manufacturer’s website and download the latest driver there, and then install it inside Windows 11.

2. Change power mode

Changing power mode inside Windows 11 can solve this issue since sometimes Windows power manager if it is set to anything except best performance can interfere with the proper functioning of the graphic adapter, and because of this error. To change the power setting do the following:
  1. Press ⊞ WINDOWS + I to open settings
  2. Click on the System tab
  3. Select power & battery on the right part
  4. Click on the menu beside power mode
  5. Select the best performance

3. Run SFC scan

Corrupted system files can also cause this error and if previous steps have not resolved it we will use Windows built-in tool SFC scan to find and repair all bad files in windows.
  1. Press ⊞ WINDOWS + S to open the search menu
  2. Type in Windows terminal and run it as administrator
  3. If prompted click on YES on UAC
  4. Press CTRL + SHIFT + 2 to run command prompt
  5. Type in sfc /scannow and press ENTER
  6. Wait for the whole process to finish and then reboot your system

4. Reinstall the problematic game

Sometimes game files can get corrupt and maybe even overwritten, try with game reinstallation if the problem still persists.
Read More
How to Fix Windows 10 Error 0x800488AB

How to Fix Windows 10 Error 0x800488AB

Code 0x800488AB – What is it?

The Error Code 0x800488AB will appear when a user is in the Windows 10 Mail app and has provided an Outlook.com e-mail address. The mail app will give a message that the “account information is out of date” and it does provide an option to fix the issue. After clicking the Fix button, this error code will show up to the user. Common symptoms include:
  • A dialog box will appear with the Error Code 0x800488AB
  • Microsoft Windows 10 Mail App will not retrieve (or subsequently send) mail
  • User cannot delete and re-add the Outlook email account in the Windows 10 Mail app
  • User can still access and log in to various Microsoft websites, including logging into the Outlook Mail website

Solution

Restoro box imageError Causes

This error can be caused by a few different actions of the user when they have changed a password or a PIN number to access their Outlook mail. This error does have a relatively easy fix after the cause is determined and where the break-in information has occurred. A few of the causes may be:
  • If the user changes their password on the Microsoft website and uses the alternative PIN login method to access the Mail App.
  • The log-in information on the Microsoft website does not match the login information on the Windows 10 App.
  • The login information was changed on the Microsoft website and was not updated to reflect on the Windows 10 Mail app.
The Microsoft website and Microsoft Mail app do not share the knowledge of the change in login credentials, therefore the log-in credentials appear to be incorrect when trying to access the Microsoft Mail app. It should be noted that a user may bypass the password option if they log in to the Microsoft Mail app while using the alternative PIN log-in method, thus still leaving the password undetected.

Further Information and Manual Repair

As is the case with all new technology and having a few wrinkles, the release of Microsoft Windows 10 is not left out. There have been a few discussions of errors and bugs, including Error Code 0x800488AB. As of right now, there are three different methods that can be utilized by any at-home user. These methods are rather simple and make sense when the problem has been identified.

Method 1:

Run the built-in Windows Store Apps troubleshooter:
  1. Press the Windows Key and then type ‘troubleshoot’ and hit Enter
  2. Select “View all” on the left panel and run the “Windows Store Apps” troubleshooter from the list displayed and see if it works.

Method 2:

Use the System File Checker tool to repair corrupted or missing system files:
  1. Click Start.
  2. Type cmd, and then press CTRL+SHIFT+ENTER to open the elevated command prompt (I.e. Command prompt with administrative rights).
  3. The User Account Control window should appear, be sure that the action it exhibits is correct, and then press the Continue button.
  4. Type or copy-paste the below command line into it without quotes:
“Sfc /scannow”

Method 3:

  1. Press the Windows Key
  2. Search for "Credentials Manager"
  3. Click on Windows Credentials
  4. Look for any reference to your windows account (generally your @outlook.com is listed)
  5. Delete them.
  6. Then select your account at the top of the start menu and select Log Out.
  7. If using a Pin Code, switch to type input and put your password into the box.
When you go to Mail, and select "Fix Issues" it will detect your password and your account should sync with new emails. In some cases, depending on why this particular error code was caused, you may have to use a powerful automated tool to have it resolved.
Read More
1 2 3 162
Logo
Copyright © 2022, ErrorTools. All Rights Reserved
Trademarks: Microsoft Windows logos are registered trademarks of Microsoft. Disclaimer: ErrorTools.com is not affiliated with Microsoft, nor claim direct affiliation.
The information on this page is provided for information purposes only.
DMCA.com Protection Status