Fix microphone not working in Windows 10

The microphone has become from exclusive niche hardware to everyday requirements. In today's world when we live in a pandemic most of the work has shifted from office to home where people need working computers with microphones, working microphones.

So what do we do when the microphone stops working? Keep reading on to find out and hopefully, we will fix this as fast as possible.

Check Microphone Privacy Settings

In 2019, Microsoft introduced new privacy features to Windows that give you more granular control over which apps are accessing your microphone. The side effect of this is that certain apps may be blocked from using your microphone without you even knowing.

To find out if this is the issue, go to Settings > Privacy > Microphone.

Click Change and make sure the slider is set to On. This will broadly mean that the mic is now enabled on your PC.

Next, make sure the slider under Allow apps to access your microphone is set to On, then look through the list of Microsoft Store apps to make sure the apps you want to use are selected.

You’re likely to be using many apps, not from the Microsoft Store, so to make sure these are enabled, scroll down even further and set the Allow desktop apps … slider to On.

Check Microphone Driver

The outdated or corrupted driver could be the issue for the microphone not working in Windows 10.

To check the driver status, follow these steps:

  1. In your Start menu search for Device Manager
  2. In the device manager window search for sound and expand it.
  3. Once expanded, you should see your audio drivers. Note that the names of these will vary depending on the manufacturer.
  4. On Audio, right-click, and select properties. On the General tab, check to see if the device is working properly.
  5. If it is not working properly, click on the driver tab and select the update option.
  6. Repeat for the other audio drivers.
  7. Restart the computer.

Check the Sounds setting

  1. In the taskbar, right-click on the speaker icon at the far-right corner and select the sound option.
  2. On the Recording tab, click on the microphone and select the Properties option.
  3. Select the levels tabs and increase the volume for both microphone and microphone boost.
  4. Go to the Enhancement tab of the same pop-up and make sure that the immediate mode checkbox is checked.
  5. Click Ok and restart the computer.

The sound troubleshooter

  1. Right-click on the sound icon at the far-right corner of the taskbar and select troubleshoot sound problems.
  2. The computer will detect any fault that exists with your audio and recommend fixes for you. You just need to read through the prompts and click the options that you think will work for you.

Try microphone on another computer

If previous steps have not produced results, try the microphone on another computer, if it is not working there then it is a hardware malfunction

If you like to learn and find out more about various Windows errors, and how to repair them go to our vast archive or use search to find articles that will explain and help you in solving your issue.
However, if you prefer to do things fast and with automatization then we are proposing to use an automated solution for your issues. The application that we are recommending is Advanced System Repair Pro
Advanced System Repair utilizes multiple tools all in one to give you a quick, simple, reliable, and very thorough diagnosis of your PC. It brings you all the tools you need in one program to clean, fix, protect, optimize and boost your PC!
1-Click Maintenance
All the tools to make it simple and easy! It's like having a professional technician at the click of a mouse.

Junk Cleaner
Keeping your computer free from unnecessary clutter also helps make your computer last longer. Like any other machine, if you keep it clean and take care of it, it will serve you better for longer!

Optimize background apps
Optimize applications background activity with the built-in Application Optimizer feature.

Disk Defrag
With a simple 1-click, Advanced System Repair speeds up your PC by assembling fragmented files on your machine and organizing them more efficiently.

Malware Removal
Finds and removes all types of harmful malware including trojans, worms, bots, adware, spyware, PUPs, and more!

Privacy Cleaner
The all-in-one privacy suite to Clean Your Tracks & Protect Your Privacy! Make your computer safe, secure, and more efficient!

System Tweak/Optimizer
ASR will analyze your complete system and settings to adjust your PC to function at its maximum performance.

Registry Cleaner
Over time, as you install and uninstall applications, the registry can become cluttered with old entries and broken settings which can result in program crashes, and annoying messages and slow the computer down.
Visit our Advanced System Repair Pro Download page to inform yourself about all the benefits of this software and get a free trial copy of it.
advanced system repair pro

Advanced System Repair Pro

One-click automated PC repair solution
ASR logo
With Advanced System Repair Pro you can easily
Replace damaged files
Restore performance
Free disk space
Remove Malware
Protects WEB browser
Remove Viruses
Stop PC freezing
DOWNLOAD
Privacy Policy | Terms of Use | Uinstall
Advanced System Repair Pro is compatible with all versions of Microsoft Windows including Windows 11

Share this article:

You might also like

Watch old game intros in 4k or 8K hi-definition
AI and neural networks are more and more being used in all parts of our lives. From face detections to deep fakes it is both amusing and frightening to watch at the same time. From some really bad uses of neural networks and AI overall, looking at you deep fakes, upscaling videos or images are mostly harmless pieces of work not harming anyone. There is one cool YouTube channel, well there are more but this one seems to have most of the videos on it and if I am wrong I apologize. https://www.youtube.com/channel/UC33rC3GO1UZFAkMcCCwjyWg So upscale is like previously mentioned a YouTube channel that hosts old game trailers and into videos but in full 4K or 8K video resolution, fully upscaled using neural networks. There are some videos that are not maybe top-notch but the large quantity of them is pretty well upscaled and they do indeed look great. So if you have some time and want that old nostalgia fix, go and check it out. You might find something that will bring that old you out and you might even drop a smile or two remembering old good days, I know I have.
Read More
Fix Minecraft Won’t Launch in Windows 10
Minecraft has taken the world by the storm, it was an indie project game and it went mainstream. Dream of every game developer I guess. The dream of every gamer on the other hand is to double click on the game and to play it and not to deal with various issues, especially if they are launch issues. Luckily for all of you gamers, here at errortools we game as well and we are happy to bring you a solution on how to fix Minecraft won't launch issue. So sit back, relax and keep on reading, and hopefully enough you will be gaming again in no time. Follow the guide presented step by step, point by point how it is presented for the quickest way to get back in Minecraft. This guide also presumes that your hardware configurations meet at least the minimum system requirements for running Minecraft.
  1. Disable antivirus and firewall

    90% of the time this is the issue why Minecraft is not working, your antivirus or firewall has detected it as a false positive, and access to system internet, etc has been cut. Try disabling it and if everything is working fine add it to the antivirus or the firewall exception list.
  2. Run Minecraft as admin

    Minecraft will sometimes refuse to run if it does not has administrator privileges. To make sure this is the case locate the Minecraft executable, right-click on it and choose properties. Go to the compatibility tab and check Run as Administrator box.
  3. End Minecraft process

    It came to knowledge that even if Minecraft is not running it can have its processes active in the background. Press CTRL + SHIFT + ESC to open task manager Locate if Minecraft has a process running If you find the Minecraft process right-click on it and choose End Task
  4. Run Minecraft in compatibility mode

    If Minecraft still refuses to start try running it in compatibility mode in the previous Windows version Locate Minecraft executable file in its install location Right-click on it and choose properties In the properties, windows go to the compatibility tab Check run this program in compatibility mode for: Select previous version of the operating system, try Windows 8 or Windows 7
  5. Update graphic card driver

    The best bet is to go to your GPU manufacturer's website and download the latest version of the driver of your GPU.
  6. Remove mods, plugins, texture packs

    Mods, plugins, texture packs are all great but sometimes they can cause GPU overloads and other issues to see if this is the case try running Minecraft in Vannila mode without anything installed, just pure and clean Minecraft as it was just downloaded and installed.
  7. Reinstall Minecraft

    If everything else failed, reinstall Minecraft. There might be a chance that some DLL file was deleted or corrupted by mistake or that some crucial files are missing. Clean reinstallation will fix all of these issues.
Read More
Change default name for New Folder in Windows
Anytime when a new folder is created in Windows name "New Folder" is offered and set as the default name. If by any chance you would like to change this and set your own default name instead of the standard one, follow this guide. Please be aware that this guide will require you to change the registry of Windows, it is common practice to make a backup of your registry each time you want to manually change any values in it, just in case something goes wrong.
  • In order to change the default new folder name first press ⊞ WINDOWS + R to open the run dialog, type in it RegEdit, and press ENTER run dialog with regedit
  • In registry editor find the key:
HKEY_CURRENT_USER\SOFTWARE\Microsoft\Windows\CurrentVersion\Explorer
  • Select the NamingTemplates key. If it is not present, you’ll need to create one.
  • Right-click the NamingTemplates key to add a String Value.
  • Assign it the following name: RenameNameTemplate.
  • Double-click on the RenameNameTemplate data value to open the Edit String dialog box.
  • In the Value Data field enter the new text you want to appear when you create a new folder. You have to make sure you are not using any of the following characters: \ / ? : * " > < |
  • Close the Registry Editor and Exit.
  • Now, when you create a new folder, it will be named Whatever you chose instead of the New folder.
And that is all to it, you now have your own personal new folder naming template.
Read More
Chrome won’t clear Browsing History and Data
As you know, one of the most popular browsers these days is the Google Chrome browser. Browsing the web every day using your Chrome browser, leaves a trail of browsing history. Google uses the browser history to streamline and make the browsing experience a lot better. But there are times when Chrome users experience trouble in deleting their web browsing history, data, cookies, and cache. In this post, you will be guided through specific settings that will help you in getting rid of the browsing history in Chrome. There are several options you can take in clearing the browsing history in Chrome. But before you try them, you can try the basic one first using the following steps:
  • First, click on the three-dotted icon and click on History from the menu.
  • Next, click on the Clear browsing data option and select “All time”.
  • Then select the type of history you want to delete.
  • After that, click on the Clear Data button.
If clearing the browsing history in Chrome the old way didn’t work, then you can try to check out the options provided below.

Option 1 – Clear the cache using the File Explorer

The first thing you can do is to clear the cache by using File Explorer. To get started, refer to these steps:
  • Tap the Win + E keys to open File Explorer.
  • Next, navigate to the following paths:
    • C:/Users/YOURUSERNAME/AppData/Local/GoogleChrome/User Data/DEFAULT/Cache
    • C:/Users/YOURUSERNAME/AppData/Local/GoogleChrome/User Data/PROFILENAMECache
  • From the given locations above, replace “YOUR USERNAME” with the user profile name you use and then search for a file named “Cookies”.
  • Now delete its contents.

Option 2 – Reset Chrome

Resetting Chrome can also help you fix the error. This means that you will be restoring its default settings, disabling all the extensions, add-ons, and themes. Aside from that, the content settings will be reset as well and the cookies, cache, and site data will also be deleted. To reset Chrome, here’s what you have to do:
  • Open Google Chrome, then tap the Alt + F keys.
  • After that, click on Settings.
  • Next, scroll down until you see the Advanced option, once you see it, click on it.
  • After clicking the Advanced option, go to the “Restore and clean up option and click on the “Restore settings to their original defaults” option to reset Google Chrome.
  • Now restart Google Chrome.

Option 3 – Try to clean reinstall Chrome

There are instances when programs leave files behind after you’ve uninstalled them and the same thing can happen to Chrome so before you reinstall Chrome, you have to make sure that you have deleted the User Data folder. To do so, refer to the following steps:
  • Hit the Win + R keys to open the Run dialog box.
  • Next, type “%LOCALAPPDATA%GoogleChromeUser Data” in the field and hit Enter to open the User Data folder.
  • From there, rename the default folder and name it something else, e.g. “Default.old”.
  • After that, install Google Chrome again and check if the issue is now fixed.
Read More
How to fix Windows 10 Store Error 0x801901F7

How to fix Windows 10 Store Error 0x801901F7

Error Code 0x801901F7 – What is it?

Error code 0x801901F7, also known as “The Server Stumbled” error because it shows a message saying “The Server Stumbled. We all have bad days” is associated with Windows Store. Server Stumbled Error 0x801901F7 is an error related to the MS server. The error occurs due to damaged registry files, malware, virus, and corrupted data. You should fix this error to prevent a system crash or a BSOD error. There are some things you can do to fix it. These are not so complex. So, anyone can try these methods to fix error 0x801901F7. Common Symptoms for error 0x801901F7:
  • Problems with Windows startup
  • System becomes very slow or the system freezes
  • Blue screen of death appears
  • Windows fails to start some process due to Stop error code 0x801901f7

Solution

Restoro box imageError Causes

  • This error is generally caused by corrupt registry files.
  • Virus infection can cause this problem.
  • Outdated driver, missing .DLL files may also cause this error.
  • Microsoft server overload may cause this problem as well.
  • Incorrect configuration may cause this problem.

Further Information and Manual Repair

To fix error 0x801901f7, there are four methods listed below. Some might work for you and some might not. Please try all of them to fix this error.

Method 1:

Basic method to fix error code 0x801901F7: Resetting Windows Store Cache Most of the time clearing or resetting the cache helps. It doesn't always work, but you should try this first before moving on to some advanced methods which are mentioned below. To reset the Windows Store cache please follow the simple steps below
  • Open RUN by searching or pressing "Windows Key + R"
  • Type "wsreset.exe" and press Enter or click on OK.
  • Windows Store will open automatically along with a command prompt.
  • This will reset Windows Store and you might see it loading as it should.
This method might work but if it fails to solve Error 0x801901F7 then follow the method below.

Method 2:

Advanced method of fixing error code 0x801901F7: Deleting Windows Store database file. By using this method, you will be deleting the database file for Windows Store. This file is located on your C drive or the drive where you installed your Operating System. Follow the steps below.
  1. Navigate to C:WindowsSoftwareDistributionDataStoreDataStore.edb.
  2. Delete DataStore.edb file from there.
  3. Now Open Windows Store and see if you still get error code 0x801901F7.
The Datastore.edb file that you deleted will be automatically created once you perform Step 3 which is launching Windows Store. If you still cannot get this error away then Close Windows Store and Reboot your PC then Launch Windows Store Again.

Method 3:

Modifying Windows update properties: Perform the steps below only if the above-mentioned methods fail. You will be tweaking a few things in the Windows update to see if it helps.
  1. Open Task Manager by right-clicking on Taskbar, then click on Task Manager.
  2. Go to Services Tab. Click on Open Services at the very bottom of the Window.
  3. Now a new window will pop up. Scroll down & find "Windows Update" from the list.
  4. Double click on Windows update to open up its Properties.
  5. Now from the Startup Type drop-down list, select Automatic. Click on Apply, Start, and then Ok.
Now you need to perform just one more step. Reset Windows Store again (Refer to method 1 for Steps). This should fix your Windows Store error that shows The Server Stumbled with 0x801901F7 Error Code.

Method 4: 

If the error is due to a problem with a driver, then follow the method below to uninstall the current driver:
  1. Open the Run command and type “sysdm.cpl” in the text box.
  2. Click Enter.
  3. Open the Hardware tab on the system properties dialog box.
  4. Then press on Device Manager.
  5. Double press on Device type and then press on the hardware device that is reporting error code 0x801901F7.
  6. Go to the Driver tab and press on Uninstall button to uninstall the device driver completely.
  7. Now, install the new driver on your computer.
  8. Restart your computer.
  9. Run virus scan of your PC
  10. Try using a different USB port.
If you do not possess the technical expertise required to accomplish this yourself or do not feel comfortable doing so, download and install a powerful automated tool to get the job done.
Read More
Setting default applications in Windows 11
Setting default applications in Windows 11
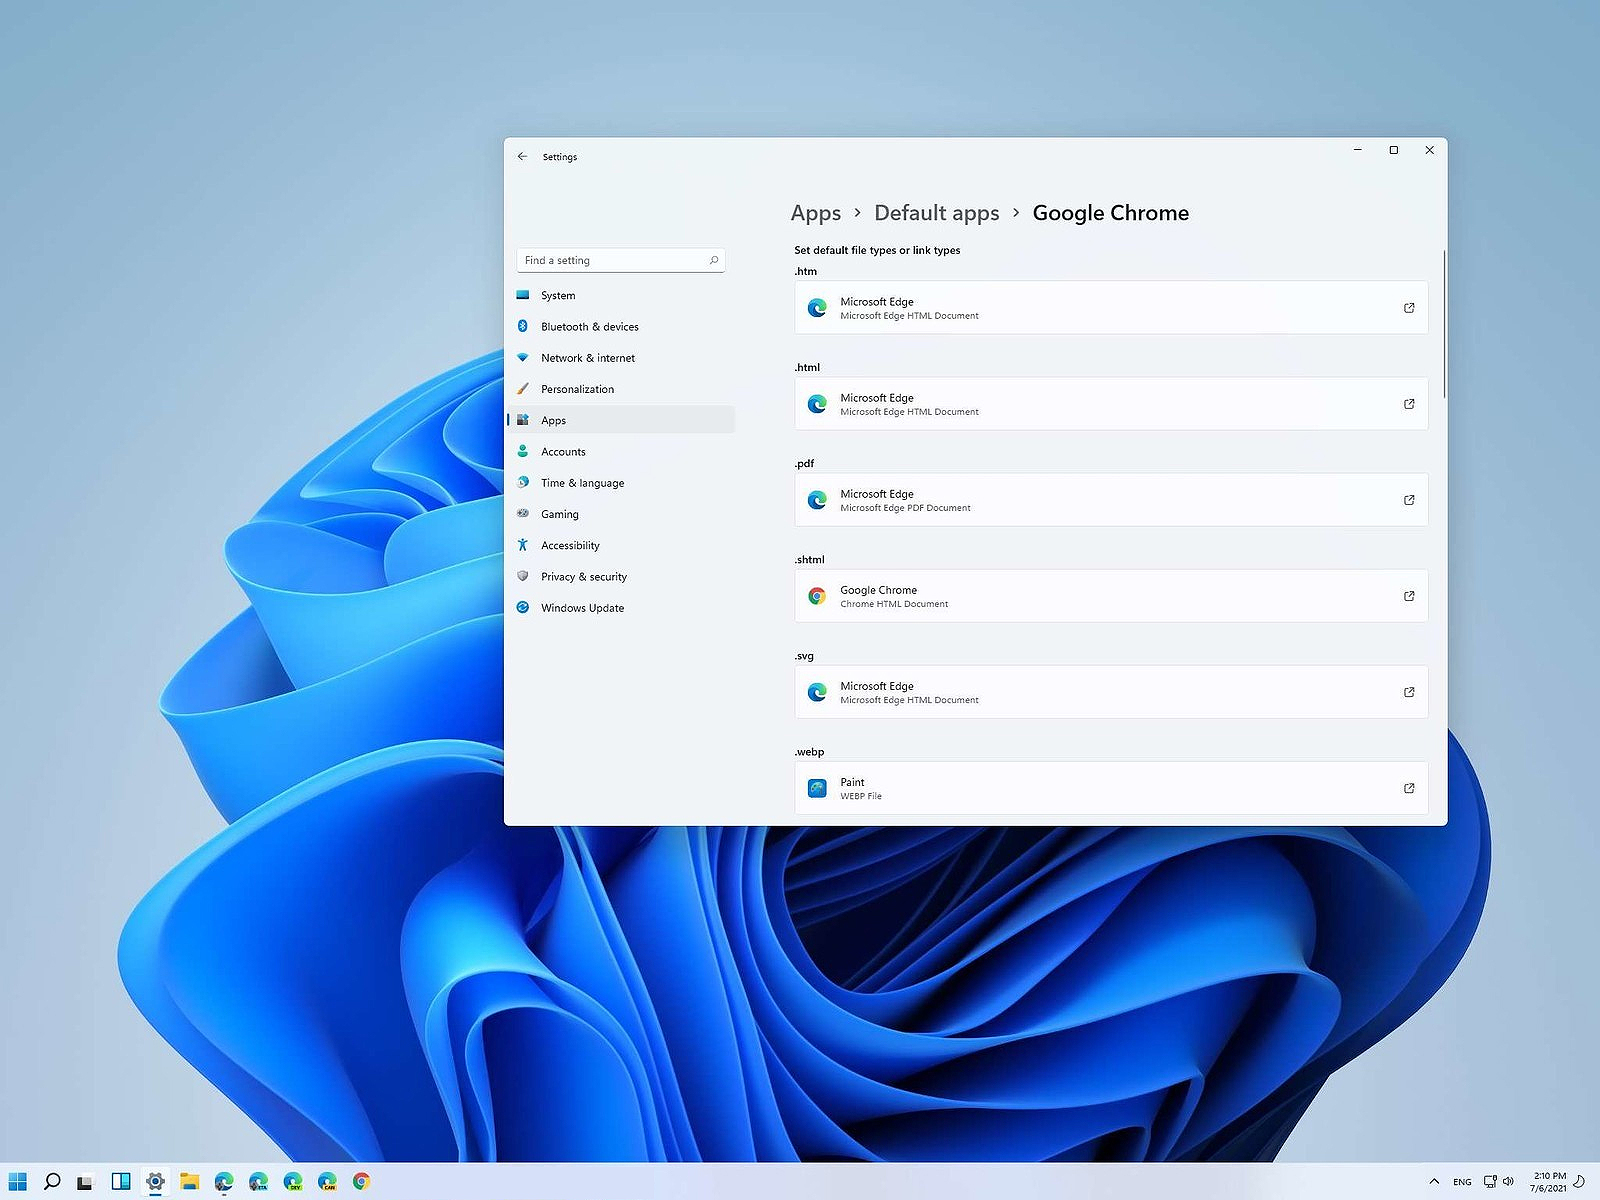
Same as in previous Windows versions, Windows 11 will also use certain applications as default ones for opening certain file types and file extensions. And yes, same as in previous versions it will come preconfigured for certain file types and associated applications like for example photos for pictures. Of course, users usually have their own favorite applications for certain file types and much more prefer to open them inside the application of their choice instead of the default one. We can change the default application like in previous Windows versions but this time there are two ways and overall more control of this process. Windows 11 has settings for choosing default file type applications and default file extension applications giving you more control of this process.

The opening setting for apps

Whatever you wish to change default application or default extension application you will need to open settings for default application. Follow steps to quickly go into it.
  1. Press ⊞ WINDOWS + I to open settings
  2. Select Apps on left
  3. On the right part select Default Apps
Now you are in settings for choosing default applications

Choosing default application by file type extension

This is considering by Microsoft as a typical way to set default applications inside Windows 11. Once you are inside the settings app there is a box labeled Enter a file type or link type. Inside the search box, type in file extension that you wish to associate the application with like .JPG, .TXT, or other. If the file extension is not associated with any application you will be presented with a Choose a Default button, if however, the file extension is already associated with the app, you will need to click on the app box itself. In any case, a pop-up will appear and ask How do you want to open YOUR FILE EXTENSION files from now on? Choose Application from the list of presented ones and click on OK.

Choosing default file type

Another method is to select the default application by file type selecting application for it. In the settings screen, under the search box, you will have a list of installed applications. Choose the application that you would like to associate a file type with and click on it. On the next details screen scroll down and select the file type that you want to associate with the selected application and click on OK.

Other/third method

There is also the third method for choosing the default application for file type but it includes some surfing on your hard drive and it can be more time-consuming for first-time settings. But it is fairly quick when you need to only use it once on some new file type (for example you have a new application installed and want to switch just one file type extension to that application). Locate the file that you want to associate with the application and right-click on it. Select Open With from the menu and then Choose Another App. Pop up will appear, select the application that you would like to use, and check the box beside Always use this app to open CHOOSEN EXTENSION files followed by clicking on the OK button.
Read More
How to Fix Error Code 0x80240001 on Your PC

How to Fix Error Code 0x80240001 on Your PC

Error Code 0x80240001- What is it?

Error Code 0x80240001 usually occurs in Windows 10 and is specific to the process of updating your system. It is similar to an error code found in previous versions of the software during the update process. There are a number of steps that can be taken to solve this error code, most of which are fairly easy for the average user to undertake.

Common symptoms for this particular error code include:

  • Inability to complete the updating process of your Windows 10 system
  • A notice that the Windows Update Agent is not able to provide appropriate services through the update module.

While it can be frustrating to have this message appear during the update process, users can resolve the error in a number of ways. However, if you are not confident in your ability to follow the steps below or if the methods listed fail to resolve the problem, contact a certified Windows 10 repair technician to assist you in the process.

Solution

Restoro box imageError Causes

Error Code 0x80240001 occurs when the Windows Update tool is unable to complete its service successfully. This error occurs most often when users attempt to update to Windows 10 from older versions of the software, including Windows 7, 8, or 8.1.

This particular error code can also occur when your system has not been updated in a regular fashion. Stacked updates make it more likely for Error Code 0x80240001 to occur.

In most cases, when Error Code 0x80240001 appears on your screen, the update process will be halted. Sometimes, the screen may display a single color background, removing the appearance of all other windows and applications.

Fortunately, there are several methods that you can use to attempt to circumvent the problem and see the update process through to completion.

Further Information and Manual Repair

While it can be frustrating to deal with an error when you attempt to update your Windows software, there are several ways that you can seek to resolve the issue that causes Error Code 0x80240001. These steps are relatively simple to complete and do not require advanced techniques to be used. However, if you are not confident in your ability to complete the steps listed below, enlist the aid of a qualified Windows technician to help you.

Here are the most common ways that Error Code 0x80240001 can be resolved for Windows 10:

Method One:  Download and Use the Windows Repair Tool

From the Windows website, you can download the Windows Repair tool, if it is not already installed on your computer. While there are other tools available through outside sites that claim that they can resolve this error, in many cases, they can be a carrier for viruses and other kinds of malware, so it is inadvisable to use non-Windows tools to fix this particular error code.

Once you have successfully added the Windows Repair tool to your computer, open it up and look for the option to run “Repair Windows Update.” Using this process, your system can search for and resolve the error, allowing you to successfully run the update tool through to completion.

Method Two:  Uninstall Recently Added Software

In some cases, software that has been recently added to a non-updated computer can cause the update process to experience issues. If you believe that this may have occurred in your case, simply uninstall the software in question, then attempt to run the Windows 10 Update process again.

The best way to prevent this error from reoccurring when you seek to update your Windows 10 system is to apply updates within a short period of time from their release date. It is recommended that users update regularly, which can allow them to avoid a number of issues that are common to the update process.

If you have any difficulty in resolving Error Code 0x80240001 after you have attempted these steps, you may need to enlist the help of a qualified technician who is familiar with the specific errors related to the Windows 10 Update process. This can especially be helpful if you have recently installed a number of new kinds of software and are unsure of whether or not any specific one may be causing your issues. If you wish to always have at your disposal a utility tool to fix these Windows 10 and other related issues when they do arise, download and install a powerful automated tool.

Read More
Website isn’t responding to connection
If there are any third-party add-ons or proxy settings that interfere with your Windows 10 computer’s internet connection, then you will most likely encounter a problem where you see an error message saying, “Website is online but isn’t responding to connection attempts” when you try to run the Network Adapter troubleshooter. Like pointed out, this kind of error can be caused by some proxy settings that prevent the connection. On the other hand, it could also be caused by some third-party add-ons. To fix this error, read on as this post will guide you on what you can do to fix it. You can try to turn off the proxy settings or disable the add-ons on your browser. You can also try resetting both the TCP/IP and DNS as well as reset the network. For more details, refer to the options provided below.

Option 1 – Try to turn off the proxy settings

There are some users who reported that they’ve fixed the problem after they’ve disabled the use of a proxy server using the built-in way. Follow the steps below to disable the proxy server.
  • Tap the Win + R keys to open the Run dialog box.
  • Then type “inetcpl.cpl” in the field and hit Enter to pull up the Internet Properties.
  • After that, go to the Connections tab and select the LAN settings.
  • From there. Uncheck the “Use a Proxy Server” option for your LAN and then make sure that the “Automatically detect settings” option is checked.
  • Now click the OK and the Apply buttons.
  • Restart your PC.
Note: If you are using a third-party proxy service, you have to disable it.

Option 2 – Try disabling the add-ons or browser extensions

The next thing you can do to fix the problem is to disable any extensions or add-ons on your browser. For instance, if you are using Chrome, here’s what you have to do:
  • Open Chrome and press Alt + F keys.
  • Go to More tools and click Extensions to look for any suspicious browser extensions or toolbars.
  • Click the Recycle bin and select Remove.
  • Restart Chrome and press Alt + F keys again.
  • Proceed to On Startup and mark Open a specific page or set of pages.
  • To check if the browser hijacker is still active, click Set pages, if it is active, overwrite the URL.

Option 3 – Try to update the Network Adapter Driver

Follow the steps below to update your Network Adapter Driver:
  • Tap the Win + R keys to launch the Run window and then type in the “MSC” command and hit Enter to open the Device Manager window.
  • From there, expand the list of all the network drives and update each one of them.
Note: If updating the network drivers didn’t help in fixing the problem, you can also try to uninstall the very same drivers and restart your Windows 10 PC. After that, the system itself will reinstall the drivers you just uninstalled. Alternatively, you can also download and install the drivers from the manufacturer’s website directly.

Option 4 – Try to reset the TCP/IP and the DNS cache

As you know, the TCP/IP or the Internet Protocol is the most important thing if you want to use the internet on your computer. That’s why if it ends up getting corrupted, you need to reset the TCP/IP to fix the problem. To reset TCP/IP, refer to these steps:
  • In the Windows start to search, type “command prompt” and right-click on Command Prompt from the search results.
  • Then select the “Run as administrator” option to open Command Prompt with admin privileges.
  • After that, execute this command: netsh int ip reset resettcpip.txt
  • Next, execute this second command: ipconfig /flushdns
  • Once it’s done, exit Command Prompt and restart your computer and then check if the error is now fixed.

Option 5 – Try to reset the Network

You can also try to perform a Network Reset to resolve the problem. This will reset the entire network configuration including your IP address. To perform Network Reset, follow these steps:
  • Tap the Win + I keys to open Settings.
  • From there, go to the Network and Internet section.
  • Next, scroll down and look for “Network Reset” under the status pane.
  • After that, click on Network Reset and then on Reset now to start resetting the network configuration. Once done, check if it is able to fix the error or not.
Read More
How to Fix Windows 10 Error 0x80070490

How to Fix Windows 10 Error 0x80070490

Error Code 0x80070490 - What is it?

When downloading a Windows update, it is important to remember that these updates are what keeps your computer safe. Some users have reported seeing error code 0x80070490 when allowing updates for their Windows PC. This error code may appear when the user is trying to connect to the update site for Windows and maybe a result of a corrupted CBS manifest. Having this error code will not only stop the update of the system, but it will also certainly halt any work being done with the computer. Quite a few Windows users have written in complaints about this error while updating from any prior Windows update to Windows 10.

Common symptoms include:

  • While a user is performing the updates, the Windows computer will stop running the updates, and it will show the error code 0x80070490.
  • Windows updates will not install any new features and will not install security patches.
  • The computer will not continue with the Windows update, and it may revert back to the previous state that the computer was in, prior to attempting the updates.

Error Causes

There is not a lot known about what exactly causes the error code 0x80070490, but it is something critical that makes Windows abruptly stop its updates. It could be caused by a simple glitch in the computer system, or it could be caused by a larger problem. One thought is that the CBS (Component-Based Servicing) manifest can be corrupt. Another thought is that the computer's anti-virus software may be interfering with the computer's ability to perform the necessary updates.

Further Information and Manual Repair

There is very little information known about error code 0x80070490 and why it exists, but there are a few methods in which to correct it. Users should be careful when trying to fix this error themselves. If the user feels that the methods are too complicated or they are uncomfortable taking it on themselves, they should contact a Windows repair technician to fix the problem. Not all methods listed will suit the user's needs, but it is dependent upon the problem at hand as to which method will be the best fit to fix the error code. If these steps are taken and the error is not corrected, it is vital to contact the Windows repair technician.

Method One: Creating a new local account

Create a new local account on the computer, and allow administrator privileges on it. Next, move all of your documents and personal files to the new account. Delete the old account (you will no longer be using this) and switch over to the new one. After switching to the new local account, add the Microsoft account to it.

Method Two: Delete user ID, Store cache from the registry

  • You will need to open the Registry Editor. Do this by pressing the Windows Key and R, then typing in “Regedit”. After this is typed in, press Enter or click the OK button to start the registry editor.
  • When this starts, you will need to navigate all the way to the following key on the left pane:
  • HKEY_LOCAL_MACHINESOFTWAREMicrosoftWindowsCurrentVersionAppxAppxAllUserStore After this, find the key that is similar to this: S-1-5-21-1505978256-3813739684-4272618129-1016
  • NOTE: this is just an example. The keys will be in a similar format but will not look exactly like this.
  • Select all the keys that look like this, and then delete them. After these keys are deleted, close the Registry Editor and restart the computer.

Method Three: Check to see if BITS, MSI Installer, Cryptographic, and Windows Update Services are running

Press the Windows key and R. Then, type in services.msc. After the Services window starts up, find the following services:  BITS, MSI Installer, Cryptographic, and Windows Update Services. When these services are found, make sure that they are up and running. If one or more of these services is not running, make sure that they are started. To do this, select the service and then click on Start the Service.

Method Four: Windows Update Troubleshooting

Press the Windows key plus W and then type in “troubleshooting”.  Select Troubleshooting. On the top left corner, select View All. Click on Windows Update troubleshooter. After this, follow the on-screen instructions in order to run the troubleshooter. After the troubleshooter has run, the issue should be fixed.

Congratulations, you have just fixed Error Code 0x80070490 in Windows 10 all by yourself. If you would like to read more helpful articles and tips about various software and hardware visit errortools.com daily. Now that’s how you fix Error Code 0x80070490 in Windows 10 on a computer. On the other hand, if your computer is going through some system-related issues that have to get fixed, there is a one-click solution known as Restoro you could check out to resolve them. This program is a useful tool that could repair corrupted registries and optimize your PC’s overall performance. Aside from that, it also cleans out your computer for any junk or corrupted files that help you eliminate any unwanted files from your system. This is basically a solution that’s within your grasp with just a click. It’s easy to use as it is user-friendly. For a complete set of instructions in downloading and using it, refer to the steps below Perform a full system scan using Restoro. To do so, follow the instructions below.
      1. Download and install Restoro from the official site.
      2. Once the installation process is completed, run Restoro to perform a full system scan. restoro application screen
      3. After the scan is completed click the “Start Repair” button. restoro application screen
Read More
Outlook: We are unable to connect right now
If you are trying to start the Microsoft Outlook application on your Windows 10 computer but you suddenly receive a message box with an error message that says, “We are unable to connect right now, Please check your network and try again later”, read on as this post will guide you on how you can fix this error. This kind of error in Microsoft Outlook could be due to some issues with your internet connection or it could also be due to the VPN software if you’re using one. Whatever the cause is, there are several potential fixes you can check out to fix the error. You have to check your internet connection or try changing it. You could also try to disable your VPN software or restart your computer or Microsoft Outlook and try starting the app again. In addition, you can also try entering your password again or check some settings in the Windows Registry or open Microsoft Outlook in Safe Mode. Refer to the guidelines provided below to further troubleshoot the problem.

Option 1 – Try to check your internet connection

The first thing you can do to resolve the problem is to check your internet connection. You have to make sure that you are connected to the internet and that it has a stable connection.

Option 2 – Try to restart your computer or Microsoft Outlook and try again

The next thing you can do to fix the error is to restart your computer or Microsoft Outlook. This simple process can actually help you fix the problem as it could only be a glitch that can be fixed with a simple restart.

Option 3 – Try to enter your password again

You could also try entering your password again to resolve the error. Just click on the Cancel button to open a dialog box and then enter your password again and see if it helps. Note that you might have to do it for all your email IDs in Microsoft Outlook.

Option 4 – Try opening Microsoft Outlook in Safe Mode and disabling its add-ins

Putting Microsoft Outlook into Safe Mode can help you identify the problems in it. Safe Mode also helps you fix a certain issue caused by some corrupted add-in. To start your Microsoft Outlook in Safe Mode, refer to these steps:
  • Tap Win + R on your keyboard to open the Run dialog box.
  • Next, type in “Outlook /safe” and press Enter to run the command.
  • After that, it will ask you to select a profile that you want to use. Just simply select a profile from the drop-down menu and click on the OK button.
  • Now you have successfully opened Microsoft Outlook in Safe Mode. As a result, it will start with disabling the add-ins. Meaning to say, there is some corrupted add-in that’s causing the problem, and that you need to look for that add-in and either disable it or have it permanently removed.
  • Once you’ve identified the corrupted add-in, you can disable or remove it by going to File > Options > Add-ins. From there, select the option “COM Add-ins” from the drop-down menu and then click the Go button.
  • Finally, close Microsoft Outlook once you’ve covered the given steps above and then try to open it normally.

Option 5 – Try disabling the VPN

As pointed out earlier, if you are using VPN, this could be the reason why you’re getting the “We are unable to connect right now, Please check your network and try again later” error so the most obvious thing to do is for you to turn off the VPN and try to run the Windows Update once more. And if you use a VPN software that works using their software, you can just completely exit or log-off from its account. On the other hand, if you are using a built-in Windows 10 VPN, you can simply turn it off or delete all the settings you have created there.

Option 6 – Try to check the settings in the Registry

  • Tap the Win + R keys to open the Run utility and type “Regedit” in the field and tap Enter to open the Registry Editor.
  • Next, navigate to this registry path: HKEY_LOCAL_MACHINESYSTEMCurrentControlSetservicesNlaSvcParametersInternet
  • From there, look for the DWORD named “EnableActiveProbing” and make sure that its value is set to “1”. When the value is set to 1, it means that it is Enabled. This is the default setting and is used to identify the status of the network connectivity of your computer.
Read More
1 2 3 162
Logo
Copyright © 2022, ErrorTools. All Rights Reserved
Trademarks: Microsoft Windows logos are registered trademarks of Microsoft. Disclaimer: ErrorTools.com is not affiliated with Microsoft, nor claim direct affiliation.
The information on this page is provided for information purposes only.
DMCA.com Protection Status