Fix KMODE EXCEPTION NOT HANDLED e1d65x64.sys

KMODE_EXCEPTION_NOT_HANDLED seems to be connected primarily to a third-party driver, e1d65x64.sys associated with the Intel(R) Gigabit adapter, NIC/Wired network NDIS (Network Driver Interface Specification) 6.x driver. Error is known to produce the dreaded blue screen of death or BSOD.

Most usually error is connected with gaming on Windows 10 computer and it manifests itself during gaming sessions.

If you are unlucky and you are faced with this unfortunate error we will be happy to try to help you and present with tips and tricks in order for you to find a solution for it.

Before you proceed with the provided solutions, be sure you have sufficient disk space on the Windows drive, run Disk Cleanup and then run CHKDSK.

1) Run the Blue Screen Online Troubleshooter

Open Control Panel, change the view setting to icons. Click Troubleshooting, and click “View all” in the tasks pane. Click “Blue Screen”. This opens the Blue Screen Troubleshooter.

2) Run Driver Verifier

  1. Start a Command Prompt window by selecting Run as an administrator, and type verifier to open Driver Verifier Manager.
  2. Select Create standard settings (the default task), and select Next. You can also choose to Create custom settings to select from predefined settings, or to select individual options. For more information, see Driver Verifier options and rule classes and Selecting Driver Verifier Options.
  3. Under Select what drivers to verify, choose one of the selection schemes described in the following table.
    Driver verifier table:
    Option Recommended use
    Automatically select unsigned drivers Useful for testing on computers that are running versions of Windows that do not require signed drivers.
    Automatically select drivers built for older versions of Windows Useful for testing driver compatibility with newer versions of Windows.
    Automatically select all drivers installed on this computer Provides maximum coverage in terms of the number of drivers that are tested on a system. This option is useful for test scenarios where a driver can interact with other devices or drivers on a system.

    This option can also exhaust the resources available for Special Pool and some resource tracking. Testing all drivers can also adversely affect system performance.

    Select driver names from a list In most cases, you will want to specify which drivers to test.

    Selecting all drivers in a device stack allows the Enhanced I/O Verification option to track objects and check compliance because an I/O request packet (IRP) is passed between each of the drivers in the stack, which allows for a greater level of detail to be provided when an error is detected.

    Select a single driver if you are running a test scenario that measures system or driver performance metrics, or if you want to allocate the greatest number of resources available for detecting memory corruption or resource tracking issues (such as deadlocks or mutexes). The Special Pool and I/O Verification options are more effective when used on one driver at a time.

  4. If you chose Select driver names from a list, select Next, and then select one or more specific drivers.
  5. Select Finish, and then restart the computer.

3) Update network device drivers

Go to the official Intel website and try to find newer versions of drivers, if there are none perhaps you will need to revert back to the previous version.

4) Scan memory for issues

Run a memory test on your system, sometimes these errors can be traced back to a faulty RAM bank.

5) Stop over-clocking your PC

If you have overclocked your PC please reverse it back to its original state and see if that would solve the issue

6) Perform System Restore to the previous restore point

If none of the previous solutions have bared fruit, roll back to a previous restore point and that should solve the issue.

If you like to learn and find out more about various Windows errors, and how to repair them go to our vast archive or use search to find articles that will explain and help you in solving your issue.
However, if you prefer to do things fast and with automatization then we are proposing to use an automated solution for your issues. The application that we are recommending is Advanced System Repair Pro
Advanced System Repair utilizes multiple tools all in one to give you a quick, simple, reliable, and very thorough diagnosis of your PC. It brings you all the tools you need in one program to clean, fix, protect, optimize and boost your PC!
1-Click Maintenance
All the tools to make it simple and easy! It's like having a professional technician at the click of a mouse.

Junk Cleaner
Keeping your computer free from unnecessary clutter also helps make your computer last longer. Like any other machine, if you keep it clean and take care of it, it will serve you better for longer!

Optimize background apps
Optimize applications background activity with the built-in Application Optimizer feature.

Disk Defrag
With a simple 1-click, Advanced System Repair speeds up your PC by assembling fragmented files on your machine and organizing them more efficiently.

Malware Removal
Finds and removes all types of harmful malware including trojans, worms, bots, adware, spyware, PUPs, and more!

Privacy Cleaner
The all-in-one privacy suite to Clean Your Tracks & Protect Your Privacy! Make your computer safe, secure, and more efficient!

System Tweak/Optimizer
ASR will analyze your complete system and settings to adjust your PC to function at its maximum performance.

Registry Cleaner
Over time, as you install and uninstall applications, the registry can become cluttered with old entries and broken settings which can result in program crashes, and annoying messages and slow the computer down.
Visit our Advanced System Repair Pro Download page to inform yourself about all the benefits of this software and get a free trial copy of it.
advanced system repair pro

Advanced System Repair Pro

One-click automated PC repair solution
ASR logo
With Advanced System Repair Pro you can easily
Replace damaged files
Restore performance
Free disk space
Remove Malware
Protects WEB browser
Remove Viruses
Stop PC freezing
DOWNLOAD
Privacy Policy | Terms of Use | Uinstall
Advanced System Repair Pro is compatible with all versions of Microsoft Windows including Windows 11

Share this article:

You might also like

Choosing default browser in Windows 11
Default applications in previous Windows versions were a pretty straightforward process. The user went to the settings application and picked for each category which application he would like to choose from the list of installed ones. In Windows 11 things are little changed. In this article, we will show you how to choose the default internet browser inside Windows 11, and sadly it is a more tedious task than in previous versions.

windows 11 default browser
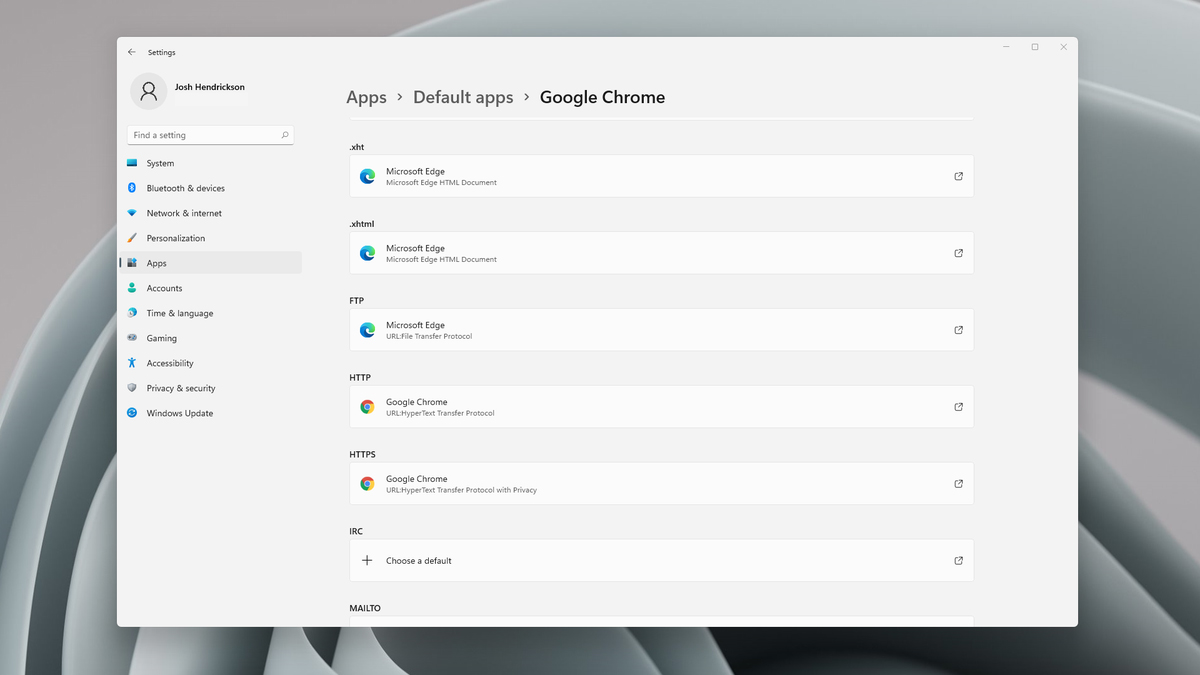
Choosing default browser in settings

As in previous versions of the Windows operating system you will need to use the settings application in order to change your default Internet browser. Previously, in Windows 10, a variety of general categories like email, web browser, and photo viewer were all listed under the Default Apps section of the Settings panel. It was easy to click on one of those categories and click on the option you like best from the small pop-up suggestion window. In the Windows 11 Insider Build, you’ll see a gauche list of an individual file or link types that you’ll need to specify your preferred browser for. The types include: HTM, HTML, PDF, SHTML, SVG, WEBP, SHT, FTP, HTTP, and HTTPS. There are additional optional types you can specify your preferred browser for as well. The issue here is in order to use a single browser which most users do you will have to go through each file type and set your preferred one. I am really not sure why this was introduced or why it has to be this way, all I can do is hope that in the final release of Windows 11 this feature will be rolled back as it used to be and that you could set your default browser in just one simple click.
Read More
Fix can not open EXE file in Windows 10
Can not open and run EXE file in Windows is not a new issue and sadly it can still happen from time to time, luckily this step by step solution will help you to resolve this problem fast and effective in no time. Try the below solutions in no particular order and I hope that you will solve the issue fast and be able to return to using the computer like it never happened
  1. Run SFC scan

    As the EXE file not opening issue lies in the Windows OS, the SFC tool will be able to identify the cause and fix this issue. Press ⊞ WINDOWS + X and choose command prompt (admin) in command prompt type: sfc /scannow Press ENTER
  2. Check registry and modify if needed

    Sometimes value in the registry key is wrong and can cause this error, in order to check if this is the case, we will open the registry editor and find out Press ⊞ WINDOWS + R to bring run dialog up type in it: RegEdit and press ENTER In the left pane of the Registry Editor window, click on the HKEY_CLASSES_ROOT to expand the section Scroll down to find out the .exe registry and click on it Go to the right pane of the window and double-click on the Default and set the Value Data as exefile Click on the OK button Next, located the given in the window: HKEY_CLASSES_ROOT>exefile>shell>open>command Click on the “Command” in the left pane of the window In the right pane of the window double-click on the Default and set Value Data as “%1” %* Click on the OK button Restart your computer and check if the issue persists
  3. Turn off Firewall and defender

    If you have a firewall and antivirus active there might be a chance of a conflict and that firewall or antivirus is preventing the EXE file from starting, disable your firewall and anti-virus and try again to open the EXE file.
  4. Turn off user account control

    User account control can also like a firewall prevent some files from executing, go into accounts and turn off user account control to see if this might be an issue preventing you from opening the file.
Read More
Bluetooth A2dp Source not working Code 52
A number of users have recently reported that they were going through an issue with their Bluetooth devices on their Windows 10 computers. This issue involves an error saying,
“Windows cannot verify the digital signature for the drivers required for this device. A recent hardware or software change might have installed a file that is signed incorrectly or damaged, or that might be malicious software from an unknown source. (Code 52).”
If you are one of the users who encountered this kind of error on your Windows 10 computer, read on as this post will guide you on how you can fix this Bluetooth error. According to security experts, the key to fixing this error is to sign the Bluetooth A2DP files with the built-in tool, System File Checker. Apart from that, you could also run the Hardware and Devices troubleshooter or perform System Restore, as well as update or reinstall the concerned drivers. For more details, refer to each one of the options provided below.

Option 1 – Try to check Bluetooth-related services

In Services, there is a Bluetooth-related service that helps users use Bluetooth so if that particular service suddenly malfunctions for some reason, you will most likely get the “Windows was unable to connect with your Bluetooth network device” error message. That’s why you need to check Services and to do that, refer to these steps:
  • Tap Win + R keys to open Run prompt and type in “services.msc” then tap Enter to open Services.
  • Next, look for the Bluetooth Support Service and double click on it to open Properties.
  • From there, verify if the Service status is showing “Running” or “Stopped”. If it’s the latter, you have to click the Start button.
  • Lastly, check if the Startup type is set to Manual.

Option 2 – Try running System File Checker or SFC scan

You could also run System File Checker or SFC scan to fix the Bluetooth error. It is a built-in command utility that helps in restoring corrupted files as well as missing files. It replaces bad and corrupted system files with good system files. To run the SFC command, follow the steps given below.
  • Tap Win + R to launch Run.
  • Type in cmd in the field and tap Enter.
  • After opening Command Prompt, type in sfc /scannow
The command will start a system scan which will take a few whiles before it finishes. Once it’s done, you could get the following results:
  1. Windows Resource Protection did not find any integrity violations.
  2. Windows Resource Protection found corrupt files and successfully repaired them.
  3. Windows Resource Protection found corrupt files but was unable to fix some of them.
  • Reboot your PC.

Option 3 – Try to perform System Restore

You might also want to perform System Restore as the error might be caused by system modifications. Thus, to undo them, you can use System Restore. Run it using these steps:
  • First, tap the Win + R keys to open the Run dialog box.
  • After that, type in “sysdm.cpl” in the field and tap Enter.
  • Next, go to the System Protection tab then click the System Restore button. This will open a new window where you have to select your preferred System Restore point.
  • After that, follow the on-screen instructions to finish the process and then restart your computer and check if the problem is fixed or not.

Option 4 – Try running the Hardware and Devices Troubleshooter

The next thing you can do to fix the problem is to run the Hardware and Devices troubleshooter. Although it won’t make much of a difference, there’s still a possibility that it could automatically fix the Bluetooth error. To use it, refer to these steps:
  • The first thing you need to do is click on Start and then on the gear-like icon to pull up the window for Settings.
  • After opening Settings, look for the Update and Security option and select it.
  • From there, go to the Troubleshoot option located on the left-hand side of the list.
  • Next, select Hardware and Devices from the list and open the Troubleshooter and run it. Once it is doing its job, wait for it to complete the process and then restart the system.
  • After the system restarts, check if the problem’s now fixed. If not, refer to the next option given below.

Option 5 – Try to reinstall or update the Bluetooth driver

The issue might have something to do with the Bluetooth drivers. It could be that it is outdated and needs to be updated or that you recently updated it and since then you have trouble removing the Bluetooth devices and so to fix the issue, you can update, roll back or uninstall the Bluetooth drivers. How? Follow the steps below.
  • Tap the Win + X keys to open the Device Manager.
  • Next, look for the Bluetooth device and right-click on it.
  • Select the option “Update driver”.
  • After that, a new popup window will appear. In there, select the option, “Search automatically for updated driver software”.
Note: Checking the update may take a few minutes so you’ll have to wait until it finishes. If it is able to find an update, you must install it. And if you want to reinstall the Bluetooth driver, just select the “Uninstall driver” option and follow the next on-screen instructions that follow.
Read More
How to do Disk cleanup in Windows 10
Disk cleanup is part of Windows 10 tools and it is essential in keeping your computer up and running in optimal settings and to free so much needed space as well as remove temporary files that can accumulate over time. Using disk cleanup from time to time is recommended and a very useful habit that will save you some headaches and optimize your computer running time, speed up boot sequence, etc. Think of it like cleaning up your desk, from time to time it can get too overwhelmed with junk and non-important things and if you are keeping it tidy all the time each time you need to find something it will be much faster and easier, same goes with computers, so if you do not have it, try to develop a habit that once per month you start disk clean up and remove trash from your hard drive. In order to do so, press ⊞ WINDOWS + E to bring File Explorer up Keyboard with windows and e markedOnce File Explorer is up and running right-click on the hard drive you wish to run disk cleanup on and click on properties. file explorer hd propertiesProperties Windows will open on the general tab, on that tab you have disk cleanup on the lower right part of properties, click on it. local disk properties cleanupWait for Windows to gather information about your hard drive and files on it. After it is finished you will be greeted with the next screen: disk cleanup section chooserHere you can thick and mark which items you would like to get rid of and which ones you would like to keep. Note that you can freely tick all of them and remove them since removing these files will not break WIndows in any way. make your choices and click on ok. You can also click on Clean up system files to run system files cleaner and get rid of junk there, you will not be able to choose any options there, Windows will alone clean up what is not needed. After disk cleanup is finished least thing you will have is more free disk space, but like mentioned, keeping your Windows and computer healthy goes a long way in its usability, speed, and performance.
Read More
Restoring accidentally deleted system files
There are times when we delete a system files without meaning to on your Windows 10 computer. This happens a lot for users sometimes mistake a system file for a malware-laden file or junk file when it’s actually a system file from the System32 or SysWOW64 folder. In such cases, it could affect your computer. For instance, you might not be able to reboot your PC or open Settings. If you have removed system files from any of these folders by accident and you desperately want to restore them, read on, as this post will guide you in resolving the problem. Restoring them isn’t actually hard, just make sure that you have system admin access. The good thing is that there exists Windows Resource Protection which protects registry keys and folders and even critical system files. So if there are any detected changes to a protected system file, the modified file is restored from a cached copy located in the Windows folder. However, if the Windows Resource Protection program fails to restore these files, you need to check out the given fixes below.

Option 1 – Run System File Checker scan

To restore the system files you deleted, you can try running System File Checker or SFC scan. System File Checker is a command utility built into your computer that helps restore corrupted files and missing files. Refer to the following steps to run it:
  • Boot your PC into Safe Mode.
  • Hit the Win + R keys to launch Run.
  • Type in cmd in the field and tap Enter.
  • After opening Command Prompt, type in sfc /scannow
The command will start a system scan which will take a few while before it finishes. Once it’s done, you could get the following results:
  1. Windows Resource Protection did not find any integrity violations.
  2. Windows Resource Protection found corrupt files and successfully repaired them.
  3. Windows Resource Protection found corrupt files but was unable to fix some of them.
  • Reboot your computer.

Option 2 – Try to run the DISM tool

Aside from System File Checker, you can also run the DISM or Deployment Imaging and Servicing Management Tool as it could help in restoring the system files on your Windows 10 computer. Using this built-in tool, you have various options such as the “/ScanHealth”, “/CheckHealth”, and “/RestoreHealth” which could help you resolve the problem.
  • Open the Command Prompt with admin privileges.
  • Then type in the following commands and make sure to hit Enter right after you type each one of them:
    • Dism /Online /Cleanup-Image /CheckHealth
    • Dism /Online /Cleanup-Image /ScanHealth
    • exe /Online /Cleanup-image /Restorehealth
  • Do not close the window if the process takes a while as it will probably take a few minutes to finish.

Option 3 – Try performing a System Restore

Running System Restore can also help you bring back the system files. You can do this option either by booting into Safe Mode or in System Restore. If you are already in the Advanced Startup Options, just directly select System Restore and proceed with the next steps. And if you have just booted your PC into Safe Mode, refer to the steps below.
  • Tap the Win + R keys to open the Run dialog box.
  • After that, type in “sysdm.cpl” in the field and tap Enter.
  • Next, go to the System Protection tab then click the System Restore button. This will open a new window where you have to select your preferred System Restore point.
  • After that, follow the on-screen instructions to finish the process and then restart your computer and check if the problem is fixed or not.

Option 4 – Try to run Automatic or Startup Repair

Startup Repair, previously known as Automatic Repair, is an advanced tool in Windows that can help you diagnose various system issues, including this one. This tool will scan system files, configuration settings, registry settings, and so on in order to fix the problem on its own. To run Startup Repair, all you have to do is boot into the Advanced Startup Options and then go to Troubleshoot > Advanced option > Startup Repair and then run it. This will resolve the problem if you have deleted any system file that’s essential to your Windows 10 PC.

Option 5 – Reset your computer

  • Tap the Win key or click on the Start button located in the Taskbar.
  • Then click on the Power button at the bottom right portion of the screen.
  • Next, press and hold the Shift key on your keyboard and then click on Restart. This will restart your Pc into the Advanced Startup options.
Note: Once you have access to the Advanced Startup options, you have to go to the setting which allows you to Reset your Windows 10 PC. All you have to do is select Troubleshoot > Reset this PC to reach the following screen Afterward, select either the “Keep my files” option and then proceed to the next on-screen instructions that follow to reset your Windows 10 computer without losing your files.
Read More
Headphone jack is not working on a laptop
In some cases, a couple of Windows 10 laptops, especially the newer ones that run the NVIDIA RTX series GPUs have been experiencing some problems, particularly with their headphone jacks which seem to be malfunctioning even though the internal speakers works just fine. And despite having all the drivers updated to their latest versions, the problem still occurs. According to security experts, this kind of problem occurs on laptop computers that are manufactured by MSI and since there is still no workaround or reliable fix released by the company, in this post you will be guided on how you can resolve the problem with the headphone jack. So if you are using a laptop made by MSI and are experiencing the same issue, then you’ve come to the right place. There are several potential fixes you can check out to resolve the problem, you can try to force reboot your computer or clean your headphone jack and then plug it back in properly. In addition, you could also try to update your Audio drivers or set your headphone as default. For more information, follow each one of the given options below.

Option 1 – Try to force reboot your computer

The first thing you can do is to force reboot your computer as this simple fix could help in fixing the problem. This option is quite simple, just make sure that before you do it, you have to save all your work.
  • First, turn on your computer and press and hold the power button for at least 30 seconds. You might notice the screen flashing or making any changes, just ignore it.
  • After that, plug out and plug in your computer and automatically turn it on.
  • Once done, check if the headphone jack is now working fine.

Option 2 – Try to clean the headphone jack and plug it properly

The next thing you can do to fix the problem is to clean your headphone jack and plug it back in properly. Make sure that you use a cotton swab in cleaning the headphone jack as there are instances where some dust might have settled in the port which results in issues like your headphone jack no working.

Option 3 – Try to update, rollback or reinstall the Audio driver

If the glitch in your audio has something to do with software, chances are it might be related to the audio driver – it could be that the newest version of your Windows 10 does not work well with the old version of the driver. This is why you have to update your audio driver to the newest available version.
  • Tap the Win + R keys to open the Run dialog box and then type in MSC and tap Enter or click OK to open the Device Manager.
  • Expand the section for the outdated device drivers.
  • And then select the outdated driver(s) and right-click on it/them.
  • From the drop-down menu, select the Update Driver option and follow the on-screen instructions to install the latest version of the driver.
  • Then also click on the option, “Search automatically for updated driver software.
  • Restart your PC after the installation.
Note: If updating or reinstalling the Audio driver didn’t work, you can go to the website of MSI and look for the support section where you can download the drivers for your computer. You just need to take note of your PC’s correct model and model number so you can find the appropriate driver.

Option 4 – Try to set the headphone as the default device manually

There are times when you plug a headphone, it does not toggle the default audio device. Thus, to fix this issue, you have to set the default audio device to the headphones manually. To do that, follow these steps:
  • First, right-click on the volume icon located on the system tray.
  • Next, select the Open sound settings option to open the Sound section in the Windows 10 Settings app.
  • From there, select the Control Panel for Sound on the rightmost column. This will open a new mini window.
  • After that, select your headphone under the Playback tab and click on the Set default button.
  • Once done, click on Apply and then OK buttons to save the changes made.

Option 5 – Try to run the Playing Audio Troubleshooter

Since the Windows 10 operating system has the Playing Audio Troubleshooter, you can use this troubleshooter to try and fix the problem with the headphones. You can access this tool in the Control Panel or in the Taskbar Search and even on the Troubleshooters page of Windows 10.
Read More
Enable or Disable Optional Windows Features
As you know, Windows operating system comes with tons of features. Some of which are not intended to be used by normal customers or users directly which means that only a small percentage of the huge user base of the operating system leverages the use of such features. However, they’ve added some major value to the feature list of the operating system. You can find these features under the “Turn Windows Features on and off” option. This indicates that if you want to, you can just type in “Turn Windows Features on and off” in the search box and then enable any feature that you want to enable. Aside from that, there are other ways you can disable or enable the optional Windows Features in your Windows 10 computer.

Option 1 – via Control Panel

  • Open Control Panel and select Uninstall a Program.
  • After that, select the “Turn Windows features On or Off” option on the left side.

Option 2 – via Command Prompt

  • Tap the Win + X combination on your keyboard or right-click on the Start button and then click on Command Prompt (Admin). Alternatively, you can also type “cmd” in the Cortana search box and right-click on the Command Prompt icon, and select the “Run as administrator” option.
  • If a User Account Control or UAC prompt appears, click on Yes.
  • Next, type in the following command to see the list of the available features.
DISM /online /get-features /format:table | more
  • Now all you have to do is copy the name of the feature that you want to enable and for you to do that, you need to execute the following command:
DISM /online /enable-feature /featurename:[Enter the name of the feature here] –All
Note: Now if you want to disable a feature that’s already enabled in your computer, refer to these sub-steps:
  • First, you need to check what features are enabled, and for you to find out, enter this command: DISM /online /get-features /format:table | find “Enabled" | more
  • And if you want to check the detailed information about a particular feature, you can enter this command: DISM /online /get-featureinfo/featurename:[Enter the name of the feature here]

Option 3 – via Windows Powershell

As you know, the Windows Powershell is a very important tool in Windows 10, and a powerful one at that since you can do a lot of things using this command line. So while you use this tool you need to populate the list of available features first and then you have to download the feature your desired feature.
  • Search for PowerShell in the Cortana search box and then run it with administrator privileges.
  • Next, type in the following command to populate the list of available features:
Get-WindowsOptionalFeature –Online
  • After that, enter the following command to install any feature you want to enable from the list of available features:
Get-WindowsOptionalFeature -Online -FeatureName *Type feature name*
  • Now enter the following command to enable your desired feature:
Enable-WindowsOptionalFeature -Online -FeatureName “Type feature name” –all
  • And if you want to disable any enabled feature, just enter the following command:
Disable-WindowsOptionalFeature -Online -FeatureName “Type feature name”

Option 4 – via an external installation source

You also have the option to fetch the latest features from an updated offline source. The source could be an ISO any other type of image or just a folder. So you need to decide if you want to use Windows Powershell or Command Prompt.
  • If you want to use Command Prompt, just enter this command: exe /online /enable-feature /featurename:< /All /Source:<Enter the path of the feature here>
  • If you want to use Windows Powershell, use this command: Install-WindowsFeature –Source “<Enter the path of the feature here>”
Note: If you want to get the latest features, you need to get the latest version of the image of the operating system that you are trying to install the feature from.
Read More
How to Disable Restart in Firefox
Mozilla Firefox has introduced a new feature known as Restart with Windows which allows the browser to automatically start when your Windows 10 computer boots. This means that if you leave the Firefox browser opened while shutting down your computer, Firefox will re-open automatically along with the tabs that were opened right before you shut down your computer. Although some users may find this feature convenient, there are others who do not approve at all as it could be a nuisance. So if you’re one of the latter, then read on as this post will show you how you can disable the Restart with Windows feature in the Firefox browser on your Windows 10 computer. Refer to the instructions laid out below to get started.
  • Step 1: Open Mozilla Firefox and if it’s opened already, just open a new tab and then type the following text in the address bar:
about:config
  • Step 2: After typing the text given above, hit Enter and if a prompt with a warning message pops up, simply click on the “I accept the risk!” button to proceed.
  • Step 3: Next, type “Restart” in the search filter which should display the following preference in the window:
“toolkit.winRegisterApplicationRestart”
  • Step 4: After that, check for the preference value and then see if it’s set to true or not. If it is set to true, then it means that the Restart with Windows feature is enabled so obviously, to disable it, you need to set its value to false.
  • Step 5: Now restart your computer without closing Firefox. After restarting your computer, you should no longer see Firefox starting automatically.
The Restart with Windows feature by default is disabled for most users. On the other hand, Mozilla will have this feature enabled as the default configuration in the coming weeks so it’s best that you now know what to do when that time comes since the newer versions of Mozilla Firefox are already being shipped with the Restart with Windows feature. However, if this post did not help you, then you might want to check if the feature has been added to the Startup folder, and from there, you can disable this startup program using the Task Manager > Startup tab.
Read More
Can’t drag and drop files or folders
Why Can’t drag and drop files or folders happens? In case you don’t know, there is a feature in Windows 10 called drag and drop that can help you move or copy files or even folders from one location to another. This feature is useful and can help you move or copy folders and files easier and quicker. However, if you encounter some problem while using this feature, worry not for this post will guide you on what you can do to resolve the problem. There are several suggestions you can check out to fix the problem. You can try to simply tap the Esc key or you could also troubleshoot the problem in a Clean Boot State. Aside from that, changing the drag height and width or disabling the User Account Control via Registry Editor might also help. For more details, refer to the instructions laid out below.

Option 1 – Try to tap the Esc key

According to some users who experienced the same dilemma, by simply tapping the Esc key, they were able to resolve the problem. All they did was tap the Esc key before they drag and drop the folder or files. Thus, you can try doing the same thing as it might also work for you. After you tap the Esc key, you have to check all the background applications and if you see some that could be related to the hotkeys or keyboard, you might have to disable or remove them. Once done, check if the problem is fixed or not.

Option 2 – Try troubleshooting the problem in a Clean Boot State

There are some instances that some conflicting programs installed in your computer might be the reason why you’re having trouble using the drag and drop feature in Windows 10. To identify which program is causing the problem, you need to put your computer in a Clean Boot State. To do so, follow the steps below.
  • Log onto your PC as an administrator.
  • Type in MSConfig in the Start Search to open the System Configuration utility.
  • From there, go to the General tab and click “Selective startup”.
  • Clear the “Load Startup items” checkbox and make sure that the “Load System Services” and “Use Original boot configuration” options are checked.
  • Next, click the Services tab and select the “Hide All Microsoft Services” check box.
  • Click Disable all.
  • Click on Apply/OK and restart your PC. (This will put your PC into a Clean Boot State. And to configure Windows to use the usual startup, just simply undo the changes.)
  • From there, start to isolate the problem by checking which one of the programs you installed recently is the root cause of the problem.

Option 3 – Try changing the drag height and width

The next thing you can do to resolve the issue is to try changing drag height and width by following these steps:
  • Tap the Win + R keys to launch the Run utility and type “Regedit” in the field and then tap Enter to open the Registry Editor.
  • Next, navigate to this registry key: HKEY_CURRENT_USERControl PanelDesktop
  • From there, choose to modify both the “DragHeight” and “DragWidth” located on the right pane.
  • After that, change the value to a very high number. Note that these values are nothing but pixel size to drag and drop folders or files.

Option 4 – Try disabling the User Account Control or UAC via Registry Editor

  • Tap the Win + R keys to launch the Run utility and type “Regedit” in the field and then tap Enter to open the Registry Editor.
  • After that, navigate to this registry key: HKEY_LOCAL_MACHINESOFTWAREMicrosoftWindowsCurrentVersionPoliciesSystem
  • From this path, modify the value of “EnableLUA” from 1 to 0. This should disable the UAC in your Windows 10 computer.
Read More
Windows SmartScreen can’t be reached right now
SmartScreen is a cloud-based anti-phishing and anti-malware component that’s come packed in all Windows 8 (8.1) and Windows 10 versions. This security component is also used in several browsers and programs like Internet Explorer, Microsoft Edge and Outlook.com. Although this program is quite useful, there’ve been reports that SmartScreen is apparently blocking Microsoft’s own apps from opening. According to some users, they only get the “Windows SmartScreen can’t be reached right now” error message every time they try to open apps from the built-in Windows suite like Photos, Mail, Alarms, Maps, etc. Whenever Windows SmartScreen is either down or unreachable on an end-user PC, your computer won’t be able to download anything in both official and unofficial channels. This error might be due to a corrupted Windows account, or it could be that SmartScreen is disabled from the Windows Defender Security Center or it might be down due to an MS issue. In addition, the error might also be caused by a proxy entry.

Option 1 – Make sure that SmartScreen is enabled

Before anything else, the first thing you must do is to check if SmartScreen is even enabled as it might be the reason why you’re getting the error. You can verify this by simply going to the Windows Defender Security Center. To do so, follow the steps below.
  • Tap the Win + R keys to open the Run dialog box.
  • Next, type “ms-settings:windowsdefender” in the field and hit Enter to open the Windows Defender Security Center.
  • After that, click on the Open Windows Defender Security Center button located under Windows Security.
  • Then click on App & browser control.
  • From there, make sure that the Check apps and files toggle is set to Warn and then check the same thing for Microsoft Edge and SmartScreen for Microsoft Store apps.
  • If it turns out that SmartScreen is indeed disabled, you have to restart your computer after making some changes and then check if the issue is fixed upon the next startup.

Option 2 – Check if SmartScreen is down for maintenance

Another possible reason why SmartScreen is not working is that it might be scheduled for maintenance. When SmartScreen is scheduled for maintenance, it will become unreachable for a lot of users at the same time and so before you go over unnecessary troubleshooting steps, you need to verify if SmartScreen is down for maintenance or not.

Option 3 – Try to disable the proxy server

If applicable, you can try to disable the proxy server to fix SmartScreen. There are some users who reported that they’ve fixed the problem after they’ve disabled the use of a proxy server using the built-in way. In some instances, certain proxy servers can interfere with the SmartScreen component and cause it to become unusable. However, if you are not using a proxy server, just skip this option and proceed to the next one, otherwise, follow the steps below to disable the proxy server.
  • Tap the Win + R keys to open the Run dialog box.
  • Next, type “ms-settings:network-proxy” in the field and hit Enter to open the Proxy tab under Settings.
  • After that, scroll down to the Manual proxy setup and make sure that the toggle button of the “Use a proxy server” option is turned off.
  • Now restart your PC and check if the problem is fixed upon the next startup.

Option 4 – Try to create a new Windows user account

There are some users who were able to fix the problem by simply creating a new Windows user account. Although this solution will make you lose a couple of settings enforced through your user account, it’s actually effective in circumventing the “Windows SmartScreen can’t be reached right now” error. To create a new Windows user account, here’s what you have to do:
  • Tap the Win + R keys to open the Run dialog box.
  • And then type “ms-settings:otherusers” in the field and hit Enter to open the Family & other people tab under the Accounts menu.
  • After that, click on the “Add someone else to this PC” option and then click on “I don’t have this person’s sign-in information.
  • Next, insert the user credentials like emails, password, birth date, etc., and then click Next. Take note that if you want to create a new local user account, just click on Add a user without a Microsoft account.
  • After you’re done creating the new Windows user account, click the start icon and then click the account icon and choose to Sign out.
  • After you’re logged in, check if SmartScreen now works properly or not.
Read More
1 2 3 162
Logo
Copyright © 2022, ErrorTools. All Rights Reserved
Trademarks: Microsoft Windows logos are registered trademarks of Microsoft. Disclaimer: ErrorTools.com is not affiliated with Microsoft, nor claim direct affiliation.
The information on this page is provided for information purposes only.
DMCA.com Protection Status