How to Fix Error Code 0xC004C770

How to Fix Error Code 0xC004C770

Error Code 0xC004C770 – What is it?

If the Error Code 0xC004C770 popped up on your computer during your activation of the Windows 10 software, don’t worry. This is a fairly common error, especially for people who own more than one computer upon which Windows 10 is installed and activated. The gist of this error code is that the product key that you have entered has already been claimed or used on a different computer. Because there are limitations on the number of computers that can use any given license activation code or product key, this error code can arise when you have exceeded that limit. If you have a single-use license and have already entered the particular product key onto another machine, you may see this error come up during activation.

Both Error Code 0xC004C770 and Error Code 0x803FA071 arise from the same problem and the same steps can be used to resolve both error codes.

Solution

Restoro box imageError Causes

Error Code 0xC004C770 is likely to appear on your screen during activation of Windows 10 if you or anyone else in your organization have already entered in the product key used on another computer. If you have a multiple-use license, the product key that you are entering may already have been used for the maximum number of computers allowed under that license.

Further Information and Manual Repair

There are two basic methods for addressing the issues associated with Error Code 0xC004C770. These methods can easily be implemented by anyone who is comfortable interacting with the Windows Store from their computer, which makes the resolution of this particular error code fairly simple and straightforward.

If you are unable to complete the steps below or Error Code 0xC004C770 has not been resolved after following the guides below, contact a Windows technician who is familiar with the Windows 10 activation process to assist you in the process. You can also get in touch with the Windows technical support team to assist you in the process if needed.

Method One: Purchase A New Product Key from Windows

If you have already used the product key on another computer or have used it on the maximum number of allowed devices, you may need to purchase an additional product key for the computer with Error Code 0xC004C770. Product keys can be purchased physically from a retailer that sells Windows 10 software licenses or purchased directly from the Windows store.

To purchase a new product key directly from the Windows Store, follow the steps below:

  • Step One: Select the Windows start button at the bottom of your toolbar. Click on “Settings,” then select the option for “Update and Security.”
  • Step Two: Click on the “Activation” option.
  • Step Three: In the menu that appears, choose the option to “Go to Store” and follow any on-screen instructions to finalize a purchase of the Windows 10 software and product key.
  • Step Four: Use the new product key to complete the installation and activation of the Windows 10 software on your computer.

If you are unable to see the “Go to Store” option when you reach the “Activation” page, you may not be set as an administrator of your machine. In this case, get in touch with the support personnel from your company to complete the purchase, installation, and activation process on your computer.

Method Two: Attempt to Finish Activation via Phone

For users who have changed out parts of their computer’s hardware, like putting in a new motherboard or activating a new hard drive, you may have more success if you attempt activation through a phone.

In order to activate your copy of Windows 10 from your phone, follow the steps below:

  • Step One: On your mobile device, open up the search box from the taskbar.
  • Step Two: In the search box, enter the phrase “SLUI 04.”
  • Step Three: Select the “SLUI 04” option that appears.
  • Step Four: Follow the directions given on the screen to complete the activation process for your copy of Windows 10.

As with any error code resolution, if the methods above are not successful or if you are not comfortable with your ability to successfully complete the steps above, get in contact with a qualified professional who is trained in the Windows 10 activation process to assist you or download a powerful automated tool to get the job done.

If you like to learn and find out more about various Windows errors, and how to repair them go to our vast archive or use search to find articles that will explain and help you in solving your issue.
However, if you prefer to do things fast and with automatization then we are proposing to use an automated solution for your issues. The application that we are recommending is Advanced System Repair Pro
Advanced System Repair utilizes multiple tools all in one to give you a quick, simple, reliable, and very thorough diagnosis of your PC. It brings you all the tools you need in one program to clean, fix, protect, optimize and boost your PC!
1-Click Maintenance
All the tools to make it simple and easy! It's like having a professional technician at the click of a mouse.

Junk Cleaner
Keeping your computer free from unnecessary clutter also helps make your computer last longer. Like any other machine, if you keep it clean and take care of it, it will serve you better for longer!

Optimize background apps
Optimize applications background activity with the built-in Application Optimizer feature.

Disk Defrag
With a simple 1-click, Advanced System Repair speeds up your PC by assembling fragmented files on your machine and organizing them more efficiently.

Malware Removal
Finds and removes all types of harmful malware including trojans, worms, bots, adware, spyware, PUPs, and more!

Privacy Cleaner
The all-in-one privacy suite to Clean Your Tracks & Protect Your Privacy! Make your computer safe, secure, and more efficient!

System Tweak/Optimizer
ASR will analyze your complete system and settings to adjust your PC to function at its maximum performance.

Registry Cleaner
Over time, as you install and uninstall applications, the registry can become cluttered with old entries and broken settings which can result in program crashes, and annoying messages and slow the computer down.
Visit our Advanced System Repair Pro Download page to inform yourself about all the benefits of this software and get a free trial copy of it.
advanced system repair pro

Advanced System Repair Pro

One-click automated PC repair solution
ASR logo
With Advanced System Repair Pro you can easily
Replace damaged files
Restore performance
Free disk space
Remove Malware
Protects WEB browser
Remove Viruses
Stop PC freezing
DOWNLOAD
Privacy Policy | Terms of Use | Uinstall
Advanced System Repair Pro is compatible with all versions of Microsoft Windows including Windows 11

Share this article:

You might also like

Fix One Drive Error: This is not a valid file name
As you know, Microsoft’s consumer cloud storage platform is none other than OneDrive. It is where users can save any of their files albeit it’s mostly used to store common files like documents and photos. However, there are times when you might encounter some problems when saving these files. Recently, some users reported that they had problems saving Word documents to OneDrive and if you experience the same issue, then you’ve come to the right place as this post will guide you on how to resolve it. According to users who encountered the problem, when they try to save Word documents on OneDrive, an error message appears instead stating, “This is not a valid file name”. This kind of error only occurs when the file is opened from within OneDrive for saving in a different folder. In other words, if the file is saved in the same folder, the error won’t pop up but if it is saved in a separate folder, that’s when the error appears. Worry not though for fixing this error is not complicated and won’t take too long. It seems that this error is due to the 259-character limitation when creating and saving files as far as the Office products are concerned. To resolve it, there are several workarounds you can check out. Before you proceed with these workarounds, make sure that you have a stable internet connection.

Option 1 – Try renaming the file with a shorter name

The first thing you can do to fix the problem is to rename the file with a shorter name. Just right-click on the file and select the Rename option from the menu and then type in the new name and click OK or tap Enter to rename the file.

Option 2 – Try renaming the folders where the file is located

Like what you did in the first given option, all it takes is a right-click but this time on a folder. Rename the folder with a different name and save the changes made and then check if you can now save the Word document on OneDrive.

Option 3 – Try moving the file to a folder with a shorter path

If the first two options didn’t work, you can try moving the file to a folder with a shorter path. Note that it is not the same as doing it locally on a Windows 10 computer so you have to right-click on the file and select the “Move to” option. After that, locate the folder where you want to move the file and select it and then click on the Move button to complete the task.

Option 4 – Try making some changes in the document

You could also try to make some modifications to the document. Once you’ve done that, click the File tab and select the Save As option and then go to the folder where you want to save the file and tap enter.
Read More
Check Windows 11 UI inside your Browser
windows 11 website
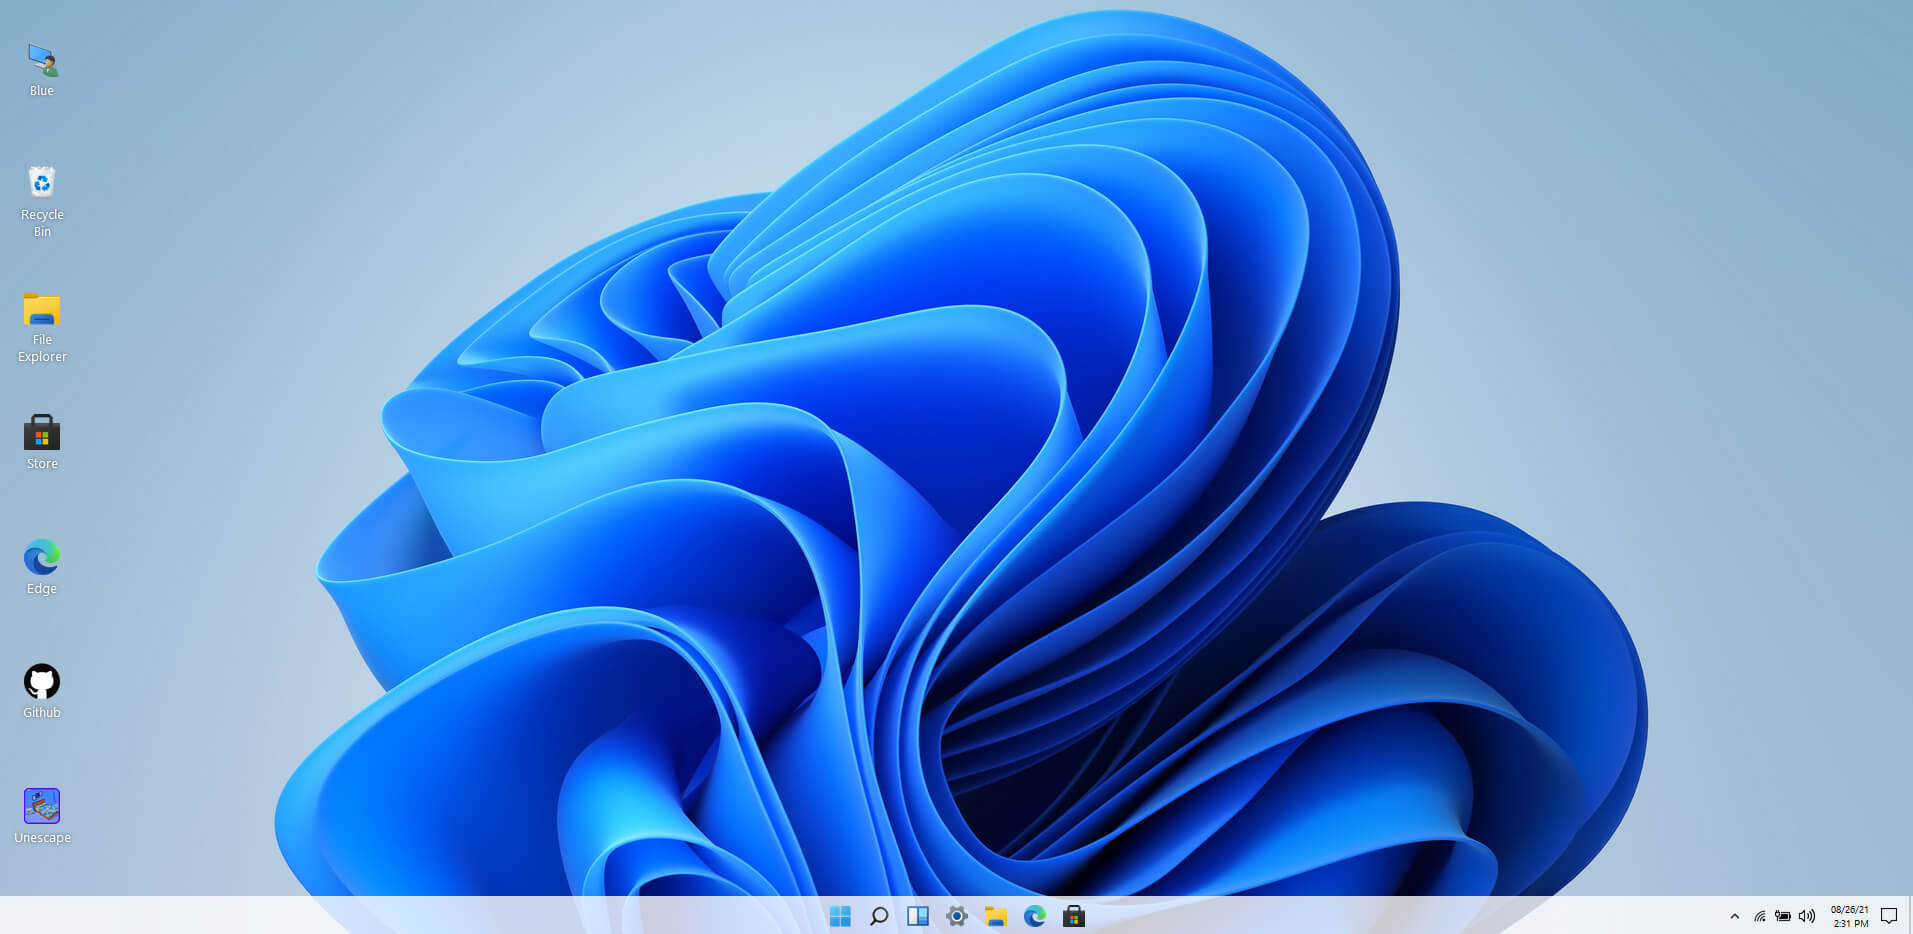
Windows 11 release date is closing in, some people have tried it via insider build, some have decided not to. It has come to our attention that there is a little website made by BlueEdge that offers a virtual Windows 11 desktop. Opening the Website will put you right inside Windows 11 desktop, now take note that this is not Windows 11, it is a simulation of Microsoft’s newest OS and therefore many things will not work like File Explorer, etc. One thing you can make sure it is working is UI itself, you can see how you do like the new Taskbar, start menu, widgets, and some other things. You can just pop up on the site and check how you do like the overall new look and feel of Windows 11 UI before installing it or trying it. We are sure that many more options will come in time but even now you can get a feel of the newest OS. Windows 11 BlueEdge site: https://win11.blueedge.me/
Read More
Fix Chrome ERR_SOCKET_NOT_CONNECTED
Recently, a number of users reported an error in Google Chrome that says, “ERR_SOCKET_NOT_CONNECTED”. If you are one of these users, read on as this post will guide you in resolving this error. This kind of error in Chrome is kind of vague so it could be caused by a couple of factors like DNS server issues, Socket Pools, third-party plugins or extensions, and many more. Whatever the cause may be, there are several options you can check out to resolve the problem. You can try to flush the Socket Pool or change the DNS address or remove unwanted extensions or reset your Google Chrome browser.

Option 1 – Try to flush the Socket Pool

  • Open Google Chrome and in the address bar, type “chrome://net-internals/”.
  • After that, select Sockets on the left side panel.
  • Next, select Flush socket pools from the right-side panel.
  • And once it’s done, restart your Chrome browser and check if the “ERR_SOCKET_NOT_CONNECTED” is fixed or not.

Option 2 – Try to change the DNS Server

In this option, you can try changing your current DNS settings to the Google Public DNS as it could also help in fixing the “ERR_SOCKET_NOT_CONNECTED” error. To do so, follow the steps below.
  • The first thing you have to do is right-click on the network icon in the Taskbar and select Network and Sharing Center.
  • Next, click on the “Change Adapter Settings” option.
  • After that, search for the network connection that you are using to connect to the internet. Note that the option might be “Wireless Connection” or “Local Area Connection”.
  • Right-click on your network connection and click on Properties.
  • Then select the new window to choose the “Internet Protocol 4 (TCP/IPv4)” option.
  • After that, click on the Properties button and click the checkbox in the new window for the option “Use the following DNS server addresses”.
  • Type in “8.8.8.8” and “8.8.4.4” and click OK and exit.

Option 3 – Get rid of any conflicting browser extensions

  • Open Chrome and press Alt + F keys.
  • Go to More tools and click Extensions to look for any suspicious browser extensions or toolbars.
  • Click the Recycle bin and select Remove.
  • Restart Chrome and press Alt + F keys again.
  • Proceed to On Startup and mark Open a specific page or set of pages.
  • To check if the browser hijacker is still active, click Set pages, if it is active, overwrite the URL.

Option 4 – Try to reset Google Chrome

Before you proceed, make sure that the Chrome browser is not running anywhere in the background via Task Manager. Once you’ve made sure that it’s no longer running, refer to these steps:
  • Tap the Win + R keys to open the Run dialog box.
  • Then type “%USERPROFILE%AppDataLocalGoogleChromeUser Data” in the field and tap Enter to open this location.
  • From there, look for the Default folder and then tap the Shift + Delete button and if a confirmation prompt appears, click on Yes.
  • After deleting the Default folder, open Google Chrome and click on the three vertical dots icon located in the top-right corner to open the menu.
  • Next, click on Settings and scroll down and then click on Advanced to open the Advanced Settings.
  • Then scroll down until you see the “Reset and clean up” section and click the “Restore Settings to their original defaults” option.
  • After that, you will see a confirmation box and from there, click on the Reset settings button to reset your Google Chrome browser.
Read More
How to Fix the AVFoundationCF.dll Error on Your PC

AVFoundationCF.dll - What is it?

AVFoundationCF.dll is a type of Dynamic Link Library file. This DLL file is associated with AVFoundationCF and is developed by Apple Computer Inc. for Windows PC. This file functions similarly to any other DLL files. It comprises of small programs. This DLL file is typically needed to load and start the Apple iTunes utility. The inability to call this file or the files to load triggers the AVFoundationCF.dll error message on your system. The error message can be displayed in either of the formats on your PC:
“The program can’t start because AVFoundationCF.dll is missing from your computer. Try reinstalling the program to fix this problem.” "This application failed to start because avfoundationcf.dll was not found.” "Cannot find %COMMONFILES%AppleApple Application Supportavfoundationcf.dll." "Cannot start AVFoundationCF. A required component is missing: avfoundationcf.dll.” “Avfoundationcf.dll Access Violation." "Cannot register avfoundationcf.dll."

Solution

Restoro box imageError Causes

AVFoundationCF.dll error can occur due to numerous reasons. However, the most common reasons for this error code include:
  • Viral infection
  • Corrupt or invalid registry entries
  • Apple Computer Inc. hardware failure such as bad hard drive
  • Missing or deleted Avfoundationcf.dll file
It is recommended to resolve the error as soon as you experience it virtually because if the error code is related to viral infection on your system, it can expose your PC to privacy errors and data security risk. And if the error is triggered by registry issues, it can lead to serious threats like system crash, failure, and data loss. Therefore, the AVFoundationCF.dll error not only hampers your ability to access and start Apple iTunes program but it also puts your PC at serious risk.

Further Information and Manual Repair

To fix the error AVFoundationCF.dll on your PC, here are some of the best and easy to do solutions that you can try:

Check your Recycle Bin

Since dll files are shared files, there is a possibility that this file accidentally got deleted when you were uninstalling some other program on your system. If you experience missing AVFoundationCF dll file error message after performing any program on your PC, then chances are that it got deleted and maybe in your recycle bin. So, first, check your recycle bin and search for the dll file. If you find it, restore it to fix the error.

Update Device Driver

To resolve the issue, try performing a driver update. This can be done by downloading the latest drivers from the hardware manufacturer’s website. Now open Device Manager from the Control Panel and locate the hardware device that you want to update the driver for. Once you find the hardware you are updating the driver for, right-click on the hardware icon and choose properties. In the properties windows, click the driver tab. Now click the update driver button. To activate changes, restart your PC. To automatically update your computer's drivers when necessary, download and install DriverFIX.

Try Re-installing Apple iTunes Program

To do this, simply go to the control panel, select programs and then uninstall a program and then select iTunes.  Uninstall it and then repeat the same program and install the Apple iTunes program again on your PC by downloading the program from Apple’s official website.

Scan for Viruses

If the error still persists, then it is advisable to scan your PC for viruses. This can be easily done by running a powerful antivirus on your PC. However, please note anti-viruses are notorious for slowing down PC performance. So, may have to compromise on the speed of your system.

Clean and Repair the Registry

If the error is caused by invalid and corrupt registry entries and damaged Avfoundationcf dll file, then the best way to resolve is to download a powerful registry cleaner. We advise you to install Restoro on your PC. This is an advanced and a multi-functional PC Fixer integrated with multiple powerful utilities including a high functional registry cleaner, an antivirus and a system optimizer. The registry cleaning utility scans all the registry issues and removes all errors triggered by the registry immediately. It cleans the registry by wiping out all the unnecessary, obsolete and redundant files including invalid entries and bad registry keys. Furthermore, it also fixes the damaged and corrupt dll files including Avfoundationcf dll file. Thereby resolving the error right away. Furthermore, the antivirus deployed in this software scans for all types of malicious codes like viruses, Trojans, spyware, and malware and removes them. To ensure you don’t compromise on your PC performance, it is deployed with a system optimizer utility that boosts the speed of your computer dramatically. This tool is bug free, has a user-friendly interface and compatible with all Windows versions. Click here to download Restoro and resolve Avfoundationcf.dll error on your PC today!
Read More
Expand right-click menu in Windows 11
Windows 11 brought with it a simplified right-click menu that has limited options. If you would like to bring the old Windows 10 right-click menu you will have to do some registry tweaking but it is doable. right click menu
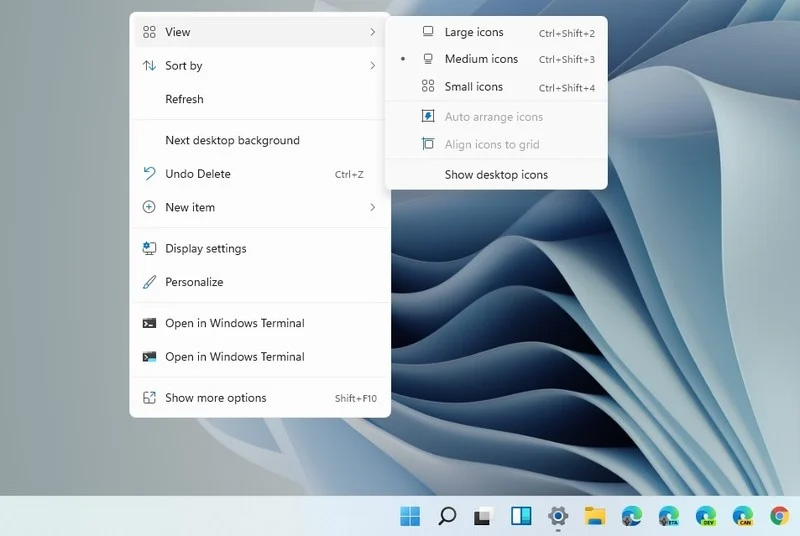
Since this requires registry tweak, please follow given solution step by step
  1. Press Start and type RegEdit
  2. Click on Registry Editor
  3. Inside registry editor find next key: Computer\H_KEY_CURRENT_USER\SOFTWARE\CLASSES\CLSID\
  4. Right click in the right part of editor window and select New > Key
  5. Type in as a name: {86ca1aa0-34aa-4e8b-a509-50c905bae2a2}
  6. Right click on {86ca1aa0-34aa-4e8b-a509-50c905bae2a2} key and select New > Key again to create new key inside this one
  7. Name inside key InprocServer32
  8. Double click the “(Default)” key in InprocServer32 to open it
  9. When the Default key opens close it without making any changes by clicking on OK. This will make its value property Blank instead of value not set
  10. Close Registry Editor
  11. Restart your PC
Once the system is up if the followed solution is applied you will now have an old school menu once right-click is used.
Read More
Windows 10 tips and tricks for easy work
Hello everyone and welcome to our new Windows 10 tips and tricks article. Today we will be focusing on small Windows tricks that could prove very useful in everyday workflow and hopefully make your life easier by implementing them in your daily routine. I am very excited to share this with you all and I hope that you will use them from now on. That being said let us begin.

Tip 1: Minimize all open windows except one.

Daily to the daily routine can involve many opened windows on a desktop and sometimes things can get messy, if you want to minimize all windows to the taskbar except one do this: Click on one window thus selecting him, click and hold the left mouse button on that windows title bar, now shake it up and down and all other windows will escape down to taskbar leaving only one you are shaking on the desktop.

Tip 2: Open the Secret Windows menu.

Through our tutorials on various errors and fixes, we have used this method already but here it is again since it is worth mentioning. If you want to open the command prompt easy and fast, or device manager, event viewer, shut down, etc. In order to open this secret menu all you need to do is press ⊞ WINDOWS + X.

Tip 3: Create an Event without opening the calendar application.

You can easily create an event without opening a calendar application, all you have to do is left-click on the clock in the taskbar, click once on a date for the event, and under calendar in event field type event description. The event will show in the calendar application like it was entered there.

Tip 4: Taking a screenshot.

This one is my favorite and it speeds up workflow very very much. Typically you take screenshots by pressing the PrntScr button on your keyboard. Now, the problem with this approach is that the screen is placed in computer memory, in the clipboard and you will need another picture processing application in order to save it. Now if you would press ⊞ WINDOWS + PrntScr, the picture would be automatically saved in your pictures/screenshots folder. And if that is not enough, you can press ⊞ WINDOWS + S + SHIFT to start Snip & Sketch tool and select the area which you would like to screen capture, this method will also place pictures in the clipboard.

Tip 5: Open pinned applications in your taskbar with your keyboard.

We have covered this one in our Windows keyboard shortcuts tips and tricks here, but if you missed that article here is the tip again. By pressing ⊞ WINDOWS + number 1,2,3...0 you will start the application from your taskbar counted from left to right.

Tip 6: Check how much Hard drive space installed applications are taking.

Applications and temporary files grow over time and can slow the system and cause some other unpleasant experiences. Go to Settings > System > Storage, click on the Hard drive on which you have installed applications, and see how much each one is taking, you can remove it from this screen also freeing some space.

Tip 7: Remove ads from the START menu.

Windows has so-called suggestions in the START menu, no matter how Microsoft is calling them, let's face it, they are ads and in my opinion, they do not belong in my START menu. To turn them off, go to Settings > Personalization > Start. Toggle the setting called Show suggestions occasionally in Start to the off position.

Tip 8: Shut down background applications.

Some applications are running in the back and are taking system resources and can send telemetry information, if you want to turn them all off go to Settings > Privacy > Background apps. To stop all apps from running in the background, toggle Let apps run in the background to off. You can choose which apps to run in the background individually by going down the list on the same page.

Tip 9: Use Background scrolling.

Did you know that you can scroll on inactive windows? To do this, just hover over the inactive background window and roll your mouse when the content of the window should be scrolling even if it's not one you are working on. If by any chance this is not happening, go to Settings > Devices > Mouse, and toggle Scroll inactive windows when I hover over them to On.

Tip 10: Show file extensions in File Explorer.

By default extensions of files are hidden, so let's say that for example, you are in a folder with pictures, you have plenty of pictures there but you do not know are they JPG or JPEG for example, do not worry there is an easy fix to bring showing extensions back. Start File Explorer, click on view top menu item, click on options, Uncheck the box that says Hide extensions for known file types. Click Apply, and OK.

Tip 11: Use focus assist.

Set it up by going to Settings > System > Focus assist. Choose from three options: Off (get all notifications from your apps and contacts), Priority (see only selected notifications from a priority list that you customize, and send the rest to your action center), and Alarms only (hide all notifications, except for alarms). You can also choose to automatically turn this feature on during certain hours, or when you're playing a game.

Tip 12: Rotate your screen.

If you have multiple screens set up or you have the rotatable screen press and hold CTRL + ALT together, then use a directional arrow to flip the screen. The right and left arrows turn the screen 90 degrees, while the down arrow will flip it upside down. Use the up arrow to bring the screen back to its normal position.

Tip 13: Enable GOD mode.

Have you always felt limited with Windows settings? Don't be, Right-click on the desktop and select New > Folder. Re-name the new folder with this bit of code: GodMode.{ED7BA470-8E54-465E-825C-99712043E01C} To enter the "God Mode" window, double-click the folder.

Tip 14: Use Virtual Desktops.

Click on Task View (the icon next to the search box). This will separate all your open windows and apps into icons. You can then drag any of them over to where it says "New desktop," which creates a new virtual desktop. Once you click out of Task View, you can toggle between virtual desktops by pressing the ⊞ WINDOWS + CTRL + right/left arrows. To remove the virtual desktops, just go back into task view and delete the individual virtual desktops, this will not close out the apps contained within that desktop, but rather just send them to the next lower desktop.

Tip 15: Customize the command prompt.

Yes, you can customize the command prompt, in order to do so, open it and right-click on its title bar, choose properties and go wild. Special badge if you make it look like commodore 64 BASIC.

Tip 16: Dictate, not type.

If you have speech recognition ON, pressing ⊞ WINDOWS + H will bring up a voice recorder, just speak and see how you can easily "write" emails, etc.

Tip 17: Use sandbox.

In Windows you have a sandbox option, which will open another Windows instance inside Windows, what do you need this? Well once the sandbox is closed everything in it is closed and if you catch the virus or other dangerous software, closing the sandbox will destroy it not affecting your actual Windows. Use it for safety testing and enjoy an easy life. Enable Windows Sandbox inside the Control Panel.

Tip 18: Use a hidden game bar.

Press the ⊞ WINDOWS + G, you can pull up the new-and-improved Game Bar. This lets you switch your Windows PC into gaming mode, which pools system resources to the game, turns off notifications, and lets you record and broadcast your gaming, along with added panels for controlling your audio, monitoring FPS, and tracking achievements. And that's it, Our 18 tips and trick to make your Windows 10 life easier, more productive, and overall more enjoyable. I certainly hope you have enjoyed reading this article same as I was writing it. Until next time if I do not see you, good afternoon, good evening, and good night.
Read More
Fix Error 0164, Memory size decreased
Computer upgrades are the most common and most efficient ones. RAM upgrade is one of the easiest ones you can do and the most common ones but even as simple an upgrade as this one can cause certain issues. If you are experiencing error 0164, memory size decreased after RAM upgrade we are offering you solutions on how to fix this particular error and get your computer back in working order.
  1. Change BIOS settings

    Enter your motherboard BIOS (usually by pressing the del key on startup) Load BIOS defaults Save changes and exit If the Error 0164: Memory size decreased issue persists even after loading setup defaults, then it must be configured manually inside the BIOS.
  2. Clear CMOS

    Follow the instructions precisely:
    • Turn off all peripheral devices connected to the computer.
    • Disconnect the power cord from the AC power source.
    • Remove the computer cover.
    • Find the battery on the board. The battery may be in a horizontal or vertical battery holder or connected to an onboard header with a wire.
    If the battery is in a holder, note the orientation of the + and – on the battery. With a medium flat-blade screwdriver, gently pry the battery-free from its connector. If the battery is connected to an onboard header with a wire, disconnect the wire from the onboard header.
    • Wait one hour, then reconnect the battery.
    • Put the computer cover back on.
    • Plug the computer and all devices back in.
    • Power on the computer.
Read More
Fix cannot load the Device Driver Code 38
Each you connect time external devices like scanners, printers, and the likes to a Windows 10 computer, the device either pushes the drivers through the USB or any other port, or you are expected to install the drivers through external media. In both cases, the driver will be loaded into the system, allowing you to use the device. However, it doesn’t always go smoothly as you could encounter some errors like the “Windows cannot load the Device Driver for this hardware because a previous instance of the Device Driver is still in memory ( Code 38 )”. If you encounter such an error in the Device Manager, then this means that a previous version of the device driver is still in memory and that each time the device is used, that previous version is loaded into memory and then unloaded which triggers the “Windows cannot load the Device Driver for this hardware because a previous instance of the Device Driver is still in memory (Code 38)” error. This kind of error occurs if the operating system loads the unwanted driver or if it fails to unload the driver. It could be that there is an obsolete version of the driver that’s still installed in the system or it could also be that you need to update your USB drivers as they could be outdated or the problem could also be due to some third party program that is interfering with the installation. Whatever the cause is, here are some suggestions you can check out to resolve the problem.

Option 1 – Uninstall previously installed drivers and reinstall their latest working version from the manufacturer’s website

The first thing you can do is to uninstall the drivers that are currently installed on your computer and then reinstall their latest working versions from their official sites. This kind of error is commonly encountered while loading drivers for scanners and printers. This is due to the fact that their drivers and software come along with a package which is usually in external media like CD or DVD. So when you install the software package, there’s a possibility that a newer version has been launched by its manufacturer. When that happens, you have to uninstall the previously installed driver package and then download the drivers from the manufacturer’s website and install them.

Option 2 – Run the Hardware and Devices Troubleshooter

  • The first thing you need to do is click on Start and then on the gear-like icon to pull up the window for Settings.
  • After opening Settings, look for the Update and Security option and select it.
  • From there, go to the Troubleshoot option located on the left-hand side of the list.
  • Next, select Hardware and Devices from the list and open the Troubleshooter and run it. Once it is doing its job, wait for it to complete the process and then restart the system.
  • After the system restarts, check if the problem’s now fixed. If not, refer to the next option given below.

Option 3 – Update or reinstall the Universal Serial Bus Controller driver

Since it could be a driver issue, you can try to update or reinstall the Universal Serial Bus Controller drivers using the Device Manager. Refer to the following steps:
  • First, click the Start button and type “device manager”.
  • Then click on the “Device Manager” from the search results to open it.
  • From there, look for the “Universal Serial Bus controllers” option and then right-click on each one of the USB drivers and select the Update Driver from the menu.
Note: If it is a regular USB drive, then it will be listed as a USB Mass Storage Device but if you have a USB 3.0 device, then look for a USB 3.0 Extensible Host Controller.
  • Restart your PC and then click the “Search automatically for updated driver software” option.
Note: If updating the USB Controller drivers didn’t work, you can try to reinstall them instead.

Option 4 – Restart your computer in a Clean Boot State

If the first three given options didn’t work and you still see the error when you connect external devices, you can try putting your computer in a Clean Boot State and then try connecting them again.
  • Log onto your PC as an administrator.
  • Type in MSConfig in the Start Search to open the System Configuration utility.
  • From there, go to the General tab and click “Selective startup”.
  • Clear the “Load Startup items” check box and make sure that the “Load System Services” and “Use Original boot configuration” options are checked.
  • Next, click the Services tab and select the “Hide All Microsoft Services” check box.
  • Click Disable all.
  • Click on Apply/OK and restart your PC. (This will put your PC into a Clean Boot State. And configure Windows to use the usual startup, just simply undo the changes.)
  • Now try to connect the external devices and check if the error is now gone.
Read More
How to Fix Kernel_Data_Inpage_Error

Kernel_Data_Inpage_Error

Kernel_Data_Inpage_Error - What is it?

Kernel_Data_Inpage_Error is a BSOD (blue screen of death) error. Also, know as a 0x0000007A Stop error. This bug check indicates that the requested page of kernel data from the paging file failed to be read into memory. In simple words, this means that Windows has trouble reading from the memory. This can apply to both kinds of memory: stored memory on your hard drive and also the dynamic memory in your RAM. The Kernel_Data_Inpage_Error turns your computer screen all blue, stops the program being executed, and sometimes even leads to abrupt system shut down.

Error Causes

Kernel_Data_Inpage_Error may occur due to numerous reasons. The exact cause of this error can easily be found by going through the code displayed in the parameter of 0x00000007A. Let’s take a look at Kernel_Data_Inpage_Error parameter codes and the underlying causes of its occurrence:
  • 0xC0000009A- This parameter code triggers missing nonpaged pool resources
  • 0xC0000009C- This represents the installed hard disk drive has bad sectors.
  • 0xC0000000E- This indicates a hardware failure or an incorrect drive configuration

Further Information and Manual Repair

No matter what the cause for Kernel_Data_Inpage_Error may be, it is advisable to fix it immediately as blue screen of death error codes are considered to be critical PC errors that can cause serious damages and even result in valuable data loss. Here are a couple of ways to repair this issue on your system:

1. Call the ‘Chkdsk’ (check disk) command on your system.

Windows XP, Vista, and 7 users can call this command, by pressing Windows Key +F and type in ‘chkdsk’ and run. However, you can’t run it while actively using Windows but you can always schedule it to start automatically the next time your computer turns on. Wrap up what you need and then reboot. Chkdsk disk checking process can take a long time, especially on large and slow hard drives. To run this command on Windows 8, open Windows search by pressing Windows Key+ F and then type ‘cmd’. Then right-click on the command prompt and choose the option ‘Run as Administrator’. To continue with the disk checking process, here you will be prompted to provide your administrator authentication. Once you insert the administrator authentication, type the command ‘Chkdsk C:/f/r/x” where the letter ‘C’ indicates the drive you want to examine and repair. Run it to scan for Kernel_Data_Inpage_Errors on your system. Chkdsk command will detect and repair errors on the hard drive and then automatically reboot.

Limitations to this Solution:

‘Chkdsk’ is a value-adding inbuilt disk checking tool in PC new Window versions; nonetheless, this command has certain limitations. It is time-consuming. You may have to wait for a long time for it to scan your system. Also when disk check is running, you will have to stop all other activities on your system. Furthermore, Chkdsk does not scan and fix all registry errors and other PC-related errors. So, you can’t be 100% sure that it will resolve all the Kernel_Data_Inpage_Errors on your PC. Congratulations, you have just fixed Kernel_Data_Inpage_Error in Windows 10 all by yourself. If you would like to read more helpful articles and tips about various software and hardware visit errortools.com daily. Now that’s how you fix Kernel_Data_Inpage_Error in Windows 10 on a computer. On the other hand, if your computer is going through some system-related issues that have to get fixed, there is a one-click solution known as Restoro you could check out to resolve them. This program is a useful tool that could repair corrupted registries and optimize your PC’s overall performance. Aside from that, it also cleans out your computer for any junk or corrupted files that help you eliminate any unwanted files from your system. This is basically a solution that’s within your grasp with just a click. It’s easy to use as it is user-friendly. For a complete set of instructions in downloading and using it, refer to the steps below Perform a full system scan using Restoro. To do so, follow the instructions below.
      1. Download and install Restoro from the official site.
      2. Once the installation process is completed, run Restoro to perform a full system scan. restoro application screen
      3. After the scan is completed click the “Start Repair” button. restoro application screen
Read More
100sOfRecepies Removal Tutorial

100sOfRecepies is a Browser Extension developed by MindSpark Inc. that provides users with hundreds of recopies for breakfast, lunch, dinner, and dessert. This extension may appear very handy at the start, however, it may monitor your browser activity, and send it back to the developer to better serve ads. This extension injects itself into the System Registry allowing it to run each time your computer is restarted.

While browsing the internet with this extension installed you may see additional ads, sponsored links, and pop-up ads displayed in your browser. Many anti-virus scanners have detected this extension as a Browser Hijacker and are therefore not recommended to keep on your computer.

About Browser Hijackers

Browser hijacking is actually a form of an unwanted program, often a web browser add-on or extension, which causes modifications in browser settings. They are made to disrupt web browser programs for various reasons. Usually, it’ll force users to predetermined sites which are aiming to increase their advertisement income. Nevertheless, it’s not that harmless. Your internet safety is compromised and it is also very annoying. In a much worst case, your browser could be hi-jacked to download malware that may do a great deal of damage to your laptop or computer.

Major symptoms that your web browser has been highjacked

The typical symptoms that indicate having this malware on your computer are: 1. the browser’s home page is changed 2. bookmark and the new tab are also modified 3. the default search engine is changed and the browser security settings have been lowered without your knowledge 4. find new toolbars which you did not add 5. unstoppable flurries of pop-up ads show up on your personal computer screen 6. your web browser gets slow, buggy crashes often 7. Inability to navigate to certain websites, particularly anti-malware and also other security software webpages.

How does a browser hijacker infect a computer?

There are several ways your computer can become infected with a browser hijacker. They generally arrive by way of spam e-mail, via file sharing websites, or by a drive-by-download. They could also come from add-on software, also known as browser helper objects (BHO), web browser plug-ins, or toolbars. Some browser hijackers spread in user’s computer systems using a deceptive software distribution technique known as “bundling” (generally through freeware and shareware). An example of some well-known browser hijacker includes Babylon, Anyprotect, Conduit, DefaultTab, SweetPage, RocketTab, and Delta Search, but the names are continually changing. Browser hijackers could record user keystrokes to gather potentially valuable information that leads to privacy issues, cause instability on computers, drastically disrupt the user experience, and eventually slow down the PC to a point where it will become unusable.

Browser Hijacker Malware – Removal

Some browser hijacking could be quite easily stopped by discovering and eliminating the corresponding malware program from your control panel. But, most hijackers are hard to get rid of manually. No matter how much you try to remove it, it can come back over and over. Moreover, browser hijackers could modify the Computer registry so that it could be very tough to restore all of the values manually, particularly when you are not a very tech-savvy person.

Can't Install Safebytes Anti-malware due to the presence of Malware? Try This!

All malware is bad, but certain kinds of malicious software do a lot more damage to your PC than others. Some malware sits in between your computer and the internet connection and blocks some or all sites which you want to check out. It would also block you from adding anything to your machine, especially anti-virus programs. So what to do when malicious software keeps you from downloading or installing Anti-Malware? Do as instructed below to eliminate malware through alternate ways.

Eliminate malware in Safe Mode

In the event the malware is set to load at Windows start-up, then booting in safe mode should avoid it. Just the minimum required applications and services are loaded when you boot your computer in Safe Mode. Listed below are the steps you need to follow to start your computer into the Safe Mode of your Windows XP, Vista, or 7 computers (go to Microsoft website for instructions on Windows 8 and 10 computers). 1) At power-on/startup, press the F8 key in 1-second intervals. This will invoke the “Advanced Boot Options” menu. 2) Choose Safe Mode with Networking with arrow keys and hit Enter. 3) When this mode loads, you should have an internet connection. Now, use your internet browser to download and install Safebytes. 4) As soon as the software program is installed, allow the scan run to remove viruses and other threats automatically.

Switch over to an alternate web browser

Malicious program code could exploit vulnerabilities on a particular web browser and block access to all anti-virus software sites. The best way to overcome this problem is to choose a browser that is known for its security measures. Firefox contains built-in Malware and Phishing Protection to keep you secure online.

Install and run anti-malware from the Thumb drive

To effectively get rid of the malware, you might want to approach the issue of running an anti-virus program on the affected PC from a different perspective. Do these simple measures to clear up your infected computer by using a portable antivirus. 1) On a virus-free PC, download and install Safebytes Anti-Malware. 2) Insert the pen drive on the same PC. 3) Run the setup program by double-clicking the executable file of the downloaded software, with a .exe file format. 4) When asked, select the location of the USB drive as the place where you want to put the software files. Follow the instructions on the screen to finish off the installation process. 5) Now, transfer the USB drive to the infected computer system. 6) Double-click the EXE file to open the Safebytes program right from the thumb drive. 7) Simply click “Scan Now” to run a scan on the affected computer for viruses.

Protect Your Computer and Privacy With SafeBytes Anti-Malware

To help protect your computer or laptop from a variety of internet-based threats, it’s important to install an anti-malware application on your personal computer. However, with countless numbers of antimalware companies in the marketplace, nowadays it’s tough to decide which one you should buy for your laptop. Some of them are excellent, some are ok types, while some will affect your PC themselves! You need to be careful not to pick the wrong product, particularly if you purchase a premium application. Amongst few good applications, SafeBytes Anti-Malware is the strongly recommended software for security-conscious people. Safebytes is one of the well-established computer solutions firms, which provide this complete anti-malware software program. Through its cutting-edge technology, this software protects your personal computer against infections caused by different types of malware and similar internet threats, including adware, spyware, trojans horses, worms, computer viruses, keyloggers, potentially unwanted programs (PUPs), and ransomware. SafeBytes carries a plethora of wonderful features which can help you protect your computer from malware attack and damage. Here are some of the good ones: Robust Anti-malware Protection: By using a critically acclaimed anti-malware engine, SafeBytes provides multi-layered protection which is made to catch and remove threats that are concealed deep in your PC. Active Protection: SafeBytes offers complete and real-time security for your PC. It’ll check your PC for suspicious activity at all times and shields your PC from unauthorized access. Website Filtering: Through its unique safety rating, SafeBytes informs you whether a website is safe or not to visit it. This will assure that you’re always certain of your safety when browsing the online world. Lightweight Utility: SafeBytes is really a lightweight application. It consumes an extremely small amount of processing power as it runs in the background therefore you will not observe any computer performance issues. 24/7 Premium Support: Skilled technicians are at your disposal 24/7! They will immediately fix any technical issues you may be experiencing with your security software.

Technical Details and Manual Removal (Advanced Users)

If you’d like to carry out the removal of 100sOfRecepies manually rather than using an automated software tool, you may follow these simple steps: Navigate to the Windows Control Panel, click on the “Add or Remove Programs” and there, select the offending program to uninstall. In cases of suspicious versions of web browser extensions, you can easily remove them through your browser’s extension manager. You may also want to reset your web browser settings, as well as delete browsing history, temporary files, and internet cookies. To ensure the complete removal, find the following Windows registry entries on your system and delete them or reset the values appropriately. Please keep in mind that only advanced users should try to manually edit the registry because incorrect file removal leads to a major problem or even a PC crash. In addition, certain malware is capable of replicating itself or preventing deletion. It is recommended that you carry out the removal procedure in Safe Mode.
Files: %Documents and Settings%\All Users\Application Data0sOfRecipes Toolbar virus %program files %\internet explorer\ 100sOfRecipes Toolbar\[random].mof %program files (x86)%0sOfRecipes Toolbar \ %programData%\suspicious folders\ %windows%\system32\driver0sOfRecipes Toolbar %app data%\ 100sOfRecipes Toolbar virus\ Registry: [HKEY_LOCAL_MACHINE\SOFTWARE\Microsoft\MATS\WindowsInstaller\EAF386F0-7205-40F2-8DA6-1BABEEFCBE8914.07.30.07.52.18]ProductName=100sOfRecipes Toolbar [HKEY_LOCAL_MACHINE\SOFTWARE\Wow6432Node\Microsoft\Tracing\Muvic_RASAPI32] [HKEY_LOCAL_MACHINE\SOFTWARE\Wow6432Node\Microsoft\Tracing\Muvic_RASMANCS] [HKEY_LOCAL_MACHINE\SOFTWARE\Wow6432Node\Microsoft\Windows\CurrentVersion\Uninstall\EAF386F0-7205-40F2-8DA6-1BABEEFCBE89] DisplayName=100sOfRecipes Toolbar [HKEY_USERS\S-1-5-21-3825580999-3780825030-779906692-1001\Software\Microsoft\Windows\CurrentVersion\Uninstall\50f25211-852e-4d10-b6f5-50b1338a9271] DisplayName=100sOfRecipes Toolbar
Read More
1 2 3 162
Logo
Copyright © 2022, ErrorTools. All Rights Reserved
Trademarks: Microsoft Windows logos are registered trademarks of Microsoft. Disclaimer: ErrorTools.com is not affiliated with Microsoft, nor claim direct affiliation.
The information on this page is provided for information purposes only.
DMCA.com Protection Status