How to Fix Error 0x00000643

Repair Error 0x00000643

Error 0x00000643 - What is it?

This is a Windows Vista printer error. It occurs when you try to use the plug-and-play service to install a WSD printer on your PC.

WSD is the abbreviation for Web Services for Devices.

It is a Microsoft API to simply programming connections to web service enabled devices such as printers, file shares and scanners.  The error 0x00000643 code is displayed in the following format:

“Operation could not be completed (error 0x00000643)”

Solution

Restoro box imageError Causes

The error 0x00000643 may occur due to multiple reasons, including:

  • No suitable driver installed for your printer
  • A firewall or other security program is too restrictive
  • Registry file has invalid entries
  • Virus and Trojan
  • Outdated system drivers

Further Information and Manual Repair

To resolve this error code on your PC, you don’t have to hire a professional technician and spend hundreds of dollars to perform system repair. You can resolve it all by yourself, even if you are not a computer programmer or lack technical expertise.

Here are some of the easiest and proven methods to fix the error 0x00000643 on your PC:

1. Update Outdated Drivers

This can be done by accessing the ‘Device Manager’. All you have to do is, go to the start menu and type Device Manager in the start search box. Then click on the Device Manager in the list. On the action menu, click the scan for hardware changes or update the driver.

2. Delete the WSD Port to Resolve Error

Go to the start menu and type printers in the search box. Click printers in the given program list and then click the option add a new printer.

After that, select the existing WSD port and any printer driver. Now delete the printer. The WSD will be deleted automatically. Once this is done, connect the printer to your computer. You will see the plug-and-play service will begin to install the printer again. This process is most likely to resolve the issue and reinstall your printer.

3. Disable Firewall

Sometimes the error may occur if the security programs are too restrictive such as the Firewall. To fix the problem simply disable Firewall.

4. Viral Infection

If the underlying cause of the error is a viral infection, then download a powerful antivirus and run it on your PC. Scan for viruses and delete them.

5. Registry Invalid Entries

If you don’t clean the registry regularly, this overloads with unnecessary, redundant and obsolete files like cookies, internet history, junk files, bad registry keys and invalid entries. This damages the registry and generates such error codes. Although you can resolve and repair the registry manually, but that method is slight tricky and time consuming. It may require technical expertise.

However, another quick and easy way to clean and restore the registry and resolve error 0x00000643 on your system is to download Restoro. This is a next-generation, advanced, and highly functional PC Repair Tool. It is deployed with an intuitive algorithm and multiple utilities such as a smart registry cleaner, a powerful antivirus, and a system optimizer.

The registry cleaning utility detects all registry issues on your PC, removes invalid entries cluttering the registry, and repairs it right away thereby resolving error 0x00000643.

The antivirus simultaneously detects malware on your PC and removes them while the system optimizer boosts the speed of your computer significantly.

Restoro is bug-free, safe, and efficient. It has simple navigations and a user-friendly interface. This software is compatible with all Windows versions including Vista.

To fix error 0x00000643 on your system in seconds, click here to download Restoro now!

If you like to learn and find out more about various Windows errors, and how to repair them go to our vast archive or use search to find articles that will explain and help you in solving your issue.
However, if you prefer to do things fast and with automatization then we are proposing to use an automated solution for your issues. The application that we are recommending is Advanced System Repair Pro
Advanced System Repair utilizes multiple tools all in one to give you a quick, simple, reliable, and very thorough diagnosis of your PC. It brings you all the tools you need in one program to clean, fix, protect, optimize and boost your PC!
1-Click Maintenance
All the tools to make it simple and easy! It's like having a professional technician at the click of a mouse.

Junk Cleaner
Keeping your computer free from unnecessary clutter also helps make your computer last longer. Like any other machine, if you keep it clean and take care of it, it will serve you better for longer!

Optimize background apps
Optimize applications background activity with the built-in Application Optimizer feature.

Disk Defrag
With a simple 1-click, Advanced System Repair speeds up your PC by assembling fragmented files on your machine and organizing them more efficiently.

Malware Removal
Finds and removes all types of harmful malware including trojans, worms, bots, adware, spyware, PUPs, and more!

Privacy Cleaner
The all-in-one privacy suite to Clean Your Tracks & Protect Your Privacy! Make your computer safe, secure, and more efficient!

System Tweak/Optimizer
ASR will analyze your complete system and settings to adjust your PC to function at its maximum performance.

Registry Cleaner
Over time, as you install and uninstall applications, the registry can become cluttered with old entries and broken settings which can result in program crashes, and annoying messages and slow the computer down.
Visit our Advanced System Repair Pro Download page to inform yourself about all the benefits of this software and get a free trial copy of it.
advanced system repair pro

Advanced System Repair Pro

One-click automated PC repair solution
ASR logo
With Advanced System Repair Pro you can easily
Replace damaged files
Restore performance
Free disk space
Remove Malware
Protects WEB browser
Remove Viruses
Stop PC freezing
DOWNLOAD
Privacy Policy | Terms of Use | Uinstall
Advanced System Repair Pro is compatible with all versions of Microsoft Windows including Windows 11

Share this article:

You might also like

Dangerous GriftHorse Trojan found on Android
There has been recently discovered in the field of malware targeting Android devices. Affecting more than 10 million users of Android phones, the malware GriftHorse is doing its attacks via phishing and premium services scams. A lot of applications have been discovered that are hosts for this malware and many of them are inside the Google store and available for download. GriftHorse
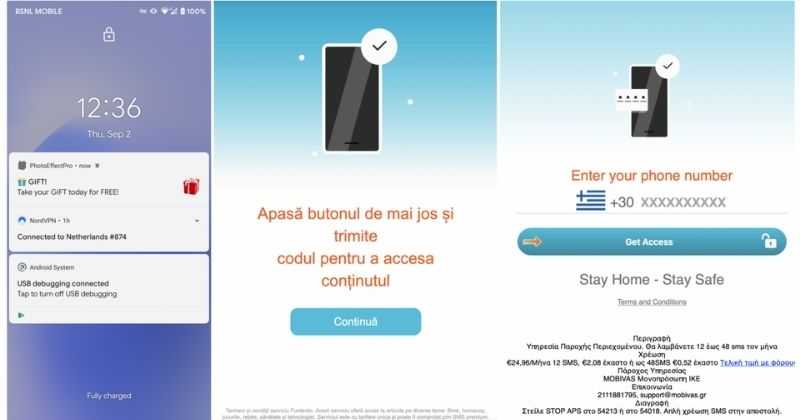
According to Zimperium zLabs, this malware that was recently detected has been doing its scams and attacks even in November of 2020 and has thus far accumulated hundreds of thousands of dollars in its scam. On the surface it looks very harmless, asking for typical permissions like internet access, calls, and other related needed functions, and then it waits. After few months the real attack happens when users get charged with premium service they never subscribed to in the first place.

List of Infected Applications that Carry GriftHorse Trojan

Zimperium zLabs listed out some of the apps with this malware. Users are advised to avoid installing them.
  •     Amazing Video Editor
  •     Bag X-Ray 100% Scanner
  •     Bus – Metrolis 2021
  •     Call Recoder Pro
  •     Call Blocker-Spam Call Blocker
  •     Cinema Hall: Free HD Movies
  •     Coupons & Gifts: InstaShop
  •     GPS Phone Tracker – Family Locator
  •     Fingerprint Changer
  •     Fitness Point
  •     Free Calls WorldWide
  •     Geospot: GPS Location Tracker
  •     GPS Phone Tracker – Family Locator
  •     Handy Translator Pro
  •     Horoscope : Fortune
  •     iCare – Find Location
  •     iConnected Tracker
  •     Instant Speech Translation
  •     Lifeel – scan and test
  •     My Chat Translator
  •     My Locator Plus
  •     Plant Camera Identifier
  •     Racers Car Driver
  •     Safe Lock
  •     Screen Mirroring TV Cast
  •     Slime Simulator
  •     Smart Spot Locator
These are only some of the many infected apps available on the internet. Zimperium zLabs also warned that GriftHorse Trojan exists in over 70 countries worldwide. The infected app quickly changes the language and displays content depending on the user’s IP address.
Read More
Windows can’t find one of the files in theme
Recently, a number of Windows 10 users getting an error on their computers that state, “Windows can’t find one of the files in this theme”. According to the affected users, this error occurs at random times even when they didn’t make any changes to their computer’s theme prior to getting the error. If you are one of these users, read on as this post will help you resolve this problem. If you click on the Yes button of the dialog box where the error is displayed, it won’t fix the problem as you will still get the same error from time to time. This kind of error could be caused by the executable file named “SettingSyncHost.exe”. It is possible that this executable file is unable to sync your theme all over your computer. On the other hand, it could also be due to some problems with the active theme. To resolve this issue, you can try to change the active theme, or disable the custom screensaver or disable theme syncing on your computer, as well as run a System File Checker or run the DISM tool. For more instructions, follow the options given below.

Option 1 – Try to change the active theme

The first thing you can do to fix the error is to change the active theme of your computer since the SettingSyncHost.exe file might not be able to properly sync the theme on the computer.
  • Go to Settings and click on Personalization.
  • Next, click on Themes and scroll down to apply a theme, and change the theme of the operating system.
  • After that, tap the Win + R keys to open the Run dialog box and type “%windir%ResourcesThemes” in the field, and then tap Enter to open the folder where the theme files are located.
  • Once you’re done, right-click and select delete for the active theme to remove the theme and its resources. This should fix the root cause of the problem. If not you can try to create a new Windows 10 theme and save it.

Option 2 – Try to disable the custom screensaver

The custom screensaver is a part of the mechanism of the lock screen. Although they were needed in the earlier Windows versions to prevent the discoloration of CRT monitor screens, they are no longer needed in the current version of Windows. Thus, you can try to disable it as it could be the one that’s causing the problem.
  • Click on the Start button and go to Settings > Personalization > Lock screen.
  • Here, scroll down and click on the Screen Saver settings.
  • After that, select the “Screen saver to (None)” option from the drop-down menu. This will disable the custom screensaver.

Option 3 – Try to disable theme syncing on your computer

You could also try to disable the theme sync feature to fix the problem. This has worked out for some users. To do so, follow these steps:
  • Click on the Start button and go to Settings > Account > Sync your settings.
  • From there, toggle off Themes in the individual sync settings column. This will disable the Theme syncing.
  • Restart your computer and see if the problem is now fixed.

Option 4 – Run the DISM tool

The next thing you can do is run the DISM tool. This tool is known to repair potentially corrupted files in your system as having them could also system issues like the “Windows can’t find one of the files in this theme” error. To repair these corrupted system files, you can run the DISM commands:
  • Tap the Win + X keys and click on the “Command Prompt (Admin)” option.
  • After that, input each one of the commands listed below sequentially to execute them:
    • Dism /Online /Cleanup-Image /CheckHealth
    • Dism /Online /Cleanup-Image /ScanHealth
    • Dism /Online /Cleanup-Image /RestoreHealth
  • Once you’ve executed the commands given above, restart your computer and check if the problem is now fixed.

Option 5 – Run the System File Checker

System File Checker or SFC is a built-in command utility that helps in restoring corrupted files as well as missing files. It replaces bad and corrupted system files to good system files that might be the cause why you’re getting the “Windows can’t find one of the files in this theme” error. To run the SFC command, follow the steps given below.
  • Type “cmd” in the Start search and then right-click on the appropriate search result.
  • Next, select “Run as administrator” to open Command Prompt with admin privileges.
  • After opening Command Prompt, type in sfc /scannow
The command will start a system scan which will take a few whiles before it finishes. Once it’s done, you could get the following results:
  1. Windows Resource Protection did not find any integrity violations.
  2. Windows Resource Protection found corrupt files and successfully repaired them.
  3. Windows Resource Protection found corrupt files but was unable to fix some of them.
  • Now restart your computer and see if the problem is fixed or not.
Read More
All wallpapers of Windows 11
We have gathered and want to share with you all of the Windows 11 wallpapers if you would like to place them on your desktop now and now wait for the official W11 release. Hope that you will like some of them and I hope to see you again on errortools.com Download Windows 11 Wallpapers here!

And here is the preview of them

W11_32W11_31W11_30W11_29W11_28W11_27W11_26W11_25W11_24W11_23W11_22W11_21W11_20W11_19W11_18W11_17W11_16W11_15W11_14W11_13W11_12W11_11W11_10W11_09W11_08W11_07W11_06W11_05W11_04W11_03W11_02W11_01
Read More
How to Fix DLL Errors in Windows?
A general rule of thumb, which is followed by most users, is to download the specific missing DLL file and place it within the software’s installation directory. However, this can be harmful to your system as hackers often upload popular malicious DLL files to target systems. Thus, you should avoid downloading DLLs from the internet. And follow these steps to fix the DLL error:
  • Restart your computer
  • Recover the .DLL file using the RESTORO; it helps to recover lost data
  • System restore to an earlier state
  • Run a malware/virus scan
  • Update all the hardware drivers
  • Running SFC /scannow command in command prompt
  • Then do as the error suggests, reinstall the program if it’s feasible. Game files can take several hours to install and therefore, reinstallation can be a cumbersome job. Also, frustrating if the error appears after reinstallation.
  • Update device drivers manually, such as graphics drivers, DirectX software if you see DLL missing error while running game
Read More
Fix Windows Update error 0x80246008
Updating your Windows 10 computer does not always go smoothly as there are some errors you can encounter along the way. One of these Windows Update errors is the error code of 0x80246008. This kind of error can occur during different phases of an update that’s being downloaded or installed and even when an update is being initialized. If you narrow down the cause of this Windows Update error, you’ll most likely see that it is related to the deliverability of a file to a computer from the servers of Microsoft. In other words, the error might be due to conflicts from programs like Firewall as well as third party programs like Antivirus or it could also be due to corrupted disk image or system files or it could be that any of the supporting Windows Update components and services are not working properly. Whatever the cause may be, the potential fixes provided in this post can be applicable to Windows Updates as well as the Microsoft Store. Refer to the suggestions provided below to resolve the Windows Update Error 0x80246008 but before you proceed, make sure that you create a System Restore point first.

Option 1 – Apply some tweak in the Windows Registry from Command Prompt

  • Tap the Win + X keys and select Command Prompt (Admin) to open Command Prompt with admin privileges.
  • Next, navigate to the root location of the bootable device inside the Command Prompt command line.
  • Once you’re in the root location, type the following command and tap Enter to execute it:
reg add HKLMSYSTEMCurrentControlSetControlBackupRestoreFilesNotToBackup
  • After that, close the Command Prompt command line and then tap the Win + R keys to open Run utility.
  • In the field, type “services.msc” and click OK or tap Enter to open the Windows Services Manager.
  • From there, look for the following services:
    • Windows Update – Manual (Triggered)
    • Background Intelligent Transfer Service – Manual
  • Now open their Properties and make sure that their Startup type is as mentioned above and that they are running. If they are not running, just click on the Start button.

Option 2 – Run the System File Checker Scan

If the registry tweak didn’t work, you can run a System File Checker scan instead. It is a built-in command-line utility that replaces bad and corrupted system files to good system files that might be the cause why you’re getting the error when you try updating your computer. To run the SFC command, follow the steps given below.
  • Tap Win + R to launch Run.
  • Type in cmd in the field and tap Enter.
  • After opening Command Prompt, type in sfc /scannow
The command will start a system scan which will take a few whiles before it finishes. Once it’s done, you could get the following results:
  1. Windows Resource Protection did not find any integrity violations.
  2. Windows Resource Protection found corrupt files and successfully repaired them.
  3. Windows Resource Protection found corrupt files but was unable to fix some of them.
  • Restart your computer.

Option 3 – Run the Windows Update Troubleshooter

If the System File Checker wasn’t able to resolve the Windows Update error, you could also try running the Windows Update Troubleshooter as it could also help in fixing any issues related to Windows Update including this one. To run it, go to Settings and then select Troubleshoot from the options. From there, click on Windows Update and then click the “Run the troubleshooter” button. After that, follow the next on-screen instructions and you should be good to go.

Option 4 – Try to disable your antivirus program

Disabling the antivirus program or any security software installed in your computer is always a good idea you can try when the Windows Update process does not go smoothly. So before you try updating your computer again, make sure to disable the antivirus or security program and once the Windows Update is done, don’t forget to enable the antivirus program back again.

Option 5 – Try deleting the files from the SoftwareDistribution folder and resetting the Catroot2 folder

The downloaded Windows Updates are placed in a folder called “SoftwareDistribution”. The files downloaded in this folder are automatically deleted once the installation is completed. However, if the files are not clean up or if the installation is still pending, you can delete all the files in this folder after you pause the Windows Update service. For complete instructions, refer to the steps below.
  • Open the WinX Menu.
  • From there, open Command Prompt as admin.
  • Then type in the following command – don’t forget to hit Enter right after typing each one of them.
net stop wuauserv net start cryptSvc net start bits net start msiserver
  • After entering these commands, it will stop the Windows Update Service, Background Intelligent Transfer Service (BITS), Cryptographic, and the MSI Installer
  • Next, go to the C:/Windows/SoftwareDistribution folder and get rid of all the folders and files thereby tapping the Ctrl + A keys to select them all and then click on Delete. Note that if the files are in use, you won’t be able to delete them.
After resetting the SoftwareDistribution folder, you need to reset the Catroot2 folder to restart the services you just stopped. To do that, follow these steps:
  • Type each one of the following commands.
net start wuauserv net start cryptSvc net start bits net start msiserver
  • After that, exit Command Prompt and restart your computer.
Read More
Make START menu full screen in Windows 10
Hello and welcome to another great tutorial from errortools.com. Today we will be making Windows START menu full screen. First introduced in Windows 8.1, the start menu has been shifted from full screen to gadget like in Windows 10 but if you prefer to have it over the entire screen with all of its glory and large icons you can do so and we will be happy to show you how. Press ⊞ WINDOWS and choose settings. Windows 10 Star menu with marked settings iconFrom the settings screen, choose Personalization. Windows 10 settings menu with marked Personalization groupUnder personalization options click on START. windows settings start screen sectionAnd then on the right part click on the button under Use Start full screen to turn it ON windows settings start screen switch for full screenThat's it, your start menu is now full screen.
Read More
Backup all drivers in Windows 10
When Windows is installed on a clean hard drive it usually finds most of the needed drivers for our computer to run, but if we by any chance have any old unsupported hardware or some exotic one chance are very high that Windows will not be able to locate and install drivers for it. And sometimes we do not even have drivers from where to download them, let's say for example you have purchased a second-hand laptop with Windows on it, you wish to create a clean and fresh copy of new Windows installation but you do not have drivers, and let us say the model is not supported so you can not download them. In this case, this shown method will help you a ton and save you a lot of time and frustration. So, in order to back all of your drivers from your Windows follow this simple guide step by step. Note please that this method will backup drivers themselves, you will not backup installation packages of drivers or similar stuff, only drivers installed in Windows itself.

Backing up the drivers

First thing first, create a folder where you want your drivers to be backed up somewhere in your HD and give it any name. Second, press ⊞ WINDOWS + X to open the secret Windows menu. keyboard with windows and x markedFrom the menu choose Command Prompt (administrator) Windows menu command prompt adminWhen the command prompt is active type the next command in it: DISM /online /export-driver /destination:C:\DriverBackup where: C:\DriverBackup is the folder and the hard drive where you want to store your backed-up drivers. Press ENTER That's it, you have now successfully backed-up all of your installed Windows drivers. Now, save all of your drivers on USB and reinstall Windows.

In order to now return backed drivers do the following:

Press again ⊞ WINDOWS + X to open the secret Windows menu. keyboard with windows and x markedbut this time choose Device manager Windows menu device managerFrom decide, manager right-click on any device Windows has not been able to install appropriate driver and choose update driver
  • Click on the Browse my computer for driver software option.
  • Click the Browse button.
  • Select the folder with the driver backup.
  • Check the Include subfolders option.
  • Click the Next button.
  • Click the Close button.
Read More
How to Fix Windows 10 Error Code 0x8024001b

How to Fix Windows 10 Error Code 0x8024001b

Error Code 0x8024001b- What is it?

At its most basic level, Error Code 0x8024001b is an error that can cause problems with the installation and updates of software and operating system updates. The most common version of this error appears in Windows 10, but a similar error with a matching code number has been present in previous versions of the operating system, back through Windows 7.

Common symptoms include:

  • Programs freezing or locking up during use
  • The appearance of an error message regarding installation difficulties
  • Computer shutting down or freezing during operation
  • Difficulty in running multiple programs at the same time

Solution

Restoro box imageError Causes

There are two main causes for Error Code 0x8024001b, both of which are fairly simple:  Updates needed for the Windows Update tool itself and software that causes Windows Update to fail during installations through conflicts in system files. While these may seem like technical issues, these problems are actually easily resolved with a few simple steps. The average user can use the methods listed below to fix the problems on their own.

Further Information and Manual Repair

For users who want to address Error Code 0x8024001b for themselves, the steps below can be followed to address the two primary causes for the error. If you have difficulty in completing these steps or are not confident in your computing skills and ability to follow the listed steps, contact a Windows repair technician.

Here are the top methods to resolve Error Code 0x8024001b on your own:

Method One:  Check for Updates to Windows Update

In some cases, the Windows Update tool may need an update for itself. When you attempt to run updates or install wizards for other software, it can cause conflicts with the Windows Update process, slowing down your computer or causing it to freeze.

If you are attempting to run multiple installations or updates at the same time, it may also cause Error Code 0x8024001b to arise on your computer.

To resolve this issue, close out all programs, with the exception of the Windows Update tool. Within the tool, select “Check for Updates” and install any updates that are needed. When finished, you should restart your computer to ensure that all updates have been fully applied before attempting any other installations or updates.

Method Two:  Uninstall Conflicting Software

Another problem that can cause Error Code 0x8024001b is the presence of conflicting software. If Error Code 0x8024001b has only recently appeared on your computer, consider removing any software that has been added to your computer, running the Windows Update process, and restarting your computer before attempting to reinstall the problem software.

With any method that you use, it is important to remember to keep your Windows Updates current at all times. This is the best way to avoid the appearance of Error Code 0x8024001b and similar errors in the future, as stacked up updates are more likely to cause issues and conflicts with your other installed software and operating system.

While there are some tools out there that claim to be able to fix Error Code 0x8024001b for you, it is important to always thoroughly investigate the publisher and distributor of such software, as some of the tools available on the Internet will actually introduce malware and adware on your computer in the name of “protecting” your computer or resolving an error.

If you have tried to use both methods above and have not fully resolved Error Code 0x8024001b, get in touch with someone who is a qualified computer repair professional and is familiar with your particular version of the Windows operating system to assist you in finalizing your resolution.

Method Three: Use An Automated Tool

If you wish to always have at your disposal a utility tool to fix these Windows 10 and other related issues when they do arise, download and install a powerful automated tool.

Read More
Fix Update components must be repaired
Recently, a lot of users reported having an issue with Windows Update. According to these users, they got an error message saying, “Windows Update components must be repaired” after they run the Windows Update troubleshooter. So if you are also facing this issue then you’ve come to the right place as this post will guide you in fixing this problem. There are various suggestions you can check out to fix this problem – you can try running the Windows Update troubleshooter again but this time, in a Clean Boot State or you could also run System File Checker or the DISM tool to repair corrupted Windows Update files or reset the Windows Update components. For more information, refer to the given options below.

Option 1 – Run the Windows Update troubleshooter in a Clean Boot State

Repairing the “Windows Update components must be repaired” error is not that complicated. One of the things you can try is to run the Windows Update troubleshooter again but this time, in a Clean Boot State. Refer to the steps below to get started.
  • Log onto your PC as an administrator.
  • Type in MSConfig in the Start Search to open the System Configuration utility.
  • From there, go to the General tab and click “Selective startup”.
  • Clear the “Load Startup items” check box and make sure that the “Load System Services” and “Use Original boot configuration” options are checked.
  • Next, click the Services tab and select the “Hide All Microsoft Services” check box.
  • Click Disable all.
  • Click on Apply/OK and restart your PC. (This will put your PC into a Clean Boot State. And configure Windows to use the usual startup, just simply undo the changes.)
  • Now try to run the Windows Update troubleshooter again and see if the error is fixed or not.

Option 2 – Try to run System File Checker

If the Windows Update troubleshooter still failed to fix the problem, you can run System File Checker instead. It is a built-in command utility that helps in restoring corrupted files as well as missing files. It replaces bad and corrupted system files with good system files. To run the SFC command, follow the steps given below.
  • Tap Win + R to launch Run.
  • Type in cmd in the field and tap Enter.
  • After opening Command Prompt, type in sfc /scannow
The command will start a system scan which will take a few whiles before it finishes. Once it’s done, you could get the following results:
  1. Windows Resource Protection did not find any integrity violations.
  2. Windows Resource Protection found corrupt files and successfully repaired them.
  3. Windows Resource Protection found corrupt files but was unable to fix some of them.

Option 3 – Run the DISM tool

Running the DISM Tool helps in repairing the Windows System Image as well as the Windows Component Store in Windows 10. Using this built-in tool, you have various options such as the “/ScanHealth”, “/CheckHealth”, and “/RestoreHealth”.
  • Open the Command Prompt with admin privileges.
  • Then type in the following commands and make sure to hit Enter right after you type each one of them:
    • Dism /Online /Cleanup-Image /CheckHealth
    • Dism /Online /Cleanup-Image /ScanHealth
    • exe /Online /Cleanup-image /Restorehealth
  • Do not close the window if the process takes a while as it will probably take a few minutes to finish.
Note: If it happens that the Windows Update client is broken, you need to run the following command to repair it then restart your PC and click on Update once again.
DISM.exe /Online /Cleanup-Image /RestoreHealth /Source:C:RepairSourceWindows /LimitAccess

Option 4 – Delete the contents in the Software Distribution folder and Catroot2 folder

You can also delete the contents in both the Software Distribution and Catroot2 folders as it could potentially fix the “Windows Update components must be repaired” error.
  • Open the WinX Menu.
  • From there, open Command Prompt as admin.
  • Then type in the following command – don’t forget to hit Enter right after typing each one of them.
net stop wuauserv net start cryptSvc net start bits net start msiserver
  • After entering these commands, it will stop the Windows Update Service, Background Intelligent Transfer Service (BITS), Cryptographic, and the MSI Installer
  • Next, go to the C:/Windows/SoftwareDistribution folder and get rid of all the folders and files thereby tapping the Ctrl + A keys to select them all and then click on Delete. Note that if the files are in use, you won’t be able to delete them.
After resetting the SoftwareDistribution folder, you need to reset the Catroot2 folder to restart the services you just stopped. To do that, follow these steps:
  • Type each one of the following commands.
net start wuauserv net start cryptSvc net start bits net start msiserver
  • After that, exit Command Prompt and restart your computer, and then try to run Windows Update once more.
Read More
Expand right-click menu in Windows 11
Windows 11 brought with it a simplified right-click menu that has limited options. If you would like to bring the old Windows 10 right-click menu you will have to do some registry tweaking but it is doable. right click menuSince this requires registry tweak, please follow given solution step by step
  1. Press Start and type RegEdit
  2. Click on Registry Editor
  3. Inside registry editor find next key: Computer\H_KEY_CURRENT_USER\SOFTWARE\CLASSES\CLSID\
  4. Right click in the right part of editor window and select New > Key
  5. Type in as a name: {86ca1aa0-34aa-4e8b-a509-50c905bae2a2}
  6. Right click on {86ca1aa0-34aa-4e8b-a509-50c905bae2a2} key and select New > Key again to create new key inside this one
  7. Name inside key InprocServer32
  8. Double click the “(Default)” key in InprocServer32 to open it
  9. When the Default key opens close it without making any changes by clicking on OK. This will make its value property Blank instead of value not set
  10. Close Registry Editor
  11. Restart your PC
Once the system is up if the followed solution is applied you will now have an old school menu once right-click is used.
Read More
1 2 3 162
Logo
Copyright © 2022, ErrorTools. All Rights Reserved
Trademarks: Microsoft Windows logos are registered trademarks of Microsoft. Disclaimer: ErrorTools.com is not affiliated with Microsoft, nor claim direct affiliation.
The information on this page is provided for information purposes only.
DMCA.com Protection Status