Fix Downloader.dll Not Found Error in Windows

Stumbling upon downloader.dll not found error is not pleasant to experience, usually, it means that desired application can not be started. There could be several reasons why this error happens from user mistakes, corrupted files, bad installation, and even bad RAM memory. Whatever the reason might be solutions provided are the same for all and offer a fix to this issue.

it is advisable to follow provided solutions from start to finish not skipping any one of them since they are tailored to address the simplest solutions and issues and move toward more complicated ones.

  1. Reinstall application

    If you are receiving Downloader.dll not found when trying to run just a single certain application, reinstall the application, there is the possibility that the application has somehow corrupted downloader.dll during the installation process. Reinstalling might fix the problem.

  2. Run SFC scan

    SFC scan is the tool meant to scan all files and fix any corrupted ones. To run this tool, open the command prompt in administrator mode by right-clicking on the windows start button and then left-clicking on the command prompt (admin). When you are in command prompt type in SFC /scannow and let the whole process finish.

  3. Update device driver

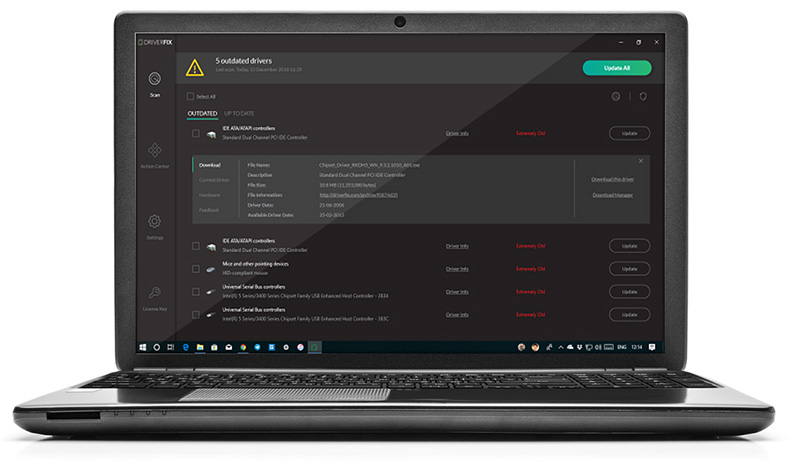
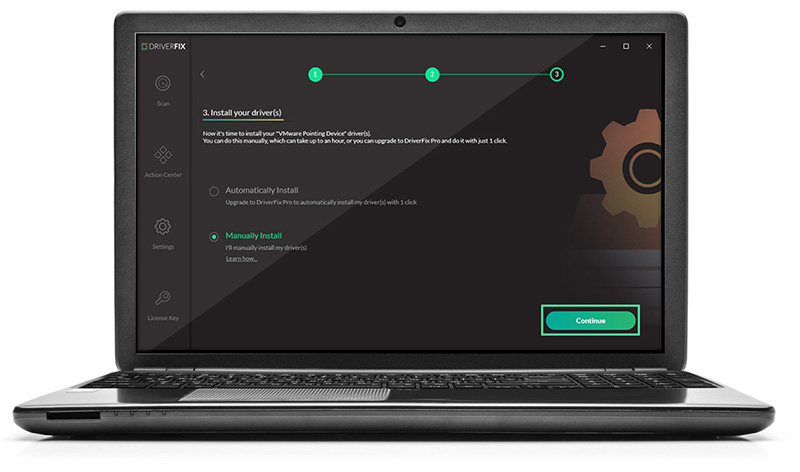
    If previous steps have not provided results, go to device manager and visually check is there a device with an exclamation or other sign next to it, if there is, right-click on it and choose update driver.

  4. Use RESTORO to fix the issue

    If you have not managed to fix the issue with provided steps, use a dedicated fixing error tool like RESTORO to fix your PC errors.

If you like to learn and find out more about various Windows errors, and how to repair them go to our vast archive or use search to find articles that will explain and help you in solving your issue.
However, if you prefer to do things fast and with automatization then we are proposing to use an automated solution for your issues. The application that we are recommending is Advanced System Repair Pro
Advanced System Repair utilizes multiple tools all in one to give you a quick, simple, reliable, and very thorough diagnosis of your PC. It brings you all the tools you need in one program to clean, fix, protect, optimize and boost your PC!
1-Click Maintenance
All the tools to make it simple and easy! It's like having a professional technician at the click of a mouse.

Junk Cleaner
Keeping your computer free from unnecessary clutter also helps make your computer last longer. Like any other machine, if you keep it clean and take care of it, it will serve you better for longer!

Optimize background apps
Optimize applications background activity with the built-in Application Optimizer feature.

Disk Defrag
With a simple 1-click, Advanced System Repair speeds up your PC by assembling fragmented files on your machine and organizing them more efficiently.

Malware Removal
Finds and removes all types of harmful malware including trojans, worms, bots, adware, spyware, PUPs, and more!

Privacy Cleaner
The all-in-one privacy suite to Clean Your Tracks & Protect Your Privacy! Make your computer safe, secure, and more efficient!

System Tweak/Optimizer
ASR will analyze your complete system and settings to adjust your PC to function at its maximum performance.

Registry Cleaner
Over time, as you install and uninstall applications, the registry can become cluttered with old entries and broken settings which can result in program crashes, and annoying messages and slow the computer down.
Visit our Advanced System Repair Pro Download page to inform yourself about all the benefits of this software and get a free trial copy of it.
advanced system repair pro

Advanced System Repair Pro

One-click automated PC repair solution
ASR logo
With Advanced System Repair Pro you can easily
Replace damaged files
Restore performance
Free disk space
Remove Malware
Protects WEB browser
Remove Viruses
Stop PC freezing
DOWNLOAD
Privacy Policy | Terms of Use | Uinstall
Advanced System Repair Pro is compatible with all versions of Microsoft Windows including Windows 11

Share this article:

You might also like

Finding out which GPU is in your computer
Every computer has to have a graphic card, it is one of the essential components in order for the computer to work. If you have a second-hand computer, got one as a gift, or similar, there is a high chance that you do not really know which components are inside. Luckily finding out which graphic card you have inside is quite easy. Right-click the taskbar and select Task Manager Click the Performance tab at the top of the window, if you don’t see the tabs, click “More Info.” Select “GPU 0” in the sidebar. The GPU’s manufacturer and model names are displayed at the top right corner of the window. You’ll also see other information, such as the amount of dedicated memory on your GPU, in this window. Windows 10’s Task Manager displays your GPU usage here, and you can also view GPU usage by application. If your system has multiple GPUs, you’ll also see “GPU 1” and so on here. Each represents a different physical GPU.
Read More
How to Fix the Error Code 28

How to Fix the Error Code 28

Error Code 28- What is it?

The error code 28 is a driver error. This is one of the many device manager error codes. When this error occurs on your computer, the following message is displayed:

“The drivers for this device are not installed. (Code 28)”

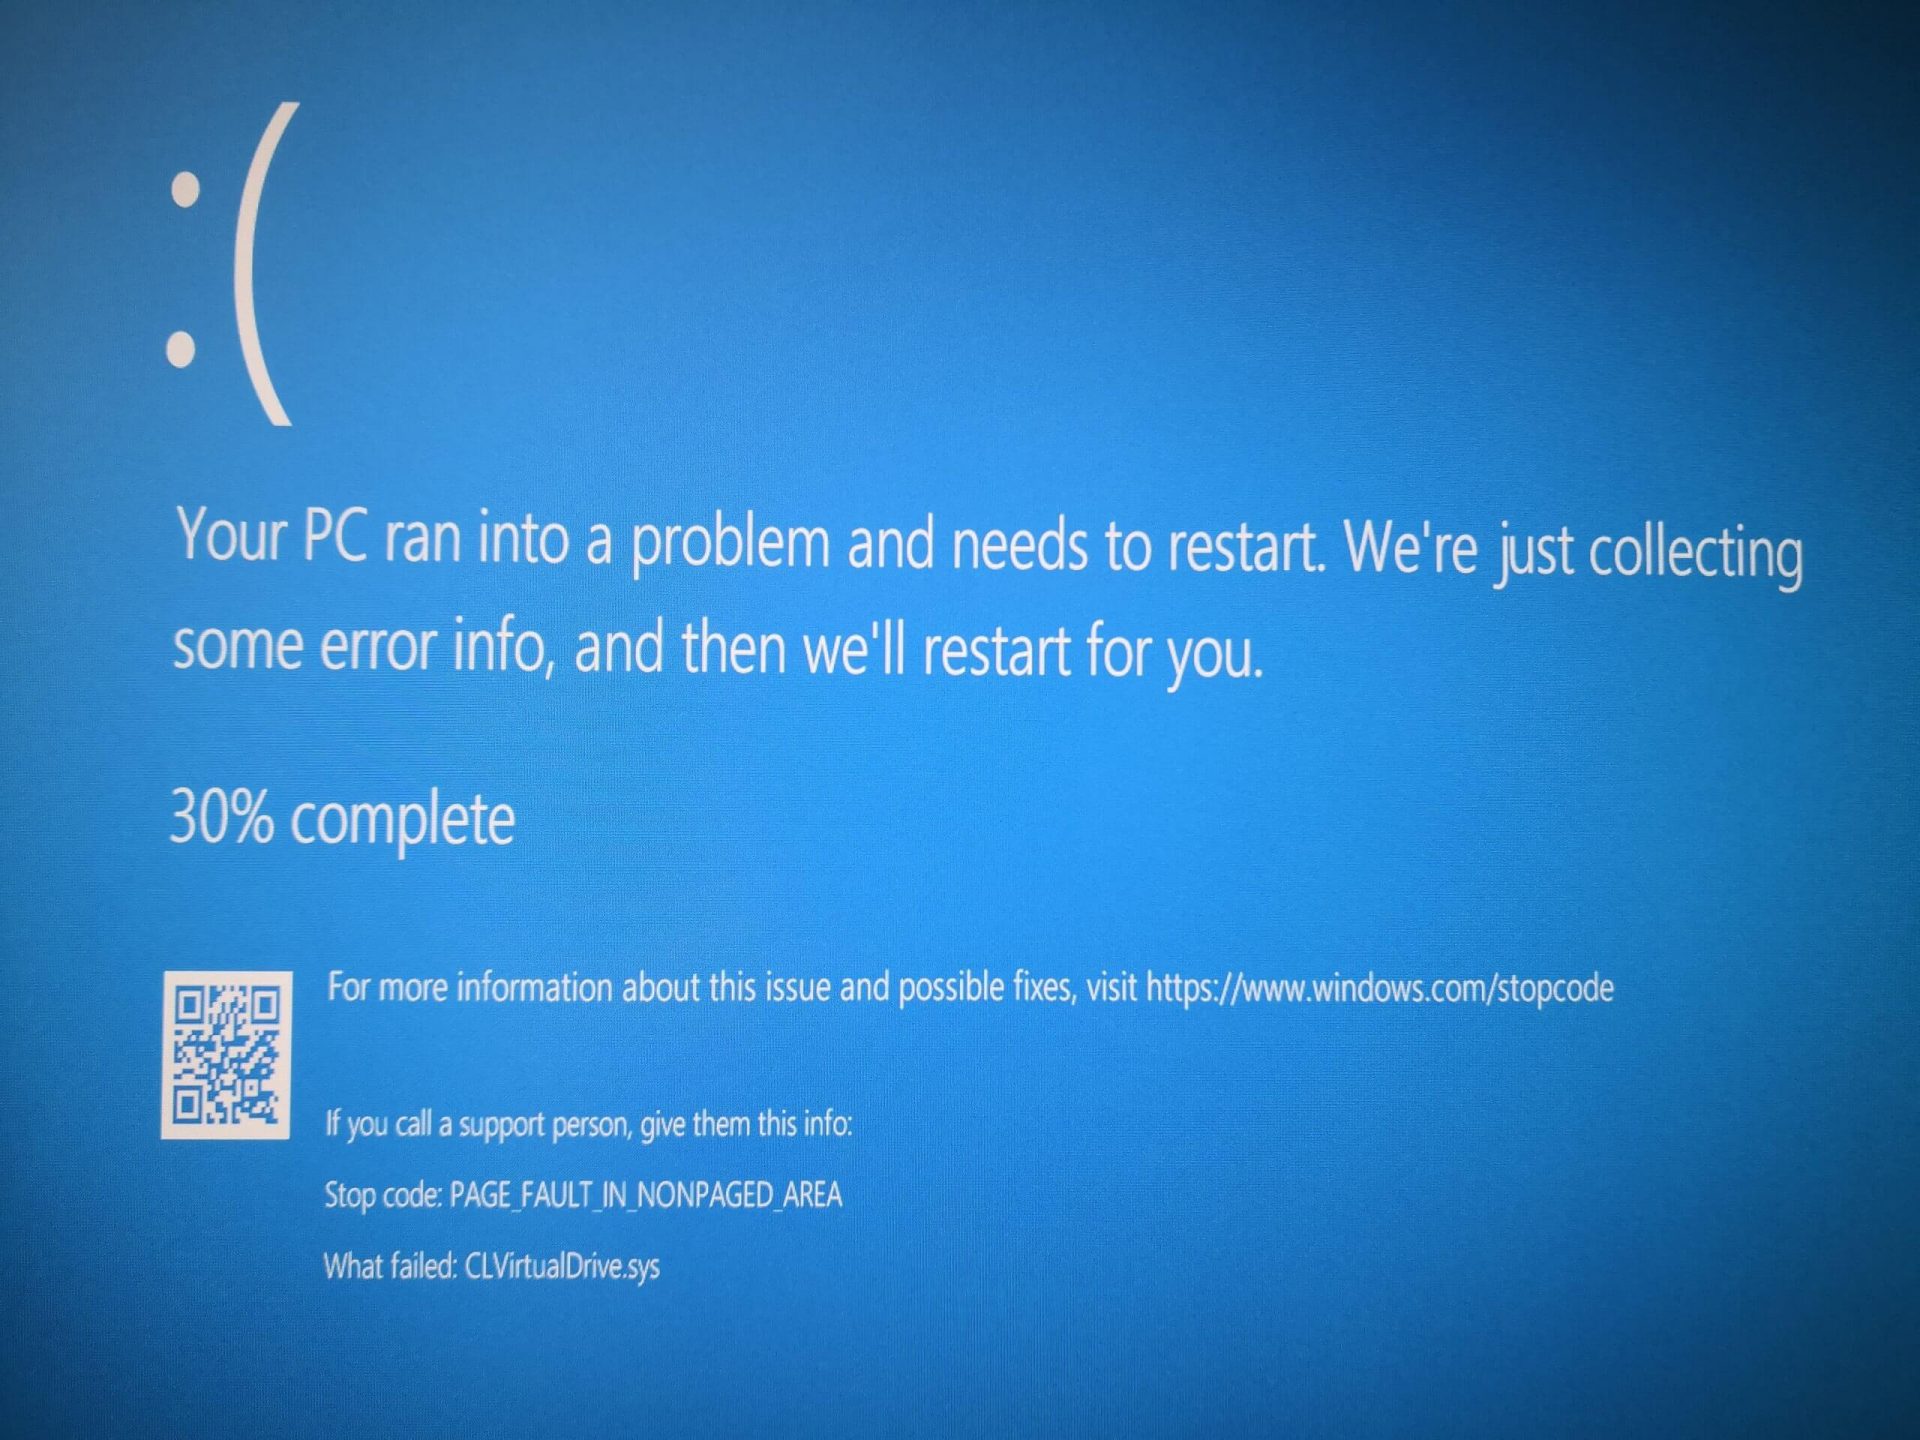
Another driver device error message you might encounter is error code 41. 

Error Causes

Error 28 occurs because of unsuccessful device driver installation. This usually happens when you try to update new drive versions on your system. It is advisable to repair this error right away as it can hamper your ability to use certain hardware. For example, if error 28 occurs due to the unsuccessful installation of the USB driver, then it if not fixed and resolved it may prevent you from using hardware devices. Unsuccessful driver installation means you either didn’t install it properly or your computer has registry issues. If it’s the registry then you must fix it without any delay because it can expose your PC to serious threats like system crash and failure. To avoid such inconvenience, repair it.

Further Information and Manual Repair

When it comes to repairing the error code 28, here’s what you can do: Simply go to the control panel and click on the Device Manager option:
  • In the details pane with the list of devices, locate the device for which you want to reinstall the driver software.
  • Double click on it to open the properties dialog box.
  • Now click on the driver tab and then click update driver.
After updating, try using that device again if it doesn’t work and shows the error code 28 on your computer screen then this means the underlying cause is the registry. Congratulations, you have just Fixed Error Code 28 In Windows 10 all by yourself. If you would like to read more helpful articles and tips about various software and hardware visit errortools.com daily. Now that’s how you fix Error Code 28 In Windows 10 on a computer. On the other hand, if your computer is going through some driver-related issues that have to get fixed, there is a one-click solution known as DRIVERFIX you could check out to resolve them. This program is a useful tool that could repair corrupted drivers and optimize your PC’s overall performance. This is basically a solution that’s within your grasp with just a click. It’s easy to use as it is user-friendly. For a complete set of instructions in downloading and using it, refer to the steps below Perform a full system scan using DRIVERFIX. To do so, follow the instructions below.
  1. Download and install DRIVERFIX. from the official site.
  2. Once the installation process is completed, run DRIVERFIX. to perform a full system scan. driverfix screenshot
  3. After the scan is completed click the “Update All” button. driverfix screenshot
Read More
Android malware spies while posing as a Update
New malware with extensive spyware capabilities steals data from infected Android devices and is designed to automatically trigger whenever new info is read to be exfiltrated. The spyware can only be installed as a 'System Update' app available via third-party Android app stores as it was never available on Google's Play Store. This drastically limits the number of devices it can infect, given that most experienced users will most likely avoid installing it in the first place. The malware also lacks a method to infect other Android devices on its own, adding to its limited spreading capabilities. However, when it comes to stealing your data, this remote access trojan (RAT) can collect and exfiltrate an extensive array of information to its command-and-control server. Zimperium researchers who spotted it observed it while "stealing data, messages, images and taking control of Android phones."

What happens when malicious software is installed

"Once in control, hackers can record audio and phone calls, take photos, review browser history, access WhatsApp messages, and more," they added. Zimperium said its extensive range of data theft capabilities includes:
  • Stealing instant messenger messages;
  • Stealing instant messenger database files (if the root is available);
  • Inspecting the default browser's bookmarks and searches;
  • Inspecting the bookmark and search history from Google Chrome, Mozilla Firefox, and Samsung Internet Browser;
  • Searching for files with specific extensions (including .pdf, .doc, .docx, and .xls, .xlsx);
  • Inspecting the clipboard data;
  • Inspecting the content of the notifications;
  • Recording audio;
  • Recording phone calls;
  • Periodically take pictures (either through the front or back cameras);
  • Listing of the installed applications;
  • Stealing images and videos;
  • Monitoring the GPS location;
  • Stealing SMS messages;
  • Stealing phone contacts;
  • Stealing call logs;
  • Exfiltrating device information (e.g., installed applications, device name, storage stats).

How does it work?

Once installed on an Android device, the malware will send several pieces of info to its Firebase command-and-control (C2) server, including storage stats, the internet connection type, and the presence of various apps such as WhatsApp. The spyware harvests data directly if it has root access or will use Accessibility Services after tricking the victims into enabling the feature on the compromised device. It will also scan the external storage for any stored or cached data, harvest it, and deliver it to the C2 servers when the user connects to a Wi-Fi network. Unlike other malware designed to steal data, this one will get triggered using Android's contentObserver and Broadcast receivers only when some conditions are met, like the addition of a new contact, new text messages, or new apps being installed. "Commands received through the Firebase messaging service initiate actions such as recording of audio from the microphone and exfiltration of data such as SMS messages," Zimperium said. "The Firebase communication is only used to issue the commands, and a dedicated C&C server is used to collect the stolen data by using a POST request."

Camouflage

The malware will also display fake "Searching for the update.." system update notifications when it receives new commands from its masters to camouflage its malicious activity. The spyware also conceals its presence on infected Android devices by hiding the icon from the drawer/menu. To further evade detection, it will only steal thumbnails of videos and images it finds, thus reducing the victims' bandwidth consumption to avoid drawing their attention to the background data exfiltration activity. Unlike other malware that harvests data in bulk, this one will also make sure that it exfiltrates only the most recent data, collecting location data created and photos taken within the last few minutes. If you would like to read more helpful articles and tips about various software and hardware visit errortools.com daily.
Read More
Fix Page Fault in Non-Paged Area in Windows 10
Page Fault in Non-Paged Area is a blue screen error usually happening with faulty drivers but it can come from different issues like faulty RAM. In this short article, we will cover usual ways on how to approach and solve this error.

Solving Page fault in Non-Paged Area

Page Fault in Non-Paged AreaRollback using system restore

Simple and easy solution, roll back to the previous system restore point where Windows was stable and working.

Fix Page Fault in Non-Paged Area using device manager

  1. Press ⊞ WINDOWS + X to open the hidden menu
  2. Click on device manager
  3. Find a device with a question mark and right-click on it
  4. Click on the rollback driver button

Fix via command prompt

  1. Press ⊞ WINDOWS + X to open the hidden menu
  2. Click on command prompt (admin)
  3. Inside command prompt type in SFC / scannow and press ENTER
  4. Wait for the process to be finished and then reboot the PC

Fix via DISM tool

  1. Press ⊞ WINDOWS + X to open the hidden menu
  2. Click on command prompt (admin)
  3. Inside command prompt type in DISM /Online /Cleanup-image /Restorehealth and press ENTER
  4. Wait for the process to be finished and then reboot the PC

Page fault in Non-Paged Area via a dedicated tool

Sometimes manual and provided solutions just simply cannot cut it because the issue is triggered also with something else and not just a single issue. Use DRIVERFIX to fix this specific issue with a single click.
Read More
How to Fix Windows 8 Error Code 0xd0000272

Error Code 0xd0000272 – What is it?

Error code 0xd0000272 occurs when Windows users are unable to activate their operating system. This usually occurs due to activation servers being busy or unavailable and affects Windows 8, Windows 8.1, and Windows 10 users. Common symptoms of the error code include the following:
  • Inability to activate Windows operating system
  • Message box with error code 0xd0000272

Solution

Restoro box imageError Causes

Windows users affected by error code 0xd0000272 usually receive a message stating that the “activation server is busy or unavailable”. Some users report the error is resolved on its own after a few hours, while others experience activation issues that resolve only after manual repair methods are implemented.

Further Information and Manual Repair

To improve your chances of resolving issues related to Windows activation error codes, use manual repair methods and procedures. These are often successful as they address the issues causing the error codes to occur, whether there be missing or corrupted system files, network connectivity issues, or invalid product keys.

Error code 0xd0000272 may be resolved by simply waiting until later – a few hours at most – to reattempt activation. If, however, the activation process fails, proceed with the methods suggested below or contact a Windows repair technician.

  1. Method One: Verify Internet Connection to Activate Windows

Are network connectivity issues preventing your machine from activating Windows? Check for this issue by verifying whether or not you are connected. Once you’ve been able to check your connection via your Internet settings and troubleshoot your network where necessary, proceed to the Product Activation Wizard.

The Product Activation Wizard will check if you have permission or authorized access to the version of Windows you are attempting to activate. This process usually involves the use of a product key. Once you enter the 25-character code – in the correct order, of course – proceed by selecting the activation option.

If the process is successful, you will be able to complete the activation and access all the features of the Windows edition you have activated. You will also notice the absence of the error code 0xd0000272 message. In cases where this manual repair method is unable to successfully resolve the issue, however, move to the next manual repair procedure on this list.

  1. Method Two: Run Windows Update Troubleshooter

Another tool available to Windows users is the Windows Update Troubleshooter. You may access the Windows Update Troubleshooter offered on Windows 8 since it does not require an internet connection and runs most of the functions required. To do so, follow the steps below.
  • Step one: Swipe to the right of the screen and click Search
  • Step two: Type Troubleshooting
  • Step three: Click Settings then select Troubleshooting
  • Step four: Under System & Security, click Fix Problems with Windows Update
  • Step five: Select Next

You can also visit Microsoft’s website to access a more comprehensive Windows Update Troubleshoot tool. Download the troubleshooter and run it to fix problems related to Windows Update. Afterward, restart your computer then check the Product Activation Wizard to verify whether or not you can activate Windows 8 or 8.1.  If the problem persists, however, and error code 0xd0000272 reoccurs, proceed to the third manual repair method.

  1. Method Three: Disable Proxy Settings

Your computer’s proxy settings may in some cases interfere with the activation process, resulting in issues like error code 0xd0000272. To fix this problem, first, disable your proxy setting then reattempt the activation process using the Product Activation Wizard.

  • Step one: Press Win + C keyboard combination
  • Step two: Select Settings
  • Step three: Click Change PC Settings
  • Step four: Select Network, then Proxy
  • Step six: Switch proxy server settings to Off

Open the Product Activation Wizard once you’ve disabled the proxy settings. Complete the activation process based on the instructions provided. If you are successful, you will no longer be bothered by error code 0xd0000272 as the symptoms of the error code will not occur.

If, however, this manual repair method fails to resolve the error code, you may need to consider other alternatives. These may include the use of a powerful automated tool. You can also consider getting help from a Windows repair technician as such professionals are able to assess your computer and provide solutions as needed.

Read More
Fix Windows Update Error 0x8024A10A
The Windows Update service, just like other services in Windows 10 may sometimes experience some issues and stop behaving properly. One of the issues you might encounter as you use the Windows Update service is the Windows Update error 0x8024A10A. This kind of error code signifies that the Windows Update service is shutting down. So if you encounter this error, read on as this post will guide you on how you can fix it. When you receive the Windows Update error 0x8024A10A, you may see this error message on your screen: “USO_E_SERVICE_SHUTTING_DOWN indicates that the WU Service is shutting down. This may happen due to a very long period of time of inactivity, a system hang leading to the service being idle and leading to the shutdown of the service. Ensure that the system remains active and the connections remain established to complete the upgrade.” You could try to restart your computer to resolve the problem since there are instances when a simple restart can fix errors. However, if it does not work, you might find the options provided below useful.

Option 1 – Try to restart the Windows Update Service

The first thing you can do to fix Windows Update error 0x8024A10A is to restart the Windows Update Service from the Services Manager. To do so, follow these steps:
  • In the Cortana search box, type “services” and click on the Services icon to open the Services Manager. Alternatively, you can also tap the Win + R keys to launch the Run prompt and then type “services.msc” in the field and hit Enter to open the Services Manager.
  • After opening the Services Manager, look for the Windows Update Service.
  • Once you found it, right-click on it and check if the Service is stopped. If it is, then select the Start option. On the other hand, if the Windows Update Service is already started, just select the Restart option.
  • After that, try to run the Windows Update again and see if the error 0x8024A10A is now fixed.

Option 2 – Run the Windows Update Troubleshooter

Since the Windows Update troubleshooter reviews the status of the services that support the process, it would prompt and fix it if there is anything that’s not right. Thus, you might want to run a built-in Windows Update troubleshooter to resolve the Windows Update error. It is one of the things you can check out as it is known to automatically resolve any Windows Update errors like error 0x8024A10A. To run this troubleshooter, go to Settings and then select Troubleshoot from the options. From there, click on Windows Update and then click the “Run the troubleshooter” button. After that, follow the next on-screen instructions and you should be good to go.

Option 3 – Run Microsoft’s online troubleshooter

Aside from the Windows Update troubleshooter, running Microsoft’s online troubleshooter might also help you fix the Windows Update Error 0x8024A10A. This online troubleshooter is known to help in fixing Windows Update errors, it scans your computer for issues that might be causing the problem and then fixes them automatically.

Option 4 – Try to run the Windows Update Service in a Clean Boot State

There are some instances that some conflicting programs installed in your computer might be the one that’s causing Windows Update error code 0x8024A10A. To identify which program is causing the problem, you need to put your computer in a Clean Boot State. To do so, follow the steps below.
  • Log onto your PC as an administrator.
  • Type in MSConfig in the Start Search to open the System Configuration utility.
  • From there, go to the General tab and click “Selective startup”.
  • Clear the “Load Startup items” check box and make sure that the “Load System Services” and “Use Original boot configuration” options are checked.
  • Next, click the Services tab and select the “Hide All Microsoft Services” check box.
  • Click Disable all.
  • Click on Apply/OK and restart your PC. (This will put your PC into a Clean Boot State. And configure Windows to use the usual startup, just simply undo the changes.)
  • Now try to run the Windows Update Service again and see if Windows Update error 0x8024A10A is now gone.
Read More
Blizzard caught destroying evidence
Blizzard employeesCalifornia's Department of Fair Employment & Housing has widened its anti-discrimination lawsuit against Activision Blizzard and claims the publisher has been shredding vital documents relevant to the ongoing investigation. A recent report from Kotaku described the department as offering poorly paid, highly insecure positions, with a culture of hostility towards LGBTQ+ testers. The DFEH's rewording of "employees" to "workers" now hopes to take these contractors' experiences into account. "As a contract employee, I feel there's a lot of pressure to excel, impress, and move through the ranks as fast as you can before your contract ends and you're forced to go 3 months without income or find another job," Axios reports one worker saying. "I take pride in what I do, but it feels like it's never enough." Activision's contentious hiring of union-busting third-party law firm WilmerHale "directly interferes" with its own investigation, it says. By going to WilmerHale, Activision appears to be claiming that all work related to the investigation is privileged and can't be shared with DFEH. The suit also claims that Activision HR shredded documents related to "investigations and complaints", against its legal obligation to retain them during the investigation. The relevant parts of the updated lawsuit were shared by Axios reporters Stephen Totilo and Megan Farokhmanesh, the former also noting that the DFEH "fixed their misspelling of Bill Cosby's name". "DFEH is also informed and aware that documents and records have not been maintained as required by law or by the DFEH's Document Retention Notice," the complaint reads, "including but not limited to documents related to investigations and complaints were shredded by human resource personnel and emails are deleted thirty days after an employees separation."

Speculation and answer from Activision Blizzard

Blizzard employee Jessica Gonzalez suspects that the costs of fines associated with destroying these documents may have been an easier blow for Blizzard to take than any penalties drawn from their existence in helping the lawsuit go through. In an email to Kotaku, Activision denied the shredding allegations and issued a statement outlining steps it had taken to improve company culture—including the ousting of high-level executives like Blizzard president J. Allen Brack. The full statement reads: "Throughout our engagement with the DFEH, we have complied with every proper request in support of its review even as we had been implementing reforms to ensure our workplaces are welcoming and safe for every employee. Those changes continue today, and include:
  •     Several high-level personnel changes
  •     Revamped hiring and recruiting practices requiring diverse interview panels
  •     Greater transparency on pay equity
  •     Expanded and improved training and investigative capabilities for human resource and compliance staff
  •     Created investigation teams outside of business units to support greater independence
  •     Restructured divisions to support greater accountability
  •     Enhanced review processes to include evaluation of managers by employees
  •     Clear boundaries on workplace behavior with a zero-tolerance approach to harassment and other actions that diminish or marginalize.
"We strive to be a company that recognizes and celebrates the diverse talents and perspectives that lead to the creation of great, globally appealing entertainment. We have provided the DFEH with clear evidence that we do not have gender pay or promotion disparities. Our senior leadership is increasingly diverse, with a growing number of women in key leadership roles across the company. "We share DFEH’s goal of a safe, inclusive workplace that rewards employees equitably and is committed to setting an example that others can follow."

California and RIOT

Beyond Activision Blizzard, California's DFEH has also probed into League of Legends creator Riot Games, accusing the studio of dragging its heels over sexual harassment allegations dating back to 2019. Riot denied the allegations, telling us that it "will never retaliate against anyone for talking to any government agency".
Read More
Run Windows Updates from Command Line
As you know, one of the most highlighted features of Windows 10 is Windows Updates. It was offered to the customers as a service rather than a product with the release of Windows 10 under the scenario of Software as a Service which led to Windows Updates being set by default on Windows 10 and without an option for any users to disable it. Although not all users are happy with what Microsoft did, this is an ultimate step towards the greater good of all its customers since Windows Updates helps users in keeping their computers secured against all kinds of threats as well as provide them with the greatest and latest updates from Microsoft. So if you are one of those users who approved of the Windows Updates service, then read on as this post will guide you in running Windows Updates from Command Line either via Command Prompt or Windows PowerShell. For the complete set of instructions, refer to the options given below.

Option 1 – Run Windows Update via Command Prompt

Command Prompt in the Windows operating system exists for a very long time now compared to the comparatively new Windows PowerShell. That’s why it has similar capabilities to run Windows Updates. However, the highlighting point here is that you don’t have to download any module for Windows Updates. To get started running Windows Updates using Command Prompt, refer to the steps below.
  • First, type “cmd” in the Cortana search box, and from the search results, right-click on Command Prompt and select the Run as Administrator option to open it with Administrator privileges.
  • If a User Account or UAC prompt appears, just click on Yes to proceed.
  • Next, type in the commands listed below, and don’t forget to tap Enter right after you type each one of them.
    • UsoClient StartScan – use this command to start checking for updates.
    • UsoClient StartDownload – use this command to start downloading updates.
    • UsoClient StartInstall – use this command to start installing the downloaded updates.
    • UsoClient RestartDevice – use this command to restart your computer after you install.
    • UsoClient ScanInstallWait – use this command to check, download and install updates.
Note: Keep in mind that the commands in Command Prompt listed above are only meant for Windows 10. On the other hand, if you are using an older Windows version, you can try using the following commands instead:
  • wuauclt /detectnow – use this command to start checking for updates.
  • wuauclt /updatenow – use this command to start installing the updates detected.
  • wuauclt /detectnow /updatenow – use this command to check, download and install updates.

Option 2 – Run Windows Updates via Windows PowerShell

If you run Windows Updates in the Windows PowerShell, it will require you to install the Windows Update module manually. Hence, you have to get the Windows Updates downloaded and install Windows Updates.
  • Search for PowerShell in the Cortana search box and then run it with administrator privileges.
  • Once you’ve opened the Windows PowerShell, type the following command and hit Enter.
    • Install-Module PSWindowsUpdate – use this command to install the Windows Update module for Windows PowerShell.
    • Get-WindowsUpdate – use this command to connect to the servers of Windows Update and download the updates if found.
    • Install-WindowsUpdate – use this command to install the Windows Updates you’ve downloaded to your computer.
Read More
How to Fix Windows 10 Error 0x80070070

How to Fix Windows 10 Error 0x80070070

Error Code 0x80070070 - What is it?

Error code 0x80070070 can be presented when there is not enough drive space on the computer to install updates. It is possible to uninstall apps that are not often used, or you may delete or archive files that are no longer needed, you may even add on some removable storage space to free up the internal memory of the computer. The computer needs a significant amount of internal memory in order to be able to update the operating system properly. When the computer fails to have the amount of memory that is needed to perform the update, the error code 0x80070070 will be presented. If this error message is not resolved, your computer might be opened to other error messages, including error code 0x80072EE2.

Common symptoms include:

  • Windows cannot install updates properly.
  • You might not be able to install any additional programs or apps onto the computer.
  • When you check the memory of the computer, it may be very near its full capacity.

Solution

Restoro box imageError Causes

The Windows 10 upgrade error is caused by varying factors including a lack of computer space or resources, malware or virus infestation, or a clogged registry on the computer.  The error code 0x80070070 will present itself when there is not enough free space on the computer to perform the necessary updates on the computer. Too many apps or programs downloaded onto the computer, too many photos, or too much music may also contribute to the lack of storage space on the computer, thus contributing to the error, and the computer not being able to install the updates to the operating system properly.

Further Information and Manual Repair

There is not a lot of information regarding this error code, but there are a few methods to repair it when it does present itself. There are practical and manual steps that can be taken when trying to get the PC up and running. The primary way to solve this problem is to free up disk space and there are several ways to do this. Please do note that if these methods seem confusing or too complicated, do contact a Windows repair technician so that they may properly correct the problem. You will need to know for sure that it is error code 0x80070070 that you are dealing with so that these options are the best bet for fixing it.

Method One: Disk Cleanup

It is important to know how much space there is on the computer to start with prior to trying to free up any space. Use the free program on the computer called the Disk Cleanup tool. This will save time and free up some hard drive space while optimizing the computer to work better.

From the Start menu, browse to the Explore option, and then select This PC. Right-click on the C drive, and then select Properties. Select Disk cleanup. From here, select the options that you would like to clear. Make sure that the recycle bin is emptied of any temporary files or any error logs. Once done, select Okay.

Use this same process to clear the system files after an update from Windows, as they may still have files from the old operating system in place.

Method Two: Remove Unwanted Apps

Go through your computer and remove any unwanted apps that are present. There are sure to be some that you do not use or do not want.

Follow these steps: From the Start menu, select Settings. Then, select System, Apps, and Features. When you have found the program that you would like to uninstall, select it and then select Uninstall. NOTE: some apps that are built into Windows do not have the capability to be uninstalled. Once you have selected Uninstall for the app or program, follow all directions that appear on the screen.

Method Three: Cloud Storage

If there are a lot of media, photos, documents, videos, and the like that are not used on a regular basis, try out cloud storage. These files will still be in your possession and will be able to be accessed from anywhere. There are many applications or websites that cater to this.

Method Four: External Storage Options

If none of the above methods work, add more storage. To acquire more storage, you can incorporate devices such as SD cards, USB flash drives, and even external hard drives.

Method Five: Use An Automated Tool

If you wish to always have at your disposal a utility tool to fix these Windows 10 and other related issues when they do arise, download and install a powerful automated tool.
Read More
Onscreen keyboard becomes transparent
If you suddenly noticed that your Onscreen keyboard in Windows 10 has become completely white or transparent for some reason, then you’ve come to the right place as this post will guide you on what you can do to resolve this kind of issue in your computer. As you know, the on-screen keyboard is included in Windows 10 and has an executable file named “osk.exe”. The on-screen keyboard is a part of the Ease of Access feature in Windows 10 which allows users to navigate the computer with the help of the mouse instead of the physical keyboard. However, there are times when you might encounter some issues when using the on-screen keyboard. One of the issues reported recently is that the on-screen keyboard becomes transparent or it only displays the borders but there is no way for you to access it. You also won’t be able to move it from the view completely. To fix this problem, there are several suggestions you can check out. You can try to check the Fade button or run the Windows Touch Keyboard troubleshooter. You can also restart its process in the Task Manager. For more details, refer to each one of the given options below.

Option 1 – Try to check the Fade button

The first thing you can do is to check the Fade button on the on-screen keyboard. You can find it at the bottom right corner of the keyboard. If it is enabled, then it’s probably the reason why your on-screen keyboard is transparent as it lets it fade in the background. Thus, you have to disable it to resolve the problem.

Option 2 – Try to run the Windows Touch Keyboard troubleshooter

The next option you can check out is running the Windows Touch Keyboard troubleshooter. This troubleshooter will help you identify the problem and would fix them automatically.

Option 3 – Try to restart the process of the on-screen keyboard via Task Manager

The next thing you can do is to restart the on-screen keyboard’s process in the Task Manager. Just follow the steps below.
  • First, tap the Ctrl + Shift + Esc keys to open the Task Manager.
  • Next, go to the Processes tab and look for the option that says, “Accessibility On-screen Keyboard”.
  • Once you found it, click on the drop-down arrow next to it and right click on the “On-screen Keyboard” option, and select End task to end its process.
  • After that, tap the Win + R keys to launch the Run utility and type “osk.exe” in the field, and then hit Enter to open the on-screen keyboard.
Read More
1 2 3 162
Logo
Copyright © 2022, ErrorTools. All Rights Reserved
Trademarks: Microsoft Windows logos are registered trademarks of Microsoft. Disclaimer: ErrorTools.com is not affiliated with Microsoft, nor claim direct affiliation.
The information on this page is provided for information purposes only.
DMCA.com Protection Status