Fix BlueTooth issues in Windows 10

Bluetooth troubleshooting, I believe firmly that each one of us who has Bluetooth sooner or later had some issues with it, after all, it seems that it is in nature of radio transmitters to from time to time due to nature of signal and nature of Windows loose communication between them and can cause device which seems to work properly but can not establish the connection.

Most of the time Bluetooth issues are like that, the signal gets lost, the connection is broken, and establishing it again can be sometimes real pain, luckily for you, we have experience in this field and are here to help you and provide you with tips how to solve Bluetooth connection issues based on our own struggles.

  1. Check if BlueTooth is ON

    Yes, this seems stupid and sounds a lot like is it plugged in but here me out. Due to lost connections and different power plans setting inside your Windows, your Bluetooth receiver might be actually turned OFF thus preventing your other device to find your computer. Checking to see if Bluetooth has been by some accident turned OFF and switching it back ON should be the first thing to do and this could be a simple solution for your problem.

  2. Restart the BlueTooth device.

    Yup, another of these have you tried turning it OFF and turn it back ON advice which seems like tech cliche but in the case of Bluetooth, this can actually solve your problem. Radio signals and radio connections are not the same kinds of beasts like cable ones and sometimes Bluetooth device remembers certain information and can cause conflict. Turning it OFF and then back ON will clear its memory and cache and you will be ready for a new start hopefully solving your issue along the way.

  3. Check power supply

    If your Bluetooth device does not have a battery indicator, it would be wise to check on the battery status of the device. Sometimes we forget to charge batteries, sometimes someones have drained them. Checking the battery or just checking if the power supply is working properly should not be overlooked and it definitely should be on your to-do list of quick solutions.

  4. Restart PC

    Sometimes most simple solutions work and if restarting your Bluetooth device did not work, maybe restarting your PC will. When you restart the PC, you clear the cache and many other things that could potentially be the reason for connection issues.

  5. Checks BlueTooth device distance from computer or interference from obstacles

    The Bluetooth device operates via radio waves, and like wi-fi, if the distance from the computer is too large or you have some thick walls in between signal will degrade and be almost useless. Be aware that your PC might catch device waves and detect them but the signal itself could be too weak for the connection to work properly. Take the device and move it closer to the PC to see if the problem will go away, if it does issue was in distance or walls.

  6. Reinstall or update device drivers.

    Sometimes the issue could be in Windows update and old drivers, make sure that all of your drivers are updated with the latest version and that Windows itself has the most recent update in it. Trying to reinstall device cold also solve some the issue.

  7. Remove and Pair deice again

    if you tried all previous steps, try removing the device from Windows and then pairing it again. This could solve the issue since Windows itself could have mistakenly saved it like something else and can not recognize it.

  8. Use Windows troubleshooter

    If everything else failed, right-click and go to troubleshoot. Windows troubleshooter will try to find the issue and direct you to a solution.

If sadly none of these things do work, you should contact the device manufacturer since it is a very good chance that the problem is one of a hardware nature.

If you like to learn and find out more about various Windows errors, and how to repair them go to our vast archive or use search to find articles that will explain and help you in solving your issue.
However, if you prefer to do things fast and with automatization then we are proposing to use an automated solution for your issues. The application that we are recommending is Advanced System Repair Pro
Advanced System Repair utilizes multiple tools all in one to give you a quick, simple, reliable, and very thorough diagnosis of your PC. It brings you all the tools you need in one program to clean, fix, protect, optimize and boost your PC!
1-Click Maintenance
All the tools to make it simple and easy! It's like having a professional technician at the click of a mouse.

Junk Cleaner
Keeping your computer free from unnecessary clutter also helps make your computer last longer. Like any other machine, if you keep it clean and take care of it, it will serve you better for longer!

Optimize background apps
Optimize applications background activity with the built-in Application Optimizer feature.

Disk Defrag
With a simple 1-click, Advanced System Repair speeds up your PC by assembling fragmented files on your machine and organizing them more efficiently.

Malware Removal
Finds and removes all types of harmful malware including trojans, worms, bots, adware, spyware, PUPs, and more!

Privacy Cleaner
The all-in-one privacy suite to Clean Your Tracks & Protect Your Privacy! Make your computer safe, secure, and more efficient!

System Tweak/Optimizer
ASR will analyze your complete system and settings to adjust your PC to function at its maximum performance.

Registry Cleaner
Over time, as you install and uninstall applications, the registry can become cluttered with old entries and broken settings which can result in program crashes, and annoying messages and slow the computer down.
Visit our Advanced System Repair Pro Download page to inform yourself about all the benefits of this software and get a free trial copy of it.
advanced system repair pro

Advanced System Repair Pro

One-click automated PC repair solution
ASR logo
With Advanced System Repair Pro you can easily
Replace damaged files
Restore performance
Free disk space
Remove Malware
Protects WEB browser
Remove Viruses
Stop PC freezing
DOWNLOAD
Privacy Policy | Terms of Use | Uinstall
Advanced System Repair Pro is compatible with all versions of Microsoft Windows including Windows 11

Share this article:

You might also like

Best Free Stock Photo WEB sites of 2021
The Internet has become an essential human right as stated in many countries around the world. Among many benefits that the internet offers are various sites selling Stock photographs for all of your needs. No matter are you working in the design industry or just want to make something for yourself there is a high chance that you will eventually need some photos for your work. Stock photo workIn this article we are going to go through the best Stock Photo sites BUT, we will focus on ones that give you royalty-free Photos, so no paying stuff here, just the best of the free world.

Adobe Stock free collection

https://tracker.tradedoubler.com In the last year of 2020, Adobe has made more than 70000 photos, videos, illustrations, and templates completely free. You are free to use provided material for personal, commercial, and creative work. Since this is adobe’s collection, well part of it, all of the given material is of high quality. You can also upload pictures to do a visual search to find similar ones.

Unsplash

https://unsplash.com/ Unsplash is a place where you will go if you want to find free-quality pictures. Since a lot of photographers are donating their selected work there you will find always consistently high-quality work there. Unsplash also has applications for Android and iOS so you can go through their stock on your mobile device as well. Photos are organized into categories that make searching much easier.

Pixabay

https://pixabay.com/ Pixabay is maybe well known due to its huge collection of both images and illustrations. There are tons and tons of stuff in there all royalty-free for use. The bad side is due to its strongest one, since there are so many images on its site, quality is not always top-notch like on Unsplash for comparison but you might find stuff here that you will not be able to do it anywhere else.

Pexels

https://www.pexels.com/ This is a great choice for web or app developers since you can find various UI ideas and designs on it. Many UI ideas ready for implementation will be found here and a decent amount of photos as well. The overall site is great for that purpose but please do read the license on each image since some of them are limited in use and cannot be used in commercial projects.

Pikwizard Stock

https://www.pikwizard.com/ Stock photography from Pikwizard is a place where you will go if you need high-quality pictures of people. There are a lot of images of people in natural poses doing things, nothing cheesy or unnatural, just pure and great-looking ones. Among other things is also a vast selection of cityscapes. Sadly as in the case of Pexels, not all pictures have the the same license so make sure to check terms of use before using one.

Gratisography Stock photos

http://gratisography.com/ Last on our list is a Stock site with a strange name and if you visit it you will see that it is not just the name that is strange. Gratisography is a stock site that aims to provide you with high-quality photographs but in different take from another site. These images are more artistic and surreal than other competitor sites. Images are uploaded almost on daily basis but since thematic is somewhat niche collection itself is relatively small.

Conclusion

That’s it, we hope that we have helped you in any way to find some material for your next project and I hope to see you soon back on errortools.com. Take care and all the best.
Read More
Fix Mic not working in DOTA2
DOTA2 involves teams of five players each, where each player chooses a “hero” character. Each game has two teams pitted against each other, on opposite sides of a map. Once you start, you and your teammates try to level up by fighting and defeating heroes from other teams as well as non-player characters who exist within the game universe. Once you have a strong enough team, you would then try to attack an opposing team’s base. If you destroy their “ancient,” your team wins. The teamwork and interactivity required to play the game are some of its biggest attractions. You can text and voice chat as part of the Dota 2 gameplay, enabling you and your team to come up with strategies to take over your opponents’ base and fortifications. For this reason, a properly working microphone and headset are important if you are to get the most out of this exciting online game. However, there are many times when you find that there are audio dropouts when you try to speak into your microphone. The question “How do I get my mic to work on Dota 2?” is one of the most commonly asked on gaming forums related to this game. Here are solutions for why this can happen:
  1. You are logged in to another computer that is running the STEAM client

    While entirely rare, there are cases where the microphone in Steam is disabled because the same account is active and in use on a different computer. It may not notify you that your account is in use elsewhere. If this is the error, try to log out on other devices and then test it on only one system. If you cannot access the other computer that has access to your account, then change your password. This will automatically disconnect your Steam account from the other computer and let you enjoy voice chat in Dota 2 and other Steam games.
  2. Your microphone is not properly set up in Dota 2

    From the main Dota 2 menu, before you start a match, you can set up your microphone for voice chat. At the top, left-hand corner, click the gear icon to open Settings Select the AUDIO tab and ensure that the Sound Device and Speaker Configuration are set to default. On the same tab, activate Voice (Party) and set your Push to Talk shortcut key for your team. Select the appropriate Open Mic Threshold using the slider at the bottom of this tab to get your microphone recorded at a comfortable level.
  3. The Windows Audio Enhancements setting is turned on

    If you still cannot get your microphone to work properly, then your problem could be Windows Audio Enhancement. It is possible to get your microphone to work with Dota 2 by disabling these features. Right-click your volume icon on the system tray and select Recording Devices. Choose your active microphone then click its Properties button. On the Microphone Enhancements tab, make sure the checkboxes marked Voice enhancements and Acoustic Echo cancellation is unchecked Reboot your PC and retry using your microphone to chat.
  4. Your audio drivers need to be updated

    If you try all of the steps above and still have Dota 2 not recognizing your mic input update mic drivers by going in device manager and choosing update driver.
Read More
5 Windows 10 Upgrade errors you might encounter

5 Windows 10 Upgrade errors you might encounter

5 Windows 10 Upgrade Errors

The recently released Windows 10 captivated the mass but its rollout, polished as it might have been, proved everything but seamless. Surf the Internet and you’ll get the gist. People are complaining and they need assistance. Assistance with what you might ask? Many have attempted to make an upgrade but failed after encountering various strange combinations of letters and numbers. These are none other than error codes. If you’ve tried and failed, feast your visuals below as you might encounter one of these 5 Windows 10 Upgrade errors.

Error Code 0x80073712

Encountering error code 0x80073712 in no way implies that you need to throw out your computer system and acquire a new one. Not at all! This error code simply means that a very important file to Windows might have gone missing or corrupted. This file is crucial to Windows update so without obtaining this file, you won’t be able to proceed with the update.

Error Code 0x800F0923

Likely, there are many programs and drivers installed on your computer. They all play a vital role. However, if you’ve received error code 0x800F0923, it might be time to consider or turn your eyes to installed drivers on your system. Why? Error code 0x800F0923 means that there’s a driver or driver on your current Operating System that’s not compatible with Windows 10. There’s clearly a dilemma here.

“We couldn't complete the updates. Undoing changes. Don't turn off your computer.” Or “Failure configuring Windows Updates. Reverting changes”

That’s a pretty odd error but I will say it's slick… That Windows 10 upgrade error is straightforward. Microsoft is just letting you know that they won’t be able to complete the update to Windows 10 and so they are putting your computer back to where it was. How nice of them.

The error messages above are pretty generic and will manifest when the upgrade fails for one reason or the other. To resolve this issue, you’ll most definitely have to decipher what error code was presented. Identifying that will provide a glimpse into exactly what steps you need to take.

The Update Isn't Applicable to Your Computer

I don’t know about you but I strongly believe Microsoft is subtly letting you know that your computer system is old and needs to be thrown out. Also, this update could imply that your PC needs to install important updates to rev you up to the requirements. All relevant updates to your computer must be installed before you can get past this stage.

Error… “Something Happened”

This Windows 10 upgrade error has been the talk of the Internet. In fact, users of Windows OS have been making it a mockery. Clearly, not many have had success after encountering this error. Obviously, “something happened” but it’s just not easy to decipher what went wrong. Microsoft is still trying to figure it out.

Solution

Restoro box image
Read More
Steam updates including storage management
Valve has released a big update to its online store and distribution platform Steam. Among typical bugs fixing and making the user experience a little more fluid, we have received some major updates as well. Please take note that you need to update Steam itself to the latest version in order to get new features.

steam libraryStorage management Page update

The storage management page has received a complete redesign and UX overhaul and it is now much easier to manage your game libraries and create new ones. The page itself looks and feels a little console more like but thanks to that it offers a much easier and clearer look and feel. steam storage manager
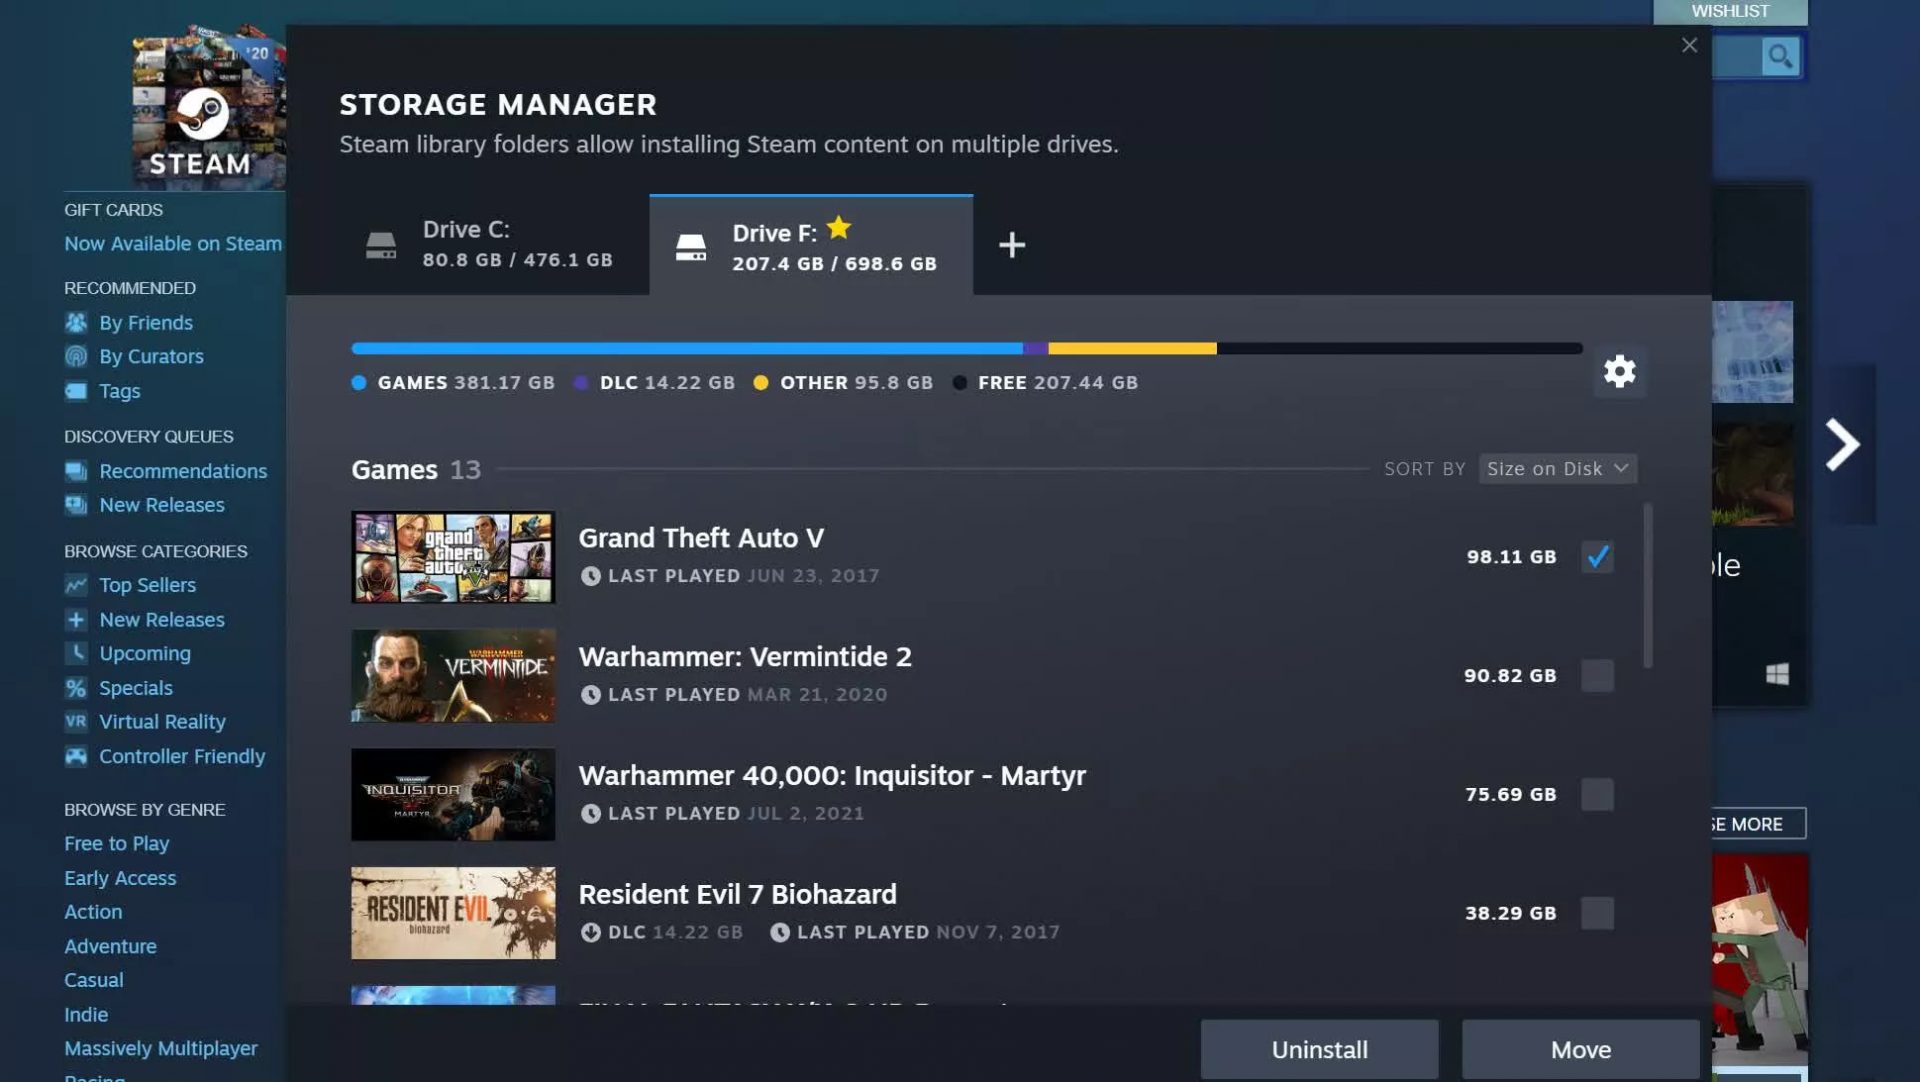
Another thing with the Steam store management page is the ability to move installation files from one location to another. Let’s say that you have two or more hard disk drivers in your machine and that you have SSD that you use for running stuff since it is fast and larger and slower one for storage. Now you can easily and quickly move one installation from one to another in order to take advantage of your faster SSD for quicker LOAD game times without making a new installation.

Steam Download page improvements

The download page has also received some love from Valve by enabling us to now see the installation progress. So far on the download page of Steam, you would only get download progress but it has been updated to show installation progress after download as well now making it more straightforward and giving you a general idea of how much more time there is to wait in order to start gaming. steam download page
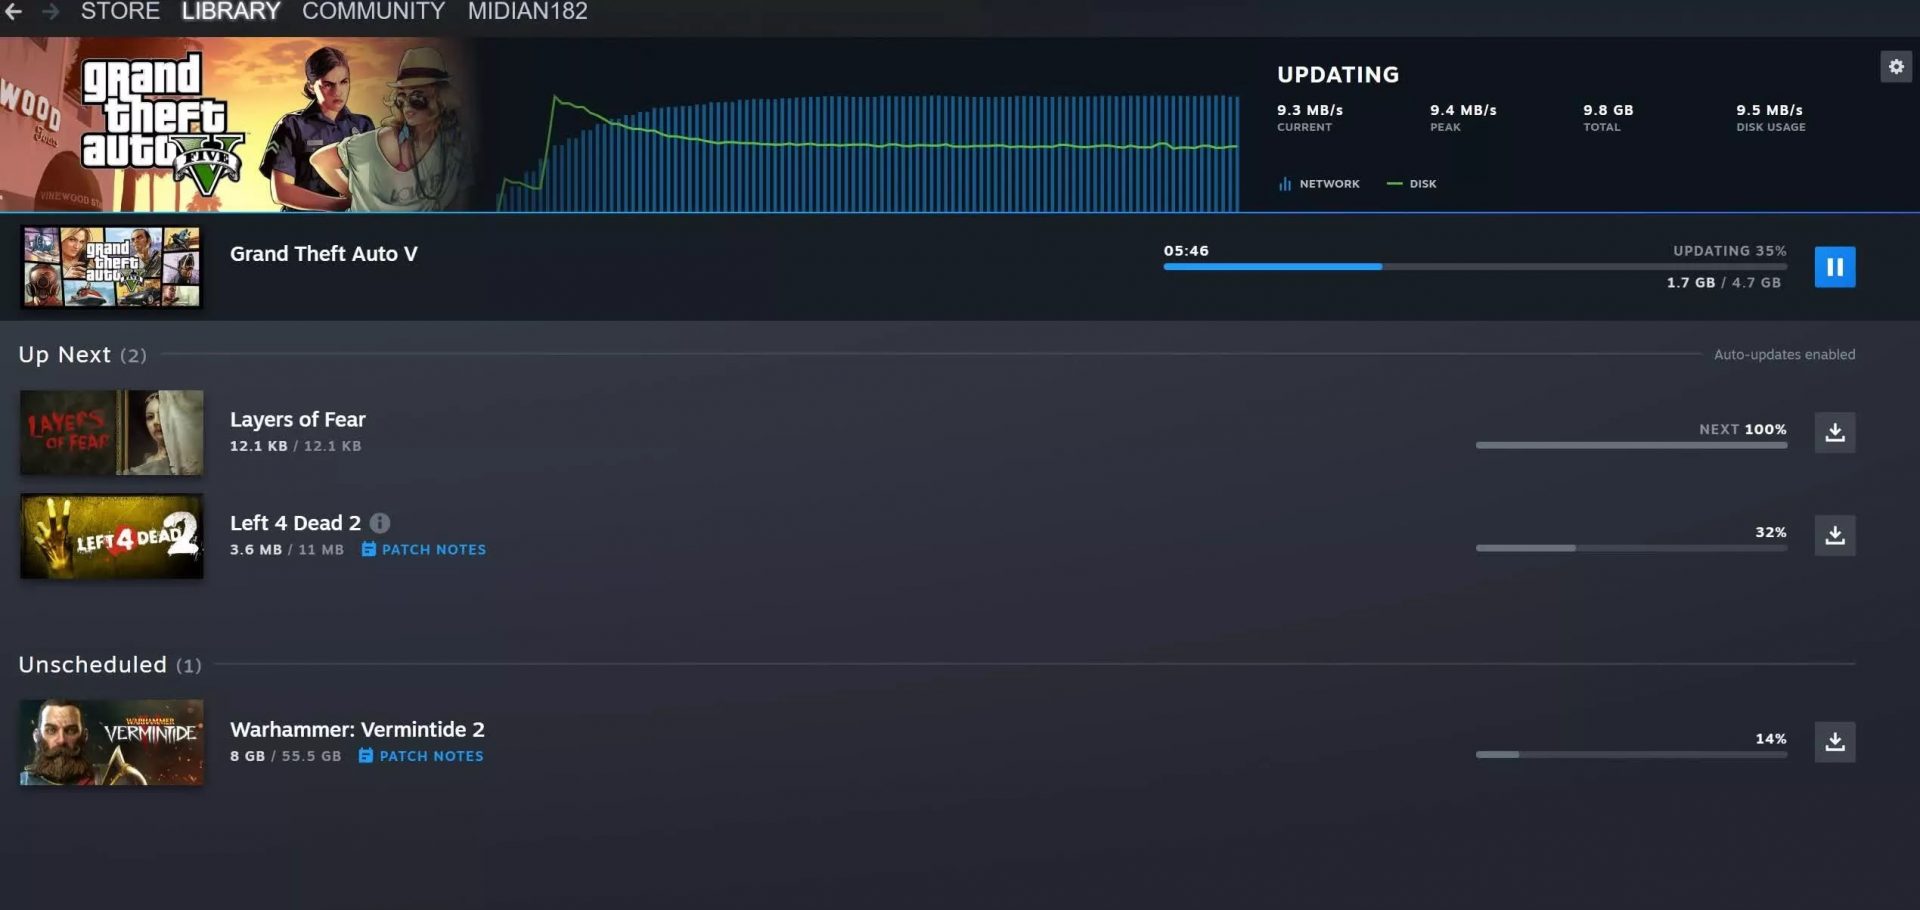
Also, you can now drag and drop items in the download bracket to reorder download orders or place them as active downloads to start downloading right away.
Read More
Software and hardware cleaning tips
Spring is almost here and with spring comes work, nature wakes up, people wake up, no more heating bills, time to start working, and time to start cleaning your PC. Good day everyone and welcome to another tip & trick for your PC. This time we are talking about cleaning your PC and keeping it up to software tight so you are ready for the upcoming spring season. Thank you for being with us and let's start:

Uninstall applications that you are not using

The unused applications can cause many issues for PC, from taking unnecessary disk space to even causing slower boot times if they have active services that require to be all-time up and running. They could slow down other applications like file explorer if they have extensions installed into them and can take RAM space with their background processes. If you are not using a particular application anymore or do not plan to use it soon it is always best practice to delete it from the system and thus removing all services and processes that go with it freeing so much-needed RAM and disc space.

Remove browser extensions you do not need

Browser extensions like applications can cause some issues with PC performance. if you spend a lot of time on the internet browser extensions can slow down browser and page loadings, they can make browsers take up more RAM memory and if they are outdated they could even present a serious security threat. Best practices are to keep only the extensions that you need all time, maybe some password managers or similar, extensions that you use on a daily basis, the rest should be uninstalled.

Remove things from the startup

Many services are booted along with Windows itself, some of them are crucial to the system even working, some not so. By eliminating not-needed services from the startup menu you will make sure that your boot times and overall performance of the system are in healthy form and that your PC is more responsive.

Organize files, folders, and desktop

The speeding of computer is not the only thing that you need to take care of, in order to be prepared and have maximum efficiency you will need to organize your files and folders as well. In a working environment, we often tend to save and place files all over the place, and in time they clog up desktop and hard drives. If the files are not well organized we will lose precious time trying to find anything that we need and require, so instead of wasting your time in locating files, why not organize them for easy and logical search so you can access them easily when needed.

Clean taskbar and start menu

Taskbar and start menu as well can be clogged with icons and non-organized application shortcuts and document shortcuts. Remove everything you do not need for that tidy and easily accessible access.

Sort bookmarks

It is very likely that you have plenty of bookmarks saved in our browser. It is also very likely that these bookmarks are not sorted and organized and now would be a great time to do it. Like files bookmarks also can cause you a lot of time loss if you need to find a specific one in a sea of many.

Run disc cleanup

Built-in disc cleanup utility will find temporary files, unused ones, and plenty of other junk on your hard drive. Now would be a great time to run it and get rid of junk files from your system.

Physically clean your computer

Now when we have taken care of the software part of our computer and system, it is time to clean up the computer itself. Unplug your computer and clean it, we will not go into details of this procedure, there is already an article on our site which deals with this part in detail so look it up if you need assistance with this part.

Clean your peripherals

Besides the computer for effective and pleasant work take care of your screen, keyboard, mouse, printer, etc. All of these devices need to be dust-free and clean if you expect them to behave on top of their game. If you would like to read more helpful articles and tips about various software and hardware visit errortools.com daily.
Read More
Change default audio output for Narrator
For PC users that are blind or have low vision, the Narrator accessibility feature in Windows 10, lets you use your PC without a display or mouse to complete common tasks – it reads and interacts with things on the screen, like text and buttons. The narrator can be used to read and write an email, browse the internet, and work with documents. In Windows 10, there are a lot of options for Narrator that you can customize. You can change its keyboard shortcuts, personalize Narrator’s voice, enable Caps Lock warnings, and more. You can choose the voice for the Narrator, adjust the speaking rate, pitch, and volume. To change the default audio output device used to play the voice of the Narrator in Windows 10:
  • Press the ⊞ WINDOWS + I
  • From the Settings menu, click Ease of Access.
  • Click Narrator on the left pane.
  • In the Narrator window, on the right pane, toggle the button to On to enable Narrator if required.
  • Scroll down to the Personalize Narrator’s voice section.
  • For the Select where you hear Narrator’s voice option, click the drop-down and select the audio output device you want from the list. Please know that you will not be able to choose if you do not have multiple audio output devices connected to your Windows 10 computer.
  • Exit Settings when done.
If you would like to read more helpful articles and tips about various software and hardware visit errortools.com daily.
Read More
Fix BAD_SYSTEM_CONFIG_INFO error in Windows
If you encounter the BAD_SYSTEM_CONFIG_INFO Blue Screen error in your Windows 10 PC, then read on as this post will guide you in fixing this issue. Usually, this kind of Blue Screen error is caused by some issues with the Boot Configuration Data file. The main issue inside of the Boot Configuration Data file is that either some boot order files or older files might be in conflict with the newer ones or the stable ones and thus triggering the BAD SYSTEM CONFIG INFO Blue Screen error. This kind of Stop error also indicates that there is an error in the Windows Registry which is why you need to update potential culprit drivers as well as edit some entries in the Registry if need be. But before you get started, make sure that you create a System Restore Point first. After creating a System Restore Point, try to boot your computer into Safe Mode and then restart your computer normally. However, if it doesn’t work, proceed to the given options below.

Option 1 – Run System Restore

Performing System Restore might help you in fixing the BAD SYSTEM CONFIG INFO Blue Screen error. You can do this option either by booting into Safe Mode or in System Restore. If you are already in the Advanced Startup Options, just directly select System Restore and proceed with the next steps. And if you have just booted your PC into Safe Mode, refer to the steps below.
  • Tap the Win + R keys to open the Run dialog box.
  • After that, type in “sysdm.cpl” in the field and tap Enter.
  • Next, go to the System Protection tab then click the System Restore button. This will open a new window where you have to select your preferred System Restore point.
  • After that, follow the on-screen instructions to finish the process and then restart your computer and check if the problem is fixed or not.

Option 2 – Update or rollback your device drivers

If the first option didn’t work for you, then it’s time to either update or roll back the device drivers. It is most likely that after you updated your Windows computer that your driver also needs a refresh. On the other hand, if you have just updated your device drivers then you need to roll back the drivers to their previous versions. Whichever applies to you, refer to the steps below.
  • Open the Devices Manager from the Win X Menu.
  • Then locate the device drivers and right-click on them to open the Properties.
  • After that, switch to the Driver tab and click on the Uninstall Device button.
  • Follow the screen option to completely uninstall it.
  • Finally, restart your computer. It will just reinstall the device drivers automatically.
Note: You can install a dedicated driver on your computer in case you have it or you could also look for it directly from the website of the manufacturer.

Option 3 – Try fixing the Windows Registry files

In order to fix the Windows Registry files, you need to make a bootable Windows 10 USB drive and then boot your PC using it. To do so, refer to the steps below.
  • Once you see the Welcome Screen, click on Next.
  • Then click on the “Repair your computer” option located on the bottom-left section of the window.
  • Next, click on Troubleshoot > Advanced Options > Command Prompt.
  • After opening Command Prompt, execute each one of the commands listed below in the sequence that they are given:
    • CD C:WindowsSystem32config
    • ren C:WindowsSystem32configDEFAULT DEFAULT.old
    • ren C:WindowsSystem32configSAM SAM.old
    • ren C:WindowsSystem32configSECURITY SECURITY.old
    • ren C:WindowsSystem32configSOFTWARE SOFTWARE.old
    • ren C:WindowsSystem32configSYSTEM SYSTEM.old
  • After executing the commands given above, type in the next ones below and make sure to execute them in the given sequence below.
    • copy C:WindowsSystem32configRegBackDEFAULT C:WindowsSystem32config
    • copy C:WindowsSystem32configRegBackSAM C:WindowsSystem32config
    • copy C:WindowsSystem32configRegBackSECURITY C:WindowsSystem32config
    • copy C:WindowsSystem32configRegBackSYSTEM C:WindowsSystem32config
    • copy C:WindowsSystem32configRegBackSOFTWARE C:WindowsSystem32config
  • Now type “exit” to close Command Prompt.
  • Restart your PC for the changes to take effect.

Option 4 – Run a Memory Check to test RAM

On the other hand, you can also fix the BAD SYSTEM CONFIG INFO Blue Screen error by running a Memory Check using the Windows Memory Diagnostic. Refer to these steps to do so.
  • Tap the Win + R keys to open the Run dialog box.
  • Then type “mdsched.exe” in the field and hit Enter to open the Windows Memory Diagnostic.
  • After that, the Windows Memory Diagnostic will give out two options such as:
  1. Restart now and check for problems (recommended)
  2. Check for problems the next time I start my computer
  • Select any of the given options. After that, your computer will restart and check for memory-based issues upon the restart. If there are any issues, it will automatically them.

Option 5 – Rebuild BCD files and repair MBR files

Like what you did on the third option above, you also have to make a bootable Windows 10 USB drive for this option and then boot your Windows 10 PC using it.
  • Once you get to the Welcome Screen part, click on Next.
  • Afterward, click on the Repair your computer option located on the bottom-left part of the window.
  • Then click on Troubleshoot.
  • Next, select the Advanced Options and then Command Prompt.
  • Once Command Prompt has been pulled up, enter each one of the following commands and in the sequence that they are given to rebuild BCD files and repair MBR files:
    • bootrec /repairbcd
    • bootrec /osscan
    • bootrec /repairmbr
  • Now type “exit” to close Command Prompt and then restart your computer to successfully apply the changes made.
Read More
Fix 0x80070037: The specified network ...
If you are trying to copy a file but suddenly encountered an error message saying, “An unexpected error is keeping you from copying the file”, then you’ve come to the right place as this post will help you resolve the problem. This error comes along with another message that states, “Error 0x80070037: The specified network resource or device is no longer available”. This kind of error occurs when the power supply to the external device is weak and causes the device to be disconnecting and reconnecting consistently. To fix this problem, you need to check out the potential fixes provided below.

Option 1 – Try to physically check the USB ports

You need to check the USB ports as there could be some ports that are loose or damaged physically which affects the overall performance of the port. You could also try to change the USB port since modern computers have a variety of USB ports. So if your USB drive supports USB 3.0 or 3.1, make sure that you plug it inside a USB 3.0 or 3.1 ports. If you’re not sure which port, just keep in mind that the USB 3 port is usually blue or you can also use your computer’s documentation or manual as a reference to locate it.

Option 2 – Check the connected cables physically

Aside from the USB ports, you also have to check the physical status of the connected cables because if there are damaged ones, just like with USB ports, it would also affect the overall connectivity of the device with the computer. So if you notice some irregularities in the connecting cable physically, you might have to buy another one and replace it and then see if it fixes the problem or not.

Option 3 – Update or reinstall the Universal Serial Bus Controller driver

Since it could be a driver issue, you can try to update or reinstall the Universal Serial Bus Controller drivers using the Device Manager. Refer to the following steps:
  • First, click the Start button and type “device manager”.
  • Then click on the “Device Manager” from the search results to open it.
  • From there, look for the “Universal Serial Bus controllers” option and then right-click on each one of the USB drivers and select the Update Driver from the menu.
Note: If it is a regular USB drive, then it will be listed as a USB Mass Storage Device but if you have a USB 3.0 device, then look for a USB 3.0 Extensible Host Controller.
  • Restart your PC and then click the “Search automatically for updated driver software” option.
Note: If updating the USB Controller drivers didn’t work, you can try to reinstall them instead.

Option 4 – Try connecting to a slower USB port

If connecting your device to USB 3.0 or 3.1 ports didn’t work, you might want to try connecting it to a slower USB port this time. There are times when the device is not capable of supporting the higher power supply from a USB 3.0 or 3.1 port which is why the weak circuits do not work properly. Thus, try connecting your device to a USB 2.0 port and check if your device is now working.

Option 5 – Try to turn off the Power Saving option

You could also try to turn off the Power Saving option to resolve the problem. All you have to do is switch to Power Management after you select the Properties of the USB device and from there, uncheck the “Allow the computer to turn off the device to save power” option. On the other hand, if you are using a laptop and did not use the USB device for a long time, then it could be powered off. This will ensure that the system does not turn off the USB device.

Option 6 – Try to connect your device to another computer

It is also possible that your computer does not support your device. To check that possibility, you can try connecting your device to a different computer and see if it is working without any issues. If it is, then you need to get another device that’s compatible with your computer.

Option 7 – Try to use a different device

You could also try using a different device and connect it to your computer. This will help you figure out if your device is damaged or not. So if the other device you connected is working just fine, then you might have to replace your device with a new one or consult an expert and have it repaired if possible.

Option 8 – Run the Hardware and Devices Troubleshooters

  • The first thing you need to do is click on Start and then on the gear-like icon to pull up the window for Settings.
  • After opening Settings, look for the Update and Security option and select it.
  • From there, go to the Troubleshoot option located on the left-hand side of the list.
  • Next, select Hardware and Devices from the list and open the Troubleshooter and run it. Once it is doing its job, wait for it to complete the process and then restart the system.
  • After the system restarts, check if the problem’s now fixed. If not, refer to the next option given below.
Read More
Fix AMD driver crashing Windows 10
Graphic cards are essential to our computers but from time to time in the race to make better GPU and to grab a large portion of the market bad drivers get released and can create really unwanted and unpleasant experiences, from Windows freezes to the black screen of death, to AMD driver Windows crashing down and many more. This article will cover basic troubleshooting with AMD drivers and offer you solutions on how to fix them.
  1. Rollback the previous version of the driver.

    Installing the new driver version is the reason for this particular error, so naturally rolling back the previous version which was stable and did not cause issues will solve the problem. To roll back the previous version of drivers follow the next steps: Open Start menu and click on settings, go to system and choose Apps and features Find: AMD Catalyst Install Manager, right-click on it, and choose to uninstall Go to AMD official website and download the previous driver version, install it on your computer Turn off automatic driver updates and reboot your system
  2. Reinstall the driver

    Sometimes it is not a bug in the released driver, it is a corruption of files because of file transfer or any other specific reason. The reinstalling driver will fix an issue if this is the case. To reinstall the driver Press ⊞ WINDOWS + X and choose Device Manager Expand Display adapters, right-click on AMD device and choose to uninstall Go to the official AMD website, download the latest driver and install it Reboot your system
  3. Disable browser extensions

    Some users have reported that error occurs only when they are watching videos online, if this is your case, go to your browser options and disable extensions to see if this will remove the problem.
  4. Remove Lucid Virty MVP

    If by any chance have this relic installed on your system, go to Applications and remove it. It is an old program shipped with old drivers and it is usually present in your Windows that was upgraded from 8.1 to 10. Uninstall it and see if this fixes your issue.
  5. Clean your graphic card

    Sometimes this error can happen due to excessive dust on your GPU, if you have the expertise, clean it or take it somewhere to be cleaned.
Read More
Fixing the We can’t find a USB flash drive
One of the preferred ways to upgrade Windows 10 is by creating a bootable USB drive. However, you might change your mind when you encounter an error during the Windows 10 Setup that says, “We can’t find a USB flash drive”. Worry not for this error can be fixed using some suggestions that will be provided in this post. The funning thing about this error in Windows setup is that the computer says it’s not there when it’s clearly there. To fix this problem, you need to check if the USB device is accessible on your computer or you can also try a different USB device. In addition, you could check if there are any issues with both the USB 3.0 and USB 2.0 ports as it could be the reason why you’re getting the error or fix the bad sectors in the USB drive as well as see if the USB drive is set as the primary drive.

Option 1 – Try to check if the USB is accessible on your PC

The first thing you can do to resolve the problem is to check if you can access your USB device from your computer. All you have to do is open File Explorer and check if the USB device is listed there or not.

Option 2 – Try to connect a different USB device

The next thing you can do to fix the error is to try connecting a different USB device, specifically the one that has more significant storage space. You also have to make sure that it’s working on a different PC.

Option 3 – Fix any issues with the USB 3.0 and 2.0 ports

Although the USB 3.0 ports are compatible with the USB 2.0 ports, it does not necessarily mean that there wouldn’t be any problem when you use them which is why it’s best to fix any issues in them or better yet, use a compatible drive.

Option 4 – Try to fix the bad sectors in the USB drive via CHKDSK

When it comes to some issues concerning the hard drive or removable devices, there is a utility in Windows that might help which is called “chkdsk”. To use it, follow the steps below.
  • Tap the Win + S keys to open the Search box.
  • Then type “command prompt” in the field and from the search results that appear, right-click on Command Prompt and select “Run as administrator”.
  • After opening an elevated command prompt, copy and paste the following command and hit Enter:
CHKDSK [volume [[path] filename]] [/F] [/V] [/R] [/X] [/C] [: size]]
Note: In the command given above, “[/F]” will try to fix the system errors while “[/R]” will be the one to fix the bad sectors.
  • Now if you are prompted to run CHKDSK after your reboot your PC, just tap Y and reboot your PC.
  • If CHKDSK is not able to find any errors, tap the Win + E keys and navigate the access window. From there, right-click on the concerned drive and click on Properties.
  • After opening Properties, click on the tab Tools and then click on the “Check” button under the Error-checking section.
  • Wait until the process is completed and then restart your computer.

Option 5 – Try checking if the USB is set as the primary drive

You might also want to check if the USB drive is set as the primary drive because if it is, then it won’t appear on the list. It could also be that the USB drive has a primary disk in it. To undo it, you need to use the DISKPART utility.
  • In the Start Search, type “command prompt” and right-click on Command Prompt from the search results, and then select the “Run as administrator” option.
  • Next, execute the “diskpart” command to initiate the DISKPART utility.
  • After that, type the “list disk” command and tap Enter to display the list of disks on the computer. You have to take note of the drive number or letter of the concerned USB drive.
  • Once done, type the “select disk <X>” command where X is the drive letter or number and tap Enter.
  • Then execute the “list partition” command to see the list of all the partitions in your computer. It should be listed as 0, 1, or 2. 0 is the primary partition.
  • Now type the “select partition 0” command and tap Enter and then type “delete partition” to delete the selected partition.
  • You can do the same to the other partitions as well and when you’re done, execute the format command to turn the USB drive into a standard one.
Read More
1 2 3 162
Logo
Copyright © 2022, ErrorTools. All Rights Reserved
Trademarks: Microsoft Windows logos are registered trademarks of Microsoft. Disclaimer: ErrorTools.com is not affiliated with Microsoft, nor claim direct affiliation.
The information on this page is provided for information purposes only.
DMCA.com Protection Status