Troubleshooting Error 106

Quick Fix to Error 106

What Is Error 106?

Error 106 is a common error experienced by Windows 7 users. Generating as a result of Misconfigured, damaged or corrupt system files on the computer, this is not a critical error.

However, troubleshooting this error is important to keep any undesired inconvenience at bay. Essentially, error 106 is one of the error codes employed by Windows and other compatible driver and software vendors.

The 106 in this error is essentially the memory address or location where the instructions reside when the error was generated.

Solution

Restoro box imageError Causes

Primarily, error 106 is caused by the damaged, Misconfigured or corrupt system files. The error may appear harmless at first.

However, if allowed to persist, it can lead to grave consequences. Allowing an error to thrive on your system is synonymous with putting the well-being of your system at risk.

As far as the events, conditions, or scenarios are concerned that lead to the generation of error 106, they are listed below as follows.

It is important to understand that these conditions lead to the corruption of system files in most cases.

  • An improper or incomplete installation or uninstallations
  • Improper or incomplete deletion of hardware or applications
  • Improper, unintentional or sudden system shutdown
  • Existence of adware, spyware, malware, or virus on your computer

It is worth mentioning that any of the conditions listed above can lead to the corruption of system files or registry entries in the system. Since the system needs correct and complete files for proper functioning which the system will be unable to find, it will result in unexplained behavior.

This also happens because the system will be lead to wrongly linked or missing information.

Further Information and Manual Repair

There are different ways to rectify this error but two of the most useful ones are briefly listed below as follows.

  • This solution is for the advanced user. First and foremost, turn on your system. Log on to it as the Administrator. Now click on the start button and follow this sequence: All Programs -> Accessories -> System Tools -> System Restore.A new window will appear in front of you. On this window, choose the option, ‘Restore my computer to an earlier time’. Now click Next.A list of restore points will appear in front of you. From this list, choose the most recent Restore Point and click Next. Click Next on the confirmation windows. Restart the computer when the restoration is complete.
  • This solution for the novice user. Download an error 106 windows repair utility. Now install this program on your computer and use it to scan your computer. Try to locate the option for fixing errors as soon as the scan complete. Make use of this option. Once all the errors have been fixed, restart your computer once again. You will now realize that the error has vanished and your computer is now free of error 106.

Use any of the solutions listed above according to your skill level.

If you like to learn and find out more about various Windows errors, and how to repair them go to our vast archive or use search to find articles that will explain and help you in solving your issue.
However, if you prefer to do things fast and with automatization then we are proposing to use an automated solution for your issues. The application that we are recommending is Advanced System Repair Pro
Advanced System Repair utilizes multiple tools all in one to give you a quick, simple, reliable, and very thorough diagnosis of your PC. It brings you all the tools you need in one program to clean, fix, protect, optimize and boost your PC!
1-Click Maintenance
All the tools to make it simple and easy! It's like having a professional technician at the click of a mouse.

Junk Cleaner
Keeping your computer free from unnecessary clutter also helps make your computer last longer. Like any other machine, if you keep it clean and take care of it, it will serve you better for longer!

Optimize background apps
Optimize applications background activity with the built-in Application Optimizer feature.

Disk Defrag
With a simple 1-click, Advanced System Repair speeds up your PC by assembling fragmented files on your machine and organizing them more efficiently.

Malware Removal
Finds and removes all types of harmful malware including trojans, worms, bots, adware, spyware, PUPs, and more!

Privacy Cleaner
The all-in-one privacy suite to Clean Your Tracks & Protect Your Privacy! Make your computer safe, secure, and more efficient!

System Tweak/Optimizer
ASR will analyze your complete system and settings to adjust your PC to function at its maximum performance.

Registry Cleaner
Over time, as you install and uninstall applications, the registry can become cluttered with old entries and broken settings which can result in program crashes, and annoying messages and slow the computer down.
Visit our Advanced System Repair Pro Download page to inform yourself about all the benefits of this software and get a free trial copy of it.
advanced system repair pro

Advanced System Repair Pro

One-click automated PC repair solution
ASR logo
With Advanced System Repair Pro you can easily
Replace damaged files
Restore performance
Free disk space
Remove Malware
Protects WEB browser
Remove Viruses
Stop PC freezing
DOWNLOAD
Privacy Policy | Terms of Use | Uinstall
Advanced System Repair Pro is compatible with all versions of Microsoft Windows including Windows 11

Share this article:

You might also like

Infographic: How To Speed Up PC Startup

How To Speed Up PC Startup

A slow PC startup can be pretty annoying. This usually results from various computer issues. If your computer is acting sluggishly, here are four ways to speed up your PC startup.

How-to-Sped-Up-PC-Startup
Read More
Disable widgets menu inside Windows 11
windows 11 widgets menu
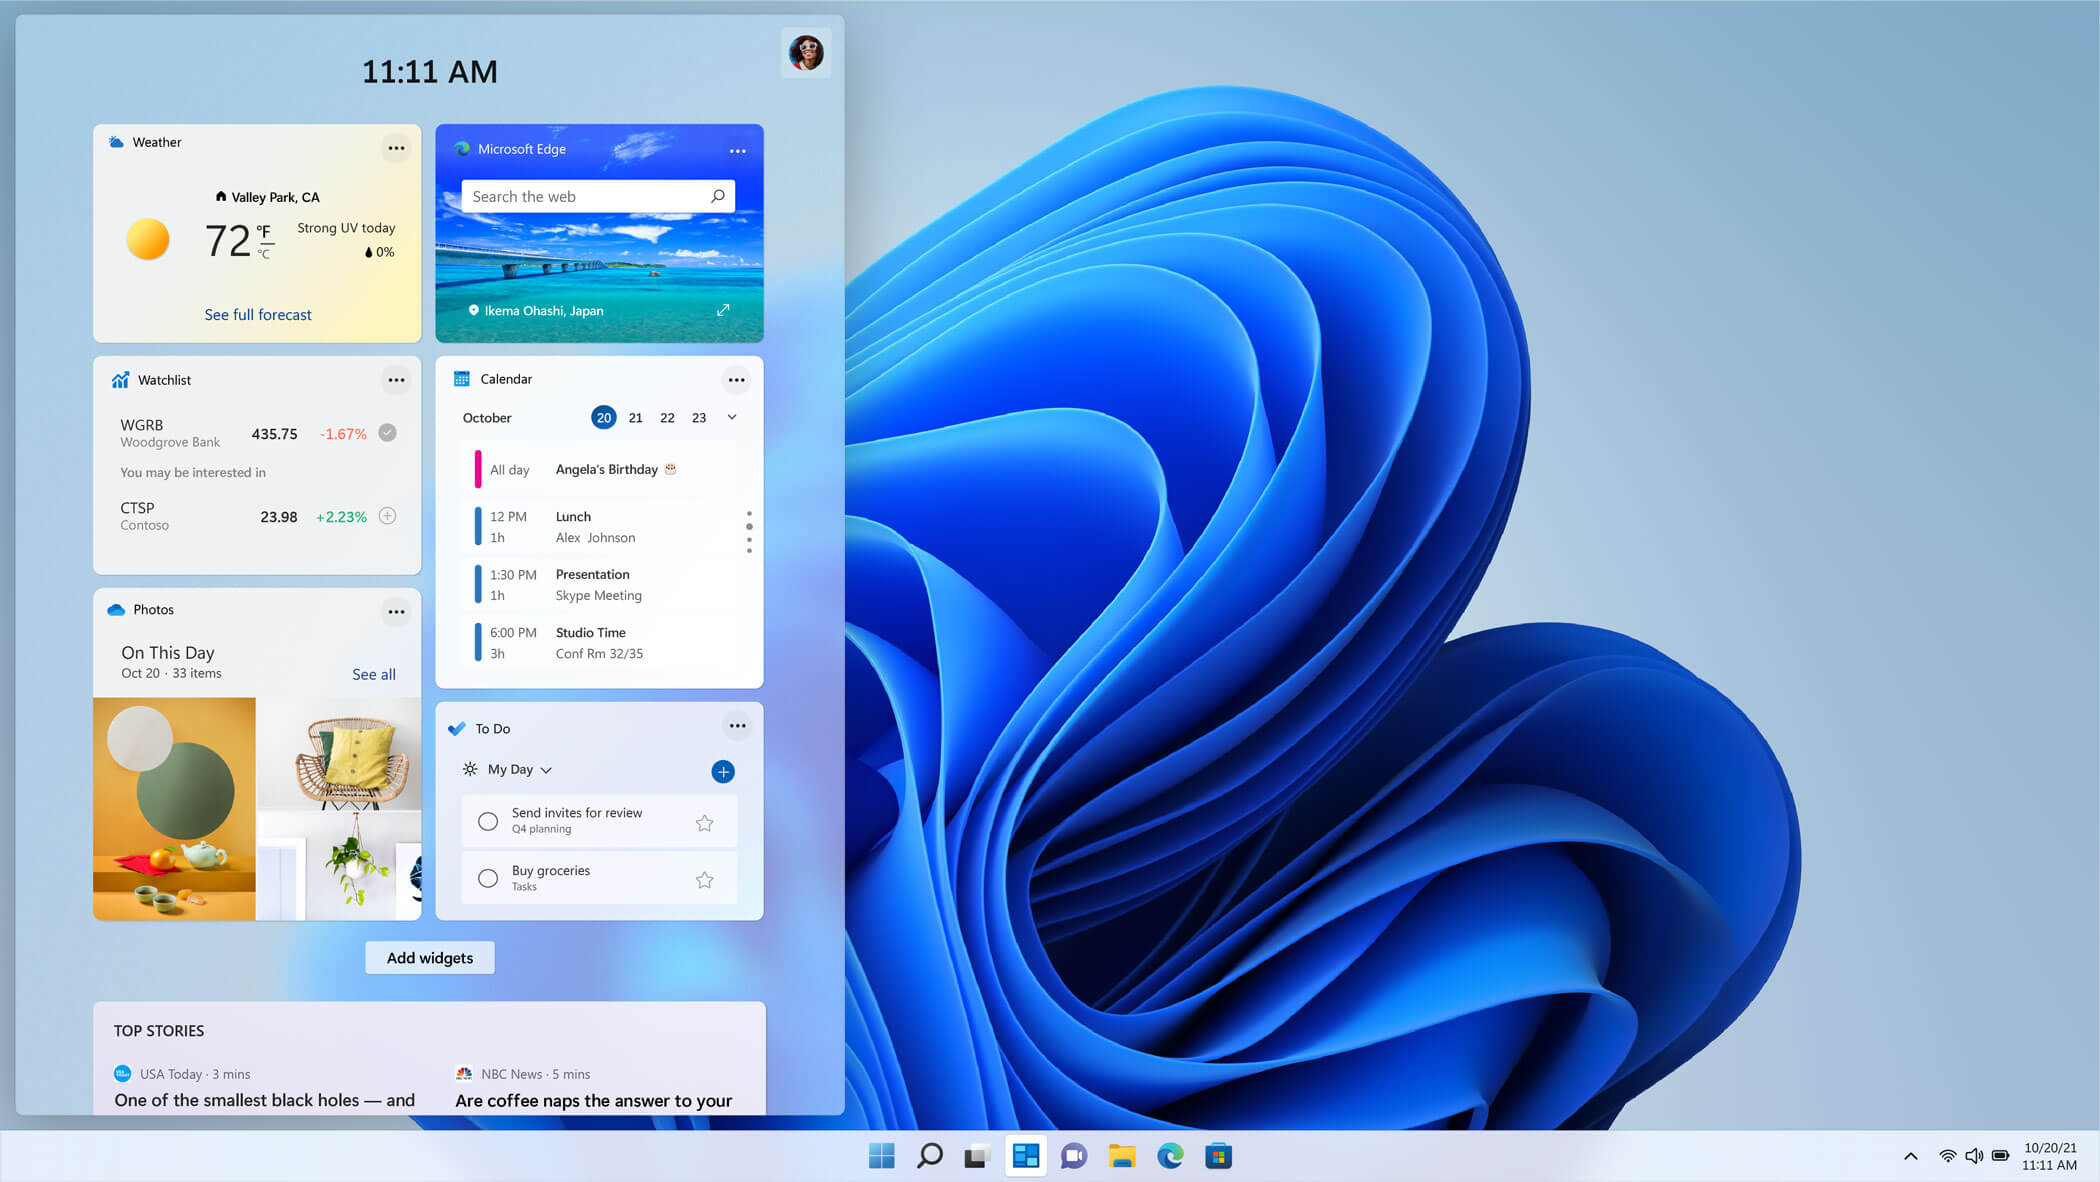
The new widget's menu inside Windows 11 is generally met with a positive attitude but there are still users which prefer not to have it. Luckily for them, Microsoft included a very easy way to turn the widgets menu on or off. Follow this easy guide to see how. Right-click on the widget button in the taskbar and click on Hide from Taskbar and that’s it Alternatively, you can also turn it off via the setting app. Go to the settings app and navigate to Personalization > Taskbar > Taskbar Items and flipping the switch beside Widgets to Off. Please note that both methods will only hide the button to toggle widgets menu, at the current state there is no really a way to actually turn it off, only hide it and make it not available to bring it up.
Read More
Guide to Resolving the Msvcr71.dll Error Code

Fix Msvcr71.dll Error Code

Msvcr71.dll Error - What is it?

Msvcr71.dll is a dynamic library link that belongs to the Microsoft Visual C Runtime library. This file is a core Windows component used by numerous Windows applications like Microsoft Office version 2002 and 2003, Windows XP Media Center, and Windows XP Tablet PC Edition. The Msvcr71.dll error commonly occurs when two applications share the same DLL file. When an application is deleted sometimes the Msvcr71.dll file is also deleted which is associated with two applications on your PC. So, when you try to run the other application you come across the Msvcr71.dll error on your system. The error also occurs when you try to install new programs or update the old program versions. This also misconfigures the DLL files and results in the Msvcr71.dll error. Msvcr71.dll error messages are often displayed as the following:
  • “This application has failed to start because Msvcr71.dll was not found.”
  • “Mscvr71.dll is a bad windows image. Please check against your installation diskette.”
  • “Cannot find [PATH]msvcr71.dll"
  • "The file msvcr71.dll is missing."

Solution

Restoro box imageError Causes

Deletion of the Msvcr71.dll file is one cause for the Msvcr71.dll file error. However, this error can also be generated due to other causes such as:
  • Corrupt, missing, or misconfigured msvcr71.dll file
  • Damaged and missing .dll files
  • Corrupt runtime code library
  • Registry issues
  • Malware attack and viral infection
  • Msvcr71.dll error codes usually occur on Windows versions XP and Vista.

Further Information and Manual Repair

Here are different ways to resolve the Msvcr71.dll error code on your system:

1. Reinstall the program/application that is causing the Error to Pop up on the Screen

When this error code occurs due to misconfigured or missing the Msvcr71.dll file, try reinstalling the program/application that is causing the error to pop up on your screen. When doing this, make sure there is no problem with the setup files from the disk you are performing the installation on your PC.

2. Check the Recycle Bin and Restore the Deleted File

If the Msvcr.dll file was deleted accidentally when you uninstalled a program on your PC, then the deleted file is most likely to be in the recycle bin. Check it and if you find it, restore it. Once the file is restored try running the application again.

3. Scan for Malware and Viruses

Install an antivirus and scan for malware and viruses. This software can also corrupt DLL files and runtime code libraries. However, this is not the best solution especially if you already have too many programs installed on your PC. New program installations cause more complications and besides antivirus are infamous for slowing down PC speed.

4. Repair the Corrupt Registry

If the three methods discussed above don’t help you resolve the Msvcr71.dll error code on your system, then this means the cause of the error is more critical than you think. The error is triggered by a corrupt and damaged registry. If this issue is not addressed timely, it can result in system failure and a fatal crash. To resolve the error code Msvcr71.dll, you need to repair the corrupt registry. And the best way to go about it is to download Restoro Restoro is a user-friendly, highly functional, and multi-functional repair tool integrated with high speed and powerful utilities such as a registry cleaner, system stability scanner, Active X and class error module, and an antivirus. It also functions as a system optimizer. It is the answer to your entire PC-related errors and issues. The automated and intuitive algorithm deployed inside this tool enables it to detect all registry errors and issues generating Msvcr71.dll error. DLL files often get damaged due to data overload, disk fragmentation, and malicious files saved in the registry. The registry cleaner removes all the unnecessary and obsolete files from the registry, clears up disk space, and repairs defragmented, damaged, and misconfigured disks. DLL files including Msvcr71.dll and also fixes the registry. It’s an in-built antivirus scan and removes viruses and the system optimizer feature ensures that your PC runs at its optimum speed. It is safe, bug-free, efficient, and easy to use.  It runs smoothly on all Windows versions. Click here to download Restoro and resolve the Msvcr71.dll error on your PC.
Read More
How to Fix Modem Error 633
[vc_row][vc_column][vc_column_text]

Easy Modem Error 633 Fix

Modem Error 633 - What is it?

Modem Error 633 error is a dial-up error that usually occurs when using a USB modem with a Windows computer. The Modem Error 633 error message is displayed as the following:

“Error 633: The Modem is already in use or not configured properly.”

Solution

Restoro box imageError Causes

This error can be triggered due to several reasons such as:
  • A software program conflicts with the USB modem
  • The modem is not configured properly
  • The Telephon.ini file is missing or damaged
  • There is some issue with the way Windows is managing the communication (COM) ports on your computer.

Further Information and Manual Repair

If you experience the Modem Error 633 on your PC, you don’t have to panic. Though this error does not pose any major threats like data loss, it may hamper your ability to use the internet therefore it is advisable to resolve the error. Repairing the Modem Error 633 is quite easy. There are a number of ways to fix this error. So, let’s get started:

Solution 1: Delete Incompatible Software and Non-Present Modems

  • Click on the start menu and go to the ‘Control Panel’. Now choose the option ‘Phone and Modem’.
  • Here you will see three tabs, the dialing rules, modems, and advanced. Choose the tab ‘Modems’. As you click on it, you will see modems installed on your PC. To repair the Modem Error 633, select and remove all the incompatible software and modems that are not present and click ‘OK’.
  • Now to bring the changes into effect, restart your system with the modem plugged in and try connecting to the internet again.

Solution 2: Change the Communication Ports

If the error occurs because the modem is not properly configured, then this solution is possibly the best way to resolve this error. Here’s what you need to do:
  • Click on the Start menu and choose My Computer.
  • Now click on the option ‘Manage’ to open the Computer Management Window.
  • Once it opens, click the option ‘Device Manager and then expand the option modems. Click on Properties, then the Advanced tab, and the Advanced Port Settings button.
  • As you click on the Advanced Port Settings, then click on the COM Port Number drop-down box.
  • Choose a new Communication Port. However, make sure it is not already in use.
  • Once you make changes, click ‘OK’ and then restart your PC.
  • Now Open Device Manager again. Open the Modern Properties Window and then Click the Diagnostics tab.
  • After that view the command response window to verify if the error is fixed. If yes, then create a new dial-up connection and connect to the internet with ease.

Solution 3: Disable the Startup items

  • Another way to resolve Modem Error 633 on your PC is to go to the start menu and type ‘msconfig’ into the search box and then press ‘enter’.
  • Open the misconfig.exe program. As you open it, you will see 4 tabs, General, Boot, Service, Start-up, and Tools.
  • Now click on the ‘Start-up’, ‘Disable All’, and then press Apply.
  • After you press Apply, a window will pop up asking to restart the computer.
  • Confirm it and click restart.
  • Once the computer restarts now try connecting to the internet again. This will hopefully resolve the Modem Error 633.
[/vc_column_text][/vc_column][/vc_row]
Read More
How to Fix ACPI_BIOS_ERROR in Windows 10
BSOD or Blue Screen of Death errors are one of the most common errors you can encounter on your Windows PC. One of these BSOD errors is the “ACPI_BIOS_ERROR”. If you suddenly get this error, it means that there is some problem in booting the operating system from your hard drive or Windows was not properly installed on your PC. In addition, this error could also mean that there is something wrong with the CMOS battery located in the motherboard. Unlike other BSOD errors, the workaround for this error is a bit different as these workarounds require a bit more expertise in updating the BIOS as well as setting the correct boot configuration. So if you only have a handful of knowledge about this level of troubleshooting, then you can seek a program named Restoro to fix the problem for you. However, if you know are capable enough in troubleshooting the problem, refer to the instructions laid out below to fix the BSOD “ACPI_BIOS_ERROR”.

Option 1 – Try to remove the SSD and update the BIOS

The first thing you have to do is to check the primary storage devices on your PC. If you have just installed a new hard drive or SSD recently on your computer, then it’s most likely the cause of the BSOD error. Moreover, you should also ensure that your BIOS is up-to-date to the latest available build.
  • Remove the SSD/HDD and inject a different HDD that was already preinstalled in your Windows PC.
  • After that, update the BIOS to the latest available build. After updating it, insert the old SSD/HDD and then try to boot your PC again. The problem should be fixed now. If not, refer to the next given option.

Option 2 – Try to check the CMOS battery and reset the CMOS module

As mentioned earlier, the CMOS battery might also be the one that’s causing the problem. It is a physical component of the motherboard and is a memory chip that contains all the settings configuration on your computer and is also powered by a battery. So if your battery loses power, the CMOS will be reset and as a result, all the configurations will be gone as well. It is also possible that the CMOS module is not properly working and every time things are saved, they are properly written due to the battery. That’s why you have to consider changing the CMOS battery and see if it fixes the problem. In addition, you also have to make sure that you completely reset the CMOS module and then try booting your PC again.

Option 3 – Try to check the BIOS settings

If the BIOS settings are incorrect, chances are that’s the reason why you’re getting the “ACPI_BIOS_ERROR” BSOD error. Every BIOS has different settings which you can make use of to enhance your computer experience. So make sure that your BIOS is up-to-date and that the settings are in accordance with your requirement. Another thing you can try is to disable the Legacy USB and the Legacy BIOS in the BIOS settings if you are trying to install a 64 bit Windows version. Make sure that you also enable AHCI before plugging in the installation drive on your PC. Moreover, ensure that your PC is using IDE or Integrated Drive Electronics mode instead of SATA or Serial Advanced Technology Attachment. Aside from that, try to check the extracted setup if it is in NTFS format, if it is, you should extract the ISO in FAT32 and use it to install Windows.

Option 4 – Try to reset the ACPI Compliant Control Method

ACPI or Advanced Configuration and Power Interface provide an open standard that operating systems can use to detect hardware, perform power management, as well as monitor the status of your device and provide information for other processes. Chances are, there are some misconfigurations with this module on your PC that lead to believing that there is no battery present. That’s why you need to reset it and see if it fixes the BSOD error or not.
  • Boot your PC into Safe Mode.
  • Tap the Win + R keys to open the Run dialog box.
  • Type in “devmgmt.msc” in the field and tap Enter to open the Device Manager.
  • After opening the Device Manager, go to the “Batteries” section and click it to expand it and then right-click on the “Microsoft ACPI-Complaint Control Method Battery” option and click on Uninstall.
  • After you disable the module, click on any empty space and then click the “Scan for hardware changes” option.
  • Then check if you can now boot your PC normally and without the BSOD error.
Read More
Fix 0x80071AC3, Volume is dirty error message
If you are trying to copy a folder or a file but encountered an error that says, “An unexpected error is keeping you from copying the folder. If you continue to receive this error, you can use the error code to search for help with this problem”, read on as this post will guide you on how you can fix this error. This kind of error is a CHKDSK error. It is the “Volume is dirty” error message with error code 0x80071AC3 which indicates that the CHKDSK operation on your computer did not go through due to some corrupted sector of your hard drive, data corruption, corrupted system files, malware infection, as well as improper installation of an application that left some residual folders and files and many more. To fix the Error 0x80071AC3, here are some potential fixes you can check out to resolve it:

Option 1 – Run the Check Disk utility

You can also run the Check Disk utility to fix the error when you connect your USB or external device.
  • In the Windows Search box, type “command prompt” and from the search results, right-click on Command Prompt and select “Run as administrator”.
  • After opening Command Prompt, type this command and tap Enter: chkdsk /r /f <PARTITION LETTER>
  • The command you entered will start to check for errors and fix them automatically. Else, it will throw an error message saying, “Chkdsk cannot run because the volume is in use by another process. Would you like the schedule this volume to be checked the next time the system restarts? (Y/N)”.
  • Tap the Y key to schedule Disk Check the next time your computer restarts.

Option 2 – Try to check if a particular volume is dirty and exclude it

The next thing you can do to fix the problem is to check if the particular volume is dirty and exclude it. To do so, follow these steps:
  • In the Start Search, type “command prompt” in the field and right-click on Command Prompt from the search results, and then select the “Run as administrator” option.
  • After opening Command Prompt with admin privileges, execute this command: fsutil dirty query <PARTITION LETTER>
  • After that, you will see either of the following results of the command you just executed:
    • “Volume <PARTITION LETTER> is dirty”
    • “Volume <PARTITION LETTER> is not dirty”
  • If you see the “Volume <PARTITION LETTER> is dirty” message, then you can just skip checking the drive for errors by executing this command: CHKNTFS /X <PARTITION LETTER>

Option 3 – Try to format the destination drive

If the first two options above didn’t work, then you might want to try formatting the drive can also help you resolve the error. To format it, follow these steps:
  • To get started formatting your drive, tap the Win + E keys and then go to the access page of the drive.
  • Next, right-click on the drive and select Format.
  • After that, uncheck the “Quick Format” option and then format your drive properly.
  • Now once the formatting process is finished, unplug the drive and plug it back in afterward.
  • Check if the error is already fixed. If the drive is not initialized, tap the Win + R keys and hit Enter.
  • After opening the Run dialog box, type “diskmgmt.msc” and hit Enter to open Disk Management.
  • From there, right-click on the drive volume and select initialize disk.
  • Next, select the correct partition type and proceed.
Read More
Fixing Error code 15 or Error code 16
If you get an Error Code 15 or Error Code 16 while you are browsing the web and you notice that your access is blocked to a particular website, then read on as this post will guide you in resolving this problem. Both Error Code 15 and Error Code 16 have the same message that states, “Access Denied: This request was blocked by the security rules”. Note that the error depends on what kind of browser you are using, as well as the operating system and network that you are using. On the other hand, the fixes for this error are the same and there is a handful of them that you can check out just make sure to follow each one of them carefully.

Option 1 – Sync Date and Time

The first thing you can try is to sync the Date and Time of your computer as the wrong Date and Time settings are one of the most common causes of connection problems like Error code 15 or Error code 16. This is because of the incompatibility between the SSL Certificate validation date and the System Clock. Thus, you have to sync your System Clock. Refer to the steps below to do so.
  • Right-click on the Taskbar and click on the Adjust Date and Time option.
  • Next, click on the Sync Now button to synchronize the Date and Time with the Microsoft Servers.
  • Now make sure that the Time Zone that’s set on the same page is correct.

Option 2 – Try to reset the affected browser

Resetting the affected browser might help in fixing Error Code 15 or Error Code 16.

Mozilla Firefox

  • Open Firefox and click the icon that looks like three stacked lines located at the top-right section of the browser.
  • Next, select the question mark icon from the drop-down menu.
  • Then select “Troubleshooting information” from the slide-out menu.
  • After that, click on the “Reset Firefox” button located at the top-right section of the newly opened web page.
  • Now select “Reset Firefox” in the confirmation pop-up window that appears.

Google Chrome

  • Open Google Chrome, then tap the Alt + F keys.
  • After that, click on Settings.
  • Next, scroll down until you see the Advanced option, once you see it, click on it.
  • After clicking the Advanced option, go to the “Restore and clean up option and click on the “Restore settings to their original defaults” option to reset Google Chrome.
  • Now restart Google Chrome.

Internet Explorer

  • Launch Internet Explorer.
  • Next, click the wrench icon for Settings.
  • Then click Internet Options.
  • After that, go to the Advanced tab.
  • From there, click the Reset button. This will reset Internet Explorer’s settings to their default condition.
  • Now click OK to save the changes made.

Option 3 – Temporarily disable Firewall and third-party antivirus

Firewall and antivirus programs are known to block files the instant it detects a threat to the system. However, there are some cases when it can also block a file even when it’s a safe one. Thus, your antivirus or firewall programs might be the reason why you can’t download anything on your Windows 10 computer. To isolate the issue, you need to temporarily disable both the Firewall and antivirus programs and then check if you can now download anything from the internet. Do not forget to enable them again as disabling them can leave your computer vulnerable to cyber threats.

Option 4 – Disable the Proxy server

You can also try to disable the Proxy server for your LAN to fix Error code 15 or Error code 16 especially if your computer was attacked by some malware or adware recently. In such cases, there is a chance that the malware or adware has changed your network settings in order to generate intrusive advertisements. Thus, you have to disable the proxy server and you can do that by following these steps:
  • Tap the Win + R keys to open the Run dialog box.
  • Then type “inetcpl.cpl” in the field and hit Enter to pull up the Internet Properties.
  • After that, go to the Connections tab and select the LAN settings.
  • From there. Uncheck the “Use a Proxy Server” option for your LAN and then make sure that the “Automatically detect settings” option is checked.
  • Now click the OK and the Apply buttons.
  • Restart your PC.
Note: If you are using a third-party proxy service, you have to disable it.

Option 5 – Check your VPN

If you are using a VPN application, there are times when it causes some issues like this error. If that’s the case, you can try to disable your VPN temporarily and see if the error is resolved or not and if turns out that your VPN is the culprit, you have to uninstall it and install a new one or its latest version. To uninstall it, follow the steps below.
  • Tap the Win + R keys to open the Run dialog box
  • Then type “appwiz.cpl” in the field and hit Enter to open the Programs and Features in Control Panel.
  • From there, look for the VPN service you are using, select it and then click on Uninstall to remove it.
  • After that, restart your computer and try to install the latest version of the program again. It should work now. If not, proceed to the next available option below.
Read More
A Quick Guide to Fixing JavaScript Void 0 Error

Correct JavaScript Void 0 Error

JavaScript Void 0 Error - What is it?

JavaScript is a computer programming language used to make a website work smoothly with the internet. It helps to display visual effects, animations, and other web page functions. You may come across the JavaScript Void (0) error message when there is a problem in loading JavaScript from a web page or the internet browser.

Error Causes

JavaScript Void (0) error is triggered by multiple reasons such as:
  • It can be due to a simple random Windows application glitch.
  • You are visiting an unsafe website that contains malware
  • JavaScript’s web browser implementation  is broken due to poor program installation
  • Active X controls, Java applets, and active scripting, the key components of JavaScript are disabled
  • Registry issues like invalid or misconfigured registry keys

Further Information and Manual Repair

For JavaScript Void (0) error-free web surfing, it is advisable to repair the issue without any delays. Let’s take a look at different methods to resolve this error on your system.

Cause: Simple Random Glitch

Solution: If the cause for the JavaScript Void 0 error is a simple glitch, then it is advisable to restart your system and then run the program again.

Cause: JavaScript’s web browser implementation is broken

Solution: If you experience the JavaScript Void 0 error message after the installation of the new browser on your system, then poor installation of the program or program conflict is most likely to be the deep-rooted cause of this error code. To resolve it, uninstall the program and undo the recent changes.

Cause: Active X controls, Java applets, and active scripting, the key components of JavaScript are disabled

Solution: You should know that components including Active X controls, Java applets, and active scripting are all essential to JavaScript in order to make your browsers run properly. If these are disabled, you may come across the JavaScript Void (0). To fix it open your browser and select the Tools tab. Then click the options button and select content. Here check the ‘enable JavaScript’ check box and click Ok to enable these components.

Cause:  Registry Issues

Solution: If after performing all the solutions discussed above, you still come across JavaScript Void (0) error code, then you should know that the problem is bigger than what you expected. It triggers registry issues. Either the cause of the error is misconfigured or invalid registry keys. To reconfigure the registry keys setting may be a challenging task and complex if you are not a computer programmer. Congratulations, you have just fixed JavaScript Void 0 Error in Windows 10 all by yourself. If you would like to read more helpful articles and tips about various software and hardware visit errortools.com daily. Now that’s how you fix JavaScript Void 0 Error in Windows 10 on a computer. On the other hand, if your computer is going through some system-related issues that have to get fixed, there is a one-click solution known as Restoro you could check out to resolve them. This program is a useful tool that could repair corrupted registries and optimize your PC’s overall performance. Aside from that, it also cleans out your computer for any junk or corrupted files that help you eliminate any unwanted files from your system. This is basically a solution that’s within your grasp with just a click. It’s easy to use as it is user-friendly. For a complete set of instructions in downloading and using it, refer to the steps below Perform a full system scan using Restoro. To do so, follow the instructions below.
      1. Download and install Restoro from the official site.
      2. Once the installation process is completed, run Restoro to perform a full system scan. restoro application screen
      3. After the scan is completed click the “Start Repair” button. restoro application screen
Read More
Choose what application will load on startup
Hello everyone and welcome to another great tutorial from errortools.com I hope everyone is feeling great and that you are prepared to boost the performance of your computer. This time we will speed up Windows startup time and overall performance by eliminating startup programs that we don't need and do not use. Microsoft itself and some application developers tend to have some applications or some services always active and set to be loaded on Windows startup. If you want to change which of these applications are starting up with your Windows and change them, follow this easy guide and you will be speeding up your Windows in no time. First thing is to open a task manager, fastest and most direct way of doing this is with a keyboard combination of CTRL + SHIFT + ESC keyboard with ctrl shift and esc markedWhen Task Manager opens, click on the startup tab on top. task manager startup tabOnce you click on startup you will get a list of applications that are set to be started when Windows is booted. startup applicationsYou can now click on the application and then click on disable on the bottom button, the application status will update in task manager to disabled and it will not be booted anymore when Windows starts. In this same manner, you can enable back some applications if you changed your mind about them. Please note that some applications are using some services and must have them running or they will not work properly. The best practice is to disable applications you are positive you will not use or use rarely so you do not want them to slow down Windows.
Read More
Enable Windows Sandbox on Windows
One of the most common ways cybercriminals use to inject suspicious code into devices is by tricking users into installing a malicious program on a targeted device. Oblivious users are vulnerable to such tricks, which is why Microsoft has been working hard in the background to address this issue. Recently, Microsoft announced the availability of a sandboxed version of Windows 10 that runs inside Windows 10 in order to isolate suspected software to run inside it and protect the system from potential threats. This Windows Sandbox feature is a new feature that keeps your computer secure. It is a virtual disposable environment that you can enable. So if suspect any software of being malicious, you can run this software in an environment and ensure that it won’t interfere with any normal processes and would not jeopardize files on your computer. To simply put it, “Windows Sandbox is a new lightweight desktop environment tailored for safely running applications in isolation”. So if the Sandbox is closed, all the residual files, software, and other data are deleted permanently. To enable Windows Sandbox, refer to the instructions provided below. Step 1: You have to make sure that you are running either Windows 10 Enterprise Editions or Windows 10 Pro and that your computer is running build 18305 or newer. Step 2: After that, you have to enable Virtualization to let another instance of Windows 10 running in Sandbox mode. Step 3: Next, search for Windows Features on and off in the search box and then select the appropriate entry. Step 4: From the list, go to the mini window and check the Windows Sandbox and then click on OK. Step 5: Afterwards, in the Cortana Search box, search for “Windows Sandbox” and select the related entry to run it in an elevated window. Step 6: Then from your main computer (host), copy the executable file and paste it inside the Windows Sandbox environment. Step 7: Now run the executable file in the Sandbox environment and use it as you normally do. Step 8: Once you’re done, close the Windows Sandbox application and as mentioned, every data regarding the executable file and the temporary environment will be deleted. Step 9: And for the sake of safety, ensure that there are no modifications made to the host because of the executions in the Sandbox environment. You have the option to contact Microsoft for feedback related to Windows Sandbox. You can use the traditional Feedback Hub if you have any suggestions or any issues. Just fill in the appropriate details and select Windows Sandbox for the feature category under the Security and Privacy section. And if you have any issues related to the execution of and within Windows Sandbox, simply choose “Recreate my problem” then select Start capture to reproduce the issue, and once you’re done, select Stop capture.
Read More
1 2 3 162
Logo
Copyright © 2022, ErrorTools. All Rights Reserved
Trademarks: Microsoft Windows logos are registered trademarks of Microsoft. Disclaimer: ErrorTools.com is not affiliated with Microsoft, nor claim direct affiliation.
The information on this page is provided for information purposes only.
DMCA.com Protection Status