Disable Telemetry & Data Collection in Windows

The Windows 10 Telemetry and Data Collection features are auto-enabled and they collect all sorts of user activity and sends it to Microsoft. Microsoft says that the data collected only enhances the overall user experience and Windows functionality better but the number of data breaches happening across the globe has forced users to be extra cautious about their data privacy. So naturally, from stronger passwords and other services management, it is only logical to turn off Windows data gathering.

To do so:

  • Press ⊞ WINDOWS + R to open the run dialog.
  • In the Run dialog type: taskschd.msc
  • Press CTRL + SHIFT + ENTER key combo to open Task Scheduler in admin mode.
  • On the left pane, navigate to the: Task Scheduler Library > Microsoft > Windows > Customer Experience Improvement Program
  • At the location, on the middle pane, right-click on the task named Consolidator and select Disable from the context menu...
  • Repeat the process with all other tasks listed in the middle pane.
  • Exit Task Scheduler.
If you like to learn and find out more about various Windows errors, and how to repair them go to our vast archive or use search to find articles that will explain and help you in solving your issue.
However, if you prefer to do things fast and with automatization then we are proposing to use an automated solution for your issues. The application that we are recommending is Advanced System Repair Pro
Advanced System Repair utilizes multiple tools all in one to give you a quick, simple, reliable, and very thorough diagnosis of your PC. It brings you all the tools you need in one program to clean, fix, protect, optimize and boost your PC!
1-Click Maintenance
All the tools to make it simple and easy! It's like having a professional technician at the click of a mouse.

Junk Cleaner
Keeping your computer free from unnecessary clutter also helps make your computer last longer. Like any other machine, if you keep it clean and take care of it, it will serve you better for longer!

Optimize background apps
Optimize applications background activity with the built-in Application Optimizer feature.

Disk Defrag
With a simple 1-click, Advanced System Repair speeds up your PC by assembling fragmented files on your machine and organizing them more efficiently.

Malware Removal
Finds and removes all types of harmful malware including trojans, worms, bots, adware, spyware, PUPs, and more!

Privacy Cleaner
The all-in-one privacy suite to Clean Your Tracks & Protect Your Privacy! Make your computer safe, secure, and more efficient!

System Tweak/Optimizer
ASR will analyze your complete system and settings to adjust your PC to function at its maximum performance.

Registry Cleaner
Over time, as you install and uninstall applications, the registry can become cluttered with old entries and broken settings which can result in program crashes, and annoying messages and slow the computer down.
Visit our Advanced System Repair Pro Download page to inform yourself about all the benefits of this software and get a free trial copy of it.
advanced system repair pro

Advanced System Repair Pro

One-click automated PC repair solution
ASR logo
With Advanced System Repair Pro you can easily
Replace damaged files
Restore performance
Free disk space
Remove Malware
Protects WEB browser
Remove Viruses
Stop PC freezing
DOWNLOAD
Privacy Policy | Terms of Use | Uinstall
Advanced System Repair Pro is compatible with all versions of Microsoft Windows including Windows 11

Share this article:

You might also like

How to use Control Panel in Windows 11
Windows 11 has brought us a new and revamped settings application that will cover most personalization and overall settings for your operating system. But as much as the new settings app is tweaked and modified there are still some things that can be modified only inside Control Panel. windows 11 control panel
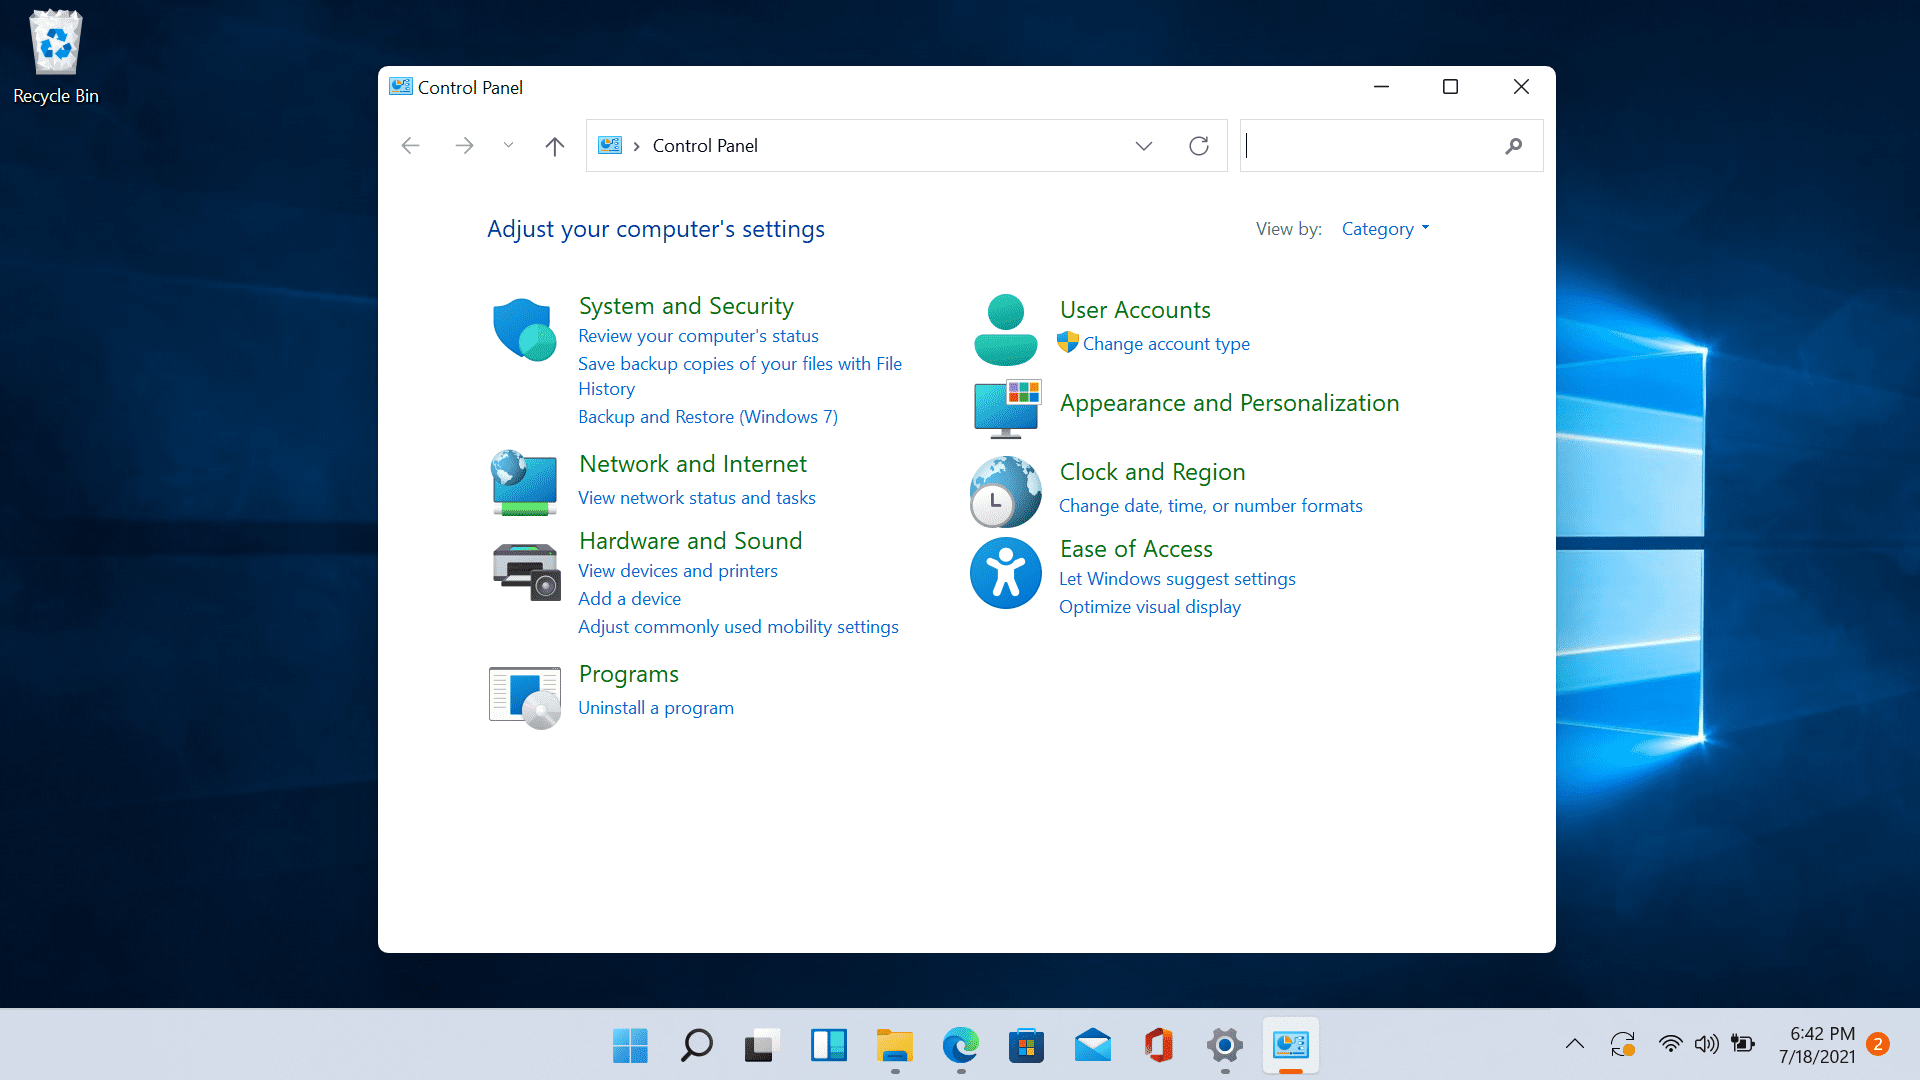
Since the Control Panel icon itself is somewhat not right away once clicked on the start button we are presenting you a couple of ways to open it so you can change each detail you want.

Via Start menu

The most straightforward and easiest way to reach and open the control panel is via the Start menu. In order to do it just click on the Start menu and type in the control panel. Then click on Control Panel Icon in the results.

Pin Control panel icon to the taskbar

In order to actually pin the control panel to Taskbar, you will need to open it first. Use the previous simple and fast steps in order to quickly open it then in the taskbar right-click on its icon. Choose Pin to Taskbar and close control panel. Now you can open the control panel quickly just by clicking it on its icon in the Taskbar.

Add Desktop icon

If you liked the idea to have an icon that you can click in order to fast open the control panel but you are not very fond of the icon being located in your Taskbar then let's place it on Desktop instead. In order to place a special control panel icon on the desktop, we will use Windows setting app. Open settings app with ⊞ WINDOWS + I and go to Personalization tab. Inside the personalization tab, go to Themes and click on Desktop Icon Settings. Check the box beside Control Panel and click on OK. The Control Panel icon will appear now on your Desktop and you can double click on it to launch it.

Run Control Panel from the Run dialog box

Same as in the previous version of Windows you can also open the Control Panel via Windows built-in run menu. This is mostly the preferred way to gain access to it by system administrators. Press ⊞ WINDOWS + R to open the run dialog. Inside dialog type in control and press ENTER. Control Panel will open right away.
Read More
Fix Windows Update error 0xC1900209
What is Windows Update Error 0xC1900209? Before you can install any updates on your Windows 10 computer, there are a lot of conditions that have to be fulfilled and one of these conditions is software compatibility. It is one of the important factors in installing Windows Updates. So if one of the software in your computer is not compatible with the new Windows Update for your OS, then the Windows 10 setup will not proceed and will block the installation of the new update. This both applies to the cumulative updates and feature updates. In such cases, you will get the following error message when you run Windows Update:
“0xC1900209, Incompatible software is blocking the upgrade process. Uninstall the application and try the upgrade again.”
This error message comes under the umbrella of the Windows 10 pre-upgrade validation using Setup.exe. And for you to identify the incompatible app, you need to grab a Windows 10 install image using the Windows Media Creation tool to download the suitable Windows 10 version and mount it. After that, execute the setup.exe file that’s located in the root folder of the Windows 10 install image. Once you execute the setup file, the upgrade wizard will give you a list of incompatible apps. Once you have determined which software is not compatible with the Windows Update, there are two options you can try to resolve the Windows Update error 0xC1900209 – you can either try to update the conflicting software or uninstall it. For more details, follow the given options below.

Option 1 – Try to update the conflicting software

If you are using an older version of the software that’s in conflict with the Windows Update, you might want to update it to its latest version and then try to apply the updates again to your Windows 10 computer. You can update the concerned software by visiting the official website of the software or any of its distribution sources. On the other hand, you can also use the Check for updates feature of that particular software if it’s available.

Option 2 – Try to uninstall the conflicting software

If updating the problematic program didn’t work, the next option you can try is to uninstall it. All you have to do is follow these steps to uninstall it successfully:
  • Tap the Win + R keys to open the Run dialog box.
  • Then type “appwiz.cpl” in the field and tap Enter to open the Programs and Features in Control Panel.
  • Next, arrange the list of installed programs in the order of the installation date.
  • After that, look for the problematic program and right-click on it, and then select Uninstall.
  • Once the uninstallation process is done, restart your computer and see if the Windows Update error 0xC1900209 is fixed or not.
Read More
Intel’s GPU ARC coming aimed at AMD & Nvidia
intel ARC
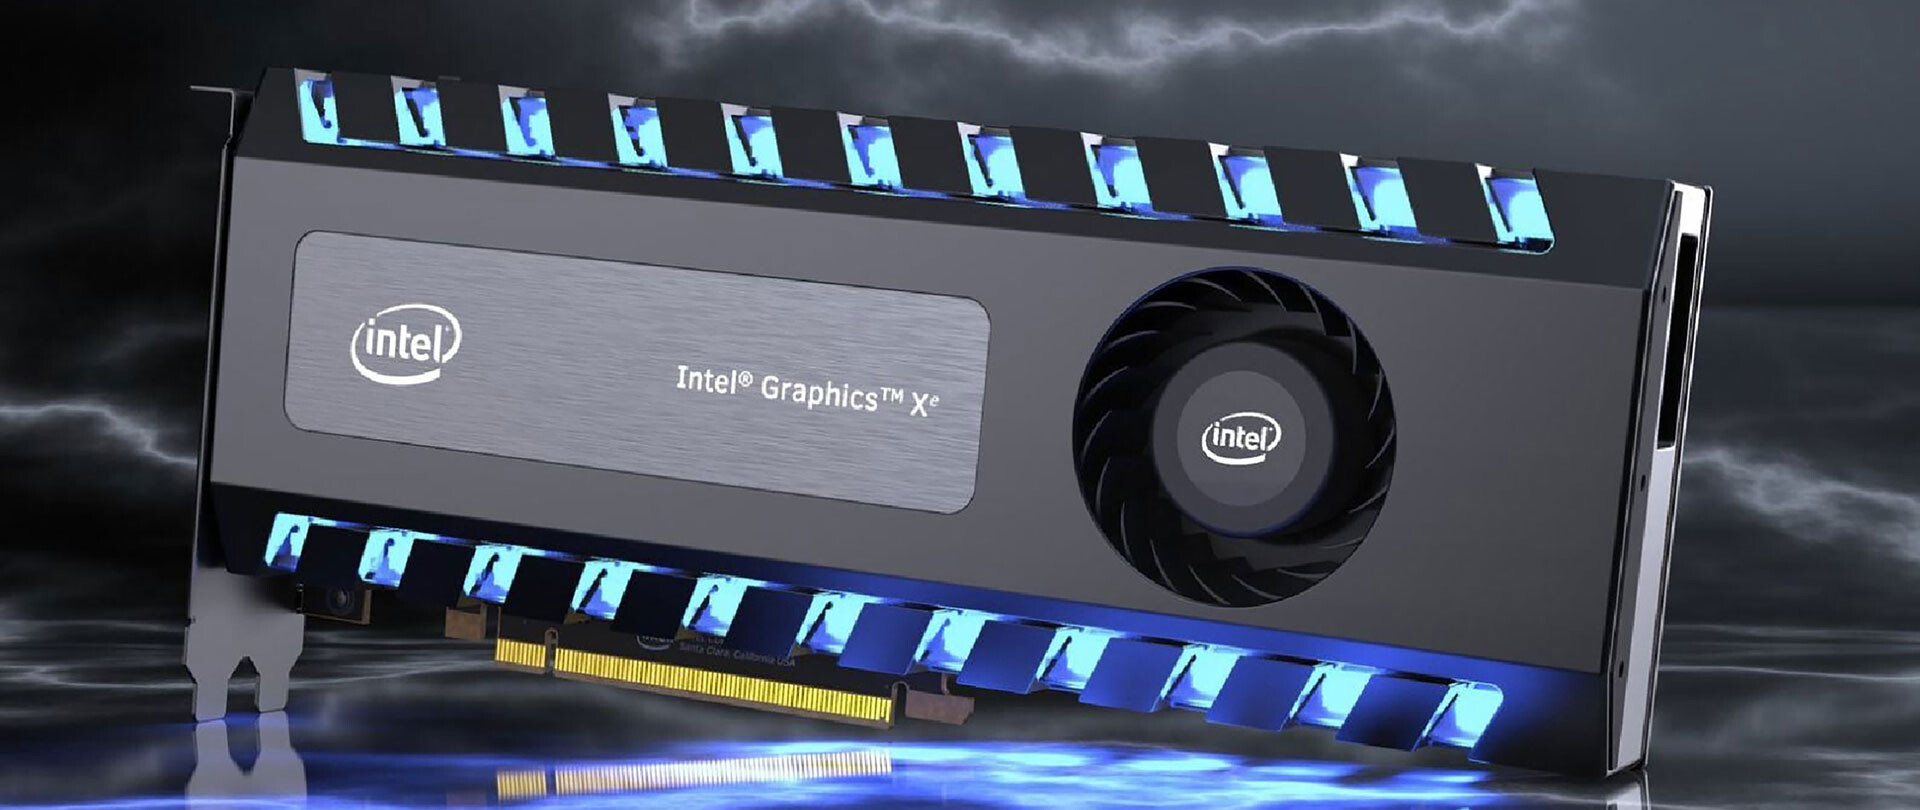
This is not the first time that Intel is trying to enter the GPU field but its adventures so far were, well let us agree not so good. All of that is hoping to be changed with the upcoming ARC GPU. The first generation of Arc graphics, code-named Alchemist and previously known as DG2, will support desktop PCs and laptops and is set to arrive in the first quarter of 2022. Alchemist will have hardware-based Ray tracing and AI-driven supersampling. This indicates that GPU is aimed to compete in the Hi-end spectrum and battle side by side with Nvidia and AMD on the market. Alchemist will also pack full DirectX 12 Ultimate support. Intel also released names for the next upcoming future generations of ARC GPUs: Battlemage, Celestial & Druid. More information about ARC products will be released later this year. “Today marks a key moment in the graphics journey we started just a few years ago. The launch of the Intel Arc brand and the reveal of future hardware generations signifies Intel’s deep and continued commitment to gamers and creators everywhere,” Roger Chandler, Intel vice president, and general manager of client graphics products and solutions.
Read More
Sites for COVID-19 information
Living in today's world sadly is still living in the COVID-19 pandemic. It has been more than a year and sadly pandemic is still very strong and we are battling it on a daily basis. Governments all over the world are trying to battle pandemics in their own way with their own ideas and prevention measures. We as individuals can not very much influence how will the pandemic itself go but fortunately in this modern age of information we can at least follow and be in the loop at the current state of the situation regarding it. Today instead of having a troubleshooting article or tips and trick for your PC we are doing something else but in the domain of internet technology, you know, just to keep everything still IT related ???? Below you will find websites with small descriptions of what they do to keep yourself informed and hope to get over this dreadful pandemic.
  1. The WHO’s COVID-19 Dashboard

    If you are interested in real-time COVID-19 information about active cases, death tool so far, new cases and the number of vaccines administrated so far I would recommend WHO's dashboard. How WHO is a non-government institution composed of doctors from all over the world with just a single goal in mind, to help and put an end to this pandemic is a great non-biased source of information on the current state of virus spread.
  2. Vaccine Finder

    Please be aware that Vaccinefinder is working only on the territory of the United States of America. The reason why it was included in this list is that basically it is a great idea and I hope to see this site expand on other world regions or at least that inspires the emergence of another worldwide website with this type of content. If you live in the USA, this site will be a great help since you can track where and how many shots are distributed to states and even towns in America.
  3. COVID tracking project

    This site is also for U.S. residents, this time it is about tracking cases in each state with details and statistics. If you are interested in more detailed statistics of hospitalized patients per state or overall you are just interested in statistics about the pandemic in the U.S. this site might provide all the information about your needs.
  4. NPR

    On national public radio or NPR for short, there is a special section devoted to the coronavirus where new articles about pandemic are released daily with new information and new findings on how to battle it and the current state of things. A great informational site to keep up with the current state of things.
  5. Google's COVID-19 page

    Google has not been inactive during this pandemic and on its page specially dedicated to the COVID-19 virus you can find a lot of free information updated daily. From safety and prevention tips to data about pandemics there is a lot of ground covered on-page and we recommend at least going through the prevention section to inform yourself how to keep yourself and others safe.
  6. Coronavirus tracker

    This daily updated chart can show how many cases and deaths are from chosen time period all in form of a chart, you can see charts for each country in the world how COVID cases rose or dropped along with the death tool it brought.
There you go, 6 websites to track and inform yourself about this dreaded pandemic which has managed to change the world and people's lives forever, sadly on the bad side.
Read More
Specified service does not exist, 0x80070424
Every now and then, the Windows Installer can also encounter some problems or glitches. One of these problems is where the Windows Update Standalone Installer, Windows Defender as well as Windows Firewall throws an error message that says, “The specified service does not exist as an installed service, 0x80070424”. This type of error can actually affect various applications on your computer so you have to fix it as soon as you can. Although there is no clear reason for what really causes this error, there are various suggestions you can try to fix it.

Option 1 – Try to run the Windows Update troubleshooter

Windows 10 have various troubleshooters that can help you resolve many system issues. So if you’re dealing with errors “The specified service does not exist as an installed service, 0x80070424”, you can run the Windows Update troubleshooter to resolve it. To run it, go to Settings and then select Troubleshoot from the options. From there, click on Windows Update and then click the “Run the troubleshooter” button. After that, follow the next on-screen instructions and you should be good to go.

Option 2 – Try to reconfigure the Windows Time Service

  • In the Start Search, type “command prompt” and right-click on Command Prompt from the search results.
  • Then click on the “Run as administrator” option to open Command Prompt with admin privileges.
  • Now execute each one of the given commands sequentially and hit Enter right after you type each one of them.
    • net stop W32time
    • exe /unregister
    • exe /register
    • net start W32time
  • After executing the given commands above, wait until it says, “W32Time successfully registered”.

Option 3 – Try to restart related Windows services

  • First, type “command prompt” in the Start Search and right-click on Command Prompt from the search results.
  • Then click on the “Run as administrator” option to open Command Prompt with admin privileges.
  • Now execute each one of the given commands sequentially and hit Enter right after you type each one of them.
    • SC config wuauserv start= auto
    • SC config bits start= auto
    • SC config cryptsvc start= auto
    • SC config trustedinstaller start= auto
Note: The commands you’ve just executed will make sure that the required Windows services are available.

Option 4 – Try to download and install the Windows Update Agent

You might also want to download and install the latest Windows Update Agent as it could also help you resolve the “The specified service does not exist as an installed service, 0x80070424” error.

Option 5 – Try to reset the Windows Update components

If by any chance that the second option didn’t work, resetting the Windows Update components could also help you resolve the problem. How? Refer to the following steps:
  • Open Command Prompt with admin privileges.
  • After that, type each one of the following commands and hit Enter after you key in one after the other.
    • net stop wuauserv
    • net stop cryptsvc
    • net stop bits
    • net stop msiserver
Note: The commands you entered will stop the Windows Update components such as Windows Update service, Cryptographic services, BITS, and MSI Installer.
  • After disabling WU components, you need to rename both the SoftwareDistribution and Catroot2 folders. To do that, type each one of the following commands below, and don’t forget to hit Enter after you type one command after the other.
    • ren C:WindowsSoftwareDistribution SoftwareDistribution.old
    • ren C:WindowsSystem32catroot2 Catroot2.old
  • Next, restart the services you’ve stopped by entering another series of commands. Don’t forget to hit Enter after you key in one command after the other.
    • net start wuauserv
    • net start cryptsvc
    • net start bits
    • net start msiserver
  • Close Command Prompt and reboot your PC and then check for updates on your computer and see if the error is resolved.

Option 6 – Try running the Windows Firewall troubleshooter

You could also try to run the Windows Firewall troubleshooter as it might also help you fix the problem. This could help in repairing and fixing Windows Firewall issues automatically. Check if it’s available for your Windows.
Read More
3 ways to bypass TPM and install W11 anywhere
TPM 2.0 requirement for Windows 11 has produced a lot of discussions since it was announced. A lot of somewhat older hardware seems to be left behind with this decision from Microsoft. So naturally, when something like this is announced, especially when it is stated it is the must-have thing, people find a way to break it and to prove it is not the case. In that spirit, I am proud to present you with not one but three-way you can install Windows 11 on hardware that does not has TPM 2.0. Please note that by bypassing this you will not be able to use some Windows 11 features tied to modules like Device encryption, vTPM in Hyper-V, and all TPM-related services. I will cover methods from the most simple and straightforward ones to the more complicated using registry editor.

Windows 11 TPM installation
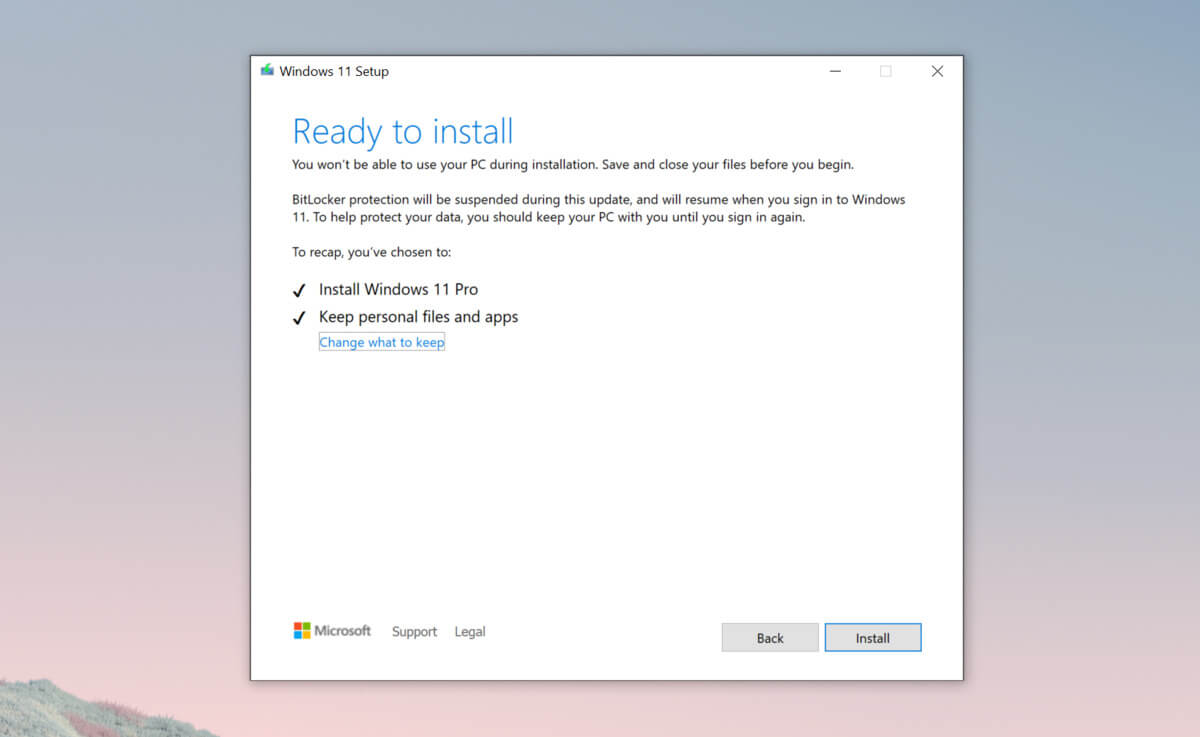
Bypass TPM with changing installation media

For this method to work you will need both Windows 10 ISO and Windows 11 ISO since it will require some file copying between them. You will also need Rufus or another tool to make a new installation media once files are copied All you have to do in this method is to go into your Windows 10 ISO and delete the install.esd, then just copy install.wim from Windows 11 installation media into the same place, and you are done. Make install ISO with Rufus and install Windows 11.

Change DLL on installation media method

For this method, you will need everything like in the previous one and the process is almost the same, but this time instead of migrating the whole installation file, we will just replace the appraiserres.dll file. Copy appraiserres.dll file from your Windows 10 installation media over the same file on Windows 11 installation and you are good to go.

Bypassing TPM via registry editor

If for some reason previous easy solutions have not worked for you do not lose hope just yet, there is one more way you can bypass TPM. In this given method you will not need Windows 10 installation media but the process is a little more complicated than previous ones.
  1. Create Windows 11 media installation
  2. Start the installation process
  3. Click the Next button.
  4. Select region, language, and time when asked. You can change these settings later.
  5. Click the Install now button.
  6. If your device was already activated, click the I don’t have a product key option to continue.
  7. Click the Next button. Select the edition of Windows. When you’re installing the OS on an existing device, Windows won’t activate if you select the incorrect edition.
  8. Click the Next button.
  9. Select the I accept the license terms option and click next.
  10. Select Custom: Install Windows only (Advanced)
  11. During the Windows installation screen, now you will see a message stating that the PC can’t run Windows 11 if you do not have TPM 2.0
  12. On this screen, press SHIFT + F10 to open Command Prompt window.
  13. Launch the registry editor, type regedit.exe in Command Prompt, and press ENTER
  14. Create a new key “LabConfig” by right-clicking on the Setup key and select New > Key under HKEY_LOCAL_MACHINE\SYSTEM\Setup.
  15. Type LabConfig and press ENTER.
  16. Right-click on the LabConfig key.
  17. Select New > DWORD (32-bit) value.
  18. Create two values: BypassTPMCheck and BypassSecureBootCheck.
  19. Set their DWORD32 value to 1.
  20. Press ENTER.
  21. Close the Registry Editor.
  22. Type exit in the Command Prompt and press ENTER or close its window.
  23. Press the back button in the Windows installation setup if it still says “This PC can’t run Windows 11”.
  24. Accept the terms & conditions.
  25. Select Custom: Install Windows only (Advanced) option and configure the partition with the current installation.
  26. Click the Next button.
  27. Finish Windows 11 installation
Read More
Software review series: RocketDock
RocketDock is one of the most popular app launchers as it has been used excessively back in several windows versions. This was modeled based on the Mac OS X launch bar and offers an animated response when you hover the mouse over the apps gathered on the Dock. This is perched at the top of your screen, and you can easily drag your favorite app icons to have them in one place. The dock keeps all your most favorite shortcuts intact for faster and easy access. Like other apps, you can easily customize the dock with skins and other add-ons. If you would like to read more helpful articles and tips about various software and hardware visit errortools.com daily.
Read More
Cooler Master's Orb X upcoming gaming chair
The newest piece of hardware for PC or console users is not really what anyone has expected and for sure not from a company like Cooler Master. orb x black and whiteI going to admit right here that I am a big fan of Cooler Master PC cases, I like them and they are always one of the things that I consider when building a new PC, overall I like their ideas and quality so personal for me it was quite a surprise to see that they are one that is making a new generation gaming chair. Now truth to be told Orb X is not your typical gaming chair as you can clearly see from the pictures. The chair itself will come in two colors: white or black and RGB lighting looks to be prominently featured throughout. orb x back
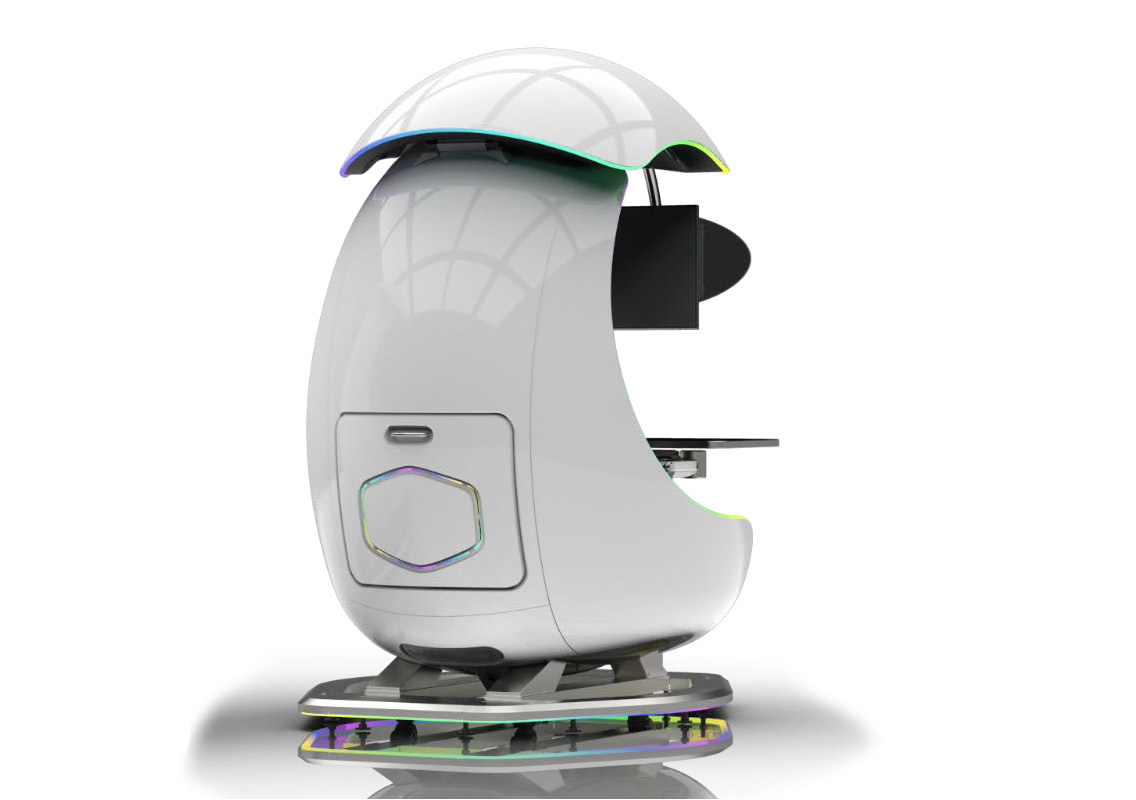
The chair itself is advertised as both meant and aimed for professional and gaming crowds but I believe the gaming crowd is in general more interested in this hardware piece. Hardware is enclosed in a fully motorized shuttle dome which aims to maximize your privacy, it supports a single 49inch display or three 27inch monitors along with surround speakers if you do not wish to use headphones. Orb x side
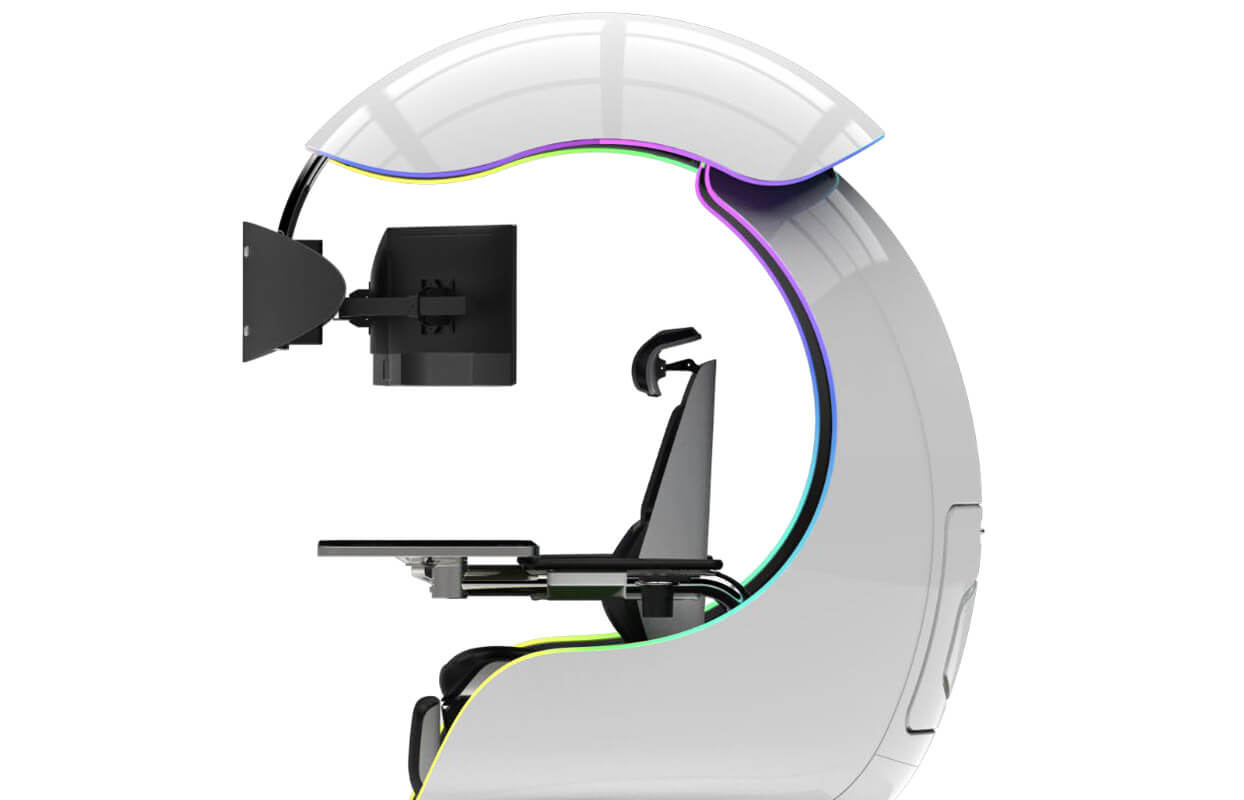
It offers an adjustable headrest, lumbar support, and footrest so you can spend some time in it and be comfortable. Controls on the chair itself allow you to raise or lower the dome for easier getting in and out of it. Orb X also has a compartment in its backside, it folds out and has a sliding tray designed to hold your PC or console. Everything is enclosed so wiring is not the issue. Overall Orb X seems really like the computer chair of the future, Cooler Master expects to release the Orb X by December 2021, priced around $12,000-$14,000.
Read More
ERR_CERT_COMMON_NAME_INVALID error in Chrome
In case you don’t know, when you visit a website that uses HTTPS, it also offers an SSL certificate to the browser in order to verify the website’s identity. Although it may contain lots of things inside it, one of them is the URL of the website. So if the certificate does not match the URL to what you entered, you will most likely get the “Server’s certificate does not match, ERR CERT COMMON NAME INVALID” error which indicates that the connection is not private and the site may try to steal your data but worry not, as this post will guide you in resolving this issue. To fix the ERR_CERT_COMMON_NAME_INVALID error, here are some suggestions that might help.

Option 1 – Check the website’s certificate

If you own the website where you’re getting the error, then you might have to check if the website’s certificate is installed properly and configured on the server as it could be the reason why you’re suddenly getting the error.

Option 2 – Check the Windows Host file

You can also try to cross-check the Windows Hosts file to find out if the website you are trying to open has been blocked, because if it is, then it’s no wonder why you’re getting the ERR_CERT_COMMON_NAME_INVALID error. There are instances when some third-party application modifies the file and adds some websites to the blocklists. So if the website is indeed blocked, you need to remove it from the list.

Option 3 – Use the Google Public DNS

You might want to change your DNS to Google Public DNS as it could also help you in fixing the ERR_CERT_COMMON_NAME_INVALID error in Chrome. To do so, follow the steps below.
  • The first thing you have to do is right-click on the network icon in the Taskbar and select Network and Sharing Center.
  • Next, click on the “Change Adapter Settings” option.
  • After that, search for the network connection that you are using to connect to the internet. Note that the option might be “Wireless Connection” or “Local Area Connection”.
  • Right-click on your network connection and click on Properties.
  • Then select the new window to choose the “Internet Protocol 4 (TCP/IPv4)” option.
  • After that, click on the Properties button and click the checkbox in the new window for the option “Use the following DNS server addresses”.
  • Type in “8.8.8.8” and “8.8.4.4” and click OK and exit.

Option 4 – Run the built-in Malware Scanner and Cleanup Tool in Chrome

In case you don’t know, there is actually a built-in malware scanner and cleanup tool in Chrome that helps you get rid of any unwanted ads, pop-ups, and even malware, as well as unusual startup pages, toolbars, and other things that could affect the performance of the browser. In addition, this built-in tool in Chrome might also help in fixing the ERR_CERT_COMMON_NAME_INVALID error.

Option 5 – Reset Chrome

Resetting Chrome can also help you get rid of the error. Resetting Chrome means restoring its default settings, disabling all the extensions, add-ons, and themes. Aside from that, the content settings will be reset as well and the cookies, cache, and site data will also be deleted. To reset Chrome, here’s what you have to do:
  • Open Google Chrome, then tap the Alt + F keys.
  • After that, click on Settings.
  • Next, scroll down until you see the Advanced option, once you see it, click on it.
  • After clicking the Advanced option, go to the “Restore and clean up option and click on the “Restore settings to their original defaults” option to reset Google Chrome.
  • Now restart Google Chrome.
Read More
How to Turn Bluetooth ON in Windows 11
Windows 11 Bluetooth
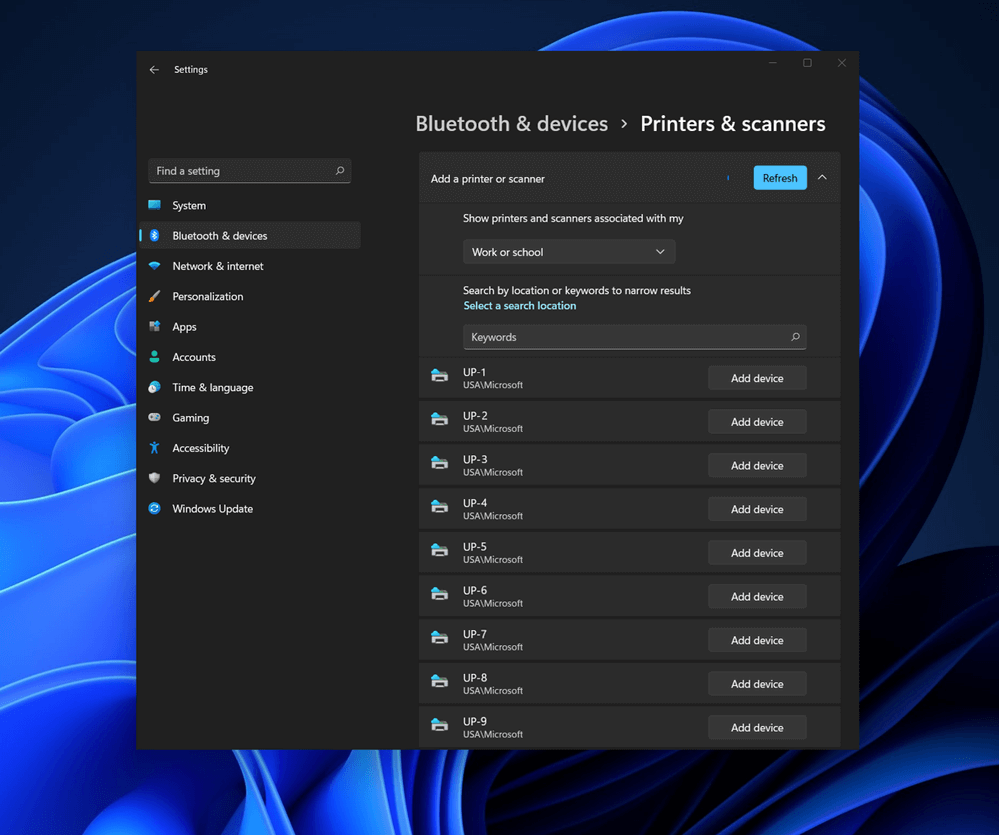
Bluetooth perhaps is slowly becoming an outdated feature but sometimes you can really used it and need it. By default, in Windows 11 Bluetooth is turned OFF so if you need it, you will need to turn it ON first. Luckily turning it ON is easy and we will guide you through the process

Turning Bluetooth using the Quick Settings menu

The easiest and fastest way to turn the Bluetooth ON is using the quick setting menu:
  1. Click on indicator icons located left of date and time in Taskbar
  2. Click on the Bluetooth icon (if the icon is not displayed, click on the pencil icon, then click on Add and add Bluetooth icon from the list)
  3. Right-click on the Bluetooth icon and select go to Settings
  4. Go to Adding a Bluetooth Device to Windows 11 section

Switch it ON via Windows Settings

  1. Open Windows settings by using ⊞ WINDOWS + I combination
  2. Click on Bluetooth & Devices
  3. Inside settings turn Switch to ON beside Bluetooth
  4. Click + Add Device large button on top
  5. Click Bluetooth
  6. Select device in the list of found devices (make sure device is turned ON, it has Bluetooth sharing ON, and that it is in pairing mode)
  7. If the device needs the password, type it in
  8. When the message Your device is ready to go is showed on the screen click on the Done

Advice on Bluetooth devices

Note that the Bluetooth devices you connect to Windows 11 stay linked to your PC unless you pair them with a different PC, smartphone, or tablet later. After a time, most Bluetooth devices power down automatically to save battery life. To continue where you left off, either power the Bluetooth device up (if it has a power button) or press a button on a keyboard or mouse, and it should automatically turn on and reconnect with your PC. If you’re having trouble connecting your Bluetooth device, make sure that Windows 11 is fully updated and that you’ve installed any drivers that came with your device. Make sure that the device is fully charged or that it has a fresh set of batteries. while Windows is searching. You’ll need to remove the device from Windows 11 first and then attempt to pair it with your PC again.

Removing devices

If you need to remove (un-pair) a Bluetooth device, just open Windows Settings and navigate to Bluetooth & Devices. Locate the name of the device that you want to remove, click the three dots button in the corner of its square and select Remove Device.
Read More
1 2 3 162
Logo
Copyright © 2022, ErrorTools. All Rights Reserved
Trademarks: Microsoft Windows logos are registered trademarks of Microsoft. Disclaimer: ErrorTools.com is not affiliated with Microsoft, nor claim direct affiliation.
The information on this page is provided for information purposes only.
DMCA.com Protection Status