Delete files and folders using Command Prompt

There are times when you might find it difficult to delete folders or files in File Explorer and it could be due to many reasons. One of these reasons can be attributed to the failure that can lock down the folders or files which prevents you from deleting them. In this kind of situation, you can utilize the Command Prompt to delete the folders, sub-folders, and files on your computer, and in this post, you will be guided on how exactly you can do that.

Before you proceed, keep in mind that when you use the Command Prompt incorrectly, it might affect your computer and render it inoperable, thus, you must be extra careful when executing the steps given below and it would also be better if you create a System Restore Point. After that, refer to the following instructions.

Step 1: First, in the Start Search, type “command prompt” in the field and from the search results, right-click on Command Prompt and then select the “Run as administrator” option to open Command Prompt with admin privileges.

Step 2: After opening Command Prompt as admin, navigate to the folder where the file you want to delete is located. Note that you have to execute the “cd” or the change directory command.

Step 3: Next, execute the following command in Command Prompt:

DEL /F /A <file path with extension>

Note: In the given command, “/F” is the force delete command, while “/A” is the command that selects the files with the ready for archiving attribute.

Step 4: After that, go to the location where you can find the folder you want to delete by using the “cd” command again. And then execute the following command right after:

RD /S <folder path>

Note: In the given command, “RD” is the command that removes the folder from the directory, while “/S” removes all of its sub-folders and files. On the other hand, if you also use the “/Q” parameter, you won’t see the “Y/N” confirmation but if you didn’t use it, then simply tap the Y button to proceed.

If you like to learn and find out more about various Windows errors, and how to repair them go to our vast archive or use search to find articles that will explain and help you in solving your issue.
However, if you prefer to do things fast and with automatization then we are proposing to use an automated solution for your issues. The application that we are recommending is Advanced System Repair Pro
Advanced System Repair utilizes multiple tools all in one to give you a quick, simple, reliable, and very thorough diagnosis of your PC. It brings you all the tools you need in one program to clean, fix, protect, optimize and boost your PC!
1-Click Maintenance
All the tools to make it simple and easy! It's like having a professional technician at the click of a mouse.

Junk Cleaner
Keeping your computer free from unnecessary clutter also helps make your computer last longer. Like any other machine, if you keep it clean and take care of it, it will serve you better for longer!

Optimize background apps
Optimize applications background activity with the built-in Application Optimizer feature.

Disk Defrag
With a simple 1-click, Advanced System Repair speeds up your PC by assembling fragmented files on your machine and organizing them more efficiently.

Malware Removal
Finds and removes all types of harmful malware including trojans, worms, bots, adware, spyware, PUPs, and more!

Privacy Cleaner
The all-in-one privacy suite to Clean Your Tracks & Protect Your Privacy! Make your computer safe, secure, and more efficient!

System Tweak/Optimizer
ASR will analyze your complete system and settings to adjust your PC to function at its maximum performance.

Registry Cleaner
Over time, as you install and uninstall applications, the registry can become cluttered with old entries and broken settings which can result in program crashes, and annoying messages and slow the computer down.
Visit our Advanced System Repair Pro Download page to inform yourself about all the benefits of this software and get a free trial copy of it.
advanced system repair pro

Advanced System Repair Pro

One-click automated PC repair solution
ASR logo
With Advanced System Repair Pro you can easily
Replace damaged files
Restore performance
Free disk space
Remove Malware
Protects WEB browser
Remove Viruses
Stop PC freezing
DOWNLOAD
Privacy Policy | Terms of Use | Uinstall
Advanced System Repair Pro is compatible with all versions of Microsoft Windows including Windows 11

Share this article:

You might also like

TPM 2.0 and Windows 11, all you need to know
TPM or Trusted Platform Module version 2.0 is a must-have if you plan on upgrading your system to Windows 11. So what exactly is TPM and do you have it?

TPM checker
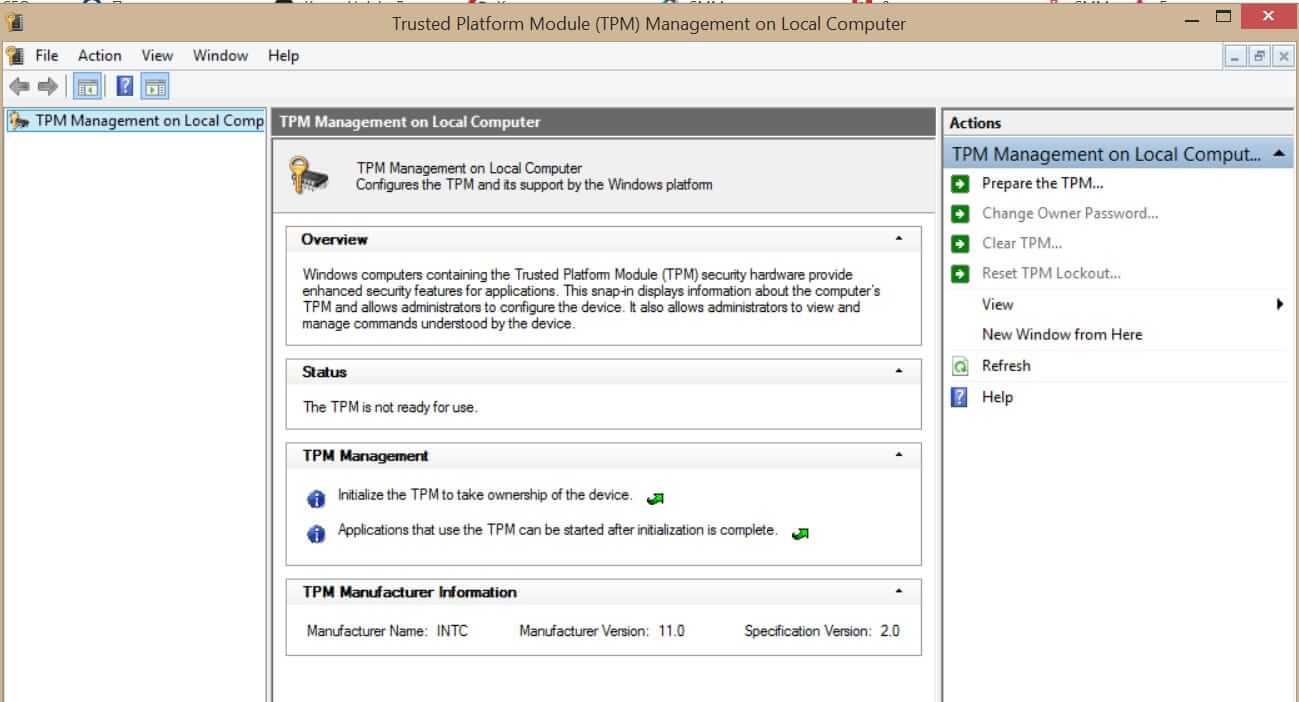
What exactly is TPM?

TPM is a tamper-resistant hardware technology tasked with generating and storing encryption keys inside it for better PC security. It can be remotely used to authenticate hardware and software by utilizing a unique endorsement key placed into the hardware itself. This technology can be used for example in BitLocker inside Windows in order to have data on a hard drive encrypted so if the mentioned drive is connected to another computer it would not be able to be accessed since the encryption key is stored in the TPM module. Microsoft is pushing its agenda that Windows 11 must be and must feel like safety first OS which will protect user data and user information and requiring TPM means that each Windows 11 will be secure so no additional software patches will be required for an extra layer of security. Windows 11 will assume that each user has TPM encryption enabled and will be built upon that.

Do you have TPM on your computer?

If your computer or hardware has been purchased in 2016 or later there are very high chances that you already have the required technology to run Windows 11. Unfortunately, many gaming motherboards have not been placing TPM in their boards and you might not have it. Also, there is the option of you having it but it is turned off in motherboard settings making Windows unable to detect it. As you can clearly see there are a lot of scenarios around required tech and honestly it is a complete mess. But lucky for you there are ways to find out do you possess the needed module in order to make an upgrade. On your current computer on which you would like to make an upgrade in your current Windows OS press ⊞ WINDOWS + R to open the run dialog. Inside run dialog type in TPM.msc and press ENTER to open Trusted Platform Module Management on Local Computer. You will immediately receive information do you have the required module. If everything is fine, you are good to go, however, if it says that compatible TPM cannot be found there is a chance that either you do not have needed hardware or it might be turned off inside motherboard settings.

Check motherboard UEFI

If you have a newer motherboard but Windows utility cannot detect TPM there is a chance that it might be turned off directly on your board. In order to check this, you will have to boot up your PC into UEFI either by pressing the corresponding key when it is turned ON or from Windows reboot options. Once you are inside UEFI you need to find security options and see if there is an option to turn ON or enable TPM. Since every motherboard is different and has different UEFI software we cannot cover all of the permutations and the best we can do is hope that provided information is enough. You can also visit your motherboard manufacturer to see instructions for your specific case.

Conclusion

TPM itself is generally an OK idea and I can surely see good sides of it but there is this lurking feeling that generally, Microsoft is not really concerned about the security of our data and that the real requirement for this is trying to battle software piracy. I simply cannot trust company which introduced tons of telemetry tracking through ages and which has done everything in their power to battle non-legal use of their software. I do not promote piracy but I support free choice and besides, who can tell me what will happen if TPM malfunctions, will I lose all of my data forever? It is not so uncommon that TPM has malfunctioned in the past and it is only logical to presume it can do it again in the future but this time we will not have the choice not to use it, we will be forced into it.
Read More
Windows Updates failed to install, 0x80073701
Recently, a number of users reported an error while trying to update their computers. This particular Windows Update error has an error code of 0x80073701. If you are one of the users who encounter this error, then read on as this post will guide you on how exactly you can fix it. Here’s the exact context of the error:
“Updates failed. There were problems installing some updates, but we’ll try again later. 2019-07 Cumulative Update for Windows 10 Version 1903 for x86-based Systems (KB4507453) – Error 0x80073701”
The Windows Update Error 0x80073701 also comes with a code “ERROR_SXS_ASSEMBLY_MISSING” which indicates that some system files are missing on your computer that caused the update installation failure error. Although this Windows Update error does not cause any severe issues, it is still being reported in the section of Windows Update where it is marked as “Update failed”. There are several potential solutions you can check out to resolve this error. You can try to run the DISM tool or the SFC or System File Checker scan. You could also try to run the Windows Update troubleshooter. For more information, make sure to follow the options given below.

Option 1 – Restart your computer and try installing the Updates again

Restarting your computer can also help in fixing the Windows Update failed to install error 0x80073701. There are cases where the issue resolves on its own as it could just be some simple network or PC error.

Option 2 – Try to run the DISM tool

Running the DISM Tool helps in repairing the Windows System Image as well as the Windows Component Store in Windows 10. Using this built-in tool, you have various options such as the “/ScanHealth”, “/CheckHealth”, and “/RestoreHealth”.
  • Open the Command Prompt as admin.
  • Then type in this command: exe /Online /Cleanup-image /Restorehealth
  • Do not close the window if the process takes a while as it will probably take a few minutes to finish.
After you run this tool, a log file is created at C:WindowsLogsCBSCBS.log. On the other hand, if the Windows Update client is already broken, you will be prompted to use a running Windows installation as the repair source or use a Windows side-by-side folder from a network share, as the source of the files. Although the chances of this happening is less, if it turns out to be the case, you need to run an advanced command in the DISM tool to repair a broken Windows Update. Just repeat the process above but use the following command instead:
DISM.exe /Online /Cleanup-Image /RestoreHealth /Source:C:RepairSourceWindows /LimitAccess

Option 3 – Try to run the System File Checker

System File Checker or SFC is a built-in command utility that helps in restoring corrupted files as well as missing files. It replaces bad and corrupted system files to good system files that might be causing the error 0x80073701. To run the SFC command, follow the steps given below.
  • Tap Win + R to launch Run.
  • Type in cmd in the field and tap Enter.
  • After opening Command Prompt, type in sfc /scannow
  • The command will start a system scan which will take a few whiles before it finishes. Once it’s done, you could get the following results:
  1. Windows Resource Protection did not find any integrity violations.
  2. Windows Resource Protection found corrupt files and successfully repaired them.
  3. Windows Resource Protection found corrupt files but was unable to fix some of them.
  • Restart your computer.

Option 4 – Try running the Windows Update Troubleshooter

Running the built-in Windows Update troubleshooter could also help you resolve the Windows Update error 0x80073701. To run it, go to Settings and then select Troubleshoot from the options. From there, click on Windows Update and then click the “Run the troubleshooter” button. After that, follow the next on-screen instructions and you should be good to go.
Read More
How to Fix MULTIPROCESSOR_CONFIGURATION_NOT_SUPPORTED error in Windows 10
If you are using a Windows 10 PC that has different processors clubbed together, chances are you might encounter an error saying, “MULTIPROCESSOR CONFIGURATION NOT SUPPORTED” during a Windows upgrade or software installation. This error is actually caused by a bug check with a value of 0x0000003E. This error also indicates that the processors in your computer are asymmetric in relation to one another. So if you want to upgrade you need to have all the processors of the same type and level. But worry not for this guide will help you in fixing this error. The MULTIPROCESSOR_CONFIGURATION_NOT_SUPPORTED error can occur in several cases such as during an installation of Windows 10, or when the driver is loaded, or when Windows Start or Shutdown and the chances of you getting a blue screen is very much high. To fix this error, refer to the options given below and make sure to follow them carefully.

Option 1 – Try to disable the Hyper-Threading in your BIOS

Hyper-Threading in the BIOS lets a processor (multi-threaded) run various tasks in a simultaneous manner. To disable this, here’s what you have to do:
  • Restart your computer and boot into it right after. To do that, tap the F2 key.
  • Once you’re in the BIOS, locate the Hyper-Threading option which should be located under the Performance section along with other options like Multi-core support, Rapid Start technology, and many more.
  • Disable Hyper-Threading and then make sure to save the changes and exit BIOS.
Note: Although Hyper-Threading is only used when necessary, there are some OEMS that don’t have the option to disable it and if that’s the case, you need to try other options given below.

Option 2 – Try to disable the Virtualization in the BIOS

Virtualization in the BIOS allows users to run a single physical resource such as the server or storage device to appear that it is running as multiple logical resources. It is also properly termed as “HYPER-V”.  To disable it, refer to these steps:
  • Boot into the BIOS as you did earlier.
  • Then look for the Security options.
  • After that, from Security options, look for Virtualization Technology or VTX among the options given.
  • Then turn it off and restart your computer.
Note: Although Windows 10 offers features such as the Device Security for Core Isolation and Memory Integrity, if you turn them off at the software level, it will not help at all. If you’re able to resolve the error, you can do some further research and see what software or hardware you can use to further help you.

Option 3 – Try checking if there are any BIOS updates available for your PC

Updating the BIOS may help you resolve the MULTIPROCESSOR CONFIGURATION NOT SUPPORTED error. You can just go to the OEM’s website as they offer utility software that can download BIOS firmware and update it without any problem. BIOS updates usually offer enhancements and fixes to some issues like this one.
Read More
How to Fix Windows 8 Error Code 0xc004f034

Error Code 0xc004f034 – What is it?

Error code 0xc004f034 occurs when Windows users are unable to activate their operating system. It affects Windows 8 and Windows 10 users and features common symptoms which include the following:
  • Inability to activate Windows
  • Message box with error code 0xc004f034

Solution

Restoro box imageError Causes

Error code 0xc004f034 often occurs due to an issue with the Windows product key. This may occur when users enter an invalid product key or use one that is appropriate for use on a different version of Windows. To correct the issue, users will need to use the correct product key for their system or contact an IT professional if their device is connected to a Key Management Service (KMS).  Windows users affected by this error code may also need to check their system for viruses or missing system files since these issues can result in error codes on Windows devices.

Further Information and Manual Repair

Manual repair methods enable users to fix problems related to error codes. Though some manual repair methods require the use of Command Prompt and utility tools like the System File Checker, even non-technical Windows users can find success simply by following the instructions provided below.

However, note that some issues can be complex, thus requiring the use of an automated tool or help from a Windows repair technician. Consider these options if the manual repair methods below do not resolve error code 0xc004f034 on your Windows 8 device.

Method One: Enter Valid Windows Product Key

Microsoft currently offers several ways for customers to activate their Windows operating system, the most common of which is the product key. This 25-character code verifies that users have access to an authorized version of Windows.

You may get a valid product key from an authorized dealer, a new PC with Windows, or access a digital copy from a Windows website when you purchase your Windows operating system online. Once you have a valid product key, use it to activate Windows and resolve error code 0xc004f034 in Windows 8. Follow the steps below to access the Product Activation Wizard.

  • Step one: Click or tab Start button then select Settings
  • Step two: Tap or click PC Settings, then select Activate Windows
  • Step three: Type invalid product key

Once a valid product key is used, the Product Activation Wizard should complete the activation process. If you are unable to complete the process, however, and error code 0xc004f034 remains unresolved, click the link or instructions the Product Activation Wizard provides regarding activation via phone or customer support.

Method Two: Run System File Checker

Another option available to Windows 8 users is System File Checker (SFC). This tool enables Windows users to scan and repair corrupted or missing system files. Follow the steps below to access SFC.

  • Step one: Go to Start and type Command Prompt or CMD.
  • Step two: Run as Administrator
  • Step three: Type sfc /scannow ensuring a space is between “sfc” and “/scannow”.

System File Checker will repair any corruptions found on system files within your machine once you successfully follow the instructions provided. The tool will also replace missing files which will lead to better performance on your PC.

When the process is complete, restart your device then check if you are able to activate Windows. If error code 0xc004f034 is still present, you will need to find another solution via repair method three.

Method Three: Scan for Viruses and other Malware

Viruses and other forms of malware are one of the main issues resulting in poor PC performance and Windows error codes. To fix this issue on your PC, scan your machine for signs of these malicious programs. If you do not have anti-malware software and would like to download one from the Internet, ensure the software you choose is effective before attempting to download it.

Once you have powerful antimalware software on your PC, begin a scan for viruses, Trojan horses, and other forms of malware. If the Windows error code occurred due to issues related to malicious programs, you will be able to resolve the issue. If, however, this manual repair method proves ineffective in resolving error code 0xc004f034, download a powerful automated tool or contact a Windows repair technician to assist you.

Method Four: Use an Automated Tool

If you wish to always have at your disposal a utility tool to fix these Windows 8 and other related issues when they do arise, download and install a powerful automated tool.
Read More
How to Fix the Error 103

Repair Error 103

Error 103 - What is it?

The error 103 may occur either due to issues in your Google Chrome browser or system issues. If error 103 occurs when using Chrome, this means there is a conflict between Google Chrome and the antivirus program running on your PC. It is displayed in either of the following formats: ‘Chrome error 103 connection aborted’, ‘Chrome error 103 err_connection_aborted’ or ‘Error 103 (net: ERR_CONNECTION_ABORTED): Unknown error. However, if this is a system error code, it may be displayed in the following format ‘The semaphore cannot be set again’ or as ‘ERROR_TOO_MANY_SEM_REQUESTS’ or as the value 0x67.

Solution

Restoro box imageError Causes

The error 103 is triggered due to multiple reasons such as: The conflict between Google Chrome and anti-viruses arises because when the web browser attempts to update, the anti-virus programs on your PC may view the update as a threat. Due to this, the connection to the internet is terminated and the error 103 message is displayed on your computer screen. And besides, this keeps you from upgrading your Google Chrome browser too. Other causes include:
  • Viral infection
  • Missing Windows component called ‘expand.exe’
  • Registry overlaps
  • Incompatible drivers

Further Information and Manual Repair

Here are some of the easy and efficient ways to resolve error 103. Choose a method according to the error 103 messages displayed on your screen.

Method 1: Check for the ‘Expand.exe’ Windows component

This method is workable if the error 103 is triggered due to browser issues. To get started, follow these steps. First, go to the start menu, and in the search bar type ‘expand.exe’. If you are able to find it, move it to the following directory C:\Windows\system32. However, if you are unable to locate it, then copy the file from Windows installation CD. Once you copy the file to the directory, reinstall the updated version of Google Chrome.

Method 2: Change the Location of the Temporary File

If the error still persists, try method 2. Go to the start menu and open the Run window. Now type C: and press OK. Then go to File, then New, and then Folder. Now create a temporary folder and name it ‘test’. After that go back to the start menu and open the Run window again. Now enter the following text in the text field:cmd.exe then press OK. In the command prompt type set TMP=C:\test. After that try reinstalling Google Chrome by typing the following in the command prompt: start ChromeSetup.exe.

Method 3: Update Drivers

If the error message 103 is generated due to system issues, then try updating drivers. Sometimes the error may occur due to incompatible drivers.

Method 4: Perform an Entire PC Scan for Viruses

To resolve error 103, perform an entire PC Scan for viruses. Sometimes the error may occur due to viral infection. Removing viruses may fix the error.

Method 5: Clean and Restore the Registry

If the error is triggered due to registry issues, then it is advisable to download Restoro. This is a multi-functional PC repair tool integrated with powerful utilities including an anti-virus, a registry cleaner, Active X controls, and class scanner, and a system optimizer. The registry cleaner feature wipes out all the unnecessary files including cookies, junk files, and bad registry keys that corrupt the registry. It cleans and restores the registry instantly. The anti-feature removes all viruses and spyware while the system optimizer utility ensures your system works at its optimum speed. It can be downloaded on all Windows versions. It is safe and efficient. This software is a one-stop solution for all PC-related errors. Click here to download Restoro.
Read More
Resize icons on desktop quickly in Windows 10
Resize icons on desktop in Windows 10 in a matter of seconds! Hello everyone and welcome to today's quick tip. If you have ever been dissatisfied with icon size on your desktop and any of the default sizes like small, medium large, etc have not been appropriate know that there is a quick way to resize icons on your desktop in between sizes. All that you have to do in order to use this built-in feature is: Press and hold CTRL and scroll with the mouse. That's it! Find your appropriate size for icons and enjoy. icons on desktop
Read More
Disable widgets menu inside Windows 11
windows 11 widgets menu
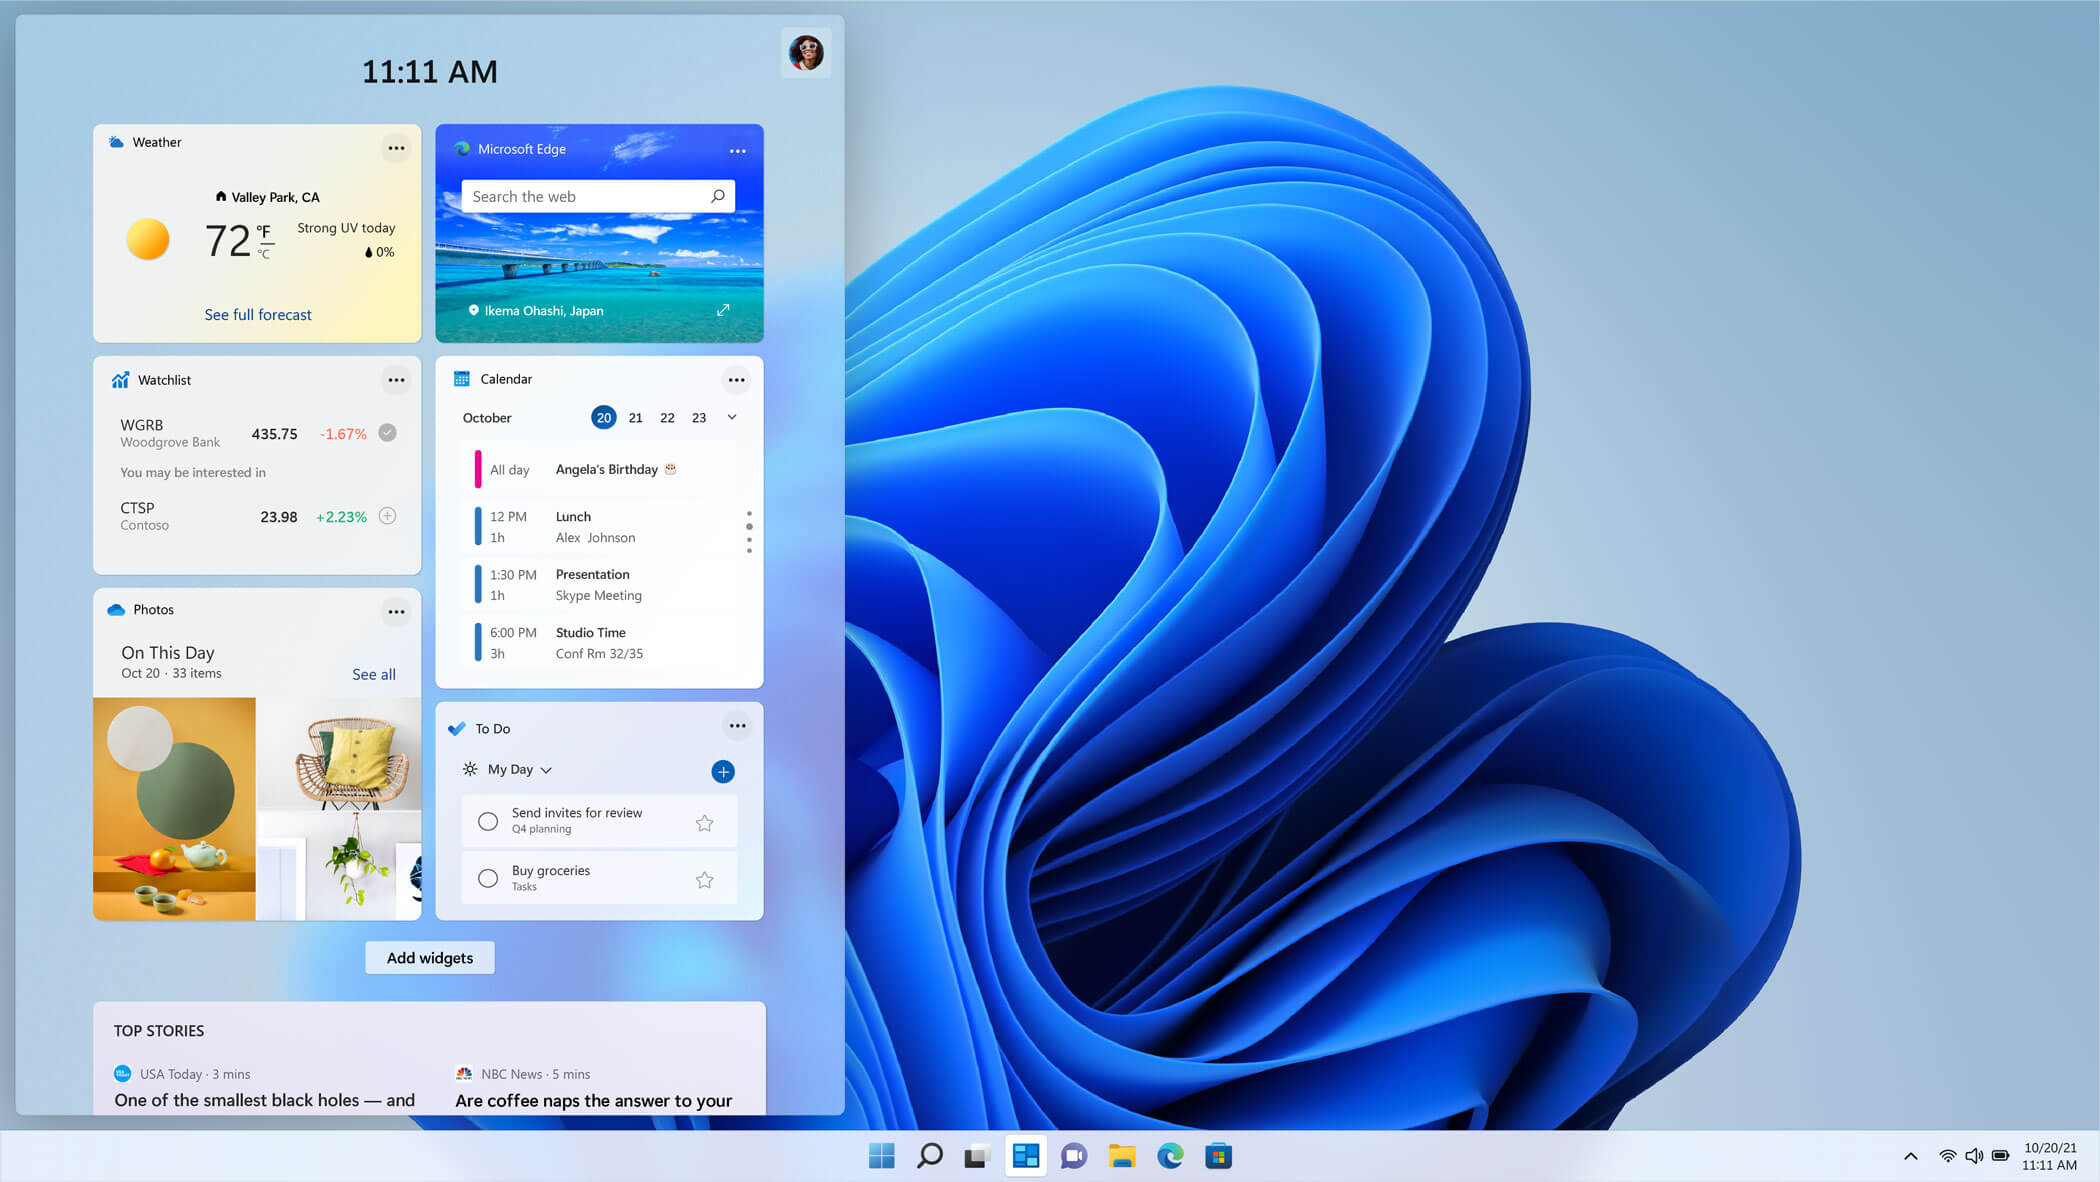
The new widget's menu inside Windows 11 is generally met with a positive attitude but there are still users which prefer not to have it. Luckily for them, Microsoft included a very easy way to turn the widgets menu on or off. Follow this easy guide to see how. Right-click on the widget button in the taskbar and click on Hide from Taskbar and that’s it Alternatively, you can also turn it off via the setting app. Go to the settings app and navigate to Personalization > Taskbar > Taskbar Items and flipping the switch beside Widgets to Off. Please note that both methods will only hide the button to toggle widgets menu, at the current state there is no really a way to actually turn it off, only hide it and make it not available to bring it up.
Read More
Copy and Paste feature is not working
One of the most basic and commonly used features in the Windows operating system is the copy and paste feature that helps users accomplish tasks in a faster and easier way. However, if you notice that it’s not working properly for some reason, then this post might be of help as it will provide you with options you can check out to resolve the problem. You can encounter this kind of problem with the copy and paste feature if some system files are corrupted or if there’s some third-party application or process that interferes with this function. Worry not though for there are some options you can check out to fix this. You can try to restart the rdpclip.exe process or the explorer.exe process. You could also try to reinstall the program where you encountered the issue with the Copy and Paste function. In addition, you could try clearing the clipboard history or run the built-in tools like the DISM tool and SFC scan. You could also troubleshoot the problem in a Clean Boot State or use the Refresh Windows tool. For more information, refer to each one of the options below.

Option 1 – Try to restart the rdpclip.exe and the explorer.exe processes

The first thing you can do to resolve the problem is to restart certain processes namely, the rdpclip.exe process and the explorer.exe process via Task Manager.
  • First, right-click on your Taskbar and select the Task Manager.
  • Next, look for the rdpclip.exe process and right-click on it, and select the End process option.
  • After that, click on the File tab > Run new task and then type “rdpclip.exe” and tap Enter.
  • This should help fix the problem. If not, you could also try to restart the explorer.exe process – just look for the explorer.exe process in the Task Manager and right-click on it, and then select the Restart option.

Option 2 – Try reinstalling the concerned program

If you only experience this issue on a particular program, you might want to uninstall this program and install it back again, and then see if it fixed the problem or not.

Option 3 – Try to clear the clipboard history

You could also try clearing the clipboard history as it has been known to help in fixing this kind of issue. You can clear the clipboard history using the command line.
  • Tap the Win + R keys to launch the Run dialog box and type “cmd” in the field and hit Enter to open Command Prompt.
  • Next, execute this command: echo off | clip
  • After that, check if the Copy and Paste function is now working properly or not.

Option 4 – Try running the DISM tool

You can run the DISM tool as well to help fix the “Tile Database is corrupt” error. Using this built-in tool, you have various options such as the “/ScanHealth”, “/CheckHealth”, and “/RestoreHealth”.
  • Open the Command Prompt with admin privileges.
  • Then type in the following commands and make sure to hit Enter right after you type each one of them:
    • Dism /Online /Cleanup-Image /CheckHealth
    • Dism /Online /Cleanup-Image /ScanHealth
    • DISM.exe /Online /Cleanup-image /Restorehealth
  • Do not close the window if the process takes a while as it will probably take a few minutes to finish.
  • Once it’s done, check if it was able to fix the corrupted Start Menu or not.

Option 5 – Try to run System File Checker or SFC scan

  • Tap Win + R to launch Run.
  • Type in cmd in the field and tap Enter.
  • After opening Command Prompt, type in sfc /scannow and hit Enter.
  • Once done, restart your computer.

Option 6 – Restart your computer in a Clean Boot State

If a third party program like antivirus is the one that’s causing the problem, you can try to put your computer in a Clean Boot State to isolate the issue by following these steps:
  • Log onto your PC as an administrator.
  • Type in msconfig in the Start Search to open the System Configuration utility.
  • From there, go to the General tab and click “Selective startup”.
  • Clear the “Load Startup items” check box and make sure that the “Load System Services” and “Use Original boot configuration” options are checked.
  • Next, click the Services tab and select the “Hide All Microsoft Services” check box.
  • Click Disable all.
  • Click on Apply/OK and restart your PC. (This will put your PC into a Clean Boot State. And configure Windows to use the usual startup, just simply undo the changes.)
  • Now try to connect your device or copy the files to your external device again and check if the problem with the Copy and Paste function is fixed.
Read More
How to Remove PUP ExpressFiles Tutorial

ExpressFiles is a program developed by Express Solutions. A number of Anti-Virus programs have flagged this program as a Potentially Unwanted Application. In many instances, it is bundled with additional programs on installation.

The program claims it offers users easy to search for various currently popular search terms. During our testing, the software never displays any search results, no matter the search words. Upon installation and setup, it defines an auto-start registry entry which makes this program run on each Windows boot for all user logins. A scheduled task is added to Windows Task Scheduler in order to launch the program at various scheduled times. The program defines an exception rule in Windows Firewall, allowing it to connect to the internet without limitations and auto-update itself.

About Browser Hijackers

Precisely what is a PUP?

If you’ve ever downloaded a free application or shareware, chances are high that the computer can get installed with a bunch of unwanted applications. A PUA / PUP (potentially unwanted application / potentially unwanted program) is a software program that comes bundled with free software and you consent to install it on your PC. These are programs you almost certainly don’t want on your computer simply because it doesn’t give any valuable service. Despite being regarded as very detrimental, PUPs aren’t always viruses or malware One simple difference between PUP and malware is distribution. Malware is normally dropped by silent installation vectors like drive-by downloads while PUP gets installed with the consent of the computer user, who purposefully or unknowingly approves the PUP installation on its PC. Having said that, there is no doubt that PUPs remain bad news for PC users as they can be incredibly damaging to the computer in numerous ways.

Exactly how do unwanted programs look like?

Potentially Unwanted Programs appear in different forms and varieties, however, in the majority of instances, they are adware programs that exhibit irritating pop-up ads and advertisements on websites you explore. In addition, the majority of free programs these days come with some unwanted add-ons; in most cases an internet browser toolbar or browser modification like a homepage hijacker. They’ll keep track of your online routines, redirect your search results to risky websites where viruses can be downloaded and installed, hijack your home page, and slow your browser down to a crawl. Potentially Unwanted Programs occasionally act quite much like computer viruses or spyware. They might carry keyloggers, dialers, browser hijackers, and tracking components that gather system details, or tracks customer habits and relays this information to third-party firms. Even if the PUPs really aren’t basically malicious, these software programs still do absolutely nothing good on your personal computer – they will take valuable system resources, slow down your PC, weaken your computer security, and make your system more susceptible to trojans.

How do you avoid PUPs?

• Read cautiously before accepting the license agreement as it may have a clause about PUPs. • Always opt for the custom if you’re presented an option between “Custom” and “Recommended” Installations – never click Next, Next, Next blindly. • Have a top-notch antivirus program like Safebytes Anti-Malware which can protect your computer from PUPs. As soon as you install this software, protection from malware and PUPs is already switched on. • Think carefully before you download any kind of shareware or freeware. Disable or get rid of toolbars and browser extensions you don’t really need. • Only use official product websites for downloading programs. Stay away from download portals altogether as most websites compel users to download the software using their own download manager, which is often bundled up with some sort of PUPs.

What To Do If You Cannot Install Any Anti-Malware?

All malware is bad, but certain types of malicious software do a lot more damage to your computer than others. Some malware types modify browser settings by adding a proxy server or modify the PC’s DNS settings. In these instances, you will be unable to visit some or all of the websites, and therefore not able to download or install the required security software to remove the infection. If you are reading this right now, you have perhaps recognized that a malware infection is a reason for your blocked web connectivity. So how to proceed when you want to install an anti-malware application like Safebytes? Follow the instructions below to eliminate malware by alternative methods.

Install in Safe Mode

The Windows-based PC comes with a special mode called “Safe Mode” where just the bare minimum required applications and services are loaded. If the malware is set to load immediately when the computer starts, shifting to this mode may well prevent it from doing so. In order to enter into Safe Mode or Safe Mode with Networking, press the F8 key while the PC is starting up or run MSConfig and locate the “Safe Boot” options under the “Boot” tab. As soon as you restart the PC into Safe Mode with Networking, you could download, install, and update anti-malware software from there. Right after installation, run the malware scanner to get rid of standard infections.

Utilize an alternate internet browser to download antivirus software

Web-based malware could be environment-specific, targeting a specific web browser or attacking particular versions of the web browser. If you’re not able to download the anti-virus application using Internet Explorer, this means the virus is targeting IE’s vulnerabilities. Here, you need to switch to a different web browser such as Chrome or Firefox to download the Safebytes Anti-malware program.

Install and run antivirus from a Thumb drive

Here’s yet another solution which is creating a portable USB anti-virus software that can scan your computer for malware without the need for installation. Try these simple actions to clean up your infected computer using portable anti-malware. 1) Download Safebytes Anti-Malware or Microsoft Windows Defender Offline onto a clean PC. 2) Mount the pen drive on the same PC. 3) Run the setup program by double-clicking the executable file of the downloaded software, which has a .exe file extension. 4) Select the drive letter of the USB drive as the location when the wizard asks you exactly where you would like to install the anti-malware. Follow activation instructions. 5) Now, insert the thumb drive into the corrupted PC. 6) Run the Safebytes Anti-malware directly from the pen drive by double-clicking the icon. 7) Click the “Scan” button to run a full computer scan and remove viruses automatically.

Overview of SafeBytes Anti-Malware

If you are looking to download the anti-malware program for your computer, there are lots of tools in the market to consider nonetheless, you just cannot trust blindly anyone, irrespective of whether it is free or paid software. A few of them do a great job in removing threats while some will ruin your PC by themselves. You need to pick a company that develops industry-best antimalware and has achieved a reputation as trustworthy. When considering commercial tool options, most people opt for well-known brands, such as SafeBytes, and they are quite happy with it. SafeBytes anti-malware is really a powerful, very effective protection software made to help users of all levels of computer literacy in detecting and removing malicious threats out of their computer. Using its outstanding protection system, this utility will quickly detect and get rid of the majority of the security threats, which include adware, viruses, browser hijackers, ransomware, PUPs, and trojans. SafeBytes anti-malware takes computer protection to a totally new level with its advanced features. Here are a few typical features present in this software: Live Protection: SafeBytes offers complete and real-time security for your laptop or computer. It’ll regularly monitor your computer for hacker activity and also gives end-users superior firewall protection. Most Reliable AntiMalware Protection: With its enhanced and sophisticated algorithm, this malware elimination tool can find and eliminate the malware threats hiding in your PC effectively. “Fast Scan” Features: SafeBytes’s high-speed malware scanning engine minimizes scanning times and extends battery life. Simultaneously, it will effectively identify and remove infected computer files or any online threat. Web Protection: SafeBytes checks and gives a unique safety ranking to each and every website you visit and block access to webpages considered to be phishing sites, thus safeguarding you from identity theft, or known to contain malicious software. Low CPU/Memory Usage: SafeBytes is well known for its low effect on computer resources and great detection rate of diverse threats. It runs quietly and efficiently in the background so you’re free to use your PC at full power all of the time. 24/7 Premium Support: SafeBytes gives you 24/7 technical support, automatic maintenance, and upgrades for the best user experience.

Technical Details and Manual Removal (Advanced Users)

If you wish to manually remove ExpressFiles without the use of an automated tool, it may be possible to do so by removing the program from the Windows Add/Remove Programs menu, or in cases of browser extensions, going to the browsers AddOn/Extension manager and removing it. You will likely also want to reset your browser. To ensure the complete removal, manually check your hard drive and registry for all of the following and remove or reset the values accordingly. Please note that this is for advanced users only and may be difficult, with incorrect file removal causing additional PC errors. In addition, some malware is capable of replicating or preventing deletion. Doing this in Safe Mode is advised.

The following files, folders, and registry entries are created or modified by ExpressFiles

Files: %APPDATAExpressFilescurrent-cloud.html %COMMONDESKTOPExpressFiles.lnk %COMMONSTARTMENUExpressFilesExpressFiles.lnk %COMMONSTARTMENUExpressFilesUninstall.lnk %PROGRAMFILESExpressFilescurrent-cloud.de.html %PROGRAMFILESExpressFilescurrent-cloud.en.html %PROGRAMFILESExpressFilescurrent-cloud.fr.html %PROGRAMFILESExpressFilescurrent-cloud.ru.html %PROGRAMFILESExpressFilesEFupdater.exe %PROGRAMFILESExpressFilesExpressDL.exe %PROGRAMFILESExpressFilesExpressFiles.exe %PROGRAMFILESExpressFilesuninstall.exe %WINDIRTasksExpress Files Updater.job %APPDATAExpressFiles %COMMONSTARTMENUExpressFiles %PROGRAMFILESExpressFileslanguage %PROGRAMFILESExpressFiles Registry: key ExpressFiles.exe at HKEY_LOCAL_MACHINESOFTWAREConduitAppPaths. key ExpressFiles at HKEY_CURRENT_USERSoftware. key ExpressFiles at HKEY_LOCAL_MACHINESOFTWARE. key ExpressFiles at HKEY_USERS.DEFAULTSoftware. HKEY_CLASSES_ROOTMagnetsshellopencommand value $PROGRAMFILESExpressFilesExpressDL.exe at HKEY_LOCAL_MACHINESYSTEMControlSet001ServicesSharedAccessParametersFirewallPolicyStandardProfileAuthorizedApplicationsList. value $PROGRAMFILESExpressFilesExpressDL.exe at HKEY_LOCAL_MACHINESYSTEMControlSet002ServicesSharedAccessParametersFirewallPolicyStandardProfileAuthorizedApplicationsList. value $PROGRAMFILESExpressFilesExpressDL.exe at HKEY_LOCAL_MACHINESYSTEMControlSet003ServicesSharedAccessParametersFirewallPolicyStandardProfileAuthorizedApplicationsList. value $PROGRAMFILESExpressFilesExpressFiles.exe at HKEY_LOCAL_MACHINESYSTEMControlSet001ServicesSharedAccessParametersFirewallPolicyStandardProfileAuthorizedApplicationsList. value $PROGRAMFILESExpressFilesExpressFiles.exe at HKEY_LOCAL_MACHINESYSTEMControlSet002ServicesSharedAccessParametersFirewallPolicyStandardProfileAuthorizedApplicationsList. value $PROGRAMFILESExpressFilesExpressFiles.exe at HKEY_LOCAL_MACHINESYSTEMControlSet003ServicesSharedAccessParametersFirewallPolicyStandardProfileAuthorizedApplicationsList.
Read More
Fix Display driver failed to start Error
Recently, a number of users reported an error when they tried to open graphic-intensive apps like video games. According to users, when they tried to open an app, they get the “Display driver failed to start” error instead. Thus, if you encounter the same error, then you’ve come to the right place as this post will guide you on how exactly you can fix it. Here’s the full content of the error message:
“Display driver failed to start; using Microsoft Basic Display Driver instead. Check Windows Update for a newer display driver.”
This kind of error could be due to several factors. It is possible that it could be a result of a corrupted or outdated graphics driver. Aside from that, it could also be due to some issues with the system settings. Worry not though for there are potential fixes that can help you fix the problem. But before you troubleshoot the problem, you need to update your Windows 10 computer first and if it didn’t help fix the problem, then here are the potential fixes that should help resolve the “Display driver failed to start” error.

Option 1 – Try to restart the Graphics driver

Although Windows 10 can recover the graphics driver on its own when it crashes, there are times when it fails to do its job. To restart the graphics driver in your computer, simply tap the Win + Ctrl + Shift + B key combination. After that, the graphics driver will be back in less than a second.

Option 2 – Try running the Hardware and Devices troubleshooter

Running the built-in hardware and devices troubleshooter can also help you in fixing the “Display driver failed to start” error.
  • The first thing you need to do is click on Start and then on the gear-like icon to pull up the window for Settings.
  • After opening Settings, look for the Update and Security option and select it.
  • From there, go to the Troubleshoot option located on the left-hand side of the list.
  • Next, select Keyboard from the list and open the Troubleshooter and run it. Once it is doing its job, wait for it to complete the process and then restart the system.
  • After the system restarts, check if the problem’s now fixed. If not, refer to the next option given below.

Option 3 – Try to update or rollback the Graphics driver

You can try to update your Graphics card driver using the Device Manager in your computer to resolve the “Display driver failed to start” error or you can also go directly to the website of your graphics card manufacturers like NVIDIA, Intel, or AMD and go to the section called Drivers then check if there’s a new available update – if there is, download and install it. To update your Graphics driver via Device Manager, refer to these steps:
  • First, boot your computer into Safe Mode.
  • After that, tap the Win + R keys to launch Run.
  • Type in devmgmt.msc into the box and tap Enter or click OK to open the Device Manager.
  • After that, a list of device drivers will be displayed. From there, look for the Display Adapters and click on them.
  • After that, right-click on each entry under the Display Adapters and select the “Uninstall Device” option from the menu.
  • Now restart your computer.
  • After restarting your computer, go to the Settings app and Check for Updates in the Windows Update section.

Option 4 – Try setting your system for maximum performance

If the first three options didn’t fix the error, you can try setting your computer for maximum performance since Windows 10 allows you to choose the effects you want to activate your system and you can do this by adjusting the performance ratio. Adjusting the performance ratio can be done via a certain setting in your computer – and this setting should be set to “Maximum Performance” to resolve the error.
  • In the Windows Search bar, type in “performance” and from the search results that appear, select the “Adjust the appearance and performance of Windows” option.
  • Next, a mini window will appear and from there, click on the radio button that says, “Adjust for best performance”.
  • Once done, click on the Apply and OK buttons to save the changes made. This should resolve the problem.
Read More
1 2 3 162
Logo
Copyright © 2022, ErrorTools. All Rights Reserved
Trademarks: Microsoft Windows logos are registered trademarks of Microsoft. Disclaimer: ErrorTools.com is not affiliated with Microsoft, nor claim direct affiliation.
The information on this page is provided for information purposes only.
DMCA.com Protection Status