How To Fix the D3dx9_43.dll Error Code

Repair D3dx9_43.dll Error Code

D3dx9_43.dll – What is it?

D3dx9_43.dll is a type of dynamic link library. This is one of the many files contained in the DirectX software collection which is used to load and run most of the Windows PC based games and advanced graphics programs.

D3dx9_43.dll error message is displayed when any one of the Microsoft games fails to load.

The error message is displayed in either of the following formats:

“D3dx9_43.DLL Not Found"

"The file d3dx9_43.dll is missing"

"File d3dx9_43.dll not found"

"D3dx9_43.dll not found. Reinstalling might help fix this."

Solution

Restoro box imageError Causes

D3dx9_43.dll error may occur due to multiple reasons. These include:

  • D3dx9_43.dll files get corrupt or damaged
  • Missing Microsoft DirectX file
  • Viruses and malware on your system
  • Driver issues
  • Registry overloaded with invalid entries

If the D3dx9_43.dll error is not fixed timely, it not only causes you a great deal of inconvenience as it hampers your ability to play Microsoft games but since the underlying causes of the error are critical, it can result in serious PC damages like system failure, system crash, and data loss.

Therefore to avoid it, it is advisable to resolve the error code immediately.

Further Information and Manual Repair

Though this is a critical PC error but the good thing is that it is easy to resolve. To fix it, you don’t always have to pay hundreds of dollars to a professional technician or be technically sound.

Here are some of the best ways to repair and resolve D3dx9_43.dll error on your system:

Check the Recycle Bin

If you get the error message "The file d3dx9_43.dll is missing" then the best method to resolve this error from your system is to check your recycle bin.

The Microsoft Direct X file could be there especially if you recently uninstalled a gaming program.

Here’s why: dll files are shared by multiple programs. So, it is possible that the program you deleted from your PC also shared the same file to load and run.

And because of this reason, the file also got removed from your PC when you uninstalled that particular program. Therefore, check your recycle bin. If you find the d3dx9_43.dll in there, restore it and try running the desired Microsoft game again. See if it works.

Re-Download DirectX

Nonetheless, if you can’t relocate it, try installing the latest version of DirectX on your system. This can be done by downloading the DirectX End-User Runtimes Web Installer on your system from the official Microsoft website.

Update Your Drivers

If the error is related to video card driver, then it is advisable to update the driver. By updating the driver for your video card you can fix the D3dx9_43.dll error instantly.

Repair the Registry

Other reasons for the D3dx9_43.dll error could be corrupt and damaged dll files. It triggers registry issues and sometimes even malware infections.

DLL files often get corrupt when the registry overloads with too many files these include mostly unnecessary and obsolete files like junk files, cookies, temporary internet history, invalid and bad registry entries.

As the clutter and overload the registry, the important files like dynamic link libraries get damaged.

Here cleaning and restoring of the registry is the best way to resolve the error pop-ups like D3dx9_43.dll. You can repair the registry manually however, it is time consuming and somewhat technical. But if you are looking for a simple and a quick fix, then download Restoro.

Try Restoro.

Restoro is a next-generation and multi-functional PC repair tool. It is embedded with a variety of PC fixing and performance-boosting utilities all in one.

It includes a registry cleaner with an intuitive algorithm that detects all types of registry issues on your system and resolves them in seconds. It cleans the registry, restores the damaged D3dx9_43.dll files, and repairs the registry.

Furthermore, Restoro also includes utilities like an antivirus, Active X controls and class detector. With the help of the in-built antivirus you can scan for viruses and malware infecting your system and remove them right away.

It also functions as a system optimizer boosting the speed of your PC dramatically. It is safe, efficient, and compatible with all Windows versions.

Click here to download Restoro, resolve the D3dx9_43.dll error, and resume enjoying Microsoft games on your PC.

If you like to learn and find out more about various Windows errors, and how to repair them go to our vast archive or use search to find articles that will explain and help you in solving your issue.
However, if you prefer to do things fast and with automatization then we are proposing to use an automated solution for your issues. The application that we are recommending is Advanced System Repair Pro
Advanced System Repair utilizes multiple tools all in one to give you a quick, simple, reliable, and very thorough diagnosis of your PC. It brings you all the tools you need in one program to clean, fix, protect, optimize and boost your PC!
1-Click Maintenance
All the tools to make it simple and easy! It's like having a professional technician at the click of a mouse.

Junk Cleaner
Keeping your computer free from unnecessary clutter also helps make your computer last longer. Like any other machine, if you keep it clean and take care of it, it will serve you better for longer!

Optimize background apps
Optimize applications background activity with the built-in Application Optimizer feature.

Disk Defrag
With a simple 1-click, Advanced System Repair speeds up your PC by assembling fragmented files on your machine and organizing them more efficiently.

Malware Removal
Finds and removes all types of harmful malware including trojans, worms, bots, adware, spyware, PUPs, and more!

Privacy Cleaner
The all-in-one privacy suite to Clean Your Tracks & Protect Your Privacy! Make your computer safe, secure, and more efficient!

System Tweak/Optimizer
ASR will analyze your complete system and settings to adjust your PC to function at its maximum performance.

Registry Cleaner
Over time, as you install and uninstall applications, the registry can become cluttered with old entries and broken settings which can result in program crashes, and annoying messages and slow the computer down.
Visit our Advanced System Repair Pro Download page to inform yourself about all the benefits of this software and get a free trial copy of it.
advanced system repair pro

Advanced System Repair Pro

One-click automated PC repair solution
ASR logo
With Advanced System Repair Pro you can easily
Replace damaged files
Restore performance
Free disk space
Remove Malware
Protects WEB browser
Remove Viruses
Stop PC freezing
DOWNLOAD
Privacy Policy | Terms of Use | Uinstall
Advanced System Repair Pro is compatible with all versions of Microsoft Windows including Windows 11

Share this article:

You might also like

Best Free Stock Photo WEB sites of 2021
The Internet has become an essential human right as stated in many countries around the world. Among many benefits that the internet offers are various sites selling Stock photographs for all of your needs. No matter are you working in the design industry or just want to make something for yourself there is a high chance that you will eventually need some photos for your work. Stock photo workIn this article we are going to go through the best Stock Photo sites BUT, we will focus on ones that give you royalty-free Photos, so no paying stuff here, just the best of the free world.

Adobe Stock free collection

https://tracker.tradedoubler.com In the last year of 2020, Adobe has made more than 70000 photos, videos, illustrations, and templates completely free. You are free to use provided material for personal, commercial, and creative work. Since this is adobe’s collection, well part of it, all of the given material is of high quality. You can also upload pictures to do a visual search to find similar ones.

Unsplash

https://unsplash.com/ Unsplash is a place where you will go if you want to find free-quality pictures. Since a lot of photographers are donating their selected work there you will find always consistently high-quality work there. Unsplash also has applications for Android and iOS so you can go through their stock on your mobile device as well. Photos are organized into categories that make searching much easier.

Pixabay

https://pixabay.com/ Pixabay is maybe well known due to its huge collection of both images and illustrations. There are tons and tons of stuff in there all royalty-free for use. The bad side is due to its strongest one, since there are so many images on its site, quality is not always top-notch like on Unsplash for comparison but you might find stuff here that you will not be able to do it anywhere else.

Pexels

https://www.pexels.com/ This is a great choice for web or app developers since you can find various UI ideas and designs on it. Many UI ideas ready for implementation will be found here and a decent amount of photos as well. The overall site is great for that purpose but please do read the license on each image since some of them are limited in use and cannot be used in commercial projects.

Pikwizard Stock

https://www.pikwizard.com/ Stock photography from Pikwizard is a place where you will go if you need high-quality pictures of people. There are a lot of images of people in natural poses doing things, nothing cheesy or unnatural, just pure and great-looking ones. Among other things is also a vast selection of cityscapes. Sadly as in the case of Pexels, not all pictures have the the same license so make sure to check terms of use before using one.

Gratisography Stock photos

http://gratisography.com/ Last on our list is a Stock site with a strange name and if you visit it you will see that it is not just the name that is strange. Gratisography is a stock site that aims to provide you with high-quality photographs but in different take from another site. These images are more artistic and surreal than other competitor sites. Images are uploaded almost on daily basis but since thematic is somewhat niche collection itself is relatively small.

Conclusion

That’s it, we hope that we have helped you in any way to find some material for your next project and I hope to see you soon back on errortools.com. Take care and all the best.
Read More
Automatically restart apps when you sign back
If you wish to continue where you have left off when you signed out of Windows follow this guide and learn how to continue your work after signing in, restart apps in your Windows. You can set Windows 10 to Automatically save your restartable apps when you sign out and restart them after you sign in. Here’s how:
  1. Right-click on the Windows logo to open the secret menu
  2. Select Settings
  3. Click open Accounts
  4. From the left side, select Sign-in options
  5. Scroll down till you see Restart apps setting
  6. Toggle the Automatically save your restartable apps when you sign out and restart them after you sign in setting to On position
Read More
Disabling Windows 10 startup delay
First time when your computer is turned ON and when Windows is booting it will wait 10 seconds before starting your startup applications. This 10 second is used to load all of Windows services so everything is running smoothly. If by any chance you do not want to wait for this startup delay and wish to start applications right away then keep on reading and follow this guide precisely. This guide will require you to play ad tweak with the registry of Windows, it is always recommended to make a registry backup before attempting any tweaks. Also, it is imperative to follow the guide as it is presented step by step. be aware that this guide will eliminate a 10-second delay for all of your starting applications, there is no way currently to remove delay for only one or a few.
  1. Press ⊞ WINDOWS + R to open the run dialog
  2. In run dialog type Regedit and press ENTER
  3. Locate HKEY_CURRENT_USER\SOFTWARE\Microsoft\Windows\CurrentVersion\Explorer\Serialize
  4. If the key does not exist, make a new one,  Go to HKEY_CURRENT_USER\SOFTWARE\Microsoft\Windows\CurrentVersion\Explorer\, right-click on the explorer and choose new > key. Name it Serialize
  5. Right-click on Serialize and choose New > DWORD (32-bit) Value
  6. Name the value StartupDelayInMSec
  7. Double click on StartupDelayInMSec and locate Value data
  8. Set the value to 0
  9. Save changes and Exit Registry editor
  10. Reboot
If you want to reverse changes and enable delay again, go back to the Registry Editor and delete the StartupDelayInMSec value.
Read More
Enable or disable Console Mode Sign-in
Microsoft has been bringing new lock-screen features with every iterative feature release of Windows 10 in order to improve user experience. However, Windows 10 users have different opinions regarding it. Some users are pleased with it while some users simply do not like it. So if you are one of the users who seem to not approve of this feature, read on as this post will be about enabling or disabling the Console Mode sign-in feature in Windows 10. Before you proceed, take note that you will not be able to use your mouse pointer in this Consol Mode login screen and you can only use your keyboard to navigate around various options. You might also want to create a System Restore point just in case. To enable or disable the Console Mode sign-in in your Windows 10 computer, refer to the given steps below. Step 1: Tap the Win + R keys to open the Run dialog box. Step 2: Then type in “Regedit” in the field and tap Enter to open the Registry Editor. Step 3: Next, navigate to the following registry path:
ComputerHKEY_LOCAL_MACHINESOFTWAREMicrosoftWindowsCurrentVersionAuthenticationLogonUITestHooks
Step 4: From there, look for a DWORD named “ConsoleMode”. If you don’t see this DWORD, you can just create a new DWORD and name it as “ConsoleMode” and make sure that its base is set to Hexadecimal. Step 5: After that, double click on ConsoleMode and change its value to “0” to disable it and “1” to enable it. Step 6: Now restart your computer to apply the changes made. Like pointed out, you can only use your keyboard when you’re in the Console Mode login window or screen. You can just use the ESC button to go back to the menu while you can utilize the arrow keys so you can go through the options that are mostly vertically arranged and the Enter key to select an option. In the Console Mode, sign-in using the Passwords and PINs worked efficiently.
Read More
Change Windows 10 Lock Screen Background
Hello everyone, I hope you are all doing well. Today we will be changing the Windows Lock Screen background. Changing the lock screen background is a very easy task and it can be done in a very short time. So let's jump right into it. The first thing you need to do is to press the Windows start button on the bottom left and then press settings. Windows 10 Star menu with marked settings iconOnce the settings screen appears, choose and click on Personalization. Windows 10 settings menu with marked Personalization groupInside personalization, click on the Lock Screen tab. Windows settings lock screenOn the right screen, under the picture, you will find Windows spotlight, click on it to bring a drop-down menu up. lock screen drop down menuYour choice is presented as a single picture for background or slideshow, a series of pictures that are going to be looped in a given time interval. If you would like just a single picture for your background, choose that and click on it. lock screen browse for picturesOnce you are in choose picture dialog, click on the browse button and navigate to the picture on your storage which you would like to have as a background. If however, you fancy slideshow as your lock screen background, click on the background drop-down menu and choose the slideshow. Next, click on add a folder and navigate to a folder where you have pictures that you would like to have as a slideshow for your Windows lock screen. lock screen add a folder option
Read More
Best VR headsets in 2021 so far
Virtual Reality is slowly becoming standard in gaming. More and more affordable headsets are coming out lowering entry prices and making them affordable for all. But in a sea of new VR headsets, it is important to at least purchase a decent one that will perform nicely and hopefully last longer. Therefore in today’s article, we will address some of the best options currently available on the market,

Oculus Quest 2

occulus quest 2 VR
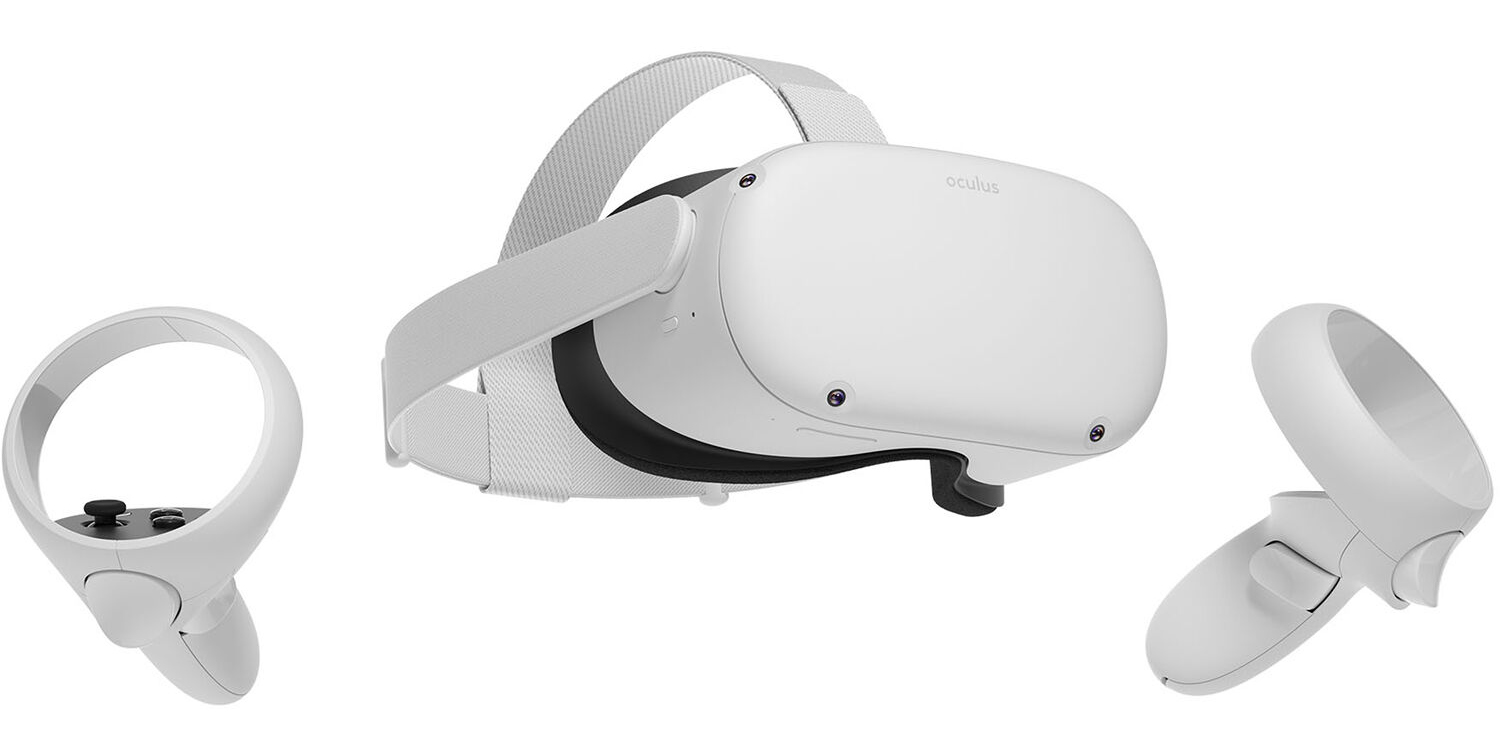
With its Rift model, Oculus set itself as a big player in VR. Now the company is slowly bowing out of the dedicated, tethered VR headset with its latest Quest 2 designed to primarily be a standalone headset. In case you do not know, tethered headset means that the headset itself is connected to your PC and is using its power to drive your VR experience. Now technical specifications of Quest 2 are pretty OK and it can drive stuff pretty decently and if you want you can purchase the dedicated cable to connect it to your PC for the full experience of games requiring more capable hardware. Oculus Quest 2 is the cheapest headset on this list and with its stable performance, is highly recommended.

Valve Index VR

valve index vr
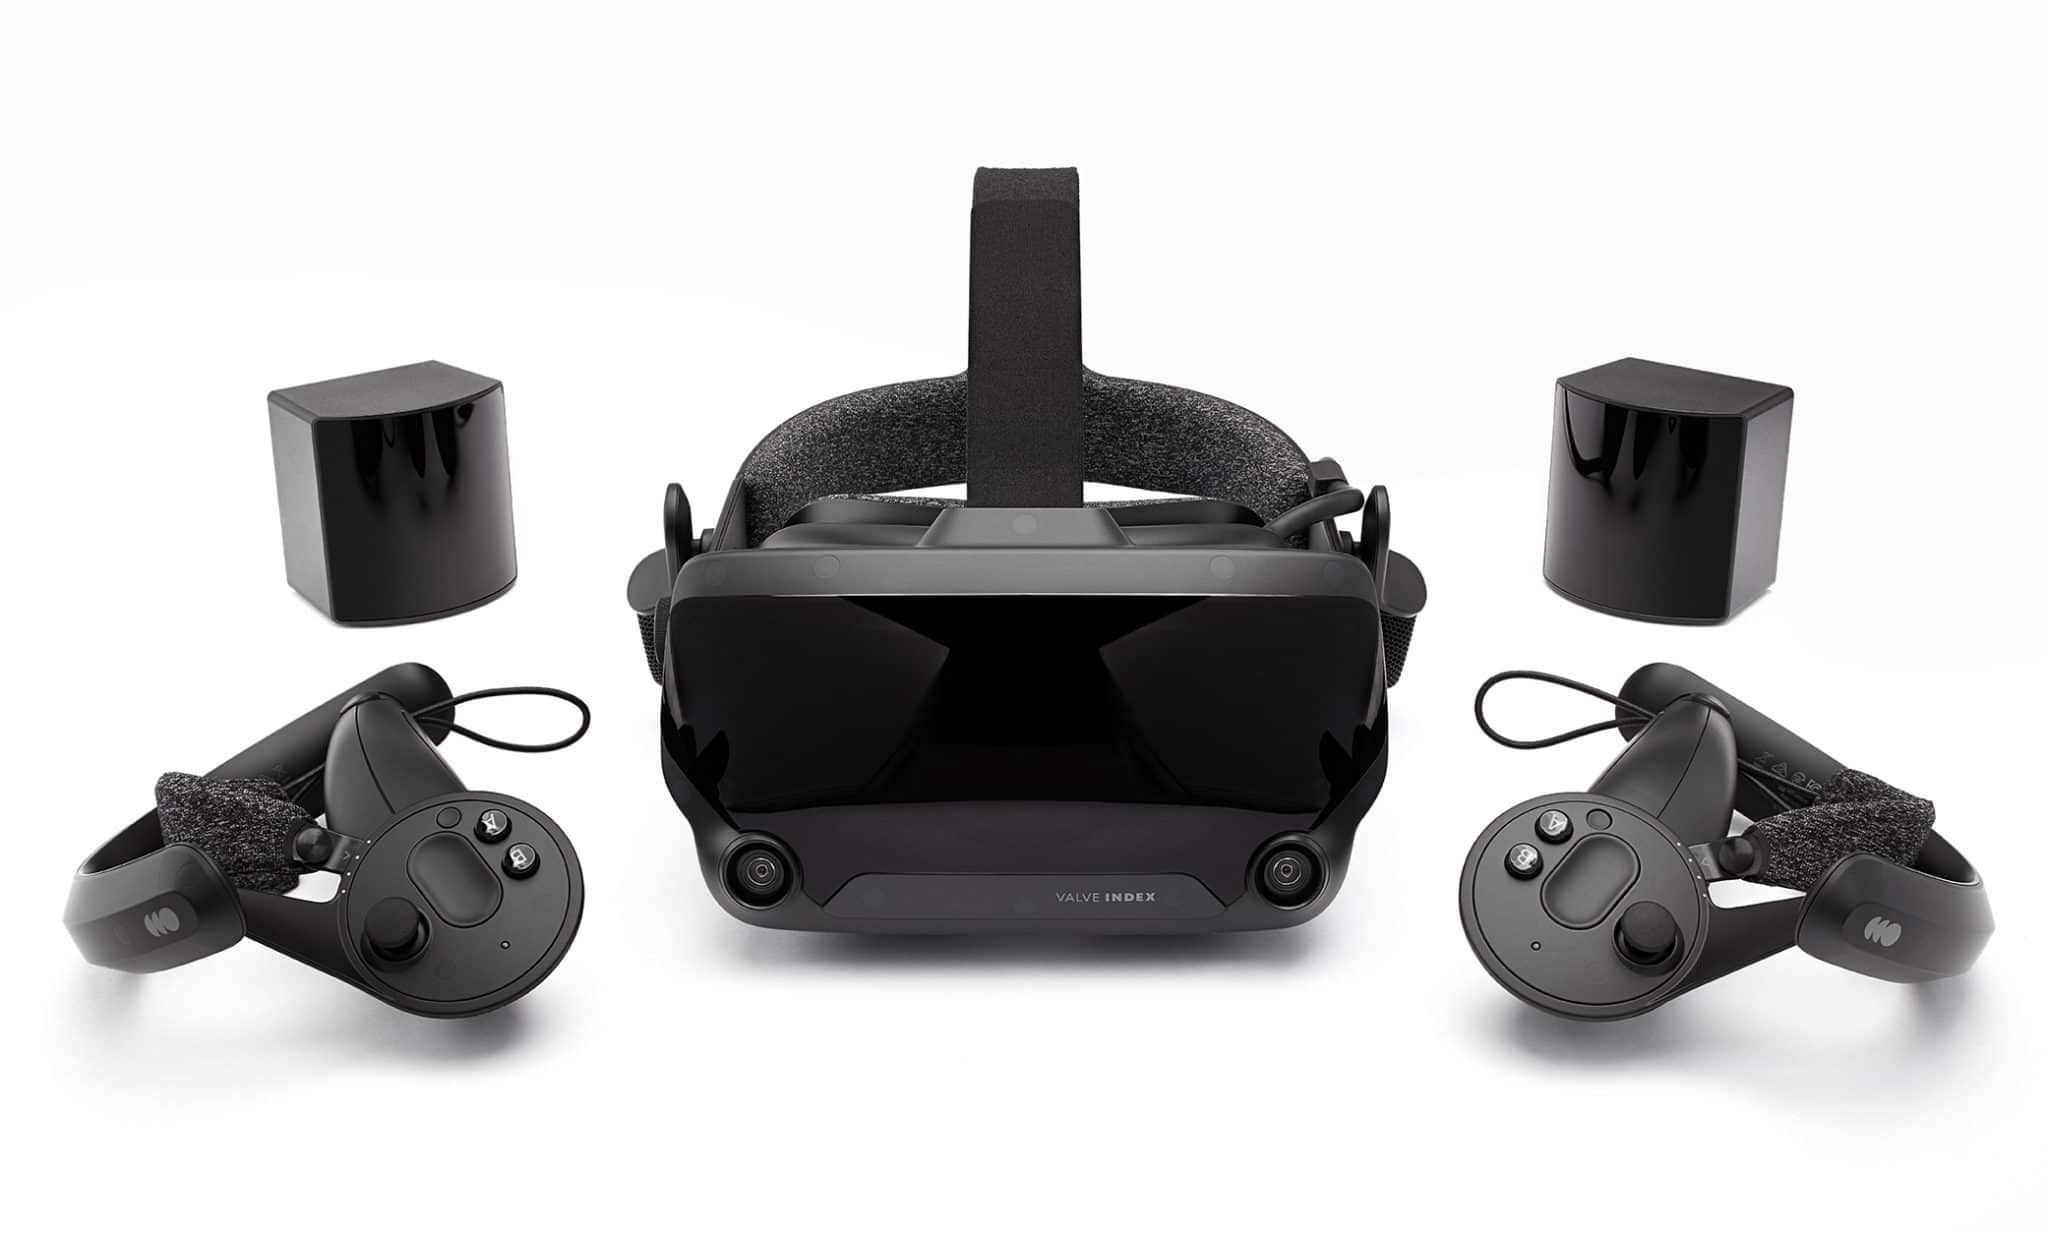
Although the headset itself is nothing revolutionary or special its controllers are. They can track individual finger movements, making games (that take advantage of them) much more immersive than the standard trigger grips on other controllers. The Index's higher refresh rate makes for smoother action, as well, which is another nice bonus. If you already have an HTC Vive or Vive Cosmos Elite, and their base stations (not the regular Cosmos), you can buy only the controllers.

Sony PlayStation VR

playstation vr
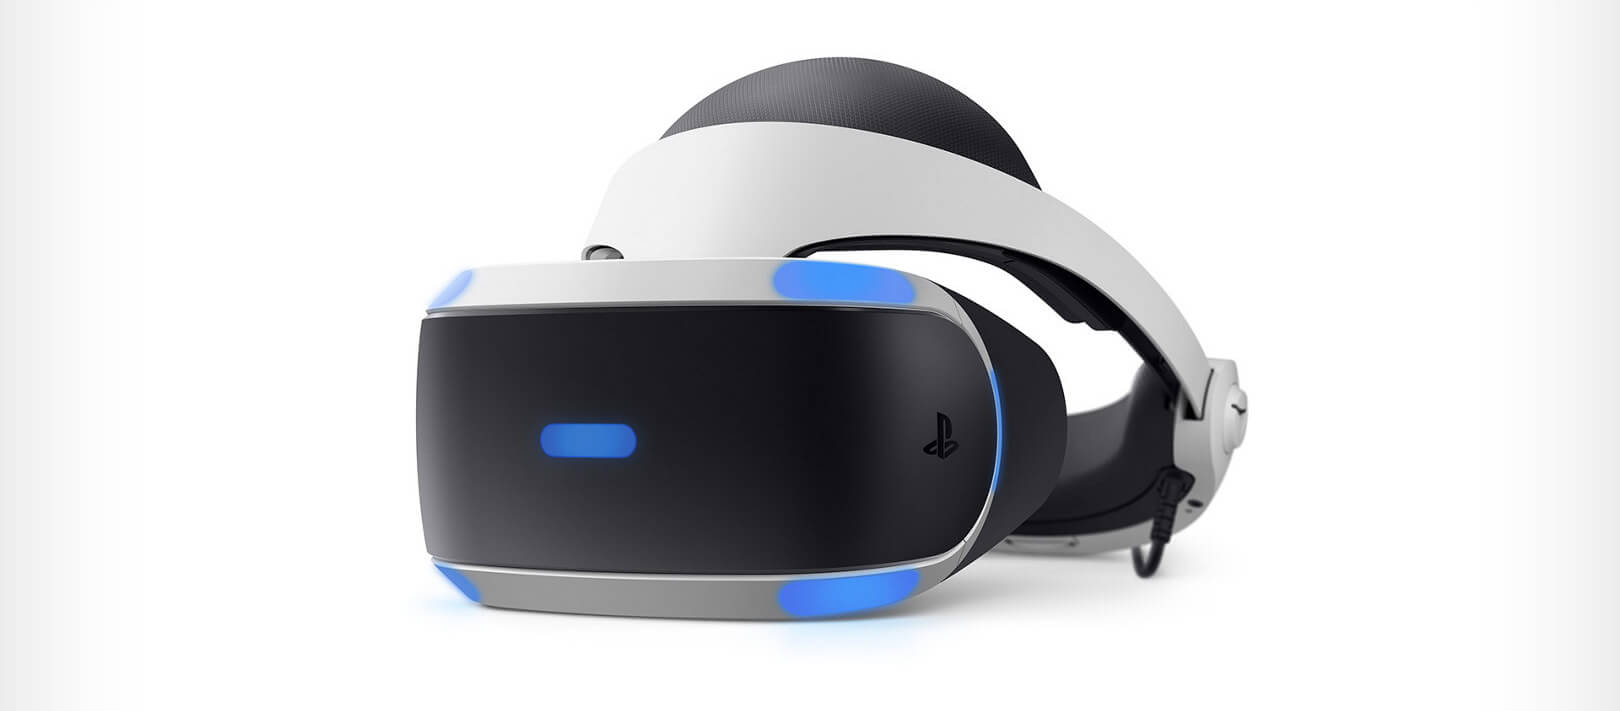
The PlayStation VR is compelling thanks to Sony backing its development, plus the PlayStation 4's affordability and availability compared with gaming PCs. All you need is the headset, a PlayStation 4, and a PlayStation Camera (now included with most PlayStation VR bundles). Not really the best of the bunch but still one of the top ones for console gaming. Sony is working on a new PlayStation VR system for the PlayStation 5, with redesigned controllers. The new headset hasn't been revealed yet, but the company has released a preview of the new controllers.

HP Reverb G2 VR

HP Reverb G2
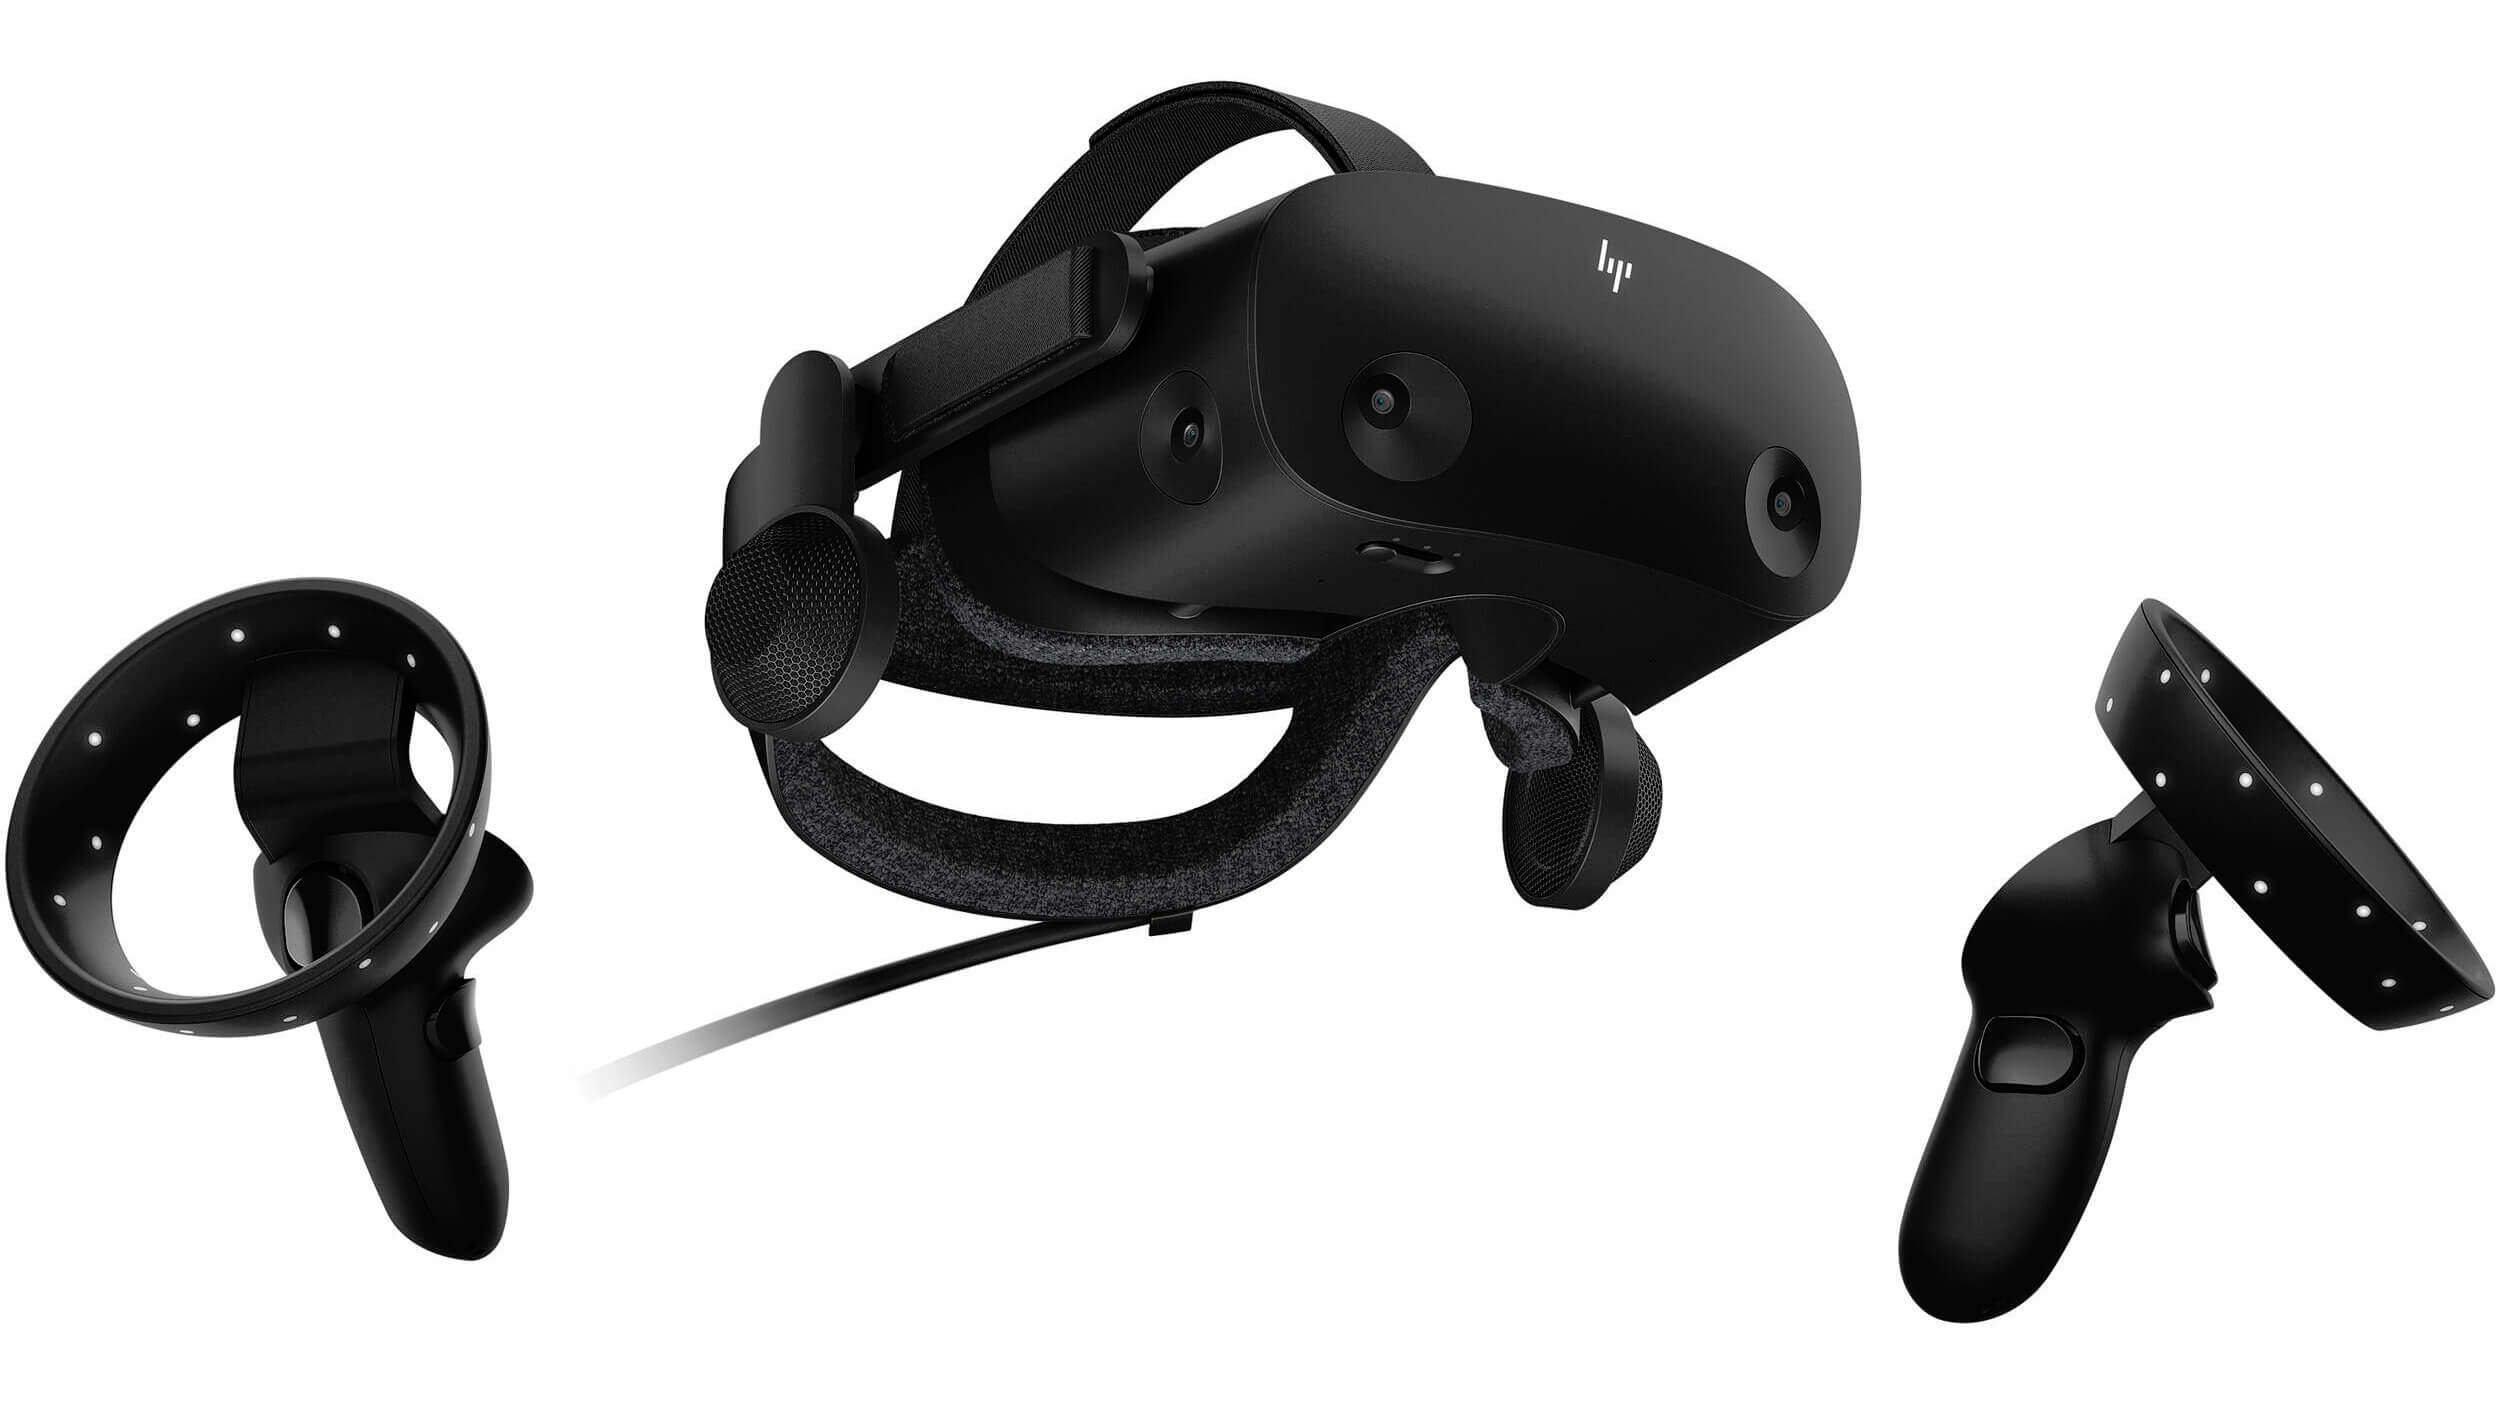
HP headset is one which you get if you want the best image quality in VR headset, sadly controllers did not follow the same quality of headset itself. But this is still a pretty decent headset overall and worth the purchase.

HTC Vive Cosmos

HTC Vive Cosmos
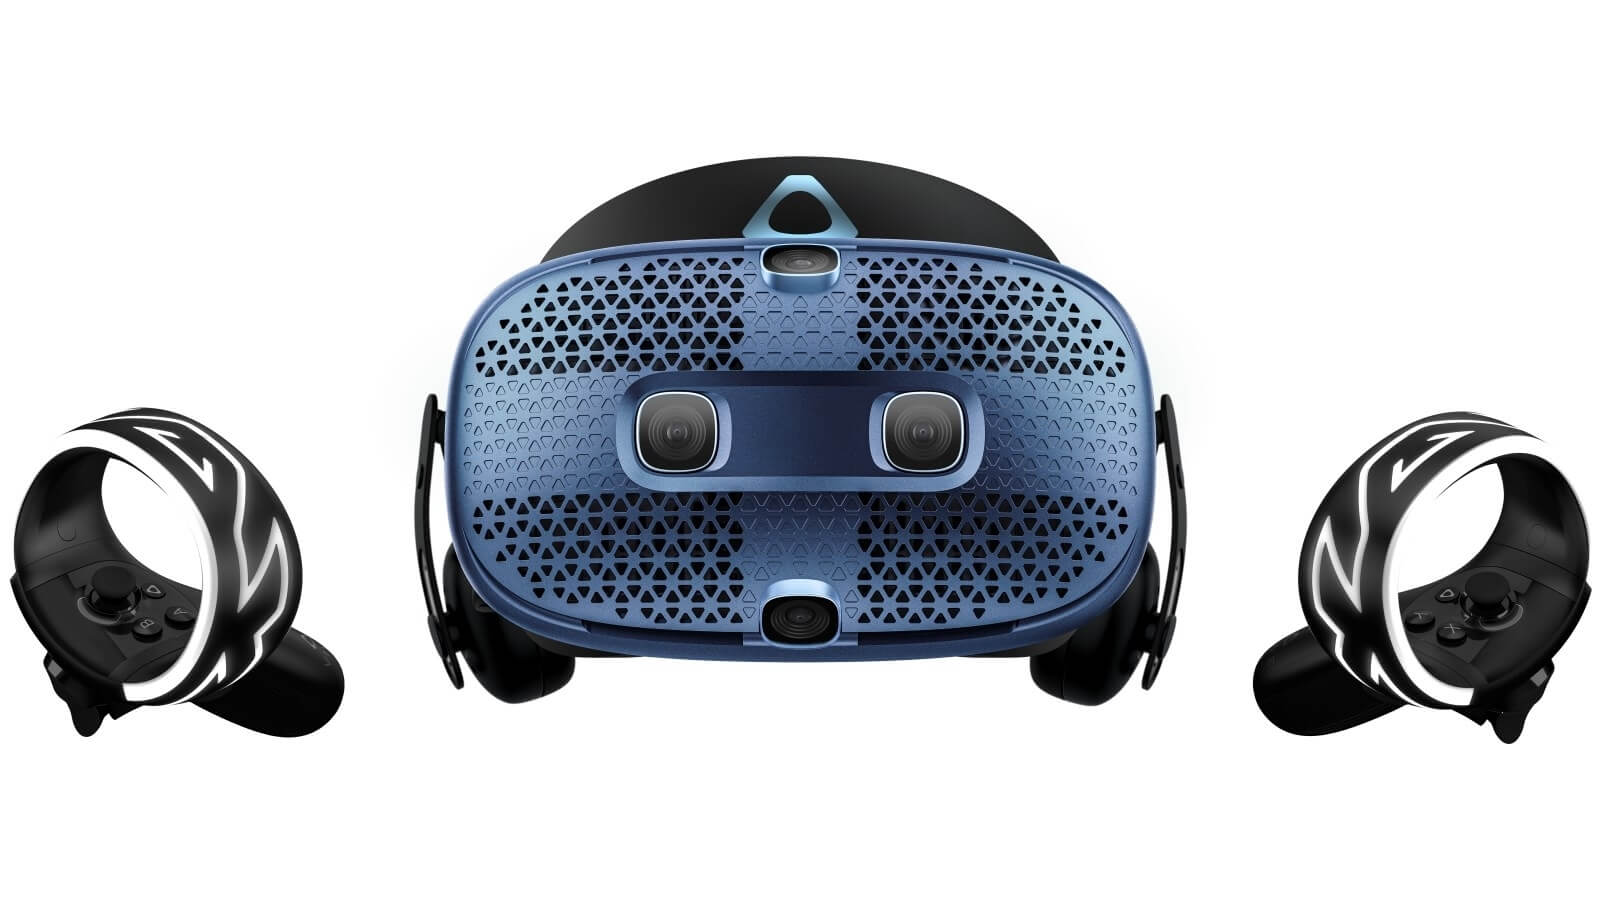
HTC's Vive Cosmos is the upgraded version of the Vive. It features a higher resolution and replaces the external base stations with outward-facing cameras for motion tracking. It's a comprehensive package for whole-room VR. HTC recently released the Vive Pro 2, a high-end VR headset targeting both enterprise users and consumers. This new headset features a 2,448-by-2,448 resolution display for each eye, making it the highest-resolution headset currently available. It's also more expensive than the Cosmos Elite. Sadly one thing that is bringing this headset down is the price.
Read More
Boot Selection Failed Because A Required Device Is Inaccessible Error in Windows 10
If you have or are currently getting a troublesome error saying, “The boot selection failed because a required device is inaccessible” when you boot your computer, then continue reading as this post will give you some suggestions that may help you resolve the error. This pesky error pops up during the booting process of your computer and prevents you from booting to your Windows 10 PC and displays the error message on a black screen instead. To fix this problem, here are some suggestions you need to check out.

Option 1 – Try checking the boot order in BIOS

  • Turn on your PC and repeatedly tap the Setup key right away about once every second until you see the Computer Setup Utility or the BIOS settings.
  • Then use the right arrow key to select the Security menu and then use the down arrow key to select the Secure Boot Configuration option and then tap Enter.
  • Just a heads up, before you can use Secure Boot Configuration, a warning will pop up. Simply tap F10 to continue to the menu. After opening it, use the down arrow key to select Secure Boot and then the right arrow key to set the setting to Disable.
  • Next, select the Legacy Support option using the down arrow key and then the right key to set the setting to Enable.
  • Now tap F10 to confirm the changes and then use the arrow key to select File menu and then the down arrow key to select Save Changes and then Exit and tap Enter to select Yes. From there, your computer should restart and once it does, use the power button to switch it off.
If you are now able to boot from your hard drive, you need to know which option to choose once the boot menu pulls up. Refer to the steps below to easily boot from your hard drive.
  • Tap the power button to boot your PC. Once your PC starts, a message will appear indicating that the boot mode has now changed.
  • Next, you’ll see a security screen displaying a four-digit code. Type in this four-digit code and tap Enter.
  • After that, tap the power button to turn the computer off and wait for a couple of seconds and then turn your PC on and tap the ESC key right away repeatedly until you see the Startup menu.
  • Now tap F9 to open the Boot Menu and use the down arrow key to select the hard disk and make sure to select it by tapping Enter on your keyboard.
  • Restart your PC and check.

Option 2 – Try running the DSKCHK Check from the Recovery Media.

The DSKCHK utility scans your hard drive for any errors, bad files, or corrupt sectors so this should help in fixing the problem.
  • The first thing you need to do is to download the Media Creation Tool from Microsoft and then open it after the download. The file should be “MediaCreationTool.exe”.
  • Then tap Accept to agree to the terms and conditions and then from the initial screen, select the “Create installation media (USB flash drive, DVD, or ISO file) for another PC” option. Keep in mind that the language, architecture, and edition of the bootable drive will be selected based on your PC’s settings but you have to uncheck the Use the recommended options for this PC in order to choose the correct settings for your own computer that’s getting the error.
  • Now click Next and then click the USB drive or DVD option once prompted to select between USB or DVD depending on what device you are using to store this image on. Then click Next and select the required drivers from the list of storage devices currently connected to the computer.
  • Click Next. After that, the Media Creation Tool will proceed to download the files needed to install and create the installation device.
  • The next thing you have to do is to insert the installation drive.
  • After that, you will see the “Choose your keyboard layout” window so select the one you prefer and then the Choose an option screen will pop up.
  • Go to Troubleshoot > Advanced Options > Command Prompt. After opening Command Prompt, input the following command and hit Enter.
CHKDSK /R /X C:
  • Now boot your PC without the recovery drive and check if the problem’s fixed or not.

Option 3 – Try resetting the BIOS

  • Open the computer case and then look for the battery in the motherboard. If you can’t find it, you can seek out the motherboard or computer documentation of your PC as well as browse the web or contact the manufacturer for further assistance.
  • Removing the battery should be easy especially if your computer uses a coin cell battery. Just use your fingers to grab on the edge of the battery then pull it up and out of the socket that’s holding it in place.
  • Keep the battery removed for about 10 minutes and then insert it back and try booting into the BIOS.

Option 4 – Try using the Startup Repair

  • Inject the installation drive you created earlier and boot your PC.
  • Select the keyboard layout from the Choose your keyboard layout window.
  • From there, the Choose an option screen pops up. Navigate to Troubleshoot > Advanced Options > Startup Repair.
Read More
Fix Setup has failed Error in Windows
If you encounter the “Setup has failed to determine supported install choices” error when trying to downgrade or upgrade your Windows 10 computer, this signifies that there are some compatibility issues with the installation process and that Windows was not able to either downgrade or upgrade to another version. Usually, this error occurs when you are using the built-in options in Windows 10 upgrade or downgrade to another version of Windows. This option is mostly used as it keeps the user settings as well as data intact. Thus, you need to keep in mind a lot of parameters before you proceed with the installation because if there is any conflict in the process, you certainly won’t be able to downgrade or upgrade your Windows computer. To resolve the issue, here are some suggestions that might help.

Option 1 – Try running in Compatibility mode

This is the first thing you can try to resolve the issue instead of going right ahead on making a bootable device. So if you are downgrading Windows, you can try to run the installer in the compatibility mode for that specific Windows version.
  • Look for the setup file.
  • Once you find it, right-click on it and select Properties from the context menu.
  • After that, go to the Compatibility tab and mark the checkbox for “Run this program in compatibility mode for:” and from the drop-down list, select either Windows 7 or Windows 8.
  • You also have to check the “Run as administrator” option.
  • Now click the Apply button and then click OK to save the changes made and check if it has resolved the issue or not.

Option 2 – Option 2 – Try troubleshooting compatibility

This option is almost the same as the first one except it is an alternative way of fixing the “Setup has failed to determine supported install choices” error in case the first one didn’t work. In this option, you will troubleshoot the compatibility issue.
  • Look for the setup file.
  • Then right-click on it and select the “Troubleshoot compatibility” from the context menu.
  • After that, click on the “Try recommended setting” option. Once the process is done, the error message should be gone.

Option 3 – Try to use the setup file instead of an image

If you are running the Windows ISO image for the installation, you can try running the setup file instead. This is because when you try to install Windows from an image file directly, it has to be loaded into a virtual CD drive first, and then from there, further operations are carried out. And so, you can just bypass this mechanism to avoid getting the “Setup has failed to determine supported install choices” error.
  • First, you need to extract the disk file to an accessible location.
  • After that, go to Sources > Setup.exe.
  • Now run the setup file to upgrade or downgrade the Windows version. Just make sure that you do run the setup file as an administrator.

Option 4 – Try to do the upgrade or downgrade in a Clean Boot state

Putting your PC in a Clean Boot state can also help when you want to upgrade or downgrade your version of Windows without any trouble because, during this state, you can start the system with a minimum number of drivers and startup programs that will surely help you in isolating the root cause of the issue.
  • Log onto your PC as an administrator.
  • Type in MSConfig in the Start Search to open the System Configuration utility.
  • From there, go to the General tab and click “Selective startup”.
  • Clear the “Load Startup items” checkbox and make sure that the “Load System Services” and “Use Original boot configuration” options are checked.
  • Next, click the Services tab and select the “Hide All Microsoft Services” checkbox.
  • Click Disable all.
  • Click on Apply/OK and restart your PC. (This will put your PC into a Clean Boot State. And configure Windows to use the usual startup, just simply undo the changes.)
  • After that, try to install the Windows Updates or upgrade again.

Option 5 – Try to use the Media Creation tool

The Media Creation tool in Windows allows you to use the ISO installation file to make a bootable device that you can use to install Windows on your PC. Note that this is kind of different from the usual installation process as it could erase your computer’s current settings and data on the primary drive. Thus, before you proceed, you need to backup all your data into some removable drive and then use the Media Creation Tool to make a bootable drive.
  • After making the bootable drive, you need to plug it into your computer and then reboot.
  • Next, tap the F10 or Esc key to open the boot options.
  • Now set the boot priority of the removable drive the highest. Once the setup comes forth, follow the next onscreen instructions and install Windows without any problems.
Read More
Fix INVALID_POINTER_READ_c0000005 atidxx64.dll
If your Microsoft Edge browser encountered a Stop Error that says, “INVALID_POINTER_READ_c0000005 (atidxx64.dll)” in your Windows 10 computer, then this indicates that your Graphics card driver is outdated. According to security experts, Microsoft has already acknowledged the problem and stated that this issue exists with Windows 10 v1809, Windows Server 2019, and Windows Server version 1809. Although there is no direct way to resolve the problem, there are still some workarounds you can try. If you are using a RadeonHD2000 or HD4000 series video card, the update will be blocked for you. Some users also claim to experience performance issues with the lock screen or the ShellExperienceHost. However, if you are using AMD, the problem is that it no longer supports Radeon HD2000 and HD4000 series graphics processing units or GPUs. Even though Microsoft is already working for a way to resolve the problem, here are some alternative solutions you can check out:

Option 1 – Update your Graphics card drivers

  • First, boot your computer into Safe Mode.
  • After that, tap the Win + R keys to launch Run.
  • Type in devmgmt.msc into the box and tap Enter or click OK to open the Device Manager.
  • After that, a list of device drivers will be displayed. From there, look for the Display Adapters and click on them.
  • After that, right-click on each entry under the Display Adapters and select the “Uninstall Device” option from the menu.
  • Now restart your computer.
  • After restarting your computer, go to the Settings app and Check for Updates in the Windows Update section.
Note: You also have the option to go directly to the website of your graphics card manufacturers like NVIDIA, Intel or AMD and go to the section called Drivers then check if there’s a new available update – if there is, download and install it.

Option 2 – Try removing AMD Radeon HD2000 and HD4000 drivers

Although this is not exactly a perfect solution, removing AMD drivers will make the operating system fall back to the default GPU available on your motherboard. You also have the option to completely disable the hardware.
  • Tap the Win + X + M keys to open the Device Manager.
  • Next, look for your Graphics card drive, and under Display Adapters, right click on them and click Uninstall device or Disable device.
  • After that, restart your computer. This will disable the AMD drivers so you won’t be able to find them. It will also release the Windows 10 v1809 update on your computer and in case your operating system tries to prompt you with the “New Device found” message, simply ignore it.

Option 3 – Try to use another browser

You might want to use another browser especially when you already updated your computer and Microsoft Edge still keeps on crashing. You can use Google Chrome, Mozilla Firefox, and other browsers as alternatives until you sort out the problem.

Option 4 – Try to remove the Graphics card physically

You might also want to try removing both AMD Radeon HD2000 and HD4000 as they are very old graphics cards. And since AMD is not going to roll out anything, at least on its own if your motherboard has an onboard GPU, it would be best to get rid of the cards. After that, install the Windows v1809 update and then put them back in. You also have the option to install the driver but just don’t use Microsoft Edge.
Read More
The device is not ready trying to connect USB
External hard drives have become essentials as they store data. However, they are also prone to issues and one of them is the “The device is not ready”. You could encounter this error when you try to access your connected hard drive. This error won’t allow you to access the contents of your hard drive so unless you fix it, you won’t be able to access any of the files on your hard drive. One of the most likely causes of this error is a hardware defect. Aside from that, it could also be due to loose connections, obsolete device drivers, as well as compatibility issues between the operating system and the hard drive. Before you start troubleshooting the problem, you need to determine if you were able to access your hard drive before you encountered the error or not. If not, you need to check the compatibility of the device with your operating system as it could be the reason why you’re getting the error. There are several potential fixes you can check out to fix this error. You can try to check the hardware connections, run the built-in Hardware and Devices troubleshooter, as well as the USB troubleshooter. You could also run the CHKDSK utility or update the drivers of the device or the USB drivers.

Option 1 – Try checking the hardware connections

The first thing you have to do before you further troubleshoot the problem is to check the hardware connections of your computer and see if there are damaged ones, just like with USB ports, it would also affect the overall connectivity of the device with the computer. So if you notice some irregularities in the connecting cable physically, you might have to buy another one and replace it and then see if it fixes the problem or not.

Option 2 – Run the Hardware and Devices Troubleshooters

  • The first thing you need to do is click on Start and then on the gear-like icon to pull up the window for Settings.
  • After opening Settings, look for the Update and Security option and select it.
  • From there, go to the Troubleshoot option located on the left-hand side of the list.
  • Next, select Hardware and Devices from the list and open the Troubleshooter and run it. Once it is doing its job, wait for it to complete the process and then restart the system.
  • After the system restarts, check if the problem’s now fixed. If not, refer to the next option given below.
Note: You could also try to run the USB troubleshooter as it could also resolve the problem.

Option 3 – Run the CHKDSK utility

As you know, the CHKDSK utility can help you in identifying the bad sectors in a drive and fix them automatically. Thus, you can run it to fix the “The device is not ready” error when you connect your USB drive to your computer.
  • Open Command Prompt with admin privileges.
  • Next, type and enter this command to execute it: chkdsk /f <drive>
  • Now, wait until the process is completed and exit Command Prompt.
  • Restart your computer and try connecting the USB drive again and see if the error is fixed.

Option 4 – Try to update the drivers of the device

Although you can always update the device drivers using the Device Manager, you might want to try downloading the latest set of drivers directly from the manufacturer’s website. Once you’ve downloaded them, install them right away and then correct the external hard drive.

Option 5 – Update or reinstall the Universal Serial Bus Controller driver

If updating the drivers of the device did not fix the “The device is not ready” error, you can try to update or reinstall the Universal Serial Bus Controller drivers instead of using the Device Manager. Refer to the following steps:
  • First, click the Start button and type “device manager”.
  • Then click on the “Device Manager” from the search results to open it.
  • From there, look for the “Universal Serial Bus controllers” option and then right-click on each one of the USB drivers and select the Update Driver from the menu.
Note: If it is a regular USB drive, then it will be listed as a USB Mass Storage Device but if you have a USB 3.0 device, then look for a USB 3.0 Extensible Host Controller.
  • Restart your PC and then click the “Search automatically for updated driver software” option.
Note: If updating the USB Controller drivers didn’t work, you can try to reinstall them instead.

Option 6 – Restart your computer in a Clean Boot State

If the first three given options didn’t work and you still see the error when you connect external devices, you can try putting your computer in a Clean Boot State and then try connecting them again.
  • Log onto your PC as an administrator.
  • Type in MSConfig in the Start Search to open the System Configuration utility.
  • From there, go to the General tab and click “Selective startup”.
  • Clear the “Load Startup items” check box and make sure that the “Load System Services” and “Use Original boot configuration” options are checked.
  • Next, click the Services tab and select the “Hide All Microsoft Services” check box.
  • Click Disable all.
  • Click on Apply/OK and restart your PC. (This will put your PC into a Clean Boot State. And configure Windows to use the usual startup, just simply undo the changes.)
  • Now try to connect the external devices and check if the error is now gone.
Read More
1 2 3 162
Logo
Copyright © 2022, ErrorTools. All Rights Reserved
Trademarks: Microsoft Windows logos are registered trademarks of Microsoft. Disclaimer: ErrorTools.com is not affiliated with Microsoft, nor claim direct affiliation.
The information on this page is provided for information purposes only.
DMCA.com Protection Status