Connecting Cortana on Windows and Android

Microsoft's anniversary update has come with many new features and improvements. One of these features is that Microsoft's Cortana can now be installed on your Android phone and as long as you are logged in to your Microsoft account on different devices, she can pass information between devices. You can not see battery life on your desktop PC, notifications, etc.

There are some prerequisites in order to get this going, first is to have a Windows version 1607 or newer. The second is to have the last Android version

Installing Cortana on Android

  1. Download and install the Cortana app from the Google Play store.
  2. Open the app and accept the license terms.
  3. Enter the credentials for the Microsoft account you use to sign in to your PC.
  4. After a few seconds, Cortana will open.
  5. Click the settings button and select Sync Notifications.
  6. By default, missed calls, incoming messages, and low battery notifications will be turned on. You can turn this on\off from here. The only option off by default is for App notifications. Any non-system apps such as Facebook and Instagram can also send alerts to your Windows box. You can choose to enable the App notification sync option or leave it off.
  7. If you enable “App notification sync,” you will need to give Cortana permissions to read and control notifications on your phone.
  8. You can then select exactly which applications will be synched to your PC.
  9. Once done you can exit out of Cortana.

Configuring Cortana on PC

  1. Click the Windows button and type Cortana. Click the icon for Cortana and Search Settings.
  2. Scroll through the settings list and look for Send notifications between devices
  3. Click the switch to turn it on.
  4. Sign in to the same Microsoft account you used in the previous section
  5. Navigate back to the Cortana & Search settings tool.
  6. Click Edit Sync Settings. Make sure that your phone shows up on the list. You can also determine if you want PC notifications are sent to your phone.

With those settings in place, you should now start getting alerts for the items you enabled in your Action Center. As notices come in, you will see them pop up in a small bubble on the lower right of your screen. You can dismiss the notification or use the link to find a compatible app in the Windows store.

If you like to learn and find out more about various Windows errors, and how to repair them go to our vast archive or use search to find articles that will explain and help you in solving your issue.
However, if you prefer to do things fast and with automatization then we are proposing to use an automated solution for your issues. The application that we are recommending is Advanced System Repair Pro
Advanced System Repair utilizes multiple tools all in one to give you a quick, simple, reliable, and very thorough diagnosis of your PC. It brings you all the tools you need in one program to clean, fix, protect, optimize and boost your PC!
1-Click Maintenance
All the tools to make it simple and easy! It's like having a professional technician at the click of a mouse.

Junk Cleaner
Keeping your computer free from unnecessary clutter also helps make your computer last longer. Like any other machine, if you keep it clean and take care of it, it will serve you better for longer!

Optimize background apps
Optimize applications background activity with the built-in Application Optimizer feature.

Disk Defrag
With a simple 1-click, Advanced System Repair speeds up your PC by assembling fragmented files on your machine and organizing them more efficiently.

Malware Removal
Finds and removes all types of harmful malware including trojans, worms, bots, adware, spyware, PUPs, and more!

Privacy Cleaner
The all-in-one privacy suite to Clean Your Tracks & Protect Your Privacy! Make your computer safe, secure, and more efficient!

System Tweak/Optimizer
ASR will analyze your complete system and settings to adjust your PC to function at its maximum performance.

Registry Cleaner
Over time, as you install and uninstall applications, the registry can become cluttered with old entries and broken settings which can result in program crashes, and annoying messages and slow the computer down.
Visit our Advanced System Repair Pro Download page to inform yourself about all the benefits of this software and get a free trial copy of it.
advanced system repair pro

Advanced System Repair Pro

One-click automated PC repair solution
ASR logo
With Advanced System Repair Pro you can easily
Replace damaged files
Restore performance
Free disk space
Remove Malware
Protects WEB browser
Remove Viruses
Stop PC freezing
DOWNLOAD
Privacy Policy | Terms of Use | Uinstall
Advanced System Repair Pro is compatible with all versions of Microsoft Windows including Windows 11

Share this article:

You might also like

Fix ERR_SSL_VERSION_INTERFERENCE on Chrome
If you encounter the ERR_SSL_VERSION_INTERFERENCE error on your Google Chrome browser then this means that the browser is trying to load a website with SSL protocol but is not able to do so. This error can occur for many reasons and in this post, you will be given potential fixes that could help you in resolving the problem. But bear in mind that these potential fixes are not that straightforward forward so if you encounter an option you don’t understand much, just skip to the options you have the knowledge of. There is no direct fault in the browser for the ERR_SSL_VERSION_INTERFERENCE error as there are issues with caching the website data locally on your computer. Moreover, this kind of error can also appear when a website is coded incorrectly or if there are conflicting browser extensions installed in the browser that prevents the website to function properly. Refer to the suggestions given below to fix the ERR_SSL_VERSION_INTERFERENCE error in Chrome on Windows 10.

Option 1 – Try clearing browser data

There are times when some data in the browser is conflicting with the loading of the website and triggers errors like ERR_CACHE_MISS. And so you can try to clear your browser’s data. This might be a very basic solution but oftentimes it works in fixing this kind of error in Google Chrome. Follow the steps below to clear the data in your browser.
  • Open your Google Chrome browser.
  • After that, tap the Ctrl + H keys. Doing so will open a new panel that allows you to delete the browsing history and other data in your browser.
  • Now select every checkbox that you see and click on the Clear browsing data button.
  • Then restart your Chrome browser and check if you can now open any website or not.

Option 2 – Try disabling TSL 1.3

If clearing the browser data didn’t fix the problem, you can also try to disable TSL 1.3 in Chrome. To do so, refer to these steps:
  • Open Google Chrome.
  • Next, type in “chrome://flags/#tls13-variant” in the address bar and tap Enter.
  • After that, you should see the experimental features page for Google Chrome where you can set TSL 1.3 to disabled.
  • After disabling TSL 1.3, restart your computer and check if the problem is fixed or not.

Option 3 – Reset Winsock, TCP/IP & Flush DNS cache

Resetting Winsock, TCP/IP, and flushing DNS might help in resolving the ERR_SSL_VERSION_INTERFERENCE error just follow these steps:
  • Right-click on the Start button and click on Command Prompt (administrator) so you can pull up an elevated Command Prompt.
  • After that, execute each one of the commands listed below. And after you typed in one after the other, you have to hit Enter.
  1. netsh winsock reset – type in this command to reset Winsock
  2. netsh int ip reset resettcpip.txt – type in this command to reset TCP/IP
  3. ipconfig /flushdns – type in this command to flush the DNS cache
  • Next, restart your PC and check if the problem’s fixed.

Option 4 – Get rid of any conflicting browser extensions

  • Open Chrome and press Alt + F keys.
  • Go to More tools and click Extensions to look for any suspicious browser extensions or toolbars.
  • Click the Recycle bin and select Remove.
  • Restart Chrome and press Alt + F keys again.
  • Proceed to On Startup and mark Open a specific page or set of pages.
  • To check if the browser hijacker is still active, click Set pages, if it is active, overwrite the URL.

Option 5 – Reset Google Chrome

Resetting Chrome can also help you get rid of the error. Resetting Chrome will restore its default settings, disabling all the extensions, add-ons, and themes. Aside from that, the content settings will be reset as well and the cookies, cache, and site data will also be deleted. To reset Chrome, here’s what you have to do:
  • Open Google Chrome, then tap the Alt + F keys.
  • After that, click on Settings.
  • Next, scroll down until you see the Advanced option, once you see it, click on it.
  • After clicking the Advanced option, go to the “Restore and clean up option and click on the “Restore settings to their original defaults” option to reset Google Chrome.
  • Now restart Google Chrome.
Read More
Can’t pair Bluetooth keyboard, Check the PIN
If you have suddenly run into a problem when trying to connect or pair your Bluetooth keyboard with your Windows 10 computer, read on as this post will guide you on how exactly you can resolve the problem. This kind of problem typically occurs when you’ve disabled the Bluetooth option. However, this option is already enabled and you still encountered the same error message saying, “Check the PIN and try connecting again”, then you need to troubleshoot the problem further. In most cases, this kind of issue can be fixed when you restart your computer and go to the Windows Settings and select the “Add Bluetooth or other devices” option and then put the keyboard into pairing mode. And when the keyboard appears in the “Add a device” dialog box, just select it. On the other hand, if your Bluetooth keyboard won’t get connected to your Windows 10 computer and you encounter an error that says, “Can’t pair Bluetooth keyboard, Check the PIN and try connecting again”, then you need to check out the options provided below but before you do so, make sure that you create a System Restore point first as some of the troubleshooting options provided involves the Windows Registry.

Option 1 – Try to use the Device Pairing Wizard

The Device Pairing Wizard is the one that allows your computer to look for any new devices and display them underneath it. All you have to do to use this wizard is to follow its instructions to connect your Bluetooth device to Windows 10. To get started, follow these steps:
  • First, tap the Win + R keys to launch the Run utility and type “devicepairingwizard” in the field, and then hit Enter to run the Device Pairing Wizard.
  • After that, wait for a couple of seconds until the devices appear. Once they do, select the Bluetooth device you wish to add.
  • A new screen with a passcode should appear instantly. You need to take note of the given passcode and type them on your Bluetooth keyboard.
  • Once done, tap Enter. This should help in pairing your computer to your Bluetooth keyboard.

Option 2 – Try to use the Registry Editor

The next thing you can do to resolve the pairing issue with your Bluetooth keyboard is to use the Registry Editor by following these steps:
  • Tap the Win + R keys to open the Run utility and type “Regedit” in the field and then hit Enter to open the Registry Editor.
  • Next, navigate to this registry path: HKEY_USERS/.DEFAULT/Software/Microsoft/Windows/CurrentVersion/Bluetooth/ExceptionDB
  • From there, look for the folder named “Addrs” and expand it. If you see any folders or keys under it, select them and delete them. These keys represent the MAC address of your Bluetooth devices.
  • Once you’re done, restart your computer and try to pair your Bluetooth keyboard once more.

Option 3 – Try running the Bluetooth Troubleshooter

As you know, Windows 10 has various troubleshooters with user-friendly interfaces where you can utilize them to fix issues in your PC. And since you’re dealing with some Bluetooth problem, you have to run the Bluetooth Troubleshooter.
  • Open the Windows 10 Settings.
  • Then go to Update & Security > Troubleshoot.
  • You should find the option for Bluetooth on your right-hand side – click on it then click on the “Run the troubleshooter” option.
  • Now follow the next screen options.

Option 4 – Try to reinstall or update the Bluetooth driver

The issue might have something to do with the Bluetooth drivers. It could be that it is outdated and needs to be updated or that you recently updated it and since you have trouble pairing your Bluetooth keyboard, you can update, rollback, or uninstall the Bluetooth drivers. How? Follow the steps below.
  • Tap the Win + X keys to open the Device Manager.
  • Next, look for the Bluetooth device and right-click on it.
  • Select the option “Update driver”.
  • After that, a new popup window will appear. In there, select the option, “Search automatically for updated driver software”.
Note: Checking the update may take a few minutes so you’ll have to wait until it finishes. If it is able to find an update, you must install it.
Read More
How to enable God mode inside Windows 11
God mode windows 11
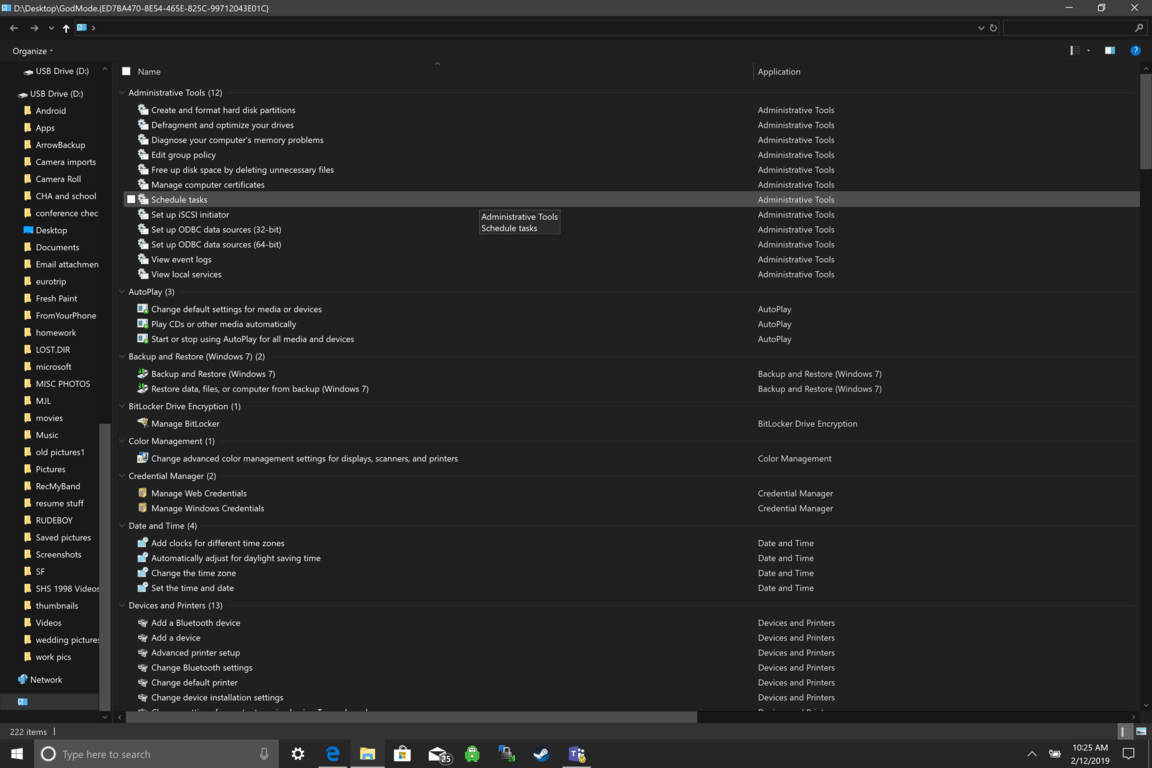
Like in Windows 10, Windows 11 will also support God mode to be enabled and used. For those readers that do know what God mode is, let me explain it in simple terms. God mode is the icon on the desktop that once clicked will open and let you adjust every option in the control panel and some hidden features for Windows inside one application. There are a lot of advantages to having this one-click fast access to features, especially if you are a power user. Luckily creating such an awesome icon and enabling God mode is very easy to accomplish, all you have to do is:
  1. Create a new folder where you want to have the God mode icon
  2. Rename folder exactly: {ED7BA470-8E54-465E-825C-99712043E01C}
  3. Enjoy God mode
As you can see creating and accessing all settings at your fingertips is much easier than most people think. Enjoy your ultimate access to Windows 11 features and if you wish you can drag and drop sections from it into the desktop or anywhere for easy access to that specific topic.
Read More
Fix error 0x00000709 when connecting a Printer
One of the most common and bothersome issues with a printer is when it refuses to get configured or set up on your computer. Thus when your printer has some configuration issues, you will most likely encounter the error 0x00000709. This occurs if there is already a default printer set and configured or Windows does not want to configure the new printer at all. The operation could not be completed (error 0x00000709), Double check the printer name and make sure that the printer is connected to the network. Today, we will try two fixes that may help you get rid of this error.

Option 1 – Run the Printer Troubleshooter

One of the first basic troubleshooting you can perform to resolve the printer issue is running the Printer Troubleshooter. This built-in troubleshooter can detect and automatically fix the problem for you. To use it, follow these steps:
  • Tap the Win + R keys to open the Run dialog box.
  • Next, type “exe /id PrinterDiagnostic” in the field and click OK or hit Enter to open the Printer Troubleshooter.
  • Then click the Next button and follow the next on-screen instructions to fix the issue with the printer.

Option 2 – Try to use some Registry tweaks to add the Printer

You might want to use some tweaks to add the Printer but before you proceed, make sure to create a System Restore Point so that if anything goes out of hand, you can always undo the changes you’ve made.
  • Tap the Win + R keys to open the Run dialog box.
  • Next, type “Regedit” in the field and hit Enter to open the Registry Editor.
  • When a UAC or User Account Control prompt appears, click Yes.
  • Once you’ve opened the Registry Editor, go to the following key location:
HKEY_CURRENT_USERSoftwareMicrosoftWindows NTCurrentVersionWindows
  • From there, double click on the file named “Device on the right side pane under the Windows folder.
  • Now add the name of your printer in the Value Data field as you can see below and then click the OK button.
Note: As you can see on the image above, you must not change the “.winspool.Ne02:” part and only the first one which is the name of your printer.
  • After that, you will get a message that says, “Cannot edit Device: Error writing the value’s new contents, simply click on OK again. You have to take note of the existing permissions before you proceed to the next step. Once you’ve added the Printer, make sure to reverse the changes you’ve made to the Permissions.
  • Now right click on the Windows folder located on the left pane and click on Permission.
  • Select Restricted under the Group or user names section.
  • Then check the checkboxes for “Full Control”, “Read” and “Special Permissions” under the Permissions for RESTRICTED section.
  • After that click the Apply button and then OK to save the changes made.
  • Next, right-click on the file named “UserSelectdDefault” and select Rename to rename it to your printer’s name.
  • Now restart your computer to successfully apply the changes made.
  • After the printer is added, don’t forget to reverse the Permission changes you’ve made early on.

Option 3 – Try updating the Printer drivers

You might also want to try updating your printer drivers. All you have to do is locate the USB Composite Device. For complete details, follow the steps below.
  • First, click the Start button and type “device manager”.
  • Then click on the “Device Manager” from the search results to open it.
  • From there, look for the USB Composite Device option and right-click on it, and select the Update Driver from the options.
  • Restart your PC and then click the “Search automatically for updated driver software” option.
Note: You also have the option to download the latest version of your Printer from the manufacturer’s website.
Read More
Microsoft Windows 11 limitations surfacing
windows 11As more and more people get into insider preview of upcoming Windows 11 we will see more and more different takes and opinions on it. Generally speaking, the first wave was quite positive when it was previewed but how time is passing more and more limitations and frustration comes to the surface. Some of the limitation that is inside it, which have been confirmed by Microsoft itself includes features missing that we had in Windows 10 like moving the application to the taskbar in order to pin it, moving the file in the taskbar to open it in default application and some big annoyances like Windows opening widgets always in Edge no matter what is your default browser. Not being able to move the taskbar from the bottom is also one of many illogical things. There is not really a point in these missing features since they were working fine in Windows 10 and many users liked them since they could customize Windows more to their liking, now with this new look at limitations it reminds me personally much of apple macOS and I will be honest, I am not a big fan of that kind of thinking. If I wanted that kind of OS I would have gotten myself a MAC, not custom build PC, but hey, Linux is always a free alternative, and how Microsoft itself is pushing limitations and in my opinion bad design choices along with awful system requirements that might just be a case for a lot of users. I am really not sure what is logic behind these moves and I am sure they have their reasons but this time it seems that their take on the new OS is not resonating well with the overall user population, well at least what I have heard so far. Things of course can still be changed and made for the better and I would rather see release postponed and issues addressed than getting more system hogging and limited new OS that at its current state looks like reskinned Windows 10 with limitations.
Read More
IW Unicorn and Scorpion PC Chair cockpits
Recently on errortools.com, we were talking about Cooler Master’s Orb X gaming chair that is an absolute beast and an amazing product. One downside of Orb X is its price. IW product line is somewhat competing with Orb X with a much more affordable price aiming to probably take customer base with lower income but offering them a great experience as well. The first thing you will notice is a different design and somewhat feeling of cheaper quality if you compare it to Orb X but that is quite reasonable considering the chair itself is around 3.5 times cheaper than Orb X which really puts it in range of everyone can get it. But does a much cheaper price means low quality? Let’s explore.

IW Unicorn

IW unicorn
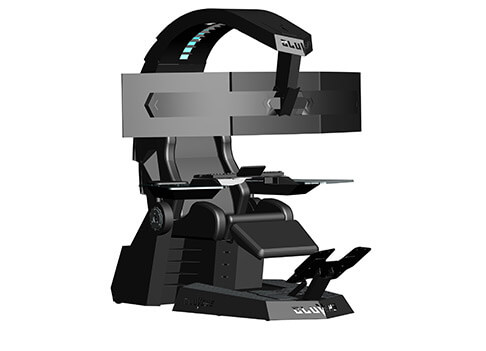
The 2021 CLUVENS BRAND newly issued model UNICORN has fully electrical tilting capabilities to 160 degrees, Reading light-two LED & RGB illumination lighting, manual open/close keyboard tray, and armrests. This model is suitable for home and office, and also gaming computer work environments. It offers functions that enable the user to experience unprecedented comfort and quasi total immersion through strategically positioned 1-3 monitors, audio systems, and accessories. The result is a complete computer office, ergonomically optimized, with a minimal footprint that improves overall performance and productivity and health and comfort. Sitting on a chair can help a lot for relieving health problems like lower back pain, herniated discs, sciatica, and neck pain and also enhance performance and viewing effects.

More Luxury and More comfortable:

Equipped with Luxury feeling reclining Gaming chair made with high-density Mold Shaping Foam and superior quality PU leather with very comfortable texture, electrical recline to 128 degrees, and more to 160 degrees for the flat position for the user.

More High-End Setting and more High-tech:

Manual push for open / close of big sized (87x34cm) Self-Balancing Keyboard tray, adjustable with 20cm distance range with Electrical control for the height of roof arm & monitors. Electrical control for reclining Zero Gravity position or even flat position, Manual adjusted Feet pedal for a more comfortable position for feet. Using a High-Quality PU leather Gaming chair that has Heat/Massage functions with it! The IW-Unicorn monitor mounts allow the use of a single monitor up to Ultra-wide 49” or 43” in size or triple monitor setups up to 3 x 29” other monitors configurations are available upon request. (VESA standard)

IW Scorpion

IW scorpion
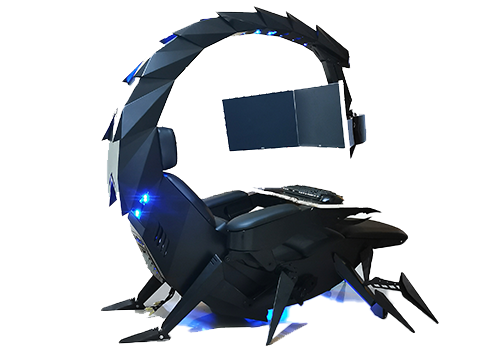
Scorpion is basically a premium version of Unicorn with being able to hold more weight, having cup holders on the armrest, etc. The look is also similar with Scorpion being more sinister-looking but overall Steel frame and chair are the same.

Conclusion

Sadly I have not personally experienced neither of these products including Orb X but from all information I have found and looked over, I would say these products are not trying to compete with each other. Although Products are similar in nature, Orb X is aimed at hi end-users focusing on privacy and robustness while IW is filling the gap of users that would like an advanced chair but are not willing or ready to shell hi amount of money for it offering advanced chairs with advanced features in somewhat affordable price.
Read More
DisplayLink in Windows 10 is not working
This post will guide you in what to do if the DisplayLink in Windows 10 is not working. There are several users who reported that their DisplayLink device has stopped working with the Windows 20 Anniversary or the Creators update all of a sudden. According to users, this issue occurs right after they finish installing a big Windows Update like the Anniversary Update or the Creators Update or right when the DisplayLink driver is updated using Windows Update. DisplayLink is a graphics transport technology that allows users to connect to any computer that supports USB or Wi-Fi. Aside from that, it is also an excellent universal docking solution to any platform which makes it a great solution for enabling multiple displays. Thus, it can be quite annoying when DisplayLink suddenly stops working. There really is no actual error message when it happens. The only telltale sign is that all the devices that use the DisplayLink technology will also stop functioning. There could be tons of reasons why DisplayLink stopped working. It could be due to an incompatible driver, or the DisplayLink driver itself is corrupted or is connected to a USB 2.0 port. In addition, the problem could also be due to the Nvidia Share (ShadowPlay) that conflicts with DisplayLink or that the Universal Serial Bus is broken. To resolve the issue, refer to the following options laid out below.

Option 1 – Run the Hardware and Devices troubleshooter

As you know, Windows comes with a built-in tool that you can use to troubleshoot the problem with DisplayLink. You can find it in Settings > Update & Security > Troubleshoot. For further instructions, follow these steps:
  • The first thing you need to do is click on Start and then on the gear-like icon to pull up the window for Settings.
  • After opening Settings, look for the Update and Security option and select it.
  • From there, go to the Troubleshoot option located on the left-hand side of the list.
  • Next, select Hardware and Devices from the list and open the Troubleshooter and run it. Once it is doing its job, wait for it to complete the process and then restart the system.
  • After the system restarts, check if the problem’s now fixed. If not, refer to the next option given below.

Option 2 – Try to uninstall DisplayLink and reconnect the docking station

If the Hardware and Device troubleshooter is of no help, you can try uninstalling DisplayLink and reconnecting the docking station. To do so, follow these steps:
  • Disconnect the docking station or any other device that uses DisplayLink.
  • Tap the Win + R keys to open the Run dialog box.
  • Then type “cpl” and hit Enter to open Programs and Features.
  • From there, look for DisplayLink, right-click on it and click Uninstall.
  • After that, follow the next on-screen instructions that appear on your screen to completely remove DisplayLink from your computer.
  • Once you’ve uninstalled DisplayLink, click this link to download and install DisplayLink again.
  • Now reconnect the docking station as well as other devices that use DisplayLink and follow the next on-screen instructions to reinstall the required drivers in your computer.
  • Restart your computer and then check if DisplayLink is now working fine or not.

Option 3 – Try using a USB 3.0 port

If you are experiencing this issue with DisplayLink with a monitor that you’re trying to connect using DisplayLink, then you have to make sure that you are using a USB 3.0 port. Based on some reports, there are certain monitors that will not work with DisplayLink while connected to a USB 2.0 port since they have insufficient power to run the monitor. Like pointed out earlier, the problem with DisplayLink might have something to do with the Nvidia ShadowPlay. This streaming feature was often reported to crash the DisplayLink monitors which is why you might want to try disabling it for a while to check if it’s really true. Once you’ve disabled Nvidia ShadowPlay, restart your computer and check if your DisplayLink monitor now works.

Option 5 – Reinstall the Universal Serial Bus controller

You can also reinstall the Universal Serial Bus controller to fix DisplayLink since a malfunctioning USB port can sometimes cause issues with DisplayLink.
  • Tap the Win + R keys to open the Run dialog box.
  • Then type “msc” in the field and hit Enter to open the Device Manager.
  • From there, look for the Universal Serial Bus controllers and expand its drop-down menu.
  • Next, right-click on every Host Controller and then click on Uninstall Device.
  • After uninstalling every entry, restart your computer to force your system to reinstall the drivers you’ve just uninstalled.
  • Once your computer has rebooted, wait until the drivers are reinstalled and then try opening DisplayLink again.

Option 5 – Reinstall the Universal Serial Bus controller

You can also try to perform a System Restore as it can also help you fix DisplayLink. You can do this option either by booting into Safe Mode or in System Restore. If you are already in the Advanced Startup Options, just directly select System Restore and proceed with the next steps. And if you have just booted your PC into Safe Mode, refer to the steps below.
  • Tap the Win + R keys to open the Run dialog box.
  • After that, type in “sysdm.cpl” in the field and tap Enter.
  • Next, go to the System Protection tab then click the System Restore button. This will open a new window where you have to select your preferred System Restore point.
  • After that, follow the on-screen instructions to finish the process and then restart your computer and check if the problem is fixed or not.
Read More
Four Proven Methods to Fix The Rundll Error

How to Fix Rundll Error

Rundll Error - What is it?

Rundll Error, DLL is also known as Dynamic Link Library is a Window library that basically consists of instructions and codes used and shared by multiple programs installed on your system. It helps programs load and run smoothly. Rundll error is generated when the system fails to access DLL files thereby hampering your ability to successfully run your desired program.

Solution

Restoro box imageError Causes

The rundll error code is triggered due to multiple reasons such as:
  • DLL file affected by virus and malware
  • Poor program installation
  • Invalid Windows registry entries
It is advisable to fix the run.dll error immediately without any delay because this error exposes your PC to serious threats such as system crash, freeze, failure, data loss, and even privacy threats like cybercrime, data breaches, and identity thefts.

Further Information and Manual Repair

To resolve the rundll error on your system, here are some solutions that you can try:

Solution 1: Reboot your System

Sometimes rebooting your system can also resolve the issue. However, if it doesn’t then you need to try some other solution to fix it.

Solution 2: Identify the Program Triggering the Error

To fix rundll error, the first thing that you need to do is to identify the program generating this error and check it for validity. For this, simply analyze the rundll error dialog box. Let’s say you get the following run.dll error on your system Error loading
C:\WINDOWS\system32\usvdgpo.dll.
This error message indicates that the program ‘usvdgpo’ is causing the run.dll error on the system. Once the program is identified, the next step is to stop it manually. For this, you go to the start menu and click run, now type ‘services.msc’ in the dialog box, and press ‘Enter’. After that right-click the related process to your rundll error and then click the ‘Stop’ button to stop the program. Now close the window. Though this action will stop the process it will not remove the reference to the bogus items. To remove that you will have to remove the program from the Windows Registry. This can be done by typing ‘Regedit’ in the Run dialog box. This will open the registry editor. From the keys listed in the left panel, navigate to the following key: HKEY_LOCAL_MACHINE/Software/Microsoft/Windows/CurrentVersion/Run. Now right-click on this key and click delete and then simply close the windows registry and reboot your system. After this, you will then have to uninstall the program to completely eradicate the rundll error. To do this, go to the control panel, Add/remove programs, and right-click to uninstall the program causing the run.dll error on your system. Click yes to confirm your decision. Once the program is uninstalled, reinstall the program using the program CD to get yourself an error-free program. This procedure is tricky, time-consuming, and maybe slightly challenging for you especially if you are not a computer programmer.

Solution 3: Run an Antivirus

If the cause of the run.dll error is a malware attack then you need to download an antivirus and run it on your system. However, this may impact the speed of your PC. Antivirus is notorious for slowing down PC speed.

Solution 4: Download Restoro.

If you are not a computer programmer, then running Restoro is possibly the easiest way for you to resolve rundll errors on your system in seconds. Restoro is an innovative, cutting edge, and multi-functional feature-filled PC repair tool that can be used to repair all kinds of system-related errors including rundll errors. The registry cleaner utility cleans up the RAM by removing unnecessary and obsolete files like junk files, invalid registry entries, and files from the uninstalled programs. It resolves disk fragmentation issues, repairs dll files, and the registry. In just a few clicks you can easily repair the registry and remove malware thereby resolving rundll errors on your system. Operating Total System Care is quite simple. It has a user-friendly interface and easy navigation. It is safe, efficient, bug-free, and compatible with all Windows versions Click here to download Restoro and resolve ‘rundll errors’ and access/run programs on your system smoothly.
Read More
Fix Unknown USB Device error message
USB devices are one of the commonly used devices every day – from plugging mobile devices for charging using pen drives, you are making use of USB drives. However, there are times when you might encounter an error message saying, “Unknown USB Device” as you plug your USB device on your Windows 10 computer. So if you encounter this kind of error message followed by either of the following explanations, read on as this post will give you a couple of suggestions you can check out to resolve the issue.
  • Device Descriptor Request Failed
  • Port reset failed
  • The device failed enumeration
  • Set address failed
  • Error code 43
You can fix this error using several ways. You can try changing the Power Options, update or roll back the USB drivers, turn off Fast Startup, or run the USB troubleshooter. Follow the options given below for more details.

Option 1 – Try to change the Power Options

  • Tap the Win + R keys to open the Run utility.
  • Then type “powercfg.cpl” and tap Enter to open the Power Options window.
  • Next, go to your selected power plan and click the “Change plan settings” option to open a new page.
  • From there, click on the “Change advanced power settings” option. This will open a new window where you can see various power consumption options.
  • Now look for the USB Settings option and expand it.
  • Then set the USB selective suspend setting to “Disabled” for both scenarios: On Battery and Plugged in.
  • After that, click on OK and restart your computer to apply the changes made.

Option 2 – Update or reinstall the Universal Serial Bus Controller driver

Since it could be a driver issue, you can try to update or reinstall the Universal Serial Bus Controller drivers using the Device Manager. Refer to the following steps:
  • First, click the Start button and type “device manager”.
  • Then click on the “Device Manager” from the search results to open it.
  • From there, look for the “Universal Serial Bus controllers” option and then right-click on each one of the USB drivers and select the Update Driver from the menu.
Note: If it is a regular USB drive, then it will be listed as a USB Mass Storage Device but if you have a USB 3.0 device, then look for a USB 3.0 Extensible Host Controller.
  • Restart your PC and then click the “Search automatically for updated driver software” option.
Note: If updating the USB Controller drivers didn’t work, you can try to reinstall them instead.

Option 3 – Try turning off Fast Startup

  • Tap the Win + R keys to open the Run dialog box and type in “control” to open the Control Panel.
  • Next, click on the Hardware and Sound section and click on Power Options.
  • Afterwards, select the “Choose what the power buttons do” option from the left side menu pane.
  • Now click on Change settings that are currently unavailable and uncheck the entry that says, “Turn on fast startup (Recommended).
  • Then click on Save Changes and restart your computer and see if it has fixed the problem or not.

Option 4 – Run the Hardware and Devices Troubleshooters

  • The first thing you need to do is click on Start and then on the gear-like icon to pull up the window for Settings.
  • After opening Settings, look for the Update and Security option and select it.
  • From there, go to the Troubleshoot option located on the left-hand side of the list.
  • Next, select Hardware and Devices from the list and open the Troubleshooter and run it. Once it is doing its job, wait for it to complete the process and then restart the system.
  • After the system restarts, check if the problem’s now fixed. If not, refer to the next option given below.
Read More
How to Fix CPU Not Compatible Error Message On Windows 10

CPU Not Compatible – What Is It

Some users wanting to upgrade to Windows 10 from Windows 7 or Windows 8.1 experienced errors with installation. One of these errors is CPU Not Compatible. When you click and run the “Get Windows 10” from your system tray bar, you’ll receive the “CPU is not compatible with Windows 10” error. When this happens, it might be good to check if there’s a bug or if your NX feature (a requirement for the Windows 10 installation) is enabled.

Solution

Restoro box imageError Causes

The “CPU is not compatible with Windows 10” error normally occurs when:

  • NX feature is not enabled
  • You experienced the Windows 10 bug

Further Information and Manual Repair

To successfully upgrade to Windows 10, your CPU must support Physical Address Extension (PAE), SSE2, and NX features. If any of these features are not activated on your system, it’ll cause the CPU not compatible error. However, some users still reported experiencing this error even though their CPU has these features activated. Normally, this is due to the bug that Windows acknowledged.

If any of these two scenarios apply to your computer, the following methods will help you fix the problem:

Method 1 – Check for bugs

The bug applies to some Windows 7 and Windows 8.1 systems. The bug occurs when the “Get Windows 10” app fails to recognize CPUs as being compatible. This produces a false negative result with a message, “Here’s why Windows 10 cannot be installed on this PC: The CPU isn’t supported”. To fix this bug, Microsoft released an update.

Unfortunately, the patch update (KB2976978 for Windows 8/8.1 and KB2952664 for Windows 7 SP1) to fix the bug may not be automatically downloaded to your computer. If this is the case, you need to verify first if the patch was installed correctly. To do this, follow the steps below:

  1. Click ‘Start’ and type in View Installed Updates. The “View installed updates” icon should appear. Click the icon.
  1. Go to the Search bar (Top right portion) then type the patch name for your system. Make sure that you type the correct patch name for your system since Windows 7 and Windows 8/8.1 have different names. If you find the patch, it means it’s already installed. You can now upgrade to Windows 10 without the CPU not-compatible error.
  1. But, if you can’t find it you need to install the patch manually.
  1. Go to Windows Update then click the “Check for Updates” button.
  1. Browse through the available updates and look for KB2976978 for Windows 8/8.1 or KB2952664 for Windows 7 SP1
  1. Download the right patch. You may need to reboot your system once it’s done.
  1. The downloaded patch should be applied after a day or two with the Windows Task Scheduler. Once the patch is applied, you can now upgrade to Windows 10.

Method 2 – Check CPU features and activate them if needed

A major requirement for Windows 10 upgrade is for the CPU to have Physical Address Extension (PAE), SSE2, and NX features enabled on your system. If you receive the CPU not compatible error, one possible cause is that any of the mentioned features are not available OR not enabled on your system. Here’s how you can fix this:

  1. Verify if your CPU supports the three instruction sets. You can use software that provides information like this. If all three are available, proceed to the next step.
  1. Go to your computer’s BIOS. To do this, reboot your computer. You will need to press a key specific to your computer’s manufacturer (usually it’s F12, F8, F2, or DEL).
  1. Look for the NX (No Execute Bit) settings. This is normally found in the “Advanced Configuration” menu, or something similar to this. Just take note that the NX setting can be named differently in BIOS. Some other names include EDB (Execute Disabled Bit), EVP (Enhanced Virus Protection), Execute Disabled Memory Protection or No Excuse Memory Protect.
  1. Once you’re in the NX settings, make sure that it’s enabled.
  1. Exit the BIOS and SAVE your changes.
  1. Boot your computer normally, then try upgrading to Windows 10 again through the “Get Windows 10” app found in the system tray.

Method 3 – Force enabling NX Bit

If changing the settings in your BIOS doesn’t do the trick, your final option is to force enable the NX bit in your Windows system. However, this is only applicable IF and ONLY IF your CPU does support it. To force enable NX bit, do the following:

  1. Click Start and go to command prompt (Type “cmd” – no quotes) and press enter.
  1. Copy and paste the text below to the command prompt.bcdedit.exe /set {current} nx AlwaysOn
  1. Execute the command. You will need to reboot your computer once this is done.
  1. Download and install Windows 10

Method 4 – Use a trusted automated tool

If you still experience the error after doing the methods above, you might want to try a powerful and trusted automated tool to fix the job.
Read More
1 2 3 162
Logo
Copyright © 2022, ErrorTools. All Rights Reserved
Trademarks: Microsoft Windows logos are registered trademarks of Microsoft. Disclaimer: ErrorTools.com is not affiliated with Microsoft, nor claim direct affiliation.
The information on this page is provided for information purposes only.
DMCA.com Protection Status