Connecting a Wireless Printer to a Windows PC

Although it’s easy to set up wired printers in most cases and they have their charm, you don’t have to be around the printer if you are connected to the same network. So in this post, you will be guided on how you can install and set up a wireless printer on your Windows 10 computer.

The idea here is to ensure that your Wi-Fi printer and your Windows 10 computer are connected on the same network and to do that, you need to carry out the following steps:

  • You have to connect the printer to the Wi-Fi network.
  • You have to add the printer or scanner to Windows 10.
  • You have to install the printer software.
  • You have to change the default printer.
  • And troubleshoot the printer.

For more details, follow the instructions below.

Step 1: Connect your printer to the Wi-Fi network.

In this step, you need to turn on your printer and look for the option to connect to a Wi-Fi network. Note that the step to connect to the Wi-Fi network depends on what kind of printer you use as well as its OEM since there will be a user interface or a Wi-Fi button that will get the job done for you. Once your printer is connected to the Wi-Fi network, you need to keep it turned on until the setup is completed.

Step 2: Next, add a printer or scanner to Windows 10

  • Since you’re already connected to the Wi-Fi network, you now have to go to Settings > Devices > Printers & scanners.
  • From there, click on the Add a printer or scanner option.
  • After that, the scanning process will begin as Windows 10 looks for the printer and once it finds it, it will display the printer in the result.
  • Choose the Wi-Fi printer from the results and click on the Add device option. Once you click this option, Windows will install the drivers via Windows 10 update. Note that this process will apply to all the printers – connected, wireless, and so on.

Step 3: You have to install a printer software

In this step, you need to use the driver software from the OEM even though the default printer software works since in most cases, the driver software from OEM works better compared to the default ones and offers much better functionality like ink-saving modes, and many more.

Step 4: You now have to change the default printer

After installing the printer software, you now have to set or change the default printer in your computer. If you have not installed any printer, the default printer in Windows is the one that saves the files. Now since you have already installed your printer, all that’s left for you to do is to change the default printer of Windows 10 to the one you installed earlier. To do that, follow these sub-steps:

  • Go to Settings and navigate to Devices > Printers & scanners.
  • From there, check the checkbox labeled, “Let Windows manage my default printer” if there are many printers. This will recommend you to use the most used printer. But if you don’t want to switch to the most used printer, then uncheck the checkbox.
  • Once done, click on the printer you want to set as the default one and go to Manage, and then click on the Set as default button.

Step 5: If you have any issues with your newly installed printer, then you need to troubleshoot it

One of the first basic troubleshooting you can perform to resolve the printer issue is running the Printer Troubleshooter. This built-in troubleshooter can detect and automatically fix the problem for you. To use it, follow these steps:

  • Tap the Win + R keys to open the Run dialog box.
  • Next, type “exe /id PrinterDiagnostic” in the field and click OK or hit Enter to open the Printer Troubleshooter.
  • Then click the Next button and follow the next on-screen instructions to fix the issue with the printer.
If you like to learn and find out more about various Windows errors, and how to repair them go to our vast archive or use search to find articles that will explain and help you in solving your issue.
However, if you prefer to do things fast and with automatization then we are proposing to use an automated solution for your issues. The application that we are recommending is Advanced System Repair Pro
Advanced System Repair utilizes multiple tools all in one to give you a quick, simple, reliable, and very thorough diagnosis of your PC. It brings you all the tools you need in one program to clean, fix, protect, optimize and boost your PC!
1-Click Maintenance
All the tools to make it simple and easy! It's like having a professional technician at the click of a mouse.

Junk Cleaner
Keeping your computer free from unnecessary clutter also helps make your computer last longer. Like any other machine, if you keep it clean and take care of it, it will serve you better for longer!

Optimize background apps
Optimize applications background activity with the built-in Application Optimizer feature.

Disk Defrag
With a simple 1-click, Advanced System Repair speeds up your PC by assembling fragmented files on your machine and organizing them more efficiently.

Malware Removal
Finds and removes all types of harmful malware including trojans, worms, bots, adware, spyware, PUPs, and more!

Privacy Cleaner
The all-in-one privacy suite to Clean Your Tracks & Protect Your Privacy! Make your computer safe, secure, and more efficient!

System Tweak/Optimizer
ASR will analyze your complete system and settings to adjust your PC to function at its maximum performance.

Registry Cleaner
Over time, as you install and uninstall applications, the registry can become cluttered with old entries and broken settings which can result in program crashes, and annoying messages and slow the computer down.
Visit our Advanced System Repair Pro Download page to inform yourself about all the benefits of this software and get a free trial copy of it.
advanced system repair pro

Advanced System Repair Pro

One-click automated PC repair solution
ASR logo
With Advanced System Repair Pro you can easily
Replace damaged files
Restore performance
Free disk space
Remove Malware
Protects WEB browser
Remove Viruses
Stop PC freezing
DOWNLOAD
Privacy Policy | Terms of Use | Uinstall
Advanced System Repair Pro is compatible with all versions of Microsoft Windows including Windows 11

Share this article:

You might also like

See if your Data is safe in Facebook breach
It is no secret that a few days ago Facebook has been breach and tons of user accounts have been compromised. These kinds of things are very unpleasant experiences for both users and the company itself. User trust lowers significantly in the company and it can greatly increase the chances of users migrating to another platform. This just shows how much a hacker or security breach can produce damage to the business. Sadly we can not offer you guidance or assistance in recovering your stolen data nor can we provide you with removing your data from the hands of the attacker. What we can do is to provide you with information has your data been stolen. Threat actor released the personal information for 533,313,128 Facebook users on a hacking forum, including mobile numbers, name, gender, location, relationship status, occupation, date of birth, and email addresses. This data was originally sold in private sales after being collected in 2019 using a bug in the 'Add Friend' feature on Facebook. Facebook had closed this vulnerability soon after it was discovered, but threat actors continued to circulate the data until it was finally released practically for free. Since then, Troy Hunt has added the leaked data to his Have I Been Pwned data breach notification service to help users determine if a Facebook member's data was exposed in the leak. Go to the site and enter your email address to check and see if your data has been compromised.
Read More
Guide for Removing SysPlayer from Windows

SysPlayer is a potentially unwanted ad-supported media application from Goobzo.com. It can display targeted ads, hijack browser search results, and can display pop-up ads. This player gathers information about your visited websites, the number of clicks on each website, and cookie information containing sensitive data, that it occasionally sends back to the server.

Multiple Anti-virus programs detect SysPlayer as malicious or potentially unwanted as of the time of publication of this video. It has been associated in bundles with iWebar, which is also flagged by many AVs.

From the publisher:

SysPlayer is an extremely lightweight free Media Player with built-in codecs, which supports the most popular video and audio formats, as well as DVD, audio CD, Webcams, and other devices. It lets you play your video files, and watch images.

About Potentially Unwanted Applications

People have experienced it – you download and install a piece of free software, next you see some unwanted programs on your computer system, find a strange toolbar on your web browser, or find your default search engine has been changed. You did not set them up, so how did they appear? A Potentially Unwanted Program, also known as PUP, in short, is actually software that contains adware, installs toolbars, or has other hidden goals. These types of programs are almost always bundled up with free software which you download via the internet or may also be bundled inside the custom installers of many download sites. Despite being considered very destructive, PUPs aren’t necessarily computer viruses or malware The main reason for this is the fact that the majority of PUPs get into users’ PC’s not because they exploit security weaknesses, for example, but because the users give consent to download and install it – unknowingly in general. On the other hand, there is no doubt that PUPs are still bad news for PC users as they can be incredibly dangerous to the computer in many ways.

What do PUPs do on your computer, really?

Unwanted programs can be found in many forms. More often, they can be found in adware bundlers which are known to use aggressive and misleading advertising. The majority of bundlers install many adware applications from several companies, each of which possesses its own EULA policy. Total System Care entirely eliminates this threat and protects your computer against unwanted programs or malware infection. PUPs that come as browser add-ons and toolbars are readily recognizable. They’ll modify web browser settings, change default search provider, substitute the default home page with their very own websites, decelerate internet speed, and can ruin your system also. They may look innocent but PUPs are usually spyware. They could include things like information gathering code which could gather and send your private information to organizations. Even if the PUPs really aren’t inherently malicious, these programs still do practically nothing good on your computer – they’ll take valuable system resources, slow down your computer, weaken your computer security, and make your system more vulnerable to trojans.

Protect yourself from PUPs

• Read the terms and conditions so that the end-user license agreement (EULA) you’re accepting is only for the program you actually intend to download. • Pick the “custom” install whenever installing a software program. Particularly, pay attention to those tiny boxes that have been checked by default, where you might ‘agree’ to receive advertising or install software bundlers. • Have a top-notch anti-virus program like Total System Care which will protect your personal machine from PUPs. Once you install this software, protection from viruses and PUPs is already switched on. • Avoid installing a freeware program you will not use. Prior to adding a toolbar or browser extension, think of whether it is really needed. • Always download programs from the original website. The majority of PUPs find their way to your computer system is through download portals, so stay away from it entirely.

What To Do If You Cannot Install Any Anti-virus?

Practically all malware is bad, but certain kinds of malicious software do a lot more damage to your computer or laptop than others. Some malware variants modify web browser settings by including a proxy server or modify the PC’s DNS configuration settings. In these instances, you’ll be unable to visit certain or all of the sites, and therefore not able to download or install the necessary security software to eliminate the malware. If you are reading this article, you probably have got affected by malware that stops you from installing security software such as Safebytes Anti-Malware. Even though this sort of issue will be harder to get around, there are some steps you can take.

Eliminate viruses in Safe Mode

The Windows operating system includes a special mode known as “Safe Mode” in which just the bare minimum required applications and services are loaded. If the malware is obstructing access to the internet and affecting your computer, launching it in Safe Mode allows you to download anti-virus and run a diagnostic scan while limiting possible damage. In order to enter into Safe Mode or Safe Mode with Networking, press F8 while the computer is starting up or run MSCONFIG and look for the “Safe Boot” options in the “Boot” tab. Once you restart into Safe Mode with Networking, you could download, install, and update the anti-malware program from there. At this point, you are able to run the antivirus scan to get rid of computer viruses and malware without hindrance from another application.

Use an alternate web browser to download an anti-malware program

Some malware only targets certain internet browsers. If this is your case, employ another web browser as it can circumvent the computer virus. If you’re not able to download the anti-virus application using Internet Explorer, this means the virus may be targeting IE’s vulnerabilities. Here, you should switch over to a different internet browser like Firefox or Chrome to download the Safebytes Anti-malware program.

Create a portable USB antivirus for removing malware

Another option would be to make a portable antivirus program on your USB thumb drive. Follow these steps to employ a USB drive to clean your corrupted system. 1) On a virus-free PC, download and install Safebytes Anti-Malware. 2) Plug the USB drive into the uninfected computer. 3) Double-click on the downloaded file to open the installation wizard. 4) Pick thumb drive as the location when the wizard asks you exactly where you would like to install the software. Follow the activation instructions. 5) Transfer the USB drive from the uninfected PC to the infected computer. 6) Double-click the EXE file to run the Safebytes tool right from the thumb drive. 7) Click the “Scan” button to run a full computer scan and remove malware automatically.

SafeBytes Anti-Malware: Light-weight Malware Protection for Windows Computer

If you’re looking to buy anti-malware for your computer system, there are many brands and applications for you to consider. A few of them do a good job in eliminating threats while many will harm your computer themselves. It is important to opt for a company that creates industry-best antimalware and has achieved a reputation as reliable. When considering trustworthy applications, Safebytes AntiMalware is certainly the highly recommended one. SafeBytes can be described as a powerful, real-time antivirus application that is created to assist the everyday computer end user in safeguarding their PC from malicious threats. Once you have installed this software program, SafeBytes superior protection system will make sure that absolutely no viruses or malicious software can seep through your PC. SafeBytes anti-malware takes computer protection to a whole new level with its advanced features. The following are some of the great features included in the product. World-class AntiMalware Protection: This deep-cleaning antimalware program goes much deeper than most anti-virus tools to clean out your personal computer. Its critically acclaimed virus engine finds and disables hard-to-remove malware that hides deep within your computer. Active Protection: SafeBytes gives real-time active supervision and protection from all of known viruses and malware. They’re extremely effective in screening and getting rid of numerous threats because they’re regularly improved with new updates and alerts. Quick Multi-threaded Scanning: Safebytes Anti-Malware, with its advanced scanning engine, provides extremely fast scanning which will quickly target any active online threat. Web Protection: SafeBytes checks and provides a unique safety ranking to every single site you visit and block access to web pages known to be phishing sites, thus safeguarding you from identity theft, or known to contain malware. Light-weight Utility: SafeBytes provides complete protection from online threats at a fraction of the CPU load due to its enhanced detection engine and algorithms. 24/7 Premium Support: Support service is accessible 24 x 7 x 365 days through chat and email to answer your concerns.

Technical Details and Manual Removal (Advanced Users)

If you wish to manually remove SysPlayer without the use of an automated tool, it may be possible to do so by removing the program from the Windows Add/Remove Programs menu, or in cases of browser extensions, going to the browsers AddOn/Extension manager and removing it. You will likely also want to reset your browser. To ensure the complete removal, manually check your hard drive and registry for all of the following and remove or reset the values accordingly. Please note that this is for advanced users only and may be difficult, with incorrect file removal causing additional PC errors. In addition, some malware is capable of replicating or preventing deletion. Doing this in Safe Mode is advised.

The following files, folders, and registry entries are created or modified by SysPlayer

Files: Search and Delete: SysPlayer.lnk Search and Delete: sysp.exe Search and Delete: AccDownload.dll Search and Delete: SysPlayer.lnk Search and Delete: SysPlayerMenu.dll Search and Delete: SysPlayerMenu64.dll Search and Delete: imageformatsqjpeg4.dll Search and Delete: libvlc.dll Search and Delete: libvlccore.dll Search and Delete: msvcp100.dll Search and Delete: msvcr100.dll Search and Delete: QtCore4.dll Search and Delete: QtGui4.dll Search and Delete: QtNetwork4.dll Search and Delete: QtSql4.dll Search and Delete: QtXml4.dll Search and Delete: sqldriversqsqlite4.dll Search and Delete: SysPlayer.exe Search and Delete: uninstall.exe Search and Delete: Updater.exe Search and Delete: SPMupdate1.job Search and Delete: SysPlayerUpd.job Registry: Key HKCUSoftwareTrolltechOrganizationDefaultsQt Plugin Cache 4.8.false Key HKCUSoftwareTrolltechOrganizationDefaultsQt Factory Cache 4.8 Key HKLMSOFTWARESysPlayer Key HKLMSOFTWAREMicrosoftWindowsCurrentVersionUninstallSysPlayer Key HKLMSOFTWAREClassesSysPlayerFile Key HKLMSOFTWAREClassesFoldershellexContextMenuHandlersSysPlayerMenuExt Key HKLMSOFTWAREClassesDirectoryshellexContextMenuHandlersSysPlayerMenuExt Key HKLMSOFTWAREClassesAppIDSysMenu.DLL Key HKLMSOFTWAREClasses*shellexContextMenuHandlersSysPlayerMenuExt
Read More
How to remove TotalRecipeSearch from your PC

TotalRecipeSearch is a browser extension for Google Chrome developed by Mindspark. This extension allows access to popular cooking websites. From the Author: Discover 1000s of tasty recipes – for FREE! Find creative, new meal ideas all in one convenient place!

When installed, this extension changes your default search engine and home page to MyWebSearch.com. While active it will monitor user activity, recording browsing data, visited websites and clicked links. This data is later used to display targeted ads throughout your browsing sessions.

While browsing the internet you will see additional unwanted ads, sponsored links, and even pop-up ads injected into your search results and websites. This extension has been marked as a Browser Hijacker by several anti-virus programs and it is targeted for removal.

About Browser Hijackers

Browser hijacking means a malicious code has taken power over and modified the settings of your web browser, without your consent. Practically most browser hijackers are made for advertising or marketing purposes. Typically, it will drive users to particular sites which are aiming to boost their ad income. Though it might appear naive, all browser hijackers are damaging and thus always classified as security risks. They not only mess up your web browsers, but browser hijackers could also modify the computer registry, making your computer susceptible to other malicious programs.

How to determine if your browser is hijacked

The typical signs that indicate having this malware on your computer are: 1. you see unauthorized changes to your web browser’s homepage 2. when you key in a URL, you find yourself regularly directed to some other web page than the one you meant 3. the default web browser settings have been changed and/or your default web engine is altered 4. you are finding browser toolbars you have never witnessed before 5. your web browser will display constant pop-up ads 6. websites load slowly and at times incomplete 7. you are blocked to access those sites of security solution providers.

How does a browser hijacker infect a computer?

Browser hijackers can enter a computer in some way or other, for example via downloads, file sharing, and email as well. They also come from add-on applications, also called browser helper objects (BHO), web browser plug-ins, or toolbars. Browser hijackers sneak into your computer in addition to free software downloads also that you unwittingly install alongside the original. Popular examples of browser hijackers include CoolWebSearch, Conduit, RocketTab, OneWebSearch, Coupon Server, Snap.do, Delta Search, and Searchult.com. The existence of any browser hijacker malware on your system might significantly diminish the browsing experience, monitor your internet activities that lead to critical privacy concerns, develop system stability problems and ultimately cause your PC to slow down or to an almost unusable condition.

How you can fix a browser hijack

Certain hijackers could be removed by simply uninstalling the corresponding free software or add-ons from the Add or Remove Programs in the Windows Control Panel. But, the majority of hijackers are very tenacious and need specialized tools to remove them. Novice PC users should not try for the manual form of removal, as it calls for comprehensive computer knowledge to carry out repairs on the computer registry and HOSTS file. Professionals always recommend users to get rid of any malware including browser hijacker by using an automatic removal tool, which is better, safer, and quicker than the manual removal technique. SafeBytes Anti-Malware discovers all types of hijackers – including TotalRecipeSearch – and eliminates every trace quickly and efficiently. Along with the anti-malware tool, a system optimizer, like SafeBytes’s Total System Care, will help you in deleting all linked files and modifications in the computer registry automatically.

Help! Malware Preventing Anti-Malware Installation And Access To The Internet

Malware could potentially cause plenty of damage to your PC. Certain malware variants alter browser settings by adding a proxy server or modify the PC’s DNS settings. In these instances, you will be unable to visit some or all of the internet sites, and thus unable to download or install the necessary security software to clear out the computer virus. So what you should do if malware prevents you from downloading or installing Safebytes Anti-Malware? Refer to the instructions below to get rid of malware through alternate methods.

Download the application in Safe Mode with Networking

In the event the malware is set to load at Windows start-up, then booting in Safe Mode should prevent it. Only minimal required applications and services are loaded when you start your PC into Safe Mode. To launch your Windows XP, Vista, or 7 PCs in Safe Mode with Networking, please do as instructed below. 1) At power-on/startup, hit the F8 key in 1-second intervals. This should bring up the Advanced Boot Options menu. 2) Use the arrow keys to choose Safe Mode with Networking and hit ENTER. 3) Once you get into this mode, you should have an internet connection again. Now, use your web browser normally and navigate to https://safebytes.com/products/anti-malware/ to download Safebytes Anti-Malware. 4) Following installation, do a full scan and allow the software program to remove the threats it detects.

Obtain the antivirus software in a different web browser

Web-based viruses could be environment-specific, targeting a particular browser or attacking particular versions of the web browser. The best way to overcome this problem is to choose a browser that is well known for its security features. Firefox comprises built-in Malware and Phishing Protection to keep you safe online.

Install and run anti-malware from your flash drive

To effectively get rid of the malware, you need to approach the issue of installing anti-virus software on the infected computer system from a different angle. Adopt these measures to employ a flash drive to fix your corrupted PC. 1) Use another virus-free computer system to download Safebytes Anti-Malware. 2) Plug the Flash drive into the clean computer. 3) Run the setup program by double-clicking the executable file of the downloaded application, with a .exe file format. 4) Select the flash drive as the location for saving the software file. Follow the directions to finish the installation process. 5) Transfer the thumb drive from the clean PC to the infected computer. 6) Double-click the EXE file to open the Safebytes software from the pen drive. 7) Click on “Scan Now” to run a scan on the affected computer for viruses.

Features and Benefits of SafeBytes Anti-Malware

If you are looking to download anti-malware software for your computer, there are various tools in the market to consider however, you cannot trust blindly anyone, regardless of whether it is a paid or free software. A few are good ones, some are decent, while some are simply just fake anti-malware programs that can damage your personal computer themselves! You need to be careful not to pick the wrong application, especially if you buy a paid software. When thinking about the highly regarded applications, Safebytes AntiMalware is certainly the highly recommended one. SafeBytes can be described as a highly effective, real-time anti-spyware application that is designed to assist everyday computer users in protecting their computers from malicious threats. This program can easily identify, remove, and protect your PC from the most advanced malware threats such as adware, spyware, trojan horses, ransomware, parasites, worms, PUPs, and other possibly damaging software programs.

SafeBytes anti-malware comes with a myriad of advanced features that sets it apart from all others. Listed below are some of the features you might like in SafeBytes Anti-Malware.

Real-time Threat Response: SafeBytes provides an entirely hands-free real-time protection and is set to check, prevent and destroy all computer threats at its very first encounter. They’re highly effective in screening and getting rid of different threats since they’re regularly improved with the latest updates and alerts. Anti-Malware Protection: Built on a highly acclaimed anti-virus engine, this malware removal application can detect and get rid of many stubborn malware threats like browser hijackers, potentially unwanted programs, and ransomware that other typical anti-virus software will miss. Fast Scan: This software program has one of the fastest and most effective virus scanning engines in the industry. The scans are highly accurate and take a little time to complete. Internet Security: SafeBytes inspects the hyperlinks present on a web page for possible threats and notifies you whether the site is safe to browse or not, through its unique safety rating system. Very Low CPU and RAM Usage: SafeBytes provides complete protection from online threats at a fraction of the CPU load because of its advanced detection engine and algorithms. Fantastic Technical Support: Skilled technicians are at your disposal 24/7! They will immediately fix any technical issues you may be experiencing with your security software. Put simply, SafeBytes has formulated a meaningful anti-malware solution that is aimed to protect your computer against various malware. Now you may realize that this software does more than just scan and eliminate threats from your computer. So when you want sophisticated forms of protection features & threat detections, buying SafeBytes Anti-Malware could be worth the dollars!

Technical Details and Manual Removal (Advanced Users)

To remove TotalRecipeSearch manually, navigate to the Add or Remove programs list in the Control Panel and choose the offending program you want to get rid of. For web browser plug-ins, go to your web browser’s Addon/Extension manager and choose the plug-in you want to remove or disable. It’s also advised to factory reset your web browser to its default condition to fix corrupt settings. If you opt to manually delete the system files and Windows registry entries, utilize the following checklist to ensure that you know exactly what files to remove before carrying out any actions. Please keep in mind that only experienced computer users should try to manually edit the system files simply because removing any single critical registry entry results in a major problem or even a system crash. Also, certain malware is capable of replicating itself or preventing deletion. Doing this malware-removal process in Safe Mode is suggested.
Files: %PROGRAMFILES%\TotalRecipeSearch_14\bar.bin\AppIntegrator.exe %PROGRAMFILES%\TotalRecipeSearch_14\bar.binSrcAs.dll %PROGRAMFILES%\TotalRecipeSearch_14\bar.binbar.dll %UserProfile%\Local Settings\Application Data\TotalRecipeSearch_14 %LOCALAPPDATA%\TotalRecipeSearch_14 %USERPROFILE%\Desktop\TotalRecipeSearch.exe %PROGRAMFILES%\TotalRecipeSearch_14\bar.binmedint.exe %PROGRAMFILES%\TotalRecipeSearch_14 %LOCALAPPDATA%\Google\Chrome\User Data\Default\cnbegpgknjllkedcnkfailmjbiahbfba %UserProfile%\Local Settings\Application Data\Google\Chrome\User Data\Default\cnbegpgknjllkedcnkfailmjbiahbfba %PROGRAMFILES%\TotalRecipeSearch_14\bar.binHighIn.exe %PROGRAMFILES%\TotalRecipeSearch_14\bar.binbarsvc.exe %PROGRAMFILES%\TotalRecipeSearch_14\bar.binbrmon.exe %USERPROFILE%\Local Settings\Application Data\TotalRecipeSearchTooltab %LOCALAPPDATA%\TotalRecipeSearchTooltab Registry: HKEY_CURRENT_USER\Software\AppDataLow\Software\TotalRecipeSearch_14 HKEY_CURRENT_USER\Software\TotalRecipeSearch_14 HKEY_LOCAL_MACHINE\SOFTWARE\Classes\TotalRecipeSearch_14.DynamicBarButton HKEY_LOCAL_MACHINE\SOFTWARE\Classes\TotalRecipeSearch_14.DynamicBarButton.1 HKEY_LOCAL_MACHINE\SOFTWARE\Classes\TotalRecipeSearch_14.FeedManager HKEY_LOCAL_MACHINE\SOFTWARE\Classes\TotalRecipeSearch_14.FeedManager.1 HKEY_LOCAL_MACHINE\SOFTWARE\Classes\TotalRecipeSearch_14.HTMLMenu HKEY_LOCAL_MACHINE\SOFTWARE\Classes\TotalRecipeSearch_14.MultipleButton HKEY_LOCAL_MACHINE\SOFTWARE\Classes\TotalRecipeSearch_14.MultipleButton.1 HKEY_LOCAL_MACHINE\SOFTWARE\Classes\TotalRecipeSearch_14.PseudoTransparentPlugin HKEY_LOCAL_MACHINE\SOFTWARE\Classes\TotalRecipeSearch_14.PseudoTransparentPlugin.1 HKEY_LOCAL_MACHINE\SOFTWARE\Classes\TotalRecipeSearch_14.Radio HKEY_LOCAL_MACHINE\SOFTWARE\Classes\TotalRecipeSearch_14.Radio.1 HKEY_LOCAL_MACHINE\SOFTWARE\Classes\TotalRecipeSearch_14.RadioSettings HKEY_LOCAL_MACHINE\SOFTWARE\Classes\TotalRecipeSearch_14.SettingsPlugin HKEY_LOCAL_MACHINE\SOFTWARE\Classes\TotalRecipeSearch_14.SettingsPlugin.1 HKEY_LOCAL_MACHINE\SOFTWARE\Classes\TotalRecipeSearch_14.SkinLauncher HKEY_LOCAL_MACHINE\SOFTWARE\Classes\TotalRecipeSearch_14.SkinLauncher.1 HKEY_LOCAL_MACHINE\SOFTWARE\Classes\TotalRecipeSearch_14.SkinLauncherSettings HKEY_LOCAL_MACHINE\SOFTWARE\Classes\TotalRecipeSearch_14.SkinLauncherSettings.1 HKEY_LOCAL_MACHINE\SOFTWARE\Classes\TotalRecipeSearch_14.ThirdPartyInstaller HKEY_LOCAL_MACHINE\SOFTWARE\Classes\TotalRecipeSearch_14.UrlAlertButton HKEY_LOCAL_MACHINE\SOFTWARE\Classes\TotalRecipeSearch_14.UrlAlertButton.1 HKEY_LOCAL_MACHINE\SOFTWARE\Classes\TotalRecipeSearch_14.XMLSessionPlugin HKEY_LOCAL_MACHINE\SOFTWARE\Wow6432Node\Microsoft\Internet Explorer\Low Rights\ElevationPolicy\03f3147c-cea6-4aae-b0ae-8d8abe7a8080 HKEY_LOCAL_MACHINE\SOFTWARE\Wow6432Node\Microsoft\Internet Explorer\Low Rights\ElevationPolicy\435e56d9-92df-4d38-bdff-fe316064953c HKEY_LOCAL_MACHINE\SOFTWARE\Wow6432Node\Microsoft\Internet Explorer\Low Rights\ElevationPolicy\4a80a60d-bdef-4d70-bccc-d0dad25ff951 HKEY_LOCAL_MACHINE\SOFTWARE\Wow6432Node\Microsoft\Internet Explorer\Low Rights\ElevationPolicy\8cab2773-5453-4778-90d9-6672805b41ca HKEY_LOCAL_MACHINE\SOFTWARE\Wow6432Node\Microsoft\Internet Explorer\Low Rights\ElevationPolicy\b723e5aa-0f63-47df-971c-ae8ea0f8393a HKEY_LOCAL_MACHINE\SOFTWARE\Wow6432Node\Microsoft\Internet Explorer\Toolbar, value: a0154e07-2b48-475c-a82a-80efd84ea33e HKEY_LOCAL_MACHINE\SOFTWARE\Wow6432Node\Microsoft\Windows\CurrentVersion\explorer\Browser Helper Objects\ab56dfde-0c14-45b3-9df6-7b0eba617870 HKEY_LOCAL_MACHINE\SOFTWARE\Wow6432Node\Microsoft\Windows\CurrentVersion\explorer\Browser Helper Objects\df22384f-cf68-4d19-969f-10423715528b HKEY_LOCAL_MACHINE\SOFTWARE\Wow6432Node\Microsoft\Windows\CurrentVersion\Ext\PreApproved\96b8a0ef-0d9d-4a92-b548-376db4bbb58b HKEY_LOCAL_MACHINE\SOFTWARE\Wow6432Node\Microsoft\Windows\CurrentVersion\Ext\PreApproved\A4503EC3-1111-4B62-8F46-0D88508F8A7B HKEY_LOCAL_MACHINE\SOFTWARE\Wow6432Node\Microsoft\Windows\CurrentVersion\Ext\PreApproved\b38fbaed-ded1-4ba6-ba2e-f2515fd49442 HKEY_LOCAL_MACHINE\SOFTWARE\Wow6432Node\Microsoft\Windows\CurrentVersion\Ext\PreApproved\e8106344-16d4-41d1-9a2a-0521a59199ea HKEY_LOCAL_MACHINE\SOFTWARE\Wow6432Node\Microsoft\Windows\CurrentVersion\Ext\PreApproved\fd79f359-e577-46db-aa74-d6e6b8b45ba8 HKEY_LOCAL_MACHINE\SOFTWARE\Wow6432Node\Microsoft\Windows\CurrentVersion\Run, value: TotalRecipeSearch Search Scope Monitor HKEY_LOCAL_MACHINE\SOFTWARE\Wow6432Node\Microsoft\Windows\CurrentVersion\Uninstall\TotalRecipeSearch_14bar Uninstall Firefox HKEY_LOCAL_MACHINE\SOFTWARE\Wow6432Node\MozillaPlugins\@TotalRecipeSearch_14.com/Plugin HKEY_LOCAL_MACHINE\SOFTWARE\Wow6432Node\TotalRecipeSearch_14 HKEY_LOCAL_MACHINE\SOFTWARE\Microsoft\Internet Explorer\Low Rights\ElevationPolicy\0384459a-9d5e-4ae1-b154-8eac39721c97 HKEY_LOCAL_MACHINE\SOFTWARE\Microsoft\Internet Explorer\Low Rights\ElevationPolicy\03f3147c-cea6-4aae-b0ae-8d8abe7a8080 HKEY_LOCAL_MACHINE\SOFTWARE\Microsoft\Internet Explorer\Low Rights\ElevationPolicy\435e56d9-92df-4d38-bdff-fe316064953c HKEY_LOCAL_MACHINE\SOFTWARE\Microsoft\Internet Explorer\Low Rights\ElevationPolicy\4a80a60d-bdef-4d70-bccc-d0dad25ff951 HKEY_LOCAL_MACHINE\SOFTWARE\Microsoft\Internet Explorer\Low Rights\ElevationPolicy\8cab2773-5453-4778-90d9-6672805b41ca HKEY_LOCAL_MACHINE\SOFTWARE\Microsoft\Internet Explorer\Low Rights\ElevationPolicy\b723e5aa-0f63-47df-971c-ae8ea0f8393a HKEY_LOCAL_MACHINE\SOFTWARE\Microsoft\Windows\CurrentVersion\explorer\Browser Helper Objects\df22384f-cf68-4d19-969f-10423715528b HKEY_LOCAL_MACHINE\SOFTWARE\Microsoft\Windows\CurrentVersion\Ext\PreApproved\2502086b-5a46-4d05-8d5b-a1e77ab8bb32 HKEY_LOCAL_MACHINE\SOFTWARE\Microsoft\Windows\CurrentVersion\Ext\PreApproved\76f3207c-3a0a-461b-b958-5653c5718243 HKEY_LOCAL_MACHINE\SOFTWARE\Microsoft\Windows\CurrentVersion\Ext\PreApproved\96b8a0ef-0d9d-4a92-b548-376db4bbb58b HKEY_LOCAL_MACHINE\SOFTWARE\Microsoft\Windows\CurrentVersion\Ext\PreApproved\A4503EC3-1111-4B62-8F46-0D88508F8A7B HKEY_LOCAL_MACHINE\SOFTWARE\Microsoft\Windows\CurrentVersion\Ext\PreApproved\b38fbaed-ded1-4ba6-ba2e-f2515fd49442 HKEY_LOCAL_MACHINE\SOFTWARE\Microsoft\Windows\CurrentVersion\Ext\PreApproved\e8106344-16d4-41d1-9a2a-0521a59199ea HKEY_LOCAL_MACHINE\SOFTWARE\Microsoft\Windows\CurrentVersion\Ext\PreApproved\fd79f359-e577-46db-aa74-d6e6b8b45ba8 HKEY_LOCAL_MACHINE\SOFTWARE\MozillaPlugins\@TotalRecipeSearch_14.com/Plugin HKEY_LOCAL_MACHINE\SYSTEM\CurrentControlSet\Services\TotalRecipeSearch_14Service HKEY_CURRENT_USER\Software\Microsoft\Internet Explorer\DOMStorage\totalrecipesearch.dl.myway.com HKEY_CURRENT_USER\Software\Microsoft\Internet Explorer\DOMStorage\totalrecipesearch.com
Read More
A Guide to Fixing Error 0x80070652 Windows 10

Error Code 0x80070652 – What is it?

Error code 0x80070652 occurs when Windows users attempt to upgrade their operating system while another program is in the process of being downloaded. It may also occur due to problems related to previously failed update attempts within Window Update. When this Windows 10 upgrade occurs, Windows users fail to access the version of Windows they are attempting to download. Instead, a message box occurs stating that error code 0x80070652 has occurred on the device. If this error message is not rectified, it could give birth to other Windows 10 errors such as error code 0x80072EE2.

Solution

Restoro box imageError Causes

Error code 0x80070652 may result from Windows 10 users attempting to download another program while upgrading their operating system. It may also be caused by an issue related to previous installations of updates. For instance, in some cases, your previous installation of the Windows process may have been interrupted or it was simply not completed properly. This causes any other upgrade process that follows to result in error code 0x80070652.

Further Information and Manual Repair

But what can be done in such a situation to resolve the error code? Windows users have several options available. For instance, they can wait on any additional program that may be in the process of downloading to complete the process before attempting to upgrade Windows. They may also troubleshoot problems related to any failed updates or select a system restore point in which the error code was not present.

The manual repair methods Windows 10 users choose may involve any of the solutions mentioned previously. The choice is largely dependent on the user and his determination to fix the error code. However, note that automated tools or Windows repair technicians may also provide solutions to PC issues like error code 0x80070652.

Method One: Verify and Troubleshoot Failed Upgrades

Since previously failed updates within Windows Update can lead to the occurrence of error code 0x80070652, Windows 10 users will need to verify which of these failed updates occurred by checking the history section of the Windows Update tool. Once you’ve been able to verify that failed updates have occurred in the recent past, you’ll need to troubleshoot these problems to rectify the error code. Follow the instructions below to check for updates that have failed to install properly via Windows Update.

  • Step one: Type Windows Update in the Search box near Start Menu
  • Step two: Select Windows Update settings
  • Step three: Select Update history
  • Step four: Review updates from the most recent to least recent to see which updates have failed
  • Step five: Click failed updates for more details and troubleshoot accordingly.

Once you’ve completed the troubleshooting of any updates which failed, proceed by rebooting your device. You may then reattempt to upgrade to the latest version of Windows 10 once no other program is in the process of being downloaded.

If the problem causing error code 0x80070652 was related to failed updates of the past, these issues will likely be resolved once you successfully troubleshoot them. However, if the error code reoccurs, apply the next manual repair solution mentioned in this article.

Method Two: Download Updates Manually via Microsoft Download Center

Another option available to users is simply downloading updates manually by visiting the official Microsoft website, specifically the Windows section which provides downloads. To successfully complete this process, ensure you look for stand-alone packages of these downloads available on the website. You will need to know the Microsoft Knowledge Base (KB) article number related to the specific update(s) which failed.

Once a Windows user has verified the KB article number of the specific update, download it from the Microsoft website, then select Run to install the update. Reboot your PC, then check Windows Update to see if you are able to successfully complete the Windows 10 upgrade.

If the upgrade fails, you may need to implement the next manual repair method as is mentioned below.

Method Three: Use Windows System Restore

One of the best options for Windows 10 users facing certain PC problems is to apply System Restore. This allows them to reset their machine for a period of time in which the problem was not present. This is known as the restore point. To apply this manual repair method, follow the steps below.

  • Step one: In the search box beside the Start Menu, type System Restore
  • Step two: Select Create a restore point
  • Step three: Select the System Protection tab then Configure or Create
  • Step four: Provide details regarding a system restore point of your choice
  • Step five: Select Create, then OK.

Method Four: Download an Automated Tool

If you wish to always have at your disposal a utility tool to fix these Windows 10 and other related issues when they do arise, download and install a powerful automated tool.

Read More
Fix The drive is not a valid backup location
USB storage devices are used to store small and even big files, depending on their sizes. Usually, the sizes of the USB vary from 2GB up to 16GB. And as time passes, they have advanced quite a bit and now it’s common to find USB sticks with a capacity of 32GB, 64GB, or even 128GB. And since they now have large capacities, USB storage devices are often used for storing backups of system data as well as creating an image. However, there are times when you might encounter an error message while trying to create a backup or image on your USB device. The error message states:
“The drive is not a valid backup location.”
One of the causes of this problem is that Windows was not able to recognize the USB drives as a valid backup location since USB storage devices weren’t previously large enough to store system images. To fix this error, here are some possible solutions that might help.

Option 1 – Try creating a sub-folder in the USB drive and backup all the images there

The first thing you can try to do is to create a sub-folder on your USB device. This is one good way you can bypass the USB drive limitation. How? Refer to the steps below.
  • First, right-click on the USB storage device and select Format.
  • Next, select NTFS as the File System and check the box next to Quick Format.
  • After that, click on Start to initiate the formatting process.
  • Once the formatting process is completed, open the USB drive and right-click anywhere inside its main drive window, and then select New > Folder.
  • Then name the folder to be created as “Image (or anything you please)”.
  • Afterward, right-click on the folder and select Properties.
  • From there, go to the Sharing tab and click on Share.
  • Now check if the Permission level on the System owner which should be your username is labeled as “Owner”.
  • Then try to back up your files again using your USB drive while keeping the sub-folder as the backup location.

Option 2 – Update the USB Controller Drivers

  • First, click the Start button and type “device manager”.
  • Then click on the “Device Manager” from the search results to open it.
  • From there, look for the “Universal Serial Bus controllers” option and then right-click on each one of the USB drivers and select the Update Driver from the menu.
  • Restart your PC and then click the “Search automatically for updated driver software” option.
You also have the option to update the motherboard and the USB driver from the manufacturer’s official website.

Option 3 – Run CHKDSK utility to check the drive for errors

When it comes to some issues concerning the hard drive or removable devices, there is a utility in Windows that might help which is called “chkdsk”. To use it, follow the steps below.
  • Tap the Win + S keys to open the Search box.
  • Then type “command prompt” in the field and from the search results that appear, right-click on Command Prompt and select “Run as administrator”.
  • After opening an elevated command prompt, copy and paste the following command and hit Enter:
CHKDSK [volume [[path] filename]] [/F] [/V] [/R] [/X] [/C] [: size]]
Note: In the command given above, “[/F]” will try to fix the system errors while “[/R]” will be the one to fix the bad sectors.
  • Now if you are prompted to run CHKDSK after your reboot your PC, just tap Y and reboot your PC.
  • If CHKDSK is not able to find any errors, tap the Win + E keys and navigate the access window. From there, right-click on the concerned drive and click on Properties.
  • After opening Properties, click on the tab Tools and then click on the “Check” button under the Error-checking section.
  • Wait until the process is completed and then restart your computer.
Read More
How to Fix ACPI_BIOS_ERROR in Windows 10
BSOD or Blue Screen of Death errors are one of the most common errors you can encounter on your Windows PC. One of these BSOD errors is the “ACPI_BIOS_ERROR”. If you suddenly get this error, it means that there is some problem in booting the operating system from your hard drive or Windows was not properly installed on your PC. In addition, this error could also mean that there is something wrong with the CMOS battery located in the motherboard. Unlike other BSOD errors, the workaround for this error is a bit different as these workarounds require a bit more expertise in updating the BIOS as well as setting the correct boot configuration. So if you only have a handful of knowledge about this level of troubleshooting, then you can seek a program named Restoro to fix the problem for you. However, if you know are capable enough in troubleshooting the problem, refer to the instructions laid out below to fix the BSOD “ACPI_BIOS_ERROR”.

Option 1 – Try to remove the SSD and update the BIOS

The first thing you have to do is to check the primary storage devices on your PC. If you have just installed a new hard drive or SSD recently on your computer, then it’s most likely the cause of the BSOD error. Moreover, you should also ensure that your BIOS is up-to-date to the latest available build.
  • Remove the SSD/HDD and inject a different HDD that was already preinstalled in your Windows PC.
  • After that, update the BIOS to the latest available build. After updating it, insert the old SSD/HDD and then try to boot your PC again. The problem should be fixed now. If not, refer to the next given option.

Option 2 – Try to check the CMOS battery and reset the CMOS module

As mentioned earlier, the CMOS battery might also be the one that’s causing the problem. It is a physical component of the motherboard and is a memory chip that contains all the settings configuration on your computer and is also powered by a battery. So if your battery loses power, the CMOS will be reset and as a result, all the configurations will be gone as well. It is also possible that the CMOS module is not properly working and every time things are saved, they are properly written due to the battery. That’s why you have to consider changing the CMOS battery and see if it fixes the problem. In addition, you also have to make sure that you completely reset the CMOS module and then try booting your PC again.

Option 3 – Try to check the BIOS settings

If the BIOS settings are incorrect, chances are that’s the reason why you’re getting the “ACPI_BIOS_ERROR” BSOD error. Every BIOS has different settings which you can make use of to enhance your computer experience. So make sure that your BIOS is up-to-date and that the settings are in accordance with your requirement. Another thing you can try is to disable the Legacy USB and the Legacy BIOS in the BIOS settings if you are trying to install a 64 bit Windows version. Make sure that you also enable AHCI before plugging in the installation drive on your PC. Moreover, ensure that your PC is using IDE or Integrated Drive Electronics mode instead of SATA or Serial Advanced Technology Attachment. Aside from that, try to check the extracted setup if it is in NTFS format, if it is, you should extract the ISO in FAT32 and use it to install Windows.

Option 4 – Try to reset the ACPI Compliant Control Method

ACPI or Advanced Configuration and Power Interface provide an open standard that operating systems can use to detect hardware, perform power management, as well as monitor the status of your device and provide information for other processes. Chances are, there are some misconfigurations with this module on your PC that lead to believing that there is no battery present. That’s why you need to reset it and see if it fixes the BSOD error or not.
  • Boot your PC into Safe Mode.
  • Tap the Win + R keys to open the Run dialog box.
  • Type in “devmgmt.msc” in the field and tap Enter to open the Device Manager.
  • After opening the Device Manager, go to the “Batteries” section and click it to expand it and then right-click on the “Microsoft ACPI-Complaint Control Method Battery” option and click on Uninstall.
  • After you disable the module, click on any empty space and then click the “Scan for hardware changes” option.
  • Then check if you can now boot your PC normally and without the BSOD error.
Read More
One or more Network Protocols are missing
Windows 10 users a set of rules or standards called Network Protocols in communicating over the internet. These protocols are the ones that made sure that the data is correctly sent between computers. However, if any of the Network Protocol is missing in your Windows 10 computer, then you will most likely encounter a problem like not being able to browse the internet, or share files. For this, you can try to run the Incoming Connections troubleshooter: As you were not able to connect to your internet connection using your PC, you can try to run the Incoming Connections troubleshooter as it might resolve the problem. Refer to the following steps to run this troubleshooter:
  • Tap the Win + I keys to open Settings.
  • After opening Settings, go to Update and Security.
  • Next, navigate to the Troubleshoot pane and select the Incoming Connections section and click the Run Troubleshooter button to get started.
  • Wait until the troubleshooter is finished doing its job and then try connecting to your network again.
If after running the Incoming Connections troubleshooter you receive an error message instead that says, “Network Protocol is missing”, then here are some suggestions you need to check out to fix it. Take note that you must have admin privileges before you start troubleshooting the problem.

Option 1 – Try to update or rollback or uninstall the Network drivers

You might also want to update, roll back, or disable your Network drivers to fix the “This operation failed as no adapter is in the state permissible for this operation” error.
  • Tap the Win + R keys to launch the Run window and then type in the “devmgmt.msc” command and hit Enter to open the Device Manager window.
  • Under the Device Manager, you will see a list of drivers. From there, look for the Network Adapters and expand it.
  • Then right-click on each one of the Network drivers and depending on your preference, you can either select “Update driver”, “Disable device” or “Uninstall device”.
  • After that, restart your PC and see if it helped in fixing the netio.sys Blue Screen error.

Option 2 – Try to reset Winsock, TCP/IP & Flush DNS

You might also want to try resetting Winsock, TCP/IP, and flushing DNS might help you resolve errors. To do so, follow these steps:
  • Right-click on the Start button and click on Command Prompt (administrator) so you can pull up an elevated Command Prompt.
  • After that, execute each one of the commands listed below. And after you typed in one after the other, you have to hit Enter.
  1. netsh winsock reset – type in this command to reset Winsock
  2. netsh int ip reset resettcpip.txt – type in this command to reset TCP/IP
  3. ipconfig /flushdns – type in this command to flush the DNS cache
  • Next, restart your PC and check if the problem’s fixed.

Option 3 – Diagnose the Network Adapter

To diagnose the Network Adapter, go to Control Panel > All Control Panel Items > Network Connections, and from there, look for the network adapter that could be causing the error. Note that if you are using a Wi-Fi connection, then it’s probably your Wi-Fi adapter, otherwise it has something to do with your Ethernet adapter. Just right-click on the problematic network adapter and select diagnose to troubleshoot.

Option 4 – Try to perform Network Reset

You can also try to perform a Network Reset to resolve the problem. This will reset the entire network configuration including your IP address. To perform Network Reset, follow these steps:
  • Tap the Win + I keys to open Settings.
  • From there, go to the Network and Internet section.
  • Next, scroll down and look for “Network Reset” under the status pane.
  • After that, click on Network Reset and then on Reset now to start resetting the network configuration. Once done, check if it is able to fix the error or not.

Option 5 – Try importing Winsock settings from another computer

If resetting Winsock or the Network didn’t fix the problem, then you can try to import settings from a computer that’s in good condition. You need to have access to the registry to get this done and then export and import a couple of settings. Refer to these steps to get started:
  • Tap the Win + R keys to open the Run dialog box and type “Regedit” in the field and hit Enter to open the Registry Editor.
  • After that, go to this registry path: HKEY_LOCAL_MACHINESYSTEMCurrentControlSetServices
  • Next, look for two registry keys named “Winsock” and “Winsock2” and then right-click on each one of them and select the Export option.
  • Now copy the registry keys to a USB drive and then copy the keys on the PC in excellent condition.
  • Then double click on each one of them and it will install the WINSOCK keys.
Read More
How to Fix the 0x800ccc92 Error Code
[vc_row][vc_column][vc_column_text]

Effective Error 0x800ccc92 Repair

0x800ccc92 - What is it?

The 0x800ccc92 is a Microsoft Outlook error. The error restricts your ability to send and receive emails on your Outlook email address successfully. This error is very similar to 0x800cc90 and 0x800ccc91 Outlook error codes. The 0x800ccc92 error message is often displayed as:

‘Receiving reported error (0x800ccc92): Your email server rejected your login.’

This error is quite common and is faced by many Microsoft Outlook users. It is advisable to fix this error immediately because besides restricting you from sending and receiving emails via Outlook, due to this error the data on your Outlook also becomes inaccessible and unreadable, and sometimes Outlook also begins to freeze unexpectedly.

Error Causes

Some of the most common causes of the error code 0x800ccc92 are:
  • PST files get corrupt
  • Incorrect Outlook configuration settings
  • PST file crosses its fixed file size limit
  • Failure of POP3 and Protocol STMP in database server connection
  • Improper synchronization between Outlook and the server
  • Usage of invalid password or username
  • Virus Infection

Further Information and Manual Repair

Any of the above causes may result in the 0x800ccc92 error message display. If you encounter this Outlook error, you don’t need to panic and call the network personnel in your office to fix and repair the error. In fact, it is very easy to fix and you can repair it by yourself: Here are some of the best and easy ways to resolve this error in the shortest time:
  • If the error message 0x0800ccc92 is displayed as POP3: Invalid Password, then in this case it is advisable to cross-check your Outlook account ID and password. Sometimes this error message may pop up if you insert an incorrect password or ID. Therefore the best way to resolve it to check where you went wrong and then re-enter your ID and Password correctly.
If the error is not related to POP3 (Post Office Protocol) then you can try some other alternative to resolve this issue.
  • Another alternative is to install the latest available Server Service Pack for Exchange. This solution works best if compatibility is the issue.
  • However, when nothing works, then it is advisable to download PST repair tool. The PST repair software is designed to scan, detect, repair, and resolve Outlook errors like 0x800ccc92.  The PST repair software is built with special algorithms that help repair PST corrupt files in seconds. This tool works on all Windows Operating Systems including Windows 8, Windows 7, Windows Vista, Windows XP, Windows 2003, and Windows 2008.
  1. All you need to do is, download and install this software on your system.
  2. Once you download it, run it on your PC to detect errors.
  3. Press scan to get started
  4. The scanning may take about a couple of minutes to complete.
  5. Once it is complete, click on the repair tab to fix the errors.
  6. Now restart your Outlook again and now try sending emails. This solution is likely to work if the above-mentioned solutions don’t.
Congratulations, you have just fixed the 0x800ccc92 Error Code in Windows 10 all by yourself. If you would like to read more helpful articles and tips about various software and hardware visit errortools.com daily. Now that’s how you fix the 0x800ccc92 Error Code in Windows 10 on a computer. On the other hand, if your computer is going through some system-related issues that have to get fixed, there is a one-click solution known as [product-name] you could check out to resolve them. This program is a useful tool that could repair corrupted registries and optimize your PC’s overall performance. Aside from that, it also cleans out your computer for any junk or corrupted files that help you eliminate any unwanted files from your system. This is basically a solution that’s within your grasp with just a click. It’s easy to use as it is user-friendly. For a complete set of instructions in downloading and using it, refer to the steps below Perform a full system scan using [product-code]. To do so, follow the instructions below.
      1. Download and install [product-code] from the official site.
      2. Once the installation process is completed, run [product-code] to perform a full system scan. restoro application screen
      3. After the scan is completed click the “Start Repair” button. restoro application screen
[/vc_column_text][/vc_column][/vc_row]
Read More
Fix Bad Image Error Status 0xc000012f
When you run a program in Windows 10, error 0xc000012f may pop up, mentioning that the files and binaries you’re trying to run are corrupted. Error 0xc000012f means Bad Image, denoting that the program’s executable or one of the supporting modules is corrupt. Or there is probably a DLL mismatch. This error usually manifests itself after a windows update or after installation of some application, in order to fix it follow the steps below:
  1. Perform SFC scan

    Press ⊞ WINDOWS + X to open the Windows menu keyboard with windows and x markedFrom the menu choose command prompt (admin) Windows menu command prompt adminIn command prompt type sfc /scannow and press ENTER Leave the computer for the operation to be completed and Reboot your computer
  2. Run DISM

    Press ⊞ WINDOWS + X to open the Windows menu keyboard with windows and x markedFrom the menu choose command prompt (admin) Windows menu command prompt adminin command prompt type: DISM.exe /Online /Cleanup-image /Restorehealth and press ENTER wait for the process to be finished and Reboot your computer
  3. Reinstall application

    If this error has been popping up after the application install remove the installed application and install it again. There is the possibility that the application installer has by accident corrupted some files, reinstalling it might fix the issue.
  4. Uninstall Windows update

    In some cases, Windows update can introduce this issue, go to Windows updates, into advanced options, and uninstall the latest update to see if this will fix the error.
  5. Install Visual C++ Redistributable

    Go to the official Microsoft website and download C++ redistributable package and install it
  6. Install new windows update

    If there is a new Windows update install, there is a chance that in the last update something went wrong and it is very likely that it was fixed in the last one.
Read More
Windows 11 new features and preview
Microsoft has presented its next version of their flagship product, Windows 11, and feelings are divided among users. Some users like it very much and eager to upgrade, some do not like the graphic overhaul it went through, but overall I think Microsoft has done a good job with it. Here in this article, we will discuss some of the new features which Windows brings to the table, well at least ones that were showed, I am sure there are plenty more which we will see once OS has been released.

New Start menu

Winodws 11 start menu
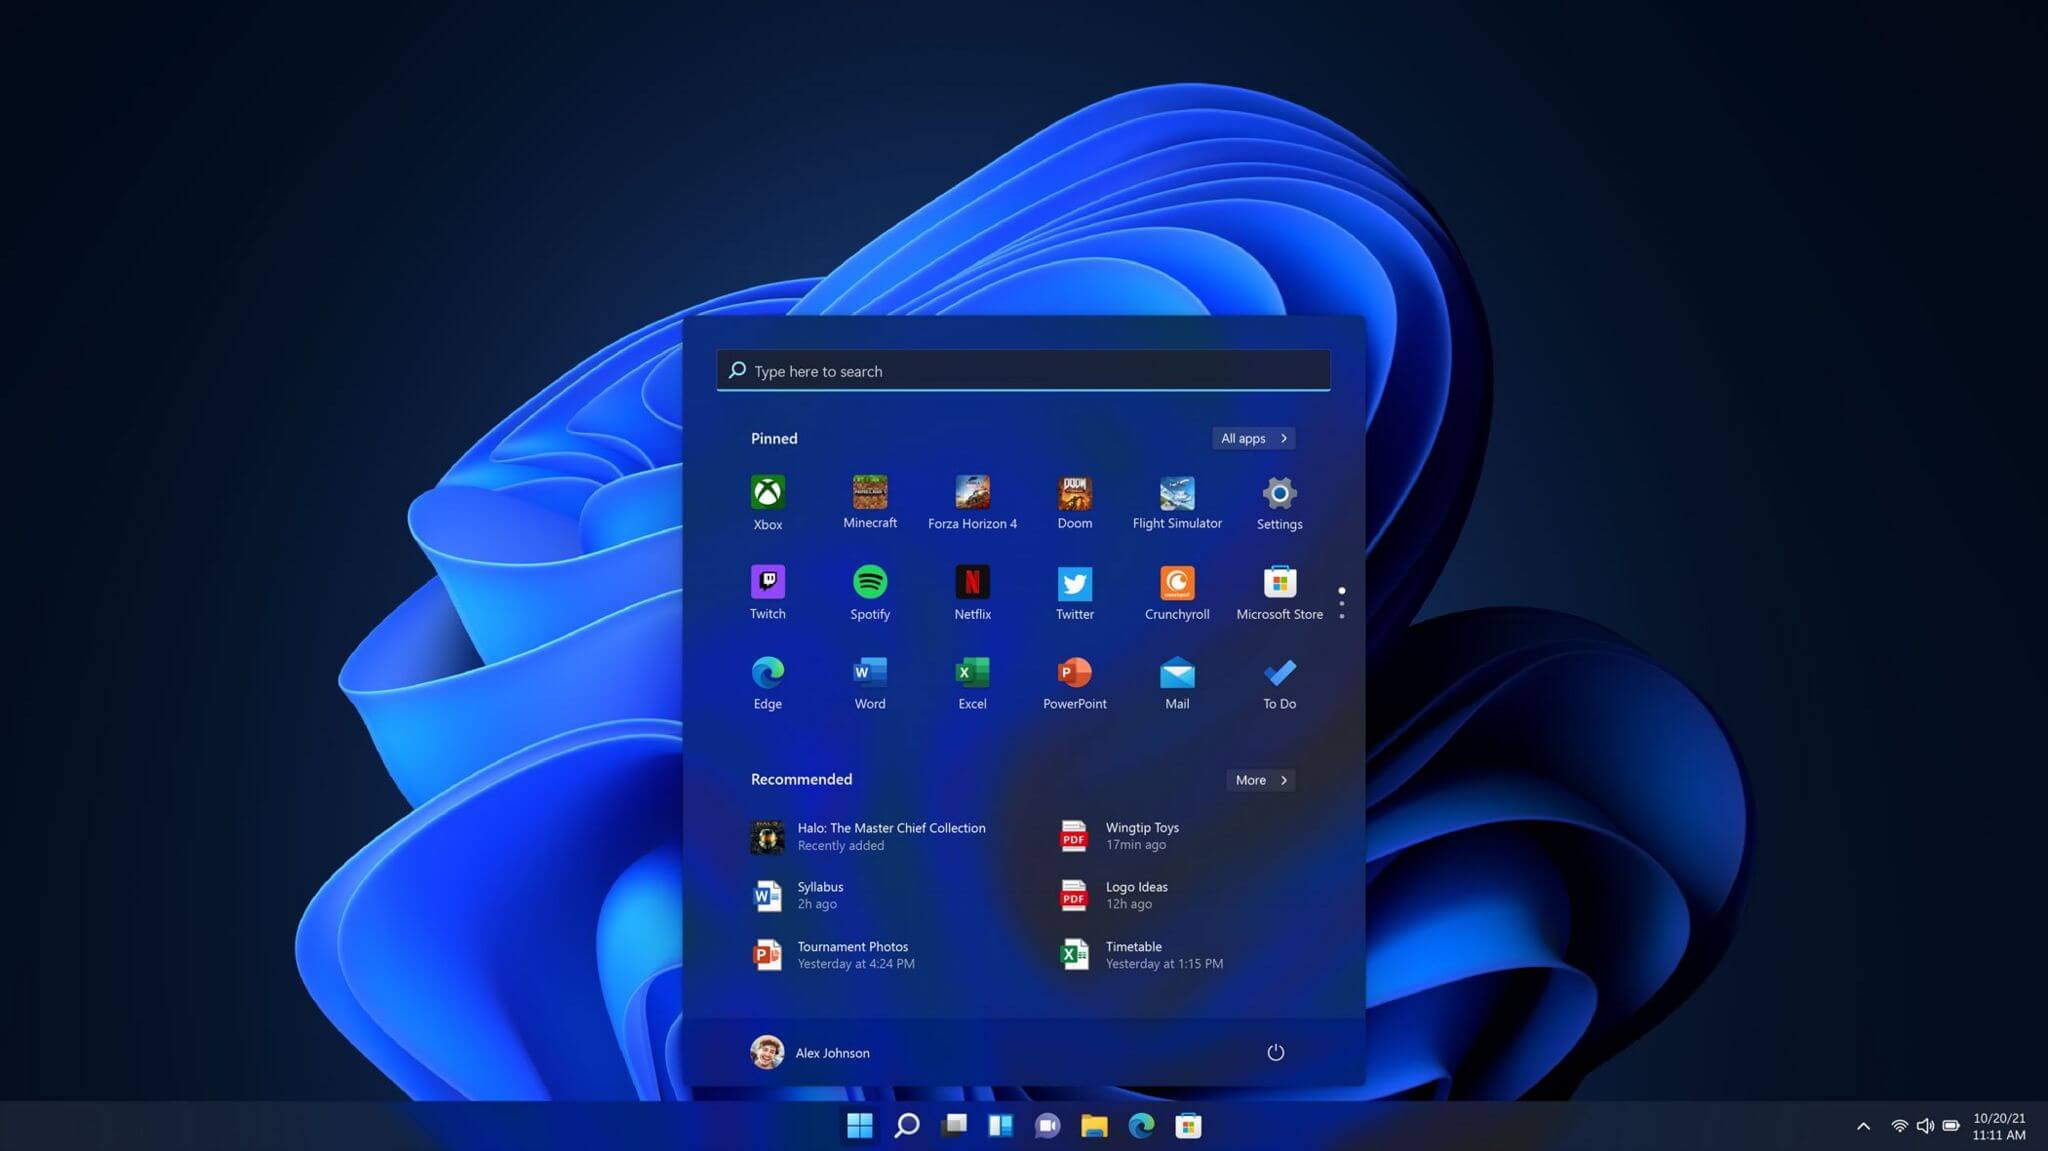
One of the first things that everyone saw when Microsoft has unveiled Windows 11 is its Start menu. Funny enough this is what has caused most of the divide among users, some find it interesting, and some do not like it. Truth is, it is different, and it is centered in the middle instead of the lower left part of the screen. It has been confirmed however that the Start menu can be moved to any part of the screen so if you want, you could place it on the lower left as it has always been. Live tiles do not longer exist in the Start menu, instead, we have styled simple icons.

Windows 11 Snap controls are great

Windows 11 snap controls
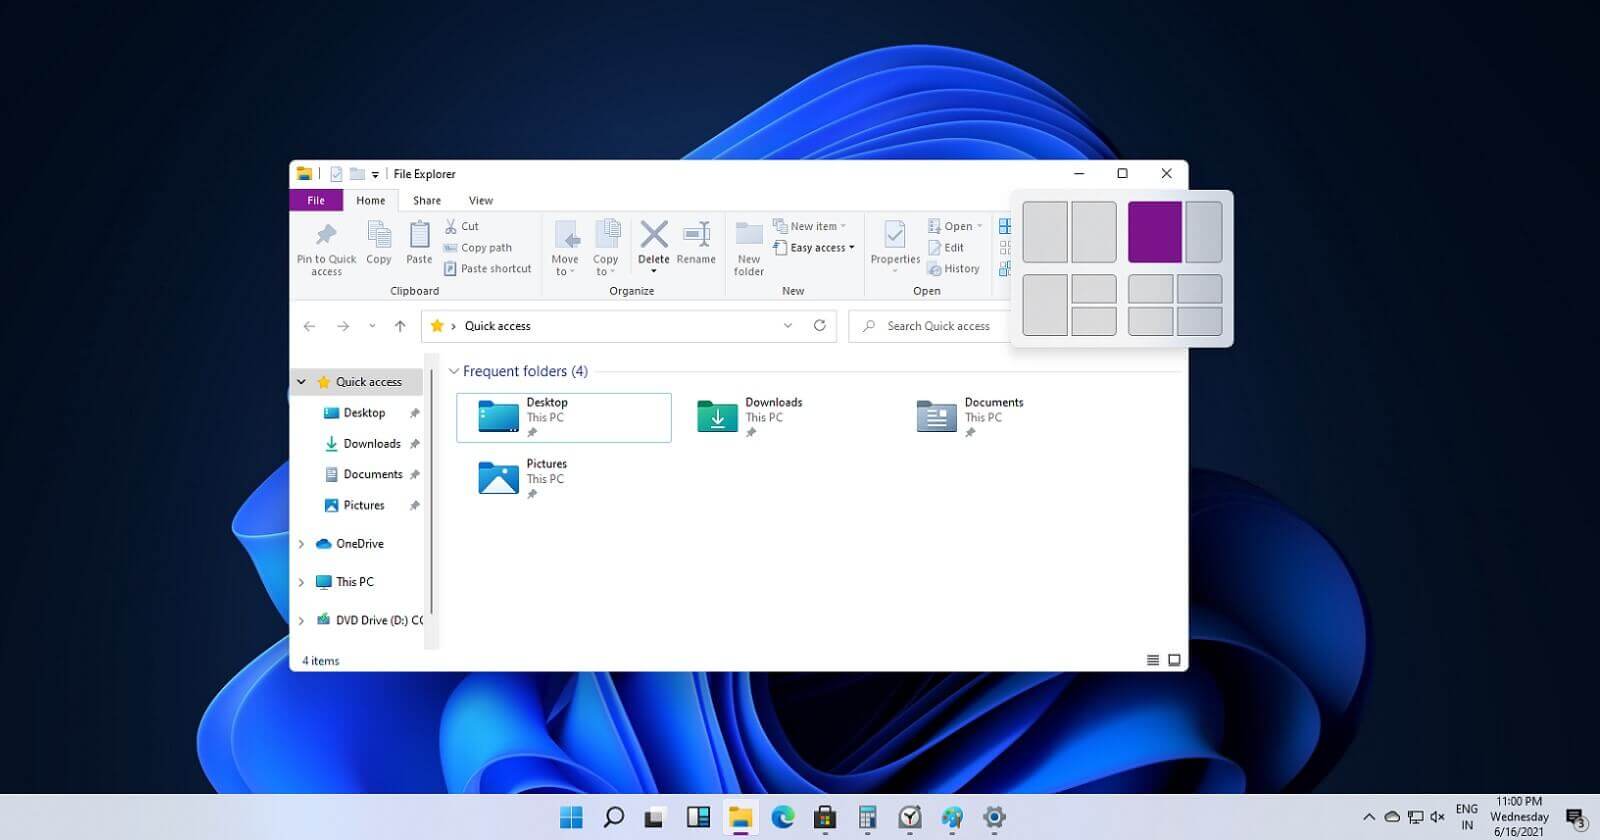
If you have used the cascade option in previous Windows versions then it is most likely that you will like the new Snap controls. You can quickly snap windows side by side, or arrange them in sections on your desktop just by hovering over maximize button on the title bar.

Windows 11 File Explorer

Windows 11 file explorer
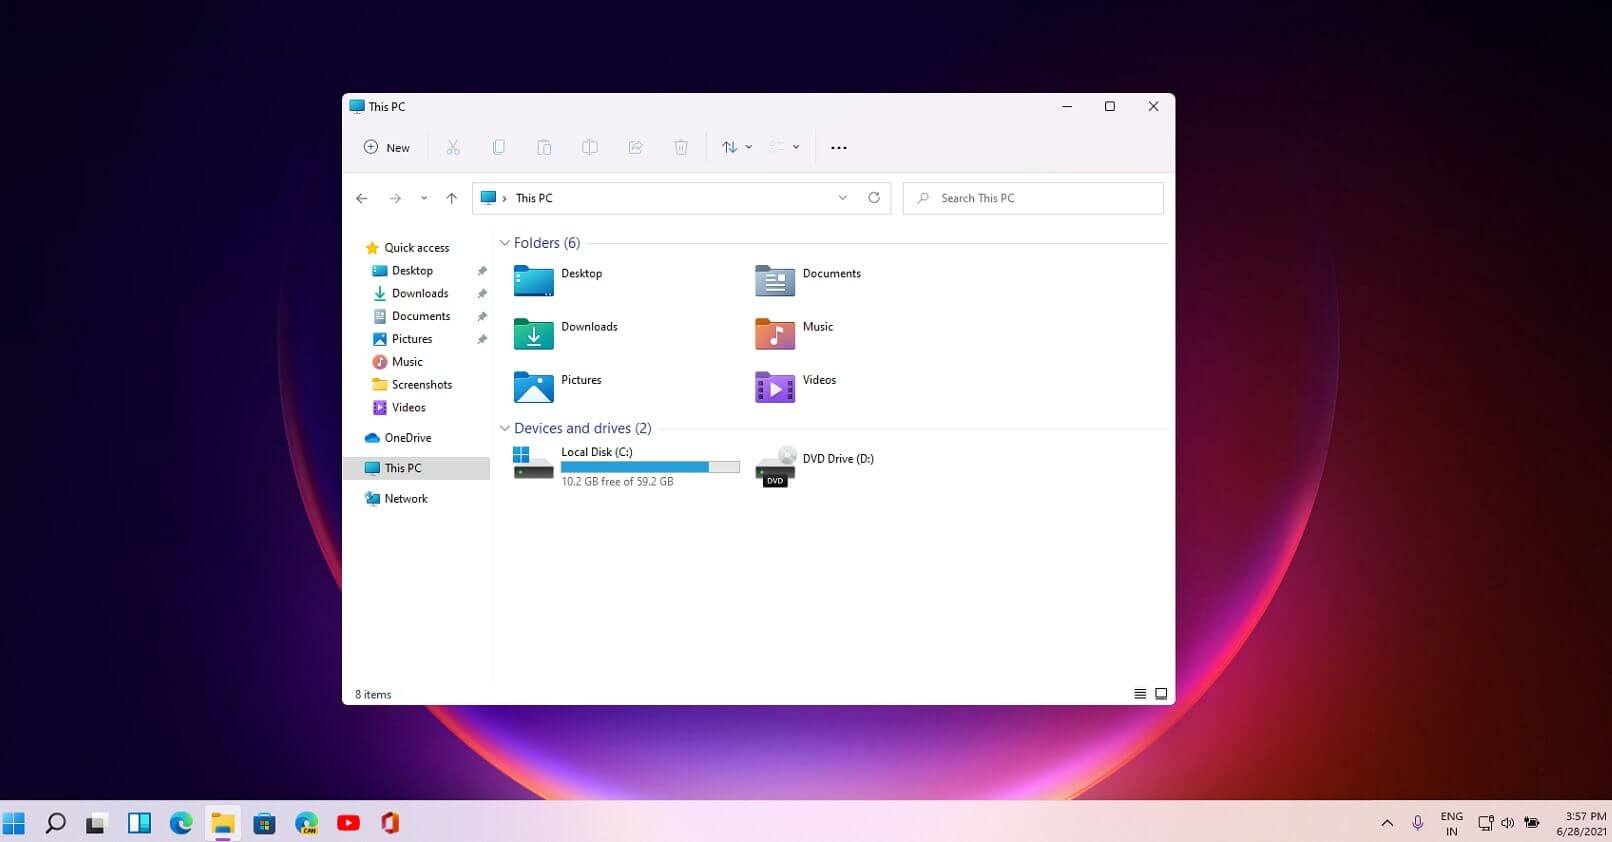
File explorer has gone through some visual and design changes, the ribbon on top has been completely removed and replaced with a header-like feature with a slick and clean design. The header contains a nice organized and designed single row of icons like cut, paste, copy, rename, delete, and new folder icons.

Settings app ovberhaul

Windows 11 settings app
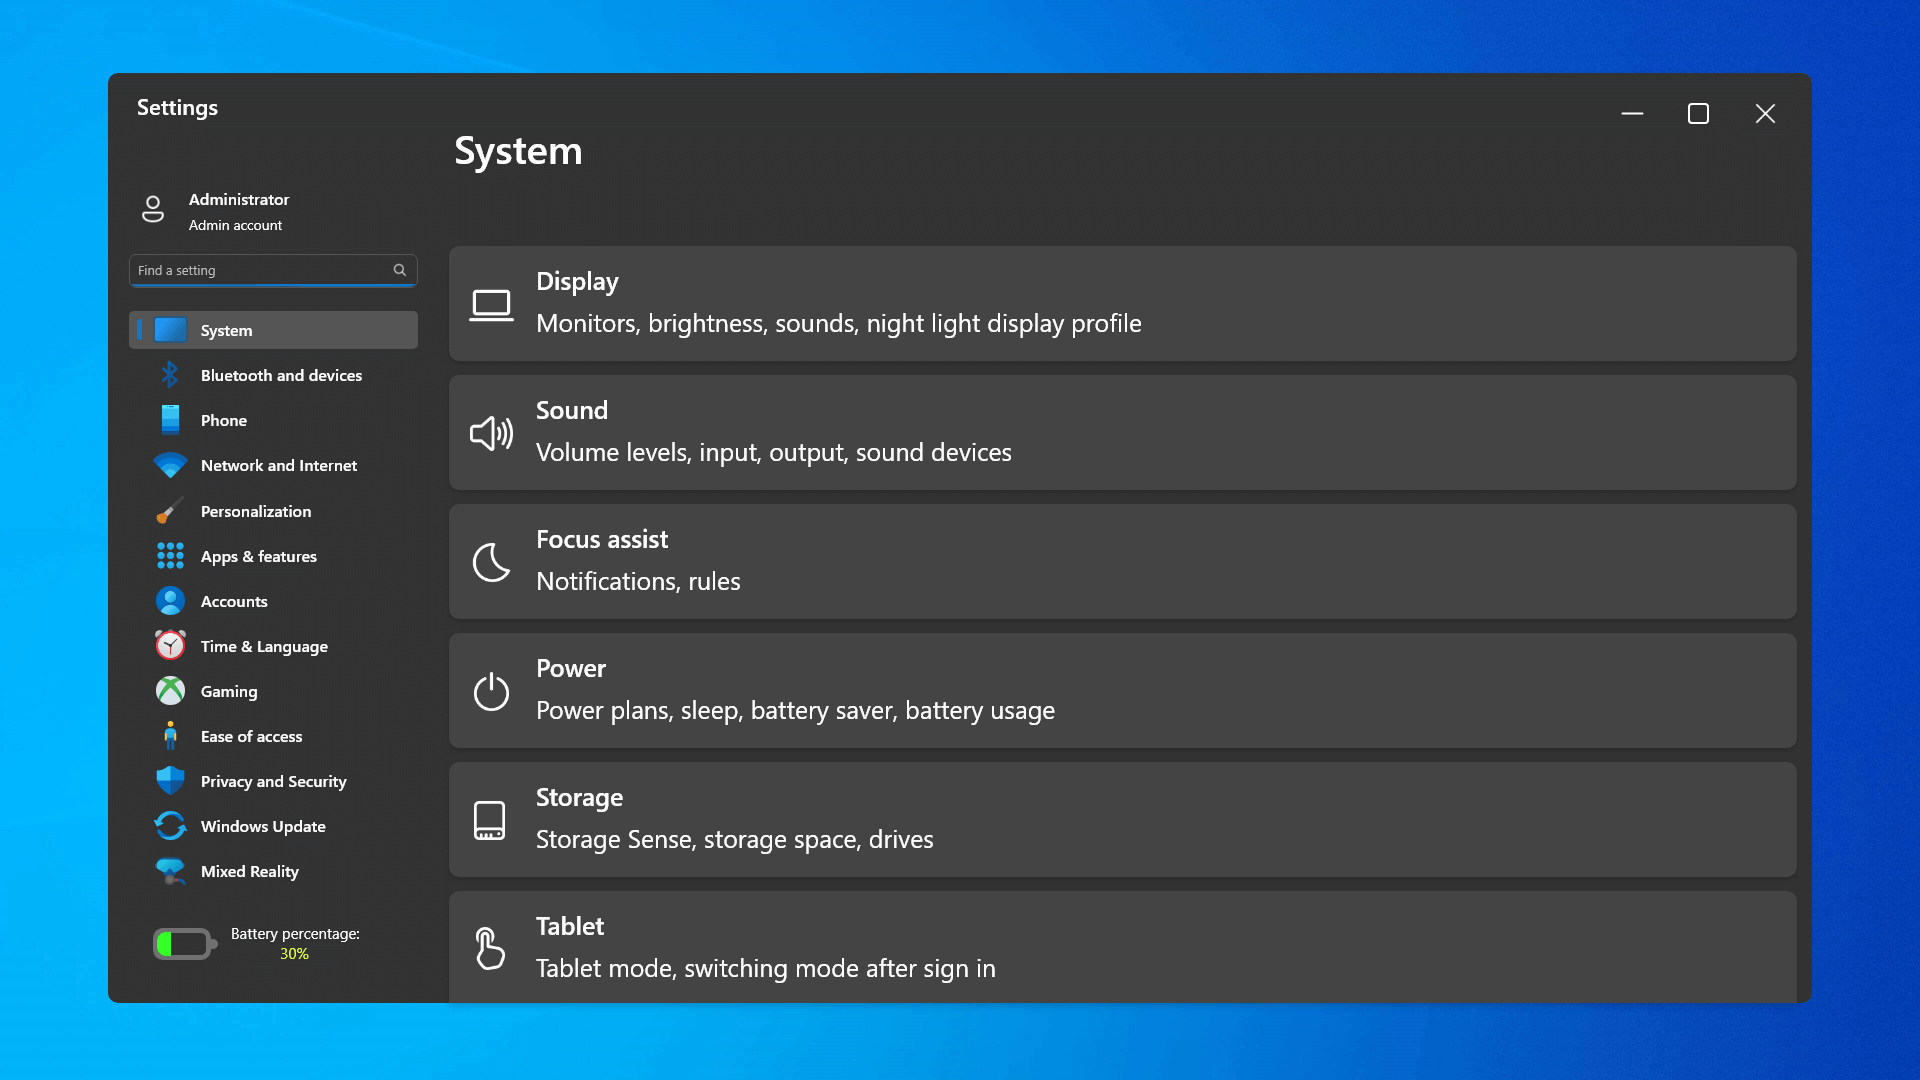
The settings app also has gone through visual and design changes. It has a new design that is very visually appealing and navigation has been simplified and more organized. Finding the right and desired setting is much faster and clearer now.

Widget tab makes comeback in Windows 11

Windows 11 widgets bar
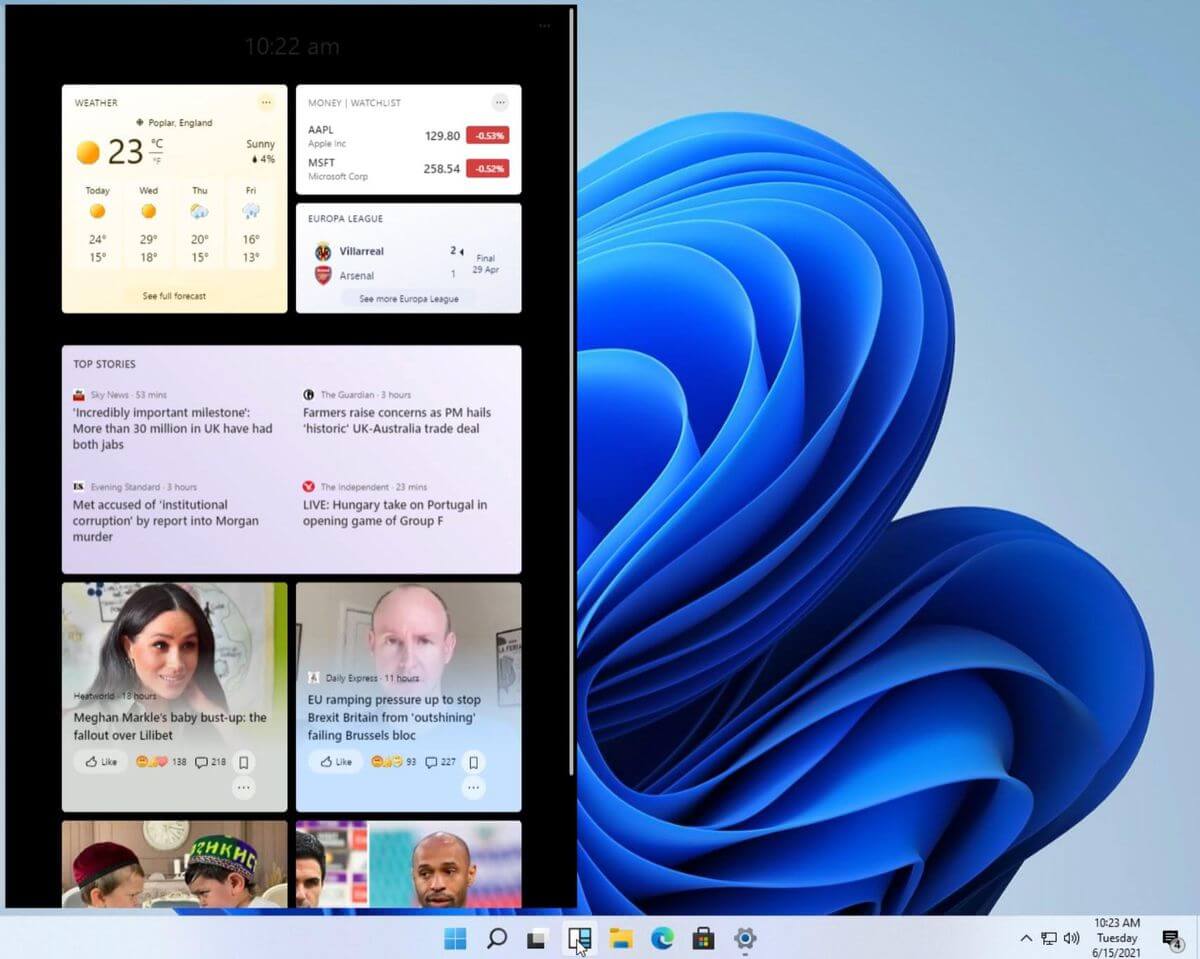
Yes, widgets are back but not like you remember them. Instead of being all-time present at your desktop like once they used to be, now there is a button on the taskbar which brings the widget bar up that contains desired widgets. This way they are easily accessible and do not clutter desktops. So far we have weather, news, calendar, and stocks widget but we will see how development on these goes. I expect to have community-made widgets like in old days for all of our needs.

XBOX app

Windows 11 xbox appThe new Xbox app is now integrated into Windows 11, offering quick access to Xbox Game Pass games, the social parts of the Xbox network, and the Xbox store.

Security and TPM 2.0 in Windows 11

Windows 11As widely known by now Windows 11 will require you to have a TPM 2.0 module capable CPU in order to install it. This system requirement has caused a lot of controversies but essentially it seems that MS's goal is to protect your personal data by using this module. The upside of course is that your data will be protected much more than in previous Windows versions, the downside, of course, will be that you will need newer hardware to run OS on it. and that is essentially it, keep on tuned on more Windows 11 information and overall articles tied to PC and technology here at errortools.com
Read More
1 2 3 162
Logo
Copyright © 2022, ErrorTools. All Rights Reserved
Trademarks: Microsoft Windows logos are registered trademarks of Microsoft. Disclaimer: ErrorTools.com is not affiliated with Microsoft, nor claim direct affiliation.
The information on this page is provided for information purposes only.
DMCA.com Protection Status