A Quick Guide to Fixing Connapi.dll Error Code

Troubleshoot Connapi.dll Error Code

Connapi.dll Error Code - What is it?

Connapi.dll is a type of dynamic link library file. This file contains small programs like any other DLL file and is called to load certain programs on your PC. The Connapi.dll error message occurs either when using or installing programs.

This error message is displayed in either of the following messages:

“Connapi.dll Not Found"

"This application failed to start because connapi.dll was not found. Re-installing the application may fix this problem."

"The file connapi.dll is missing."

"Cannot start [APPLICATION]. A required component is missing: connapi.dll. Please install [APPLICATION] again."

"Cannot find [PATH]connapi.dll"

Solution

Restoro box imageError Causes

Connapi.dll error may occur due to numerous reasons on your PC. The most common causes include:

  • Missing Connapi.dll file
  • Corruption of the Connapi.dll file
  • Driver Issues
  • Viral Infection
  • Registry Issues such as bad and invalid entries

This error may hamper your ability to access your desired programs causing you a great deal of inconvenience. And if the underlying cause of the error is related to the registry, then your computer can be at serious risks like system failure and crash.

Further Information and Manual Repair

To resolve Connapi.dll error code on your PC, here is a list of solutions. These are easy, very simple to perform, deliver the best results, and more importantly require no technical expertise.

Solution 1: Check your Recycle Bin - You May Have Deleted the File Accidentally

As dll files are shared files, it is possible that you accidentally deleted the Connapi.dll file while uninstalling a program from your system. In such a situation, go to the recycle bin and look for the file.

If you find the missing Connapi.dll file, simply restore it and then try running your desired program again. If the program runs, then the error is resolved. However, if it still persists, then try other solutions given below.

Solution 2: Update the Drivers

Try updating drivers for hardware devices on the system. To do this, go to the start menu and then Control Panel. Double click on Add or Remove programs icon.

Now select incompatible drivers and remove them. After that, restart your PC to activate changes. Now go to the manufacturers’ website to download new drivers and install them on your PC.

Solution3: Scan for Viruses

Another solution is to scan for viruses and malware. Sometimes these can also damage and corrupt dll files on your system. To perform a scan, simply download a powerful antivirus program and run it.

Solution 4: Clean and Restore the Registry

If the error code is still there, then this means the problem is triggered by the registry issues. To resolve it you must clean the registry and remove all the unnecessary and obsolete files like junk files, internet history, temporary files, and cookies.

The best way to clean these files instantly is to install Restoro. This is an advanced, cutting-edge, and multi-functional PC Fixer. It has a user-friendly interface and is integrated with powerful utilities like a registry cleaner, anti-virus, and a system optimizer. It is compatible with all Windows versions.

The registry cleaning feature scans your entire PC in seconds and detects all the registry issues. It removes all the bad registry entries and unnecessary files. Simultaneously, it also fixes the system files and dll files like Connapi.dll.

The anti-virus utility removes all types of malicious software on your system while the system optimizer utility ensures your system performs at its optimum speed.

To resolve Connapi.dll error, click here to download Restoro.

If you like to learn and find out more about various Windows errors, and how to repair them go to our vast archive or use search to find articles that will explain and help you in solving your issue.
However, if you prefer to do things fast and with automatization then we are proposing to use an automated solution for your issues. The application that we are recommending is Advanced System Repair Pro
Advanced System Repair utilizes multiple tools all in one to give you a quick, simple, reliable, and very thorough diagnosis of your PC. It brings you all the tools you need in one program to clean, fix, protect, optimize and boost your PC!
1-Click Maintenance
All the tools to make it simple and easy! It's like having a professional technician at the click of a mouse.

Junk Cleaner
Keeping your computer free from unnecessary clutter also helps make your computer last longer. Like any other machine, if you keep it clean and take care of it, it will serve you better for longer!

Optimize background apps
Optimize applications background activity with the built-in Application Optimizer feature.

Disk Defrag
With a simple 1-click, Advanced System Repair speeds up your PC by assembling fragmented files on your machine and organizing them more efficiently.

Malware Removal
Finds and removes all types of harmful malware including trojans, worms, bots, adware, spyware, PUPs, and more!

Privacy Cleaner
The all-in-one privacy suite to Clean Your Tracks & Protect Your Privacy! Make your computer safe, secure, and more efficient!

System Tweak/Optimizer
ASR will analyze your complete system and settings to adjust your PC to function at its maximum performance.

Registry Cleaner
Over time, as you install and uninstall applications, the registry can become cluttered with old entries and broken settings which can result in program crashes, and annoying messages and slow the computer down.
Visit our Advanced System Repair Pro Download page to inform yourself about all the benefits of this software and get a free trial copy of it.
advanced system repair pro

Advanced System Repair Pro

One-click automated PC repair solution
ASR logo
With Advanced System Repair Pro you can easily
Replace damaged files
Restore performance
Free disk space
Remove Malware
Protects WEB browser
Remove Viruses
Stop PC freezing
DOWNLOAD
Privacy Policy | Terms of Use | Uinstall
Advanced System Repair Pro is compatible with all versions of Microsoft Windows including Windows 11

Share this article:

You might also like

Instagram posts available now on computer
Instagram posting has been reserved for mobile phones for a very long time but in October 2021 that privilege has come to an end. Instagram added the long-awaited ability to post to Instagram from the website. You get nearly all of the same filters and editing tools that you can find in the iPhone and Android app, too. Instagram logoIn order to post via computer on your Instagram account all you need is a browser. The first step, of course, is to go to instagram.com and login into your account, if you do not have an account, you can make one for free. Next, click on the + icon in the upper right corner. Create a new post screen will open, in this screen click on the Select from computer blue button on the bottom. The file manager will open, choose your desired photo and confirm. After that, you will be presented will an adjustment screen for a photo, here you can crop the photo, zoom in, adjust the aspect ratio, or if you wish add more photos to create a slide show. Once you are done will all of these adjustments, click on Next in the upper right. From there you will be taken into a filter screen where you can apply one of many filters or if you want, you can adjust brightness, contrast, saturation, temperature, etc. just like in the application on your phone. Once you have the desired result, again click on Next in the upper right part of the screen. Lastly, you will be given an option to write a caption for the photo if you wish and add a location. Once this step is finished you can post the feed by clicking on share in the upper right part. That is all to it, just like in a mobile application you can now use your computer for Instagram posting.
Read More
REvil vanishes over night without trace
REvilREevil is one of the most active and successful hacking groups connected to Russia and operating all over the world. The group recently demanded a huge bitcoin ransom for an attack targeting IT firm Kaseya in the USA. Since Tuesday blog and payment site run by REvil group cannot be longer reached without any kind of explanation or why. The reason behind the disappearance is unknown but has sparked speculation that the group may have been targeted deliberately by authorities. US President Joe Biden said he raised the issue with Vladimir Putin during a phone call on Friday, after discussing the subject during a summit with the Russian president in Geneva last month. Mr. Biden told reporters that he had "made it very clear to him...we expect them to act" on information and also hinted the US could take direct digital retaliation on servers used for intrusions. The timing of Tuesday's outage has sparked speculation that either the US or Russian officials may have taken action against REvil - though officials have so far declined to comment and cyber experts say sudden disappearances of groups are not necessarily uncommon. The development comes after a series of high-profile ransomware attacks which have hit major US businesses this year. The FBI accused REvil - also known as Sodinokibi - of being behind a ransomware attack on the world's largest meat processing company JBS last month.
Read More
Intel's open-source Clear Linux* Project
clear linux project
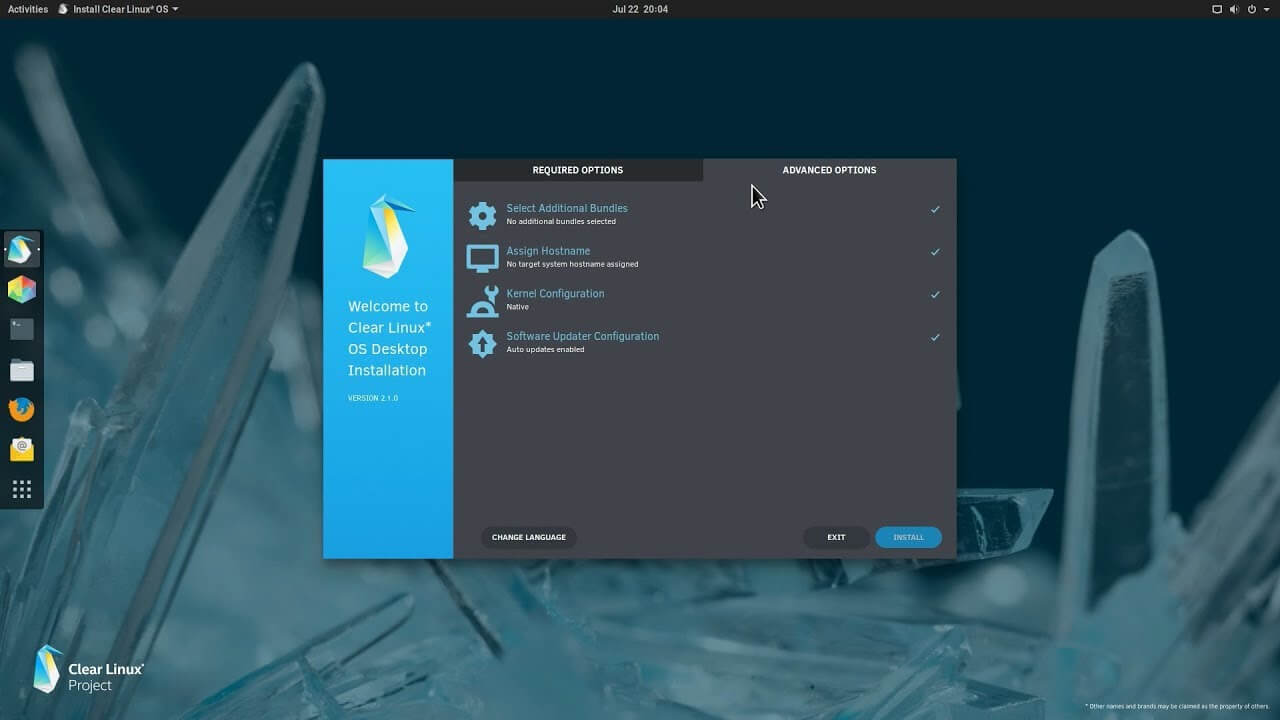
The Clear Linux Project creates an operating system and software stack that offers highly optimized performance, security, versatility, and manageability. Clearly optimized for Intel CPUs and based on GNOME it will offer you incredible speeds if you are on Intel CPU. The big news, though, is that Clear Linux sports the shiny new Gnome 40. This is a fresher Gnome than you'll find even on Ubuntu's more experimental 21.04 release. The only big names that let you test drive Gnome 40 are Fedora and Arch Linux.

Packages only when you need them

Installation of packages is used by Swupd, a Clear Linux* package management tool. It is easy to use and pretty straightforward.
  • "bundle-list" for showing what's installed
  • "bundle-info" for details on installed bundles (such as owned files via the "‑‑files" flag)
  • "search" for repository searching
  • "bundle-add" for installation
  • "bundle-remove" for uninstallation
The only problem here is the packages themselves. Clean Linux* has been imagined as a developer distro focusing mostly on well-development tolls. In intel’s words: “A Linux OS built for Linux developers”, so some things will be left out. Strangely enough some things as FFmpeg which if you want to have and blast some youtube videos while you work will have to complete manually by yourself.

Clear Linux* modular philosophy

Everything in Clear Linux* is based on a modular philosophy approach. There is no /etc/fstab file, the /boot directory is totally empty. Every partition to be mounted is enabled as a systemd "mount unit." Intel reaping the benefits of systemd's modular philosophy, where everything is a unit. If you know your way around systemd, intermediate-level configuration tasks should be straightforward. Any advanced configuration likely demands deep systemd knowledge.

Clear Linux* performance

As stated earlier this is Intel’s distro, optimized for Intel hardware meaning that Intel as the developer has every possible tool at its disposal to make use of hardware to its maximum potential and it shows. Distro almost leaves other ones two times in speed performance. So if you are looking for a distribution that will deliver you speed and it is aimed for developer Clear Linux* is for you.

Conclusion

Clear Linux* is a really interesting distro and seeing how Intel is adding new software packages on its official website it might have a bright future. But as always, be the judge for yourself and see if it can fit your needs. Go get it at: https://clearlinux.org/
Read More
List of games that support Nvidia RTX tech

RTX nvidiaWhat is RTX

Nvidia GeForce RTX is a high-end professional visual computing platform created by Nvidia, primarily used for designing complex large-scale models in architecture and product design, scientific visualization, energy exploration, and film and video production. Nvidia RTX enables real-time ray tracing. Historically, ray tracing had been reserved for non-real-time applications (like CGI in visual effects for movies and in photorealistic renderings), with video games having to rely on direct lighting and precalculated indirect contribution for their rendering. RTX facilitates a new development in computer graphics of generating interactive images that react to lighting, shadows, and reflections. RTX runs on Nvidia Volta-, Turing- and Ampere-based GPUs, specifically utilizing the Tensor cores (and new RT cores on Turing and successors) on the architectures for ray-tracing acceleration.

Advantage in games

With incredible lighting and shadows, reflection, better smoke, and water effects, and more, RTX has managed to place awesome real-time effects on your desktop all that’s to Nvidia technology behind it. Of course, in order to harvest this kind of technology and features game itself needs to support and have RTX in it, you can not turn RTX in just any game, the game itself must have technology build in it. Therefore we are bringing you the list of all RTX games you can find currently on the market so you can enjoy at the moment best graphics a PC can offer

List of games supporting the technology

  • Amid Evil
  • The Ascent
  • Battlefield V
  • Call of Duty: Black Ops Cold War
  • Call of Duty: Modern Warfare
  • Control
  • Cyberpunk 2077
  • Deliver Us the Moon
  • Doom Eternal
  • Dirt 5
  • Fortnite
  • Ghostrunner
  • Justice Online
  • Weibo
  • JX3
  • Lego Builder’s Journey
  • Mechwarrior 5: Mercenaries
  • The Medium
  • Metro Exodus (and The Two Colonels DLC)
  • Minecraft
  • Moonlight Blade
  • Mortal Shell
  • Observer: System Redux
  • Pumpkin Jack
  • Quake II RTX
  • Ring of Elysium
  • Shadow of the Tomb Raider
  • Stay in the Light
  • Watch Dogs: Legion
  • Wolfenstein: Youngblood
  • World of Warcraft: Shadowlands
  • Xuan-Yuan Sword VII

Upcoming games that will support RTX

  • Atomic Heart
  • Boundary
  • Bright Memory: Infinite
  • Convallaria
  • Dying Light 2
  • F.I.S.T.: Forged in Shadow Torch
  • Five Nights at Freddy’s: Security Breach
  • Grimmstar
  • Maneater
  • Project X
  • Sword and Fairy 7
  • Synced: Off Planet
  • Vampire: The Masquerade — Bloodlines 2
  • The Witcher 3: Complete Edition
Read More
Fix Windows Update error code 0x80d02002
A lot of users have experienced various issues either in installing a Feature or a Windows Update. One of these errors is the one with the error code 0x80d02002. If you are one of the users who is facing this problem right now, then the working solutions given in this post will surely help. The Windows Update error code 0x80d02002 indicates that Windows 10 fails to upgrade or install as there is some issue with the files that have been downloaded and Windows encounters an error in installing them. Thus, the best thing you can do in such a case is to start the installation from scratch but before you do that, here are some suggestions that might help.

Option 1 – Try to rename the SoftwareDistribution folder

The Software Distribution folder in the Windows operating system is a folder that can be found in the Windows directory and is used to store files temporarily which might be required to install the Windows Update on your PC. Thus, it is required by the Windows Update and maintained by WUAgent. Aside from that, it also contains all the Windows Update History files and once you delete them, you will most likely lose the Update history. As a result, the next time you run the Windows Update, it may result in a longer detection time.
  • Open the WinX Menu.
  • From there, open Command Prompt as admin.
  • Then type in the following command – don’t forget to hit Enter right after typing each one of them.
net stop wuauserv net stop bits rename c:windowsSoftwareDistribution SoftwareDistribution.bak
  • After entering these commands, it will stop the Windows Update Service, the Background Intelligent Transfer Service, and rename the SoftwareDistribution folder.
  • Next, got to the C:\Windows\SoftwareDistribution folder and get rid of all the folders and files thereby tapping the Ctrl + A keys to select them all and then click on Delete. Note that if the files are in use, you won’t be able to delete them.
  • Once all the contents in the Software Distribution folder are deleted, restart your PC and then go back to Command Prompt and input the following commands again.
net start wuauserv net start bits
Since the folder has already been flushed, it will be populated afresh the instant your restart your computer and open Windows Update.

Option 2 – Try to reset the Catroot2 folder

You can also try resetting the catroort2 folder as it is known to fix tons of Windows Update issues including the Windows Update error code 0x80d02002. Both the Catroot and catroot2 are Windows operating system folders that are required for the Windows update process.  So when you run the Windows Update, the catroort2 folders stores the signatures of the Windows Update package and helps it in the installation. It makes use of the “%windir%System32catroot2edb.log” file in the updating process. Afterward, the updates are stored in the SoftwareDistribution folder which is used then by the Automatic Updates in order to execute the updating process. Keep in mind that you must not rename or delete the Catroot folder. Although the Catroot2 folder is recreated automatically by Windows, the Catroot folder isn’t.

Option 3 – Try running the DISM tool to fix the broken Windows Update client

The Windows update/upgrade error 0x80d02002 might be caused by some issues in the Windows Update client so you need to run the DISM tool to repair it. Note that you have to use another computer or another Windows from a shared network to fix it.

Option 4 – Try to run the Windows Update Troubleshooter

Running the built-in Windows Update troubleshooter could also help you resolve the Windows Update error 0x80d02002. To run it, go to Settings and then select Troubleshoot from the options. From there, click on Windows Update and then click the “Run the troubleshooter” button.

Option 5 – Try to run Microsoft’s troubleshooter online

You also have the option to run Microsoft’s online troubleshooter which could help you fix Windows Update errors.
Read More
Restore default Display Color settings in Windows 10
The color settings in a Windows computer certainly matter a lot especially when it comes to printing pictures. Users who are found or edit photos for a living change their computer’s color settings in order to ensure that the printout looks like the actual colors. However, those settings might not be appropriate for computer display and you can really tell right away that there something’s not right in the display. You might also notice some weird tint which isn’t easy to get rid of. You can’t actually tell the difference at first, not until you look at some other computers and then wonder what’s wrong with yours so, in this guide, you will know how to restore the display color settings back to their default state on your Windows 10 PC. Make sure to follow each one of the steps laid out below carefully to restore the default Display Color settings.

Step 1: Set the Color Management Settings to default.

  • In the Start search box, type in “color management”. Once you see it in the search results, open it.
  • Once you’ve pulled up the Color Management window, go to the Advanced tab. From there, make sure that every single option is set to default – from all the options in both the “Windows Color System” and “ICC rendering intent to WCS gamut mapping”.
Note: You also have the option to reset it for everyone by simply clicking on the “Change system defaults” button.
  • Finally, you can also try to calibrate your display.

Step 2: Set the Graphics Properties to default.

After making changes in the Color Management settings, you need to also set the Graphics Properties to default.
  • Start by right-clicking on any empty space on your desktop.
  • Then select the Graphics properties from the context menu. From the Graphics properties window, you will see that most sections have to restore defaults.

Step 3: Try using Nvidia Color Settings for Desktop

The next thing you can try is using the Nvidia Color Settings if you have Nvidia graphics installed on your Windows 10 PC. Just the Control Panel to reset the color settings.
  • From the system tray, launch the Nvidia control panel.
  • Next, go to Display > adjust desktop color settings.
  • From there, select the display and then select the Nvidia Settings.
  • After that, change the options accordingly in order to get the correct combination though you can always leave them to default.
Read More
15 Deep WEB sites you need to visit
Deep WEBA not long time ago we had an article about the deep WEB and dark WEB here on errortools.com explaining its origins and its purpose. The article can be found here if you are interested: https://errortools.com/windows/what-is-deep-and-dark-web/ Now at this point in time, we want to present you with 15 great Deep WEB sites that could offer you some information not found anywhere else, that could offer you some privacy, or simply to have some fun and safely explore how it is like to be part of deep WEB. Take notice that for successful visiting of given sites you will need to have installed TOR browser. More about Tor browser itself can be found here: https://errortools.com/blog/software-review-series-tor-browser/ and its official website for download here: https://www.torproject.org/download/ Make sure that you copy the onion link and paste it into your TOR browser in order to access the site. That being said, let’s begin.

Mail2Tor

http://mail2tor2zyjdctd.onion/ If you want secure and private ways of sending your emails then look no further. Mail2Tor uses a webmail client and encrypts each email received or sent, combine that for not storing IP addresses and you have a private and safe environment for your emails.

The Hidden Wiki

http://zqktlwiuavvvqqt4ybvgvi7tyo4hjl5xgfuvpdf6otjiycgwqbym2qad.onion/wiki/index.php/Main_Page The Hidden Wiki is the go-to site if you want to explore more of deep WEB since it is the site of collected .onion sites. Think of it as a registry of onion sites that want to be accessed publicly but offer anonymity.

TorLinks

http://torlinksd6pdnihy.onion/ TorLinks is another site focusing on .onion site listings. Site themselves are divided into categories and are easy to find. Take note that .onion sites come and go so make sure to visit frequently both The Hidden Wiki and TorLinks in order to be updated.

Torch Search Engine

ttp://xmh57jrzrnw6insl.onion/ Torch is the oldest and most well-known search engine for dark web links, with its database of over a million .onion websites there is a chance that you will find what you are looking for on it.

DuckDuckGo

http://3g2upl4pq6kufc4m.onion/ Integrated into TOR itself as a default search engine DucDuckGo has proven itself to be a great competitor and challenger to Google. But unlike Google, DuckDuckGo will not track you nor store your search activities making it a great general private search engine.

Facebook

https://www.facebookwkhpilnemxj7asaniu7vnjjbiltxjqhye3mhbshg7kx5tfyd.onion/ Yup, Facebook has its own .onion version of its popular platform. Now since Facebook itself is a social media platform anonymity is out of the question but with .onion routing, you can have and maintain a Facebook account from locations where you normally could not like in some countries where Facebook.com is banned.

Galaxy3

http://galaxy3bhpzxecbywoa2j4tg43muepnhfalars4cce3fcx46qlc6t3id.onion/ Galaxy3 is also a social platform, the site is mostly populated with code experts and other individuals posting all kinds of stuff.

The Dark Lair

http://vrimutd6so6a565x.onion/index.php/Board Dark Lair was the first image exchange website that evolved into a social network. One difference from the other two mentioned is that you can engage in the website without registration as an anonymous user.

Pro Publica

https://www.propub3r6espa33w.onion/ The aim of the five-time Pulitzer Prize winner ProPublica is “To expose abuses of power and betrayals of the public trust by government, business, and other institutions, using the moral force of investigative journalism to spur reform through the sustained spotlighting of wrongdoing.” It’s the first major online publication to have a .onion address. The non-profit newsroom is funded by organizations such as the Sandler Foundation and has made countless contributions to the fight for free speech and privacy.

Soylent News

http://7rmath4ro2of2a42.onion/ Soylent news is an onion site that well brings news. The difference from other sites of the same content is that Soylent news is community moderated without any big names involved so it is authentic in its content.

CIA

ttp://ciadotgov4sjwlzihbbgxnqg3xiyrg7so2r2o3lt5wz5ypk4sxyjstad.onion/ Tor’s history is an unlikely tale. It was created by the U.S Navy with the purpose of helping informants in foreign nations to communicate safely over the Internet. The Central Intelligence Agency (CIA), in that spirit, released a .onion site so that people from across the globe can browse their resources securely and anonymously.

Secure drop

https://secrdrop5wyphb5x.onion/ Secure drop is a platform for changing leaked information and for journalists to communicate with their leads in private. It is used by Washington Post, Pro Publica, and The Guardian.

Hidden Answers

http://answerszuvs3gg2l64e6hmnryudl5zgrmwm3vh65hzszdghblddvfiqd.onion/ Hidden Answers is Reddit or Quora of the dark web but as in the spirit of the dark web, all discussed topics and stories are in total anonymity.

SCI-HUB

http://scihub22266oqcxt.onion/ With over 50 million research papers in the domain of science shared freely, Sci-Hub eliminates all barriers of free knowledge and offers a unique approach to education and scientific information.

Smartmixer.IO

http://smrtmxdxognxhv64.onion/ Smartmixer is a bitcoin mixer. The service scrambles your bitcoin with other users making your purchases completely anonymous. And that's it. 15 dark WEB onion sites you need to visit. I hope that you enjoyed the list and found something useful in it. Also, note that onion links can change overnight so if any of provided links do not work just go to DuckDuckGo and search for the site with the onion at the end.
Read More
DRIVER_UNLOADED_WITHOUT_CANCELLING_PENDING_OPERATION
If you encounter the DRIVER_UNLOADED_WITHOUT_CANCELLING_PENDING_OPERATION Blue Screen error with an error code of 0x000000CE then it means that a driver failed to cancel the pending operations before unloading. Some of the driver files that might be the culprit include the intelppm.sys, intcdaud.sys, tmxpflt.sys, mrxsmb.sys and asusptpfilter.sys. This kind of Blue Screen error occurs when the driver failed to cancel lookaside lists, worker threads, DPCs, and other items before unloading. You can usually identify which driver file is triggering the BSOD error in the BSOD error itself since its name would be printed on the blue screen and stored in memory at the location (PUNICODE_STRING) KiBugCheckDriver. Refer to the possible solutions given below to fix the DRIVER_UNLOADED_WITHOUT_CANCELLING_PENDING_OPERATIONS error.

Option 1 – Perform a System Restore

Performing System Restore might help you in fixing the SYNTP.SYS Blue Screen error. You can do this option either by booting into Safe Mode or in System Restore. If you are already in the Advanced Startup Options, just directly select System Restore and proceed with the next steps. And if you have just booted your PC into Safe Mode, refer to the steps below.
  • Tap the Win + R keys to open the Run dialog box.
  • After that, type in “sysdm.cpl” in the field and tap Enter.
  • Next, go to the System Protection tab then click the System Restore button. This will open a new window where you have to select your preferred System Restore point.
  • After that, follow the on-screen instructions to finish the process and then restart your computer and check if the problem is fixed or not.

Option 2 – Disable the BIOS Memory options

Disabling the BIOS Memory options such as Caching and Shadowing can help you in fixing the DRIVER_UNLOADED_WITHOUT_CANCELLING_PENDING_OPERATIONS Blue Screen error. All you have to do is enter the BIOS first and then use the Arrow and Enter keys to select your choices. And if you can’t seem to find it, look for specific instructions from your OEM or you could also look out for instructions from the manufacturer of your motherboard.

Option 3 – Update or rollback your device drivers

If the first option didn’t work for you, then it’s time to either update or roll back the device drivers. It is most likely that after you updated your Windows computer that your driver also needs a refresh. On the other hand, if you have just updated your device drivers then you need to roll back the drivers to their previous versions. Whichever applies to you, refer to the steps below.
  • Open the Devices Manager from the Win X Menu.
  • Then locate the device drivers and right-click on them to open the Properties.
  • After that, switch to the Driver tab and click on the Uninstall Device button.
  • Follow the screen option to completely uninstall it.
  • Finally, restart your computer. It will just reinstall the device drivers automatically.
Note: You can install a dedicated driver on your computer in case you have it or you could also look for it directly from the website of the manufacturer.

Option 4 – Try to run the CHKDSK utility

Running the CHKDSK utility might also help you resolve the DRIVER_UNLOADED_WITHOUT_CANCELLING_PENDING_OPERATIONS Blue Screen error. If your hard drive has issues with integrity, the update will really fail as the system will think that it’s not healthy and that’s where the CHKDSK utility comes in. The CHKDSK utility repairs hard drive errors that might be causing the problem.
  • Open Command Prompt with admin privileges.
  • After opening Command Prompt, execute the following command and hit Enter:
chkdsk /f /r
  • Wait for the process to be completed and then restart your computer.

Option 5 – Run the Memory Diagnostic Tool to check for Memory leaks

  • Tap the Win + R keys to open Run and type exe and hit Enter to open the Windows Memory Diagnostic Tool.
  • After that, it will give two options such as:
    • Restart now and check for problems (Recommended)
    • Check for problems the next time I start my computer
  • Once your computer has restarted, perform a basic scan or you could also go for the “Advanced” options such as “Test mix” or “Pass count”. Simply tap the F10 key to start the test.
Note: After you select the option, your PC will restart and check for memory-based issues. If it finds any issues, it will automatically fix them and if there’s no issue found, then it’s most likely not a memory-based issue so you should try the other options given below.

Option 6 – Try analyzing the Memory Dump Files

You can also try to analyze the Memory Dump files as it can help you identify the root cause of the DRIVER_UNLOADED_WITHOUT_CANCELLING_PENDING_OPERATIONS error.

Option 7 – Try checking the Registry settings

You might also want to try disabling the concerned driver file if it is mentioned in the Stop error. For example, if the stop error mentioned the “intelppm.sys” driver file then you have to disable this driver file since it is most likely the culprit. To do that, follow the steps below.
  • Tap the Win + R keys to open the Run dialog box.
  • Next, type “Regedit” in the field and hit Enter to open the Registry Editor.
  • After that, go to the this registry path: HKEY_LOCAL_MACHINE > SYSTEM > CurrentControlSet > Services > Processor
  • From there, double click on Start and change its value to “4”.
  • Now go to this path: HKEY_LOCAL_MACHINE > SYSTEM > CurrentControlSet > Services > Intelppm.
  • Set its value to “4” and then restart your computer to apply the changes made.

Option 8 – Run the Blue Screen Troubleshooter

The Blue Screen troubleshooter is a built-in tool in Windows 10 that helps users in fixing BSOD errors like DRIVER_UNLOADED_WITHOUT_CANCELLING_PENDING_OPERATIONS. It can be found on the Settings Troubleshooters page. To use it, refer to these steps:
  • Tap the Win + I keys to open the Settings panel.
  • Then go to Update & Security > Troubleshoot.
  • From there, look for the option called “Blue Screen” on your right-hand side and then click the “Run the troubleshooter” button to run the Blue Screen Troubleshooter and then follow the next on-screen options. Note that you might have to boot your PC into Safe Mode.
Read More
Steam updates including storage management
Valve has released a big update to its online store and distribution platform Steam. Among typical bugs fixing and making the user experience a little more fluid, we have received some major updates as well. Please take note that you need to update Steam itself to the latest version in order to get new features.

steam libraryStorage management Page update

The storage management page has received a complete redesign and UX overhaul and it is now much easier to manage your game libraries and create new ones. The page itself looks and feels a little console more like but thanks to that it offers a much easier and clearer look and feel. steam storage manager
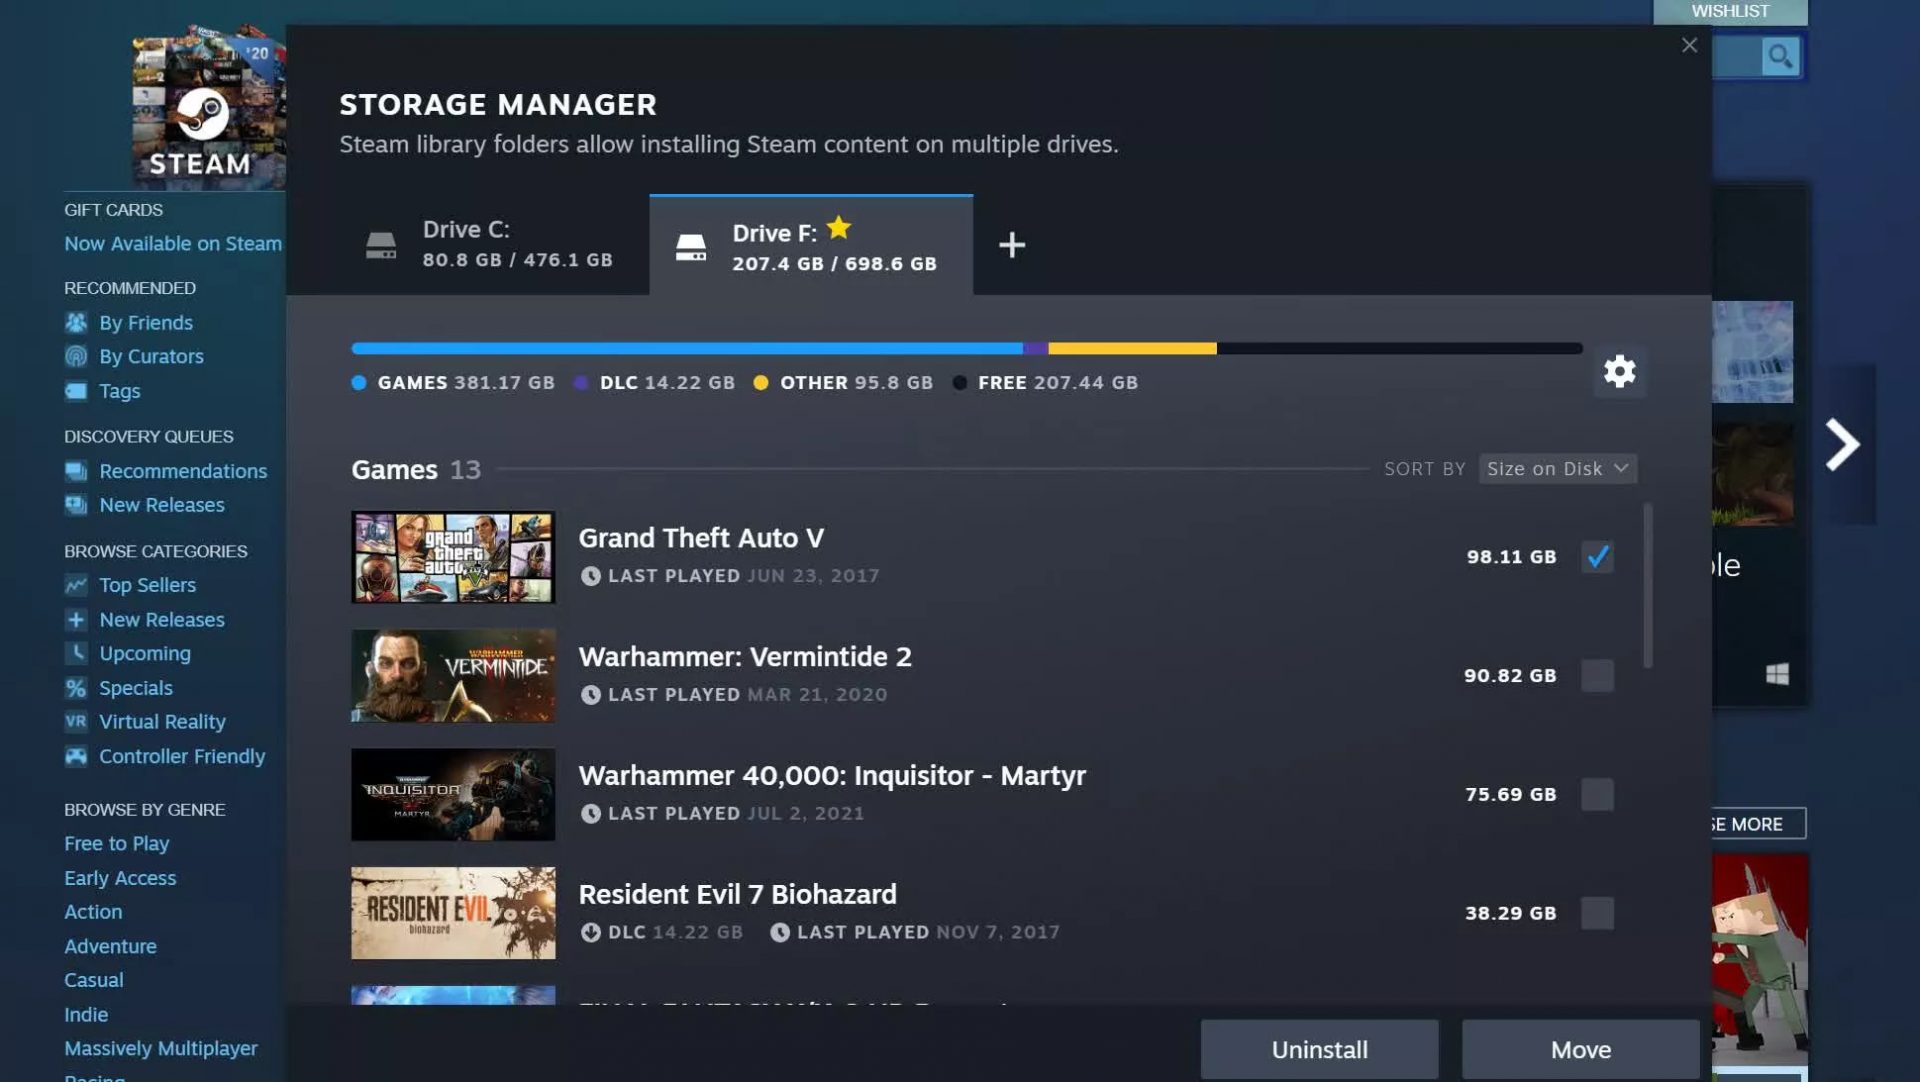
Another thing with the Steam store management page is the ability to move installation files from one location to another. Let’s say that you have two or more hard disk drivers in your machine and that you have SSD that you use for running stuff since it is fast and larger and slower one for storage. Now you can easily and quickly move one installation from one to another in order to take advantage of your faster SSD for quicker LOAD game times without making a new installation.

Steam Download page improvements

The download page has also received some love from Valve by enabling us to now see the installation progress. So far on the download page of Steam, you would only get download progress but it has been updated to show installation progress after download as well now making it more straightforward and giving you a general idea of how much more time there is to wait in order to start gaming. steam download page
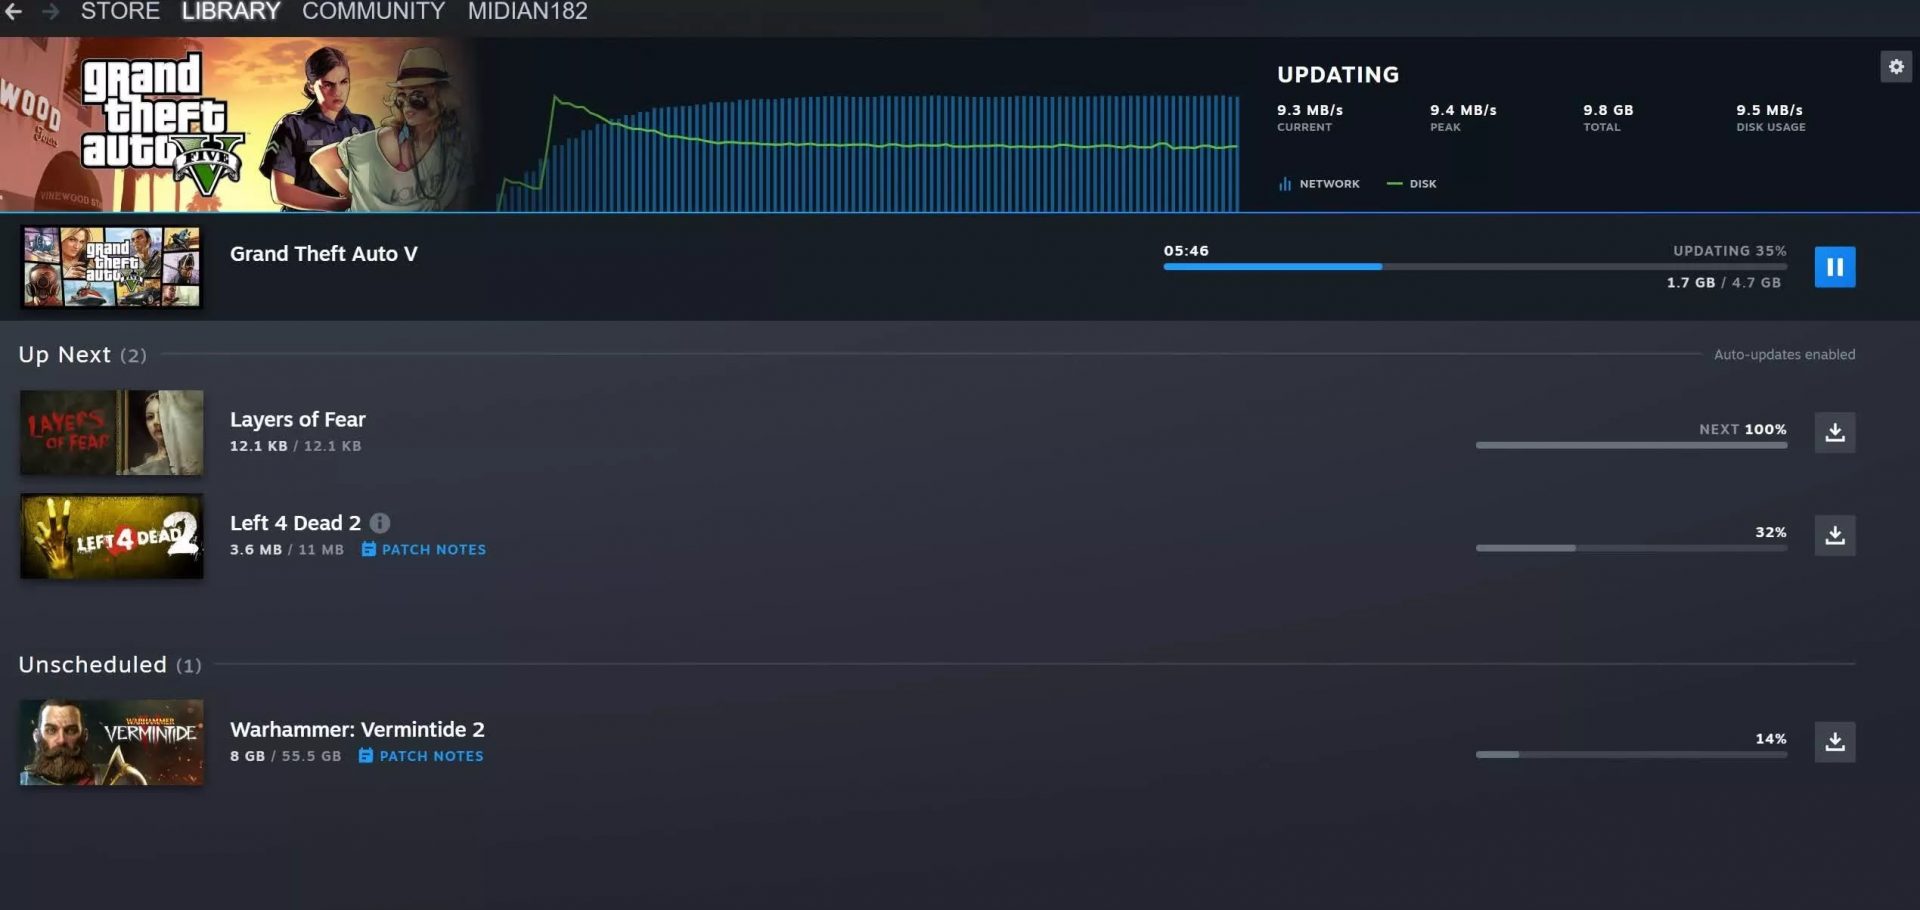
Also, you can now drag and drop items in the download bracket to reorder download orders or place them as active downloads to start downloading right away.
Read More
How to Fix Error 0x80073712 in Windows
There are times when system files get corrupted and if the Windows Update process finds the system’s integrity questionable, chances are, the update, upgrade or the installation may fail and you will only be getting an error code 0x80073712 instead of completing the process. The error code 0x80073712 indicates that a file needed by the Windows setup or the Windows Update is most likely missing or damaged. To resolve the problem, here are some suggestions you can try.

Option 1 – Try running the DISM Tool

Running the DISM Tool helps in repairing the Windows System Image as well as the Windows Component Store in Windows 10. Using this built-in tool, you have various options such as the “/ScanHealth”, “/CheckHealth”, and “/RestoreHealth”.
  • Open the Command Prompt as admin.
  • Then type in this command: exe /Online /Cleanup-image /Restorehealth
  • Do not close the window if the process takes a while as it will probably take a few minutes to finish.
After you run this tool, a log file is created at C:WindowsLogsCBSCBS.log. On the other hand, if the Windows Update client is already broken, you will be prompted to use a running Windows installation as the repair source or use a Windows side-by-side folder from a network share, as the source of the files. Although the chances of this happening are less, if it turns out to be the case, you need to run an advanced command in the DISM tool to repair a broken Windows Update. Just repeat the process above but use the following command instead:
DISM.exe /Online /Cleanup-Image /RestoreHealth /Source:C:RepairSourceWindows /LimitAccess

Option 2 – Try running the System File Checker

System File Checker or SFC is a built-in command utility that helps in restoring corrupted files as well as missing files. It replaces bad and corrupted system files with good system files that might be causing the error 0x80073712. To run the SFC command, follow the steps given below.
  • Tap Win + R to launch Run.
  • Type in cmd in the field and tap Enter.
  • After opening Command Prompt, type in sfc /scannow
The command will start a system scan which will take a few whiles before it finishes. Once it’s done, you could get the following results:
  1. Windows Resource Protection did not find any integrity violations.
  2. Windows Resource Protection found corrupt files and successfully repaired them.
  3. Windows Resource Protection found corrupt files but was unable to fix some of them.

Option 3 – Try running the Chkdsk utility

You can also try running the Chkdsk utility to resolve the Windows Update error 0x80073712. If your hard drive has issues with integrity, the update will really fail as the system will think that it’s not healthy and that’s where the Chkdsk utility comes in. The Chkdsk utility repairs hard drive errors that might be causing the problem.
  • Open Command Prompt with admin privileges.
  • After opening Command Prompt, execute the commands listed below, and don’t forget to hit Enter right after you type in each one of them and if you have installed Windows to some different directory, you must replace “C” with the name of the drive you’ve installed Windows with.
  • chkdsk C: /r /x
  • chkdsk C: /f
Note: The Chkdsk function might take a while before it finishes its operations so you need to be patient and wait until the entire process is completed.

Option 4 – Try running the Windows Update Troubleshooter

Running the built-in Windows Update troubleshooter could also help you resolve the Windows Update error 0x80073712. To run it, go to Settings and then select Troubleshoot from the options. From there, click on Windows Update and then click the “Run the troubleshooter” button.

Option 5 – Try running Microsoft’s online troubleshooter

You also have the option to run Microsoft’s online troubleshooter which could help you fix Windows Update errors.
Read More
1 2 3 162
Logo
Copyright © 2022, ErrorTools. All Rights Reserved
Trademarks: Microsoft Windows logos are registered trademarks of Microsoft. Disclaimer: ErrorTools.com is not affiliated with Microsoft, nor claim direct affiliation.
The information on this page is provided for information purposes only.
DMCA.com Protection Status