Command prompt tips and tricks

Hello and welcome to errortools articles. Today we will talk about some great and awesome tips and tricks for the command prompt. Commands which can make your life easier and your workday more pleasant.

That being said let's dive in right into muddy waters and swim out with new knowledge.

Tip 1: Read Motherboard information

There are a lot of reasons why you would like to read information from your motherboard, maybe you would like to upgrade your BIOS, perhaps you would like to know the serial number, maybe even the version number. Well, you can, type the following code into the command prompt and you will receive all information about your motherboard.

wmic baseboard get product,version,serialnumber,product

Tip 2: Copy command output to clipboard

Getting information from the command prompt to a word processor, into an email or any other medium can be somewhat troublesome, usually, people tend to screenshot or write from a command prompt into another destination, which could induce errors, and let's be honest, it is not practical. You can copy command output directly into the clipboard ready for pasting it anywhere with | clip. So for example if you would like to paste the directory structure of your c drive command would look like: dir c: | clip, now output would be placed into the clipboard ready to be pasted anywhere needed.

Tip 3: Erase data permanently

When you delete data on your hard drive, what really happens is that files are marked with a marker which marks that space for new data writing, but the data itself is still present and can be brought back. This sometimes could impose problems but if you would type: cipher /w:c Windows will write random data over each marked file deleting it forever without means to be brought back.

Tip 4: Manage your IP address

If you would like to play with your IP address and do fancy stuff with it do the following:
ipconfig /release to release your IP address
ipconfig /renew to renew your IP address
ipconfig /flushdns to flush down DNS information and enjoy a new browsing start.

Tip 5: Check to see are packets reaching the desired location

You installed a new LAN printer, or a new switch, maybe you want to check if your new site is up and running. Use ping destination in order to see if TCP packets are reaching desired information, you can use it with a specific address like ping 192.168.1.1 or you can type a web address, for example, ping google.com and see if a connection can be established.

Tip 6: Get information about a specific command

So you learned some command prompt commands, but you do not know all of their configuration or switches? No worries, just type command/? to get a list of available switches for it. For example ipconfig/? will write you a list of available switches for ipconfig command.

Tip 7: Link and execute multiple commands one after another.

Let us say that for example, you would like to copy files into a different folder, then rename some and delete others and you need to do a couple of times. Instead of writing command after command once each one is finished link them with && and they will execute one after another.

Tip 8: Scan and repair files.

In order to scan files and repair broke or corrupted ones write in the command prompt: sfc /scannow. Please know that this command can take a long time since it is solely dependant on the number of files, their size, and the power of the computer.

Tip 9: Manage and configure your computer energy

Command powercfg will let you manage and see the power configuration of your computer. Just write powercfg/? and see what you need and want to change or get information about.

Tip 10: Associate files with applications

Windows already has some file associations defined, and some applications take over some type of files but if you want to take control into your own hand use assoc command. For example
assoc.txt= "APPLICATION NAME" will associate txt files with the provided application.

Tip 11: Hide files and folder.

Do you have some folder or file with information that you do not want to be seen when someone opens file explorer? Use attrib +h <name of file> and hide file or attrib +h /D <folder name> to hide folder.

Tip 12: Get a list of installed computer drivers

Want to know which drivers are installed in your system? Use driverquery and take a look.

Tip 13: Find and locate shared folders

have you shared a folder but forgot which one and where? Do not bang your head on the wall, we have a simple solution for you. just type in command prompt net share and see everything.

Tip 14: Run commands as an administrator

You do not have administrator privileges? Do you want to bypass common blockades?

runas /user:yourdomainadministrator command

That is all that we have for you today, I certainly hope you have found something useful here and that we have managed to teach you some valuable things.

If you like to learn and find out more about various Windows errors, and how to repair them go to our vast archive or use search to find articles that will explain and help you in solving your issue.
However, if you prefer to do things fast and with automatization then we are proposing to use an automated solution for your issues. The application that we are recommending is Advanced System Repair Pro
Advanced System Repair utilizes multiple tools all in one to give you a quick, simple, reliable, and very thorough diagnosis of your PC. It brings you all the tools you need in one program to clean, fix, protect, optimize and boost your PC!
1-Click Maintenance
All the tools to make it simple and easy! It's like having a professional technician at the click of a mouse.

Junk Cleaner
Keeping your computer free from unnecessary clutter also helps make your computer last longer. Like any other machine, if you keep it clean and take care of it, it will serve you better for longer!

Optimize background apps
Optimize applications background activity with the built-in Application Optimizer feature.

Disk Defrag
With a simple 1-click, Advanced System Repair speeds up your PC by assembling fragmented files on your machine and organizing them more efficiently.

Malware Removal
Finds and removes all types of harmful malware including trojans, worms, bots, adware, spyware, PUPs, and more!

Privacy Cleaner
The all-in-one privacy suite to Clean Your Tracks & Protect Your Privacy! Make your computer safe, secure, and more efficient!

System Tweak/Optimizer
ASR will analyze your complete system and settings to adjust your PC to function at its maximum performance.

Registry Cleaner
Over time, as you install and uninstall applications, the registry can become cluttered with old entries and broken settings which can result in program crashes, and annoying messages and slow the computer down.
Visit our Advanced System Repair Pro Download page to inform yourself about all the benefits of this software and get a free trial copy of it.
advanced system repair pro

Advanced System Repair Pro

One-click automated PC repair solution
ASR logo
With Advanced System Repair Pro you can easily
Replace damaged files
Restore performance
Free disk space
Remove Malware
Protects WEB browser
Remove Viruses
Stop PC freezing
DOWNLOAD
Privacy Policy | Terms of Use | Uinstall
Advanced System Repair Pro is compatible with all versions of Microsoft Windows including Windows 11

Share this article:

You might also like

Disable Windows insider in Windows 10
In their search for making Windows, a better operating system Microsoft has come up with an insider program that will collect telemetry and send it to Microsoft in order to provide enough information to make a better OS. Being in an insider program is per choice basis and it is not forced to anyone. This guide will cover how to turn off the insider program since its constant updates and telemetry can slow down the internet. So if you decided that you no longer want to be part of this program here is how to turn it off.
  • Press ⊞ WINDOWS + R to open the run dialog keyboard with windows and r marked
  • Type in dialog gpedit.msc and press ENTER
  • You will find yourself in the Local Group Policy Editor Window. Inside windows find: Computer Configuration > Administrative Templates > Windows Component > Windows Update > Windows Update for Business
  • Move to the right pane and double-click on the Manage Preview Builds option
  • Inside the Manage Preview Builds window, check the Enabled radio button
  • Go to the Options section, and using the drop-down menu, set the preferred release channel
  • Select Apply and then OK
Read More
Best Browsers in 2021 with browser description
In today's digital life, when we access the internet daily, browsers are essential almost as our operating system, after all, we do access all of the internet data via them, and having a good, reliable, and personal browser tailored for our needs can make all the difference in the world. In today's article, we will introduce you to the five greatest browsers of today, we will point their advantages and disadvantages and why should you pick one or another. As with each piece of software, there is not an ultimate browser, better than anything else and we will not favor anyone on this list, the decision which you should use is solely up to you, we are here to provide you with an objective opinion on each one. All of this being said, let's begin with the countdown in no particular order.
  1. Mozilla firefox.

    firefox browser If you consider yourself a power user or you value your privacy then firefox is the browser for you. It is open source and is packed with great features like reporting when your email has been used for a known data breach, it stops annoying pop-up notifications, stops browser fingerprinting, and many more. Firefox is also a cross-platform browser making it a great choice if you want to transfer and use your data across multiple devices with one account. The downside of firefox however is its speed, this browser is the slowest on this list, I guess features and advantages took their tool in the speed department, but if that is not a concern for you and you feel like the positives outweigh some slower speed, grab it here.
  2. Google Chrome

    chrome browser Chrome browser has been a game-changer when it was released and even today some of its features are still great and needed. It is packed with some great features like tab freezing, for example, it is cross-platform meaning that also as firefox you can change data between browsers on different devices. it is a very expandable browser with tons of extensions and its speed performance is very very good. The downside of Chrome are two things sadly, one of them is its hunger for RAM, the browser takes a big chunk of RAM once it is active and on some older computer with limited RAM it performs slowly, another is telemetry which its sending, in other words, other browsers don’t come with the lingering fear that Google’s just a little bit too involved in all of our lives. But if downsides do not trouble you and you have a decent amount of RAM in your system chrome might be the best solution for you, grab it here and check it out.
  3. Microsoft Edge

    edge browser Or should I say Microsoft edge 2.0 since this new Edge is completely recoded and rethought, a completely new browser based on chromium. The first version of the edge was an inhouse attempt from Microsoft and it was a disaster, I guess the lesson was learned, and this new edge we have today is a great Browser, it is lightning fast and packed with some great features with one among them standing out I just love, that is the ability to save web pages as applications and truth to be told you have to try this in order to see al great advantages it offers. A very interesting feature is that edge itself wins the speed race from all of the 5 contestants here which is a great surprise. Of course, the downside of annoying Microsoft pushing it to be your default is, well it's Microsoft, as chrome is tied to Google so is edge tied to Microsoft, and the same dreaded feeling that big MS is watching you. If however, you do not concern yourself with these kinds of things, since it is already part of Windows 10, give it a spin and try it, I am sure you will at least love its blazing speed.
  4. Vivaldi

    vivaldi browser A new kid on the block, relatively unknown Browser Vivaldi offers some great customizable features no other one on this list offers, a very unique and down to each detail customization option, you can literally tweak each and every aspect of this browser making it best customizable and personal browser ever. How it is also based o chromium, every chrome extension works in it naturally. It is very good in speed and constantly updated and developed. The downside, well if you are anything like me, you could spend ages trying to customize it, ages, it has tons of features, and making it really feel and tick as you want can consume a really lot of time. If this thing does not bother you at all, grab Vivaldi here.
  5. Opera

    opera browser Last but not least, we have another relic of the old browser age, the Opera browser. Packed with great security and great in-house features like a built-in VPN, built-in ad blocker, built-in crypto wallet, etc this browser seems like a swiss army knife. Opera is full of features and it shows once you start using it. The downside of opera is that its look and feel are specifically tailored to a certain type of user and not everyone will find that appealing or attractive, add some great but hidden and hard to come by features and it may go unnoticed. However, I think you should really give it a go since it definitely deserves more attention than it gets. Grab it here and check it out.
That's it, 5 great browsers to look up, I hope that you have enjoyed the read and I hope to see you again here for more articles. If you would like to read more helpful articles and tips about various software and hardware visit errortools.com daily.
Read More
A Guide to Resolving Error Code 35

Guide on Resolving Error Code 35

Error Code 35 - What is it?

Error Code 35 is a typical Device Manager error. It indicates information missing to properly configure your device.  Error code 35 is usually displayed in the following format:

“Your computer's system firmware does not include enough information to properly configure and use this device. To use this device, contact your computer manufacturer to obtain a firmware or BIOS update. Code 35”

Solution

driverfix boxError Causes

The 2 common reasons for Device Manager error code 35 are:

  • Outdated BIOS
  • Mis-configured, corrupted, or outdated Drivers

No matter what the reason may be, it is advisable to resolve the problem immediately without any delay otherwise you will be unable to use your hardware device.

Further Information and Manual Repair

Below is the list of the most effective and easy to perform solutions to resolve error code 35 on your PC. These solutions do not require any technical knowledge or understanding. Simply follow the instructions to resolve this error code.

Method 1 - Update the BIOS

BIOS (Basic Input/Output System) is the embedded software on the computer’s motherboard.

Though not all PCs have the same BIOS manufacturer, but the steps for updating the BIOS are similar for all versions. Before you get started with the updating process, first identify your current BIOS version.

  • For this, go to the start menu and type msinfo32, and press enter.
  • Now click System Summary to view your BIOS version. Here you will see the version number and date.
  • Now check your PC motherboard manufacturer’s website to download the BIOS update for the model you own. Also, download any Read Me Files and documentation. These contain guidelines and precautions that you should know before you update.
  • Backup all your data and existing BIOS before you update the BIOS version. This will keep your data protected in case the attempt to update BIOS fails.
  • Also, when updating, make sure to use an uninterruptible power supply. Remember power outage or even a small power fluctuation can corrupt the BIOS which is something you don’t want.
  • Now it’s time to perform the update. Run the downloaded installer for the BIOS updating software. Double click on the executable file.
  • Look for a button names Update, Flash, or Run.
  • Click on it to start updating the new version
  • After the update is complete, your computer will restart automatically.

This will hopefully resolve the problem. However, if the error still persists then there is a possibility that the error code is related to outdated drivers. To resolve, try method 2.

Method 2 - Download Driver Assist to Update Drivers Automatically

Update drivers to repair error code 35 on your PC by simply downloading DriverFIX. This is a cutting-edge program deployed with an intelligent programming system.

It is compatible with all Windows versions.

It scans your PC for problematic drivers and updates them with the latest and compatible versions automatically and in a few seconds thereby repairing all Device Manager error codes including error code 35 generated due to outdated/corrupted drivers.

In addition to this, it updates all device drivers on a regular basis, so you don’t have to stress over and keep a track of what drivers on your PC need to be updated and when.

Click here to download DriverFIX to resolve Device Manager error code 35 today!

Read More
Fix 0xA00F4244 or 0x200F4244 error in Windows
Error 0xA00F4244 or 0x200F4244 is when Windows can not detect the WEB camera in your system and it is usually accompanied by the message: We can’t find or start your camera. There could be several reasons for this error and in this guide, we will cover all of them in order to help you to get back on track and start using your WEB camera which is perhaps now more required than ever in this world we live in.
  1. Check privacy settings

    With the latest Microsoft Windows updates come the latest issues and it is not strange that privacy settings can become reset or changed when an update is applied. This is a quick fix to this issue and can be the sole reason why you get this error, go to Windows settings, then to privacy and check to see if the WEB camera is turned OFF, if this is the case turn it back ON and make sure that option Allow apps to access your camera is also set to ON.
  2. Check if the camera is enabled

    Sometimes it is by mistake, sometimes by an update but the web camera could be disabled in the device manager of Windows. Right-click on the Windows Start button and click on device manager to open it up, find and expand the cameras category. Right-click on your camera, if it is disabled, you will have the option to enable the camera, if it is enabled and Windows is detecting that it is working fine you will have the option to disable it.
  3. Check antivirus settings

    Antivirus and firewall applications are in today's world and life-essential piece of software but they can sometimes create more harm than good, from stopping windows updates to killing important services of applications and preventing internet access being just some examples of their paranoid behavior. Try disabling or turning your protection software OFF and see if your WEB camera will miraculously come back to life. If this is the case, somewhere in the settings of software there is an option that controls this aspect, try to locate it and set it in that way so you are able to use your camera.
  4. Reinstall camera driver

    If the previous three solutions failed to produce a satisfactory solution then reinstalling the camera driver might fix the problem. Go to your manufacturer's camera website and download the latest driver for your camera. Go to the device manager and uninstall the driver for the camera, then apply the latest driver and reboot the system.
  5. Check connections and cable

    Sometimes an issue is not due to software nature, sometimes it is hardware. Try checking connections and plug the camera in another USB port, twist and turn the cable a little to see is issue cable-related.
  6. Check to see if the application supports your camera

    If Windows has detected the camera and is not reporting any issues with it check your application to see if it can detect your camera and that it supports it fully. Sometimes newer applications tend to support only newer camera models. Try to use the camera in other software as well to see if the problem is with the application you are using.
  7. Try camera on another computer

    If everything else fails, try the camera on another computer to see if it will work there. If the camera is not working there as well it is probably malfunctioned and broken for good. If it does work there, try to find out what is different in that computer in comparison to yours, maybe it is some service running in the background, certain application configuration, Windows version itself, USB port version, or something else.
Read More
Fix Setup has failed Error in Windows
If you encounter the “Setup has failed to determine supported install choices” error when trying to downgrade or upgrade your Windows 10 computer, this signifies that there are some compatibility issues with the installation process and that Windows was not able to either downgrade or upgrade to another version. Usually, this error occurs when you are using the built-in options in Windows 10 upgrade or downgrade to another version of Windows. This option is mostly used as it keeps the user settings as well as data intact. Thus, you need to keep in mind a lot of parameters before you proceed with the installation because if there is any conflict in the process, you certainly won’t be able to downgrade or upgrade your Windows computer. To resolve the issue, here are some suggestions that might help.

Option 1 – Try running in Compatibility mode

This is the first thing you can try to resolve the issue instead of going right ahead on making a bootable device. So if you are downgrading Windows, you can try to run the installer in the compatibility mode for that specific Windows version.
  • Look for the setup file.
  • Once you find it, right-click on it and select Properties from the context menu.
  • After that, go to the Compatibility tab and mark the checkbox for “Run this program in compatibility mode for:” and from the drop-down list, select either Windows 7 or Windows 8.
  • You also have to check the “Run as administrator” option.
  • Now click the Apply button and then click OK to save the changes made and check if it has resolved the issue or not.

Option 2 – Option 2 – Try troubleshooting compatibility

This option is almost the same as the first one except it is an alternative way of fixing the “Setup has failed to determine supported install choices” error in case the first one didn’t work. In this option, you will troubleshoot the compatibility issue.
  • Look for the setup file.
  • Then right-click on it and select the “Troubleshoot compatibility” from the context menu.
  • After that, click on the “Try recommended setting” option. Once the process is done, the error message should be gone.

Option 3 – Try to use the setup file instead of an image

If you are running the Windows ISO image for the installation, you can try running the setup file instead. This is because when you try to install Windows from an image file directly, it has to be loaded into a virtual CD drive first, and then from there, further operations are carried out. And so, you can just bypass this mechanism to avoid getting the “Setup has failed to determine supported install choices” error.
  • First, you need to extract the disk file to an accessible location.
  • After that, go to Sources > Setup.exe.
  • Now run the setup file to upgrade or downgrade the Windows version. Just make sure that you do run the setup file as an administrator.

Option 4 – Try to do the upgrade or downgrade in a Clean Boot state

Putting your PC in a Clean Boot state can also help when you want to upgrade or downgrade your version of Windows without any trouble because, during this state, you can start the system with a minimum number of drivers and startup programs that will surely help you in isolating the root cause of the issue.
  • Log onto your PC as an administrator.
  • Type in MSConfig in the Start Search to open the System Configuration utility.
  • From there, go to the General tab and click “Selective startup”.
  • Clear the “Load Startup items” checkbox and make sure that the “Load System Services” and “Use Original boot configuration” options are checked.
  • Next, click the Services tab and select the “Hide All Microsoft Services” checkbox.
  • Click Disable all.
  • Click on Apply/OK and restart your PC. (This will put your PC into a Clean Boot State. And configure Windows to use the usual startup, just simply undo the changes.)
  • After that, try to install the Windows Updates or upgrade again.

Option 5 – Try to use the Media Creation tool

The Media Creation tool in Windows allows you to use the ISO installation file to make a bootable device that you can use to install Windows on your PC. Note that this is kind of different from the usual installation process as it could erase your computer’s current settings and data on the primary drive. Thus, before you proceed, you need to backup all your data into some removable drive and then use the Media Creation Tool to make a bootable drive.
  • After making the bootable drive, you need to plug it into your computer and then reboot.
  • Next, tap the F10 or Esc key to open the boot options.
  • Now set the boot priority of the removable drive the highest. Once the setup comes forth, follow the next onscreen instructions and install Windows without any problems.
Read More
Steam Deck, a modern PC handheld console
steam deck
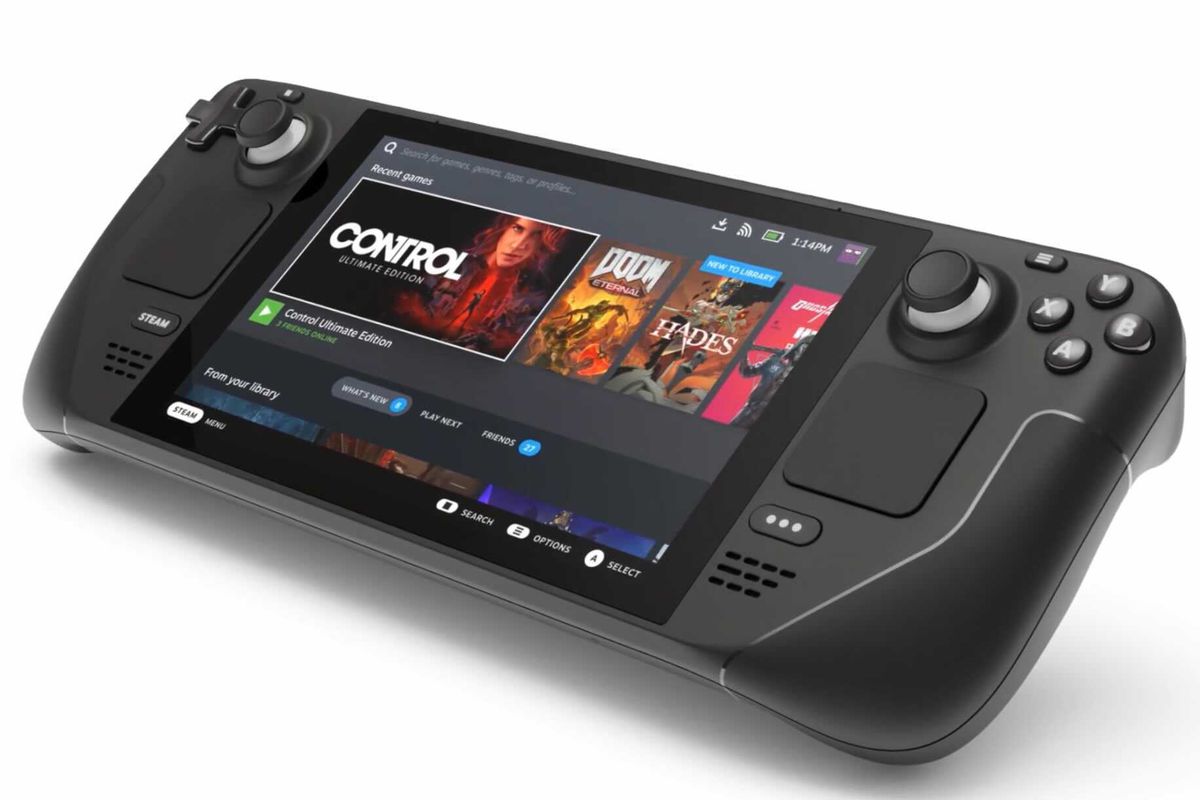
Valve has announced the first gaming PC handheld console: Steam Deck. At its core, Stead Deck is just a portable, small PC in little casing. It uses AMD Zen 2 CPU and RDNA 2 GPU architecture, has 16GB of RAM, Wi-Fi, and Bluetooth. It is a portable device with both a touchpad and joystick packing a seven-inch screen with a resolution of 1280x800 (16:10 aspect ratio). The screen has an ambient light sensor for automatic light adjustments same as your modern mobile device. Stating to Valve battery will hold up from two to eight hours depending on the activity of the user and what exactly he is doing. The handheld comes also with a carrying case.

Steam Deck operating system and software

Out of the box, Steam Dock comes with the latest Valve’s version of SteamOS 3. Just for comparing, the steam box was coming SteamOS 2, so this new Linux-based OS is aimed to provide better performance and better compatibility. Naturally, all Linux games in your Steam library will work right out of the box but Valve has something called PROTON inside OS, it is emulation software based on Wine that will supposedly let you play all of your Library games on a given OS. One big thing to mention here is that this is PC after all meaning that if you do not like having SteamOS on it you can install Windows instead and so far as we know it will support Windows 11. Now with Windows 11, you will be able to play all of your Steam games and run any kind of Windows software on it including EPIC store, battle.net, and others.

Cost and release date

The initial release date is set for December 2021 and today on July 16th Valve is opening you can reserve your copy if you want to pre-purchase. Follow this link if you want to reserve your copy. Reserve your Steam Deck device The price of the device will depend on the memory capacity which you would like to have. Please note that each of the 3 offered devices will have the same hardware, the only difference will be in memory available, and the most expensive version will also have anti-glare screen, everything else is identical. 64GB model will be $399, 256GB model will have the price of $529 and largest one with whooping 512GB will be $649

Conclusion

Valve ventures into the digital hardware domain again but it is unsure will they make it this time. Both Steam machine and their controller were in long run failed and later unsupported products so perhaps some customer caution is advised. Although having a handheld PC is tempting I would advise seeing how the overall market will accept this contraption before throwing money into it.
Read More
New toys in new PowerToys for Windows
A new update to popular Microsoft PowerToys has brought a few new features that are aimed at speeding up the workflow. PowerToysThe first new feature that was slid in is Always on top utility. With this cool utility, you can keep the window as the name suggests, always on top of other windows. To enable this cool feature all you have to do is press the key combination of ⊞ WINDOWS + CTRL + T and an active window will be now always on top of all other windows. To reverse and unlock this window from being always on top just press key combination again. A second new feature is a really great one and my favorite thing to happen in power toys. Often we are making the search in our browsers to find stuff, things, maybe some explanations, information, etc. The newest update in power toys brings this to a whole new dimension. While you are on PC you just simply need to type ?? followed by questions like: ?? When doctor strange 2 is coming out and that will launch your default browser with your chosen search engine and provide you with the answer. Third and final thing is G-code support in the file explorer preview pane and thumbnails, meaning that if you work with CNC equipment you can now have a thumbnail preview of the code itself inside File Explorer. And that’s it for now, thank you for coming and reading, Take care and I hope to see you next time.
Read More
Can’t connect to this network Windows issue
Internet connectivity issues like Can’t connect to this network present a complex problem with simple solutions for PC and laptop users. First, it is usually recommended that users rule out problems with the internet connection, router, and Wi-Fi settings before proceeding to troubleshoot settings on your PC/laptop. Once the rest are ruled out, we can then proceed with the following troubleshooting steps and guidelines to fix your wifi connection issue: The first step is to update your windows network adapter driver. Connectivity problems may arise if your network driver is not updated or if it is incompatible with the network adapter. To do so, you may resort to any third-party driver scanning and installing programs found online. This solution should resort if users don’t want the hassle of perusing through windows settings that users may not be familiar with. However, this solution requires a pre-existing internet connection other than wifi, so it is recommended you have a backup internet connection via ethernet. The second step is to uninstall the driver for your network adapter. This solution is to resort if there is an issue with the driver as restarting the PC after the following steps let windows reinstall the driver again:
  • Open the quick access menu on your keyboard by pressing the Windows key and X key at the same time and select “Device Manager” from the menu list.
  • From the list of devices, select “Network Adapters”
  • Usually on the top of the list is the Wireless Network Adapter
  • Right-click the Wireless Network Adapter and select the option to “Uninstall device”
  • You will be given a confirmation in a new separate window to proceed. Click “Uninstall” to proceed.
  • After completing the previous steps, try rebooting your Windows PC and reconnecting to see if it works.
A third step is to disable the 802.1 1n modes of your network adapter by following the next steps:
  • First press the Windows logo key and the X key at the same time to bring up the quick-access menu. And like the previous step, select “Device Manager”
  • From the list of devices, select “Network Adapters”
  • Right-click the Wireless Network Adapter from the drop-down menu and select properties
  • Under properties, select the “Advanced” tab then select the 802.1 1n Mode. To the right drop-down menu change the option to  “Disabled” and click “Ok”
  • After, try to re-establish the connection to see if the steps have worked.
In the event that any of the preceding did not fix your problem, it helps to take a second look at the router and network settings using the interface provided by your ISP. A simple reset to the back of your router often fixes the issue. Also, try to check if you have any other administrative capabilities over the network to determine whether your device, in particular, has been MAC filtered or if the frequency of your wireless adapter is not compatible with the broadcast frequency of your router.
Read More
Fix Error 0x80246019 in Microsoft Store
Microsoft has started building a unified store with Windows 8 and later with Windows 10 in order to make it easier for users to get safer and more modern applications for their Windows 10 devices. This unified store is called the Microsoft Store which is tied up with the Windows Update. The delivery for them both are quite similar which is why they also have some common errors as well as fixes for them. So in this post, you will be guided on how you can fix error 0x80246019 for both Microsoft Store and Windows Update in your Windows 10 computer. The error 0x80246019 might be caused by corrupted system files or missing ones or be due to some glitch in the component services and other possible causes but whatever the cause is, you can fix it with the help of the following fixes, make sure to follow each one of them carefully.

Option 1 – Reset Windows Update components

  • Open Command Prompt with admin privileges.
  • After that, type each one of the following commands and hit Enter after you key in one after the other.
    • net stop wuauserv
    • net stop cryptsvc
    • net stop bits
    • net stop msiserver
Note: The commands you entered will stop the Windows Update components such as Windows Update service, Cryptographic services, BITS, and MSI Installer.
  • After disabling WU components, you need to rename both the SoftwareDistribution and Catroot2 folders. To do that, type each one of the following commands below, and don’t forget to hit Enter after you type one command after the other.
    • ren C:WindowsSoftwareDistribution SoftwareDistribution.old
    • ren C:WindowsSystem32catroot2 Catroot2.old
  • Next, restart the services you’ve stopped by entering another series of commands. Don’t forget to hit Enter after you key in one command after the other.
    • net start wuauserv
    • net start cryptsvc
    • net start bits
    • net start msiserver
  • Close Command Prompt and reboot your PC.

Option 2 – Toggle the Windows Insider Program settings

This option is only applicable to you if you are a part of the Windows Insider Program. If you are, then follow the steps below.
  • First, you have to open Settings and go to the Update & Security section.
  • From there select the Windows Insider Program.
  • After that, select the “Stop Insider Preview builds” option and then restart your computer.
  • Now open the Windows Insider Program again and check if it fixes error 0x80246019 or not.

Option 3 – Run the System File Checker Scan

System File Checker or SFC is a built-in command utility that helps in restoring corrupted files as well as missing files. It replaces bad and corrupted system files with good system files that might be the cause why you’re getting error 0x80246019. To run the SFC command, follow the steps given below.
  • Tap Win + R to launch Run.
  • Type in cmd in the field and tap Enter.
  • After opening Command Prompt, type in sfc /scannow
The command will start a system scan which will take a few whiles before it finishes. Once it’s done, you could get the following results:
  1. Windows Resource Protection did not find any integrity violations.
  2. Windows Resource Protection found corrupt files and successfully repaired them.
  3. Windows Resource Protection found corrupt files but was unable to fix some of them.
 Reboot your computer.

Option 4 – Run the DISM tool

You can also run the DISM Tool as it helps in repairing the Windows System Image as well as the Windows Component Store in Windows 10. Using this built-in tool, you have various options such as the “/ScanHealth”, “/CheckHealth”, and “/RestoreHealth” which could help in fixing error 0x80246019.
  • Open the Command Prompt with admin privileges.
  • Then type in the following commands and make sure to hit Enter right after you type each one of them:
    • Dism /Online /Cleanup-Image /CheckHealth
    • Dism /Online /Cleanup-Image /ScanHealth
    • exe /Online /Cleanup-image /Restorehealth
  • Do not close the window if the process takes a while as it will probably take a few minutes to finish.

Option 5 – Try to reset the Microsoft Store cache

Just like browsers, Microsoft Store also caches as you view apps and games so it is most likely that the cache is no longer valid and must be removed. To do so, follow the steps below.
  • Right-click on the start button and click on Command Prompt (administrator).
  • Next, type in the command, “wsreset.exe” and tap Enter. Once you do, the command will clear the cache for the Windows Store app.
  • Now restart your PC and afterward, try opening Microsoft Store again and then try to install your app or update your computer again.

Option 6 – Run the Windows Update Troubleshooter

You might also want to run the Windows Update Troubleshooter as it could also help in fixing error 0x80246019. To run it, go to Settings and then select Troubleshoot from the options. From there, click on Windows Update and then click the “Run the troubleshooter” button. After that, follow the next on-screen instructions and you should be good to go.
Read More
How to fix Error 2753, The file is not marked
Installing programs on your Windows 10 computer does not go smoothly as you could encounter some issues along the way that could prevent you from successfully installing the program. One of the common errors you can encounter during the installation of programs is Error 2753. There are times when the packages are corrupted or those packages are not working properly or it wasn’t able to create files and paths. When you encounter this kind of error, you will get the following error message:
“Error 2753, The File is not marked for installation.”
Note that this kind of error is not bound to only some specific files but it can also happen with any file, be it an executable file or an MSI file. To fix this error, here are some possible solutions that you could try.

Option 1 – Fresh download the setup file

The first thing you can do is to fresh download the setup file from the official homepage and then place it in a different location. Just make sure that you download the correct setup file that’s compatible with your operating system. Then restart your computer and sign in as administrator. After that, right-click on the setup file and select the Run as administrator to proceed with the installation.

Option 2 – Try removing all the previous versions of the software

If there is a previous version of the program that’s still installed on your computer, you need to uninstall that program since it might be the reason why you’re getting Error 2753.
  • Tap the Win + R keys to open the Run dialog box
  • Then type “appwiz.cpl” in the field and hit Enter to open the Programs and Features in Control Panel.
  • From there, look for the previous version of the program you are trying to install, select it and then click on Uninstall to remove it.
  • After that, restart your computer and try to install the latest version of the program again. It should work now. If not, proceed to the next available option below.

Option 3 – Run the setup file as administrator

The setup file may need more permission in order to execute properly and so you need to run it as an administrator. To do so, you need to give it more privileges for it to work as intended by its developer.
  • Right-click on the setup file and select the Run as administrator option.
  • Afterward, a User Account Control or UAC prompt will appear and from there, click on Yes and then check if the file runs or not.
Note: If the setup file does not run, you may have to take ownership of the folder where the setup file is located. To take ownership of the folder, refer to these steps:
  • First, locate the concerned folder and right-click on it then select Properties.
  • Next, click on the Edit button in the Properties window and click OK to confirm if you got a User Account Control elevation request.
  • After that, select user/group from the permission windows or click on the Add button to add another user or group. It would be best if you add “Everyone” to give permission.
  • Then check “Full Control” under the “Allow” column to assign full access rights control permissions.
  • Now edit the permission to Full Control for “Everyone”.
  • Click OK to save the changes made and then exit.

Option 4 – Try running the setup file in Compatibility Mode

You may be getting Error 2753 if the setup file is not intended to run on the Windows 10 version you are using which is why you have to run it in Compatibility Mode. This will allow the setup file to think that it is running in a compatible environment as it is intended to.

Option 5 – Try to re-register the vbscript.dll file

You may have to re-register the vbscript.dll file using the regsvr32.exe before you can successfully install the program and fix Error 2753. The Regsvr32 tool is a command-line utility that can be used to register and un-register the OLE controls like DLL and ActiveX (OCX) control in the Windows operating system. Follow the steps below to use it.
  • Open Command Prompt as admin from the WinX menu.
  • Next, type exe vbscript.dll in the elevated Command Prompt and hit Enter to execute the command. This will re-register the affected DLL file using the Windows operating system tool, regsvr32.exe.
  • You should see a message saying, “DllRegisterServer in vbscript.dll succeeded” if the Regsvr32 tool was able to run successfully. After that, try to install the program again and see if it now works.
Read More
1 2 3 162
Logo
Copyright © 2022, ErrorTools. All Rights Reserved
Trademarks: Microsoft Windows logos are registered trademarks of Microsoft. Disclaimer: ErrorTools.com is not affiliated with Microsoft, nor claim direct affiliation.
The information on this page is provided for information purposes only.
DMCA.com Protection Status