A Quick Guide to Resolving the Runtime Error R6025

Repair Runtime Error R6025

What is the Runtime Error R6025?

The runtime error R6025 can be quite annoying for PC users as it pops up randomly anytime. It is a type of runtime error but typically associated with C++ programming. The error is displayed in the following format:

‘Runtime Error! Program: C:…R6025-Pure Virtual Function Call’

Solution

Restoro box imageError Causes

The runtime error R6025 is triggered due to the following reasons:

  • Runtime components of Visual C++ libraries are missing
  • Microsoft.NET framework damaged
  • Registry corrupted with bad files and data overload
  • Virus and malware invasion

Further Information and Manual Repair

Try the solutions given below to repair the runtime error R6025 on your system:

Cause: Microsoft.NET framework damaged

Solution: If this is the underlying cause of the error, then it is advisable to reinstall and repair the Microsoft.NET framework on your PC.

To reinstall this framework, go to the start menu, click control panel, programs and then click ‘Turn Windows features on or off’. Here you might be promoted for an administrator password. Insert the password to proceed.

Now locate Microsoft.NET framework 3.5.1 and uncheck this box, press OK and then reboot your system. After that open ‘Turn Windows features on or off’ and check the Microsoft.NET framework 3.5.1 and then restart your PC. This will hopefully resolve the error.

Cause: Runtime components of Visual C++ libraries are missing

Solution: If runtime components of Visual C++ libraries are missing, then you will have to download and install these from different websites. This can be time-consuming and slightly complicated for you if you are not technically sound.

Cause: Malware Attack

Solution: If the runtime error R6025 is triggered due to a malware attack, then you will have to install and run a powerful antivirus on your PC. This will help detect and remove such malicious software affecting your system.

Cause: Registry Issues

Solution: If registry corruption is the underlying cause of the runtime error R6025 on your PC, then you need to clean up the registry and repair it. The best way to clean and repair the registry is to download Restoro.

Restoro is an advanced PC repair tool integrated with powerful and highly functional utilities all in one.

Utilities include a registry cleaner and a system optimizer. It has easy navigation, a user-friendly interface, and is compatible with all Windows versions. Users of all levels can operate it to resolve all kinds of PC errors including the runtime error R6025.

The registry cleaner utility wipes out all the unnecessary, malicious, obsolete files and invalid entries overloading the RAM. It frees up the disk space, repairs the damaged files and the registry.

Furthermore, Restoro also functions as a system optimizer. It detects system instability issues and resolves them while boosting the speed of your PC.

To resolve the runtime Error R6025 on your system in seconds click here to download Restoro PC repair tool now!

If you like to learn and find out more about various Windows errors, and how to repair them go to our vast archive or use search to find articles that will explain and help you in solving your issue.
However, if you prefer to do things fast and with automatization then we are proposing to use an automated solution for your issues. The application that we are recommending is Advanced System Repair Pro
Advanced System Repair utilizes multiple tools all in one to give you a quick, simple, reliable, and very thorough diagnosis of your PC. It brings you all the tools you need in one program to clean, fix, protect, optimize and boost your PC!
1-Click Maintenance
All the tools to make it simple and easy! It's like having a professional technician at the click of a mouse.

Junk Cleaner
Keeping your computer free from unnecessary clutter also helps make your computer last longer. Like any other machine, if you keep it clean and take care of it, it will serve you better for longer!

Optimize background apps
Optimize applications background activity with the built-in Application Optimizer feature.

Disk Defrag
With a simple 1-click, Advanced System Repair speeds up your PC by assembling fragmented files on your machine and organizing them more efficiently.

Malware Removal
Finds and removes all types of harmful malware including trojans, worms, bots, adware, spyware, PUPs, and more!

Privacy Cleaner
The all-in-one privacy suite to Clean Your Tracks & Protect Your Privacy! Make your computer safe, secure, and more efficient!

System Tweak/Optimizer
ASR will analyze your complete system and settings to adjust your PC to function at its maximum performance.

Registry Cleaner
Over time, as you install and uninstall applications, the registry can become cluttered with old entries and broken settings which can result in program crashes, and annoying messages and slow the computer down.
Visit our Advanced System Repair Pro Download page to inform yourself about all the benefits of this software and get a free trial copy of it.
advanced system repair pro

Advanced System Repair Pro

One-click automated PC repair solution
ASR logo
With Advanced System Repair Pro you can easily
Replace damaged files
Restore performance
Free disk space
Remove Malware
Protects WEB browser
Remove Viruses
Stop PC freezing
DOWNLOAD
Privacy Policy | Terms of Use | Uinstall
Advanced System Repair Pro is compatible with all versions of Microsoft Windows including Windows 11

Share this article:

You might also like

Removing BEEP when adjusting volume in Windows
I often switch between my desktop speakers and headphones and because of this I very often use the volume adjustment bar to adjust sound levels so it is not too loud and each time when I set it I get annoying BEEP at the end. Now personally this might not bother you and you might want to leave it since it can be a useful feature to tell you how much volume is loud but if you are adjusting multiple times volume during the say it can become really frustrating to hear it each time, especially when switching to headphones and it beeps into your ears. In this guide, I will show you how to remove the beep so it is not heard anymore when you adjust the volume. Please know that beep is part of the Windows sound scheme and you can either remove specific sound with a completely silent wave or just turn off all windows alert sounds.
  • Open Windows settings and go to system > sound
  • in system sound, go to the right part of the screen and click on the sound control panel
  • In the sound control panel click on the Sounds tab
  • In the sounds, tab click on the drop-down menu under the sound scheme and choose no sounds.
There you go! You have successfully removed annoying BEEP each time you adjust the volume in Windows 10
Read More
Troubleshooting Error 1722

Troubleshooting Error 1722

What is Error 1722?

Error 1722 is a type of Windows Installer error. Developed by Microsoft, Windows Installer is a software component used for the installation, maintenance, and removal of software on Windows systems. This is basically an .MSI file that contains explicit instructions about installing and removing specific applications that are supported by this file for example JAVA and ArcGIS. The error 1722 occurs when there is a problem with the Windows Installer package. And because of this the program supported by Windows Installer Package fails to set up and install. This error message is displayed in the following format:
“Error 1722. There is a problem with this Windows Installer package. A program required for this install to complete could not be run. Contact your support or package vendor.”

Solution

Restoro box imageError Causes

You may encounter error 1722 due to multiple reasons such as:
  • Windows Installer Package corruption
  • Improper Windows Installer Package installation
  • Windows Script Hosting permission issues
  • Viral Infection
It is advisable to fix error 1722 to ensure the application supported by the Windows Installer Package that you are trying to set up on your PC, installs successfully.

Further Information and Manual Repair

To resolve Windows Installer Package error 1722 on your PC, try the methods given below:

Method 1

Sometimes the error 1722 may pop up if the Windows Installer Package is not installed properly. In such an event, it is advisable to uninstall Windows Installer Package and then reinstall it. To do so, click on start, then control panel, program, and features and then choose the Add/Remove Program option to uninstall the Windows Installer Package on your system. Once it is removed, click OK to save changes. Then reboot your PC. Now download the Installer package and reinstall. After the installation is complete, now try installing the application supported by the Installer package you wished to install. However, first, it is suggested that you remove any traces of the failed application first. For example, if you previously received the error while installing Java, then remove all traces of failed Java installation.

Method 2

The alternative method is to change Window Script Hosting settings. To do this, go to the start menu, open Run and then type ‘Regedit’ in the command line and then press OK to continue. Check for either or both of the following registry keys HKEY_CURRENT_USERSoftwareMicrosoftWindows Script HostSettingsEnabled HKEY_LOCAL_MACHINESoftwareMicrosoftWindows Script HostSettingsEnabled If either of these has a DWORD value of ‘0’, then scripting is disabled. Change the values to ‘1’ will enable scripting and resolve the issue.

Method 3

There can be two reasons for Windows Installer Package corruption, viruses or registry overloaded with bad entries and obsolete files. If the error is triggered by viruses, then run an antivirus program to remove viruses and restore your PC. However, if the error is related to registry issues, then download Restoro. This is an easy-to-use PC Fixer with a powerful registry cleaner. The registry cleaner wipes out all the obsolete files cluttering the registry and repairs the damaged and the corrupt important files thereby repairing all errors including error 1722 on your system. Click here to download Restoro.
Read More
IW Unicorn and Scorpion PC Chair cockpits
Recently on errortools.com, we were talking about Cooler Master’s Orb X gaming chair that is an absolute beast and an amazing product. One downside of Orb X is its price. IW product line is somewhat competing with Orb X with a much more affordable price aiming to probably take customer base with lower income but offering them a great experience as well. The first thing you will notice is a different design and somewhat feeling of cheaper quality if you compare it to Orb X but that is quite reasonable considering the chair itself is around 3.5 times cheaper than Orb X which really puts it in range of everyone can get it. But does a much cheaper price means low quality? Let’s explore.

IW Unicorn

IW unicorn
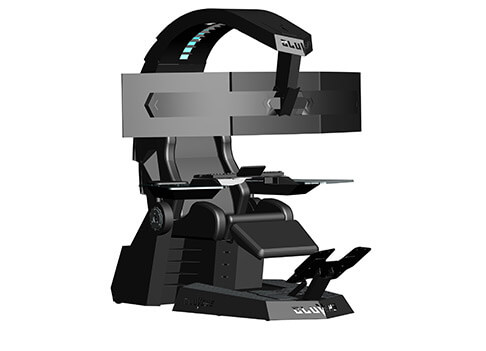
The 2021 CLUVENS BRAND newly issued model UNICORN has fully electrical tilting capabilities to 160 degrees, Reading light-two LED & RGB illumination lighting, manual open/close keyboard tray, and armrests. This model is suitable for home and office, and also gaming computer work environments. It offers functions that enable the user to experience unprecedented comfort and quasi total immersion through strategically positioned 1-3 monitors, audio systems, and accessories. The result is a complete computer office, ergonomically optimized, with a minimal footprint that improves overall performance and productivity and health and comfort. Sitting on a chair can help a lot for relieving health problems like lower back pain, herniated discs, sciatica, and neck pain and also enhance performance and viewing effects.

More Luxury and More comfortable:

Equipped with Luxury feeling reclining Gaming chair made with high-density Mold Shaping Foam and superior quality PU leather with very comfortable texture, electrical recline to 128 degrees, and more to 160 degrees for the flat position for the user.

More High-End Setting and more High-tech:

Manual push for open / close of big sized (87x34cm) Self-Balancing Keyboard tray, adjustable with 20cm distance range with Electrical control for the height of roof arm & monitors. Electrical control for reclining Zero Gravity position or even flat position, Manual adjusted Feet pedal for a more comfortable position for feet. Using a High-Quality PU leather Gaming chair that has Heat/Massage functions with it! The IW-Unicorn monitor mounts allow the use of a single monitor up to Ultra-wide 49” or 43” in size or triple monitor setups up to 3 x 29” other monitors configurations are available upon request. (VESA standard)

IW Scorpion

IW scorpion
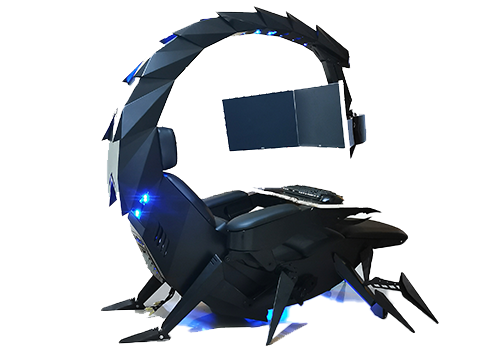
Scorpion is basically a premium version of Unicorn with being able to hold more weight, having cup holders on the armrest, etc. The look is also similar with Scorpion being more sinister-looking but overall Steel frame and chair are the same.

Conclusion

Sadly I have not personally experienced neither of these products including Orb X but from all information I have found and looked over, I would say these products are not trying to compete with each other. Although Products are similar in nature, Orb X is aimed at hi end-users focusing on privacy and robustness while IW is filling the gap of users that would like an advanced chair but are not willing or ready to shell hi amount of money for it offering advanced chairs with advanced features in somewhat affordable price.
Read More
Headphones are not visible in playback devices
If you connected headphones to your Windows 10 computer to listen to audio but when you check it in the playback devices, you’re not able to find it, read on as this post will guide you in what you can do to figure out what exactly caused this kind of problem and how you can resolve it. This kind of issue could simply be with the headphone itself or the headphone port or your operating system. So if it turns out that the problem is with the hardware, you might have to replace the components. However, it is recommended that you troubleshoot the problem first before doing that. The most basic thing you can do is to try changing the headphone port, although this can be quite difficult since most computers don’t have any extra port for headphones if your computer has one, then give it a go. If it still didn’t work, follow each one of the options provided below.

Option 1 – Try to run the Playing Audio troubleshooter

Since the Windows 10 operating system has the Playing Audio Troubleshooter, you can use this troubleshooter to try and fix the problem with the “No Audio Output Device is installed” error. You can access this tool in the Control Panel or in the Taskbar Search and even on the Troubleshooters page of Windows 10. Run this troubleshooter and see if it can fix the issue or not.

Option 2 – Try to update the Audio driver

If the error has something to do with software, chances are it might be related to the audio driver – it could be that the newest version of your Windows 10 does not work well with the old version of the driver. This is why you have to update your audio driver to the newest available version.
  • Tap the Win + R keys to open the Run dialog box and then type in MSC and tap Enter or click OK to open the Device Manager.
  • Expand the section of the Audio inputs and outputs.
  • And then from the drop-down menu, select the Update Driver option and follow the on-screen instructions to install the latest version of the driver.
  • Then also click on the option, “Search automatically for updated driver software.
  • Restart your PC after the installation.
Note: If updating the Audio driver didn’t work, you can go to the website of your PC manufacturer and look for the support section where you can download the drivers for your computer. You just need to take note of your PC’s correct model and model number so you can find the appropriate driver.

Option 3 – Try enabling the headphones from the playback devices

  • Tap the Win + R keys to open the Run dialog box and type the “CPL” command.
  • Tap Enter to open the Playback devices.
  • Next, right-click on any open space section and check the boxes for the “Show Disconnected Devices” and “Show Disabled Devices” options.
  • After that, this should help in displaying the headphones in the section of Playback devices.
  • And if they are disabled, you can just right-click them to have them enabled.
Read More
How to know if you have keylogger in Windows
Hello and welcome everyone, today we will be talking about dreaded keyloggers, why they are dangerous, and how to know if you might have one in your system. Keylogger is a malicious application placed in your system and hidden with only one goal in mind, to get information about what are you typing and by that means for a person who infected you to get information about your credit card information or other sensitive data. They can be introduced into your systems in various ways and often can not be detected easily. Modern antivirus applications have ways of detecting them and removing but this tutorial aims to teach you how to spot them all by yourself since new keyloggers are produced daily and sometimes relying on antivirus alone is not enough. Unlike viruses and trojans, keyloggers are not heavy on system resources and you will not feel slow down on your computer if you have one which makes them harder to sport with regular work. Some of them can be even tracking you on the website and not even be physically present on your computer. Generally, we could categorize keylogger into 4 categories:
  1. Web browser-based keylogger. Some websites would have CSS scripts, input web forms, or so-called man in the middle keylogger. Lucky for us even Windows defenders with the latest update can detect this type of keylogger and successfully deal with it and how keylogger itself is not present on our system we are safe.
  2. General spyware keylogger. This keylogger is present in your system, usually, it infected it via email attachment, social media download, torrent download, some malicious so-called fixer application, etc. Most antivirus applications and windows defenders can detect these types as well and remove them successfully.
  3. Kernel-level keylogger. This keylogger is a more dangerous type they tend to operate underneath Windows as a rootkit and can go undetected by antivirus and windows defenders.
  4. Hypervisor-based keylogger. This is the most dangerous keylogger, they use virtualization techniques to hide and mask themselves as a replica of the operating system and they scan all keystrokes by the user. These are very rare keyloggers but they do exist.
If you suspect that you have a keylogger or just want to check your system for precaution reasons follow these tips and guides and luckily you will solve your issue in no time and your data will be safe.
  1. Use Task Manager to find suspicious entries.

    Task manager is a great application implemented in Windows that is constantly monitoring and showing all services, applications, and processes currently running on your system and thus a great tool to monitor your system if you know how to use it. First, open task manager by pressing CTRL + SHIFT + ESC Then take a good look into it, try to find suspicious names, probably duplicate of running application, something like Windows logon application, or keylog or anything similar which seems out of ordinary. If you manage to find a suspicious running application right-click on it and close it. Also while you are in task manager jump into the startup tab and check to see are there some unusual applications starting with your Windows, if you find anything, disable it right away. This is the most simple and quickest way to get some information right away if you suspect to have some simpler keylogger in your system.
  2. Use the command prompt to monitor your network.

    In order to check connections to your computer and find potential suspicious ones start the command prompt in administrator mode, press ⊞ Win + X, and choose command prompt (administrator). type in netstat -b and press ENTER. All website and application connections to your computer are now visible. ignore svchost, edge browser, windows store, etc ad check the IP of the remaining ones using the internet.
  3. Use rootkit malware removal tool.

    Download restoro and scan your complete system for malware and remove them with one click.
  4. Use keystroke encryption.

    Install encrypting software and even if you have a keylogger, the application will encrypt each stroke and all that attacker will get is gibberish
Please remember to always download files from trusted sources, do not open unknown emails, and do not share your information publicly. Take common protection steps in order to protect yourself in the digital world.
Read More
Fixing netio.sys Blue Screen error in Windows
One of the most important components of a computer in the network. The network, with the help of network devices, makes it possible for all kinds of devices to exchange information. One of the files associated with the network driver is the netio.sys file. It is a system file used by third-party programs to interact with the devices on the network. If you encounter a Blue Screen of Death error that’s related to the netio.sys file then you’ve come to the right place as this post will guide you in fixing it. Here are some of the Blue Screen errors related to the netio.sys file:
  • KMODE EXCEPTION NOT HANDLED
  • PAGE FAULT IN A NONPAGED AREA
  • IRQL NOT LESS EQUAL
  • SYSTEM_SERVICE_EXCEPTION
  • DRIVER IRQL NOT LESS OR EQUAL
  • SYSTEM THREAD EXCEPTION NOT HANDLED
To fix the netio.sys Blue Screen errors on your Windows 10 computer, you can check out each one of the following suggestions.

Option 1 – Try to use the System File Checker

One of the built-in tools in Windows that you can use to fix Blue Screen errors is the System File Checker. This built-in command utility can help you restore corrupted or missing files as well as replace bad and corrupted system files. Chances are, the netio.sys file might be corrupted so to fix it, use System File Checker.
  • First, right-click on the Start button and click on the “Command Prompt (Admin) option.
  • Next, type in the sfc /scannow command and hit Enter to execute it.
The command will start a system scan which will take a few whiles before it finishes. Once it’s done, you could get the following results:
  1. Windows Resource Protection did not find any integrity violations.
  2. Windows Resource Protection found corrupt files and successfully repaired them.
  3. Windows Resource Protection found corrupt files but was unable to fix some of them.
  • Finally, restart your computer.

Option 2 – Try checking the Memory for any errors

The first thing you can do to check the memory for errors is to run the CHKDSK utility. The CHKDSK utility repairs hard drive errors that might be causing the problem.
  • You need to open “This PC” first.
  • And then right-click on your operating system partition for Windows.
  • Next, click on Properties and navigate to the Tools tab.
  • After that, click on the Check button under the Error Checking section.
  • A new mini window will appear and from there, click on Scan drive.
  • Now let it scan your disk drive partition to check for errors and then restart your computer.
After running the CHKDSK utility, it’s now time to fix issues with your RAM by running the Memory Diagnostic tool. This tool in windows can help resolve the Blue Screen errors related to the netio.sys file by checking and automatically fixing any memory-based issues. To run it, refer to these steps:
  • Tap the Win + R keys to open Run and type mdsched.exe and hit Enter to open the Windows Memory Diagnostic Tool.
  • After that, it will give two options such as:
    • Restart now and check for problems (Recommended)
    • Check for problems the next time I start my computer
  • Once your computer has restarted, perform a basic scan or you could also go for the “Advanced” options such as “Test mix” or “Pass count”. Simply tap the F10 key to start the test.
Note: After you select your preferred option, your computer will restart and check for memory-based issues. If it finds any issues, it will automatically fix them and if there’s no issue found, then it’s most likely not a memory-based issue so you should try the other options given below.

Option 3 – Try to update or rollback or disable Network drivers

You might also want to update, roll back or disable your Network drivers to resolve the netio.sys Blue Screen errors.
  • Tap the Win + R keys to launch the Run window and then type in the “mdsched.msc” command and hit Enter to open the Device Manager window.
  • Under the Device Manager, you will see a list of drivers. From there, look for the Network Adapters and expand it.
  • Then right-click on each one of the Network drivers and depending on your preference, you can either select “Update driver”, “Disable device” or “Uninstall device”.
  • After that, restart your PC and see if it helped in fixing the netio.sys Blue Screen error.

Option 4 – Perform System Restore

Performing System Restore can also help fix BSOD errors, including the ones related to the netio.sys file. To run System Restore, follow the steps below.
  • First, tap the Win + R keys to open the Run dialog box.
  • After that, type in “sysdm.cpl” in the field and tap Enter.
  • Next, go to the System Protection tab then click the System Restore button. This will open a new window where you have to select your preferred System Restore point.
  • After that, follow the on-screen instructions to finish the process and then restart your computer and check if the problem is fixed or not.

Option 5 – Run the Blue Screen Troubleshooter

Troubleshooting Blue Screen of Death errors wouldn’t be complete without the Blue Screen troubleshooter. As you know, it is a built-in tool in Windows 10 that helps users in fixing BSOD errors like Storport.sys. It can be found on the Settings Troubleshooters page. To use it, refer to these steps:
  • Tap the Win + I keys to open the Settings panel.
  • Then go to Update & Security > Troubleshoot.
  • From there, look for the option called “Blue Screen” on your right-hand side and then click the “Run the troubleshooter” button to run the Blue Screen Troubleshooter and then follow the next on-screen options. Note that you might have to boot your PC into Safe Mode.
Read More
Windows 11 Insider Preview Build 22000.71
Microsoft just released Windows 11 Insider build 22000.71. Let’s dive in and see what it brings with you.

windows insider 2000Changes and features

New entertainment widget. The entertainment widget allows you to see new and featured movie titles available in the Microsoft Store. Selecting a movie will direct you to the Microsoft Store to see more information about that title. Just open widgets and click or tap on the “Add widgets” button and choose the entertainment widget. For now, the entertainment widget is available for Insiders in the following countries: US, UK, CA, DE, FR, AU, JP. The new context menus and other right-click menus have been updated to use acrylic material. We are testing the usability of a SplitButton for making new folders and files in the File Explorer command bar. The Taskbar previews (when you mouse-over open apps on the Taskbar) have been updated to reflect the new visual design of Windows 11.

Fixes

Taskbar:

  • We fixed an issue where if you drag app icons on the Taskbar to rearrange them, it was making the apps launch or minimize when you released the icon.
  • Using a long press with a touch on an app icon in the Taskbar to open the jump list should now work.
  • After right-clicking the Start icon in the Taskbar, clicking somewhere else should now dismiss the menu more reliably.
  • Shift + Right-click on an app icon in the Taskbar will now bring up the window menu like it used to and not the jump list.
  • We’ve addressed an issue that was making your mouse move slowly when hovering over the Taskbar previews.
  • We’ve included the fix for an issue when using multiple Desktops where an app icon in the taskbar might give the appearance of multiple windows being open when that wasn’t the case on that Desktop.
  • When using the Amharic IME you should no longer see an unexpected X next to the IME icon in the taskbar.
  • The issue where if you click on the input indicator on the Taskbar and it would unexpectedly highlight Quick Settings has been fixed.
  • When you hover over Task View, the preview flyout for your Desktops will no longer pop back up after using Esc to dismiss them.
  • We made a fix to address an issue where explorer.exe might crash after hovering over the Task View icon in the Taskbar.
  • We fixed an issue where the selected date in the calendar flyout was out of sync with the date in the Taskbar.
  • We made an update to address a scenario resulting in some Insiders not seeing the lunar calendar text in the calendar flyout when enabled in Settings.
  • This flight addressed an issue that could unexpectedly make the Taskbar background transparent.
  • Right-clicking the focus assist icon in the taskbar should now show a context menu.
  • The issue from the previous flight where icons in the taskbar corner were getting crushed against the top of the Taskbar has been addressed.
  • The tooltip for the location in use icon in the Taskbar should no longer appear blank sometimes.

Settings:

  • We fixed an issue making Settings crash on launch periodically.
  • Using the volume mixer sliders in Sound Settings should be more responsive now, as well as the page responsiveness as a whole.
  • We fixed an issue resulting in Disk and Volumes Settings’ change size option being clipped.
  • There was a non-functional verify link under Backup Settings – this has been fixed.
  • The Power and Battery Settings page should no longer be reporting that the battery saver is engaged if it’s not.
  • The Power and Battery Settings page should also now not crash when launched from Quick Settings.
  • We fixed a grammatical error in the Sign-in Settings text.
  • The “I forgot my PIN” link was unexpectedly missing in Sign-in Settings when a PIN was set up and has now been returned.
  • The issue where the Move option under Apps & Features in Settings wasn’t working reliably should be addressed in this build.
  • We’ve mitigated a problem where some of the colors in Settings weren’t updating after switching between dark and light mode, leaving the unreadable text.
  • We’ve done some work to help improve the performance of Settings when switching between light and dark mode.
  • We addressed an issue where some of the elements of the Themes page in Settings would end up crowded together when the window size was small.
  • We resolved an issue where the Pen menu toggle under Taskbar Settings was not in sync with the actual state of the feature.
  • Changes made to “Dismiss notification after this amount of time” in Accessibility Settings should now persist.
  • Some of the icons you could enable in Taskbar Settings were erroneously labeled Windows Explorer even though that’s not what they were – this should now be fixed.
  • The Connect text in Quick Settings has been updated to say Cast.

File Explorer:

  • Clicking the command bar button twice should now close any dropdown that appeared.
  • The new command bar should now appear when “Open folders in a separate process” is enabled under File Explorer Options > View.
  • This build addresses an issue where right-clicking a file and selecting Open With > Choose another app might launch the file in the default app rather than opening the Open With dialog.
  • Fixed an issue the desktop and File Explorer context menu would stop launching.

Search:

  • We fixed an issue where the option to verify your account in Search wasn’t working.
  • Hovering over the Search icon on a secondary monitor will now show the flyout on the correct monitor.
  • Search should now work if you open Start and start typing after having gone to the apps list and back.

Widgets:

  • When using the Outlook client with a Microsoft account, Calendar, and To-Do updates should sync faster down to the widgets.
  • We addressed an issue where if you added multiple widgets quickly from the widget's settings, it could result in some of the widgets not being visible on the board.
  • We fixed a bug where widgets could all become stuck in a loading state (blank squares in the window).
  • The traffic widget should now follow the Windows mode (light or dark).
  • The title of the sports widget should no longer mismatch with the content of the widget.

Other:

  • This build addresses an issue where ALT + Tab was getting stuck open sometimes after you released the keys and had to be manually dismissed.
  • We made a fix for an issue where Narrator's focus wasn’t ending up on the emoji panel after using the keyboard shortcut to open it.
  • Magnifier’s lens view has been updated so the lens now has rounded corners.
  • We found an issue that was noticeably impacting Start launch reliability for some Insiders, and have addressed it with this flight.
  • We’ve updated the “Most Used” text in the Start menu’s app list so it should no longer be getting clipped.
  • Using the semantic zoom in Start’s app list should no longer result in the list being pushed down and to the right off the edge of the window.
  • We fixed an issue where if you pressed ⊞ WIN + Z you would need to press Tab before you could use the arrow key to navigate through the snap layouts.
  • We addressed an issue where an acrylic area could get left on the screen after repeatedly snapping and unsnapping a window with touch.
  • We’ve done some work to mitigate an unexpected flash when moving a snapped window with touch.
  • We made a change to help window borders have a little more contrast when “Show accent color on title bars and windows borders” was turned off.

Known issues in Windows 11 repaired

Start:

  • In some cases, you might be unable to enter text when using Search from Start or the Taskbar. If you experience the issue, press ⊞ WIN + R on the keyboard to launch the Run dialog box, then close it.
  • Based on feedback, we are working on adding access keys to ⊞ WIN + X so that you can do things like “⊞ WIN + X M” to launch Device Manager. Insiders may see this functionality in this build, however, we are currently investigating an issue in which sometimes the option is unexpectedly unavailable.

Taskbar:

  • There is an issue in this build where Explorer.exe will crash when the date and time button on the Taskbar is clicked to access new notifications with Focus Assist turned off. The workaround for this is to enable Focus assist to priority or alarms mode. Note that when focus assist is turned on, notification popups won’t appear, but they will be in the notification center when opened.
  • The Taskbar will sometimes flicker when switching input methods.
  • Taskbar previews may draw partially offscreen.

Settings:

  • When launching the Settings app, a brief green flash may appear.
  • When using Quick Settings to modify Accessibility settings, the settings UI may not save the selected state.
  • The button to rename your PC doesn’t work in this build. If needed, this can be done using sysdm.cpl.
  • Settings will crash when clicking “Facial recognition (Windows Hello)” under Sign-in Settings if Windows Hello is already set up.
  • Reset this PC and Go back buttons in Settings > System > Recovery does not function. Reset and rollback can be accessed from the Windows Recovery Environment by selecting System > Recovery > Advanced startup, and pressing Restart now. Once in Windows Recovery, choose Troubleshoot.
  • Choose Reset this PC to perform a reset.
  • Choose Advanced options > Uninstall Updates > Uninstall latest feature update to perform a rollback.

File Explorer:

  • exe crashes in a loop for Insiders using the Turkish display language when the battery charge is at 100%.
  • When right-clicking the desktop or File Explorer, the resulting context menu and submenus may appear partially off-screen.
  • Clicking a desktop icon or context menu entry may result in the wrong item being selected.

Search:

  • After clicking the Search icon on the Taskbar, the Search panel may not open. If this occurs, restart the “Windows Explorer” process, and open the search panel again.
  • When you hover your mouse over the Search icon on the Taskbar, recent searches may not be displayed. To work around the issue, restart your PC.
  • The search panel might appear black and not display any content below the search box.

Widgets:

  • Widgets board may appear empty. To work around the issue, you can sign out and then sign back in again.
  • Launching links from the widgets board may not invoke apps to the foreground.
  • Widgets may be displayed in the wrong size on external monitors. If you encounter this, you can launch the widgets via touch or WIN + W shortcut on your actual PC display first and then launch on your secondary monitors.

Store:

  • The install button might not be functional yet in some limited scenarios.
  • Rating and reviews are not available for some apps.

Windows Security:

  • Device Security is unexpectedly saying “Standard hardware security not supported” for Insiders with supported hardware.
  • “Automatic sample submission” is unexpectedly turned off when you restart your PC.

Localization:

  • There is an issue where some Insiders may be missing some translations from their user experience for a small subset of languages running the latest Insider Preview builds. To confirm if you have been impacted, please visit this Answers forum post and follow the steps for remediation.
That's is so far, the latest update information on Windows 11 insider build. Stay tuned for more information when it comes as it comes.
Read More
0x80071771, The specified file could not ...
If you are tried encrypting or decrypting a file using the default EFS engine but you receive an error message instead saying, “Error Applying Attributes, An error occurred applying attributes to the file: The specified file could not be decrypted”, read on as this post will help you sort out the problem. If you encounter this error you can use the error code in it. You will most likely get error code 0x80071771. This kind of error occurs when the File Explorer’s copy and paste feature was not able to read the source file being encrypted or decrypted. It could also occur if you try to access a file that has been on another computer previously.

To fix error code 0x80071771 when decrypting or encrypting a file, refer to the instructions provided below.

Step 1: You need to check first if you can decrypt the files encrypted by EFS. However, if you can’t, just proceed and then take full control of the file. Step 2: To take control of the file, open File Explorer and right-click on the partition, and then click on Properties. Step 3: After that, click on the Edit button under the Security tab. Step 4: Next, make sure that “Everyone” is selected under the Group or user names section. Step 5: Afterwards, the Permissions for Everyone section will be activated. Just make sure that all the checkboxes for Allow are checked and then click on the Apply button. Step 6: Once you’re done, click on the Advanced button. This will open a new window labeled Advanced Security Settings. From there, click on the Change link under the Owner section. Step 7: Now type your account name in the field and click on Check Names to verify the account name and click OK. Step 8: After that, select the “Replace owner on sub-containers and objects” option and then click OK. Step 9: Next, select Administrators in the Group or User names list and select Full Control in the Permissions for Administrators panel and click OK.
Read More
Makecab.exe is running & consuming CPU
The Makecab.exe process that’s running on your Windows 10 computer is a program that compresses the Component-Based Servicing log or CBS log files and they can get really huge if they’re not compressed. As a result, it would utilize important space on your operating system although makecab.exe does not consume high CPU resources in doing so. However, there are times when it recreates thousands of instances of itself and could cause overconsumption of system resources which slows down your computer. So when the makecab.exe process causes high CPU usage in your system, this could mean that there is a failed Windows Update. In addition, the high CPU usage of the makecab.exe process could also mean that your computer is infected with a virus or malware. Whichever the case is, you can check out several possible solutions that are given in this post to resolve the problem.

Option 1 – Try to delete log file using File Explorer

The CBS log files could reach up to 20GB size and so if you delete them, it would help in saving space in your computer and since they’re not much of use, deleting them won’t negatively affect the system at all. To delete the CBS log files, all you have to do is open the File Explorer and then go to C:/Windows/Logs/CBS and from there, open the CBS log files and delete them all. Doing so should ease the load in the makecab.exe process since it no longer has to compress the CBS log files. As a result, the process would be more relaxed. After that, you can restart your computer and check if the problem’s now fixed.

Option 2 – Try deleting the log file via Command Prompt

You can also try to delete the log files using an elevated Command Prompt. Refer to these steps to do so:
  • Type “command prompt” in the Windows Search bar and then right-click on the related search result and select the “Run as administrator” option.
  • Next, type the following command and hit Enter to execute it:
del /f %windir%logscbs*.log
  • Restart your computer afterward once the command has been executed. This should end the high disk usage by makecab.exe, if not, proceed to the next given options below.

Option 3 – Uninstall any suspicious programs you’ve installed recently

If you have recently installed some programs on your Windows 10 computer, and since then you’ve experienced high CPU usage brought on by makecab.exe, then you might want to uninstall those programs.
  • Tap the Win + R keys to open the Run dialog box
  • Then type “appwiz.cpl” in the field and hit Enter to open the Programs and Features in Control Panel.
  • From there, look for the suspicious programs you’ve installed, select them and then click on Uninstall to remove them.
  • After that, restart your computer and try to install the latest version of the program again. It should work now. If not, proceed to the next available option below.

Option 4 – Try running Disk Cleanup

You might want to run the Disk Cleanup utility as it is a useful tool that could delete temporary and useless files on your computer.
  • Tap the Win + R keys to open the Run dialog box and then type “cleanmgr” in the field and hit Enter to open the Disk Cleanup window.
  • After that, select the drive you want to clean.
  • Now click OK to clean the disk and restart your computer.

Option 5 – Try to run System File Checker scan

System File Checker or SFC is a built-in command utility that helps in restoring corrupted files and missing files. It replaces bad and corrupted system files to good system files. To run the SFC command, follow the steps given below.
  • Tap Win + R to launch Run.
  • Type in cmd in the field and tap Enter.
  • After opening Command Prompt, type in sfc /scannow
The command will start a system scan which will take a few whiles before it finishes. Once it’s done, you could get the following results:
  1. Windows Resource Protection did not find any integrity violations.
  2. Windows Resource Protection found corrupt files and successfully repaired them.
  3. Windows Resource Protection found corrupt files but was unable to fix some of them.
  • Restart your PC.

Option 6 – Try scanning your computer using Windows Defender

As mentioned, the high CPU usage of makecab.exe might be caused by some malware or virus in the system and so to eliminate it, you have to scan your computer using security programs like Windows Defender.
  • Tap the Win + I keys to open Update & Security.
  • Then click on the Windows Security option and open Windows Defender Security Center.
  • Next, click on Virus & threat protection > Run a new advanced scan.
  • Now make sure that Full Scan is selected from the menu and then click the Scan Now button to get started.
Read More
Telnet not recognized as internal/external
In case you don’t know, a teletype network, also known as Telnet, is a protocol that is meant for internet or LAN communication which is used primarily to control other computers effortlessly. And it is available as a command-line utility in Windows and helps users in opening a command-line interface for the remote computer. However, a lot of users have reported an error that states, “Telnet is not recognized as an internal or external command, operable program, or batch file” when you try to use it. If you are one of these users, then you’ve come to the right place as this post will guide you on how to fix this error in Windows 10. This kind of error means that the Telnet utility is not installed on your computer but Telnet is a default feature in Windows 10 so the protocol mainly is not enabled yet. The Telnet client is disabled by default in Windows 10 and to fix this error, you can try to enable the Telnet Client via Programs and Features or try to install Telnet using an elevated Command Prompt.

Option 1 – Try to enable the Telnet Client via Programs and Features

The first thing you can do is to enable the Telnet client using Programs and Features since it is disabled by default. To do that, follow the steps below.
  • Tap the Win + R keys to open the Run dialog box and type “appwiz.cpl” in the field and hit Enter to open the Programs and Features window.
  • Next, select the “Turn Windows features on or off” from the options given on the left-hand side.
  • After that, look for the Telnet client from the list and check the checkbox next to it and then click on OK to save the changes made.
  • Now restart your computer.

Option 2 – Try to install Telnet via an elevated Command Prompt

If enabling the Telnet client using Programs and Features didn’t work, then you can try to do it using Command Prompt instead. To get started, follow the steps given below.
  • In the Windows Search bar, type “command prompt” in the field and right-click on Command Prompt from the search results, and select the “Run as administrator” option.
  • Next, execute this command to enable the Telnet client: dism /online /Enable-Feature /FeatureName:TelnetClient
  • Once the command has been executed, close the Command Prompt and restart your computer.
Read More
1 2 3 162
Logo
Copyright © 2022, ErrorTools. All Rights Reserved
Trademarks: Microsoft Windows logos are registered trademarks of Microsoft. Disclaimer: ErrorTools.com is not affiliated with Microsoft, nor claim direct affiliation.
The information on this page is provided for information purposes only.
DMCA.com Protection Status