3 ways to bypass TPM and install W11 anywhere

TPM 2.0 requirement for Windows 11 has produced a lot of discussions since it was announced. A lot of somewhat older hardware seems to be left behind with this decision from Microsoft.

So naturally, when something like this is announced, especially when it is stated it is the must-have thing, people find a way to break it and to prove it is not the case.

In that spirit, I am proud to present you with not one but three-way you can install Windows 11 on hardware that does not has TPM 2.0. Please note that by bypassing this you will not be able to use some Windows 11 features tied to modules like Device encryption, vTPM in Hyper-V, and all TPM-related services.

I will cover methods from the most simple and straightforward ones to the more complicated using registry editor.

Windows 11 TPM installation
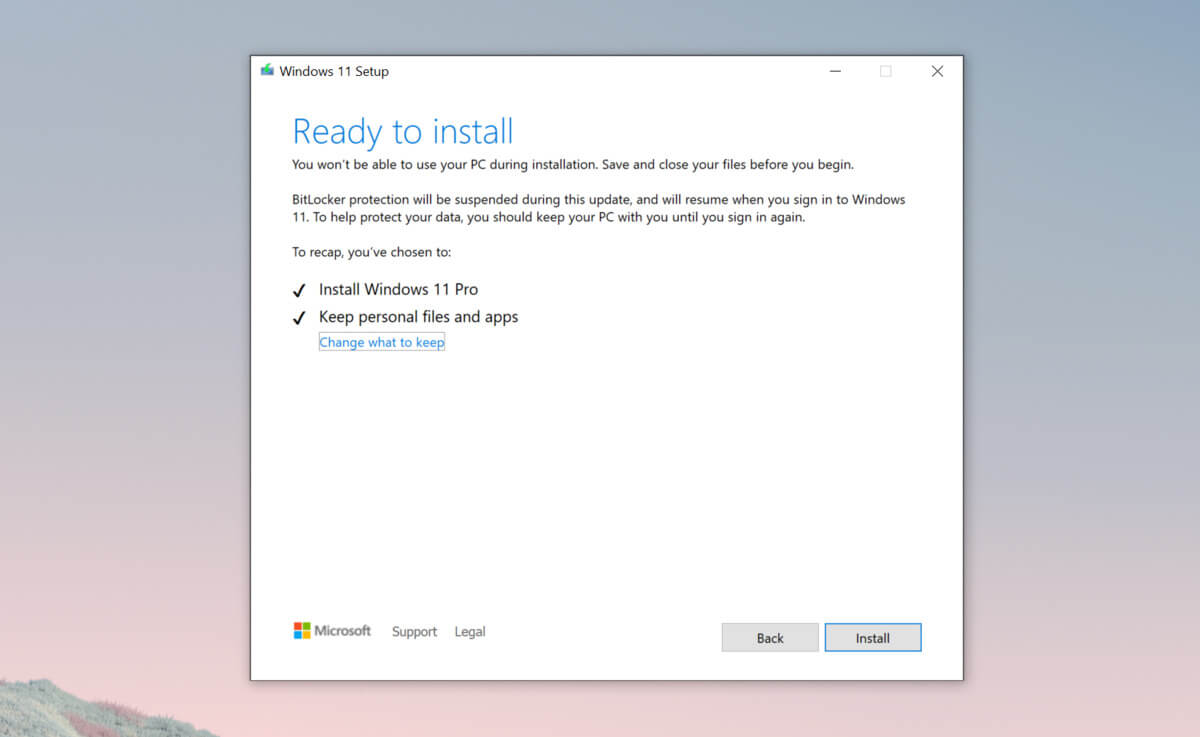
Bypass TPM with changing installation media

For this method to work you will need both Windows 10 ISO and Windows 11 ISO since it will require some file copying between them.

You will also need Rufus or another tool to make a new installation media once files are copied

All you have to do in this method is to go into your Windows 10 ISO and delete the install.esd, then just copy install.wim from Windows 11 installation media into the same place, and you are done.

Make install ISO with Rufus and install Windows 11.

Change DLL on installation media method

For this method, you will need everything like in the previous one and the process is almost the same, but this time instead of migrating the whole installation file, we will just replace the appraiserres.dll file.

Copy appraiserres.dll file from your Windows 10 installation media over the same file on Windows 11 installation and you are good to go.

Bypassing TPM via registry editor

If for some reason previous easy solutions have not worked for you do not lose hope just yet, there is one more way you can bypass TPM.

In this given method you will not need Windows 10 installation media but the process is a little more complicated than previous ones.

  1. Create Windows 11 media installation
  2. Start the installation process
  3. Click the Next button.
  4. Select region, language, and time when asked. You can change these settings later.
  5. Click the Install now button.
  6. If your device was already activated, click the I don’t have a product key option to continue.
  7. Click the Next button.
    Select the edition of Windows. When you’re installing the OS on an existing device, Windows won’t activate if you select the incorrect edition.
  8. Click the Next button.
  9. Select the I accept the license terms option and click next.
  10. Select Custom: Install Windows only (Advanced)
  11. During the Windows installation screen, now you will see a message stating that the PC can’t run Windows 11 if you do not have TPM 2.0
  12. On this screen, press SHIFT + F10 to open Command Prompt window.
  13. Launch the registry editor, type regedit.exe in Command Prompt, and press ENTER
  14. Create a new key “LabConfig” by right-clicking on the Setup key and select New > Key under HKEY_LOCAL_MACHINE\SYSTEM\Setup.
  15. Type LabConfig and press ENTER.
  16. Right-click on the LabConfig key.
  17. Select New > DWORD (32-bit) value.
  18. Create two values: BypassTPMCheck and BypassSecureBootCheck.
  19. Set their DWORD32 value to 1.
  20. Press ENTER.
  21. Close the Registry Editor.
  22. Type exit in the Command Prompt and press ENTER or close its window.
  23. Press the back button in the Windows installation setup if it still says “This PC can’t run Windows 11”.
  24. Accept the terms & conditions.
  25. Select Custom: Install Windows only (Advanced) option and configure the partition with the current installation.
  26. Click the Next button.
  27. Finish Windows 11 installation
If you like to learn and find out more about various Windows errors, and how to repair them go to our vast archive or use search to find articles that will explain and help you in solving your issue.
However, if you prefer to do things fast and with automatization then we are proposing to use an automated solution for your issues. The application that we are recommending is Advanced System Repair Pro
Advanced System Repair utilizes multiple tools all in one to give you a quick, simple, reliable, and very thorough diagnosis of your PC. It brings you all the tools you need in one program to clean, fix, protect, optimize and boost your PC!
1-Click Maintenance
All the tools to make it simple and easy! It's like having a professional technician at the click of a mouse.

Junk Cleaner
Keeping your computer free from unnecessary clutter also helps make your computer last longer. Like any other machine, if you keep it clean and take care of it, it will serve you better for longer!

Optimize background apps
Optimize applications background activity with the built-in Application Optimizer feature.

Disk Defrag
With a simple 1-click, Advanced System Repair speeds up your PC by assembling fragmented files on your machine and organizing them more efficiently.

Malware Removal
Finds and removes all types of harmful malware including trojans, worms, bots, adware, spyware, PUPs, and more!

Privacy Cleaner
The all-in-one privacy suite to Clean Your Tracks & Protect Your Privacy! Make your computer safe, secure, and more efficient!

System Tweak/Optimizer
ASR will analyze your complete system and settings to adjust your PC to function at its maximum performance.

Registry Cleaner
Over time, as you install and uninstall applications, the registry can become cluttered with old entries and broken settings which can result in program crashes, and annoying messages and slow the computer down.
Visit our Advanced System Repair Pro Download page to inform yourself about all the benefits of this software and get a free trial copy of it.
advanced system repair pro

Advanced System Repair Pro

One-click automated PC repair solution
ASR logo
With Advanced System Repair Pro you can easily
Replace damaged files
Restore performance
Free disk space
Remove Malware
Protects WEB browser
Remove Viruses
Stop PC freezing
DOWNLOAD
Privacy Policy | Terms of Use | Uinstall
Advanced System Repair Pro is compatible with all versions of Microsoft Windows including Windows 11

Share this article:

You might also like

Instagram posts available now on computer
Instagram posting has been reserved for mobile phones for a very long time but in October 2021 that privilege has come to an end. Instagram added the long-awaited ability to post to Instagram from the website. You get nearly all of the same filters and editing tools that you can find in the iPhone and Android app, too. Instagram logoIn order to post via computer on your Instagram account all you need is a browser. The first step, of course, is to go to instagram.com and login into your account, if you do not have an account, you can make one for free. Next, click on the + icon in the upper right corner. Create a new post screen will open, in this screen click on the Select from computer blue button on the bottom. The file manager will open, choose your desired photo and confirm. After that, you will be presented will an adjustment screen for a photo, here you can crop the photo, zoom in, adjust the aspect ratio, or if you wish add more photos to create a slide show. Once you are done will all of these adjustments, click on Next in the upper right. From there you will be taken into a filter screen where you can apply one of many filters or if you want, you can adjust brightness, contrast, saturation, temperature, etc. just like in the application on your phone. Once you have the desired result, again click on Next in the upper right part of the screen. Lastly, you will be given an option to write a caption for the photo if you wish and add a location. Once this step is finished you can post the feed by clicking on share in the upper right part. That is all to it, just like in a mobile application you can now use your computer for Instagram posting.
Read More
MS will release single office apps in MS Store
It seems that Microsoft is going to offer subscription and sales of individual office applications in the Windows Store. The office package will still be available as a package but for the first time, we will get single applications as standalone ones available for purchase. ms officeThis is a very interesting decision by Microsoft and I fully support it, this time users will be able to pay less and to choose only applications that they need instead of paying for the whole package and not using it.
Read More
How to fix Error 2753, The file is not marked
Installing programs on your Windows 10 computer does not go smoothly as you could encounter some issues along the way that could prevent you from successfully installing the program. One of the common errors you can encounter during the installation of programs is Error 2753. There are times when the packages are corrupted or those packages are not working properly or it wasn’t able to create files and paths. When you encounter this kind of error, you will get the following error message:
“Error 2753, The File is not marked for installation.”
Note that this kind of error is not bound to only some specific files but it can also happen with any file, be it an executable file or an MSI file. To fix this error, here are some possible solutions that you could try.

Option 1 – Fresh download the setup file

The first thing you can do is to fresh download the setup file from the official homepage and then place it in a different location. Just make sure that you download the correct setup file that’s compatible with your operating system. Then restart your computer and sign in as administrator. After that, right-click on the setup file and select the Run as administrator to proceed with the installation.

Option 2 – Try removing all the previous versions of the software

If there is a previous version of the program that’s still installed on your computer, you need to uninstall that program since it might be the reason why you’re getting Error 2753.
  • Tap the Win + R keys to open the Run dialog box
  • Then type “appwiz.cpl” in the field and hit Enter to open the Programs and Features in Control Panel.
  • From there, look for the previous version of the program you are trying to install, select it and then click on Uninstall to remove it.
  • After that, restart your computer and try to install the latest version of the program again. It should work now. If not, proceed to the next available option below.

Option 3 – Run the setup file as administrator

The setup file may need more permission in order to execute properly and so you need to run it as an administrator. To do so, you need to give it more privileges for it to work as intended by its developer.
  • Right-click on the setup file and select the Run as administrator option.
  • Afterward, a User Account Control or UAC prompt will appear and from there, click on Yes and then check if the file runs or not.
Note: If the setup file does not run, you may have to take ownership of the folder where the setup file is located. To take ownership of the folder, refer to these steps:
  • First, locate the concerned folder and right-click on it then select Properties.
  • Next, click on the Edit button in the Properties window and click OK to confirm if you got a User Account Control elevation request.
  • After that, select user/group from the permission windows or click on the Add button to add another user or group. It would be best if you add “Everyone” to give permission.
  • Then check “Full Control” under the “Allow” column to assign full access rights control permissions.
  • Now edit the permission to Full Control for “Everyone”.
  • Click OK to save the changes made and then exit.

Option 4 – Try running the setup file in Compatibility Mode

You may be getting Error 2753 if the setup file is not intended to run on the Windows 10 version you are using which is why you have to run it in Compatibility Mode. This will allow the setup file to think that it is running in a compatible environment as it is intended to.

Option 5 – Try to re-register the vbscript.dll file

You may have to re-register the vbscript.dll file using the regsvr32.exe before you can successfully install the program and fix Error 2753. The Regsvr32 tool is a command-line utility that can be used to register and un-register the OLE controls like DLL and ActiveX (OCX) control in the Windows operating system. Follow the steps below to use it.
  • Open Command Prompt as admin from the WinX menu.
  • Next, type exe vbscript.dll in the elevated Command Prompt and hit Enter to execute the command. This will re-register the affected DLL file using the Windows operating system tool, regsvr32.exe.
  • You should see a message saying, “DllRegisterServer in vbscript.dll succeeded” if the Regsvr32 tool was able to run successfully. After that, try to install the program again and see if it now works.
Read More
InternetSpeedTracker Removal Guide

InternetSpeedTracker is a browser extension developed by MindSpark Inc. This browser add-on offer uses tips on how to boost their “bad” internet connection speed. It displays false internet speed in order to get you to open the sponsored links listed in the toolbar.

This extension also hijacks your browser home page and replaces your default search engine with MyWay. While browsing the internet you will see additional unwanted sponsored ads and links throughout your search results, and sometimes even pop-up ads might appear. While active this extension gathers personal information, website visits, links, and clicks and uses this data to serve ads.

InternetSpeedTracker has been flagged as a Browser Hijacker by several anti-virus scanners, and due to its data mining behavior, it is not recommended to keep it on your computer, especially because it gives false data about your internet speed.

About Browser Hijackers

Browser hijack is a very common type of online fraud where your internet browser settings are modified to allow it to carry out things you don’t intend. They’re created to disrupt browser functions for several purposes. It redirects you to the sponsored sites and inserts ads on the web browser which helps its developer generate earnings. Nevertheless, it’s not that naive. Your web safety is jeopardized and it is also extremely irritating. They don’t just ruin your web browsers, but browser hijackers could also modify the computer registry, making your PC vulnerable to other attacks.

How one can know if your web browser is hijacked

Signs that an internet browser is a hi-jacked include: the browser’s home-page is modified; you find yourself regularly directed to a different site than the one you meant; the default search engine is changed; unwanted new toolbars are added to your web browser; never-ending pop-up ads show up and/or your browser pop-up blocker is disabled; your web browser starts running sluggishly or displays frequent glitches; You simply can’t access specific sites, particularly anti-virus sites.

How they infect PCs

A browser hijacker can be installed on your computer when you check out an infected website, click an e-mail attachment, or download something from a file-sharing website. They are usually included with toolbars, BHO, add-ons, plugins, or browser extensions. A browser hijacker could also be installed as a part of freeware, shareware, demoware, and fake programs. A good example of a notorious browser hijacker is the most recent Chinese malware known as “Fireball”, which has attacked 250 million computer systems worldwide. It acts as a hijacker but can be turned into a fully functioning malware downloader afterward. Browser hijackers could affect the user’s browsing experience greatly, keep track of the websites visited by users and steal private information, cause difficulty in connecting to the internet, and ultimately create stability issues, making software programs and systems freeze.

How to repair a browser hijack

Some hijackers could be removed by uninstalling the freeware they came with or by eliminating any extension you have recently added to your system. But, many hijackers are hard to get rid of manually. No matter how much you attempt to eliminate it, it can keep coming back over and over again. And there’s no denying the fact that the manual fixes and removal methods can be quite a complicated job for a rookie PC user. Furthermore, there are several risks connected with fiddling around with the system registry files.

What you can do if Virus Stops You From Downloading Anything?

Malware could cause all kinds of damage after they invade your system, ranging from stealing your private information to deleting data files on your computer system. Certain malware variants modify web browser settings by adding a proxy server or modify the computer’s DNS configuration settings. In such cases, you’ll be unable to visit some or all of the websites, and thus not able to download or install the necessary security software to remove the infection. If you’re reading this article, chances are you’re stuck with a virus infection that is preventing you to download or install the Safebytes Anti-Malware program on your PC. There are some fixes you can try to get around with this issue.

Install antivirus in Safe Mode with Networking

If the malware is set to load at Windows startup, then booting in Safe Mode should prevent it. Since only the minimal programs and services start-up in safe mode, there are rarely any reasons for issues to take place. Listed below are the steps you should follow to start your computer into the Safe Mode of your Windows XP, Vista, or 7 computers (visit Microsoft site for instructions on Windows 8 and 10 PCs). 1) At power on/start-up, tap the F8 key in one-second intervals. This will bring up the Advanced Boot Options menu. 2) Select Safe Mode with Networking with arrow keys and hit Enter. 3) As soon as this mode loads, you will have an internet connection. Now, utilize your web browser normally and navigate to https://safebytes.com/products/anti-malware/ to download and install Safebytes Anti-Malware. 4) Right after the software program is installed, let the diagnostic scan run to remove trojans and other malware automatically.

Switch to an alternate web browser

Web-based viruses can be environment-specific, aiming for a particular internet browser or attacking specific versions of the browser. The best solution to avoid this issue is to opt for a browser that is known for its security features. Firefox comprises built-in Phishing and Malware Protection to keep you safe online.

Run anti-virus from a pen drive

Another technique is to download and transfer an anti-malware application from a clean PC to run a scan on the affected computer. Follow these steps to use a flash drive to clean your infected system. 1) Download Safebytes Anti-Malware or Microsoft Windows Defender Offline onto a clean PC. 2) Insert the pen drive on the same system. 3) Double-click the Setup icon of the anti-malware software package to run the Installation Wizard. 4) Pick a USB flash drive as the place when the wizard asks you exactly where you would like to install the application. Follow the instructions on the computer screen to complete the installation process. 5) Now, transfer the pen drive to the infected computer. 6) Run the Safebytes Anti-malware directly from the thumb drive by double-clicking the icon. 7) Click the “Scan” button to run a full system scan and remove malware automatically.

Let's Talk About SafeBytes Anti-Malware!

Want to install the best anti-malware application for your laptop or computer? There are many applications available in the market which comes in free and paid versions for Windows computers. Some of them are great and some are scamware applications that pretend as legitimate anti-malware programs waiting to wreak havoc on your PC. When looking for an antimalware program, pick one which gives reliable, efficient, and total protection against all known viruses and malware. One of the recommended tools by industry leaders is SafeBytes Anti-Malware, the most dependable program for Windows computers. SafeBytes anti-malware is a reliable tool that not only secures your system permanently but is also quite user-friendly for people of all ability levels. This application could easily identify, remove, and protect your personal computer from the most advanced malware attacks such as spyware, adware, trojan horses, ransomware, worms, PUPs, and other possibly damaging software applications. SafeBytes has excellent features when compared to other anti-malware programs. Below are a few of the great ones: World-class AntiMalware Protection: Built upon a greatly acclaimed anti-virus engine, this malware removal application can identify and remove numerous obstinate malware threats such as browser hijackers, PUPs, and ransomware that other common antivirus applications will miss. Live Protection: SafeBytes gives real-time active supervision and protection from all known viruses and malware. They’re very effective in screening and eliminating different threats because they are regularly improved with new updates and alerts. Web Security: SafeBytes provides an instant safety rating on the web pages you are going to visit, automatically blocking risky sites and making sure that you are certain of your safety while browsing the internet. Very Low CPU and Memory Usage: SafeBytes provides complete protection from online threats at a fraction of the CPU load due to its enhanced detection engine and algorithms. Premium Support: SafeBytes provides 24/7 technical support, automatic maintenance, and updates for the best user experience.

Technical Details and Manual Removal (Advanced Users)

If you wish to manually remove InternetSpeedTracker without the use of an automated tool, it may be possible to do so by removing the program from the Windows Add/Remove Programs menu, or in cases of browser extensions, going to the browsers AddOn/Extension manager and removing it. You will likely also want to reset your browser. To ensure the complete removal, manually check your hard drive and registry for all of the following and remove or reset the values accordingly. Please note that this is for advanced users only and may be difficult, with incorrect file removal causing additional PC errors. In addition, some malware is capable of replicating or preventing deletion. Doing this in Safe Mode is advised.

The following files, folders, and registry entries are created or modified by InternetSpeedTracker

Files: C:DOCUME1USER1LOCALS1Tempnsk1.tmp C:b418207fbd4b466002312b66521c390947518e9a0d787e4e059af0505f607f3e C:DOCUME1USER1LOCALS1Tempnsk2.tmp C:DOCUME1USER1LOCALS1Tempnsk2.tmpnsDialogs.dll C:DOCUME1USER1LOCALS1Tempnsk2.tmpSystem.dll C:DOCUME1USER1LOCALS1Tempnsk2.tmpnsDialogs.dll C:DOCUME1USER1LOCALS1Tempnsk2.tmpSystem.dll C:Program FilesInternetSpeedTracker_9tEIInstallr.binNP9tEISb.dl_ C:PROGRA1INTERN2Installr.binNP9tEISb.dl_ C:Program FilesInternetSpeedTracker_9tEIInstallr.binNP9tEISb.dll C:Program FilesInternetSpeedTracker_9tEIInstallr.bintEIPlug.dl_ C:PROGRA1INTERN2Installr.bintEIPlug.dl_ C:Program FilesInternetSpeedTracker_9tEIInstallr.bintEIPlug.dll C:Program FilesInternetSpeedTracker_9tEIInstallr.bintEZSETP.dl_ C:PROGRA1INTERN2Installr.bintEZSETP.dl_ C:Program FilesInternetSpeedTracker_9tEIInstallr.bintEZSETP.dll C:WINDOWSsystem32rundll32.exe C:Program FilesInternetSpeedTracker_9tEIInstallr.binNP9tEISb.dl_ C:Program FilesInternetSpeedTracker_9tEIInstallr.binNP9tEISb.dll C:Program FilesInternetSpeedTracker_9tEIInstallr.bintEIPlug.dl_ C:Program FilesInternetSpeedTracker_9tEIInstallr.bintEIPlug.dll C:Program FilesInternetSpeedTracker_9tEIInstallr.bintEZSETP.dl_ C:Program FilesInternetSpeedTracker_9tEIInstallr.bintEZSETP.dll Registry: HKLMSOFTWAREClassesInternetSpeedTracker_9t.HTMLMenu HKLMSOFTWAREClassesInternetSpeedTracker_9t.HTMLPanel HKLMSOFTWAREClassesInternetSpeedTracker_9t.SettingsPlugin HKLMSOFTWAREClassesInternetSpeedTracker_9t.ToolbarProtector HKLMSOFTWAREWow6432NodeMicrosoftWindowsCurrentVersionexplorerBrowser Helper Objects9e28b297-11d4-4293-aa6f-558658ee66ae HKLMSOFTWAREWow6432NodeMicrosoftWindowsCurrentVersionexplorerBrowser Helper Objectscc28794a-99d4-4b1b-bccf-b065ce5f9feb HKLMSOFTWAREWow6432NodeInternetSpeedTracker_9t HKLMSYSTEMControlSet001servicesInternetSpeedTracker_9tService HKLMSYSTEMCurrentControlSetservicesInternetSpeedTracker_9tService HKUS-1-5-21-1633355155-4214755471-2067616181-1000SoftwareAppDataLowSoftwareInternetSpeedTracker_9t HKLMSOFTWAREWow6432NodeMicrosoftWindowsCurrentVersionRunInternet Speed Tracker EPM Support
Read More
How to Fix dxgmms2.sys BSOD in Windows
The dxgmms2.sys file is a system driver file in Windows that is associated with the Graphics Rendering capabilities of a computer. However, this file is known to cause various Blue Screen of Death errors. Some of the culprits for these errors include issues with RAM, hard disk issues, corrupted drivers, and incompatible firmware. Despite its many causes, fixing this issue is quite straightforward so it should be easier for you to fix it. Here are some of the Blue Screen errors related to the dxgmms2.sys file:
  • SYSTEM_THREAD_EXCEPTION_NOT_HANDLED
  • SYSTEM_SERVICE_EXCEPTION
  • KMODE EXCEPTION NOT HANDLED
  • PAGE FAULT IN A NONPAGED AREA
  • IRQL NOT LESS OR EQUAL
If you have recently created a System Restore point prior to getting the dxgmms2.sys Blue Screen error, then you need to perform System Restore first before you further troubleshoot the problem as it might help in resolving the Blue Screen error. Refer to the steps below to perform System Restore.
  • First, press the Win + R keys to open the Run dialog box.
  • After that, type in “sysdm.cpl” in the field and tap Enter.
  • Next, go to the System Protection tab then click the System Restore button. This will open a new window where you have to select your preferred System Restore point.
  • After that, follow the on-screen instructions to finish the process and then restart your computer and check if the problem is fixed or not.
If System Restore didn’t help in fixing the Blue Screen error, now’s the time for you to resort to the troubleshooting tips provided below but before you get started, make sure that you create a System Restore point first.

Option 1 – Reinstall the Graphics Card drivers

  • Tap the Win + R keys to launch Run.
  • Type in devmgmt.msc into the box and tap Enter or click OK to open the Device Manager.
  • After that, a list of device drivers will be displayed. From there, look for the Graphics Card drivers listed under Display Adapters.
  • Right-click on each one of the Graphics Card drivers and select Uninstall device and then follow the next on-screen instructions given to uninstall the driver.
  • Now reboot your computer. During this time, your system will automatically reinstall the Graphics card drivers.
Note: You also have the option to go directly to the website of your graphics card manufacturer and check if there’s a new update – if there is, download it. After that, you could also check if there’s a new update of the game you’re getting the issue of the black bar.

Option 2 – Try running the DirectX Diagnostic Tool

Since the dxgmms2.sys Stop error has something to do with the DirectX Graphics APIs, you can run the DirectX Diagnostic tool to resolve the problem.

Option 3 – Try updating or re-installing DirectX

If the DirectX Diagnostic tool didn’t work, you can try to update or reinstall DirectX instead. This can help in fixing the problem because when you reinstall or update DirectX, it will replace the incompatible or corrupted components of DirectX from your computer.

Option 4 – Try to update the BIOS

Updating the BIOS can help you fix the Blue Screen error related to the dxgmms2.sys file but as you know, BIOS is a sensitive part of a computer. Even though it is a software component, the functioning of the hardware depends on it largely. Thus, you must be careful when modifying something in the BIOS. So if you don’t know much about it, it’s best if you skip on this option and try the other ones instead. However, if you are well-versed in navigating the BIOS, then follow the steps below.
  • Tap the Win + R keys to open the Run dialog box.
  • Next, type “msinfo32” in the field and press Enter to open System Information.
  • From there, you should find a search field on the bottom where you have to search for the BIOS version and then press Enter.
  • After that, you should see the developer and version of the BIOS installed on your PC.
  • Go to your manufacturer’s website and then download the latest version of BIOS on your computer.
  • If you are using a laptop, make sure that you keep it plugged in until you have updated the BIOS.
  • Now double click on the downloaded file and install the new BIOS version on your computer.
  • Now restart your computer to apply the changes made.

Option 5 – Use some registry tweaks

  • Tap the Win + R keys to launch the Run utility.
  • Then type “Regedit” in the field and hit Enter to open the Registry Editor.
  • Next, navigate to this registry key: HKEY_LOCAL_MACHINESYSTEMCurrentControlSetControlGraphicsDrivers
  • From there, right-click on the right-side panel and click on New > DWORD (32-bit) Value.
  • Then set the name of the new DWORD to “TdrDelay”.
  • After that, use the next set of instructions and select the one for the Windows version you are using.

32-bit Windows:

  • Choose the DWORD (32-bit) value.
  • Then type in “TdrDelay” as the name and hit Enter.
  • After that, double click on TdrDelay and add “10” as its value and click OK. This will set the response time for your GPU to be 10 seconds.

64-bit Windows:

  • Select the QWORD (64-bit) value.
  • Next, type in “TdrDelay” as the name and hit Enter.
  • Double click on TdrDelay and type in “10” as its value data and click OK.
  • Restart your computer to apply the changes made.

Option 6 – Disable the Sleep Functionality

You might also want to disable the Sleep Functionality as it could be the reason why you’re getting the Blue Screen error. There are times when the graphics card’s drivers are being used in the background and if the display goes to sleep and is awakened, it may cause a Blue Screen error. To fix it, you can prevent your computer from going into Sleep mode.

Option 7 – Try to run the Blue Screen Troubleshooter

The Blue Screen troubleshooter is a built-in tool in Windows 10 that might help you fix any Blue Screen errors related to the dxgmms2.sys file. It can be found on the Settings Troubleshooters page. To use it, refer to these steps:
  • Tap the Win + I keys to open the Settings panel.
  • Then go to Update & Security > Troubleshoot.
  • From there, look for the option called “Blue Screen” on your right-hand side and then click the “Run the troubleshooter” button to run the Blue Screen Troubleshooter and then follow the next on-screen options. Note that you might have to boot your PC into Safe Mode.
Read More
Disable Windows 11 animations for fast work
windows 11 animationsWindows 11 has some cool animations including fading effects which make working in it feels nice and futuristic but the cost of this is that there is a slight delay to certain actions performed. If you want the snap fast feature in Windows 11 and do not care about this eye candy there is an easy way to turn animations off inside it.
  • First, open Windows Settings by pressing ⊞ Windows + I on your keyboard
  • Alternatively, click on Start, search for Settings, and then click its icon.
  • When Settings appears, look in the sidebar and select Accessibility.
  • In Accessibility settings, click on Visual Effects.
  • In Visual Effects, switch Animation Effects to Off.
That’s it, changes will be applied automatically, you can close settings and continue working inside Windows 11 without animations and fades. You can always switch animations back On via settings if you change your mind.
Read More
Fix The selected disk is not a fixed MBR disk
Both the DISKPART utility and the Disk Management are useful tools in Windows 10 that manage the disk space allocation, and so on. But these tools are not without errors as you could also encounter some when you run them. Recently, some users reported getting an error that says, “The selected disk is not a fixed MBR disk when trying to use the DISKPART utility”. Here’s the exact message of the error:
“The selected disk is not a fixed MBR disk. The ACTIVE command can only be used on fixed MBR disks.”
This kind of error only occurs when you try to activate a disk partition on a UEFI system partition. However, the command works only if your computer is based on BIOS/MBR. The UEFI method has no concept of the active partition and since you have a UEFI system, the disk type is GPT instead of MBR. To simply put it, your BIOS needs the MBR disk type while the UEFI needs the GPT disk type. To fix the “The selected disk is not a fixed MBR disk when trying to use the DISKPART utility” error, there are various potential fixes you can try. You might have to disable Secure Boot, convert the disk to MBR or fix the Boot Manager. For more instructions, follow the options provided below.

Option 1 – Disable the Secure Boot in the BIOS

Disabling the Secure Boot in the BIOS settings is definitely recommended to resolve the issue. To disable Secure Boot, here’s what you have to do:
  • First, boot your computer into Windows 10.
  • Next, go to Settings > Windows Update. From there, check if there is anything that you have to download and install if you see any available updates. Usually, OEMs send and update the list of trusted hardware, drivers, and operating systems for your computer.
  • After that, go to the BIOS of your computer.
  • Then go to Settings > Update & Security > Advanced Startup options. If you click on Restart Now, it will restart your computer and give you all the advanced options.
  • Next, select Troubleshoot > Advanced Options. As you can see, this screen offers you further options including System restore, Startup repair, Go back to the previous version, Command Prompt, System Image Recovery, and UEFI Firmware Settings.
  • Select the UEFI Firmware Settings which will take you to the BIOS.
  • From there, go to the Security > Boot > Authentication tab where you should see Secure Boot. Note that every OEM has its own way of implementing the options so it varies.
  • Next, set Secure Boot to Disabled and set Legacy Support to On or Enabled.
  • Save the changes made and exit. Afterward, your computer will reboot.

Option 2 – Try converting the disk to MBR

You can try to change the File System of the drive from GPT to MBR but before you do so, make sure that you create a backup copy of your data to an external drive. Once you have that covered, follow the steps below.
  • Create a bootable Windows 10 media and boot your computer from it.
  • Next, click on the “Repair your computer” option on the first Windows 10 installation setup window.
  • Afterward, select the operating system partition from the given options and click on Next.
  • Now select Command Prompt within the System Recovery options box and execute this command to initiate the Diskpart utility: diskpart
  • Then type either one of these commands to view the list of all the Disk connects or the partitions on those disks formed: list disk or list volume
  • After that, execute another one of these commands depending on the command you previously entered to select the disk or partition you want to select: select disk # or select volume #
  • Now execute this command to clean your drive: clean
  • Finally, execute this last command to convert the selected disk or partition as MBR: Convert MBR
  • Restart your computer and check if the error is fixed.

Option 3 – Try to fix the Boot Manager

  • You can start by booting into the installation environment for Windows 10 from an installation media.
  • After that, click on Repair your computer and on the blue screen, select Troubleshoot and then select the Advanced options menu.
  • From there, select Command Prompt and once you open it, enter each one of the commands given below by sequence.
    • bootrec /FixMbr
    • bootrec /FixBoot
    • bootrec /RebuildBcd
  • Once you’re done executing the commands given above, type “exit” to close the Command Prompt window and then restart your computer and see if it fixed error code 0xc000014c.
Read More
How to get rid of My Maps Wizard

My Maps Wizard is a browser extension for Google Chrome Developed by Mindspark Inc. This extension offers users access to different websites that offer route planning, map views, and other traveling tools.

While all this might sound interesting and useful, this extension has been marked as a Browser Hijacker by several popular anti-virus applications.

When installed this extension changes your default home page and new tab page to MyWay.com or Ask.com depending on the extension version. It also monitors and records user browsing activity that it later uses to display sponsored / unwanted ads throughout your browsing sessions. While browsing the internet with this extension active and installed you will see additional pop-up ads, sponsored links, and injected ads into search results.

About Browser Hijackers

Browser hijacking is a form of unwanted software, often a browser add-on or extension, which causes modifications in the browser’s settings. There are lots of reasons why you may experience a browser hijack; however commercial, advertising, and marketing are the primary reasons for their creation. It redirects you to the sponsored websites and injects ads on your internet browser that assists its creator to generate earnings. Although it may seem naive, these tools were created by malicious people who always attempt to take full advantage of you, so that hackers can easily earn money from your naive and distraction. Browser hijackers could also allow other harmful programs without your knowledge to further damage your personal computer.

How you can know whether the web browser is hijacked?

There are numerous symptoms of web browser hijacking: 1. you notice unauthorized modifications to your web browser’s homepage 2. you find new unwanted favorites or bookmarks added, usually directed to ad-filled or pornography sites 3. the default search engine and the default web browser settings are altered 4. you find many toolbars on the internet browser 5. never-ending pop-up ads appear and/or your browser pop-up blocker is disabled 6. your browser has instability problems or exhibits frequent errors 7. you can’t visit specific websites such as homepages of anti-malware software.

So how does a PC get infected with a browser hijacker?

There are a number of ways your PC can get infected by a browser hijacker. They generally arrive by way of spam email, via file-sharing websites, or by a drive-by download. They may also originate from any BHO, browser extension, toolbar, add-on, or plug-in with malicious intent. A browser hijacker may also come bundled up with some freeware that you unwittingly download to your PC, compromising your internet security. An example of some infamous browser hijacker includes Conduit, Anyprotect, Babylon, SweetPage, DefaultTab, RocketTab, and Delta Search, however, the names are often changing. Browser hijacking can lead to severe privacy problems and even identity theft, affect your web browsing experience by taking control of outgoing traffic, drastically slows down your personal computer by consuming lots of system resources, and cause system instability as well.

Learn how to remove a browser hijacker

Certain browser hijacking can be quite easily stopped by finding and eliminating the corresponding malware software through your control panel. Having said that, the majority of hijackers are quite tenacious and need specialized tools to remove them. Furthermore, manual removals require in-depth system knowledge and therefore could be a very difficult task for novice computer users. Industry experts always suggest users eliminate any malicious software including browser hijacker by using an automatic removal tool, which is simpler, safer, and quicker than the manual removal solution. One of the best tools for correcting browser hijacker infections is SafeBytes Anti-Malware. It will help you remove any pre-existing malicious software on your system and provides you real-time monitoring and protection against new internet threats. Employ a system optimizer (such as Total System Care) along with your antivirus software to correct various registry issues, eliminate computer vulnerabilities, and boost your computer performance.

What To Do When You Cannot Install Safebytes Anti-Malware?

All malware is bad, but certain types of malware do much more damage to your computer or laptop than others. Certain malware variants modify web browser settings by adding a proxy server or change the PC’s DNS configuration settings. In these instances, you’ll be unable to visit certain or all of the sites, and thus not able to download or install the required security software to eliminate the computer virus. So what to do if malicious software keeps you from downloading or installing Anti-Malware? There are a few actions you can take to get around this issue.

Install the anti-malware in Safe Mode

Safe Mode is actually a unique, basic version of Microsoft Windows in which just bare minimum services are loaded to stop viruses as well as other troublesome applications from loading. If the virus is set to load automatically when PC boots, shifting to this mode may prevent it from doing so. To get into Safe Mode or Safe Mode with Networking, press F8 while the system is starting up or run MSConfig and find the “Safe Boot” options under the “Boot” tab. Once you are in safe mode, you can try to install your antivirus application without the hindrance of malicious software. Now, you are able to run the antivirus scan to remove computer viruses and malware without hindrance from another malicious application.

Download the security software in an alternate browser

Malicious code may exploit vulnerabilities in a particular internet browser and block access to all anti-malware software sites. The best solution to avoid this issue is to go with a browser that is well known for its security features. Firefox contains built-in Malware and Phishing Protection to keep you secure online.

Run antivirus from a pen drive

Another way is to download and transfer anti-malware software from a clean PC to run a virus scan on the affected computer. Try these simple measures to clean up your infected computer by using portable anti-malware. 1) Download Safebytes Anti-Malware or Windows Defender Offline onto a virus-free computer system. 2) Mount the USB drive onto the same computer. 3) Double-click on the downloaded file to open the installation wizard. 4) When asked, select the location of the pen drive as the place where you want to store the software files. Follow activation instructions. 5) Remove the pen drive. You can now utilize this portable antivirus on the infected computer. 6) Double click the Safebytes Anti-malware icon on the flash drive to run the application. 7) Press the “Scan Now” button to begin the malware scan.

Let's Talk About SafeBytes Anti-Malware!

If you’re looking to download an anti-malware application for your PC, there are lots of tools out there to consider however, you cannot trust blindly to anyone, regardless of whether it is paid or free software. A few are very good ones, some are decent, and some are merely fake anti-malware applications that will harm your PC themselves! You must pick one that is efficient, practical and has a good reputation for its malware protection. One of the recommended software programs is SafeBytes Anti-Malware. SafeBytes has a superb history of excellent service, and customers are very happy with it. Safebytes is among the well-established computer solutions firms, which provide this complete anti-malware software. Using its cutting-edge technology, this software will help you remove multiples types of malware like viruses, PUPs, trojans, worms, ransomware, adware, and browser hijackers.

SafeBytes anti-malware provides a plethora of advanced features which sets it aside from all others. The following are some of the features you may like in SafeBytes.

World-class AntiMalware Protection: Built upon a greatly acclaimed anti-virus engine, this malware removal application can identify and get rid of numerous obstinate malware threats such as browser hijackers, potentially unwanted programs, and ransomware that other typical anti-virus programs will miss. Live Protection: SafeBytes offers complete and real-time security for your PC. It’ll constantly monitor your pc for hacker activity and also provides users with superior firewall protection. Safe Browsing: Through its unique safety rating, SafeBytes informs you whether a site is safe or not to visit it. This will make sure that you’re always certain of your online safety when browsing the web. Light-weight Utility: SafeBytes is a lightweight and user-friendly anti-virus and anti-malware solution. As it uses minimum computer resources, this application leaves the computer power exactly where it belongs to: with you. Fantastic Tech Support Team: You can get high levels of support 24/7 if you’re using their paid version. SafeBytes can keep your personal computer safe from the latest malware threats automatically, thus keeping your internet experience secure and safe. You can be sure that your computer system will be protected in real-time once you put this tool to use. If you want advanced forms of protection features & threat detections, buying SafeBytes Anti-Malware could be worth the money!

Technical Details and Manual Removal (Advanced Users)

To remove My Maps Wizard manually, go to the Add/Remove programs list in the Windows Control Panel and select the offending program you want to get rid of. For internet browser extensions, go to your browser’s Addon/Extension manager and select the add-on you would like to remove or disable. You will additionally also want to totally reset your web browser to its default configuration settings. To ensure complete removal, find the following Windows registry entries on your computer and remove them or reset the values appropriately. But bear in mind, this can be a tricky task and only computer professionals could carry it out safely. In addition, some malicious programs are capable to defend against its removal. You’re advised to do this process in Safe Mode.
Registry: [HKEY_LOCAL_MACHINE\Software\Microsoft\Windows\CurrentVersion\explorer\Shell Folders] Common Startup = C:\windows\start menu\programs\startup [HKEY_LOCAL_MACHINE\Software\Microsoft\Windows\CurrentVersion\explorer\User Shell Folders] Common Startup = C:\windows\start menu\programs\startup [HKEY_LOCAL_MACHINE\Software\Microsoft\Windows\CurrentVersion\RunServices] Whatever = c:\runfolder\program.exe
Read More
Fixing the Port in use, please wait
Recently, a number of Windows 10 users reported an issue wherein they try to print from their PCs but were unable to and got an error message instead that states, “Port in use, please wait”. However, no matter how long they waited, nothing changed and they were still unable to print from their computers. On the other hand, when some of the users attempted to print wirelessly from their mobile devices, the printing continues which indicates that there is some issue between the computer and the printer. So if you are one of the users who are currently facing this problem, then this post should help. To fix this issue with your Printer, here are some possible fixes you can try that might work.

Option 1 – Run the Printer Troubleshooter

The first thing you can do to fix the “Port in use, please wait” error is to run the Printer Troubleshooter. This built-in troubleshooter in Windows 10 can help you fix most print issues. It checks if you have the latest printer drivers and then tries to fix and update them automatically. Aside from that, it also checks if you have connectivity issues or if the Print Spooler and the required Services are running fine. To run it, follow the steps below.
  • Tap the Win + R keys to open the Run dialog box.
  • Next, type “msdt.exe /id PrinterDiagnostic” in the field and click OK or hit Enter to open the Printer Troubleshooter.
  • Then click the Next button and follow the next on-screen instructions to fix the issue with the printer.

Option 2 – Try updating the Printer drivers

You might also want to try updating your printer drivers. All you have to do is locate the USB Composite Device. For complete details, follow the steps below.
  • First, click the Start button and type “device manager”.
  • Then click on the “Device Manager” from the search results to open it.
  • From there, look for the USB Composite Device option and right-click on it, and select the Update Driver from the options.
  • Restart your PC and then click the “Search automatically for updated driver software” option.
Note: You also have the option to download the latest version of your Printer from the manufacturer’s website.

Option 3 – Try selecting the correct port for your Printer

If the first two options given above didn’t work, then maybe it’s time to select a correct port for your printer since the wrong port has been selected which is why you’re getting the “Port in use, please wait” error.
  • Open “Devices and Printers” from the Start search.
  • Next, look for your printer from the list of devices and right-click on it, and then select Printer Properties.
  • Now go to the Ports tab under the newly opened Properties window and make sure that the port type matches the connection on the list of ports currently in use.
Note: If your printer is using a USB connection then the port should have a USB or DOT 4 in its description but if your printer is using a network connection then it should have the following description:
  • WSD
  • Network
  • IP
And if you notice that there are several listings for the same type of port, you have to change the selection to a different one and then click the OK button to save the changes made.
Read More
Fix error code 0x80190001 in Windows
If you are trying to install a Feature Update in Windows 10 but you got the error code 0x80190001, then it means that there is something wrong with the installation files. The installation files are either corrupted or some of them failed to be downloaded. On the other hand, the issue might also have something to do with a driver issue. When you encounter error 0x80190001, you will see the either of following error message on your screen:
“Something went wrong Couldn’t download Windows 10, please check your network settings and try again. You can contact Microsoft support for help with this error. Here’s the error code 0x80190001”. Or: “An unexpected error was encountered while attempting to download files required for the upgrade”.
Here are some fixes that could help you resolve the error 0x80190001. Follow them carefully.

Option 1 – Run the Network Troubleshooter

As mentioned in the error message the issue might have something to do with the network settings of your computer so you can try to run the Network Troubleshooter and then try updating or installing Windows 10 again.

Option 2 – Update Network drivers

  • Tap the Win + R keys to launch Run.
  • Type in msc into the box and tap Enter or click OK to open the Device Manager.
  • After that, look for Network Adapters from the list of device drivers displayed. Once you find it, expand it to see the Network drivers.
  • Right-click on it and select the option “Uninstall device” – do the same thing for the other Network drivers.
  • Restart your PC so Windows can detect and reinstall the drivers you just uninstalled.

Option 3 – Use Storage Sense to clean up temporary and junk files

  • Open Setting > System > Storage from the WinX Menu.
  • From there, you will see a list of all the local and connected storage devices along with the details on the free space.
  • Now make sure that the Storage Sense feature is turned On then go find a link that says “Free Up Space” and click it to open.
  • After that, a screen which is the built-in program in Windows 10 will appear and will scan your computer for the following junk files so you can free up disk space:
  • Windows Upgrade Log Files
  • The system created Windows Error Reporting Files
  • Thumbnails
  • Temporary Internet Files
  • Previous Windows Installation Files
  • Delivery Optimisation Files
  • DirectX Shader Cache
Note: Once you’re done freeing up space on your drive, try to run the setup file again.

Option 4 – Delete the contents in the SoftwareDistribution folder

The Software Distribution folder in the Windows operating system is a folder that can be found in the Windows directory and is used to store files temporarily which might be required to install the Windows Update on your PC. Thus, it is required by the Windows Update and maintained by WUAgent. A lot of users tried deleting the files in this folder to fix the problem and so far it has worked. Like them, you can try clearing the Windows Update cache by simply deleting the contents of the folder named “SoftwareDistribution” since Windows apparently can’t clear and re-download the update contents once they are corrupted. Thus, deleting the contents of this folder will make Windows download the contents again which will fix the problem. To do that, follow the steps below.
  • Open the WinX Menu.
  • From there, open Command Prompt as admin.
  • Then type in the following command – don’t forget to hit Enter right after typing each one of them.
net stop wuauserv net stop bits
  • After entering these commands, it will stop the Windows Update Service and the Background Intelligent Transfer Service.
  • Next, go to the C:/Windows/SoftwareDistribution folder and get rid of all the folders and files thereby tapping the Ctrl + A keys to select them all and then click on Delete. Note that if the files are in use, you won’t be able to delete them.
  • Once all the contents in the Software Distribution folder are deleted, restart your PC and then go back to Command Prompt and input the following commands again.
net start wuauserv net start bits
 Since the folder has already been flushed, it will be populated afresh the instant your restart your computer and open Windows Update.

Option 5 – Run the Windows Update Troubleshooter

You might also want to run the Windows Update Troubleshooter as it is also known to help users resolve Windows Update errors like error 0x80190001.

Option 6 – Try to disable your antivirus program

Disabling the antivirus program or any security software installed in your computer is always a good idea you can try when the Windows Update process does not go smoothly. So before you try updating your computer again, make sure to disable the antivirus or security program and once the Windows Update is done, don’t forget to enable the antivirus program back again.

Option 7 – Try to use the Media Creation tool

The Media Creation tool in Windows allows you to use the ISO installation file to make a bootable device that you can use to install Windows on your PC. Note that this is kind of different from the usual installation process as it could erase your computer’s current settings and data on the primary drive. Thus, before you proceed, you need to backup all your data into some removable drive and then use the Media Creation Tool to make a bootable drive.
  • After making the bootable drive, you need to plug it into your computer and then reboot.
  • Next, tap the F10 or Esc key to open the boot options.
  • Now set the boot priority of the removable drive the highest. Once the setup comes forth, follow the next onscreen instructions and install Windows without any problems.
Read More
1 2 3 162
Logo
Copyright © 2022, ErrorTools. All Rights Reserved
Trademarks: Microsoft Windows logos are registered trademarks of Microsoft. Disclaimer: ErrorTools.com is not affiliated with Microsoft, nor claim direct affiliation.
The information on this page is provided for information purposes only.
DMCA.com Protection Status