Guide to Repair Error 0x80040116

Repair Error 0x80040116

What's the 0x80040116?

Ms-Outlook is the widely used and most favored program to get and to send e-mails within workplaces.

In addition, it eases customers' business execution through additional features like producing schedule records to retaining track of important dates and sessions, preserving details on addresses, producing several files for handling significant e-mails and accessories, and additionally preserving drafts of emails individuals intend to send in future.

Ms-Outlook helps individuals handle functions and organize with each other effectively and economically.

Nevertheless, everything may suddenly halt when the problem code information screen is experienced by the Outlook user, you.

This is time-consuming and annoying as it prevents you from getting into your account and could lock you away from your view e-mail account.

Error code 0x80040116 is a familiar Outlook error that jumps up with no caution on the display.

Besides restricting your capacity to utilize your Outlook account, it presents a critical risk to the private data you've stored inside. Additionally, there is the chance of losing parts and information preserved in your e-mail account.

Error Causes

Finding and determining error code 0x80040116 cause isn't fairly easy. The truth is that there are several distinct causes that could activate this error

A few of the major causes of this error include:-

  • Broken PST list document. Ms-outlook uses this file to handle the users' requests. You can encounter this problem signal when it gets ruined.
  • 2 gigabytes limit is exceeded by the PST record. You have been incorporating data to Outlook accounts for years frequently without any erasures. When the 2GB limit is reached this error may surface.
  • PST file gets damaged. This generally occurs thanks to virus contamination to the System or sudden system shutdown.
  • Problems with account settings.

Further Information and Manual Repair

The error 0x80040116 is displayed in just one of these types:

  • "Outlook.pst cannot be accessed - 0x80040116(where "Outlook.pst" is PST file name)"
  • "Sending and receiving reported error (0x80040116): Unknown error 0x80040116"
  • "Outlook.pst cannot be accessed – 0x80040116"

When you have this error, it is advisable to correct it promptly to ensure it doesn't interfere with your productivity and work.

You do not require to contact an IT expert, to solve this issue. It's graded as an error signal that's easy to repair. So you do not want need deep IT knowledge to fix it.

There are two methods to remove this problem signal. Erase some memory if the error is created by excessive data.

This technique functions in the event the error's cause is PST size. However, that is not likely the best method to repair it if dropping the data that is outdated is no alternative.

Maybe the one that is greatest and the 2nd alternative is to install and to obtain Stellar Phoenix Outlook PST Repair.

Why is this the solution that is most effective to repair and solve the problem code 0x80040116 out there is that the software can fix the malfunction no matter the trigger?

What this means is you do not have to understand the nitty-gritty of determining a problem signal and then locate a unique option to fix its cause.

Wait there is a lot more! Stellar Phoenix Outlook PST fix tool is compatible with all versions of Windows.

Therefore, whether you've got 2007, the 2000 version, or 2010 Outlook editions, you do not have to be concerned about the compatibility like with several other repair resources out there.

Also, it solves the issue in a short while as well as re-establishes each of the e-mails, contact records, and diary info. That means that if you had lost the info as a result of error code 0x80040116, it is possible to heave a sigh of relief as everything is going to be regained right back.

What you need to do is click here, Download, and run Stellar Phoenix Outlook PST on your computer to recover your ms-outlook accounts now and fix error code 0x80040116.

If you like to learn and find out more about various Windows errors, and how to repair them go to our vast archive or use search to find articles that will explain and help you in solving your issue.
However, if you prefer to do things fast and with automatization then we are proposing to use an automated solution for your issues. The application that we are recommending is Advanced System Repair Pro
Advanced System Repair utilizes multiple tools all in one to give you a quick, simple, reliable, and very thorough diagnosis of your PC. It brings you all the tools you need in one program to clean, fix, protect, optimize and boost your PC!
1-Click Maintenance
All the tools to make it simple and easy! It's like having a professional technician at the click of a mouse.

Junk Cleaner
Keeping your computer free from unnecessary clutter also helps make your computer last longer. Like any other machine, if you keep it clean and take care of it, it will serve you better for longer!

Optimize background apps
Optimize applications background activity with the built-in Application Optimizer feature.

Disk Defrag
With a simple 1-click, Advanced System Repair speeds up your PC by assembling fragmented files on your machine and organizing them more efficiently.

Malware Removal
Finds and removes all types of harmful malware including trojans, worms, bots, adware, spyware, PUPs, and more!

Privacy Cleaner
The all-in-one privacy suite to Clean Your Tracks & Protect Your Privacy! Make your computer safe, secure, and more efficient!

System Tweak/Optimizer
ASR will analyze your complete system and settings to adjust your PC to function at its maximum performance.

Registry Cleaner
Over time, as you install and uninstall applications, the registry can become cluttered with old entries and broken settings which can result in program crashes, and annoying messages and slow the computer down.
Visit our Advanced System Repair Pro Download page to inform yourself about all the benefits of this software and get a free trial copy of it.
advanced system repair pro

Advanced System Repair Pro

One-click automated PC repair solution
ASR logo
With Advanced System Repair Pro you can easily
Replace damaged files
Restore performance
Free disk space
Remove Malware
Protects WEB browser
Remove Viruses
Stop PC freezing
DOWNLOAD
Privacy Policy | Terms of Use | Uinstall
Advanced System Repair Pro is compatible with all versions of Microsoft Windows including Windows 11

Share this article:

You might also like

Fix an Unformattable and Unusable USB Drive
If you have a USB that has stopped working and does not show any signs of life do not throw it away just jet. Hello and welcome to another great tutorial on errortools.com, today we will explore how to bring back to life dead USB memories.

Detect a Corrupted  Drive:

If your computer is still able to detect your USB drive, you might want to know if it’s been corrupted. Select the Properties of the drive folder and check the device status. If it says This device is working properly this USB drive is worth saving. There’s no need to worry if you can’t see the USB drive folder.

Erase the USB Drive with Diskpart Tool

Press ⊞ WINDOWS + X top open start menu and choose Command prompt (admin) Type diskpart and press ENTER Type in list disk and press ENTER Locate your USB drive by size and type in select disk#, where # is the number of removable disks.

Reallocate the USB Drive Volume

Press ⊞ WINDOWS + R to open the run dialog and type in diskmgmt.msc Select the USB drive and Right-click on it and select create simple volume. It will lead to a new simple volume wizard window. Once you click next, you can specify the volume size for the pen drive. Select the maximum volume, which is shown as a default unit in MB. As soon as you see the next step, select assign drive letter which will help you view your pen drive once again. Format the partition in the next step. This may be just an extra step because you have already wiped the data clean. But it is always better to be sure. Click Finish to complete the new simple volume wizard which will now be allocated to the USB drive. After you reallocate the unallocated USB drive space, you will be able to view the USB drive storage once again.
Read More
How to Fix Win32kbase.sys BSOD error
There is various Blue Screen of Death errors that you can encounter as you use your Windows 10 computer and some of these Stop errors have something to do with the win32kbase.sys file. This post will guide you in fixing the BSOD errors related to the win32kbase.sys file.
  • A problem has been detected and Windows has been shut down to prevent damage to your computer. The problem seems to be caused by the following file: Win32kbase.sys.
  • Your PC ran into a problem and needs to restart. If you would like to know more, you can search online later for this error: win32kbase.sys.
  • SYSTEM_SERVICE_EXCEPTION (win32kbase.sys)
  • STOP 0x0000000A: IRQL_NOT_LESS_EQUAL – win32kbase.sys
  • STOP 0x0000001E:
KMODE_EXCEPTION_NOT_HANDLED – win32kbase.sys
  • STOP 0×00000050:
PAGE_FAULT_IN_NONPAGED_AREA – win32kbase.sys
The win32kbase.sys file is a Windows operating system Base Win32 Kernel Driver file located in the System32 folder so if it ends up getting corrupted or if it went missing, your computer will throw up Blue Screen error. To fix BSOD errors that have something to do with the win32kbase.sys file, here are some possible fixes that could help. Worry not for these possible fixes are not complicated.

Option 1 – Run the Check Disk or CHDSK utility

One of the first things you can try to resolve the win32kbase.sys Blue Screen error is running the CHKDSK utility. If your hard drive has issues with integrity, the update will really fail as the system will think that it’s not healthy and that’s where the CHKDSK utility comes in. The CHKDSK utility repairs hard drive errors that might be causing the problem.
  • Open Command Prompt with admin privileges.
  • After opening Command Prompt, execute the following command and hit Enter:
chkdsk /f C:
  • Wait for the process to be completed and then restart your computer.

Option 2 – Run SFC or System File Checker scan

System File Checker or SFC is a built-in command utility that helps in restoring corrupted files as well as missing files. It replaces bad and corrupted system files to good system files. To run the SFC command, follow the steps given below.
  • Tap Win + R to launch Run.
  • Type in cmd in the field and tap Enter.
  • After opening Command Prompt, type in sfc /scannow
The command will start a system scan which will take a few whiles before it finishes. Once it’s done, you could get the following results:
  1. Windows Resource Protection did not find any integrity violations.
  2. Windows Resource Protection found corrupt files and successfully repaired them.
  3. Windows Resource Protection found corrupt files but was unable to fix some of them.
 Restart your PC.

Option 3 – Try to run the DISM commands

You might want to repair potentially corrupted files in your system as having them could also trigger the win32kbase.sys Blue Screen error. To repair these corrupted system files, you can run the DISM commands:
  • Tap the Win + X keys and click on the “Command Prompt (Admin)” option.
  • After that, input each one of the commands listed below sequentially to execute them:
    • Dism /Online /Cleanup-Image /CheckHealth
    • Dism /Online /Cleanup-Image /ScanHealth
    • Dism /Online /Cleanup-Image /RestoreHealth
  • Once you’ve executed the commands given above, restart your computer and check if the dxgkrnl.sys Blue Screen error is now fixed.

Option 4 – Try to run the Blue Screen Troubleshooter

As you know, the Blue Screen troubleshooter is a built-in tool in Windows 10 that helps users in fixing Blue Screen errors related to the win32kbase.sys file. It can be found in the Settings Troubleshooters page. To use it, refer to these steps:
  • Tap the Win + I keys to open the Settings panel.
  • Then go to Update & Security > Troubleshoot.
  • From there, look for the option called “Blue Screen” on your right-hand side and then click the “Run the troubleshooter” button to run the Blue Screen Troubleshooter and then follow the next on-screen options. Note that you might have to boot your PC into Safe Mode.
Read More
This operation failed as no adapter ...
If you have set a static IP address manually in your Windows 10 computer and you encounter an error saying, “This operation failed as no adapter is in the state permissible for this operation”, then you won’t be able to connect to any network. Many users have reported that they were unable to connect to any network after they set their IP addresses manually and all they see is a red cross symbol on the network icon located at the left-hand side of the taskbar. And upon trying to release the IP configuration and renew the address using Command Prompt or Windows PowerShell, they are getting the error instead. Users also noted that their internet connection is fine since they were able to connect to their Wi-Fi connection on their mobile devices. However, they find it hard to connect to the internet using their PCs. To fix this issue, here are some possible fixes you can check out. Make sure to follow each one of the instructions carefully.

Option 1 – Try to run the Internet Connections troubleshooter

As you were not able to connect to your internet connection using your PC, you can try to run the Internet Connections troubleshooter as it might resolve the problem. Refer to the following steps to run this troubleshooter:
  • Tap the Win + I keys to open Settings.
  • After opening Settings, go to Update and Security.
  • Next, navigate to the Troubleshoot pane and select the Internet Connections section and click the Run Troubleshooter button to get started.
  • Wait until the troubleshooter is finished doing its job and then try connecting to your network again.

Option 2 – Try to perform Network Reset

As pointed out, the “This operation failed as no adapter is in the state permissible for this operation” error occurs due to the static IP you’ve set. Thus, to fix it, you can try to perform a Network Reset. This will reset the entire network configuration including your IP address. To perform Network Reset, follow these steps:
  • Tap the Win + I keys to open Settings.
  • From there, go to the Network and Internet section.
  • Next, scroll down and look for “Network Reset” under the status pane.
  • After that, click on Network Reset and then on Reset now to start resetting the network configuration. Once done, check if it is able to fix the error or not.

Option 3 – Try to update or rollback or uninstall the Network drivers

You might also want to update, roll back, or disable your Network drivers to fix the “This operation failed as no adapter is in the state permissible for this operation” error.
  • Tap the Win + R keys to launch the Run window and then type in the “MSC” command and hit Enter to open the Device Manager window.
  • Under the Device Manager, you will see a list of drivers. From there, look for the Network Adapters and expand it.
  • Then right-click on each one of the Network drivers and depending on your preference, you can either select “Update driver”, “Disable device” or “Uninstall device”.
  • After that, restart your PC and see if it helped in fixing the netio.sys Blue Screen error.

Option 4 – Try to reset Winsock, TCP/IP & Flush DNS

You might also want to try resetting Winsock, TCP/IP, and flushing DNS might help you resolve errors. To do so, follow these steps:
  • Right-click on the Start button and click on Command Prompt (administrator) so you can pull up an elevated Command Prompt.
  • After that, execute each one of the commands listed below. And after you typed in one after the other, you have to hit Enter.
  1. netsh winsock reset – type in this command to reset Winsock
  2. netsh int ip reset resettcpip.txt – type in this command to reset TCP/IP
  3. ipconfig /flushdns – type in this command to flush the DNS cache
  • Next, restart your PC and check if the problem’s fixed.
Option 5 – Temporarily disable Firewall and third-party antivirus Firewall and antivirus programs are known to block files the instant it detects a threat to the system. However, there are some cases when it can also block a file even when it’s a safe one. Thus, your antivirus or firewall programs might be the reason why you can’t download anything on your Windows 10 computer. To isolate the issue, you need to temporarily disable both the Firewall and antivirus programs and then check if you can now download anything from the internet. Do not forget to enable them again as disabling them can leave your computer vulnerable to cyber threats.
Read More
ERR_SSL_VERSION_OR_CIPHER_MISMATCH
If you encounter an error message saying, “ERR SSL VERSION OR CIPHER MISMATCH” while visiting a website, then it is not primarily your fault as an end-user. In fact, it can happen on any website like Chrome, Edge, Firefox, and even Internet Explorer. Getting this error means that the website you are visiting is using an SSL certificate which your browser seems to be rejected because there is some issue with the certificate. It is also possible that the certificate that’s downloaded on your computer is corrupted or that your computer configuration for TSL/SSL is misconfigured. Here are the complete details of the error message:
“A secure connection cannot be established because this site uses an unsupported protocol, Error code ERR_SSL_VERSION_OR_CIPHER_MISMATCH”
To resolve the ERR_SSL_VERSION_OR_CIPHER_MISMATCH error, refer to the options given below and see which one works for you.

Option 1 – Try to access the website with the only HTTP

The first thing you can do is to try accessing the website using HTTP instead of HTTPS. If you can open the website using HTTP then it means that the problem is in the website itself. And if you are the website owner, you can check the following:
  • Check if your website’s SSL certificate name is mismatched. Here you need to ensure that the name and alias of the websites match with the actual website URL where the certificate is installed.
  • Second, check if your server is using the RC4 Cipher. If it is, then you need to fix that.
On the other hand, you may also check if your CDN also supports SSL since most of the CDN nowadays supports SSL. All you have to do is configure it correctly and it should be good to go.

Option 2 – Try enabling SSL 3 / TLS and disable QUIC Protocol

If you were using Google Chrome when you got the ERR SSL VERSION OR CIPHER MISMATCH error, then you need to follow the protocol fixes for SSL3/TLS and QUIC which are usually some of the reasons that cause the SSL version / Cipher Mismatch. It also has a few fixes for Windows 10 computer where you can clear the certificates and make sure that your computer date and time is in sync with your time zone and so on. If you were using Edge or Internet Explorer when you got the error, then you have to follow the steps below.
  • Type “Internet” in the search box of your browser. After that, you should see the Internet Options from the search results.
  • Next, open the Internet Properties window and switch to the Advanced tab and then scroll down to the Security section.
  • From there, check the “Use TLS 1.1” checkbox as well as the “Use TLS 1.2” checkbox and then click OK to save the changes made.
  • Restart the browser.
On the other hand, if you were using Firefox when you go the error, here’s what you have to do.
  • Open Firefox and in the address bar, type “about:config” and hit Enter.
  • If a warning appears, just click on the “I accept the risk!” button to proceed.
  • Next, type in “TLS” in the search field and hit Enter.
  • Then look for “security.tls.version.min” and double click on it and set its integer value to 3 to force the protocol of TLS 1.3.
  • Now click OK and restart Firefox and do the same thing with SSL.
Read More
How to personalize STEAM with custom skin
steam skin
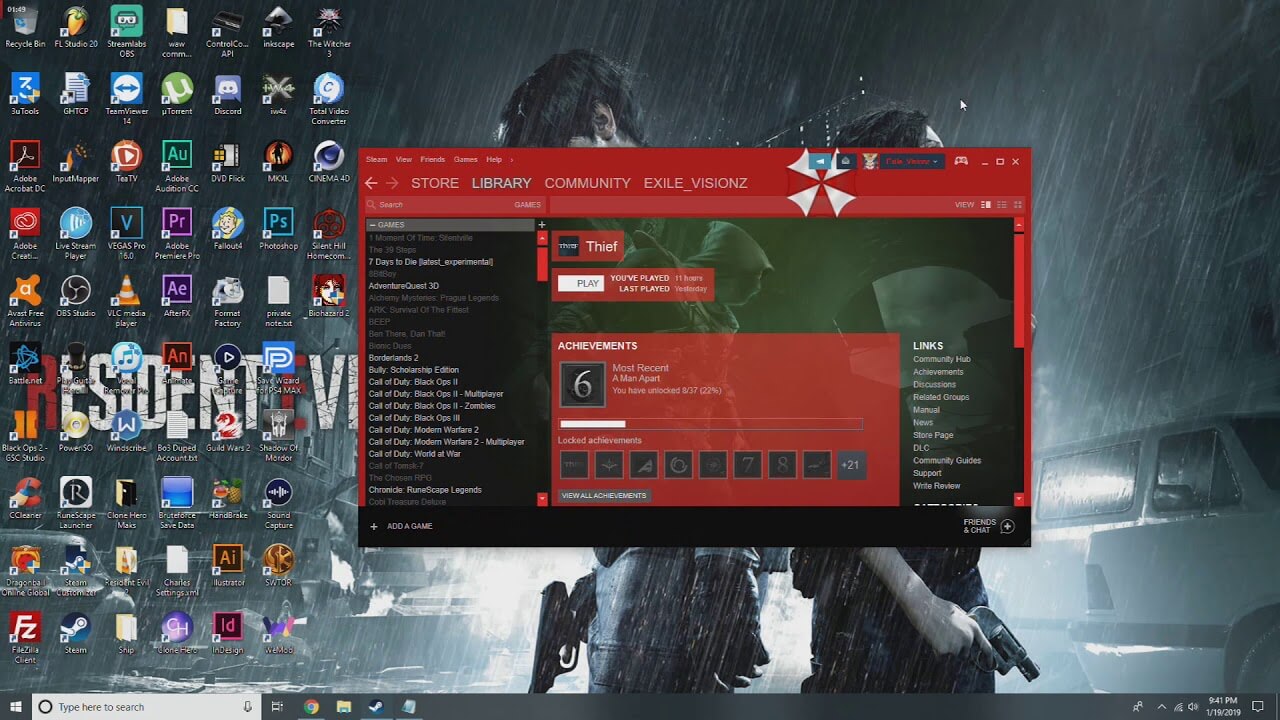
Skinning of applications is not new to PC users, but did you knew you could skin Steam? With skin, you can customize the UI and style of the client to what you want making it more personal and to your liking. First thing is to find the skin that you would like to install. There are a lot of sites where you could find custom made Steam skins but we would recommend steamskins.org The site itself is organized in tabs with different sections, once you click on the tab you will get a list of skins available for chosen section. If you click on the skin you will be taken to skin page detail where you can find what skin is aiming for, its legibility, a record of how the skin has been altered over time, or some mix of these aspects. Note that some skins might have issues like some buttons might be missing from big picture mode but so far none of the skins has any kind of client breaking feature, only functionality one.

Downloading skin

Once you have chosen desired skin and while on the skin details page, scroll to the middle of the page just above the Related Skins sections with two options: Direct Download and External Download. Now usually I would recommend Direct download but in this case, I would advise going with External Download for the simple reason that the External link will send you to the developer's website where there is a higher chance to get the latest updated skin.

Installing it in Steam

Once the skin is downloaded you will first need to create a skin folder inside your Steam installation location. Navigate to your Steam installation folder (default: C:\Program Files (x86)\Steam) and create a new folder inside it. Give new folder name Skins and confirm. Extract the skin zip file in the newly made folder. Once the file is extracted you can delete the ZIP file if you wish. Go to your Steam client and go to Steam>Settings. In settings select Interface on the left bar and on the right part then click the Select the skin you wish Steam to use the drop-down menu and select the skin that you wish to use. Confirm and restart your Steam client

Reverting to old skin

If you found skin unappealing or, unfortunately, has some functions missing you can always choose another skin or revert back to default Steam skin. Default Steam skin is named in the drop-down menu as < default skin >.
Read More
Fix Windows Updates Error code 0x80246007
Downloading Windows Updates does not always go smoothly as you can encounter several issues like the “Some updates did not finish downloading, We will keep trying, Error code 0x80246007” error. In fact, this error can also occur on other Windows applications like OneNote. According to security experts, this error happens for many reasons. For one, it could be that the Windows Update database is corrupted. It could also be that there is another process that’s in conflict with the Windows Update components or there might be some issue with the Background Intelligent Transfer Service (BITS). Whichever the cause may be, you can fix it by following the solutions given below.

Option 1 – Delete the contents in the Temporary folder

You can also try deleting the contents in the Temporary folder – all the downloaded, pending, or failed Windows 10 updates. You can do that using the simple and easy steps below.
  • Tap the Win + R keys to open the Run dialog box.
  • Then type “%temp%” in the field and press Enter to open the Temporary folder.
  • After that, select all the folders and files within the Temp folder and delete all of them.

Option 2 – Try running the Windows Update Troubleshooter

Running the built-in Windows Update troubleshooter is one of the things you can first check out as it is known to automatically resolve any Windows Update errors like Error code 0x80246007. To run it, go to Settings and then select Troubleshoot from the options. From there, click on Windows Update and then click the “Run the troubleshooter” button. After that, follow the next on-screen instructions and you should be good to go.

Option 3 – Try renaming or removing the pending .xml file

The problem might be due to some pending .xml file so you need to rename or remove it. To do so, just go to C:/Windows/WinSxS folder. From there, look for a pending .xml file – you can either rename it or delete it. This will allow the Windows Update to delete any pending tasks and build a new and fresh update check.

Option 4 – Restart the Background Intelligent Transfer Service (BITS)

The Background Intelligent Transfer Service or BITS is a part of the Windows Update service that manages the background download of Windows Update, as well as scans for new updates and so on. Thus, if your Windows Update fails a couple of times, you might want to restart BITS. For you to do that, make sure that you have admin privileges.
  • Press the Win + R keys to open the Run dialog box.
  • Then type “msc” in the field and hit Enter to open Services.
  • After opening Services, look for the Background Intelligent Transfer Service from the list of services and then double click on it to open Properties.
  • Next, set the Startup type to Manual and click on the Start button. If it doesn’t help, you can try setting it to Automatic (Delayed) and then reboot your PC.

Option 5 – Run the DISM tool

Running the DISM Tool helps in repairing the Windows System Image as well as the Windows Component Store in Windows 10. Using this built-in tool, you have various options such as the “/ScanHealth”, “/CheckHealth”, and “/RestoreHealth”.
  • Open the Command Prompt with admin privileges.
  • Then type in the following commands and make sure to hit Enter right after you type each one of them:
    • Dism /Online /Cleanup-Image /CheckHealth
    • Dism /Online /Cleanup-Image /ScanHealth
    • exe /Online /Cleanup-image /Restorehealth
  • Do not close the window if the process takes a while as it will probably take a few minutes to finish.

Option 6 – Delete the files from the Software Distribution folder

The downloaded Windows Updates are placed in a folder called “SoftwareDistribution”. The files downloaded in this folder are automatically deleted once the installation is completed. However, if the files are not clean up or if the installation is still pending, you can delete all the files in this folder after you pause the Windows Update service. For complete instructions, refer to the steps below.
  • Open the WinX Menu.
  • From there, open Command Prompt as admin.
  • Then type in the following command – don’t forget to hit Enter right after typing each one of them.
net stop wuauserv net start cryptSvc net start bits net start msiserver
  • After entering these commands, it will stop the Windows Update Service, Background Intelligent Transfer Service (BITS), Cryptographic, and the MSI Installer
  • Next, go to the C:/Windows/SoftwareDistribution folder and get rid of all the folders and files thereby tapping the Ctrl + A keys to select them all and then click on Delete. Note that if the files are in use, you won’t be able to delete them.

Option 7 – Reset the Catroot2 folder

After resetting the SoftwareDistribution folder, you need to reset the Catroot2 folder to restart the services you just stopped. To do that, follow these steps:
  • Type each one of the following commands.
net start wuauserv net start cryptSvc net start bits net start msiserver
  • After that, exit Command Prompt and restart your computer, and then try to run Windows Update once more.
Read More
The executable program that ...
If you are trying to start a service using the Windows Services Manager but you got an error message stating, “The executable program that this service is configured to run in does not implement the service”, then you’ve come to the right place as this post will provide you instructions on how you can fix this error. Since almost all program requires service to run on your computer, if the service is not listed in the corresponding registry key, then you will most likely encounter this error on your Windows 10 computer. Here’s the entire content of the error message:
“Windows could not start the service on Local Computer. Error 1083: The executable program that this service is configured to run in does not implement the service.”
To fix this error, you have to add the service name in the respective host in the Registry Editor, and to do that, here are some steps you need to take on. Step 1: The first thing you have to do is to take note of the service name that’s given in the error message. For instance, you get the “Windows Management Service. Step 2: Next, you need to open the Services Manager by tapping the Win + R keys and typing “services.msc” in the Run dialog box, and then tapping Enter. Step 3: After opening the Services Manager, look for the Windows Management Service and once you see it, double click on it. This will open a new mini window. Step 4: From the newly opened window, copy the Service name and the Path to executable under the General tab. If the path to the executable is displayed as “C:/Windows/system32/svchost.exe -k netsvcs –p”, you need the “netsvcs” part only. Note that it can be different for different services and you need the part that comes after “-k”. Step 5: Now tap the Win + R keys again to open Run utility and type “Regedit” in the field and click OK to open the Registry Editor. Step 6: After that, navigate to the following registry path:
ComputerHKEY_LOCAL_MACHINESOFTWAREMicrosoftWindows NTCurrentVersionSvchost
Step 7: From the given registry path, look for a key named “REG_MULTI_SZ” located on your right-hand side. This key is named after the “Path to executable” part. For instance, you should see “netsvcs”. Step 8: Double click on the REG_MULTI_SZ key and enter the Service name that you’ve copied earlier and then write it down at the end of the preset list. Step 9: Now save the changes you’ve made and try to open the program or run the service again.
Read More
Fix 0x00000016 Blue Screen Error
If you are a gamer, you might have encountered either the CID HANDLE CREATION or VIDEO TDR ERROR errors with an error code of 0x00000016 as you play a game. These kinds of Stop errors have something to do with the Graphics card driver. It could be that your Graphics card driver needs to be updated or it may be corrupted. Whichever the case is, you can try fixing this error using the given solutions below but before you proceed, make sure to create a System Restore Point first so that you can easily roll back to the previous state of your computer in case something does not go as expected.

Option 1 – Try checking if your graphics card is enabled and update it as well

Although the problem is quite massive, the fix could be as simple as enabling the graphics card if it turns out to be disabled. There might be some strange reason why your graphics card disables itself. Thus, the best and first option you can try is to check if the graphics card is enabled or not. To do so, follow these steps:
  • Tap the Win + R keys to open the Run dialog box.
  • Then type “devmgmt.msc” in the field and hit Enter to open the Device Manager.
  • After opening the Device Manager, look for your graphics card option among the list of device drivers. Once you found it, check if it is enabled or not. If it’s not enabled, you should see a gray arrow pointing downwards. Right-click on the card and select Enabled.
  • Next, right-click on the graphics card once more and click on the Update Driver Software option and then click on the “Search automatically for updated driver software” option.

Option 2 – Reinstall the Graphics card drivers

  • Tap Win + R to open Run then type “devmgmt.msc” in the field and hit Enter to open the Device Manager.
  • From there, look for the Display adapters and uninstall each one of the graphics card drivers by right-clicking on them and selecting the Uninstall device option.
  • After uninstalling the graphics card drivers, close the Device Manager and tap Win + R to open Run once again.
  • After that, type “appwiz.cpl” in the field and hit Enter to open Programs & Features in the Control Panel.
  • Next, look for any program that’s related to your GPU manufacturers like Nvidia, AMD, or Intel. Right-click on any GPU-related entry and click on Uninstall to uninstall them and then follow the next on-screen instructions that appear afterward.
  • Now restart your computer.
  • Once your computer has restarted, go to the GPU manufacturer’s website and download the latest driver version for your graphics card model and then install it.
  • Restart your computer once again. That should fix the problem.

Option 3 – Try reinstalling the game

If updating and reinstalling your Graphics card driver didn’t help, then you can try to reinstall the game where you’re getting the CID HANDLE CREATION or VIDEO TDR ERRORS.

Option 4 – Uninstall the programs you installed recently

Chances are, some programs that you just installed might be the one that’s causing the BSOD error. Thus, you need to uninstall the program to resolve the problem.
  • In the search box, type in “control” and then click on Control Panel (desktop app) among the search results.
  • After that, select Programs and Features from the list which will give you a list of all the programs installed on your computer.
  • From there, look for the concerned program and select it and then uninstall it.
Note: If you have downloaded the app from the Windows Store, you can simply right-click on it from the application list and then uninstall it. In addition, you might also want to check the hardware components of your computer that might not support the operating system itself. You can disconnect all the external devices like USB drives, scanners, printers, etc., and then reboot your PC. After that, add the devices again one after the other and check if the BSOD error is now fixed or not.

Option 5 – Try disabling your monitor’s Sleep functionality

There are times when the Sleep functionality of your monitor can also cause BSOD errors like CID HANDLE CREATION or VIDEO TDR errors. There are also times when the graphics card is running in the background and the display goes to sleep and then it’s turned back on but you encounter this kind of Blue Screen error. This is why you can try to disable your computer monitor’s Sleep mode.

Option 6 – Run the Blue Screen Troubleshooter

The Blue Screen troubleshooter is a built-in tool in Windows 10 that helps users in fixing BSOD errors like CID HANDLE CREATION or VIDEO TDR errors. It can be found on the Settings Troubleshooters page. To use it, refer to these steps:
  • Tap the Win + I keys to open the Settings panel.
  • Then go to Update & Security > Troubleshoot.
  • From there, look for the option called “Blue Screen” on your right-hand side and then click the “Run the troubleshooter” button to run the Blue Screen Troubleshooter and then follow the next on-screen options. Note that you might have to boot your PC into Safe Mode.

Option 7 – Try to run the Chkdsk utility

Running the CHKDSK utility might also help you resolve the CID HANDLE CREATION or VIDEO TDR errors. If your hard drive has issues with integrity, the update will really fail as the system will think that it’s not healthy and that’s where the CHKDSK utility comes in. The CHKDSK utility repairs hard drive errors that might be causing the problem.
  • Open Command Prompt with admin privileges.
  • After opening Command Prompt, execute the following command and hit Enter:
chkdsk /f /r
  • Wait for the process to be completed and then restart your computer.
Read More
Fixing the Java Error Code 1603 in Windows 10
You might have experienced a situation where you’re trying to install or update your Java application on your Windows 10 computer but were not able to do so for some reason. One of the problems you can encounter while updating or installing Java is Error Code 1603. There are two ways you can install Java – you have the option to choose where to get Java either from the online download or offline download. There are times when before you can install Java, you might have to disable the firewall first as it may interrupt the Java online installation. And while doing so, if you are getting the “Java Update or Install did not complete – Error Code 1603” error message, read on as this post will show you what you can do to fix it. At the time of writing, the exact cause of this error is still unknown. On the other hand, you must still check if you have fulfilled all the system requirements needed to install Java. You have to make sure that your Windows 10 PC has sufficient disk space available for the Java installation or update. In addition, you also have to make sure that you meet all the hardware requirements and you are using a popular web browser for the installation, and that you have administrative privileges for download and installation. To fix the “Java Update or Install did not complete – Error Code 1603” error, here are some suggestions you can try.

Option 1 – Restart your computer before you install the new Java package

You might have to restart your computer if you got the error code 1603 while installing Java through an offline download.
  • Restart your computer.
  • Next, download and install the offline installer of the Java package from the official site of Java and not some third-party source.
  • In the prompt box that appears while downloading the Java package, select the option Save in and save the package in your preferred folder.
  • After that, navigate to the saved, downloaded package on your computer and then double click on the file to begin the installation process.
After that, if it didn’t fix the problem and you’re still getting the error code 1603, follow the next given option below.

Option 2 – Uninstall the old versions of Java before you install the new package

  • Open the Control Panel.
  • After that, click on Programs and features.
  • Then select the old Java package and click on Uninstall.
  • Restart your computer and then try installing the new Java package again from its official site.

Option 3 – Disable the Java content in the browser you’re using via Java Control Panel and reinstall Java

  • Open the Control Panel again.
  • And then click on the Java icon to open the Java Control Panel.
  • Next, navigate to the Security tab and then uncheck the “Enable Java content in the browser” option.
  • Then click on Apply and then Ok to save the changes made.
  • Now install the new Java package again after you download it from its official website.
  • Once the installation is completed, re-enable the “Enable Java content in the browser” option in the Java Control Panel as it is essential especially if you are running Java content in your browser.
Read More
Cannot Create User Account During Out Of Box Experience or Sign In, Non-Responsive Behavior (Welcome Back) Page

When you upgrade your Windows 7 or Windows 8.1 system to Windows 10, you’ll undergo a phase called Out of Box Experience, or simply OOBE. This phase is intended to allow users to customize their Windows 10 experience, which includes defining personal settings, creating user accounts, and more. Some users reported having issues when creating their user account during the Out of Box Experience (OOBE) on Windows 10 upgrade. Some also reported issues about non-responsive behavior (Welcome Back) page.

Solution

Restoro box imageError Causes

Unfortunately, there’s no known cause for this error. However, some users reported that this occurs when:

  • There’s a problem with the ISO or CD used to install Windows 10
  • There’s hardware malfunctioning on the computer

Further Information and Manual Repair

Your Windows 10 upgrade will not be successful if you’re not able to create a user account or finish the Out of the Box (OOBE) phase of the installation. Here are some methods that will help you fix this manually.

Method 1 – Wait and retry

Some users reported that waiting for about an hour and retrying the process again will solve this problem. It’s also recommended that you keep your computer in a ventilated place while you wait to retry the process.

Method 2 – Load default user manually

This method has 2 requirements in order to work.

  1. You need to be upgrading from a previous Windows version, and
  2. Your Windows was originally configured to automatically boot to desktop

If you meet these two requirements, you can solve the error by following the steps below:

  1. Hold CTRL+ESC keys. Windows should load the default user after doing this step.
  2. Press the Windows key + X. Then, click the Computer Management icon
  3. Choose “Local Users and Groups”
  4. Double click on Users
  5. Right-click on the right pane, and then choose “New User”
  6. Create a new user account and password

Method 3 – Power down your laptop

This method only applies if you’re a laptop user.

  1. Power down your laptop
  2. Remove the battery of your laptop
  3. Wait for about 10 minutes
  4. Connect your laptop using direct current
  5. Turn on your laptop again
  6. Create a new user account and log in

Method 4 – Create a local account if you’re trying to set up a Microsoft account

Instead of connecting to a Microsoft Account after the set-up, you might want to try creating a local account. To do this, follow the steps below:

  1. Power down your computer if you are to set up a Local Account.
  2. Disconnect your computer from the Internet, either Wired or Wireless
  3. Unplug your computer, and wait for about 10 minutes.
  4. Reconnect your computer and start Windows. Do NOT connect to the Internet and make sure you’re disconnected to any devices you don’t need.
  5. Try creating a user account again

 If the steps above don’t work, you might want to try Startup repair.

Method 5 – Boot your computer from Windows 10 media

In order to do this step, you need to have official Windows 10 ISO files.

  1. Go to the “Install Now” screen
  2. Choose Repair your computer
  3. Click Advanced Options
  4. Click Safe Mode

After doing the steps above, there’s a chance you get an error message that says “installation cannot be completed in safe mode”. When you see this, just press Shift+F10. This will execute and open the command prompt of your computer.

 From the command prompt, you can try and create a new user account.

 For example, net user Username Password /add

 The username here should be replaced with the account name you want to add, and the Password here should be replaced with the password you want to use for the account.

 After replacing the username and password on the text, press the Enter button on your keyboard. You’ll know if the command is successful once you see the message, “The command completed successfully.”

You can now close the command prompt. Restart your computer and try to log in using the account you just created.

Method 6 – Use a powerful automated software

If all the above methods still don’t work, it might be best to try automated software to help you fix this problem.

Read More
1 2 3 162
Logo
Copyright © 2022, ErrorTools. All Rights Reserved
Trademarks: Microsoft Windows logos are registered trademarks of Microsoft. Disclaimer: ErrorTools.com is not affiliated with Microsoft, nor claim direct affiliation.
The information on this page is provided for information purposes only.
DMCA.com Protection Status