How to Fix the Socket Error 10060

Repair Socket Error 10060

Socket Error 10060 - What is it?

Socket Error 10060 is a typical Outlook Express error. This error often occurs when the connection to the server fails. It specifically refers to a timeout while communicating with the email providers servers.

The vast majority of all emails use SMTP for outgoing mail. Socket error 10060 in most instances is related to the SMTP settings for the user’s email.

The error message is sometimes displayed in the following format:

Outlook Express Socket Error10060 - The connection to the server failed Account:’ your account’

Another thing you must know about this error is that it only stops the user from sending emails. This means that you can only receive emails, not send them.

Solution

Restoro box imageError Causes

The cause of this error code is hard to narrow down typically because there are many causes that can trigger the socket error code 10060. Some of the most common causes of this error code are:

  • Issues in email settings
  • Authentication settings
  • Firewall settings
  • Malware

Though this is not a critical error code it is advisable to fix it immediately without any delays.

This error can hamper your communication via email and slow down your work productivity especially if you use Outlook for communication across the organization.

Further Information and Manual Repair

Here are some of the many methods to fix and resolve this error code. To help you resolve this issue, we have selected and listed down the best, quick, and easy do-it-yourself methods. Try them and repair Socket error code 10060 all by yourself without any professional assistance.

Method 1 - Check the Names of POP3 and SMTP Servers

To begin with, first check the names of the POP3 and SMTP servers to ensure that they are correct. Then check the outgoing SMTP port. Contact your email provider to determine the correct settings.

Sometimes email providers change this value more than any other in their individual settings. Get it verified. Change the settings if needed.

Method 2 - Outgoing SMTP Server Requires Authentication

Sometimes the error code may occur due to authentication issues. If this is the reason then, don’t worry it is easy to fix. Simply go to the settings options and check the box ‘My server requires authentication’.

Once you check the box, try sending the email again. This is most likely to resolve the socket error 10060 on your PC.

Method 3 - Disable Firewall

Your Firewall security may sometimes be the reason for socket error 10060 too. Therefore if after trying method 1 and 2, the error still persists, then it is advisable to disable firewall.

Once you disable it, try sending an email using your Outlook account. If it works, the error is resolved.

Method 4 - Scan for Malware

There is a possibility that the Socket error 10060 is popping on your PC due to malware infection. If so, then it is advisable to download Restoro.

This is a highly functional and a user-friendly PC fixer deployed with a powerful antivirus and several other scanners. Run it on your PC to scan for malware. It detects and removes all types of malware including Trojans, viruses, adware, spyware, and more in seconds.

Click here to download Restoro to resolve socket error 10060 on your system today.

If you like to learn and find out more about various Windows errors, and how to repair them go to our vast archive or use search to find articles that will explain and help you in solving your issue.
However, if you prefer to do things fast and with automatization then we are proposing to use an automated solution for your issues. The application that we are recommending is Advanced System Repair Pro
Advanced System Repair utilizes multiple tools all in one to give you a quick, simple, reliable, and very thorough diagnosis of your PC. It brings you all the tools you need in one program to clean, fix, protect, optimize and boost your PC!
1-Click Maintenance
All the tools to make it simple and easy! It's like having a professional technician at the click of a mouse.

Junk Cleaner
Keeping your computer free from unnecessary clutter also helps make your computer last longer. Like any other machine, if you keep it clean and take care of it, it will serve you better for longer!

Optimize background apps
Optimize applications background activity with the built-in Application Optimizer feature.

Disk Defrag
With a simple 1-click, Advanced System Repair speeds up your PC by assembling fragmented files on your machine and organizing them more efficiently.

Malware Removal
Finds and removes all types of harmful malware including trojans, worms, bots, adware, spyware, PUPs, and more!

Privacy Cleaner
The all-in-one privacy suite to Clean Your Tracks & Protect Your Privacy! Make your computer safe, secure, and more efficient!

System Tweak/Optimizer
ASR will analyze your complete system and settings to adjust your PC to function at its maximum performance.

Registry Cleaner
Over time, as you install and uninstall applications, the registry can become cluttered with old entries and broken settings which can result in program crashes, and annoying messages and slow the computer down.
Visit our Advanced System Repair Pro Download page to inform yourself about all the benefits of this software and get a free trial copy of it.
advanced system repair pro

Advanced System Repair Pro

One-click automated PC repair solution
ASR logo
With Advanced System Repair Pro you can easily
Replace damaged files
Restore performance
Free disk space
Remove Malware
Protects WEB browser
Remove Viruses
Stop PC freezing
DOWNLOAD
Privacy Policy | Terms of Use | Uinstall
Advanced System Repair Pro is compatible with all versions of Microsoft Windows including Windows 11

Share this article:

You might also like

Software review series: QuickLook
QuickLook app is one of the best options to preview files without opening them in Windows 10. It works similar to the Quick Look feature of macOS. This Microsoft Store app has some really interesting features. It lets you preview images, documents, and media files. Also, just a hotkey is needed to preview the content of a file. There is no interface for the app. Only a preview window is visible. You can also expand the preview window to full size. Apart from that, it lets you keep the preview window on top of the other opened applications. For image files, it also provides the EXIF data. After installing this app, just select some file that you want to preview, and press the Spacebar key. That’s it! The preview window will open immediately to view the file content. If you would like to read more helpful articles and tips about various software and hardware visit errortools.com daily.
Read More
Fix One Drive Error: This is not a valid file name
As you know, Microsoft’s consumer cloud storage platform is none other than OneDrive. It is where users can save any of their files albeit it’s mostly used to store common files like documents and photos. However, there are times when you might encounter some problems when saving these files. Recently, some users reported that they had problems saving Word documents to OneDrive and if you experience the same issue, then you’ve come to the right place as this post will guide you on how to resolve it. According to users who encountered the problem, when they try to save Word documents on OneDrive, an error message appears instead stating, “This is not a valid file name”. This kind of error only occurs when the file is opened from within OneDrive for saving in a different folder. In other words, if the file is saved in the same folder, the error won’t pop up but if it is saved in a separate folder, that’s when the error appears. Worry not though for fixing this error is not complicated and won’t take too long. It seems that this error is due to the 259-character limitation when creating and saving files as far as the Office products are concerned. To resolve it, there are several workarounds you can check out. Before you proceed with these workarounds, make sure that you have a stable internet connection.

Option 1 – Try renaming the file with a shorter name

The first thing you can do to fix the problem is to rename the file with a shorter name. Just right-click on the file and select the Rename option from the menu and then type in the new name and click OK or tap Enter to rename the file.

Option 2 – Try renaming the folders where the file is located

Like what you did in the first given option, all it takes is a right-click but this time on a folder. Rename the folder with a different name and save the changes made and then check if you can now save the Word document on OneDrive.

Option 3 – Try moving the file to a folder with a shorter path

If the first two options didn’t work, you can try moving the file to a folder with a shorter path. Note that it is not the same as doing it locally on a Windows 10 computer so you have to right-click on the file and select the “Move to” option. After that, locate the folder where you want to move the file and select it and then click on the Move button to complete the task.

Option 4 – Try making some changes in the document

You could also try to make some modifications to the document. Once you’ve done that, click the File tab and select the Save As option and then go to the folder where you want to save the file and tap enter.
Read More
How to Deal With Error Code 42

Repair and Solve Error Code 42

Code 42 - What is it?

Code 42 Error is referred to as a Device Manager Error code. Before we explain what this code indicates, it is important to understand what ‘Device Manager’ is and its functions.

Device Manager is basically a Windows tool that helps manage devices attached to the system such as the Printer, Scanner and the USB Device. The Device Manager Error code 42 occurs when a duplicate device is detected.

Error Code 42 is displayed in the following format:

“Windows cannot load the device driver for this hardware because there is a duplicate device already running in the system. Code 42”

Solution

driverfix boxError Causes

Narrowing down to one particular cause for error code 42 is not virtually possible because it may be triggered due to many underlying reasons. These include:

  • When a bus driver incorrectly generates and creates 2 identically named devices
  • When a device with a serial number is found in a new location without being removed from its original location
  • Mis-configured drivers

No matter what the reason for this error code,, to avoid inconvenience and to ensure proper hardware performance, it is advisable to fix it right away without any delay.

Further Information and Manual Repair

If you’re not technically sound, the code 42 message display can panic you. But don’t worry, the error message sounds complex but it is quite easy to fix.

To resolve code 42 in a few minutes, simply try the methods given below. These methods are easy-to-perform, effective and more importantly require no technical expertise.

Method 1 - Restart Your System

Code 42 can pop up due to some temporary glitch in the Device Manager. By simply restarting your PC, you can resolve this problem.

Therefore, first things first, restart your system. However, in case it doesn’t work out, try other methods.

Method 2 - Launch the Troubleshooting Wizard

Launch the troubleshooting wizard to find the underlying problem and resolve it accordingly. To do this, proceed with the following steps:

  • Go to the start menu
  • Type Device Manager in the search bar and press enter
  • Now click on the ‘General Tab’
  • Then click on ‘Trouble Shoot’ to launch the Troubleshooting Wizard
  • After that follow the instructions in this Wizard to diagnose the problem and resolve it.

Method 3 - Restore Your PC to its Previous State

Another method to fix code 42 is to use the System Restore tool to restore your PC to its previous working state before the error popped up. To do this,

  • Go to the start menu
  • Type System Restore in the search bar and press enter
  • Now click on ‘Restore my computer to an earlier time’ and then click ‘Next’
  • After that select the restore point on the restore point list and confirm settings
  • Restart your PC to activate changes
  • Before restoring your PC to its previous state, create a backup. By creating data backup you can avoid data loss issues, which are likely to occur during this process.

Creating backup manually can be time-consuming and a painstaking task. The best way to create backup and restore your PC to its normal state is to download DriverFIX.

It is a user-friendly device driver management software that helps create data backup automatically and simultaneously restores your PC back to its normal working state in a few seconds.

This software is compatible with all Windows versions.

Click here to download DriverFIX on your system to resolve error code 42.

Read More
Cooler Master's Orb X upcoming gaming chair
The newest piece of hardware for PC or console users is not really what anyone has expected and for sure not from a company like Cooler Master. orb x black and whiteI going to admit right here that I am a big fan of Cooler Master PC cases, I like them and they are always one of the things that I consider when building a new PC, overall I like their ideas and quality so personal for me it was quite a surprise to see that they are one that is making a new generation gaming chair. Now truth to be told Orb X is not your typical gaming chair as you can clearly see from the pictures. The chair itself will come in two colors: white or black and RGB lighting looks to be prominently featured throughout. orb x back
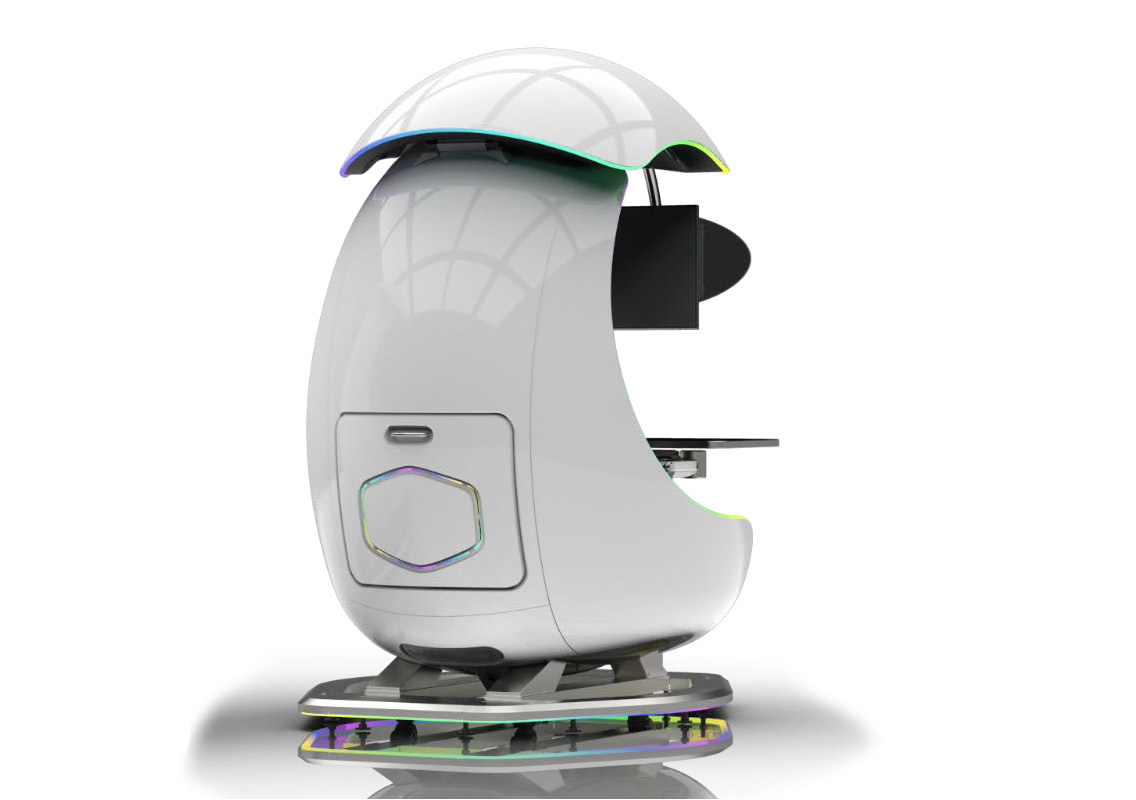
The chair itself is advertised as both meant and aimed for professional and gaming crowds but I believe the gaming crowd is in general more interested in this hardware piece. Hardware is enclosed in a fully motorized shuttle dome which aims to maximize your privacy, it supports a single 49inch display or three 27inch monitors along with surround speakers if you do not wish to use headphones. Orb x side
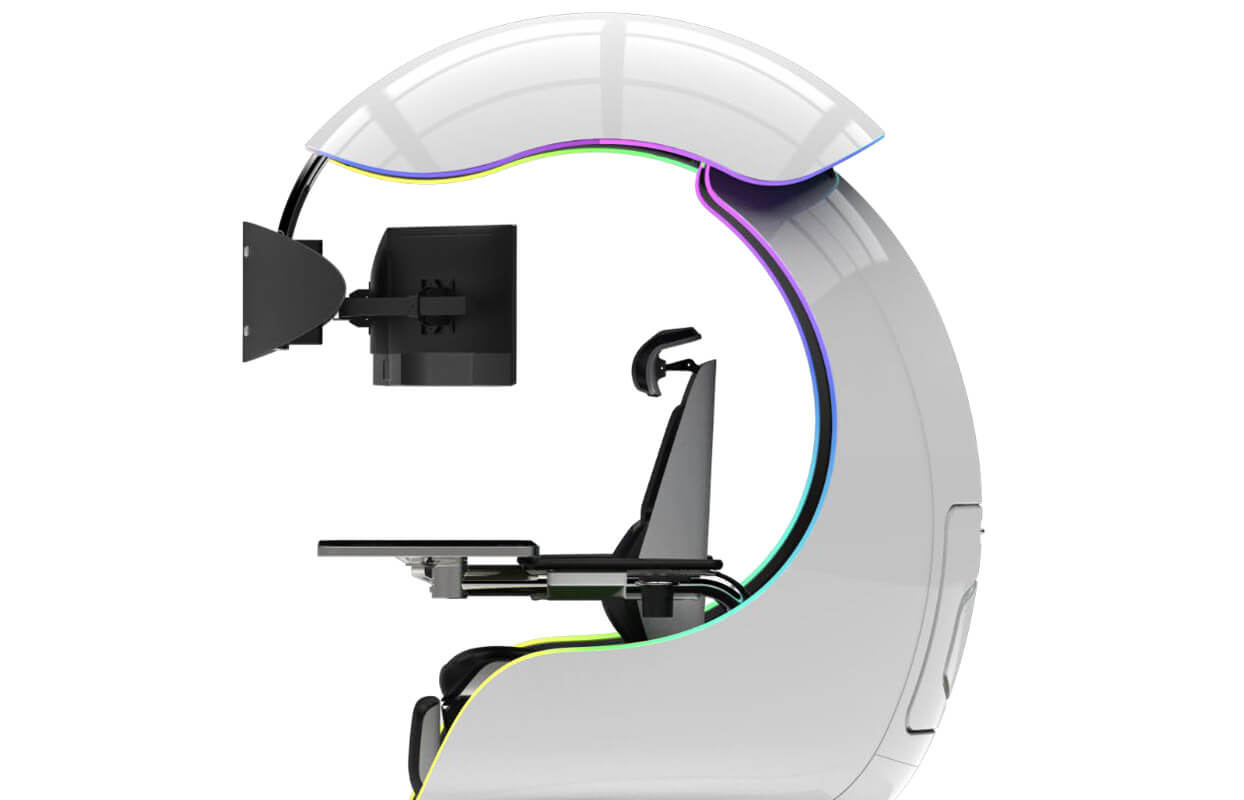
It offers an adjustable headrest, lumbar support, and footrest so you can spend some time in it and be comfortable. Controls on the chair itself allow you to raise or lower the dome for easier getting in and out of it. Orb X also has a compartment in its backside, it folds out and has a sliding tray designed to hold your PC or console. Everything is enclosed so wiring is not the issue. Overall Orb X seems really like the computer chair of the future, Cooler Master expects to release the Orb X by December 2021, priced around $12,000-$14,000.
Read More
Uninstalling the Weather App in Windows
Windows 10 has a pre-installed Weather app that offers the local weather information, forecast, temperature gradient, historical data, multiple locations, and many more. It can be handy especially if you tend to check on the weather. However, if you are one of those users who barely use this app, you have the option to uninstall it from your computer and that’s exactly what we’re going to do in this post. There are several methods to uninstall the Weather app in Windows 10. You can uninstall it via Settings or Start Menu or even using a command in Windows PowerShell. Note that uninstalling the Weather app does not affect the functionality of your Windows 10 computer by any means so you shouldn’t worry about uninstalling it. To get started, follow the instructions provided below.

Option 1 – Uninstall the Weather app through Settings

The first option you can try to uninstall the Weather app is through Settings. It’s a very simple process so you wouldn’t have any trouble following it.
  • First, click on the Start menu and go to Settings.
  • From there, select System > Apps & Features.
  • After that, wait until the list of apps is opened, and then look for the Weather app and click on it.
  • Next, click on Uninstall in the given menu to uninstall the Weather app from your computer.

Option 2 – Uninstall the Weather app through the Start Menu

Another simple way to uninstall the Weather app is through the Start Menu. It only takes a right click and there are actually two ways to go about this – one is new with the recent feature update of Windows. How? Refer to these steps:
  • Click on the Start button and type in “weather” and right-click on the Weather app which appears in the list.
  • Next, click on the Uninstall option. This will uninstall the Weather app.
  • You can also use the other uninstall option which you can find on the right side of the list that also shows other quick action for the app.

Option 3 – Uninstall the Weather app through a command in Windows PowerShell

  • Tap the Win + X key combination and click on the “Windows PowerShell (Admin)” option to open PowerShell with admin privileges.
  • After that, execute the following Remove App package command for the Weather app to uninstall it.
Get-AppxPackage Microsoft.BingWeather | Remove-AppxPackage
  • Once done, it will remove the Weather app from your computer.
Read More
Fix UNEXPECTED STORE EXCEPTION in Windows 10
Blue Screen of Death or Stop errors are definitely one of the most difficult issues to face in your Windows computer. One of them is the UNEXPECTED STORE EXCEPTION BSOD error. When you encounter this Stop error on your Windows 10 computer, this means that the store component has caught an unexpected exception. There are many potential causes for this error, but we’ve narrowed it down to a few specific causes – for one, this error could be caused by your antivirus program installed on your computer, two, it could also be caused by outdated hardware drivers on your computer, it could also be an error in the file system as well as some issue with the lock screen app, or even output to an unexpected port. Whichever the cause may be, you can use a couple of fixes laid out below. Make sure to carefully follow them.

Option 1 – Try to update your Display driver

  • First, boot your computer into Safe Mode.
  • After that, tap the Win + R keys to launch Run.
  • Type in devmgmt.msc into the box and tap Enter or click OK to open the Device Manager.
  • After that, a list of device drivers will be displayed. From there, look for the Display Adapters and click on them.
  • After that, right-click on each entry under the Display Adapters and select the “Uninstall Device” option from the menu.
  • Now restart your computer.
  • After restarting your computer, go to the Settings app and Check for Updates in the Windows Update section.
Note: You also have the option to go directly to the website of your graphics card manufacturers like NVIDIA, Intel, or AMD and go to the section called Drivers then check if there’s a new available update – if there is, download and install it.

Option 2 – Run both the System File Checker scan and DISM tool

If the problem is caused by corrupted system files, then you can use both the System File Checker and the DISM tool. To use them, follow the instructions below.
  • Tap the Win + X keys or right-click on the Start button and click the “Command Prompt (Admin)” option. Alternatively, you can also search for “cmd” in the Cortana search box and right-click on Command Prompt from the search results, and select the “Run as administrator” option.
  • After that, if a User Account Control prompt pops up, click on Yes to proceed.
  • Once the Command Prompt window is pulled up, type the following command and hit Enter:
DISM.exe /Online /Cleanup-image /Restorehealth
  • Wait for the process to be completed. Once it’s done, type the following command and hit Enter:
sfc /scannow
  • The command will start a system scan which will take a few whiles before it finishes. Once it’s done, you could get the following results:
  1. Windows Resource Protection did not find any integrity violations.
  2. Windows Resource Protection found corrupt files and successfully repaired them.
  3. Windows Resource Protection found corrupt files but was unable to fix some of them.
  • Restart your PC.
Note: You should see the “Windows Resource Protection found corrupt files and successfully repaired them. Details are included in the CBS.Log %WinDir%LogsCBSCBS.log” message on your screen. On the other hand, if you see the “Windows Resource Protection found corrupt files but was unable to fix some of them. Details are included in the CBS.Log %WinDir%LogsCBSCBS.log” message instead, then you should run the following command in Command Prompt:
findstr /c:"[SR]" %windir%LogsCBSCBS.log >"%userprofile%Desktopsfclogs.txt"
The command you entered will open up the logs on your Desktop where you can look for files that are causing the error on your computer manually.

Option 3 – Disable Fast Start-up

If you want your computer to boot faster, then you might have enabled Fast Start-up. This feature is ideal for computers that are using a hard disk drive. However, turning on this feature also means that when the computer boots, it might lag some drivers that are loaded when it initially boots up. Thus, it might be the potential cause of the UNEXPECTED STORE EXCEPTION BSOD error. Thus, you need to disable Fast Start-up. To do that, follow these steps:
  • Boot your PC into Safe Mode.
  • Then tap the Win + R keys to open the Run dialog box.
  • Next, type in “control” to open Control Panel.
  • After that, select Hardware and Sound and click on Power Options.
  • Select “Choose what the power buttons do” from the left side menu pane and click on Change settings that are currently unavailable.
  • Afterward, uncheck the “Turn on fast startup (Recommended)” entry and click on Save Changes.
  • Now restart your PC for the changes to take effect and then check if the problem’s fixed afterward.

Option 4 – Try to run the Chkdsk utility

You can also run the Chkdsk utility to resolve the UNEXPECTED STORE EXCEPTION BSOD error. If your hard drive has issues with integrity, the update will really fail as the system will think that it’s not healthy and that’s where the Chkdsk utility comes in. The Chkdsk utility repairs hard drive errors that might be causing the problem.
  • Open Command Prompt with admin privileges.
  • After opening Command Prompt, execute the following command and hit Enter:
chkdsk /f /r
  • Wait for the process to be completed and then restart your computer.
Read More
ERR_CERT_COMMON_NAME_INVALID error in Chrome
In case you don’t know, when you visit a website that uses HTTPS, it also offers an SSL certificate to the browser in order to verify the website’s identity. Although it may contain lots of things inside it, one of them is the URL of the website. So if the certificate does not match the URL to what you entered, you will most likely get the “Server’s certificate does not match, ERR CERT COMMON NAME INVALID” error which indicates that the connection is not private and the site may try to steal your data but worry not, as this post will guide you in resolving this issue. To fix the ERR_CERT_COMMON_NAME_INVALID error, here are some suggestions that might help.

Option 1 – Check the website’s certificate

If you own the website where you’re getting the error, then you might have to check if the website’s certificate is installed properly and configured on the server as it could be the reason why you’re suddenly getting the error.

Option 2 – Check the Windows Host file

You can also try to cross-check the Windows Hosts file to find out if the website you are trying to open has been blocked, because if it is, then it’s no wonder why you’re getting the ERR_CERT_COMMON_NAME_INVALID error. There are instances when some third-party application modifies the file and adds some websites to the blocklists. So if the website is indeed blocked, you need to remove it from the list.

Option 3 – Use the Google Public DNS

You might want to change your DNS to Google Public DNS as it could also help you in fixing the ERR_CERT_COMMON_NAME_INVALID error in Chrome. To do so, follow the steps below.
  • The first thing you have to do is right-click on the network icon in the Taskbar and select Network and Sharing Center.
  • Next, click on the “Change Adapter Settings” option.
  • After that, search for the network connection that you are using to connect to the internet. Note that the option might be “Wireless Connection” or “Local Area Connection”.
  • Right-click on your network connection and click on Properties.
  • Then select the new window to choose the “Internet Protocol 4 (TCP/IPv4)” option.
  • After that, click on the Properties button and click the checkbox in the new window for the option “Use the following DNS server addresses”.
  • Type in “8.8.8.8” and “8.8.4.4” and click OK and exit.

Option 4 – Run the built-in Malware Scanner and Cleanup Tool in Chrome

In case you don’t know, there is actually a built-in malware scanner and cleanup tool in Chrome that helps you get rid of any unwanted ads, pop-ups, and even malware, as well as unusual startup pages, toolbars, and other things that could affect the performance of the browser. In addition, this built-in tool in Chrome might also help in fixing the ERR_CERT_COMMON_NAME_INVALID error.

Option 5 – Reset Chrome

Resetting Chrome can also help you get rid of the error. Resetting Chrome means restoring its default settings, disabling all the extensions, add-ons, and themes. Aside from that, the content settings will be reset as well and the cookies, cache, and site data will also be deleted. To reset Chrome, here’s what you have to do:
  • Open Google Chrome, then tap the Alt + F keys.
  • After that, click on Settings.
  • Next, scroll down until you see the Advanced option, once you see it, click on it.
  • After clicking the Advanced option, go to the “Restore and clean up option and click on the “Restore settings to their original defaults” option to reset Google Chrome.
  • Now restart Google Chrome.
Read More
How to get rid of FunPopularGames.com

FunPopularGames is a browser extension developed by Mindspark Inc. that lets you play popular, best-rated, and other games via popular websites, it also allows you to bookmark your favorite games for faster and easier access.

When installed it changes your default new tab page and default search engine to Search by MyWay. While browsing the internet with this extension enabled you will see additional injected ads, sponsored content, and pop-up ads throughout your browsing sessions.

While active this extension monitors user activity and browsing sessions, enabling it to track visited websites, clicked links, and other useful information that it later forwards to Mindspark to be used/sold for better ad placement.

About Browser Hijackers

Browser hijacking is amongst the internet’s constant risks that target internet browsers. It’s a kind of malicious software that alters your web browser’s configuration settings so that you are redirected to sites or web pages you had no intention of visiting. Browser hijackers could do a variety of things on your PC. These are generally used to force hits to predetermined sites, manipulating web traffic to generate ad revenue. Although it may seem naive, all browser hijackers are harmful and therefore always classified as security threats. Browser hijackers could also allow other destructive programs without your knowledge to further damage your PC.

How to determine if your internet browser has been hijacked

The following are some signs and symptoms that indicate you’ve been hijacked: 1. the home page of your browser is changed suddenly 2. you find new unwanted bookmarks or favorites added, usually directed to ad-filled or porn sites 3. the default online search engine and the default browser settings are altered 4. you see unsolicited new toolbars added 5. unstoppable flurries of popup ads show up on your computer screen 6. your browser has become unstable or starts running sluggishly 7. you can’t navigate to certain web pages, such as security software-related sites.

Exactly how browser hijacker finds its way onto your PC

There are several ways your computer or laptop can become infected with a browser hijacker. They typically arrive by way of spam email, via file sharing websites, or by a drive-by download. They can also originate from any BHO, extension, add-on, toolbar, or plug-in with malicious intent. Sometimes you might have accidentally accepted a browser hijacker as part of an application bundle (usually freeware or shareware). Browser hijacking can cause serious privacy problems and also identity theft, disrupt your browsing experience by taking control of outbound traffic, drastically slows down your computer by consuming lots of resources, and lead to system instability at the same time.

Browser Hijacker Malware – Removal

Certain browser hijacking can be simply reversed by discovering and removing the corresponding malware application from your control panel. But, the majority of hijacking codes are not easy to get rid of manually, since they go deeper into the operating system. Moreover, manual removals require in-depth system understanding and therefore could be a very difficult job for beginner computer users. Anti-malware software is really effective with regards to discovering and removing browser hijackers that standard anti-virus program has overlooked. To eradicate any type of browser hijacker from your personal computer, you should download this certified malware removal application – SafeBytes Anti-Malware.

What To Do When You Cannot Install Any Anti-virus?

Malware can cause all sorts of damage if they invade your PC, ranging from stealing your private information to deleting data files on your computer. Some malware is created to interfere with or prevent things that you want to do on your computer system. It may not allow you to download anything from the web or it will stop you from accessing a few or all internet sites, especially the anti-malware websites. If you’re reading this, you may have got affected by malware that stops you from downloading a security program such as Safebytes Anti-Malware. Although this type of issue will be difficult to circumvent, there are a few steps you can take.

Get rid of malware in Safe Mode

In Safe Mode, you are able to modify Windows settings, un-install or install some software, and eradicate hard-to-delete viruses. In the event the malware is obstructing internet access and affecting your PC, launching it in Safe Mode allows you to download antivirus and run a scan while limiting potential damage. To start the computer into Safe Mode, press the “F8” key on the keyboard just before the Windows logo screen comes up; Or right after normal Windows boot up, run MSConfig, look over “Safe Boot” under the Boot tab, and then click Apply. As soon as you reboot into Safe Mode with Networking, you can download, install, as well as update the anti-malware program from there. At this point, you can run the anti-malware scan to get rid of computer viruses and malware without any hindrance from another application.

Switch over to an alternate browser

Malicious program code may exploit vulnerabilities in a particular web browser and block access to all anti-malware software sites. If you are not able to download the security program using Internet Explorer, this means malware is targeting IE’s vulnerabilities. Here, you must switch to a different web browser like Chrome or Firefox to download the Safebytes application.

Create a portable antivirus for removing malware

Another method is to download and transfer anti-malware software from a clean PC to run a scan on the affected computer. Follow these steps to employ a flash drive to clean your corrupted system. 1) On a clean PC, install Safebytes Anti-Malware. 2) Plug the Thumb drive into the clean computer. 3) Double-click the Setup icon of the anti-malware software to run the Installation Wizard. 4) Choose the flash drive as the location for saving the file. Follow the directions to finish the installation process. 5) Remove the USB drive. You can now use this portable antivirus on the infected computer system. 6) Double-click the antivirus program EXE file on the USB flash drive. 7) Run Full System Scan to identify and clean-up up all kinds of malware.

SafeBytes Security Suite Benefits

In order to protect your laptop or computer from a variety of internet-based threats, it’s very important to install an anti-malware program on your PC. But with so many anti-malware companies out there, nowadays it’s difficult to decide which one you should obtain for your computer. A few of them do a good job in removing malware threats while some will ruin your computer by themselves. You have to pick one that is dependable, practical, and has a good reputation for its malware protection. Among few good applications, SafeBytes Anti-Malware is the strongly recommended software program for the security-conscious end user. SafeBytes anti-malware is a powerful, highly effective protection tool designed to help end-users of all levels of IT literacy in finding and removing harmful threats out of their personal computers. With its cutting-edge technology, this application will allow you to eradicate several types of malware which include viruses, PUPs, trojans, worms, ransomware, adware, and browser hijackers.

SafeBytes has got a plethora of wonderful features that can help you protect your computer from malware attacks and damage. A few of them are listed as below:

World-class AntiMalware Protection: With its advanced and sophisticated algorithm, this malware elimination tool can detect and remove the malware threats hiding in the computer effectively. Real-time Active Protection: SafeBytes offers an entirely hands-free active protection that is set to check, block and destroy all computer threats at its first encounter. They’re very efficient in screening and removing various threats since they’re continuously revised with new updates and safety measures. Internet Security: SafeBytes gives an instant safety rating to the pages you’re about to visit, automatically blocking dangerous sites and ensuring that you are certain of your online safety while browsing the web. Lowest CPU and Memory Usage: SafeBytes is a lightweight and easy-of-use anti-virus and antimalware solution. Since it utilizes minimum computer resources, this software leaves the computer’s power exactly where it belongs: with you. 24/7 Online Support: For any technical concerns or product assistance, you could get 24/7 professional assistance via chat and email. SafeBytes has come up with an excellent anti-malware solution that can help you conquer the latest malware threats and virus attacks. Malware trouble can become a thing of the past when you put this software program to use. You will get the very best all-around protection for the money you pay on SafeBytes Anti-Malware subscription, there isn’t any doubt about it.

Technical Details and Manual Removal (Advanced Users)

If you do not wish to use an automated tool and like to get rid of FunPopularGames manually, you could possibly do so by going to the Windows Add/Remove Programs menu in the Control Panel and delete the offending program; in cases of browser extensions, you may remove it by going to the browser’s Add-on/Extension manager. You will probably also want to reset your web browser to its default configuration settings. To be certain of complete removal, find the following registry entries on your computer and remove them or reset the values accordingly. However, editing the registry is usually a hard task that only advanced users and professionals should try to fix the problem. Moreover, some malicious programs have the capability to defend against its removal. Completing this task in Safe Mode is advised.
Files: Search and delete: AppIntegrator.exe AppIntegrator64.exe AppIntegratorStub.dll AppIntegratorStub64.dll AssistMonitor.dll AssistMonitor64.dll BAT.dll CrExt.dll CrExtPdu.exe DpnMngr.dll dubar.dll dubarsvc.exe dubprtct.dll dudatact.dll dudlghk.dll dudlghk64.dll dufeedmg.dll duhighin.exe duhtmlmu.dll duhttpct.dll duidle.dll dumedint.exe dumlbtn.dll duPlugin.dll duregiet.dll duscript.dll duskin.dll duskplay.exe duSrcAs.dll HiddenToolbarReminder.dll HkFxMgr.dll HkFxMgr64.dll InstallEnabler.dll t8EPMSup.dll T8EXTEX.DLL T8EXTPEX.DLL T8HTML.DLL t8Res.dll T8TICKER.DLL ToolbarGuard.dll ToolbarGuard64.dll Verify.dll TPIManagerConsole.exe
Read More
Do you need Antivirus software for Windows 11
Windows 11 has arrived and it is being adopted all around the globe as we are writing this article. People are adapting it daily and today we will take a look at some advanced security features of the new Windows and do you really need an antivirus in it. Windows securityIt is not a secret that Windows 11 is the most secure Windows ever created, well at least up until now. It is packed with advanced security features like S-mode, Secure Boot, and Trusted Platform Module (TMP 2.0). All these new security features that Microsoft has advertised made people question are enough for security or do you still need third-party Antivirus software. In order to get an answer to this question, let us first take a detailed look at what each one of them does, and then we will give you our opinion on a given subject.

Windows S mode

For everyday home use, Windows 11 S mode is the most secure feature to have on your PC. This is a safety protocol where only apps from Microsoft Store are allowed to be installed. This eliminates the risk of installing third-party apps that may contain viruses or malware. Furthermore, S-mode protects your web browsing activity through the Microsoft Edge browser. S-mode does not allow you to use other browsers for security reasons. If you are using Windows 11 in S-mode, your PC and data will be secure in most parts. You need not buy antivirus when using Windows 11 in S-mode.

Windows Defender

The inbuilt security suite, Windows Defender was launched for the first time in 2006. Earlier to that it had existed and was known as Microsoft AntiSpyWare. Windows Defender has undergone significant improvements over the years. In its latest version available with Windows 11, Windows Defender offers a comprehensive range of security features. It is available under the Windows Security system. Some key security features include real-time virus and threat protection, account protection, firewall & network protection, app and browser control, parental controls, and device (hardware) security. This is comparable to security features offered by third-party antivirus programs.

Microsoft Account

In Windows 11, it is necessary to use a Microsoft account that will be linked to your device. This ensures the security of your data in case your device is lost or stolen. You just need to make sure that you have set a strong password for your device. Windows 11 also has Bitlocker that keeps your data in encrypted form.

Ransomware protection

In view of rising cases of ransomware, Microsoft has introduced dedicated ransomware protection in Windows 11. It works by stopping apps from carrying out unauthorized changes to files and folders. Users can choose their important files and folders that they want to be protected from ransomware.

Conclusion

As we went through Windows 11 security features, we can clearly see that it is packed heavily with many security features that aim to protect your data and your identity. Looking at them, one can clearly come to the conclusion that you do not really need any third-party software and that Windows itself can catch and protect most of the issues, and they would be right. If you use Windows 11 carefully, meaning that you go only to trusted websites, do not open suspicious emails, and click on suspicious links, if you do not use extensively external USB devices or mass media you really do not need any kind of third party protection, Windows built-in tools will do well and keep you protected. However, if you do come in contact with other people's USB devices if you surf over the net, and overall if you really want to be at peace of mind that you are protected you will still need a well-established third-party software protection solution. Windows 11 has great security features, best so far in any Windows but it is still far from being a solution that does not require dedicated protection solution. So do yourself a favor and grab one. We recently had a top antivirus software review, find the article here and pick one that is best for you. https://errortools.com/viruses/the-best-antivirus-software-of-2021/
Read More
Fix Minecraft Won’t Launch in Windows 10
Minecraft has taken the world by the storm, it was an indie project game and it went mainstream. Dream of every game developer I guess. The dream of every gamer on the other hand is to double click on the game and to play it and not to deal with various issues, especially if they are launch issues. Luckily for all of you gamers, here at errortools we game as well and we are happy to bring you a solution on how to fix Minecraft won't launch issue. So sit back, relax and keep on reading, and hopefully enough you will be gaming again in no time. Follow the guide presented step by step, point by point how it is presented for the quickest way to get back in Minecraft. This guide also presumes that your hardware configurations meet at least the minimum system requirements for running Minecraft.
  1. Disable antivirus and firewall

    90% of the time this is the issue why Minecraft is not working, your antivirus or firewall has detected it as a false positive, and access to system internet, etc has been cut. Try disabling it and if everything is working fine add it to the antivirus or the firewall exception list.
  2. Run Minecraft as admin

    Minecraft will sometimes refuse to run if it does not has administrator privileges. To make sure this is the case locate the Minecraft executable, right-click on it and choose properties. Go to the compatibility tab and check Run as Administrator box.
  3. End Minecraft process

    It came to knowledge that even if Minecraft is not running it can have its processes active in the background. Press CTRL + SHIFT + ESC to open task manager Locate if Minecraft has a process running If you find the Minecraft process right-click on it and choose End Task
  4. Run Minecraft in compatibility mode

    If Minecraft still refuses to start try running it in compatibility mode in the previous Windows version Locate Minecraft executable file in its install location Right-click on it and choose properties In the properties, windows go to the compatibility tab Check run this program in compatibility mode for: Select previous version of the operating system, try Windows 8 or Windows 7
  5. Update graphic card driver

    The best bet is to go to your GPU manufacturer's website and download the latest version of the driver of your GPU.
  6. Remove mods, plugins, texture packs

    Mods, plugins, texture packs are all great but sometimes they can cause GPU overloads and other issues to see if this is the case try running Minecraft in Vannila mode without anything installed, just pure and clean Minecraft as it was just downloaded and installed.
  7. Reinstall Minecraft

    If everything else failed, reinstall Minecraft. There might be a chance that some DLL file was deleted or corrupted by mistake or that some crucial files are missing. Clean reinstallation will fix all of these issues.
Read More
1 2 3 162
Logo
Copyright © 2022, ErrorTools. All Rights Reserved
Trademarks: Microsoft Windows logos are registered trademarks of Microsoft. Disclaimer: ErrorTools.com is not affiliated with Microsoft, nor claim direct affiliation.
The information on this page is provided for information purposes only.
DMCA.com Protection Status