Dangerous GriftHorse Trojan found on Android

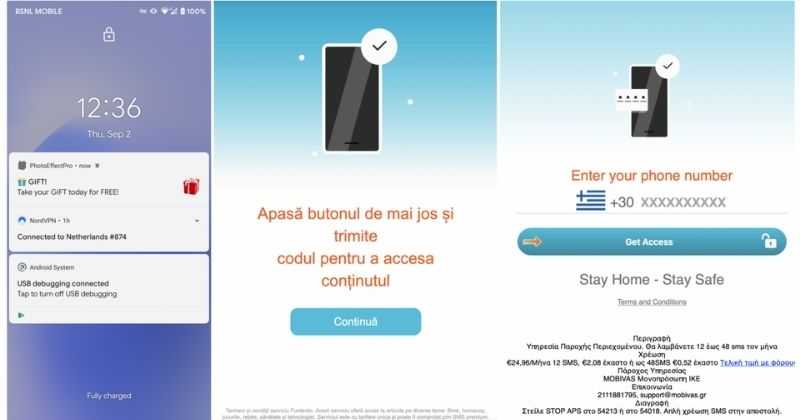
There has been recently discovered in the field of malware targeting Android devices. Affecting more than 10 million users of Android phones, the malware GriftHorse is doing its attacks via phishing and premium services scams. A lot of applications have been discovered that are hosts for this malware and many of them are inside the Google store and available for download.

GriftHorseAccording to Zimperium zLabs, this malware that was recently detected has been doing its scams and attacks even in November of 2020 and has thus far accumulated hundreds of thousands of dollars in its scam.

On the surface it looks very harmless, asking for typical permissions like internet access, calls, and other related needed functions, and then it waits. After few months the real attack happens when users get charged with premium service they never subscribed to in the first place.

List of Infected Applications that Carry GriftHorse Trojan

Zimperium zLabs listed out some of the apps with this malware. Users are advised to avoid installing them.

  •     Amazing Video Editor
  •     Bag X-Ray 100% Scanner
  •     Bus – Metrolis 2021
  •     Call Recoder Pro
  •     Call Blocker-Spam Call Blocker
  •     Cinema Hall: Free HD Movies
  •     Coupons & Gifts: InstaShop
  •     GPS Phone Tracker – Family Locator
  •     Fingerprint Changer
  •     Fitness Point
  •     Free Calls WorldWide
  •     Geospot: GPS Location Tracker
  •     GPS Phone Tracker – Family Locator
  •     Handy Translator Pro
  •     Horoscope : Fortune
  •     iCare – Find Location
  •     iConnected Tracker
  •     Instant Speech Translation
  •     Lifeel – scan and test
  •     My Chat Translator
  •     My Locator Plus
  •     Plant Camera Identifier
  •     Racers Car Driver
  •     Safe Lock
  •     Screen Mirroring TV Cast
  •     Slime Simulator
  •     Smart Spot Locator

These are only some of the many infected apps available on the internet.

Zimperium zLabs also warned that GriftHorse Trojan exists in over 70 countries worldwide. The infected app quickly changes the language and displays content depending on the user’s IP address.

If you like to learn and find out more about various Windows errors, and how to repair them go to our vast archive or use search to find articles that will explain and help you in solving your issue.
However, if you prefer to do things fast and with automatization then we are proposing to use an automated solution for your issues. The application that we are recommending is Advanced System Repair Pro
Advanced System Repair utilizes multiple tools all in one to give you a quick, simple, reliable, and very thorough diagnosis of your PC. It brings you all the tools you need in one program to clean, fix, protect, optimize and boost your PC!
1-Click Maintenance
All the tools to make it simple and easy! It's like having a professional technician at the click of a mouse.

Junk Cleaner
Keeping your computer free from unnecessary clutter also helps make your computer last longer. Like any other machine, if you keep it clean and take care of it, it will serve you better for longer!

Optimize background apps
Optimize applications background activity with the built-in Application Optimizer feature.

Disk Defrag
With a simple 1-click, Advanced System Repair speeds up your PC by assembling fragmented files on your machine and organizing them more efficiently.

Malware Removal
Finds and removes all types of harmful malware including trojans, worms, bots, adware, spyware, PUPs, and more!

Privacy Cleaner
The all-in-one privacy suite to Clean Your Tracks & Protect Your Privacy! Make your computer safe, secure, and more efficient!

System Tweak/Optimizer
ASR will analyze your complete system and settings to adjust your PC to function at its maximum performance.

Registry Cleaner
Over time, as you install and uninstall applications, the registry can become cluttered with old entries and broken settings which can result in program crashes, and annoying messages and slow the computer down.
Visit our Advanced System Repair Pro Download page to inform yourself about all the benefits of this software and get a free trial copy of it.
advanced system repair pro

Advanced System Repair Pro

One-click automated PC repair solution
ASR logo
With Advanced System Repair Pro you can easily
Replace damaged files
Restore performance
Free disk space
Remove Malware
Protects WEB browser
Remove Viruses
Stop PC freezing
DOWNLOAD
Privacy Policy | Terms of Use | Uinstall
Advanced System Repair Pro is compatible with all versions of Microsoft Windows including Windows 11

Share this article:

You might also like

Software review series: Adobe Photoshop
From photo editing and compositing to digital painting, animation, and graphic design you can do it all in Photoshop. Bring ideas to life across desktop and iPad. Magically transform images with the power of AI. Learn new skills and share your projects via Livestream. Started as a photo editing application, photoshop has surpassed the original ideas and designs in the following years growing with each release and including more tools and flexibility not matched in other applications. Photoshop was the first to introduce many new features and set standards for other applications. How years have passed product grew and innovation was pushed forward, it took some time but eventually, photoshop was able to set itself as the industry-standard application for pixel editing and it holds that position even today. Throughout the world artist all over the globe are using it to create digital art in various fields be that illustrations, film, photography, texturing, etc. Its vast majority of tools and possibilities as well as its extensibility with plugins, actions, brushes have cemented it in the highest place in any designer or artist toolkit. Today you can get it as a part of a creative suite for a monthly fee on the official adobe website and even if you do not need other creative suite applications photoshop is worth the fee alone. Simply you have to try it, learn it, and then harvest its power. If you would like to read more helpful articles and tips about various software and hardware visit errortools.com daily.
Read More
How to Fix Error Code 43

The solution to Error Code 43

Code 43 - What is it?

Code 43, Device Manager Error, is reported when Windows doesn’t recognize a hardware device such as the video card, USB, printer, or any other piece of external hardware attached to your PC.

The Device Manager stops the hardware if it reports some kind of unspecified problem. It is mostly displayed in the following format:

“Windows has stopped this device because it has reported problems. Code 43”

Solution

driverfix boxError Causes

Code 43 can be triggered due to several reasons. However, 95% of the times it is related to the device driver problems such as:

  • Missing Drivers
  • Corrupted Drivers
  • Outdated Drivers

Driver problems pop up when either new driver versions are available or drivers become damaged due to some underlying reasons like viral infections.

Other than driver problems, code 43 can also pop up when you install and remove the software. This can cause hardware conflict in the registry, altering driver communication.

Code 43 can hamper your ability to use your desired device smoothly.  Although Code 43 is not a fatal error code like Runtime and BSoD errors, it is still advisable to resolve it immediately to avoid inconvenience.

You can sometimes bypass error code 43 temporarily by a simple PC reboot but this will not fix the problem permanently. For a permanent fix, try the methods given below.

Further Information and Manual Repair

To help you repair code 43 permanently from your PC, below are some of the best, easy perform, and effective solutions. Simply follow the steps to get rid of code 43 from your PC.

Method 1 - Launch and Run the Troubleshoot Wizard

This is one way to find the exact nature of the problem that spurred error code 43 to pop up. To launch and run the Troubleshoot Wizard, here’s what you need to do:

  • Go to the start menu
  • Type Device Manager in the search bar and then press enter
  • Click on Device Manager to run it on your system
  • Now click on the ‘General Tab’
  • After that press Trouble Shoot to launch the Troubleshooting Wizard

The Wizard will diagnose the problem and provide you a solution to resolve it, all you have to do from there is to follow the Wizard’s instructions

Method 2 - Check the Hardware Documentation

If for some reason Method 1 doesn’t work,  another solution would be to check the hardware documentation for more information about diagnosing the problem.

Method 3 - Uninstall Faulty Drivers

If the underlying reason for code 43 is related to driver problems, then the best way to resolve it is to uninstall faulty drivers and then reinstall new drivers. One of the many ways to uninstall drivers is:

  • Click on the start button
  • Type ‘sysdm.cpl’ in the search box and then press enter to continue
  • In the System Properties dialog box open the Hardware tab
  • Click Device Manager and then double click Device Type
  • Now click on the problematic hardware device reporting code 43
  • After that go to the Driver tab and click Uninstall to uninstall that driver completely
  • Visit the manufacturer’s website and download the new driver version
  • Install it on your system by extracting the .ZIP file

Method 4 - Update Drivers Automatically

Identifying and updating new driver versions manually can be both frustrating and time-consuming especially if you are in a rush and no computer whiz.

Also, after you update the drivers, you need to keep checking them time and again to ensure they don’t become outdated. You need to update them every time new versions are available which can be stressful.

To avoid this hassle by repairing code 43 permanently, download DriverFIX. This is an innovative and user-friendly device driver software program exclusively designed to resolve all kinds of driver problems.

Whether code 43 occurs on your PC due to missing or outdated drivers, DriverFIX can resolve the problem easily.

The intelligent programming system embedded in this software enables it to detect problematic and outdated drivers in seconds.

It matches new and compatible versions and updates the drivers immediately, automatically, and on a regular basis in just a few clicks. This resolves code 43 and also ensures that all your drivers remain up to date.

DriverFIX is compatible with all Windows versions.

Click here to download DriverFIX to repair and resolve code 43 right away.

Read More
Backup and Restore pinned Taskbar Items
Pinned Windows 10 Taskbar Items. One of the most used interfaces in the Windows environment is the Taskbar. It is where users like to pin their most-used programs as well as shortcuts with extra privileges and automated tasks. In fact, it’s a lot better than the Start Menu. So if any Windows Update messes up with your computer, or if you’ve just switched to a different computer, setting up the Taskbar with the very same set of programs you used to have is definitely not an easy task. But worry not as this post will guide you on how you can backup and restore the items on your Taskbar either manually or automatically.

Manual Backup:

  • Tap the Win + R keys to open the Run prompt.
  • Then type “%AppData%MicrosoftInternet ExplorerQuick LaunchUser PinnedTaskBar” in the field and hit Enter to open the folder where you can see all the shortcuts or pinned items in the Taskbar.
  • After that, copy all the files in the folder and paste them somewhere else as a backup. For instance, E:\Pinned Items Backuppinnedshortcuts.
  • Next, tap the Win + R keys to open the Run prompt once more, and then type “Regedit” in the field and hit Enter to open the Registry Editor. When the User Account Control dialog box appears, click Yes.
  • After opening the Registry Editor, navigate to this key – HKEY_CURRENT_USERSoftwareMicrosoftWindowsCurrentVersionExplorerTaskband
  • Then right-click on the Taskbar folder and select Export.
  • Now save the file with the .reg extension to another location like the E:\Pinned Items Backup folder and then name it.
  • Close the Registry Editor.

Manual Restore:

Make sure to copy all the files to one of the drives if you are using another computer and then refer to the following steps.
  • Tap the Win + R keys to open the Run prompt.
  • Then type “%AppData%MicrosoftInternet ExplorerQuick LaunchUser PinnedTaskBar” in the field and hit Enter to open the same folder where you just copied all the shortcuts. Make sure to keep it open.
  • Then open the backup folder where you saved all the pinned items and copy all the files there.
  • Next, go to the Taskbar folder (%AppData%MicrosoftInternet ExplorerQuick LaunchUser PinnedTaskBar) and then paste your files in there. If you encounter a problem while doing so, just replace it with your own set of files.
  • After that, go to E:\Pinned Items Backuppinnedshortcuts and then double click on tb-pinned-items.reg. If a User Account Control prompt appears, click Yes. This will add the registry file into the main registry hub. You will also get a dialog box that will confirm that data has been added to the registry successfully. Click OK.
  • You should now see the items on the Taskbar. You have to restart Windows Explorer. To do so, end its process in the Task Manager.

Automatic Backup:

Backing up and restoring the pinned Taskbar items in your Windows 10 computer can be done automatically as well. But before you get started on the process, you need to understand what’s going on behind the hood first. First, you need to create two bat files and name them “Backup Pinned Taskbar Items” and “Restore Pinned Taskbar Items”. After you have that covered, refer to the following steps:
  • Open the Notepad app and paste the following details and save it as “Backup Pinned Taskbar Items.bat.
REG EXPORT HKEY_CURRENT_USERSoftwareMicrosoftWindowsCurrentVersionExplorerTaskband “E:\Pinned Items Backuptb-pinned-items.reg” xcopy “%AppData%MicrosoftInternet ExplorerQuick LaunchUser PinnedTaskBar” “E:\Pinned Items Backuppinnedshortcuts” /E /C /H /R /K /Y
  • After that, run the newly created bat file with admin privileges.

Automatic Restore:

  • Open the Notepad app and paste the following details and save it as “Restore Pinned Taskbar Items.bat”.
REGEDIT /S “E:Pinned Items Backuptb-pinned-items.reg” xcopy “E:Pinned Items Backuppinnedshortcuts” “%AppData%MicrosoftInternet ExplorerQuick LaunchUser PinnedTaskBar” /E /C /H /R /K /Y
  • After that, run the bat file with admin privileges.
Note: Just so you know, there is a drawback to this process as we’ve noticed that any pinned apps that were downloaded from the Windows Store don’t appear in these places and any items downloaded and installed separately from the internet and then pinned.
Read More
Fix Libmysql.dll is Missing Error in Windows
Libmysql.dll is missing or not found error appears in Windows when the user is trying to open and run the application. In this guide, we will offer you solutions on how to fix and remove this annoying error.
  1. Check recycle bin

    Some applications or purely by accident itself libmysql.dll gets deleted. If you have not turned recycle bin off go to it and check to see if the file is by any chance there. If you find it, right-click on it, choose restore, the error will be gone.
  2. Update drivers

    Press ⊞ WINDOWS + X to open the Windows menu and click on Device manager In device manager locate device which has alert mark next to it Right-click on it and choose update driver Reboot your computer
  3. Run SFC scan

    Press ⊞ WINDOWS + X and choose command prompt (admin) In command prompt type in sfc /scannow and press ENTER wait for the operation to complete and Reboot your system
  4. Reinstall application

    if you are getting an error only on one application or an error has started to appear after the installation of a particular application go to Windows applications, uninstall it and then install it again. There is a chance that the file has been corrupted during the installation process.
Read More
Fix Memory error 0x0000001A on Windows
One of the hardest issues you can encounter on your Windows computer is the Blue Screen of Death error. There are various kinds of BSOD or Stop errors and one of them is the “Memory Management Error 0x0000001A” error. This kind of Stop error might signify a hardware problem in your computer and is most likely caused by an issue with RAM or hard disk or even malware that takes up all your computer’s memory, thus, making it crash and display a BSOD error like the Memory Management Error 0x0000001A. Moreover, this kind of Stop error can also occur during the Windows upgrading process. So in this post, we’ll show you what you can do to fix the Memory Management error on your Windows 10 PC.

Option 1 – Run the Blue Screen Troubleshooter

The Blue Screen troubleshooter is a built-in tool in Windows 10 that can be found on the Settings Troubleshooters page. To use it, refer to these steps:
  • Tap the Win + I keys to open the Settings panel.
  • Then go to Update & Security > Troubleshoot.
  • From there, look for the option called “Blue Screen” on your right-hand side and then click the “Run the troubleshooter” button to run the Blue Screen Troubleshooter and then follow the next on-screen options. Note that you might have to boot your PC into Safe Mode.

Option 2 – Update the device drivers

  • Tap the Win + R keys to launch Run.
  • Type in devmgmt.msc into the box and tap Enter or click OK to open the Device Manager.
  • After that, a list of device drivers will be displayed. Look for the device driver you and then select either “Update driver” or “Uninstall device”. And if you find any “Unknown device”, you need to update it as well.
  • Select the “Search automatically for updated driver software” option and then follow the instructions to complete the process.
  • If you have chosen to uninstall the driver, follow the screen options to complete the process and then restart your PC.
  • Connect the device and Scan for hardware changes – you can see this option under Device Manager > Action.

Option 3 – Run the Windows Memory Diagnostics Tool to test RAM

Since the issue concerns the memory of your computer, you can also try running the Windows Memory Diagnostics Tool to find out if the RAM module of your computer has become corrupted. To run this tool, follow these steps:
  • Tap the Win + S keys to open Search.
  • Then type “Windows Memory Diagnostics Tool” in the field and hit Enter to open the Windows Memory Diagnostics Tool.
  • After that select any of the following option from the prompt that appears:
    • “Restart now and check for problems (recommended)”
    • “Check for problems the next time I start my computer”
  • After that, if you find that your RAM is corrupted, you might have to purchase a new one or change the motherboard of your computer.

Option 4 – Run the DISM tool

There are cases when the Memory Management Error 0x0000001A error is caused by the Windows System Image so you need to repair it using the DISM or Deployment Imaging and Servicing Management tool. The DISM tool is another command-line tool in the Windows operating system that could help users fix various corrupted system files. To use it, follow these steps:
  • Open the Command Prompt as admin.
  • Then type in this command: Dism /Online /CheckHealth
  • Do not close the window if the process takes a while as it will probably take a few minutes to finish.

Option 5 – Run the SFC scan

  • Tap Win + R to launch Run.
  • Type in cmd in the field and tap Enter.
  • After opening Command Prompt, type in sfc /scannow
The command will start a system scan which will take a few whiles before it finishes. Once it’s done, you could get the following results:
  1. Windows Resource Protection did not find any integrity violations.
  2. Windows Resource Protection found corrupt files and successfully repaired them.
  3. Windows Resource Protection found corrupt files but was unable to fix some of them.

Option 6 – Try using System Restore

You can also try to perform a System Restore as it can also help you fix the BSOD error. You can do this option either by booting into Safe Mode or in System Restore. If you are already in the Advanced Startup Options, just directly select System Restore and proceed with the next steps. And if you have just booted your PC into Safe Mode, refer to the steps below.
  • Tap the Win + R keys to open the Run dialog box.
  • After that, type in “sysdm.cpl” in the field and tap Enter.
  • Next, go to the System Protection tab then click the System Restore button. This will open a new window where you have to select your preferred System Restore point.
  • After that, follow the on-screen instructions to finish the process and then restart your computer and check if the problem is fixed or not.
Read More
Chrome update failed error 3, 4, 7, 10, etc
If you find it hard to update Google Chrome to its latest version and each time you try to do so it keeps on failing, worry not for this post will guide you in fixing a list of Google Chrome Update errors. Even though there are a lot of error codes around Chrome, these are only caused by issues with the update. Here are some of the errors you can encounter when updating Google Chrome:
  • Update failed: You can encounter this error when the Updates are disabled by the administrator.
  • Update failed with
    • Error 3 or 11: When Chrome’s inbuilt updater fails to find the Update server to download the latest version.
    • Error 4 or 10: This happens while checking for updates with the message “Update check failed to start”
    • Error 7 or 12: This occurs when the download fails while checking for updates.
  • Windows OS version is not supported.
  • Google Chrome may not be able to keep itself updated.
  • Any other errors that mention that “Update failed”
Since these aforementioned error codes are related to “Update Failure”, then they have common solutions and here they are:

Option 1 – Restart your computer

You need to restart your computer first and then try updating Chrome again. There are times when it’s only a temporary issue that can be fixed by simply restarting your computer.

Option 2 – Try checking antivirus programs, firewall, and parental control settings

If you have antivirus programs, a firewall installed in your computer, as well as parental controls, then any of these could be blocking you to download anything, including the update for Chrome. This is why you have to double-check and make sure that software updates aren’t being blocked by these programs. On the other hand, you can also try running the Network Troubleshooter as it can help you resolve any DNS or connectivity issues. To use it, follow the steps below.
  • Open the Search bar on your computer and type in “troubleshoot” to open the Troubleshoot settings.
  • Next, scroll down and select the “Network Adapter” option from the right pane.
  • Then click on the Run Troubleshooter” button.
  • After that, your computer will check for any possible errors and will pinpoint the root cause of the problem if possible.

Option 3 – Try to remove Proxy

Removing the Proxy might also help you in fixing the Chrome Update errors. Here’s how you can do it:
  • Tap the Win + R keys to open the Run dialog box.
  • Then type “inetcpl.cpl” in the field and hit Enter to pull up the Internet Properties.
  • After that, go to the Connections tab and select the LAN settings.
  • From there. Uncheck the “Use a Proxy Server” option for your LAN and then make sure that the “Automatically detect settings” option is checked.
  • Now click the OK and the Apply buttons.
  • Restart your PC.
Note: If you are using a third-party proxy service, you have to disable it.

Option 4 – Try to reset Winsock, TCP/IP & Flush DNS cache

Resetting Winsock, TCP/IP, and flushing DNS might help in resolving the Chrome Update errors just follow these steps:
  • Right-click on the Start button and click on Command Prompt (administrator) so you can pull up an elevated Command Prompt.
  • After that, execute each one of the commands listed below. And after you typed in one after the other, you have to hit Enter.
  1. netsh winsock reset – type in this command to reset Winsock
  2. netsh int ip reset resettcpip.txt – type in this command to reset TCP/IP
  3. ipconfig /flushdns – type in this command to flush the DNS cache
  • Next, restart your PC and check if the problem’s fixed.

Option 5 – Try to run the Chrome Cleanup tool

You might want to run Google Chrome’s built-in Malware Scanner & Cleanup tool as it could also help in getting rid of any unwanted ads, pop-ups, and even malware, as well as unusual startup pages, toolbars, and anything else that might overtake the network and could affect the performance of the browser.

Option 6 – Get rid of any conflicting browser extensions

  • Open Chrome and press Alt + F keys.
  • Go to More tools and click Extensions to look for any suspicious browser extensions or toolbars.
  • Click the Recycle bin and select Remove.
  • Restart Chrome and press Alt + F keys again.
  • Proceed to On Startup and mark Open a specific page or set of pages.
  • To check if the browser hijacker is still active, click Set pages, if it is active, overwrite the URL.

Option 7 – Reset Google Chrome

Resetting Chrome can also help you get rid of the error. Resetting Chrome will restore its default settings, disabling all the extensions, add-ons, and themes. Aside from that, the content settings will be reset as well and the cookies, cache, and site data will also be deleted. To reset Chrome, here’s what you have to do:
  • Open Google Chrome, then tap the Alt + F keys.
  • After that, click on Settings.
  • Next, scroll down until you see the Advanced option, once you see it, click on it.
  • After clicking the Advanced option, go to the “Restore and clean up option and click on the “Restore settings to their original defaults” option to reset Google Chrome.
  • Now restart Google Chrome.
Read More
Run Windows Updates from Command Line
As you know, one of the most highlighted features of Windows 10 is Windows Updates. It was offered to the customers as a service rather than a product with the release of Windows 10 under the scenario of Software as a Service which led to Windows Updates being set by default on Windows 10 and without an option for any users to disable it. Although not all users are happy with what Microsoft did, this is an ultimate step towards the greater good of all its customers since Windows Updates helps users in keeping their computers secured against all kinds of threats as well as provide them with the greatest and latest updates from Microsoft. So if you are one of those users who approved of the Windows Updates service, then read on as this post will guide you in running Windows Updates from Command Line either via Command Prompt or Windows PowerShell. For the complete set of instructions, refer to the options given below.

Option 1 – Run Windows Update via Command Prompt

Command Prompt in the Windows operating system exists for a very long time now compared to the comparatively new Windows PowerShell. That’s why it has similar capabilities to run Windows Updates. However, the highlighting point here is that you don’t have to download any module for Windows Updates. To get started running Windows Updates using Command Prompt, refer to the steps below.
  • First, type “cmd” in the Cortana search box, and from the search results, right-click on Command Prompt and select the Run as Administrator option to open it with Administrator privileges.
  • If a User Account or UAC prompt appears, just click on Yes to proceed.
  • Next, type in the commands listed below, and don’t forget to tap Enter right after you type each one of them.
    • UsoClient StartScan – use this command to start checking for updates.
    • UsoClient StartDownload – use this command to start downloading updates.
    • UsoClient StartInstall – use this command to start installing the downloaded updates.
    • UsoClient RestartDevice – use this command to restart your computer after you install.
    • UsoClient ScanInstallWait – use this command to check, download and install updates.
Note: Keep in mind that the commands in Command Prompt listed above are only meant for Windows 10. On the other hand, if you are using an older Windows version, you can try using the following commands instead:
  • wuauclt /detectnow – use this command to start checking for updates.
  • wuauclt /updatenow – use this command to start installing the updates detected.
  • wuauclt /detectnow /updatenow – use this command to check, download and install updates.

Option 2 – Run Windows Updates via Windows PowerShell

If you run Windows Updates in the Windows PowerShell, it will require you to install the Windows Update module manually. Hence, you have to get the Windows Updates downloaded and install Windows Updates.
  • Search for PowerShell in the Cortana search box and then run it with administrator privileges.
  • Once you’ve opened the Windows PowerShell, type the following command and hit Enter.
    • Install-Module PSWindowsUpdate – use this command to install the Windows Update module for Windows PowerShell.
    • Get-WindowsUpdate – use this command to connect to the servers of Windows Update and download the updates if found.
    • Install-WindowsUpdate – use this command to install the Windows Updates you’ve downloaded to your computer.
Read More
Fix Windows Update Error 0x80004005
As you know, Microsoft is consistent in pushing updates to its supported versions of the Windows operating systems in order to make it better and defend it from different kinds of vulnerabilities. And pushing billions of active Windows computers every now and then is really not an easy thing to do since it calls for a complex Windows Update delivery module. These complexities often give rise to various errors like the Windows Update error code 0x80004005. When you encounter this kind of Windows Update error, you will see the following error message on your screen:
“There were problems installing some updates, but we’ll try again later. If you keep seeing this and want to search the web or contact support for information, this may help 0x80004005.”
This kind of Windows Update error occurs due to an issue while either installing or downloading an update. There are several ways you can fix the problem. You can try to replace the dpcdll.dll file, reset the Windows Update-related services, run the Windows Update troubleshooter or manually install the Windows Updates. For more details, check out the options given below.

Option 1 – Try to replace the DLL file with a trusted source

The first thing you can do is to replace the dpcdll.dll file with a trusted source.
  • First, you need to get the new dpcdll.dll file from another computer with preferably the same file version number as your computer.
  • After that, you need to boot your PC into Safe Mode and navigate to the paths listed below and then replace the file using a USB drive or other external storage devices.
    • For x86: This PC > C:/Windows/System32
    • For x64: This PC > C:/Windows/SysWOW64
  • Next, type “cmd” in the Cortana search box and right-click on Command Prompt, and select “Run as administrator” to open it with administrator privileges.
  • Now type the “regsvr32 dpcdll.dll” command and hit Enter.
  • Restart your PC and check if the error is now fixed.

Option 2 – Try to reset the Windows Update components

If by any chance that the third option didn’t work, you can also try resetting the Windows Update components as it could also help you resolve the Windows Update error. How? Refer to the following steps:
  • Open Command Prompt with admin privileges.
  • After that, type each one of the following commands and hit Enter after you key in one after the other.
    • net stop wuauserv
    • net stop cryptsvc
    • net stop bits
    • net stop msiserver
Note: The commands you entered will stop the Windows Update components such as Windows Update service, Cryptographic services, BITS and MSI Installer.
  • After disabling WU components, you need to rename both the SoftwareDistribution and Catroot2 folders. To do that, type each one of the following commands below and don’t forget to hit Enter after you type one command after the other.
    • ren C:WindowsSoftwareDistribution SoftwareDistribution.old
    • ren C:WindowsSystem32catroot2 Catroot2.old
  • Next, restart the services you’ve stopped by entering another series of commands. Don’t forget to hit Enter after you key in one command after the other.
    • net start wuauserv
    • net start cryptsvc
    • net start bits
    • net start msiserver
  • Close Command Prompt and reboot your PC.

Option 3 – Run the Windows Update Troubleshooter

You might also want to run the Windows Update Troubleshooter as it could also help in fixing Windows Update error 0x80004005. To run it, go to Settings and then select Troubleshoot from the options. From there, click on Windows Update and then click the “Run the troubleshooter” button. After that, follow the next on-screen instructions and you should be good to go.

Option 4 – Try downloading and installing the Windows Updates manually

Windows Update Error 0x80004005 might be due to a Windows Update that has failed. So if it is not a feature update and only a cumulative update, you can download the Windows Update and install it manually. But first, you need to find out which update has failed, and to do so, refer to the following steps:
  • Go to Settings and from there go to Update and Security > View Update History.
  • Next, check which particular update has failed. Note that Updates that have failed to install will be displayed under the Status column which has a label of “Failed”.
  • After that, go to the Microsoft Download Center and look for that update using its KB number and once you find it, download and then install it manually.
Note: You can also use the Microsoft Update Catalog, a service from Microsoft that provides a list of software updates that can be distributed over a corporate network. With the help of this service, it can be easier for you to find Microsoft software updates, drivers as well as fixes.
Read More
Fix Device not migrated on Windows 10
Hello everyone, in today's tips and tricks we will focus on providing you with various solutions on how to solve the Device not migrated error that appears after the Windows update has been performed. Sometimes sadly updates to our operating systems can introduce us to various issues that look scary but in reality, they are solvable and not so scary at all. After all who would not find this message concerning, especially when it happens in the middle of work. device error messageThe first thing that would pop into my mind is that I have lost tons of work and that something in my hardware has gone very wrong and it is dead. Luckily that is not the case and this error means that due to Windows update drivers were not properly transferred due to some compatibility issues, maybe it was a corrupt update file, etc. Of course, the reason could be hardware malfunction as well, but if everything was working fine before the update, it is a software issue, and I must say it is a common one and fixable. Please keep reading this guide in order to fix the Device not migrated error.
  1. Update the Driver

    You should always try this first, if the device is not recognizable, try updating its driver and see if the problem vanishes. In order to update the driver, we will need first to locate which device has not been migrated properly, we will do this with help of a search engine on the internet like google for example. So open your browser of choice, go to a search engine (google for example) and type in the search box first line from your error message, yes, that scary one. You will be given which device has malfunctioned and was not migrated properly, now we will locate the device and update its drivers. To do this press WINDOWS + X on your keyboard to bring up Windows secret menu and choose device manager. keyboard with windows and x marked Find device inside device manager, right-click on it, and choose properties. Go to the events tab and make sure that the device has migration issues. device not migrates status You have now 3 options for updating the driver, you can do it manually, automatically, or with the driver installer. We will cover all 3 options so you choose which one best suits you. OPTION 1: Manually. Close the Properties tab, go to the device manufacturer website and download the latest driver, if there are no drivers there, the only executable installer for the device skip this step and try the other 2. After you have downloaded the driver package from the website, right-click on the device and choose update driver. device update driver Now navigate to the folder where you have downloaded your driver package and update the driver. Reboot your system. OPTION 2: Automatic update. Close the Properties tab, right-click on the device and choose to uninstall. device manager uninstall device Once the device is uninstalled, restart your system, and Windows will automatically search and install the latest driver for the device. OPTION 3: Via driver installer. If you have downloaded .EXE or executable driver installer from device manufacturers web site try installing it, if the installation fails, try using compatibility mode for the installer. Navigate where the installer is located, right-click on it, and choose properties. Go to compatibility TAB and try installing it with administrator privileges in Windows 8 mode. device run compatibility troubleshooterReboot your system after this step. This should solve the issues, however, if the issue still persists, follow the next steps.
  2. Verify the Corrupted System Files

    Press WINDOWS + X on the keyboard to open the hidden system menu and choose Command prompt (administrator) keyboard with windows and x marked In the command prompt type in: sfc /scannow and press ENTER. command prompt SFC scan The scanning process and repair of files will take around 15 min. Leave it to finish completely, do not restart, work on the computer or shut it down while the process is active, and only after it is finished reboot your system.
  3. Update Windows.

    If your Windows is not updated sometimes this issue can be resolved by updating it on the latest version. Click on start and then on settings. Windows 10 Star menu with marked settings icon Once the settings screen is opened, find and click on Update and Security. Windows settings update and security section marked Go to the Windows update tab and click on DOWNLOAD or click on check for updates for the latest Windows fix. windows settings windows update selected
  4. Reset BIOS to factory settings.

    Sometimes BIOS not being properly configured can cause issues in Windows itself and prevent it from detecting PnP devices thus creating this error. Restoring BIOS back to the factory setting can help. Turn off your computer and turn it back on. Press delete, f12, f11, or any other key which will take you to BIOS (default key is delete but sometimes manufacturers map this to another one. Once your screen turns ON you will see in the bottom message which key needs to be pressed in order to enter BIOS). Sadly since every BIOS could be different we can not cover step by step guide for each but you need to find the option where you load BIOS defaults, click on it save, and exit. Your computer will restart and boot into Windows, check to see if the problem still persists. BIOSD load defaults
  5. Update BIOS

    BIOS can cause issues with certain PnP devices when the newest Windows update is rolled. If reverting BIOS to the factory setting has not been successful try update. Go to your motherboard manufacturer website, find the update and read step by step guide there since updating BIOS differs from version to version and from manufacturer to manufacturer. After the update is done, restart the computer and hopefully, the error is gone.
  6. Perform a System Restore

    If everything else fails, perform a system restore to get Windows back into the state before the update was installed and when everything was working fine. Press WINDOWS + R on the keyboard to open the run dialog. keyboard with windows and r marked In the run dialog, type control panel and press enter to enter control panel, locate recovery and click on it. control panel recovery selected Inside the recovery screen click on Open System Restore. advanced recovery tools Choose a date when everything was working in order, the best bet is the date before Windows update and roll it back. system restore latest backup restore Click on date, and then on next.
Read More
Fix 0xd00000e5, 0x8007139f, 0x80090030 PIN
The quickest and easiest way to log into your computer is when you use the PIN feature in Windows 10. Even though it is a bit slower compared to biometric logins such as Fingerprint and Iris scanning that comes under Windows Hello, the PIN feature is definitely less complicated. However, just like any other module of the software, it is also prone to some errors. In this post, you will be guided in fixing several PIN errors such as 0xd00000e5, 0x8007139f, and 0x8009003. These errors could be caused at different points in time like when you change or create a PIN or when you log into your computer. To fix the 0xd00000e5, 0x8007139f and 0x8009003 PIN errors, there are various solutions you can try. You may empty the contents of the NGC folder or remove and change the PIN or the password. You could also use the Group Policy Editor or reset the ACLs in the NGC folder as well as run built-in tools like System File Checker and the DISM tool.

Option 1 – Take ownership of the NGC folder and delete its contents

  • Boot your computer first into Safe Mode.
  • Next, you need to take ownership of the Ngc folder first and you can do that using Command Prompt.
  • Type “command prompt” in the Windows Search bar and then right-click on the relevant search result and select “Run as administrator”.
  • After that, if a User Account Control or UAC prompt appears, just click on Yes to proceed.
  • Next, type and enter this command: TAKEOWN /F C:WindowsServiceProfilesLocalServiceAppDataLocalMicrosoftNgc
  • Note that the <path> is the location of the folder or file in File Explorer.
  • Now type and enter this second command: ICACLS C:WindowsServiceProfilesLocalServiceAppDataLocalMicrosoftNgc /grant administrators:F
  • Finally, once the command has been executed, restart your computer.
  • Once your computer has restarted, delete all the contents in the Ngc folder and check if the error is now fixed.

Option 2 – Try to remove and change the PIN or password

The 0xd00000e5, 0x8007139f, and 0x8009003 PIN errors could be caused by some conflicting issues with the PIN or password you have set for the User Account of your computer. Thus, you have to remove or change the PIN or password to fix these PIN errors.
  • Remove the PIN by going to Settings > Accounts > Sign-in options.
  • From there, go to the PIN section and click on the Remove button.
  • You will be asked to verify your account to proceed in removing the PIN, enter your credentials.
  • Restart your computer and then set up a new PIN.
  • Once you’re done, restart your computer and check if the error is gone now.

Option 3 – Try to use the Group Policy Editor

  • Tap the Win + R keys to open the Run utility and type “gpedit.msc” in the field and tap Enter to open the Group Policy Editor.
  • Next, navigate to this policy setting: Computer Configuration > Administrative Templates > System > Logon
  • After that, double click on the “Turn on convenience PIN Sign-in” option located on the right-side panel.
  • Then set its radio button to Enabled. You will see the following description when you do so:
“This policy setting allows you to control whether a domain user can sign in using a convenience PIN. If you enable this policy setting, a domain user can set up and sign in with a convenience PIN. If you disable or don’t configure this policy setting, a domain user can’t set up and use a convenience PIN. Note: The user’s domain password will be cached in the system vault when using this feature. To configure Windows Hello for Business, use the Administrative Template policies under Windows Hello for Business.”
  • After setting the radio button to Enabled, it will turn on the Logins in your computer using the PIN.
  • Close the Group Policy Editor and restart your computer for the changes to take effect.

Option 4 – Try to reset the ACLs in the Ngc folder

  • Type “command prompt” in the Windows Search bar and then right-click on the relevant search result and select “Run as administrator”.
  • After opening Command Prompt with admin privileges, execute this command: C:/Windows/Service/Profiles/Local/Service/AppData/Local/MicrosoftNgc /T /Q /C /RESET
  • The command you entered will start checking for errors and fix them automatically.

Option 5 – Run the System File Checker scan and the DISM tool

System File Checker:

  • Tap Win + R to launch Run.
  • Type in cmd in the field and tap Enter.
  • After opening Command Prompt, type in sfc /scannow
The command will start a system scan which will take a few whiles before it finishes. Once it’s done, you could get the following results:
  1. Windows Resource Protection did not find any integrity violations.
  2. Windows Resource Protection found corrupt files and successfully repaired them.
  3. Windows Resource Protection found corrupt files but was unable to fix some of them.
  • Now restart your computer.

DISM tool:

  • Open Command Prompt.
  • Then type in the following commands and make sure to hit Enter right after you type each one of them:
    • Dism /Online /Cleanup-Image /CheckHealth
    • Dism /Online /Cleanup-Image /ScanHealth
    • Dism /Online /Cleanup-image /Restorehealth
  • After that, wait until the process is finished and do not close the window as the process will probably take a couple of minutes.
  • Once it’s done, restart your computer.
Read More
1 2 3 162
Logo
Copyright © 2022, ErrorTools. All Rights Reserved
Trademarks: Microsoft Windows logos are registered trademarks of Microsoft. Disclaimer: ErrorTools.com is not affiliated with Microsoft, nor claim direct affiliation.
The information on this page is provided for information purposes only.
DMCA.com Protection Status