Quick Guide to Fixing Error Code 29

Guide on How to Fix Error COde 29

What is Error Code 29?

Code 29 is a Device Manager error commonly seen whenever a hardware device driver reports a problem. This error code indicates that the resources needed for operation are not available.

The computer hardware basically requires drivers to interface with the operating system. Drivers comprise multiple components and are supplemented with other resources provided by the BIOS (a physical chip on the motherboard).

The BIOS contains a set of basic input and output instructions for the computer system to boot, load drivers, and more.

Its firmware provides resources that drivers require to interface with other essential components. However, when the firmware fails to provide the requested resources, the device drivers stop functioning; this results in error codes like code 29.

Error code 29 is usually displayed in the following format:

“This device is disabled because the firmware of the device did not give it the required resources”
Code 29

Solution

driverfix boxError Causes

Error code 29 may be triggered due to several reasons. These include:

  • Outdated drivers
  • Corrupted drivers
  • BIOS misconfiguration
  • The device firmware is corrupt
  • Previous attempt to update the driver failed

To avoid inconvenience and to ensure your computer keeps working at its optimal pace, it is recommended that you repair error code 29 on your PC immediately. Delay may limit you from using certain hardware attached to your system properly.

Further Information and Manual Repair

To repair error code 29, you don’t have to hire a professional and spend hundreds of dollars. Here are some quick and effective DIY methods that you can try to resolve this issue in minutes even if you don’t have any technical background.

Method 1 - Reboot Your PC

Sometimes, error codes like code 29 may pop up on your computer screen due to some temporary glitch with the hardware. Rebooting can resolve the issue easily.

Therefore, before you do anything, try restarting your PC. It could be all you need to repair code 29. However, if the error code continues to persist, try the other methods given below.

Method 2 - Clear the CMOS

This may sound technical but it isn’t. To begin, with CMOS is an acronym for Complimentary Metal Oxide Semiconductor.

It is a term that is used to describe motherboard memory that contains the BIOS settings. Clearing CMOS helps reset the BIOS settings to their default manufacturer levels. It’s easy to do and is an effective troubleshooting step to resolve error code 29.

To do this, simply:

  1. Enter the BIOS setup utility  by restarting your PC
  2. Watch for an entering setup message
  3. Enter the BIOS access key. Usually, the key is F2 or F12. However, the key may differ from manufacturer to manufacturer. You may want to check the manufacturer’s website first to find out the BIOS access key before you restart your PC.
  4. ‘Reset BIOS settings’ to their default factory levels.

Method 3 - Enable the Device in the BIOS

Error code 29 may appear if a device is disabled. In such a scenario, simply follow the same steps as discussed in method 2, and in the advanced BIOS settings, look for disabled devices.

Enable the devices in the BIOS so that you use them easily.

This will hopefully resolve the issue. If it doesn’t, then this means the error code 29 is caused by either corrupted or outdated drivers. Try method 4 to resolve this issue successfully.

Method 4 - Identify the Problematic Device Drivers and Update them

Whether the error code 29 is caused by a misconfigured, corrupted, or outdated driver, simply update the new driver version to resolve. When doing it manually, you will first have to find and identify the problematic device drivers in the Device Manager.

You can access the Device Manager by going to the start menu and then simply typing Device Manager in the search bar.

Access the Device Manager and the properties to identify problematic drivers. Problematic drivers are normally displayed with a yellow exclamation mark.

Once you have spotted problematic drivers, simply update new drivers to resolve them. Though there is nothing technical about it but it may be time-consuming.

Method 5 - Install Driver Assist to Update Drivers Automatically and Regularly

A good alternative to manual driver update is DriverFIX. Simply download and install DriverFIX on your PC to update all problematic drivers in seconds. This is a cutting-edge program designed to resolve all kinds of device driver problems.

It is user-friendly and compatible with all Windows versions.

The intelligent programming system deployed inside this software program enables it to identify and detect all problem drivers automatically thereby sparing you from the hassle.

Furthermore, it also matches the drivers with the latest and compatible versions and updates them on a regular basis.

It takes the guesswork out of finding misconfigured and corrupted drivers and fixes driver-related problems and error codes like code 29 right away.

Click here to download DriverFIX to repair Device Manager error code 29 on your system without any hassle.

If you like to learn and find out more about various Windows errors, and how to repair them go to our vast archive or use search to find articles that will explain and help you in solving your issue.
However, if you prefer to do things fast and with automatization then we are proposing to use an automated solution for your issues. The application that we are recommending is Advanced System Repair Pro
Advanced System Repair utilizes multiple tools all in one to give you a quick, simple, reliable, and very thorough diagnosis of your PC. It brings you all the tools you need in one program to clean, fix, protect, optimize and boost your PC!
1-Click Maintenance
All the tools to make it simple and easy! It's like having a professional technician at the click of a mouse.

Junk Cleaner
Keeping your computer free from unnecessary clutter also helps make your computer last longer. Like any other machine, if you keep it clean and take care of it, it will serve you better for longer!

Optimize background apps
Optimize applications background activity with the built-in Application Optimizer feature.

Disk Defrag
With a simple 1-click, Advanced System Repair speeds up your PC by assembling fragmented files on your machine and organizing them more efficiently.

Malware Removal
Finds and removes all types of harmful malware including trojans, worms, bots, adware, spyware, PUPs, and more!

Privacy Cleaner
The all-in-one privacy suite to Clean Your Tracks & Protect Your Privacy! Make your computer safe, secure, and more efficient!

System Tweak/Optimizer
ASR will analyze your complete system and settings to adjust your PC to function at its maximum performance.

Registry Cleaner
Over time, as you install and uninstall applications, the registry can become cluttered with old entries and broken settings which can result in program crashes, and annoying messages and slow the computer down.
Visit our Advanced System Repair Pro Download page to inform yourself about all the benefits of this software and get a free trial copy of it.
advanced system repair pro

Advanced System Repair Pro

One-click automated PC repair solution
ASR logo
With Advanced System Repair Pro you can easily
Replace damaged files
Restore performance
Free disk space
Remove Malware
Protects WEB browser
Remove Viruses
Stop PC freezing
DOWNLOAD
Privacy Policy | Terms of Use | Uinstall
Advanced System Repair Pro is compatible with all versions of Microsoft Windows including Windows 11

Share this article:

You might also like

Configuring Groove Music Equalizer in Windows
In case you don’t know, Groove Music is due to retire its OneDrive streaming service this month. Despite that being the case, there is actually a workaround you can try to still continue enjoying music streaming. The app also allows you to play your own local files and if required, you can also modify or tailor the experience with new features – for instance, Groove Music brings an Equalizer to the settings of the app. As the name suggests, the equalizer allows you to tweak frequency responses to your liking. On top of being able to tweak individual bands, the equalizer supports few pre-set settings to enable quick changes. This post will guide you on the process of accessing and using the equalizer in the Groove Music app. To get started, refer to the instructions provided below. Step 1: You need to make sure that you are running the latest version of the Groove Music app or version 10.18011.1211.0 or higher in order to use the equalizer in Groove Music. If needed, you can check the version number from Windows Store. Step 2: Open Windows Store and then click on the ellipses icon and select the Downloads and Updates option. Step 3: Next, search for Groove Music and check its version number. Step 4: Now that you’ve verified the version number of Groove Music, you need to open the equalizer setting. It is enabled by default and to access it, click on the gear icon for Settings and select equalizer under the Playback settings. Step 5: After that, the Equalizer window will pop up. It is where you can configure the equalizer settings using the drop-down menu. Here are the following presets you can choose from:
  • Flat
  • Treble Boost
  • Bass Boost
  • Headphones
  • Laptop
  • Portable speakers
  • Home Stereo
  • TV
  • Car
  • Custom
Step 6: Drag the dots upwards or downwards to set your own preferences, as needed. Note: The only downside to this setting is that there is no shortcut available for quick access as you have to navigate through the Settings section manually to access it and change the preset configurations. In addition, the Groove Music app also works on the mobile version of Windows 10.
Read More
Fix HIDCLASS.sys failed Blue Screen Error
If you were trying to print some documents but encounter the HIDCLASS.SYS Blue Screen error instead, then you’ve come to the right place as this post will guide you in fixing any Blue Screen errors related to the HIDCLASS.SYS file. HIDCLASS.SYS is a Windows operating system driver file. HID or Human Interface Device includes Keyboards, mice, and other input devices. HIDCLASS.SYS is a critical system driver file that is responsible for connecting different kinds of devices all over the system, including the functionality where a Word Processor can access the printer to print documents. This file comes under the category of kernel-mode device drivers and if the driver fails, it can result in a Stop Error. There are a lot of Stop errors related to the HIDCLASS.SYS file, such as:
  • KMODE EXCEPTION NOT HANDLED
  • SYSTEM SERVICE EXCEPTION
  • DRIVER POWER STATE FAILURE
  • PAGE FAULT IN A NONPAGED AREA
  • SYSTEM THREAD EXCEPTION NOT HANDLED
  • DRIVER VERIFIER IOMANAGER VIOLATION
  • IRQL NOT LESS EQUAL
The fixes for the Blue Screen errors related to the HIDCLASS.SYS files are pretty simple but before you troubleshoot the problem using these fixes, make sure that you boot your computer into Safe Mode with Networking first. After that, get started on these tips:

Option 1 – Update or rollback or disable concerned device drivers

To fix the HIDCLASS.SYS error, you can also try to roll back, or update, or disable the concerned device drivers.
  • Open the Devices Manager from the Win X Menu.
  • Then locate the device drivers particularly the ones that are under the sections of Keyboard, Mouse, USB, and HID Drivers.
  • Next, right-click on them to open the Properties.
  • After that, switch to the Driver tab and click on the Uninstall Device button.
  • Follow the screen option to completely uninstall it.
  • Finally, restart your computer. It will just reinstall the device drivers automatically.
Note: You can install a dedicated driver on your computer in case you have it or you could also look for it directly from the website of the manufacturer. On the other hand, if you have just updated your device drivers then you need to roll back the drivers to their previous versions or disable them.

Option 2 – Check for any incompatible devices

The next thing you can do to troubleshoot the HIDCLASS.SYS Stop error is to plug in and out each one of the different hardware that is connected to your computer. Doing so will help you determine which one of the hardware is the one that’s triggering the error to pop up. You will also know what hardware drivers or anything else that could be causing this error which includes external devices like mouse, keyboard, printer, as well as internally attached components like the Graphics card and so on.

Option 3 – Try running the ChkDsk utility

Running the ChkDsk utility can also help you resolve any Blue Screen errors related to the HIDCLASS.SYS file. To run this tool, refer to these steps:
  • First, open This PC and right-click on your operating system partition for Windows.
  • Next, click on Properties and navigate to the Tools tab.
  • Then click on Check under the Error Checking section.
  • After that, a new mini window will be opened and from there click on Scan drive and let it scan your disk drive partition for any errors and then restart your computer.

Option 4 – Try checking the Memory for any errors

  • Tap the Win + R keys to open Run and type exe and hit Enter to open the Windows Memory Diagnostic Tool.
  • After that, it will give two options such as:
    • Restart now and check for problems (Recommended)
    • Check for problems the next time I start my computer
  • Once your computer has restarted, perform a basic scan or you could also go for the “Advanced” options such as “Test mix” or “Pass count”. Simply tap the F10 key to start the test.
Note: After you select the option, your PC will restart and check for memory-based issues. If it finds any issues, it will automatically fix them.

Option 5 – Run the System File Checker

System File Checker or SFC is a built-in command utility that helps in restoring corrupted files as well as missing files. It replaces bad and corrupted system files with good system files. To run the SFC command, follow the steps given below.
  • Type “cmd” in the Start search and then right-click on the appropriate search result.
  • Next, select “Run as administrator” to open Command Prompt with admin privileges.
  • After opening Command Prompt, type in sfc /scannow
The command will start a system scan which will take a few whiles before it finishes. Once it’s done, you could get the following results:
  1. Windows Resource Protection did not find any integrity violations.
  2. Windows Resource Protection found corrupt files and successfully repaired them.
  3. Windows Resource Protection found corrupt files but was unable to fix some of them.
  • Now restart your computer and see if the Blue Screen error is fixed or not.
Read More
A Quick Guide to Repair User32.dll Error Code

Fix User32.dll Error Code

User32.dll Error Code - What is it?

User32.dll is a Dynamic Link Library file. Windows stores instructions for graphical elements such as dialog boxes and Windows in this file. This file is a crucial file, necessary to run Windows operations. If this file is damaged, deleted, or removed from the system you may not be able to run the programs on your system that use and share the User32.dll file thereby causing you inconvenience. The User32.dll file error is displayed in the following format:

“This application has failed to start because USER32.dll was not found. Reinstalling the application may fix this problem.”

Or

“[Program] illegal system DLL relocation”

Program here refers to the name of a program that caused the User32.dll error message.

Solution

Restoro box imageError Causes

User32.dll errors are triggered by the following reasons:
  • Missing and damaged .dll files
  • Viral infection
  • Registry corruption
User32.dll error is also referred to as C0000135 blue screen of death error. When the User32.dll error occurs it not only locks you out of your desired program but also turns your computer screen blue. If the error is not repaired timely it may expose your PC to serious threats such as abrupt system shutdowns, system failure, and crash.

Further Information and Manual Repair

To resolve the User32.dll error on your PC, try the following solutions:

1. Reinstall Programs Causing User32.dll errors

Sometimes User32.dll error may occur due to missing DLL files.  This happens when you delete a program from your PC and accidentally the DLL file also gets deleted which is shared by other programs on your system. Therefore to resolve this first find out what programs on your system use User32.dll to load and run on your system. To do this use the Tasklist command-line tool. It displays the names of all the programs that currently use the User32.dll file. After this, reinstall the programs that use User32.dll files on your system. This will hopefully resolve the error.

2. Install and Run Restoro

If it doesn’t, then this probably means that the damage is deep-rooted. It is related to the damaged DLL files, registry corruption, or viral infection. To resolve all of these causes in one go, it is best to download Restoro instead of downloading 3 different software to resolve each cause for the error separately. This is basically an advanced, innovative, and multi-functional PC repair tool embedded with multiple powerful utilities including a registry cleaner, and a system optimizer. It is a one-stop solution for all your PC-related problems including the User32.dll error. The registry cleaner wipes the clutter and obsolete files damaging the hard disk and simultaneously repairs the DLL files and the registry. The antivirus feature removes all the viruses on your system while the system stability utility boosts the PC speed significantly. It is safe, user-friendly, and compatible with all Windows versions including Windows Vista, XP, Windows 7, 8, 8.1, and 10. Click here to download Total System Care to resolve the User32.dll error right away.
Read More
How to personalize STEAM with custom skin
steam skin
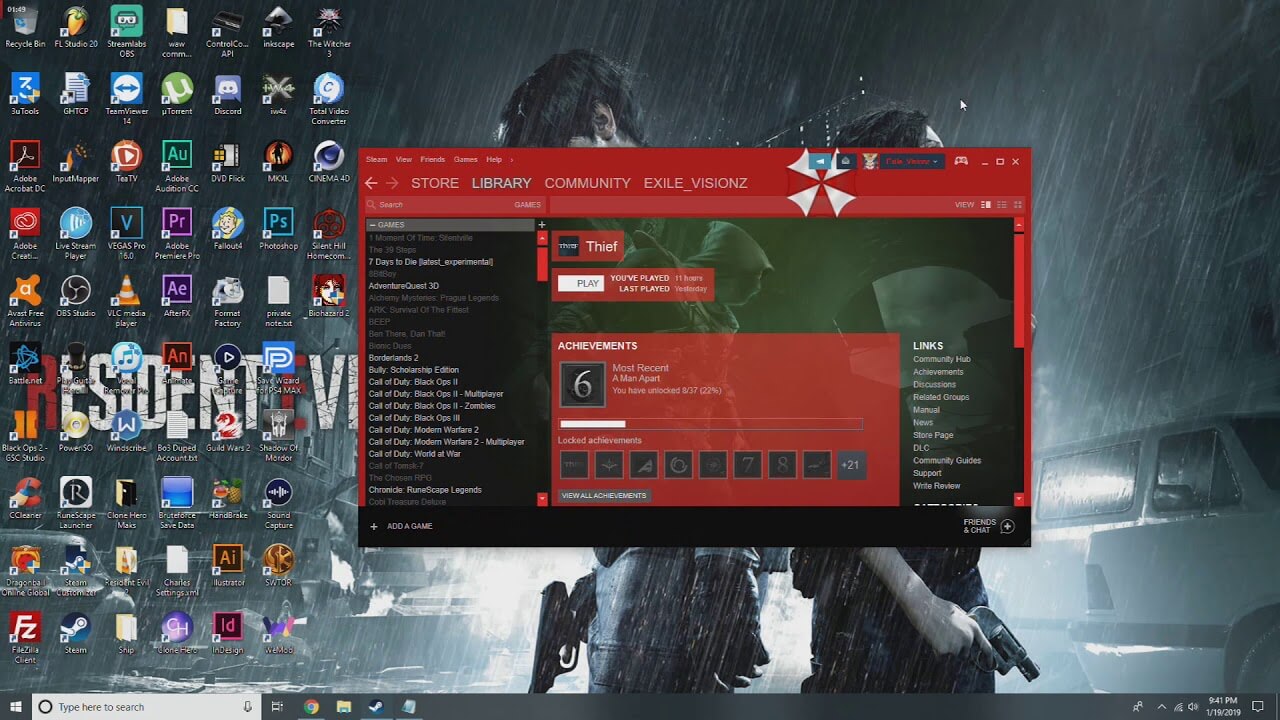
Skinning of applications is not new to PC users, but did you knew you could skin Steam? With skin, you can customize the UI and style of the client to what you want making it more personal and to your liking. First thing is to find the skin that you would like to install. There are a lot of sites where you could find custom made Steam skins but we would recommend steamskins.org The site itself is organized in tabs with different sections, once you click on the tab you will get a list of skins available for chosen section. If you click on the skin you will be taken to skin page detail where you can find what skin is aiming for, its legibility, a record of how the skin has been altered over time, or some mix of these aspects. Note that some skins might have issues like some buttons might be missing from big picture mode but so far none of the skins has any kind of client breaking feature, only functionality one.

Downloading skin

Once you have chosen desired skin and while on the skin details page, scroll to the middle of the page just above the Related Skins sections with two options: Direct Download and External Download. Now usually I would recommend Direct download but in this case, I would advise going with External Download for the simple reason that the External link will send you to the developer's website where there is a higher chance to get the latest updated skin.

Installing it in Steam

Once the skin is downloaded you will first need to create a skin folder inside your Steam installation location. Navigate to your Steam installation folder (default: C:\Program Files (x86)\Steam) and create a new folder inside it. Give new folder name Skins and confirm. Extract the skin zip file in the newly made folder. Once the file is extracted you can delete the ZIP file if you wish. Go to your Steam client and go to Steam>Settings. In settings select Interface on the left bar and on the right part then click the Select the skin you wish Steam to use the drop-down menu and select the skin that you wish to use. Confirm and restart your Steam client

Reverting to old skin

If you found skin unappealing or, unfortunately, has some functions missing you can always choose another skin or revert back to default Steam skin. Default Steam skin is named in the drop-down menu as < default skin >.
Read More
Watch Marvel Universe in chronological order
marvelSo far I believe each person on this planet has at least heard of Marvel superhero movies, perhaps even watched a few of them, and no wonder. Movies are spawning now over 20 titles and they are not really released as events described in them. Throw into mix TV series and you can get confused pretty fast. Now it was officially stated that all TV series that were released before Wanda vision is no canon in Marvel cinematic universe which simplify thing a little but there are still series that are.

So without further blabbering around here is a list of Marvels films and TV series in chronological order:

  • Captain America: The First Avenger
  • Captain Marvel
  • Iron Man
  • Iron Man 2
  • The Incredible Hulk
  • Thor
  • The Avengers
  • Iron Man 3
  • Thor: The Dark World
  • Captain America: The Winter Soldier
  • Guardians of the Galaxy
  • Guardians of the Galaxy Vol. 2
  • Avengers: Age of Ultron
  • Ant-Man
  • Captain America: Civil War
  • Spider-Man: Homecoming
  • Doctor Strange
  • Black Panther
  • Thor: Ragnarok
  • Ant-Man and The Wasp
  • Black Widow
  • Avengers: Infinity War
  • Avengers: Endgame
  • WandaVision
  • The Falcon and The Winter Soldier
  • Spiderman: Far From Home
  • Loki
And there you go, if you have someone who has not yet seen movies or you would like to view that as the story is revealed and not by the date they were released now you can easily with this list.
Read More
A Guide to Fixing Magcore.dll Error on Your PC

Magcore.dll Error Fix Guide

Magcore.dll Error - What is it?

Magcore.dll is a type of Dynamic Link Library. This file is associated with software developed by ArcSoft, a renowned multimedia application developer. Magcore.dll consists of small programs that help load and run software developed by ArcSoft on your system smoothly. This file virtually comes into function when you use certain audio and video features incorporated in ArcSoft programs for example ArcSoft Media converter. However, you may experience Magcore.dll error code on when this DLL file fails to run and load programs. The error may hamper your ability to access ArcSoft programs on your system and cause you a great deal of inconvenience. Magcore.dll error is often displayed in any one of the following formats:
“The file magcore.dll is missing” “MagCore.dll cannot be found” "Cannot find [PATH]magcore.dll" “This application has failed to start because MagCore.dll was not found. Reinstalling the application may fix the error.”

Solution

Restoro box imageError Causes

This DLL file is known to be prone to errors. MagCore.dll error occurs due to several reasons such as:
  • Missing or damaged MagCore.dll file
  • Hardware failure
  • Viral infection
  • Registry issues
If you experience MagCore.dll error on your system, it is advisable to fix it right away. Though it is not fatal, but if you don’t repair it, you may not be able to access practically all ArcSoft programs on your PC.

Further Information and Manual Repair

Here are some of the efficient and easy manual methods to resolve error MagCore.dll on your PC:

Method 1 - Scan and Remove Malware

MagCore.dll error can be triggered by viral or other malware infection. Malware can easily damage DLL files and masquerade as the MagCore.dll file. To resolve, simply download a powerful antivirus on your system. Run it to scan your entire PC for viruses and remove them right away.

Method 2 - Update the Drivers for Hardware Devices

As we mentioned above the error may be related to hardware failure too. In times like these, it is advisable to update the drivers for hardware devices. For example if you try to play a 3D video game and it fails to run showing you MagCore.dll error message, then simply try updating the drivers for your video card. Drivers can be updated in Windows by using a driver update wizard from within Device Manager.

Method 3 - Use System Restore to Undo Recent System Changes

After trying method 1 and 2, if the error code still persists, then it is opt for method 3. Use Windows System Restore utility to undo recent system changes and bring your PC to its normal previous condition before the error occurred. To restore, simply go to the start menu, type System Restore. Now click on System Restore and just pick a point in the past called a restore point to return important Windows files and settings.

Method 4 - Repair the Registry

If the underlying cause of the MagCore.dll error code is related to registry issues, then simply repair the registry. You can fix it manually but it is a little complicated and time-consuming. You may find it difficult if you are not a technical whiz. Nonetheless to resolve and repair it in seconds, download Restoro. This is a powerful and a user-friendly PC Fixer embedded with a registry cleaner and several other highly functional scanners. Run it to scan your entire PC for registry problems. The registry cleaner utility removes all bad and invalid entries, cleans up the registry space, and repairs the damaged files. Click here to download Restoro and repair MagCore.dll error code on your PC.
Read More
Fix Windows Update Error 0x80244019
If you are trying to update your Windows 10 computer but encounter the Windows update error 0x80244019 instead, read on as this post will help provide you some possible fixes to resolve the problem. This kind of Windows Update error is usually caused by your Windows Update settings or the Windows Update components. Many users who encountered this error reported that the update fails with the said error which keeps them from enjoying the latest features that the Windows Update brings. In such cases, some of the common culprits for this Windows Update error are the Windows Update settings, Windows Update configuration, third-party antivirus programs, and so on. To resolve this error, you can check out the options provided below.

Option 1 – Restart your computer and try installing the Updates again

You can restart your computer and then try installing the updates once again. There are instances when a simple restart resolves Windows Update errors. Aside from that, it would also be better if you make sure that your internet connection is working and that it’s stable. And so after you restart your computer, check for updates once again and see if you’re still getting the error or not.

Option 2 – Try to change the Windows Update settings

You might also want to try tweaking the Windows Update settings. This will prevent other Microsoft products from being updated and besides, you can always turn the option back on afterward. To change Windows Update settings, follow these steps:
  • Tap the Win + I keys to open Settings.
  • Next, go to Updates and Security and click on the Advanced Options.
  • From there, turn off the “Get me updates for other Microsoft products when I update Windows” option.

Option 3 – Run the Windows Update Troubleshooter

Running the built-in Windows Update troubleshooter is one of the things you can first check out as it is known to automatically resolve any Windows Update errors like error code 0x80244019. To run it, Refer to these steps:
  • Tap the Win + I keys to open Settings.
  • From there, click Update and Security and go to the Troubleshoot section.
  • Next, select Windows Update and click the “Run the troubleshooter” button and wait until it’s finished, and then try to run Windows Update again.

Option 4 – Try to disable the third-party antivirus program

Disabling the antivirus program or any security software installed in your computer is always a good idea you can try when the Windows Update process does not go smoothly. There are times when you encounter Windows Update errors like 0x80244019 due to interference of third party antivirus programs. So before you try updating your computer again, make sure to disable the antivirus or security program and once the Windows Update is done, don’t forget to enable the antivirus program back again.

Option 5 – Try to manually install the Windows Updates

Windows Update Error 0x80244019 might be due to a Windows Update that has failed. So if it is not a feature update and only a cumulative update, you can download the Windows Update and install it manually. But first, you need to find out which update has failed, and to do so, refer to the following steps:
  • Go to Settings and from there go to Update and Security > View Update History.
  • Next, check which particular update has failed. Note that Updates that have failed to install will be displayed under the Status column which has a label of “Failed”.
  • After that, go to the Microsoft Download Center and look for that update using its KB number and once you find it, download and then install it manually.
Note: You can also use the Microsoft Update Catalog, a service from Microsoft that provides a list of software updates that can be distributed over a corporate network. With the help of this service, it can be easier for you to find Microsoft software updates, drivers as well as fixes.

Option 6 – Restart some Windows Update services

The first thing you have to do is to restart Windows Update-related services. Refer to the steps below to do so.
  • Open the WinX Menu.
  • From there, open Command Prompt as admin.
  • Then type in the following command – don’t forget to hit Enter right after typing each one of them.
net stop wuauserv net stop bits
  • After entering these commands, it will stop the Windows Update Service and the Background Intelligent Transfer Service.
  • Next, go to the C:/Windows/SoftwareDistribution folder and get rid of all the folders and files thereby tapping the Ctrl + A keys to select them all and then click on Delete. Note that if the files are in use, you won’t be able to delete them.
  • Once all the contents in the Software Distribution folder are deleted, restart your PC and then go back to Command Prompt and input the following commands again.
net start wuauserv net start bits
 Since the folder has already been flushed, it will be populated afresh the instant your restart your computer and open Windows Update. Now try to update your computer again and see if the error is fixed or not.
Read More
Fix Windows errors 80240020, 8007002C, 80246007, 80070004
Upgrading your Windows 10 computer does not always go smoothly and you often encounter not just one but various errors so, in this post, we are going to cover several Windows 10 upgrade errors such as 80240020, 8007002C, 80246007, 80070004. All these upgrade errors are related to the Windows Update folder. Thus, you need to clear the Software Distribution folder, repair the System Image and fix System Health in order to resolve all these Windows 10 Upgrade errors. Before you get started on the steps to resolve these tons of errors, you have to disable your security program for the meantime, disconnect your peripherals, remove USBs connected to your PC and then make sure that your PC is connected to the main power supply. Once you have everything covered, carefully follow the options given below.

Option 1 – Delete Windows 10 Update Files in the SoftwareDistribution folder

The Software Distribution folder in the Windows operating system is a folder that can be found in the Windows directory and is used to store files temporarily which might be required to install the Windows Update on your PC. Thus, it is required by the Windows Update and maintained by WUAgent. A lot of users tried deleting the files in this folder to fix the problem and so far it has worked. Like them, you can try clearing the Windows Update cache by simply deleting the contents of the folder named “SoftwareDistribution” since Windows apparently can’t clear and re-download the update contents once they are corrupted. Thus, deleting the contents of this folder will make Windows download the contents again which will fix the problem. To do that, follow the steps below.
  • Open the WinX Menu.
  • From there, open Command Prompt as admin.
  • Then type in the following command – don’t forget to hit Enter right after typing each one of them.
net stop wuauserv net stop bits
  • After entering these commands, it will stop the Windows Update Service and the Background Intelligent Transfer Service.
  • Next, go to the C:\Windows\SoftwareDistribution folder and get rid of all the folders and files thereby tapping the Ctrl + A keys to select them all and then click on Delete. Note that if the files are in use, you won’t be able to delete them.
  • Once all the contents in the Software Distribution folder are deleted, restart your PC and then go back to Command Prompt and input the following commands again.
net start wuauserv net start bits
Since the folder has already been flushed, it will be populated afresh the instant your restart your computer and open Windows Update.
  • Now Open Settings and check for Windows Updates. Windows 10 should begin the download right away.

Option 2 – Try using the DISM tool

Running the DISM Tool helps in repairing the Windows System Image as well as the Windows Component Store in Windows 10. Using this built-in tool, you have various options such as the “/ScanHealth”, “/CheckHealth”, and “/RestoreHealth”.
  • Open the Command Prompt with admin privileges.
  • Then type in the following commands and make sure to hit Enter right after you type each one of them:
    • Dism /Online /Cleanup-Image /CheckHealth
    • Dism /Online /Cleanup-Image /ScanHealth
    • exe /Online /Cleanup-image /Restorehealth
  • Do not close the window if the process takes a while as it will probably take a few minutes to finish.
Note: If it happens that the Windows Update client is broken, you need to run the following command to repair it then restart your PC and click on Update once again.
DISM.exe /Online /Cleanup-Image /RestoreHealth /Source:C:RepairSourceWindows /LimitAccess
Note: The Windows Upgrade error, with error code 80240020 is an expected error message that happens when the upgrade requires customer user action. Thus, you need to do the following steps to resolve this particular Windows Upgrade error.
  • Tap the Win + R keys to open the Run dialog box.
  • Then type “regedit” in the field and hit Enter to open the Registry Editor.
  • After that, navigate to this registry key: HKEY_LOCAL_MACHINESOFTWAREMicrosoftWindowsCurrentVersionWindowsUpdate
  • Now right click on WindowsUpdate located in the left pane and then create a new key and name it as “OSUpgrade
  • Next, right-click in an empty space in the left pane and create a new DWORD and name it “AllowOSUpgrade” and enter “1” as its value.

Option 3 – Try running the Windows Update in a Clean Boot State.

Putting your PC in a Clean Boot state can also help you install Windows Updates or Upgrades without any trouble because, during this state, you can start the system with a minimum number of drivers and startup programs that will surely help you in isolating the root cause of the issue.
  • Log onto your PC as an administrator.
  • Type in MSConfig in the Start Search to open the System Configuration utility.
  • From there, go to the General tab and click “Selective startup”.
  • Clear the “Load Startup items” checkbox and make sure that the “Load System Services” and “Use Original boot configuration” options are checked.
  • Next, click the Services tab and select the “Hide All Microsoft Services” checkbox.
  • Click Disable all.
  • Click on Apply/OK and restart your PC. (This will put your PC into a Clean Boot State. And configure Windows to use the usual startup, just simply undo the changes.)
  • After that, try to install the Windows Updates or upgrade again.
Read More
Disable non MS store apps in Windows 11
Disable non MS store apps in Windows 11 post picture
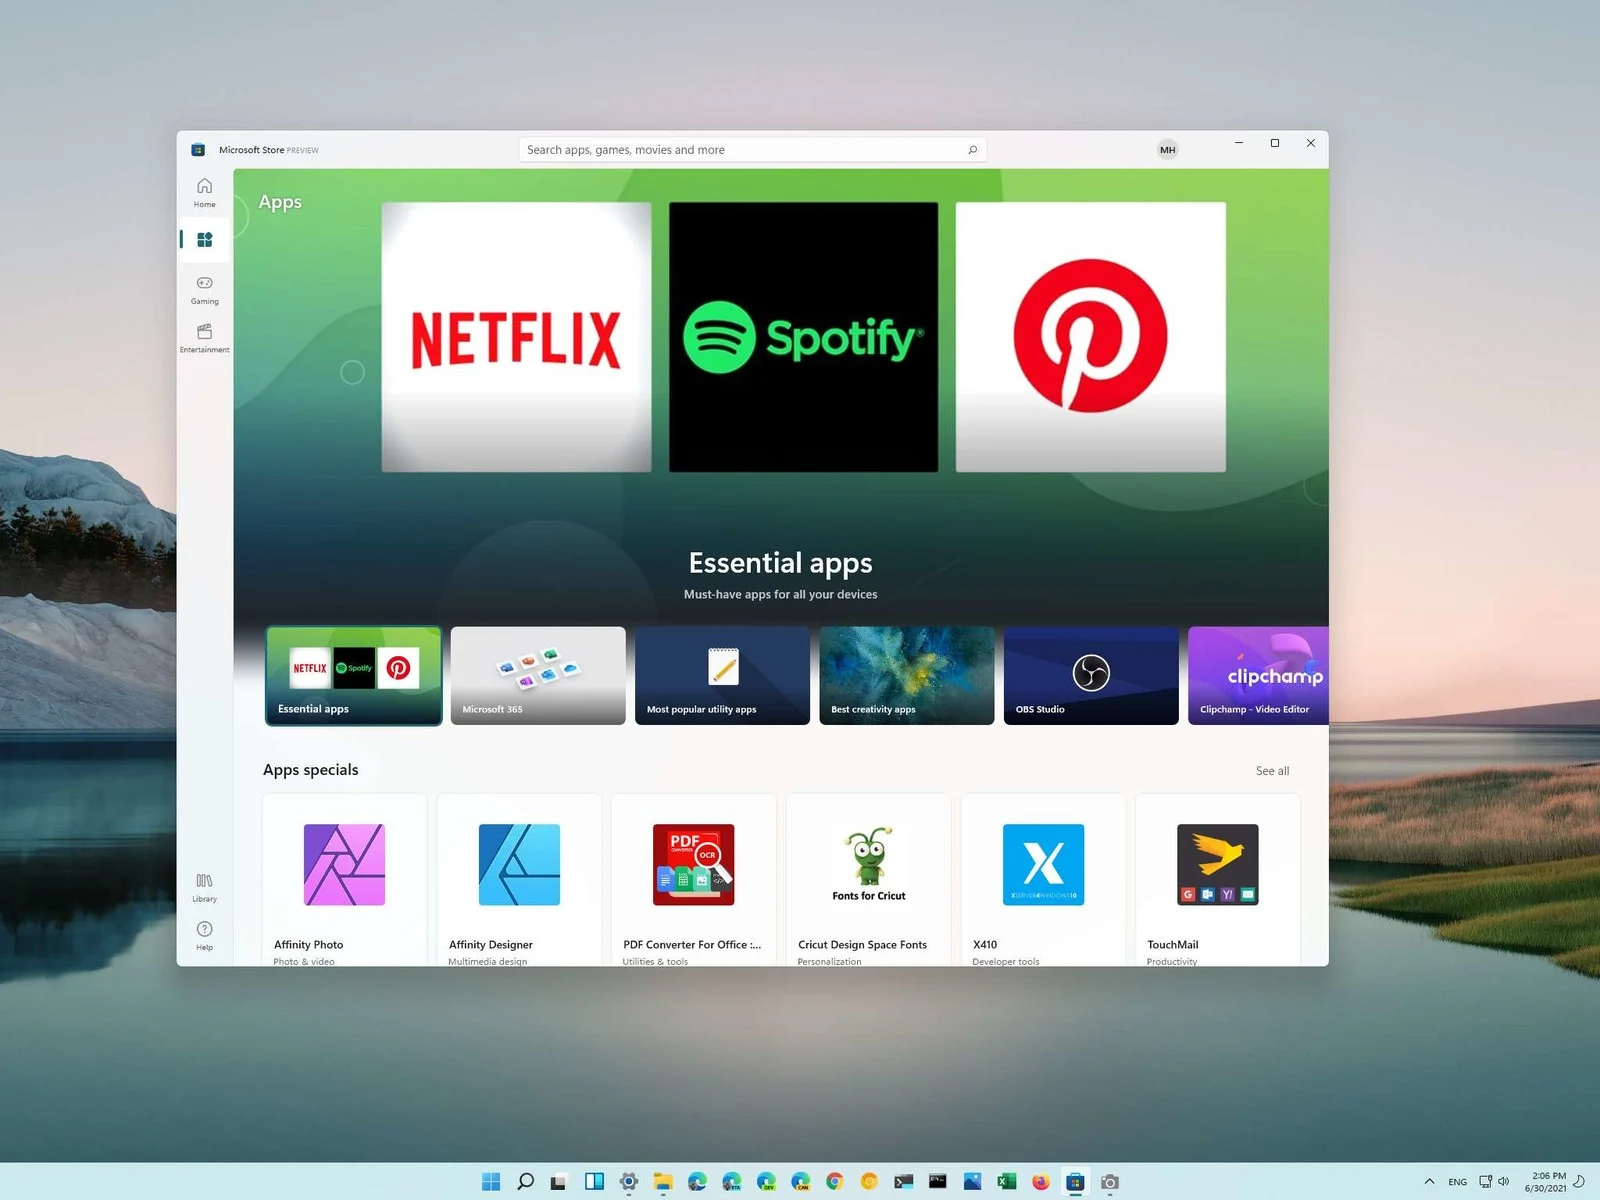
You can prevent starting of app installations files if they have not come from the MS store inside Windows 11. This can make your PC more secure because all apps in the store will have to be digitally signed and overall it can provide you with more control over what will be installed. Follow the guide below to find out how can you easily turn this feature ON.
  1. Press ⊞ WINDOWS + I to open Windows settings
  2. Select Apps and then choose Apps & Features
  3. Click on Choose where to get apps to bring a drop-down menu
  4. Select The Microsoft Store only (Recommended)
  5. Close settings
Settings will apply changes immediately and you continue using Windows right away. With these settings turned ON if you want to install a downloaded application or run the installer you will not be able to, and message The app you’re trying to install isn’t a Microsoft-verified app will show on your screen. You can always reverse this setting by choosing Anywhere in settings instead of Microsoft store only.
Read More
Remove ChatZum from Windows

ChatZum is a Potentially Unwanted Program that installs a Toolbar into your browser. This program allegedly allows users to zoom in on photos without clicking on them, however, upon further research, it was discovered that this function does not work on the latest version of browsers.

From the Author: ChatZum is a Browser add-on (toolbar) that enables its users to hover over images in Major Social network's websites and view a larger version of an image.

While installing this toolbar will track user web browsing sessions and will record website visits, clicks, and sometimes even personal information. This information is later used to display targeted ads to the user. To allow easier user tracking, the program changes the browser home page and default search engine to Nation Search Advanced, which injects additional advertisements and tracks user activity.

Several anti-virus applications have marked this program as Potentially Unwanted, and it is not recommended to keep it on your computer, especially considering the fact it will most likely not work on your browser.

About Potentially Unwanted Applications

If you have ever installed a free application or shareware, chances are high that the computer will get installed with a bunch of unwanted applications. A Potentially Unwanted Program, also called PUP, in short, is actually software that contains adware, installs toolbars, or has got other hidden objectives. These types of programs are generally bundled up with a free application that you download from the internet or may also be bundled inside the custom installers of many download websites. PUPs aren’t always viewed as “pure” malware in the strictest sense. A fundamental difference between PUP and malware is distribution. Malware is normally dropped by silent installation vectors like drive-by downloads while PUP gets installed with the consent of the computer user, who knowingly or unknowingly approves the PUP installation on their computer system. But, there is no doubt that PUPs remain bad news for PC users as it could be quite dangerous to your computer in many ways.

The damage PUPs can do

The unwanted programs after installation display numerous annoying pop-up ads, trigger fake alerts, and sometimes even forces a computer owner to pay for the software. PUPs that come as browser add-ons and toolbars are commonly recognizable. These toolbars alter your homepage and your search engine in the installed web browser, track your web activities, modify your search results with redirects and sponsored links, and eventually slow down your browser and diminish your browsing experience. Potentially unwanted programs use aggressive distribution methods to get onto your computer. The worst part of setting up a PUP is the adware, spyware, and keystroke loggers that could lurk inside. Even if the PUPs really aren’t inherently malicious, these applications still do practically nothing good on your PC – they’ll take valuable system resources, slow down your PC, weaken your computer security, making your PC more vulnerable to malware.

How to avoid ‘crapware’

• Read the EULA thoroughly. Look for clauses that state that you have to accept advertising and pop-ups or bundled applications from the company. • Always opt for the custom if you’re offered an option between “Custom” and “Recommended” Installations – never ever click Next, Next, Next thoughtlessly. • Use a good anti-malware application. Try Safebytes Anti-malware which can find PUPs and treat them as malware by flagging them for deletion. • Be alert if you download and install freeware, open-source applications, or shareware. Do not ever install software applications that seem shady or malicious. • Always download applications from the original website. The majority of PUPs find their way onto your laptop or computer is via download portals, so steer clear of it altogether. Remember the fact that even though PUPs could potentially cause damage and hinder the proper functioning of the PC, they can’t enter into your system without your consent, so be alert not to provide them with it.

How One Can Get rid of Malware that is Blocking Websites or Preventing Downloads

Malware could potentially cause many kinds of damage to PCs, networks, and data. Some malware goes to great lengths to stop you from downloading or installing anything on your computer, especially antivirus software. If you’re reading this article, odds are you’re stuck with a malware infection that is preventing you to download or install the Safebytes Anti-Malware program on your PC. Even though this sort of problem can be tougher to circumvent, there are some steps you can take.

Make use of Safe Mode to resolve the issue

If the malware is set to run automatically when Microsoft Windows starts, stepping into safe mode could block the attempt. Just minimal required programs and services are loaded when you boot your computer in Safe Mode. To launch your Windows XP, Vista, or 7 computers in Safe Mode with Networking, do as instructed below. 1) Tap the F8 key repeatedly as soon as your PC boots, however, before the big Windows logo or black screen with white texts come up. This would invoke the Advanced Boot Options menu. 2) Choose Safe Mode with Networking with arrow keys and hit ENTER. 3) When this mode loads, you should have the internet. Now, obtain the malware removal program you want by utilizing the web browser. To install the program, follow the guidelines in the installation wizard. 4) Right after installation, do a full scan and allow the software program to get rid of the threats it detects.

Switch to an alternate internet browser

Some malware mainly targets certain browsers. If this is your situation, employ another internet browser as it might circumvent the computer virus. When you suspect that your Internet Explorer has been hijacked by a trojan or otherwise compromised by online hackers, the best thing to do is to switch over to an alternate internet browser such as Mozilla Firefox, Google Chrome, or Apple Safari to download your chosen security program – Safebytes Anti-Malware.

Create a portable USB antivirus for eliminating viruses

Another technique is to download and transfer an antivirus application from a clean computer to run a scan on the infected computer. Follow these steps to run the anti-malware on the affected computer. 1) Download the anti-malware on a virus-free PC. 2) Connect the flash drive to a USB slot on the clean computer. 3) Double click on the exe file to run the installation wizard. 4) Choose the USB stick as the location for saving the file. Follow the instructions on the screen to finish off the installation process. 5) Now, transfer the flash drive to the infected computer. 6) Run the Safebytes Anti-malware directly from the USB drive by double-clicking the icon. 7) Click the “Scan Now” button to start the virus scan.

Protect your PC from Malware With SafeBytes Security Suite

If you are looking to install an anti-malware program for your PC, there are lots of tools in the market to consider nonetheless, you just cannot trust blindly anyone, regardless of whether it is a paid or free program. A few of them are great but there are several scamware applications that pretend as authentic anti-malware programs waiting around to wreak havoc on your PC. You have to pick a company that develops industry-best anti-malware and it has earned a reputation as reliable. One of the highly recommended applications by industry analysts is SafeBytes Anti-Malware, the safest program for Microsoft Windows. SafeBytes can be described as a highly effective, real-time antivirus application that is made to assist the average computer user in protecting their PC from malicious internet threats. Through its cutting-edge technology, this software will help you protect your computer against infections brought on by various kinds of malware and other internet threats, including spyware, adware, trojans, worms, computer viruses, keyloggers, ransomware, and potentially unwanted program (PUPs).

There are many wonderful features you’ll get with this particular security product. Listed below are some of the features you will like in SafeBytes.

Active Protection: SafeBytes offers a completely hands-free active protection and is set to observe, block, and kill all computer threats at its very first encounter. It will check your PC for suspicious activity at all times and its unrivaled firewall shields your computer from illegal entry by the outside world. Robust, Anti-malware Protection: Using a critically acclaimed malware engine, SafeBytes offers multilayered protection which is made to catch and remove threats that are concealed deep inside your PC. Web Security: Safebytes allots all sites a unique safety ranking that helps you to get an idea of whether the webpage you’re just about to visit is safe to view or known to be a phishing site. Extremely Speed Scanning: SafeBytes’s virus scan engine is among the fastest and most efficient in the industry. It's targeted scanning significantly increases the catch rate for viruses which is embedded in various computer files. Lightweight: SafeBytes is really lightweight software. It consumes an extremely small amount of processing power as it runs in the background which means you will not observe any computer performance difficulties. 24/7 Support: For any technical concerns or product assistance, you may get 24/7 expert assistance via chat and email. To sum it up, SafeBytes Anti-Malware offers outstanding protection combined with an acceptable low system resources usage with both great malware detection and prevention. You now may realize that this particular tool does more than just scan and remove threats from your computer. You will get the best all-around protection for the money you pay on SafeBytes AntiMalware subscription, there’s no question about it.

Technical Details and Manual Removal (Advanced Users)

If you wish to do the removal of ChatZum manually rather than using an automated software tool, you can follow these simple steps: Navigate to the Windows Control Panel, click the “Add/Remove Programs” and there, choose the offending application to remove. In case of suspicious versions of web browser plug-ins, you can easily get rid of it through your web browser’s extension manager. You might also want to reset your home page and search providers, as well as delete browsing history, temporary files, and cookies. If you choose to manually remove the system files and Windows registry entries, use the following list to make sure you know exactly what files to remove before undertaking any actions. Please note that only advanced users should try to manually edit the system files mainly because removing any single vital registry entry results in a serious problem or even a PC crash. In addition, certain malware is capable of replicating itself or preventing its removal. Doing this malware-removal process in Safe Mode is recommended.
Files: Search And Delete: tbcore3.dll arrow_refresh.png basis.xml chatzum.dll info.txt inst.tmp loaderie.js suggestion_plugin.dll TbCommonUtils.dll tbcore3.dll tbhelper.dll TbHelper2.exe uninstall.exe uninstaller.exe update.exe Folders: C:\Program Files\ChatZum Toolbar\ C:\Documents and Settings\username\Application Data\Mozilla\Firefox\Profiles\gb5e8gtn.default\extensions\staged\ADFA33FD-16F5-4355-8504-DF4D664CFE83 Registry: Key HKLM\SOFTWARE\ChatZum Toolbar Key HKLM\SOFTWARE\Microsoft\Windows\CurrentVersion\Uninstall\ChatZum Toolbar
Read More
1 2 3 162
Logo
Copyright © 2022, ErrorTools. All Rights Reserved
Trademarks: Microsoft Windows logos are registered trademarks of Microsoft. Disclaimer: ErrorTools.com is not affiliated with Microsoft, nor claim direct affiliation.
The information on this page is provided for information purposes only.
DMCA.com Protection Status