How to Repair Error Code 31

How to Repair Error Code 31

What is Error Code 31?

Device Manager Error Code 31 pops up when Windows prevents the driver for a particular hardware device from loading. The error code 31 is almost always presented in the following format:

“This device is not working properly because Windows cannot load the drivers required for this device.” Code 31

This error can occur with any hardware device; however, in most cases, it occurs with Ethernet cards. The good news is that it belongs in the easy-to-resolve category. So repairing it should not be difficult.

Solution

driverfix boxError Causes

Error code 31 is related to driver problems, and the most common causes include:

  • Outdated drivers
  • Missing drivers
  • Mis-configured drivers
  • Corrupt drivers

Further Information and Manual Repair

To resolve error code 31 on your system, try the methods given below. We have listed down some of the most effective and easy-to-perform DIY methods for fixing Device Manager code 31 on your PC.

Method 1 - Rollback the Driver to its Previous State

This simply means to return the driver back to its previous state - to the version last installed. Try this method to resolve error code 31. This is probably the easiest way to return your PC to its previous working state.

However, by doing so, you will not be able to update your drivers and run new driver versions on your system. In other words, this is a temporary method to fix this issue.

You may still want to try other methods given below to ensure you have the latest drivers installed on your system.

You can roll back the driver to its previous version by accessing the Driver Rollback feature located in the driver settings within the Device Manager. Or another way to perform a rollback is to use the Windows System Restore Utility.

It is a recovery tool built-in the new Windows versions. To access it, simply go to the start menu and type System Restore Utility in the search menu.

Access it and pick a point in the past, also referred to as the restore point, to return your PC to its previous state before the error code 31 occurred.

However, to resolve the problem permanently, try method 2.

Method 2 - Update the Driver

Error code 31, as discussed above, may occur due to outdated, misconfigured, or corrupted drivers. Whatever the reason may be, to ensure the proper functioning of your hardware device, it is important to update the drivers on your system frequently.

To start driver updates, first, it is important to find out and identify problematic drivers. You need to identify the drivers that are corrupt, misconfigured, and outdated. For this, go to the Device Manager and then look for devices with yellow exclamation marks.

The yellow exclamation marks next to the devices show that these device drivers are problematic. Once you’ve identified the problematic drivers, simply update them by finding the latest and compatible versions on the manufacturer’s website.

This process is time-consuming and can be frustrating at times, especially when doing it for the first time.

Also, once you’ve updated the drivers, you need to update them from time to time to ensure they don’t get outdated, or else you will have to encounter Device Manager error codes again.

Method 3 - Download DriverFIX to Update Drivers Automatically

To avoid the hassle and stress involved in updating drivers manually, it is advisable to download and install DriverFIX.

DriverFIX is a smart, innovative, and feature-filled software embedded with an intelligent algorithm that quickly detects problematic drivers, matches them with the latest and compatible versions, and updates them immediately and automatically in just a few seconds and a couple of clicks.

It’s as simple as it can be. Furthermore, with this software installed on your PC, you don’t have to stress and worry about when your drivers need to be updated again.

DriverFIX ensures all drivers are continuously and regularly updated before they become outdated.

Click here to download DriverFIX to repair Device Manager error code 31 and update drivers automatically and regularly.
If you like to learn and find out more about various Windows errors, and how to repair them go to our vast archive or use search to find articles that will explain and help you in solving your issue.
However, if you prefer to do things fast and with automatization then we are proposing to use an automated solution for your issues. The application that we are recommending is Advanced System Repair Pro
Advanced System Repair utilizes multiple tools all in one to give you a quick, simple, reliable, and very thorough diagnosis of your PC. It brings you all the tools you need in one program to clean, fix, protect, optimize and boost your PC!
1-Click Maintenance
All the tools to make it simple and easy! It's like having a professional technician at the click of a mouse.

Junk Cleaner
Keeping your computer free from unnecessary clutter also helps make your computer last longer. Like any other machine, if you keep it clean and take care of it, it will serve you better for longer!

Optimize background apps
Optimize applications background activity with the built-in Application Optimizer feature.

Disk Defrag
With a simple 1-click, Advanced System Repair speeds up your PC by assembling fragmented files on your machine and organizing them more efficiently.

Malware Removal
Finds and removes all types of harmful malware including trojans, worms, bots, adware, spyware, PUPs, and more!

Privacy Cleaner
The all-in-one privacy suite to Clean Your Tracks & Protect Your Privacy! Make your computer safe, secure, and more efficient!

System Tweak/Optimizer
ASR will analyze your complete system and settings to adjust your PC to function at its maximum performance.

Registry Cleaner
Over time, as you install and uninstall applications, the registry can become cluttered with old entries and broken settings which can result in program crashes, and annoying messages and slow the computer down.
Visit our Advanced System Repair Pro Download page to inform yourself about all the benefits of this software and get a free trial copy of it.
advanced system repair pro

Advanced System Repair Pro

One-click automated PC repair solution
ASR logo
With Advanced System Repair Pro you can easily
Replace damaged files
Restore performance
Free disk space
Remove Malware
Protects WEB browser
Remove Viruses
Stop PC freezing
DOWNLOAD
Privacy Policy | Terms of Use | Uinstall
Advanced System Repair Pro is compatible with all versions of Microsoft Windows including Windows 11

Share this article:

You might also like

How to move Taskbar to the left in Windows 11
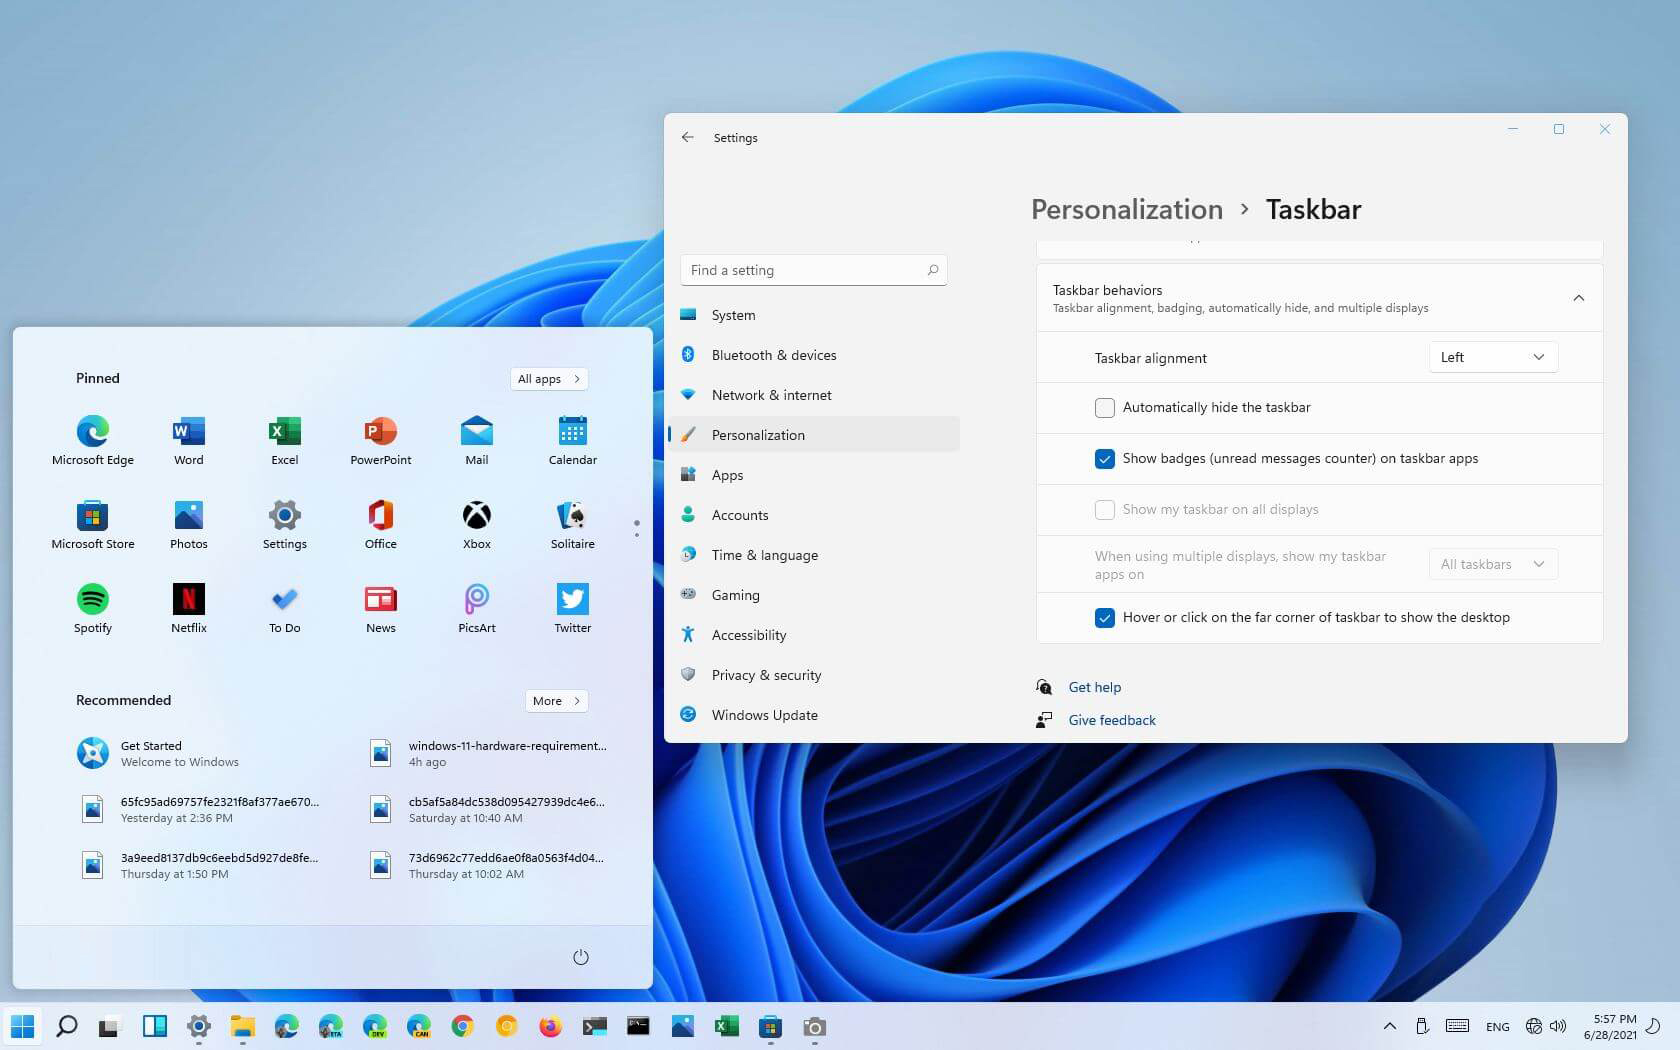
The standard icon place in the Taskbar inside Windows 11 is in the center. Some users welcomed this change, some not so much. If you are part of the user base that is not so much thrilled with this Microsoft’s idea of innovation, do not worry, there is an easy way to move all icons and start button on the left inside Taskbar.

Taskbar icons on leftMoving icons in Taskbar

  1. Open Windows settings by using ⊞ WINDOWS + I key combination
  2. Click on Personalization
  3. Select Taskbar
  4. Click on Taskbar Behaviors
  5. Click on the drop-down menu beside Taskbar Alignment
  6. Select your desired option of icon alignment
  7. Close settings
Your options will be active right away and you will see icons switching to the position of your choosing.
Read More
TitleBar, Minimize, Maximize and Close missing
In case you don’t know, the Title bar comes with the Maximize, Minimize, as well as the Close button. However, there are instances when you might notice that the Title bar, Maximize, Minimize and Close buttons are missing in the File Explorer. This kind of problem might be due to some glitch in the computer, or it could also be caused by some built-in tool or an installed program in your computer. Moreover, there are also other factors that you have to consider such as corruption in the system files as well as errors in the user profile which is generated on a domain network, and so on. There are several suggestions you can check out to fix the problem. You can try to boot your computer in a Clean Boot State to see if a third-party program is the root cause of the problem. You can also try to run built-in tools like System File Checker and the DISM tool. You could also get the video buffer emptied, reset or reinstall the program, or recreate the User Profile.

Option 1 – Put your computer in a Clean Boot State

As pointed out, it is possible that some third-party program or service is the one that’s behind the problem. To isolate this possibility and to identify the culprit, you have to put your computer into a Clean Boot State. To do so, follow the steps below.
  • Log onto your PC as administrator.
  • Type in MSConfig in the Start Search to open the System Configuration utility.
  • From there, go to the General tab and click “Selective startup”.
  • Clear the “Load Startup items” check box and make sure that the “Load System Services” and “Use Original boot configuration” options are checked.
  • Next, click the Services tab and select the “Hide All Microsoft Services” check box.
  • Click Disable all.
  • Click on Apply/OK and restart your PC. (This will put your PC into a Clean Boot State. And configure Windows to use the usual startup, just simply undo the changes.)
  • You need to disable one third-party app after the other to really isolate the issue. And once you’ve narrowed down the problem, you can either disable the third-party app that’s causing the problem or remove it.

Option 2 – Run System File Checker scan

You might also try running the System File Checker or SFC scan to fix the issue. System File Checker is a command utility built into your computer that helps restore corrupted files and missing files. Refer to the following steps to run it:
  • Hit the Win + R keys to launch Run.
  • Type in cmd in the field and tap Enter.
  • After opening Command Prompt, type in sfc /scannow
The command will start a system scan which will take a few whiles before it finishes. Once it’s done, you could get the following results:
  1. Windows Resource Protection did not find any integrity violations.
  2. Windows Resource Protection found corrupt files and successfully repaired them.
  3. Windows Resource Protection found corrupt files but was unable to fix some of them.
  • Restart your computer and see if the System32 folder still pops up at startup or not.

Option 3 – Try running the DISM tool

You can try running the Deployment Imaging and Servicing Management or DISM tool to fix the Windows Upgrade problem. Using this built-in tool, you have various options such as the “/ScanHealth”, “/CheckHealth”, and “/RestoreHealth”.
  • Open the Command Prompt with admin privileges.
  • Then type in the following commands and make sure to hit Enter right after you type each one of them:
    • Dism /Online /Cleanup-Image /CheckHealth
    • Dism /Online /Cleanup-Image /ScanHealth
    • exe /Online /Cleanup-image /Restorehealth
  • Do not close the window if the process takes a while as it will probably take a few minutes to finish.

Option 4 – Try to empty the Vide buffer

These kinds of problems could also be due to bad data in the Video Buffer. Thus, you can try to empty the Video buffer to resolve the problem. All you have to do is tap the Shift + Ctrl + Win key + B keys on your keyboard. After that, leave your computer idle for about 10 seconds until you notice it blink once. Now you try using your computer as usual and see if the glitch is now fixed or not.

Option 5 – Try to reset or reinstall the program

Another thing you can do to fix the issue is to reset or reinstall the program where you encounter the problem. Chances are, you are running the application in the Full-screen mode but you can exit it by simply tapping the Esc or F11 key. However, if nothing changed, then consider resetting or reinstalling the program. Just go to the Windows 10 Settings app and navigate to Apps > Apps & Features. From there, look for the entry of the application you’re having problems with and select it and then click on the Advanced options. After that, click on the Reset button under the Reset section.

Option 6 – Try recreating the User Profile

You might also want to try recreating the User Profile on your computer since some errors in the creation of a User Profile can result in problems like this one. Thus, you have to try deleting the User Profile and then recreate it.
Read More
Infographic: How To Speed Up PC Startup

How To Speed Up PC Startup

A slow PC startup can be pretty annoying. This usually results from various computer issues. If your computer is acting sluggishly, here are four ways to speed up your PC startup.

How-to-Sped-Up-PC-Startup
Read More
0x800701e3, The request failed due ...
A lot of things can go wrong even when you’re only doing some simple operations or tasks on your computer and this is due to the fact that there are various small operations make up in order to perform the larger operations on your computer. So if any of these smaller operations are not properly working, it crashes the operation as a whole and it throws an error code instead. And one of these error codes is Error 0x800701e3. This particular error pops up when an error has occurred in the File Explorer when a transfer is initiated from one disk to another in your Windows 10 computer. When you encounter this error, you will get the following error message:
“Error 0x800701e3: The request failed due to a fatal hardware error.”
There are several methods you can check out to fix this error – you can try to run System Restore or Check Disk or format the destination drive or check the SMART attribute of the drive. For more details, refer to each one of the following options.

Option 1 – Try to run System Restore

Error 0x800701e3 might be due to some adjustments you’ve made in your computer’s settings. Thus, to fix this error, you can try undoing those changes using System Restore. How? Refer to these steps:
  • Tap the Win + R keys to open the Run dialog box.
  • After that, type in “sysdm.cpl” in the field and tap Enter.
  • Next, go to the System Protection tab then click the System Restore button. This will open a new window where you have to select your preferred System Restore point.
  • After that, follow the on-screen instructions to finish the process and then restart your computer and then check if your mouse is now back to its normal state.

Option 2 – Try running the Check Disk utility

You can also run the Check Disk utility in fixing Error 0x800701e3.
  • In the Windows Search box, type “command prompt” and from the search results, right-click on Command Prompt and select “Run as administrator”.
  • After opening Command Prompt, type this command and tap Enter: chkdsk <Partition Letter>: /f /r /x /b
  • The command you entered will start to check for errors and fix them automatically. Else, it will throw an error message saying, “Chkdsk cannot run because the volume is in use by another process. Would you like the schedule this volume to be checked the next time the system restarts? (Y/N)”.
  • Tap the Y key to schedule Disk Check the next time your computer restarts.

Option 3 – Try to format the destination drive

Formatting the destination drive could also help you resolve error 0x800701e3. To format your drive, follow these steps:
  • First, open File Explorer and then right-click on the drive where you encountered the error.
  • Next, select Format from the context menu. This will open a new mini window.
  • Then select the NTFS option from the drop-down menu for the File System menu.
  • After that, check the box labeled as Quick Format.
  • Now click on Start. Keep in mind that doing so will remove all the contents of your storage device.

Option 4 – Verify the hard drive using SMART attributes

In case you don’t know, Windows has a built-in feature of SMART analysis which analyzes the hard drive/SSD and checks all the parameters by performing some minor operations. To use it, follow these steps:
  • Tap the Win + S keys and type “command prompt” in the field then right-click on the related search result and select the “Run as administrator” option.
  • After opening Command Prompt as admin, type the “wmic diskdrive get status” command and hit Enter.
  • You should get a result after that, and if you see that it’s “normal”, proceed to the next option below
Read More
Fix NO_USER_MODE_CONTEXT in Windows
If you have encountered the NO_USER_MODE_CONTEXT Blue Screen error when using your computer, read on as this post will walk you through a couple of suggestions you can try to resolve this Stop error. This kind of Blue Screen error can occur when a program is trying to leverage the use of a system driver but fails to do so. Some of the common causes of this BSOD error are incompatible or corrupted drivers, incorrect configuration of entries in the Registry, damaged memory locations, malware infection, and many more. In addition, this Stop error does not often occur and indicates that an attempt to enter user mode with no context was made. If this is the first time you’ve restarted your computer after you’ve installed additional hardware, you have to remove the hardware and then restart your computer once again and then check the Microsoft Hardware Compatibility List to confirm that the hardware and its drivers are compatible with your operating system. If it doesn’t help, you can check out the given suggestions below to fix the NO_USER_MODE_CONTEXT Blue Screen error in Windows 10.

Option 1 – Try to update or rollback your device drivers

The first thing you can try to fix the NO_USER_MODE_CONTEXT Blue Screen error is to either update or roll back the device drivers. It is most likely that after you updated your Windows computer that your driver also needs a refresh. On the other hand, if you have just updated your device drivers then you need to roll back the drivers to their previous versions. Whichever applies to you, refer to the steps below.
  • Open the Devices Manager from the Win X Menu.
  • Then locate the device drivers and right-click on them to open the Properties. Note that the main drivers that might be the cause behind the NO_USER_MODE_CONTEXT Blue Screen error will be listed under the “ID ATA/ATAPI controllers” section as well as the “Storage controllers” section.
  • After that, switch to the Driver tab and click on the Uninstall Device button.
  • Follow the screen option to completely uninstall it.
  • Finally, restart your computer. It will just reinstall the device drivers automatically.
Note: You can also directly download the relevant drivers of your computer from the manufacturers’ website. So if you have an SSD, the issue might be due to an old storage driver.

Option 2 – Try running System File Checker or SFC scan

System File Checker or SFC is a built-in command utility that helps in restoring corrupted files as well as missing files. It replaces bad and corrupted system files to good system files. To run the SFC command, follow the steps given below.
  • Tap Win + R to launch Run.
  • Type in cmd in the field and tap Enter.
  • After opening Command Prompt, type in sfc /scannow
The command will start a system scan which will take a few whiles before it finishes. Once it’s done, you could get the following results:
  1. Windows Resource Protection did not find any integrity violations.
  2. Windows Resource Protection found corrupt files and successfully repaired them.
  3. Windows Resource Protection found corrupt files but was unable to fix some of them.
 Reboot your PC.

Option 3 – Try running the Memory Diagnostic Tool

The Memory Diagnostic tool in windows can help resolve the NO_USER_MODE_CONTEXT Blue Screen error by checking and automatically fixing any memory-based issues. To run it, refer to these steps:
  • Tap the Win + R keys to open Run and type exe and hit Enter to open the Windows Memory Diagnostic Tool.
  • After that, it will give two options such as:
    • Restart now and check for problems (Recommended)
    • Check for problems the next time I start my computer
  • Once your computer has restarted, perform a basic scan or you could also go for the “Advanced” options such as “Test mix” or “Pass count”. Simply tap the F10 key to start the test.
Note: After you select your preferred option, your computer will restart and check for memory-based issues. If it finds any issues, it will automatically fix them.

Option 4 – Perform System Restore

  • First, tap the Win + R keys to open the Run dialog box.
  • After that, type in “sysdm.cpl” in the field and tap Enter.
  • Next, go to the System Protection tab then click the System Restore button. This will open a new window where you have to select your preferred System Restore point.
  • After that, follow the on-screen instructions to finish the process and then restart your computer and check if the problem is fixed or not.

Option 5 – Run the Blue Screen Troubleshooter

Troubleshooting Blue Screen of Death errors wouldn’t be complete without the Blue Screen troubleshooter. As you know, it is a built-in tool in Windows 10 that helps users in fixing BSOD errors like NO_USER_MODE_CONTEXT. It can be found on the Settings Troubleshooters page. To use it, refer to these steps:
  • Tap the Win + I keys to open the Settings panel.
  • Then go to Update & Security > Troubleshoot.
  • From there, look for the option called “Blue Screen” on your right-hand side and then click the “Run the troubleshooter” button to run the Blue Screen Troubleshooter and then follow the next on-screen options. Note that you might have to boot your PC into Safe Mode.
Read More
USB Security key is not working on Windows
As you know, the USB security keys are a secure medium to validate a lot of components in a computer. They can be used to log in to Windows 10. Now with the advancement of APIs, you can authenticate across the website as well using the same key. However, there are times when it may not work and it could be caused by several factors. It could be due to corrupted or incompatible drivers or it could also be due to compromised integrity of the key, and many more. So if you happen to encounter an issue with the USB security key on your Windows 10 computer, then there are several potential fixes you can try. You can try toggling the Internet Options settings or reinstall the respective USB drivers. You could also try changing the PIN of the security key or disable the antivirus program on your computer or troubleshoot the web browser. Refer to the potential fixes provided below to fix the problem.

Option 1 – Try to toggle the settings of the Internet Options

  • In the Windows Search box, search for Internet Options to open it.
  • Next, go to the Security tab and drag the security slider to the lowest possible security for all the given zones.
  • After that, click on OK to save the changes made and close the Internet Options.
Note that this option is only a temporary measure as it can make your computer vulnerable. Make sure to press the Reset all zones to default level button.

Option 2 – Try to update or reinstall the respective drivers

If updating the drivers of the device did not fix the problem with the USB security key, you can try to update or reinstall the Universal Serial Bus Controller drivers instead of using the Device Manager. Refer to the following steps:
  • First, click the Start button and type “device manager”.
  • Then click on the “Device Manager” from the search results to open it.
  • From there, look for the “Universal Serial Bus controllers” option and then right-click on each one of the USB drivers and select the Update Driver from the menu.
Note: If it is a regular USB drive, then it will be listed as a USB Mass Storage Device but if you have a USB 3.0 device, then look for a USB 3.0 Extensible Host Controller.
  • Restart your PC and then click the “Search automatically for updated driver software” option.
Note: If updating the USB Controller drivers didn’t work, you can try to reinstall them instead.

Option 3 – Try to change the PIN of the security key

If the first two options didn’t work, you can try changing the PIN of the security key. There are instances when the PIN for the security key might have been corrupted. Thus, resetting it can help you resolve the problem.

Option 4 – Temporarily disable Firewall and third-party antivirus

Firewall and antivirus programs are known to block the proper functioning of the USB security key. Thus, your antivirus or firewall programs might be the reason why you can’t download anything on your Windows 10 computer. To isolate the issue, you need to temporarily disable both the Firewall and antivirus programs and then check if you can now download anything from the internet. Do not forget to enable them again as disabling them can leave your computer vulnerable to cyber threats.

Option 5 – Try to troubleshoot the web browser

Troubleshooting your web browser can also help you fix the USB security key problem. You can do that by checking if your web browser supports the security key and you can do that by checking on the official website of your browser. You can also try to update your web browser to its latest version but if it didn’t help, you can try to reinstall it or switch to another web browser.
Read More
How to Fix REGISTRY_ERROR in Windows
As you know, you can encounter Blue Screen errors at any given point after your computer boots up and can just reboot it randomly which results in loss of unsaved work. One of these Blue Screen errors is the “REGISTRY_ERROR”. This kind of Stop error has a bug check value of 0x00000051 which indicates your computer’s registry has encountered a severe error. There could be a number of causes for this error but at the time of writing, it is quite difficult to narrow them down to one component. If you face this kind of Blue Screen error, worry not as this post will guide you in fixing it. As mentioned, this error indicates that there is something wrong with the registry, particularly an I/O error while it tried to read one of its files. This may be caused by hardware issues or file system corruption. It could also be due to failure in a refresh operation which is only used by the security system and only when resource limits are encountered. To fix the Registry_Error Blue Screen, you can try to use the CHKDSK utility or the System File Checker, or the DISM tool or run the Blue Screen troubleshooter. You may also try to reset your computer or repair Windows by using installation media.

Option 1 – Run the Check Disk utility

The first thing you can do to fix the REGISTRY_ERROR Blue Screen error is to run the Check Disk utility. How? Follow these steps:
  • In the Windows Search box, type “command prompt” and from the search results, right-click on Command Prompt and select “Run as administrator”.
  • After opening Command Prompt, type this command and tap Enter: chkdsk <Drive Letter>: /f /r /x /b
  • The command you entered will start to check for errors and fix them automatically. Else, it will throw an error message saying, “Chkdsk cannot run because the volume is in use by another process. Would you like the schedule this volume to be checked the next time the system restarts? (Y/N)”.
  • Tap the Y key to schedule Disk Check the next time your computer restarts.

Option 2 – Run the Blue Screen Troubleshooter

The Blue Screen troubleshooter is a built-in tool in Windows 10 that helps users in fixing BSOD errors like REGISTRY_ERROR. It can be found in the Settings Troubleshooters page. To use it, refer to these steps:
  • Tap the Win + I keys to open the Settings panel.
  • Then go to Update & Security > Troubleshoot.
  • From there, look for the option called “Blue Screen” on your right-hand side and then click the “Run the troubleshooter” button to run the Blue Screen Troubleshooter and then follow the next on-screen options. Note that you might have to boot your PC into Safe Mode.

Option 3 – Run System File Checker

  • Open Command Prompt with admin privileges.
  • After that, execute this command: sfc /scannow
  • Once the scan is completed, restart your computer and then check if the REGISTRY_ERROR is now fixed.

Option 4 – Run the DISM tool

You can try running the Deployment Imaging and Servicing Management or DISM tool to fix the REGISTRY_ERROR Blue Screen error. Using this built-in tool, you have various options such as the “/ScanHealth”, “/CheckHealth”, and “/RestoreHealth”.
  • Open the Command Prompt with admin privileges.
  • Then type in the following commands and make sure to hit Enter right after you type each one of them:
    • Dism /Online /Cleanup-Image /CheckHealth
    • Dism /Online /Cleanup-Image /ScanHealth
    • exe /Online /Cleanup-image /Restorehealth
  • Do not close the window if the process takes a while as it will probably take a few minutes to finish. Once it’s done, restart your computer.

Option 5 – Reset your computer

  • Tap the Win key or click on the Start button located in the Taskbar.
  • Then click on the Power button at the bottom right portion of the screen.
  • Next, press and hold the Shift key on your keyboard and then click on Restart. This will restart your Pc into the Advanced Startup options.
Note: Once you have access to the Advanced Startup options, you have to go to the setting which allows you to Reset your Windows 10 PC. All you have to do is select Troubleshoot > Reset this PC to reach the following screen Afterward, select either the “Keep my files” option and then proceed to the next on-screen instructions that follow to reset your Windows 10 computer without losing your files.

Option 6 – Try to perform repair install by creating a Windows 10 installation media

  • Click this link and then click the Download Tool Now button.
  • Next, click the “Use the tool to create installation media (USB flash drive, DVD, or ISO file)…” option and follow the next given instructions on the screen.
  • Now select the ISO file option in step 5.
  • After that, you should now have an ISO file.
  • Next, go to the location where you’ve downloaded the ISO file.
  • Then right-click on the Windows 10 ISO file and select the Open with option and then select File Explorer.
  • Now click on “setup.exe” and follow the next instructions that appear on the screen. When asked, you have to select either Nothing (clean install) or Keep personal files only option. Take note that you must not select the “Keep personal files, apps, and Windows settings”.
Read More
DirectX encountered an unrecoverable error
DirectX encountered unrecoverable error usually face gamers when they try to star certain game. In this guide, we will help you to get over it and solve the issue. Follow steps in this guide one after another since they go from most simple ones to complex ones so following is advised in order not to waste a ton of time and resources doing wrong tasks.
  1. Check your game page and your DirectX

    The first and most common thing that can cause this type of error is when your installed DirectX is not the same version that the game requires. Check the game store page to see system requirements and write down which DirectX version it requires in order to run. Then press ⊞ WINDOWS + R to bring run dialog and type in it DXDIAG and press ENTER DX diagnostic window will pop up and at the bottom, you can find which DirectX version is installed on your system. If versions are different, install the required DirectX version and run the game.
  2. Update or reinstall GPU drivers

    DirectX can get corrupted via bad driver update, in order to fix this, reinstall or update your Graphic drivers to the latest version from the official manufacturers' website.
  3. Set custom scaling to 100

    Go into Windows settings and set custom Display scaling to a value of 100, sign out, and then sign back in.
  4. Delete registry key

    Note that you should do this as the last option and be very careful since you can crash whole Windows in this way. Press ⊞ WINDOWS + R to open the run dialog and type RegEdit in it to open the registry editor. Find this key: ComputerHKEY_CLASSES_ROOTPROTOCOLSFiltertext/XML and delete it from the registry, you might want to do a backup of the registry first, just in case.
  5. Use dedicated error fix tool

    use error fixing tools like RESTORO and fix all of your issues with one simple click.
Read More
An Easy Guide to Resolving Code 18

An Easy Guide to Resolving Error Code 18

Code 18 - What is it?

Code 18 is a typical Device Manager error code that occurs when the device driver is damaged. Device Manager is an important tool that allows Windows PC users to have an overall look at the connected hardware.

Furthermore, it also allows diagnostic testing. It is vital too and errors associated with the Device Manager such as error code 18 should and must be resolved quickly.

Error code 18 is usually presented in the following formats:

“The drivers for this device are not installed. (Code 18)” Or “Reinstall the drivers for this device.”

Solution

driverfix boxError Causes

Error code 18 may be triggered due to several reasons such as:

  • Outdated drivers
  • Corrupted drivers
  • Improperly configured drivers

Error code 18 may cause a great deal of inconvenience. It may hamper your ability to use certain devices on your PC.

For example, if code 18 pops up due to a corrupted or improperly configured keyboard driver, then it may hamper your ability to use your keyboard and work on your PC.

Further Information and Manual Repair

The good news is that Device Manager error codes like error code 18 are easy to resolve. Below are some of the easiest and effective methods to repair error code 18 on your PC. Try one of these methods to repair error code 18 in no time:

Method 1 - Uninstall and Reinstall Device Drivers

One of the easiest ways to repair error code 18 and to ensure that this error doesn’t pop up on your PC again is to uninstall the problematic driver. For this, simply:

  • Go to the start menu
  • Type Device Manager and press enter
  • Now click on the device whose driver you want to uninstall.
  • Press right-click and then click on uninstall. Windows will prompt you to confirm the removal of the driver.
  • Click OK to confirm and then reboot your PC to activate changes.
  • Now scan for new hardware and follow the same process to reinstall the uninstalled device driver.

Method 2 - Update Drivers Automatically

Finding problematic drivers and then updating them individually can be frustrating and a time-consuming process. It can take a lot of time to perform updates and resolve the error code on your PC.

If you have projects to work on with pressing deadlines, then updating drivers on your PC separately can cause you a great deal of inconvenience and waste your precious time.

However, to avoid this situation, we advise you to set your drivers to update automatically. Automatic update installation requires only a few seconds.

And to update drivers automatically, it is recommended you download DriverFIX.

As the name suggests, this software is designed to assist programmers to upgrade device drivers automatically. In just a few clicks, you can update all your outdated drivers and repair error code 18.

DriverFIX is easy to use and an advanced program that is smoothly integrated with an intelligent programming system. This system identifies and detects all the problematic drivers on your PC and then updates each driver automatically to their latest versions.

It continues to update drivers regularly ensuring that you never come across device driver problems on your system.

Click here to download DriverFIX and repair error code 18 today!

Read More
Fix UNEXPECTED STORE EXCEPTION in Windows 10
Blue Screen of Death or Stop errors are definitely one of the most difficult issues to face in your Windows computer. One of them is the UNEXPECTED STORE EXCEPTION BSOD error. When you encounter this Stop error on your Windows 10 computer, this means that the store component has caught an unexpected exception. There are many potential causes for this error, but we’ve narrowed it down to a few specific causes – for one, this error could be caused by your antivirus program installed on your computer, two, it could also be caused by outdated hardware drivers on your computer, it could also be an error in the file system as well as some issue with the lock screen app, or even output to an unexpected port. Whichever the cause may be, you can use a couple of fixes laid out below. Make sure to carefully follow them.

Option 1 – Try to update your Display driver

  • First, boot your computer into Safe Mode.
  • After that, tap the Win + R keys to launch Run.
  • Type in devmgmt.msc into the box and tap Enter or click OK to open the Device Manager.
  • After that, a list of device drivers will be displayed. From there, look for the Display Adapters and click on them.
  • After that, right-click on each entry under the Display Adapters and select the “Uninstall Device” option from the menu.
  • Now restart your computer.
  • After restarting your computer, go to the Settings app and Check for Updates in the Windows Update section.
Note: You also have the option to go directly to the website of your graphics card manufacturers like NVIDIA, Intel, or AMD and go to the section called Drivers then check if there’s a new available update – if there is, download and install it.

Option 2 – Run both the System File Checker scan and DISM tool

If the problem is caused by corrupted system files, then you can use both the System File Checker and the DISM tool. To use them, follow the instructions below.
  • Tap the Win + X keys or right-click on the Start button and click the “Command Prompt (Admin)” option. Alternatively, you can also search for “cmd” in the Cortana search box and right-click on Command Prompt from the search results, and select the “Run as administrator” option.
  • After that, if a User Account Control prompt pops up, click on Yes to proceed.
  • Once the Command Prompt window is pulled up, type the following command and hit Enter:
DISM.exe /Online /Cleanup-image /Restorehealth
  • Wait for the process to be completed. Once it’s done, type the following command and hit Enter:
sfc /scannow
  • The command will start a system scan which will take a few whiles before it finishes. Once it’s done, you could get the following results:
  1. Windows Resource Protection did not find any integrity violations.
  2. Windows Resource Protection found corrupt files and successfully repaired them.
  3. Windows Resource Protection found corrupt files but was unable to fix some of them.
  • Restart your PC.
Note: You should see the “Windows Resource Protection found corrupt files and successfully repaired them. Details are included in the CBS.Log %WinDir%LogsCBSCBS.log” message on your screen. On the other hand, if you see the “Windows Resource Protection found corrupt files but was unable to fix some of them. Details are included in the CBS.Log %WinDir%LogsCBSCBS.log” message instead, then you should run the following command in Command Prompt:
findstr /c:"[SR]" %windir%LogsCBSCBS.log >"%userprofile%Desktopsfclogs.txt"
The command you entered will open up the logs on your Desktop where you can look for files that are causing the error on your computer manually.

Option 3 – Disable Fast Start-up

If you want your computer to boot faster, then you might have enabled Fast Start-up. This feature is ideal for computers that are using a hard disk drive. However, turning on this feature also means that when the computer boots, it might lag some drivers that are loaded when it initially boots up. Thus, it might be the potential cause of the UNEXPECTED STORE EXCEPTION BSOD error. Thus, you need to disable Fast Start-up. To do that, follow these steps:
  • Boot your PC into Safe Mode.
  • Then tap the Win + R keys to open the Run dialog box.
  • Next, type in “control” to open Control Panel.
  • After that, select Hardware and Sound and click on Power Options.
  • Select “Choose what the power buttons do” from the left side menu pane and click on Change settings that are currently unavailable.
  • Afterward, uncheck the “Turn on fast startup (Recommended)” entry and click on Save Changes.
  • Now restart your PC for the changes to take effect and then check if the problem’s fixed afterward.

Option 4 – Try to run the Chkdsk utility

You can also run the Chkdsk utility to resolve the UNEXPECTED STORE EXCEPTION BSOD error. If your hard drive has issues with integrity, the update will really fail as the system will think that it’s not healthy and that’s where the Chkdsk utility comes in. The Chkdsk utility repairs hard drive errors that might be causing the problem.
  • Open Command Prompt with admin privileges.
  • After opening Command Prompt, execute the following command and hit Enter:
chkdsk /f /r
  • Wait for the process to be completed and then restart your computer.
Read More
1 2 3 162
Logo
Copyright © 2022, ErrorTools. All Rights Reserved
Trademarks: Microsoft Windows logos are registered trademarks of Microsoft. Disclaimer: ErrorTools.com is not affiliated with Microsoft, nor claim direct affiliation.
The information on this page is provided for information purposes only.
DMCA.com Protection Status