How to Fix Error Code HPQTRA08.exe

How to Fix Error Code HPQTRA08.exe

HPQTRA08.exe - What is it?

HPQTRA08.exe (Hewlett Packard Tray 08) is the Hewlett Packard Digital Imaging Monitor task. It is installed with the drivers of HP imaging products like PhotoSmart Printers.

It incessantly monitors and indicates the connectivity status with any recognizable HP product.

Simply put, HPQTRA08.exe is an exe (executable) file that contains step-by-step instructions that a computer follows to carry out a function.

HPQTRA08.exe error code is displayed in any of the following formats:

  • "Hpqtra08.exe Application Error."
  • "Cannot find hpqtra08.exe."
  • "Hpqtra08.exe not found."
  • "Error starting program: hpqtra08.exe."
  • "Hpqtra08.exe is not a valid Win32 application."
  • "Hpqtra08.exe failed."
  • "Faulting Application Path: hpqtra08.exe."
  • "Hpqtra08.exe has encountered a problem and needs to close. We are sorry for the inconvenience."
  • "Hpqtra08.exe is not running."

Solution

Restoro box imageError Causes

Error code HPQTRA08.exe can be triggered for several reasons. However, some of the most common causes include:

  • Corrupt Windows registry keys
  • Virus infection
  • Deleted, damaged, or corrupted HPQTRA08.exe file
  • HPQTRA08.exe file conflict
  • Corrupt or incomplete installation of Hp Digital Imaging

It is advisable to repair the error code HPQTRA08.exe on your PC immediately. Delays can lead to serious problems especially if the underlying cause of the error is related to registry corruption.

Further Information and Manual Repair

To resolve this error on your PC, you don’t need to hire a professional and pay hundreds of dollars for the repair. Simply try the DIY methods listed below to fix the problem right away.

Method 1 - Download and Install HPQTRA08.exe File

If the error cause is related to deleted, corrupted, or damaged HPQTRA08.exe file, then the best way to fix the problem is to install the HPQTRA08.exe file on your PC.

However, first, make sure the site you select to download the file from is reliable and trusted.

By downloading from an unreliable website you can expose your PC to potential malicious programs and risk your data security.

Method 2 - Remove all Viruses

Sometimes viruses and malware tend to disguise in the form of exe files such as the HPQTRA08.exe file.

In such a situation scan your entire PC for viruses and malware using a powerful antivirus. Remove all the malicious programs found to fix the issue.

Method 3 - Clean and Repair the Registry

The registry saves all PC-related activities and information including both important and obsolete files such as cookies, bad registry entries, invalid keys, internet history, and junk files.

If these files are not removed from the registry frequently, these accumulate in the registry and corrupt thereby triggering error codes. Error code HPQTRA08.exe is generated when the corrupt Windows registry keys are associated with the HPQTRA08.exe file.

To resolve, clean the registry and repair it. Although this can be done manually it can be time-consuming and tricky especially if you are not technically sound, therefore it is advisable to download Restoro.

Click here to download Restoro and resolve error HPQTRA08.exe.

Method 4 - Locate and Install the Driver

As was pointed out, you might need to reinstall the printer driver again. Using DriverFIX, you’ll be able to automatically update your computer system and install the drivers your computer needs to operate smoothly.

If you like to learn and find out more about various Windows errors, and how to repair them go to our vast archive or use search to find articles that will explain and help you in solving your issue.
However, if you prefer to do things fast and with automatization then we are proposing to use an automated solution for your issues. The application that we are recommending is Advanced System Repair Pro
Advanced System Repair utilizes multiple tools all in one to give you a quick, simple, reliable, and very thorough diagnosis of your PC. It brings you all the tools you need in one program to clean, fix, protect, optimize and boost your PC!
1-Click Maintenance
All the tools to make it simple and easy! It's like having a professional technician at the click of a mouse.

Junk Cleaner
Keeping your computer free from unnecessary clutter also helps make your computer last longer. Like any other machine, if you keep it clean and take care of it, it will serve you better for longer!

Optimize background apps
Optimize applications background activity with the built-in Application Optimizer feature.

Disk Defrag
With a simple 1-click, Advanced System Repair speeds up your PC by assembling fragmented files on your machine and organizing them more efficiently.

Malware Removal
Finds and removes all types of harmful malware including trojans, worms, bots, adware, spyware, PUPs, and more!

Privacy Cleaner
The all-in-one privacy suite to Clean Your Tracks & Protect Your Privacy! Make your computer safe, secure, and more efficient!

System Tweak/Optimizer
ASR will analyze your complete system and settings to adjust your PC to function at its maximum performance.

Registry Cleaner
Over time, as you install and uninstall applications, the registry can become cluttered with old entries and broken settings which can result in program crashes, and annoying messages and slow the computer down.
Visit our Advanced System Repair Pro Download page to inform yourself about all the benefits of this software and get a free trial copy of it.
advanced system repair pro

Advanced System Repair Pro

One-click automated PC repair solution
ASR logo
With Advanced System Repair Pro you can easily
Replace damaged files
Restore performance
Free disk space
Remove Malware
Protects WEB browser
Remove Viruses
Stop PC freezing
DOWNLOAD
Privacy Policy | Terms of Use | Uinstall
Advanced System Repair Pro is compatible with all versions of Microsoft Windows including Windows 11

Share this article:

You might also like

Should you buy used GPU in current market?
Things have stirred lately with Chinas ban on crypto mining and many used GPUs will flow the market probably. But should you buy a used GPU? Short answer: NO, long answer: keep on reading to find out why.

GPU 1080tiGPU shortage and its cause

As you all know by now, we live sadly in a world struck by a global Pandemic. Due to this awful disease and measures taken against it, many people are either working from home or are at home making the manufacturing of new chips problematic while demand on the market has raised. Throw into that mix crypto mining which has raised in popularity and you have, well today's market where we have GPU shortage. Now with the latest news that China has banned the mining of cryptocurrency, there is to be expected that at some point in time mining cards used there will fit the market in the whole world. Sadly even with a large quantity of GPUs that will become available, the overall price of cards will not be much lowered I am afraid since demand is still very high and many people would not want to purchase used mining cards and neither should you.

Be prepared for the worst scenario

Although this sounds very pessimistic and in most cases, it will not turn out to be true, you should always prepare yourself mentally that you might be in that lower percentage that will end up with a really bad GPU. What has come up to be absolutely true when considering GPU that were mining is that if anything at all can be done to GPU in order to increase performance, it has been done. Miners want to optimize and almost every GPU if could be overclocked, it was overclocked. Extensive mining also means that thermal paste has been dried and it is pretty useless at this point and there is a very high chance that fans and heat sinks will need much cleaning or even replacement raising the price of the card itself for mentioned paste, fans, and heat sinks. There's no way to tell what the previous owner might have done with a graphics card when you're shopping online, so our advice is to assume the worst. Don't trust the seller to give truthful information. Any listing that says it was "never used for mining" at this point is probably a lie.

Age of the GPU matters

Date when GPU itself has manufactured really matters. Newer cards even if used extensively have been used for a much shorter period of time and are not so damaged were ones produced a few years ago have seen a lot of action. Let’s say that you get RTX 3060, In the worst-case scenario it has been mining since late February of 2021 and basically, it is still under warranty so it should behave OK and put some good work in gaming even in that state. On another hand, if we take for example GTX 1080Ti which is 4 years old GPU things start to change drastically. 4 years GPU could be worn out even if it was used just for extensive gaming sessions let alone for mining.

No return policy and seller rating

Most of the time you will run into a product that cannot be returned or no refunds policy. This should bring a red flag right away and deter you from purchase. Sellers with the highest ratings are more trustworthy since many of them will not want to destroy their reputation but these will probably not even have these kinds of merchandise in their store. Buying with a poor rating seller and no return policy on a product is just asking for trouble. And although some stores do have arbitration and will stand on the customer side there is no guarantee for that and it will take too much time to process.

If you really must buy a second-hand GPU

Of course in these troubled times sometimes due to malfunction or any other reason, there would not be another choice than to buy a second-hand GPU. In this case, if there is no other option consider sellers with many positive ratings. If you can buy locally that would even be better or the best-case scenario would be if you could visually see and inspect GPU itself in order to see in what state it is. Look for warranty stickers to see if they are thorn and the card has been tampered with. Also take a good look at screws, if they have scratches card has been opened, probably to replace fan or heating sinks which means that it has worked a lot.

Conclusion

It is very difficult to give the best possible advice on this situation since of GPU shortage, but I would much prefer a new GPU with lower performance than a hi-performance one which was mining.
Read More
Fix Broadcom BCM20702A0 driver error
In recent times, some Windows 10 users have seen an error code BCM20702A0, when using Bluetooth and they are concerned as to what it is all about. We can say for certain that it has something to do with your Bluetooth driver. The error message in question is:
The drivers for this device are not installed. There are no compatible drivers for this device.
The problem here tends to no longer allow specific Bluetooth components to properly communicate with your Windows 10 operating system. It also affects laptops that do not have native Bluetooth support; therefore, the manufacturer installed a dongle on the inside to deliver the service. This is not the best way to do things because native support is always better. On the other hand, maybe you’re using a Broadcom USB Bluetooth dongle that is acting up, and as such, the error is showing. Below are solutions provided for this particular error and how to eliminate it.
  1. Run the Bluetooth Troubleshooter

    Press ⊞ WINDOWS to open the menu and select settings In settings choose Update & Security Go to troubleshoot and on the right panel click on additional troubleshooters Click on Bluetooth Select Run the troubleshooter, then sit back and allow the tool to do its thing. Once you’ve completed the task, click on Apply this fix if any repairs are needed Reboot your computer
  2. Install Broadcom driver from official website

    Windows drivers for Broadcom Bluetooth devices are no longer posted on their website. They should be available through Microsoft’s Windows Update service. If drivers were not downloaded automatically by Windows Update, use Device Manager to refresh the driver from Windows Update. However, the Broadcom Bluetooth drivers seem to be available here on the Lenovo website. To fix the BCM20702A0 driver error, you may download and install them. After downloading it, right-click on the downloaded item, and select Run as administrator. After installation, restart your computer, then check again if it works.
  3. Remove all Bluetooth drivers and USB controllers

    If previous solutions did not work, go to device manager and remove all Bluetooth devices along with all USB controllers. Reboot your computer and Windows will automatically reinstall and set all devices.
Read More
A Quick Guide to Resolving IRQL_NOT_LESS_OR_EQUAL Error

Fixing IRQL_NOT_LESS_OR_EQUAL Error

IRQL_NOT_LESS_OR_EQUAL - What is it?

IRQL_NOT_LESS_OR_EQUAL error is a type of blue screen of death (BSoD) error. It is a typical Windows PC error that occurs even in the latest Windows versions. The IRQL_NOT_LESS_OR_EQUAL error occurs on the computer screen when a memory address triggers unauthorized access. This leads to the suspension of your login session. The computer screen turns blue.

Solution

Restoro box imageError Causes

IRQL_NOT_LESS_OR_EQUAL error occurs due to several reasons. However, the most common causes for this error code include:
  • Incompatible device drivers
  • The poor device driver installation
  • Faulty hardware
  • Disk fragmentation
  • Registry issues
  • Viruses and malware attack
Blue screen of death error codes like IRQL_NOT_LESS_OR_EQUAL is critical. If not resolved timely, this error code can pose serious threats to your PC. It can lead to system crash and failure, due to which you can also lose your valuable data stored in your system. How to Fix IRQL_NOT_LESS_OR_EQUAL Error Code?

Further Information and Manual Repair

Here are some of the best and easy DIY methods to resolve this error code on your PC:

1. Roll Back Drivers

If the underlying cause of IRQL_NOT_LESS_OR_EQUAL error is poor driver installation, then try this method to resolve the issue. This can be done by simply clicking the start menu. Once you click on it, go to the control panel, then double click the system icon and locate the System Properties window. After that, click the hardware tab and then the device manager button. Now locate the device you recently installed. Double click on the recently installed device driver, click the driver tab, and then the rollback driver button. This will take a while, so wait for the process to finish.  After that, reboot the system.

2. Run Hardware Diagnostic

The IRQL error may also be triggered by faulty hardware. To identify which hardware is causing the error to pop up, you will have to run a hardware diagnostic.
  • For this, go to the start menu, type Memory Diagnostic in the search bar.
  • Now access this tool and click on Diagnose your memory problems. As you click it, it will ask you to perform the check by either restarting the PC immediately or on the next restart.
  • Select the immediate one to get going. The system will carry a scan on the memory and show you the list of problematic errors detected during the scan. To resolve this error then all you have to do is replace the piece of faulty hardware.
Nonetheless, if no faulty hardware is detected, this means the error is related to memory. If so, try method 3 to resolve.

3. Disable Memory Caching

To fix the IRQL_NOT_LESS_OR_EQUAL error, try disabling the memory caching option. This is called BIOS memory caching. This can be done by restarting your PC and pressing the BIOS setup keys to enter the settings screen. Mostly it is an F2 key, however, it may be different in some computers as the motherboards of different makes have their own respective keys. Once you enter the BIOS settings look for options stating memory settings. Access these options and disable the memory caching feature.

4. Scan your PC for Malware

As mentioned above this error message can also result due to the intrusion of malicious software like malware, viruses, and spyware. To detect and remove them from your PC, download an antivirus and perform a system scan. Remove the detected viruses and malware to resolve. Please note, antivirus installation may lower the speed of your PC.

5.  Repair Registry and Fragmented Disk

Due to poor PC maintenance, you may experience registry issues. The registry stores all the activities performed on the PC including the unnecessary pieces of information like junk files, internet history, temporary files, cookies, and other flies. Such files take up a lot of disk space. When there is not much space on the storage device, the new data is saved in fragments. This is called disk fragmentation. When this file becomes fragmented it takes time to rearrange the data and reunite it to run the fragmented file on your PC. If not resolved, this leads to registry issues and thereby generating various PC error codes including IRQL_NOT_LESS_OR_EQUAL errors. The best way to clean the registry and repair the fragmented disk is to download Restoro. This is an advanced and multi-functional PC Fixer. It is embedded with multiple system repair utilities including a powerful registry cleaner that detects all registry issues in seconds, removes and wipes out unnecessary files cluttering the registry, cleans and repairs the registry and the damaged files. Other utilities include an antivirus that detects privacy errors and all types of malicious software infecting your system. It also functions as a system optimizer which means by running this software on your PC you won’t be compromising on your system’s performance. The system optimizer utility boosts the speed of your PC. This tool is safe and efficient. It has a user-friendly interface and is compatible with all Windows versions. Click here to download Restoro and resolve the IRQL_NOT_LESS_OR_EQUAL error code right away.
Read More
Malware Guide: How to Remove Solimba

How to Easily remove Solimba from your system

What is Solimba?

Solimba is a bundled executable program. It was created to be launched as a promotional tool to get advertisements loaded on a user’s system, upon installation. As a bundle, Solimba offers installation of various programs, with the objective of promoting various products and services. It utilizes unethical techniques, as in the case with adware tactics to influence or for want of a better word, hijack an Internet Browser to affect a website’s result on a search results page. In this assessment, Solimba distributed ads on Internet Explorer, Chrome, and Mozilla browsers, by hijacking various Internet Browsers to change the user's experience. (Images are shown below) Technical details about Solimba PUP include:
Digital Signature:  POPELER SYSTEM, S.L. Entry Point:   0x0000C1DC

Assessment of Solimba Potentially Unwanted Program

Solimba PUP is all about the ads. Once this executable is installed, it penetrates your computer system and sends ads all over your Internet Browser – Chrome, Internet Explorer, Mozilla Firefox, and the likes. For this assessment of Solimba.exe PUP, two installations were carried through. In layman's terms, I actually installed Solimba on two occasions to decipher the true nature of the PUP. It was shocking to find that both installations revealed different bundled programs and advertisements. In the first instance (as shown below), Solimba proved more aggressive in featuring ads for revenue advancements.
 Solimba employed aggressive advertising techniques
It’s important to note that hijacked results resulting from the installation of Solimba. This affected the results of the website on the Internet browser to boost its ranking, even without the use of a search engine. The advertisement displayed on the Internet Explorer search page routes the user to a software installation website. The utility tool in question was a “Windows 8.1 PC Repair” tool used to identify threats present on the Windows 8.1 OS.Advertisement shown on Chrome after Solimba Installation The advertisement displayed on the Chrome Browser search page routes the user to a health and beauty magazine website. This site advocates health and beauty, especially issues concerning weight loss. Several ads were visible on-site, displaying products to assist people in losing weight. During my installation of Solimba, the installation wizard underscored that four programs would be downloaded. These programs included N8Fanclub.com_KinoniRemoteDesktop, Lolliscan, PaceItUp, and SearchProtect. Interestingly, only two programs from the list were apparent or obvious. An N8Fanclub.com_KinoniRemoteDesktop file was made on the Desktop and SearchProtect was seen in “All Programs”, along with files stored on the computer’s Local Drive. The other programs that were “supposedly” installed remained concealed. A test was done to determine whether these were counted as extensions or add-ons to the varying web browsers but nothing was found on any of the tested browsers – Google Chrome, Internet Explorer, and Mozilla Firefox.

Description of 4 Installed Files

N8Fanclub.com_KinoniRemoteDesktop

When this file was initially found on the Desktop, a rootkit came to mind. A rootkit was used as a means to an end. Whoever was on the receiving end of this unwanted file would be able to connect to an infiltrated system without the knowledge of the user. After running the file to determine its behavior, nothing much happened. A message appeared indicating that the software couldn’t execute on the computer. That was pretty tricky since, to begin with, I didn’t place that specific file on the desktop but it came along with the territory and so I had to accept it. Further research online into N8Fanclub.com_KinoniRemoteDesktop proved very rewarding. A search of the entire file name was not able to do the trick so I had to do research on both terms separately. After landing on N8Fanclub.com, I was nicely asked to disable my adblocker. There seemed nothing harmful about the site. However, due to the fact that it was not what I initially installed, the program was an unwanted program. That’s exactly what Solimba does. It installs several other programs that were not requested by the user in an attempt to make money from advertising. The mere fact that this program got installed meant that it was to promote an online service.

KinoniRemoteDesktop

was a separate program. It was combined with N8Fanclub as a way to allow users to use their PC computer “as if they were sitting in front of it.” A user would be able to make use of a full web browser, watch Flash videos, play games, and even use office applications. This would be done from the user’s Nokia device. This is an advertisement at its best.

Lolliscan

This program did not allow me to see much since it didn’t leave a physical trace behind. However, during the installation, Lolliscan was listed as one of the four programs that would be installed. Overall, Lolliscan supposedly should be able to save people money since this form of the ad focuses on showing coupons when visiting sites such as Amazon. While this seems like a good deal, this ad will invade your personal space and distribute pop-ups at the most inopportune times.

PaceItUp

As the name states, PaceItUp is software added to a browser with the intent to speed your computer. Quite the contrary, PaceItUp does the total opposite since it installs bundled programs that slow down a computer system. PaceItUp is also known for displaying ads and tracking what the user does on his/her computer system.

SearchProtect

It’s known for hijacking your computer’s homepage. In fact, this addition is very stubborn and often possesses a challenge when a request to uninstall is made.

Further Information on Solimba

The second installation of Solimba also had its own dose of bundles to display. In comparison to the first installation, two programs from the bundle were different while two remained the same. two additional programs were installed along with the second installation of this bundle. These were dubbed Optimizer Pro and GamesDesktop. SearchProtect and N8Fanclub.com_KinoniRemoteDesktop remained triumphant and unbeatable. They were repeated within the installation. To completely remove Solimba from your computer, click here to download and install Spyhunter.
Read More
Fix Error codes 12002-4, 12007-4, 12152-4
If you are trying to install Office but got an error saying, “Something went wrong, Sorry we ran into a problem” with error codes 12002-4, 12007-4, or 12152-4 instead, this indicates that you have a problem with your internet connection. Aside from internet connection issues, the problem could also be due to some programs that block the installation files to be downloaded so when they time out, you get these error codes. There are several options you can try to fix the 12002-4, 12007-4, or 12152-4 error codes. You can try to install Office offline or turn off the proxy server or VPN (if you’re using one). You can also try to temporarily disable your antivirus program or Firewall. Refer to the given potential fixes below to troubleshoot and fix the problem.

Option 1 – Try to install Office offline

The first thing you can do if you encounter the error codes 12002-4, 12007-4, or 12152-4 when installing Office is to download an offline copy of Office especially when you’re certain that your internet connection is slow. Once you’ve downloaded it, install it again. The offline installer will download both the 32 and 64-bit versions of Office. Keep in mind that you must download the correct version.

Option 2 – Disable the Proxy server

The first thing you can do is to try disabling the Proxy server as it might be the reason why you’re getting error 0x80244022 for Windows Updates. To disable the proxy server, refer to the steps below.
  • Tap the Win + R keys to open the Run dialog box.
  • Then type “inetcpl.cpl” in the field and hit Enter to pull up the Internet Properties.
  • After that, go to the Connections tab and select the LAN settings.
  • From there. Uncheck the “Use a Proxy Server” option for your LAN and then make sure that the “Automatically detect settings” option is checked.
  • Now click the OK and the Apply buttons.
  • Restart your PC.
Note: If you are using a third-party proxy service, you have to disable it. In addition, if you are also using a VPN, you can try to disable it as well.

Option 3 – Temporarily disable the Antivirus and Firewall

As mentioned earlier, the downloading of the installation files could be blocked by either the antivirus program or Firewall or it could be both especially when the link seems suspicious. To fix this problem, you have to disable both the antivirus like Windows Defender and the Firewall or any third-party software you might be used temporarily and then download the installation files again. Once the download is completed, make sure to turn on the antivirus program and the Firewall again. On the other hand, you can also try downloading in a different location which also means that you have to try a different network. It could be that the load on the current system is too high which is why it’s not able to offer enough bandwidth to download the installation files of Microsoft Office.
Read More
Win 11 update brings one click browser change
After a lot of backlash about choosing the default Windows browser, Microsoft has officially backed up and brought back a one-click browser change into Windows 11. default browser inside windows 11
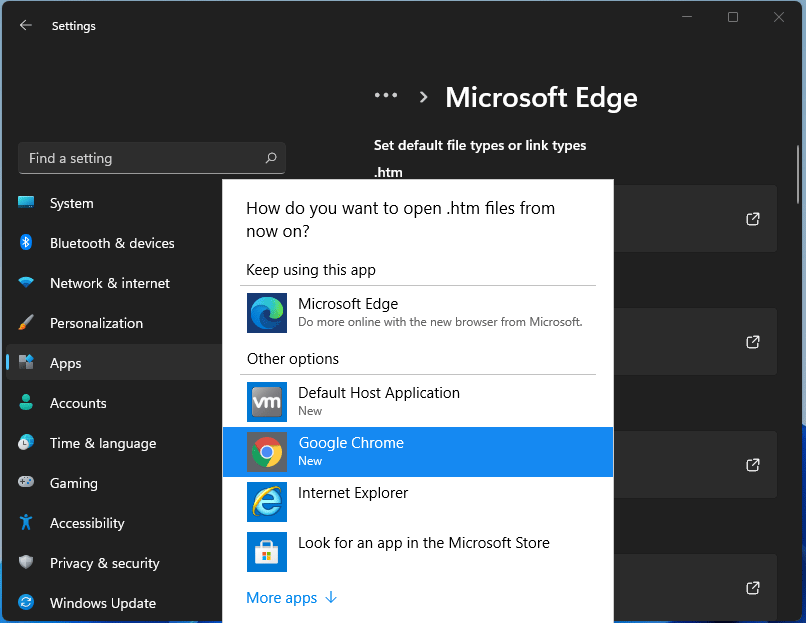
For anyone who is not aware, when Windows 11 was released if you wanted to switch to another browser you had to go into the settings app and choose the default browser for different types of file extensions like HTML, HTM, PDF for opening on the web, etc. Of course, this was completely unnecessary and it was not well received by users. So after some time, Microsoft backpedaled to standard one click, choose your default browser solution that existed in the previous version of Windows OS. Altho sometimes Microsoft knows how to irritate its users base, it is good to know that they can also listen and fix things that are required.
Read More
Identify resource hogging applications
Resource hogging is a term when one single application or few of them are taking all system resources for themself causing extreme slow down in the computer and nonresponsiveness. It can be a very frustrating and time-consuming experience and it can cost you money if you can not finish work on time due to this effect. I believe that everyone has experienced at least one slowdown in their IT carrier because of resource-hogging applications and most users do not know how to deal with this. We are here to help you with this issue. Just to be aware that this method shown here is not a method to miraculously speed up your PC or anything similar, this is to be able to detect and recover from extreme slowdowns. Hardware components are still very important and if you can upgrade your computer if it is outdated, please do it because new applications will require a more modern system, and not any kind of tips and tricks will save you from outdated hardware.

Identifying resource hogging app

Now when we got that out of the way let's talk about slowdowns, it is no secret that sometimes an application has bugs and memory leaks that can cause this kind of behavior, and sometimes the application simply takes up too much memory for any other application to work normally. The most simple and straightforward way is to bring up a Windows task manager and inspect running applications and services. You can bring task manager by the key combination of CTRL + SHIFT + ESC If the system is in deep memory deficit you will have to wait for the task manager to open and show itself on-screen. Once opened, click on more details if that view is not opened by default. Once the view expands you will see all running applications with how much RAM memory have they taken and how much CPU they are using.

What to do with app?

Now you are presented with a choice on what to do with the problematic application. If you press the end task button on the bottom right, Windows will kill the application and its processes but any unsaved work inside the application will be lost and unrecoverable in most cases. Or you can try to remove smaller applications running to free up more memory and CPU in order for the computer to catch up. Any choice you make is up to you, but be very careful not to kill Windows essential service by mistake, that will cause immediate system instability with high chances of a system crash.
Read More
Not enough USB controller resources Error
As you know, USB is now being widely used in all devices with USB A as the leading type with most devices based on it. Peripheral devices such as Pen Drives, External Hard disks, and many more also use a USB port. On the other hand, USB C is also coming up to be the next big standard in the computing world because of its high transfer speeds, wider compatibility as well as support for external Graphics Processing Units. However, just recently, USB 3.0 ports have been reported to cause the following error to pop up on Windows 10 computers every time a USB device is plugged in.
“Not enough USB controller resources. The controller does not have enough resources for this device.”
To fix this error, here are some guidelines you can check out. Make sure to follow them carefully.

Option 1 – Try to use a lower generation USB port

The first thing you can do is to try using a lower generation USB port as this issue mostly occurs when a device is connected to a USB 3,0 port. This means that you have to plug in your device to a USB 2.0 port and then see if it fixes the error or not. You can easily decipher a USB 3.0 port from a USB 2.0 port as the former is in blue.

Option 2 – Try to use a dock

You could also try to use a dock to resolve the error. Note that when too much power on laptops and notebooks are drawn from the USB ports and as a USB 3.0 port draws more power compared to a USB 2.0 port. Thus, if you plug in your USB storage device into a USB 2.0 port with the help of a dock, it should fix the problem.

Option 3 – Try disabling the xHCI Mode option in the BIOS

  • First, boot your computer into the BIOS.
  • Once your computer has booted, go to the Advanced tab.
  • Next, make sure that the entry for “xHCI Pre-boot mode” is set to Disabled under the USB Configuration section.
  • Now save the changes you’ve made and then restart your computer to Windows 10 and see if the error is now fixed.

Option 4 – Update or reinstall the Universal Serial Bus Controller driver

Since it could be a driver issue, you can try to update or reinstall the Universal Serial Bus Controller drivers using the Device Manager. Refer to the following steps:
  • First, click the Start button and type “device manager”.
  • Then click on the “Device Manager” from the search results to open it.
  • From there, look for the “Universal Serial Bus controllers” option and then right click on each one of the USB drivers, especially the Generic USB Hub driver, and then select the Update Driver from the menu.
  • Restart your PC and then click the “Search automatically for updated driver software” option.
Note: If updating the USB Controller drivers didn’t work, you can try to reinstall them instead.

Option 5 – Run the Hardware and Devices Troubleshooter

You could also run the Hardware and device Troubleshooter to try and fix the “Not enough USB controller resources” error.
  • The first thing you need to do is click on Start and then on the gear-like icon to pull up the window for Settings.
  • After opening Settings, look for the Update and Security option and select it.
  • From there, go to the Troubleshoot option located on the left-hand side of the list.
  • Next, select Hardware and Devices from the list and open the Troubleshooter and run it. Once it is doing its job, wait for it to complete the process and then restart the system.
  • After the system restarts, check if the problem’s now fixed. If not, refer to the next option given below.
Read More
A Guide to Fix Error Code 0x80070004 on Windows 10

Error Code 0x80070004 on Windows 10 – What Is It?

Some users trying to upgrade from Windows 7 or Windows 8/8.1 reported experiencing installation rollback with error code 0x80070004. This error normally appears when the Computer Name is set to names that can’t be used for the computer. It’s also possible this error occurs if users or program files folder were redirected to a different partition.

Solution

Restoro box imageError Causes

The Error code 0x80070004 on Windows 10 is normally caused if any of the following were used as the Computer Name and the user tried to upgrade to Windows 10:

  • System (or SYSTEM)
  • SELF
  • LOCAL
  • Network
Failure to fix this error message might result in others, including error code  0xc0000001

Further Information and Manual Repair

If you don’t solve this error, you won’t be able to upgrade from Windows 7 or Windows 8/8.1 to Windows 10. Note that this error will continuously bring you back to the original OS unless fixed.

Please note that if you’re not confident in doing these steps, you might want to consider seeking the help of an expert or using an automated tool that will help fix this.

Here are a few methods to try.

Method 1: Check and Change the Computer Name

The most common cause of this error is if your computer uses any of the following reserved names:

  • LOCAL
  • System (or SYSTEM)
  • Network
  • SELF

These reserved names are not meant to be used as computer names. If this is what your computer uses and you try to upgrade to Windows 10, you will surely get this error. Check your computer name and if you see any of the reserved names, change it right away.

Changing Computer Name in Windows 8.1

If you’re trying to upgrade from Windows 8.1, you can change the name of the computer by following these steps:

  • Step 1: Open the Start menu then simply type “rename computer”. After that, choose “Rename this computer”
  • Step 2: A dialog box will open. Just click the “Change” button
  • Step 3: A new dialog box will open. Type the new name. Click Apply then Ok.

Changing Computer Name in Windows 7

If you’re trying to upgrade from Windows, you can follow the steps below to change the name of your computer.

  • Step 1: Go to the Start menu then on the Computer section, right-click the mouse and choose “Properties”.
  • Step 2: A new dialog box will appear. Go to “Computer name, domain, and workgroup settings” then click “Change settings”. In case you’re asked for administrative access, make sure to grant it.
  • Step 3: Find the “Computer Name” tab then click “Change”
  • Step 4: Change the computer name and click Ok.

Method 2: Fix the “Users” directory issue

If the first method doesn't work, it probably means the computer name isn’t the cause of this error. Another reason why users experience Error code 0x80070004 when upgrading to Windows 10 is if the “Users” directory was relocated. So, when you try upgrading to Windows 10, the installer wasn’t able to find the user profiles on the “%systemdrive%”, where the current operating system is installed.

If you changed or moved any of the Users, Program Data, or Program Files folders, this will cause the error. Before you upgrade to Windows 10, you might be required to reset or reinstall your current operating system (Windows 7 or Windows 8.1).

If you haven’t made any changes or haven’t moved any of the mentioned folders, there’s a great chance that your users' profiles are corrupted. You can also reinstall your current operating system. However, you might want to check for the corrupter user profile first. To do this, follow the steps below:

  • Step 1: Go to the Start menu and type System
  • Step 2: Click System  then go to the Advanced tab
  • Step 3: Go to Settings, which you’ll find under User Profiles

On the Users Profiles, make a copy of all the accounts somewhere. Sign out from the current user account then try logging in back using the accounts you’ve copied. For each account, you get an error, delete it. However, make sure that you don’t delete the UpdateUser and Administrator account ever.

After this is done, try upgrading your operating system to windows 10 again.

Method 3: Try a trusted and secured Automated Tool

If the above methods still not useful, you might want to rely on an automated tool. Find a secured and trusted tool. It will help fix this issue.

Read More
Videos folder missing from File Explorer
As you know, the Videos folder can be found under “This PC” by default on your Windows 10 computer. However, as per the reports of some users, there are a few occasions where it somehow gets replaced by the Documents folder. In other words, the Videos folders are replaced by a duplicated copy of the Documents folder. Out of the two Documents folder, one Document folder will contain all the usual files and subfolders while the second one is empty. Although when you click the Documents icon on your Desktop (if you have a shortcut), it will still take you to the right Documents folder. To fix this particular issue and get the Videos folder back in the File Explorer, here are some potential fixes that should help.

Option 1 – Run System Restore

The first thing you can try to do to resolve the problem is to run System Restore. This can help you go back to the previous state of your computer before the issue with the Videos and Documents folder.
  • Tap the Win + R keys to open the Run dialog box.
  • After that, type in “sysdm.cpl” in the field and tap Enter.
  • Next, go to the System Protection tab then click the System Restore button. This will open a new window where you have to select your preferred System Restore point.
  • After that, follow the on-screen instructions to finish the process and then restart your computer and check if the problem is fixed or not.

Option 2 – Try to restore Defaults

The next thing you can do is to restore Defaults. How? Refer to these steps:
  • Open File Explorer and then right-click on any of the two Documents folders.
  • After that, select the Properties option from the context menu and switch to the Location tab and click on Find target.
  • Next, copy the address and paste it in the field above the “Find target” option, and then click the “Restore Default” button.

Option 3 – Try to change the Registry Path

  • Tap the Win + R keys to open the Run dialog box.
  • Then type “Regedit” in the field and tap Enter to open the Registry Editor.
  • Next, navigate to this registry path: HKEY_CURRENT_USERSoftwareMicrosoftWindowsCurrentVersionExplorerUser Shell Folders
  • After that, edit the path for {35286A68-3C57-41A1-BBB1-0EAE73d76C95} under the “User Shell Folders” key to match the path shown for My Videos: %USERPROFILE%Videos.
  • Once you’re done, open the folder under “This PC” that has the Documents icon and tap Shift + right-click in the folder background, and then select the “Open PowerShell window here” option to fix the naming of the Documents folder. The path should read: “C:users<UserName>Documents.
  • Next, execute this command: ri desktop.ini –force
  • The command you entered will delete the files and folders and so when added for Documents, it will get rid of the empty Documents folder.
  • Now all you that’s left to do is to find where the target location is going to be for both folders and check if anyone foes to the user name location.
  • Then delete the one which goes to the incorrect location.
Read More
1 2 3 162
Logo
Copyright © 2022, ErrorTools. All Rights Reserved
Trademarks: Microsoft Windows logos are registered trademarks of Microsoft. Disclaimer: ErrorTools.com is not affiliated with Microsoft, nor claim direct affiliation.
The information on this page is provided for information purposes only.
DMCA.com Protection Status