Transferring characters in diablo 2 remake

Diablo 2 resurrected has hit official release and servers seem to be finally taken care of and everything seems to be running smoothly now. The game also received great praise from gamers and attracted old players of the original Diablo 2 game.

diablo 2 gameplaySpeaking of old players of old Diablo 2, they can transfer their old characters into remaster and continue playing them within this new great HD environment. There are some steps and requirements but we are here to help and transferred characters will bring full stash, inventory, and equipped items with them.

Requirements

There are not many requirements for this transfer to occur but they must be respected in order to be successful. The first thing is a minor requirement and somewhat annoying but it needs to be done, firstly fire up Diablo 2 resurrected and create a character, any kind of character with any kind of name, any kind of class. This strange requirement is to actually create a character folder and register it inside D2 resurrected so we can copy old ones there.

The second requirement will be that characters that you wish to be transferred must be offline characters. Old battle net online characters cannot be transferred at this moment and probably will not be in the future as well. So for all of you that wish to transfer online characters, bad luck, for the rest of us casuals playing offline single-player mode, we can enjoy our characters.

Process of diablo 2 character trasfer

The process itself of transferring characters when previously mentioned requirements are met is just a simple and copy operation. If you have somewhere backed your characters go into your backup folder and copy files in c:\users\*current user*\saved games\*diablo 2 resurrected folder*

If you do not have characters backed up and just have old Diablo 2 installed and playing it, you can go to c:\users\*current user*\saved games\*diablo 2 folder* and just copy all characters files into c:\users\*current user*\saved games\*diablo 2 resurrected folder*

Your old characters end with .d2s extension, grab all that you want to transfer, and copy them into D2R. Take note that copied characters cannot be brought back into Diablo 2, once they are copied into Diablo 2 resurrected all further progress on them will be tied to the new game.

Conclusion

That’s it about the transfer process and requirements for it. Fire up the new game version and enjoy.

If you like to learn and find out more about various Windows errors, and how to repair them go to our vast archive or use search to find articles that will explain and help you in solving your issue.
However, if you prefer to do things fast and with automatization then we are proposing to use an automated solution for your issues. The application that we are recommending is Advanced System Repair Pro
Advanced System Repair utilizes multiple tools all in one to give you a quick, simple, reliable, and very thorough diagnosis of your PC. It brings you all the tools you need in one program to clean, fix, protect, optimize and boost your PC!
1-Click Maintenance
All the tools to make it simple and easy! It's like having a professional technician at the click of a mouse.

Junk Cleaner
Keeping your computer free from unnecessary clutter also helps make your computer last longer. Like any other machine, if you keep it clean and take care of it, it will serve you better for longer!

Optimize background apps
Optimize applications background activity with the built-in Application Optimizer feature.

Disk Defrag
With a simple 1-click, Advanced System Repair speeds up your PC by assembling fragmented files on your machine and organizing them more efficiently.

Malware Removal
Finds and removes all types of harmful malware including trojans, worms, bots, adware, spyware, PUPs, and more!

Privacy Cleaner
The all-in-one privacy suite to Clean Your Tracks & Protect Your Privacy! Make your computer safe, secure, and more efficient!

System Tweak/Optimizer
ASR will analyze your complete system and settings to adjust your PC to function at its maximum performance.

Registry Cleaner
Over time, as you install and uninstall applications, the registry can become cluttered with old entries and broken settings which can result in program crashes, and annoying messages and slow the computer down.
Visit our Advanced System Repair Pro Download page to inform yourself about all the benefits of this software and get a free trial copy of it.
advanced system repair pro

Advanced System Repair Pro

One-click automated PC repair solution
ASR logo
With Advanced System Repair Pro you can easily
Replace damaged files
Restore performance
Free disk space
Remove Malware
Protects WEB browser
Remove Viruses
Stop PC freezing
DOWNLOAD
Privacy Policy | Terms of Use | Uinstall
Advanced System Repair Pro is compatible with all versions of Microsoft Windows including Windows 11

Share this article:

You might also like

Fix Windows 11 Black Screen Error
A black screen error inside Windows 11 is a typical screen turning to solid black without any error message. This can be very annoying since it can randomly appear out of nowhere and it will appear while you are using the computer. Worry not, this is not a serious error and we have several solutions for it, so please keep reading and try them as presented in order.

Black screenRestart graphic driver

This is the first thing to check if the issue is due to software or driver malfunctioning, there is a shortcut for rebooting graphic driver inside Windows 11. Press WINDOWS + CTRL + SHIFT + B to reboot the graphic driver and see if this fixes the issue. A beep sound should be heard during this process and the screen should turn back to normal.

Check connections

Sometimes the screen can go black due to a faulty connection or cable. If you have it at your hand try a different cable or slightly and gently nudge the existing one to see will screen flicker. If you are on a laptop try gently moving the lid from back to front and pay attention to the screen. If screen flickers or picture returns with this method, cable or connector needs to be replaced.

Clean your computer

The black screen can be because the computer is overheating. If this is the case either fan inside is not working properly or there is a lot of dirt and dust that needs to be removed so airflow can be established again for proper cooling. We have an article on errortools.com on how to properly clean your PC but if you are not technical enough maybe the best solution would be to call someone who is or to take the PC to service for cleaning.

Change The Projection Settings

Press WINDOWS + P to open projection settings, check to see if PC is set to PC screen only. If any other option is selected change it to PC screen only since this can cause random black screen issues.

Uninstall latest updates

If this problem has started to manifest itself during the latest update, go to setting and roll back from the latest update to fix this issue.

Scan system for malware

The black screen can also be caused by various viruses and malware. IF you have anti-virus software, run a full system scan to check it for malware. If you do not have one, download a free one and run a system scan, we recommend Bitdefender.
Read More
Microsoft removed password as a requirement
ms password gone
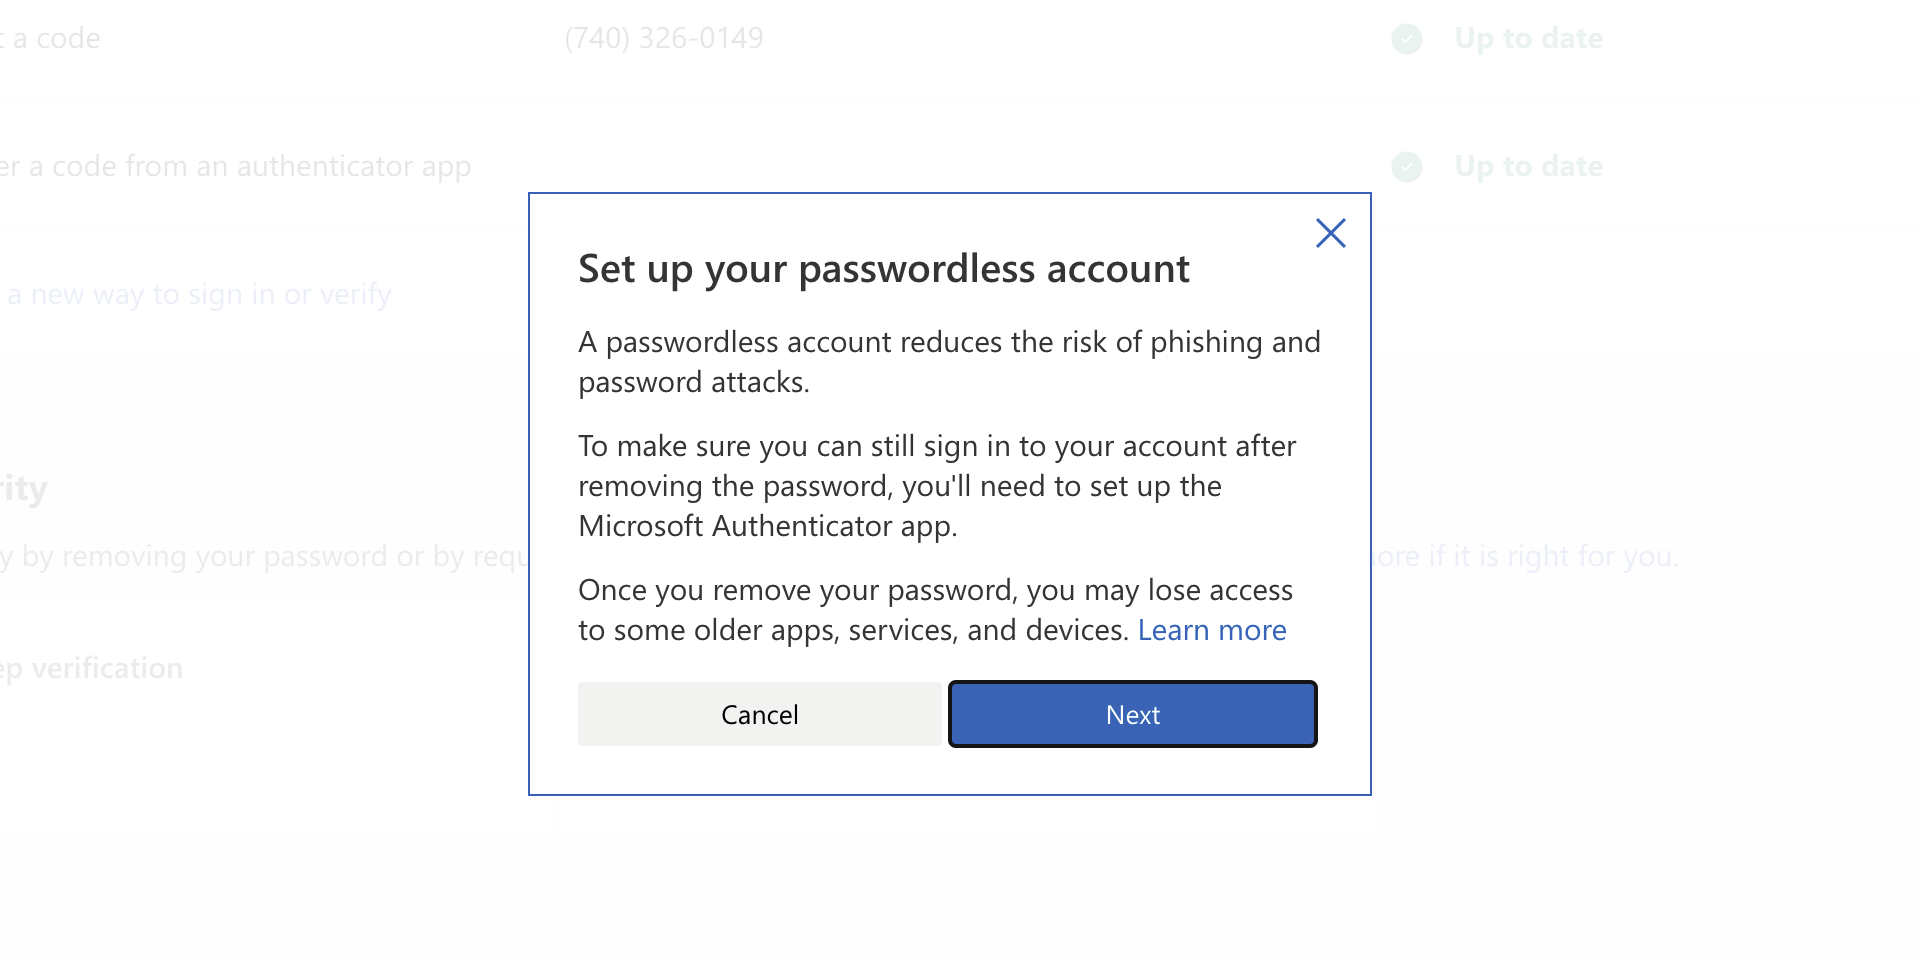
As of the time of writing this article you no longer need or are required to have a password if you plan to log in to your Microsoft account. Microsoft explored various options for account security and came to the conclusion that passwords are obsolete. Microsoft is letting you access your account through the Microsoft Authenticator app, Windows Hello, a security key, SMS verification, or email verification code. All of these methods are way better in terms of security than passwords.

How to turn these features on?

To get rid of your Microsoft password, the process is simple. You simply need to go to your Microsoft account, click “advanced security options,” then “enable passwordless accounts” under the Additional security section.
Read More
"Stop Running This Script" Error - How to Fix It

Stop Running This Script Error

Stop Running This Script Error - What is it?

"Stop Running This Script" Error is a Windows Internet Explorer error message that is displayed in the following format with a yes and a no button:
Stop running this script?
A Script on this page is causing your web browser to run slowly.  If it continues to run, your computer might become unresponsive. This occurs when some scripts take an excessive amount of time to run. To be precise, there are some websites that use JavaScript, JQuery, and Active X scripts to run. These scripts are notorious for taking too much time to run. So, if you use the Internet Explorer as your web browser, then by default if the website takes a long time to load, the ‘Stop running this script error will be triggered. Other than this, if you are scripting an Active X control on the web page to transfer a very heavy file or run a huge database query, this may cause delays and lead to the error display. However, if you use Firefox, then the ‘Stop running this script error code will be promoted as ‘Unresponsive Script’ error.

Solution

Restoro box imageError Causes

The ‘Stop running this script error code’ is triggered due to multiple reasons. These include:
  • Webpage programming errors
  • Running a pop-up killer
  • Spyware and viral infection
  • Active X control errors

Further Information and Manual Repair

Here are some of the best methods that you can try to resolve Internet Explorer’s ‘stop running this script error’ on your PC:

1. Change the Internet Explorer Settings

This can be done by opening Internet Explorer and in the top menu, click on Tools, and then go to Internet Options. Now click on the Advanced Tab option. Locate where it says ‘Disable Script Debugging’. Once you find it uncheck the box beside it. Now close the browser and restart your PC. Access the same website on your IE web browser and see if the website opens. If it does, then the error is resolved. However, if it doesn’t, then you the underlying causes for the stop running this script error message could either be spyware or ActiveX control error.

2. Download Restoro

Whether the error occurs due to spyware invasion of Active X control error, it is advisable to download Restoro on your PC. This is a next-generation, innovative, and multi-functional PC repair tool that has several powerful utilities deployed together in one program. Plus you don’t have to get into the technicalities of resolving Active X control issues. Restoro is safe, bug-free, and efficient. It has a user-friendly interface and simple navigation which makes it quite easy for all levels of users to operate. It is compatible with all Windows versions including Windows 7, 8, XP, Vista, 8.1, and 10. This PC repair tool is a one-stop solution for all your script error repair needs. It includes the following utilities: a registry cleaner, a system stability detector, and an ActiveX control error scanner. It simultaneously scans for ActiveX control errors too. So, if the IE script error is triggered by ActiveX control issues, it resolves them too. To fix the ‘stop running this script’ error code on your PC, click here to download Restoro
Read More
New Chrome update brings surveillance debate
Google Chrome 94 is here and it has introduced a controversial idle detection API. For those people that do not know what idle detection API is, well basically Chrome can be asked by a website to report when a user of the site has a site open and is idle on the device. The issue that people have with this is that this particular feature can be used to report when the user is not using a computer at all. chrome idle detection feature
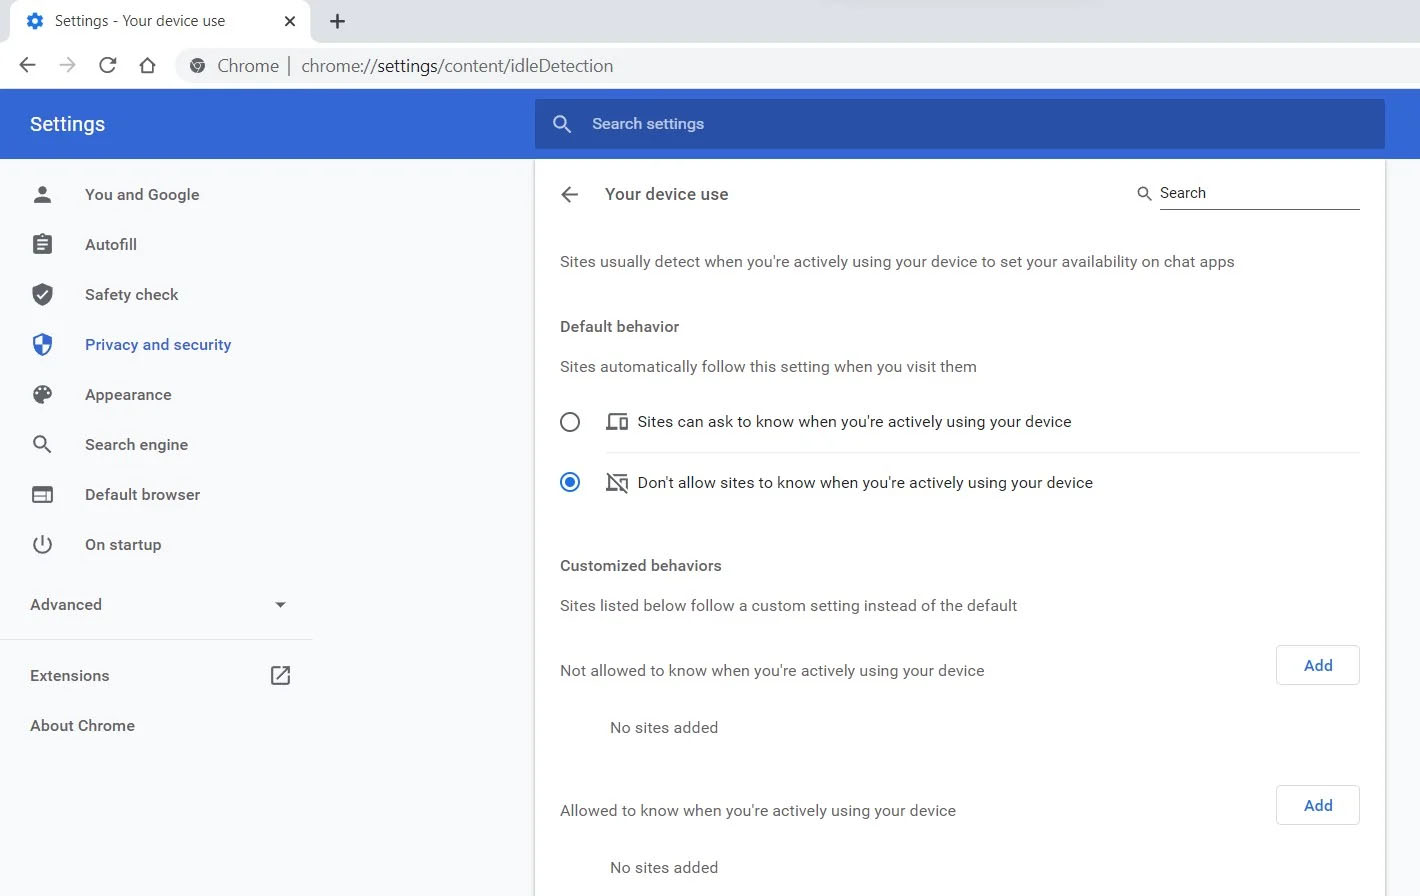
Good thing is that website or web application will prompt you to allow it to use this feature like when a site/application wants to use your microphone or web camera. Developers are on board with this feature since it can provide them with more telemetric data on how users are interacting with their website/application but there are some that are strongly voicing against this. Tantek Çelik, Mozilla Standards Lead, commented on GitHub, saying:
As it is currently specified, I consider the Idle Detection API too tempting of an opportunity for surveillance capitalism motivated websites to invade an aspect of the user’s physical privacy, keep long-term records of physical user behaviors, discerning daily rhythms (e.g. lunchtime), and using that for proactive psychological manipulation (e.g. hunger, emotion, choice)… Thus I propose labeling this API harmful and encourage further incubation, perhaps reconsidering simpler, less-invasive alternative approaches to solve the motivating use-cases.
Others who have spoken against this feature are people from the WebKit development team inside Apple. Ryosuke Niwa, an Apple software engineer who works on WebKit said:
That doesn’t seem like a strong enough use case for this API. For starters, there is no guarantee that the user won’t immediately come back to the device. Also, who is such a service supposed to know what another device user might be using at any given point? We’re definitely not going to let a website know all the devices a given user might be using at any given point. That’s a very serious breach of the said user’s privacy. It seems to me that such a suppression/distribution mechanism is best left for the underlying operating systems/web browsers to handle.
Of course, technology itself as always can be used for good or for bad and time will tell if this feature has brought good stuff or it has paved another brick in surveillance and privacy manipulation. As said for now option will prompt for agreement and let's hope that it will be used for good causes from this day into the future.
Read More
How to Fix the Waol.exe Error

Waol.exe Error Repair

Waol.exe Error - What is it?

Waol.exe is an executable file located in a subfolder of "C:\Program Files" - usually C:\Program Files\America Online 9.0a. Waol.exe is not a core file but it is an important part of AOL (American Online) utilities. It ensures the AOL programs run smoothly on your system. The Waol.exe error occurs when the AOL program fails to execute and run properly. The error message is displayed in the following format:

“Waol.exe has encountered a problem and needs to close. We are sorry for the inconvenience.’

Solution

Restoro box imageError Causes

Waol.exe error typically occurs when this executable file gets infected by a virus, Trojan, adware, or spyware. When this happens the file location also changes. Therefore the best way to verify if your PC is under attack by malicious software is to check the Waol.exe file location on your PC. If the file is found in some other location instead of its correct disk location, then you must immediately fix this error before the damage sets it. Malicious software like viruses and spyware are notorious for slowing down PC performance and besides they give access to hackers to break into your system and manipulate your confidential and private data saved on your PC. This exposes you to serious privacy errors and data security dangers including identity thefts, cybercrime, and data breaches. Furthermore, viruses can also corrupt the computer’s registry and lead to system failure and crashes.

Further Information and Manual Repair

To resolve Waol.exe error many PC users seek an antivirus. Though this also helps resolve the issue but you should know that an antivirus has certain limitations. It is known to slow down the system speed and will only remove viruses from your PC. This means if the virus has affected the registry of your PC, it will not resolve that, and to repair your registry you may then have to download a registry cleaner separately on your system thereby reducing the PC speed even more. To ensure all kinds of malware are removed and registry issues resolved along with system speed optimization, it is recommended to download Restoro. This is an advanced, innovative, and multi-functional PC repair tool deployed with a variety of powerful utilities. These include a registry cleaner and a system optimizer. It is safe, efficient, user-friendly, and compatible with all Windows versions including Vista, XP, Windows 7, 8, 8.1, and 10. The antivirus feature embedded inside this software detects scans and removes all malicious programs infecting your PC immediately. It resolves all your system’s privacy issues and makes sure that your system is inaccessible to hackers. Besides this, the registry cleaner removes files cluttering and damaging the registry and also restores it. With the help of the system stability detector, it detects errors causing PC slowdowns and resolves them too thereby boosting the speed of your PC dramatically. To resolve Waol.exe error right away, click here to download Restoro today.
Read More
Yellow triangle with exclamation on Battery
Seeing a yellow triangle with an exclamation mark on the battery symbol on the System Tray of your Windows 10 laptop is not really uncommon especially if your battery is about to run out of power. However, if you just purchased your laptop recently and the first thing you’ve noticed when you first opened it is the yellow triangle with an exclamation mark in the battery, read on as this post will help you resolve this issue. Seeing this kind of icon on your computer does not necessarily mean that you have to replace your battery as there are still several potential fixes you can try to resolve the problem. So if you notice this icon, you can try running the Power troubleshooter as it will help you resolve any potential issues with the battery. Aside from that, you can also restore the default settings of the power plan manually or uninstall and reinstall the battery driver. For more information, refer to the given options below.

Option 1 – Try to run the Power troubleshooter

As pointed out, the Power troubleshooter can help you resolve any issues your battery might have automatically. It plans and detects system settings that can affect power usages like timeout and sleep settings, display settings, and screensavers and restores them to their default settings. To run this troubleshooter, follow these steps:
  • Open the Windows Settings and go to the Update and Security option.
  • Next, click on the Troubleshoot option under Update and Security and then scroll down until you see the “Power” option.
  • Under Power, click on the “Run the troubleshooter” button to start running the Power troubleshooter.
  • Wait for a couple of seconds until the Power troubleshooter is done scanning your computer for issues. Once it’s done, follow the next on-screen instructions that appear on the screen.
  • If needed, restart your computer and see if it has fixed the problem.

Option 2 – Restore the default settings of the Power plan manually

  • Open the Windows Settings again and select System.
  • Next, scroll down until you see the “Power & sleep” option.
  • After that, click on the “Additional power settings” option located in the right pane to open the Power Options.
  • Now click on the link that says, “Change Plan Settings” and select the “Restore default settings for this plan” option.

Option 3 – Try to uninstall or reinstall the Battery driver

You might also want to uninstall or reinstall the battery driver as it can also resolve the problem. But before you start, you have to shut down your computer and remove the power chord as well as the battery. Once you’re done, follow these steps:
  • Plug the power chord and restart your computer.
  • Once your computer has restarted, tap the Win + R keys to open the Run utility and type “devmgmt.msc” in the field and tap Enter to open the Device Manager.
  • After that, look for the “Batteries” driver from the list of drivers and expand it.
  • Then right-click on the “Microsoft ACPI-Compliant System” driver and click on the “Uninstall device” option.
  • Once it’s done, restart shut down your computer and remove the power chord and then attach the battery.
  • Now attach the power chord again and restart your computer to automatically install the driver.
Read More
Where can you get computer viruses & malware
From their infant stages to modern days, computer viruses were always kind of here. From simple ones that were annoying with playing speaker sounds and throwing messages on screen to more malicious ones capable of deleting and encrypting files. In today's modern world it is very important to protect yourself, modern viruses are not a joke anymore and they are aimed to create serious damage to computer systems. Where can you get computer viruses & malwareThey can encrypt files in order to make you pay for a decrypter, they can straight up delete files or even cause some hardware damage. Like mentioned before protecting yourself is important, but protecting does not mean only having antivirus software installed, information, where are common places in which they lurk and could be picked up, is also very important. That is why we are exploring in this article the most common place where you can pick viruses or other malware.

Downloading Programs

Programs that contain the downloadable files are the commonest source of malware such as freeware, worms, and other executable files. Whether you download an image editing software, a music file, or an e-book, it is important to ensure the reliability of the source of the media. Unknown, new, or less popular sources should be avoided.

Pirated or Cracked Software

Are you aware of software cracking? Well, every time you open cracked software, your antivirus software might flag it as malware as the cracks consist of malicious scripts. Always say “No” to cracks as they can inject malicious script into your PC.

Email Attachments

Anyone can send you an email attachment whether you know them or not. Clicking on unknown links or attachments can harm your device. Think twice before clicking anything and make sure that file type is not ‘.exe’.

Internet

One of the easiest ways to get a virus on your device is through the Internet. Make sure to check the URL before accessing any website. For a secured URL always look for ‘HTTPS in it. For example, when you click videos published on social media websites, they may require you to install a particular type of plug-in to watch that video. But in reality, these plug-ins might be malicious software that can steal your sensitive information.

Booting Data from Unknown CDs

Malicious software can get into your device through an unknown CD. A good practice to be safe from malicious infection is to remove CD when your device is not working at all. Your system could reboot the CD if it is not removed before switching off the computer.

Bluetooth

Bluetooth transfers can also infect your system, so it is crucial to know what type of media file is being sent to your computer whenever a transfer takes place. An effective armor would be to allow Bluetooth connectivity with only known devices and activate it only when required.

Unpatched Software

Often overlooked, unpatched software is also a leading source of virus infection. Security holes in software are exploited by attackers and are unknown to software makers until the attackers release them in the form of zero-day attacks. It is therefore recommended to install software updates as soon as they are available on your PC.
Read More
nslookup works but ping fails in Windows
nslookup is a command-line tool that helps in finding the DNS records of a website. It sends a name server query to the DNS and obtains the corresponding IP address. Aside from that, it can also perform some complex functionality such as finding details about FTP server, Mail server and many more but most of them are used by administrators. The best thing about nslookup is that it queries the DNS server directly and it does not rely on the cache. On the other hand, there is another tool called PING that is used to verify connectivity. PING sends a packet of information to the IP address or Domain and gets back a response in the form of packets. So if everything goes well, all packets are received but if not, it will help you find out where the delay in the network exactly is. However, the ping command does not always attempt a DNS lookup which means that it might be using the DNS cache and use the IP address available in that table. Although both nslookup and PING help you in identifying the host or IP address, however, they don’t always work and sometimes fail. So if your nslookup works but ping fails on your Windows 10 PC when querying the IP address of a website then it could be caused by many reasons. It could be that the nslookup queries work for you but when you try to use PING, it fails. For instance, if you open the abc.com website, here’s how it will look like:
nslookup xyz.com Server: dns.company.com Address: 192.168.1.38 C:> ping xyz.com Ping request could not find host xyz.com. Please check the name and try again.
The domain is converted into an IP address and then data is sent to that IP address when you use PING. So when a reply comes back it means that the data is going back and forth to that domain without any problem. However, if the DNS fails to resolve the IP address of the website or if your PC does not attempt a DNS lookup, you will receive a similar error message that says, “Could not find host” and so on. To resolve this issue, here are some options that might help.

Option 1 – Reset Winsock, TCP/IP & Flush DNS

Resetting Winsock, TCP/IP, and flushing DNS might help you resolve the issue with nslookup and PING. To do so, follow these steps:
  • Right-click on the Start button and click on Command Prompt (administrator) so you can pull up an elevated Command Prompt.
  • After that, execute each one of the commands listed below. And after you typed in one after the other, you have to hit Enter.
  1. netsh winsock reset – type in this command to reset Winsock
  2. netsh int ip reset resettcpip.txt – type in this command to reset TCP/IP
  3. ipconfig /flushdns – type in this command to flush the DNS cache
  • Next, restart your PC and check if the problem’s fixed.

Option 2 – Force Windows to do a DNS lookup using FQDN

  • Go to Settings > Network & Internet > Status > Change adapter options.
  • From there, right-click on the network and select Properties.
  • Next, in case you’re using IPv6, from the list of connections available in the list, select Internet Protocol Version 4.
  • Then click on Properties and click Advanced.
  • After that, switch to the DNS tab and select “Append these DNS suffixes (in order)” and click on the Add button and then add “.” as a suffix so that each time you query using PING and another tool, it will add a “.” at the end and will force the lookup.

Option 3 – Make sure that there is only one default gateway

If your computer has more than one NIC connected and there are multiple default gateways, then it will most likely create confusion which is why you need to remove the default gateway from the configuration of all NICs and make sure that there is only one default gateway.

Option 4 – Use the Google Public DNS

You might want to change your DNS to Google Public DNS as it could also help you in fixing the nslookup and PING issues. To do so, follow the steps below.
  • The first thing you have to do is right-click on the network icon in the Taskbar and select Network and Sharing Center.
  • Next, click on the “Change Adapter Settings” option.
  • After that, search for the network connection that you are using to connect to the internet. Note that the option might be “Wireless Connection” or “Local Area Connection”.
  • Right-click on your network connection and click on Properties.
  • Then select the new window to choose the “Internet Protocol 4 (TCP/IPv4)” option.
  • After that, click on the Properties button and click the checkbox in the new window for the option “Use the following DNS server addresses”.
  • Type in “8.8.8.8” and “8.8.4.4” and click OK and exit.

Option 5 – Check the Windows Host file

You can also try to cross-check the Windows Hosts file to find out if the website you are trying to open has been blocked, because if it is, then it’s no wonder why PING fails even when nslookup works. There are instances when some third-party application modifies the file and adds some websites to the blocklists. So if the website is indeed blocked, you need to remove it from the list.

Option 6 – Delete the WLAN Profiles

Deleting the WLAN Profiles might be a good idea if you are not able to connect to the internet on your computer and if you’re using Wi-Fi. It could be that the networks that were connected previously have gone rogue which is why it is not connecting properly. And so deleting the WLAN profiles might help you in fixing the issue with nslookup and PING.

Option 7 – Reinstall the Network Adapter Drivers

  • Tap the Win + R keys to launch the Run window and then type in the “msc” command and hit Enter to open the Device Manager window.
  • Under the Device Manager, you will see a list of drivers. From there, look for the Network Adapters and expand it.
  • Then right-click on each one of the Network drivers and select “Uninstall device”.
  • Restart your PC.
Read More
A Guide to Fixing Error 101

Easy Methods to Fix Error 101

Error 101 - What is it?

Error 101 is a Google Chrome error. You may experience this error if you browse the internet using Google Chrome. This error results when the existing HTTP connection between Chrome and the website is broken. The error is displayed in the following format: “Error 101 (net::ERR_CONNECTION_RESET): The connection was reset.”

Solution

Restoro box imageError Causes

The cause of Google Chrome error 101 cannot be narrowed down. This error can be triggered on your PC due to multiple reasons. These include:
  • The inability of the Google Chrome installer to create a temporary directory on your PC during the installation process
  • Enabled DNS Prefetching
  • Firewall
  • Viral Infection
  • Bad Registry Entries
  • Poor Internet Connection
Though this error code is not fatal, nonetheless it is advisable to fix it to ensure you are able to browse the internet using Google Chrome.

Further Information and Manual Repair

The good news is that this error is quite easy to resolve. Even if you are not a technical whiz you can still manage to fix it by trying these easy and effective DIY methods we have listed below:

Method 1: Reload the Website link on Chrome or Check Your Internet Connection

Sometimes refreshing the webpage can resolve the issue easily. Try doing it. Reload the link by pressing Ctrl +R. This will refresh the webpage. If it starts working then that’s great but if it doesn’t then it is advisable to check your internet connection. Disable and Enable the connection and then try browsing on Chrome again. If websites are accessible then the problem is resolved. If the error persists then try other methods.

Method 2: Disable DNS Pre-fetching

Sometimes this error may occur due to enabled DNS pre-fetching. To resolve the issue, open Chrome, then click on the wrench key. Go to setting and under the bonnet and Privacy section, look for the DNS perfecting option. If it is enabled, then uncheck it to disable DNS Pre-fetching. Save the changes and then close the browser. Now open it again and try browsing on Chrome. If error 101 does not appear and you are able to access websites then the issue is fixed.

Method 3: Scan for Viruses

Another way to fix this is to download and run a powerful antivirus. Scan and remove viruses to fix the problem.

Method 4: Check the permission for your temporary folder

As mentioned above, another underlying reason for error 101 can be Google Chrome installer was unable to create a temporary directory on your system during the installation process. To resolve it, check the permission for your temporary folder. Here’s how to do it: First go to the start menu and type Run. Now enter one of the following directories in the text fields 1. Windows XP: %USERPROFILE%Local Settings 2. Windows Vista: %USERPROFILE%AppDataLocal After that press OK. This will open a new window. In the Window that opens, right-click the temp folder. Now select properties and press the security tab to continue. In the group and user names section, select your user profile name. In the permissions, section verify that the checkboxes for READ, WRITE, and READ  & EXECUTE permissions in the DENY column are not selected. After you have verified, click apply and then ok. Now try reinstalling the Google Chrome browser again on your system.

Method 5: Remove Bad Entries by Cleaning the Registry

Bad entries and cookies saved in the registry can also lead to error 101. You can remove them manually but that will take a great deal of time and can be slightly difficult if you are not technically sound. Therefore, it is advisable to download Restoro. This is a user-friendly PC Fixer integrated with a registry cleaner that scans and removes all registry issues in a few clicks. It removes all the bad entries and junk files cluttering the registry and repairs it instantly. Click here to download Restoro.
Read More
Disabling File Grouping in Explorer in Windows
Browsing your files on a computer seamlessly is made possible by the File Explorer in Windows 10 as it provides users with a great sense of customization for both listing and performing operations on a file. You have the option to arrange the folders and files being browsed by their name, type, date, size, and so on. Moreover, files that share a common attribute can be also be grouped accordingly using the grouping feature. However, there are times when instead of helping, it causes some problems for some users. This is why in this post, you will be guided on how you can disable the File Grouping feature in the File Explorer in Windows 10. There are two methods you need to consider in disabling the File Grouping feature in Windows 10. First, you can disable it for only one folder or you can disable it for all the folders on your computer. For more details, follow the instructions given below.

Option 1 – Disable File Grouping in only one folder

This first option is relatively straightforward and simple which will work if you only want to disable File Grouping in one folder.
  • First, open File Explorer, and go to the folder you want to disable File Grouping.
  • Next, right-click anywhere on that folder.
  • And then select Group by > None. This will disable File Grouping for only that particular folder.

Option 2 – Disable File Grouping in all the folders

If you wish to disable File Grouping in all the folders on your computer, then you need to follow this option. If you have already tried the first one, then continue with the given steps below.
  • Tap the Alt + V key combination.
  • Then tap the Alt + Y keys and then tap Alt + O keys.
  • After that, navigate to the View tab, and under the Folder views section, select Apply to Folders.
  • Now click on the Apply and OK buttons to save the changes made. This will disable File Grouping in all the folders listed in the File Explorer.
Read More
1 2 3 162
Logo
Copyright © 2022, ErrorTools. All Rights Reserved
Trademarks: Microsoft Windows logos are registered trademarks of Microsoft. Disclaimer: ErrorTools.com is not affiliated with Microsoft, nor claim direct affiliation.
The information on this page is provided for information purposes only.
DMCA.com Protection Status