T-Mobile Hack, 40 Million and more Impacted

T-MobileHacker group recently came up with claims that they have stolen data from 100 million T-Mobile customers. T-Mobile has responded with confirmation it has been compromised and that over 40 million records were stolen, among them are not just present customers, but anyone who has applied for T-Mobile service as well as past accounts.

What has been stolen?

Report from T-Mobile states that stolen records included first and last name, date of birth, social security number, driver’s license & ID information. The company said that it has “no indication that the data contained in the stolen files included any customer financial information, credit card information, debit or other payment information.” Not really a reassuring statement meaning that they really do not know, but even if the statement is true, already stolen information is as much if even not more damaging and devastating as payment information.

What T-Mobile is planning to do now?

It is stated that the hole used for the hack has been addressed and closed so no more data can be stolen.

Considering people that had their personal information compromised, T-Mobile said it is planning to reach out to them and offer them two years of free identity protection through McAfee’s ID Theft Protection Service.

Additionally, T-Mobile recommends postpaid customers change their PIN by going online into their T-Mobile account or calling T-Mobile customer service by dialing 611 on their phone. The company also recommends a feature called Account Takeover Protection that prevents unauthorized individuals from stealing a phone number and porting it out of T-Mobile.

Finally, the company will publish a website “for one-stop information and solutions to help customers take steps to further protect themselves.”

If you like to learn and find out more about various Windows errors, and how to repair them go to our vast archive or use search to find articles that will explain and help you in solving your issue.
However, if you prefer to do things fast and with automatization then we are proposing to use an automated solution for your issues. The application that we are recommending is Advanced System Repair Pro
Advanced System Repair utilizes multiple tools all in one to give you a quick, simple, reliable, and very thorough diagnosis of your PC. It brings you all the tools you need in one program to clean, fix, protect, optimize and boost your PC!
1-Click Maintenance
All the tools to make it simple and easy! It's like having a professional technician at the click of a mouse.

Junk Cleaner
Keeping your computer free from unnecessary clutter also helps make your computer last longer. Like any other machine, if you keep it clean and take care of it, it will serve you better for longer!

Optimize background apps
Optimize applications background activity with the built-in Application Optimizer feature.

Disk Defrag
With a simple 1-click, Advanced System Repair speeds up your PC by assembling fragmented files on your machine and organizing them more efficiently.

Malware Removal
Finds and removes all types of harmful malware including trojans, worms, bots, adware, spyware, PUPs, and more!

Privacy Cleaner
The all-in-one privacy suite to Clean Your Tracks & Protect Your Privacy! Make your computer safe, secure, and more efficient!

System Tweak/Optimizer
ASR will analyze your complete system and settings to adjust your PC to function at its maximum performance.

Registry Cleaner
Over time, as you install and uninstall applications, the registry can become cluttered with old entries and broken settings which can result in program crashes, and annoying messages and slow the computer down.
Visit our Advanced System Repair Pro Download page to inform yourself about all the benefits of this software and get a free trial copy of it.
advanced system repair pro

Advanced System Repair Pro

One-click automated PC repair solution
ASR logo
With Advanced System Repair Pro you can easily
Replace damaged files
Restore performance
Free disk space
Remove Malware
Protects WEB browser
Remove Viruses
Stop PC freezing
DOWNLOAD
Privacy Policy | Terms of Use | Uinstall
Advanced System Repair Pro is compatible with all versions of Microsoft Windows including Windows 11

Share this article:

You might also like

Enable Windows Sandbox on Windows
One of the most common ways cybercriminals use to inject suspicious code into devices is by tricking users into installing a malicious program on a targeted device. Oblivious users are vulnerable to such tricks, which is why Microsoft has been working hard in the background to address this issue. Recently, Microsoft announced the availability of a sandboxed version of Windows 10 that runs inside Windows 10 in order to isolate suspected software to run inside it and protect the system from potential threats. This Windows Sandbox feature is a new feature that keeps your computer secure. It is a virtual disposable environment that you can enable. So if suspect any software of being malicious, you can run this software in an environment and ensure that it won’t interfere with any normal processes and would not jeopardize files on your computer. To simply put it, “Windows Sandbox is a new lightweight desktop environment tailored for safely running applications in isolation”. So if the Sandbox is closed, all the residual files, software, and other data are deleted permanently. To enable Windows Sandbox, refer to the instructions provided below. Step 1: You have to make sure that you are running either Windows 10 Enterprise Editions or Windows 10 Pro and that your computer is running build 18305 or newer. Step 2: After that, you have to enable Virtualization to let another instance of Windows 10 running in Sandbox mode. Step 3: Next, search for Windows Features on and off in the search box and then select the appropriate entry. Step 4: From the list, go to the mini window and check the Windows Sandbox and then click on OK. Step 5: Afterwards, in the Cortana Search box, search for “Windows Sandbox” and select the related entry to run it in an elevated window. Step 6: Then from your main computer (host), copy the executable file and paste it inside the Windows Sandbox environment. Step 7: Now run the executable file in the Sandbox environment and use it as you normally do. Step 8: Once you’re done, close the Windows Sandbox application and as mentioned, every data regarding the executable file and the temporary environment will be deleted. Step 9: And for the sake of safety, ensure that there are no modifications made to the host because of the executions in the Sandbox environment. You have the option to contact Microsoft for feedback related to Windows Sandbox. You can use the traditional Feedback Hub if you have any suggestions or any issues. Just fill in the appropriate details and select Windows Sandbox for the feature category under the Security and Privacy section. And if you have any issues related to the execution of and within Windows Sandbox, simply choose “Recreate my problem” then select Start capture to reproduce the issue, and once you’re done, select Stop capture.
Read More
Remove CalendarSpark Browser Hijacker

CalendarSpark is a browser extension developed by MindSpark. This extension allows an easy way to print or view calendar templates and make schedulers for a day/week/month/year. This browser extension hijacks your browser home page and search engine, changing them to MyWay.com. While the extension is installed it monitors your browsing activity and collets visited websites, clicked links, and sometimes even personal information, which it later uses to display targeted unwanted ads through your browsing sessions.

While browsing the internet with this extension installed you will see additional sponsored links, ads, and sometimes even pop-up ads on websites that are not supposed to have any of these. Several anti-virus scanners have detected this extension as a Browser Hijacker, and due to its data collecting behavior, it is not recommended to keep it on your computer.

About Browser Hijackers

Browser hijackers (sometimes called hijackware) are a kind of malware that modifies web browser configuration settings without the computer owner’s knowledge or permission. These kinds of hijacks are raising at an alarming rate across the world, and they could be truly nefarious and sometimes harmful too. Browser hijacker malware is created for a number of reasons. These are generally used to force hits to a specific site, manipulating web traffic to generate ad revenue. However, it’s not that harmless. Your online safety is jeopardized and it is also extremely irritating. In a worst-case scenario, your browser could be hijacked to open up your computer system to a host of additional attacks.

Indications of browser hijack

When your browser is hi-jacked, the following could happen: your home page is reset to some unknown webpage; you get redirected to sites you never intended to visit; The default search page of the web browser is changed; unwanted new toolbars are added to your internet browser; you’ll find random pop-ups start showing on a regular basis; your internet browser starts running slowly or exhibits frequent errors; Inability to navigate to certain websites, particularly antivirus as well as other security software sites.

Exactly how browser hijacker finds its way onto your PC

Browser hijackers can enter a PC by some means or other, including via file sharing, downloads, and e-mail as well. They could also be deployed via the installation of an internet browser toolbar, add-on, or extension. A browser hijacker can be installed as a part of freeware, shareware, demoware, and pirated programs. An example of some well-known browser hijacker includes Conduit, Anyprotect, Babylon, DefaultTab, SweetPage, RocketTab, and Delta Search, but the names are regularly changing. Browser hijackers could interrupt the user’s web surfing experience significantly, track the websites visited by users and steal sensitive information, cause problems in connecting to the net, and then finally create stability issues, causing programs and computers to freeze.

Removal

Some kinds of browser hijackers can be quickly removed from the computer by deleting malicious applications or any other recently added freeware. Regrettably, most of the software applications used to hijack an internet browser are intentionally designed to be difficult to remove or detect. Furthermore, manual removals require in-depth system knowledge and therefore can be an extremely difficult job for novice computer users.

What you can do if Virus Stops You From Downloading Antivirus?

Practically all malware is inherently dangerous, but certain types of malware do much more damage to your computer than others. Some malware sits in between your computer and your internet connection and blocks a few or all websites that you would like to check out. It will also block you from the installation of anything on your PC, especially antivirus applications. If you’re reading this article now, you might have perhaps realized that virus infection is the real cause of your blocked net connectivity. So how to proceed when you want to download and install an antivirus application like Safebytes? Although this sort of problem can be tougher to circumvent, there are some steps you can take.

Download the software in Safe Mode with Networking

In Safe Mode, you may change Windows settings, un-install or install some program, and eliminate hard-to-delete viruses and malware. In case the virus is set to load immediately when the PC starts, switching to this mode can prevent it from doing so. To boot into Safe Mode, press “F8” key on the keyboard just before Windows logo screen appears; Or after normal Windows boot up, run MSCONFIG, look over Safe Boot under Boot tab, and then click Apply. After you reboot into Safe Mode with Networking, you could download, install, as well as update the anti-malware program from there. At this point, you can run the anti-malware scan to eliminate viruses and malware without hindrance from another application.

Obtain the antivirus program using an alternate web browser

Some malware only targets particular internet browsers. If this sounds like your situation, utilize another browser as it may circumvent the virus. The best way to avoid this problem is to choose a browser that is well known for its security features. Firefox has built-in Phishing and Malware Protection to help keep you safe online.

Install and run anti-malware from the Thumb drive

Here’s yet another solution which is creating a portable USB antivirus software package that can check your system for malicious software without the need for installation. To run anti-virus from a USB drive, follow these simple steps: 1) Use another virus-free PC to download Safebytes Anti-Malware. 2) Plug in the flash drive to a USB slot on the clean computer. 3) Double-click the executable file to open the installation wizard. 4) When asked, choose the location of the USB drive as the place where you would like to store the software files. Follow activation instructions. 5) Unplug the flash drive. You may now use this portable anti-malware on the affected computer. 6) Run the Safebytes Anti-malware directly from the flash drive by double-clicking the icon. 7) Run Full System Scan to detect and clean-up up all types of malware.

SafeBytes Anti-Malware Benefits

If you are looking to install anti-malware software for your PC, there are numerous tools on the market to consider but you cannot trust blindly to anyone, irrespective of whether it is free or paid software. A few of them are great, some are decent, while some will harm your computer themselves! You need to select one that is dependable, practical, and has a strong reputation for its malware protection. While thinking about the dependable software programs, Safebytes AntiMalware is certainly the strongly recommended one. SafeBytes anti-malware is a trusted tool that not only protects your computer system permanently but is also very user-friendly for people of all ability levels. Once you’ve got installed this software, SafeByte's sophisticated protection system will make sure that absolutely no viruses or malicious software can seep through your personal computer. SafeBytes has a plethora of amazing features that can help you protect your PC from malware attacks and damage. Listed below are some of the great features included in the tool. Optimum AntiMalware Protection: Using a critically acclaimed malware engine, SafeBytes provides multilayered protection that is designed to find and eliminate viruses and malware that are concealed deep in your computer’s operating system. Live Protection: SafeBytes offers a completely hands-free real-time protection that is set to observe, block, and wipe out all computer threats at its very first encounter. It will inspect your computer for suspicious activity regularly and its unparalleled firewall shields your computer from illegal entry by the outside world. Faster Scan: SafeBytes Anti-Malware has got a multi-thread scan algorithm that works up to 5 times faster than any other protection software. Website Filtering: SafeBytes checks and provides a unique safety ranking to each and every site you visit and block access to webpages known to be phishing sites, thus safeguarding you from identity theft, or known to contain malware. Light-weight: The program is light-weight and will work silently in the background, and will not impact your computer efficiency. Premium Support: For any technical inquiries or product assistance, you could get 24/7 professional assistance via chat and email.

Technical Details and Manual Removal (Advanced Users)

To get rid of CalendarSpark manually, navigate to the Add/Remove programs list in the Windows Control Panel and select the program you want to get rid of. For browser extensions, go to your web browser’s Addon/Extension manager and select the add-on you intend to remove or disable. You will probably also want to reset your internet browser. In order to ensure the complete removal, manually examine your hard disk and computer registry for all of the following and remove or reset the values accordingly. But bear in mind, this is a tricky task and only computer professionals can carry it out safely. In addition, certain malicious programs are capable to defend against its deletion. Doing this malware-removal process in Safe Mode is suggested.
Files: calendarspark.dl.myway[1].xml %UserProfile%\Local Settings\Application Data\CalendarSparkTooltab chrome-extension_apfkjcjglfhoemadfobgcacfkdhapiab_0.localstorage-journal %LOCALAPPDATA%\CalendarSparkTooltab http_calendarspark.dl.tb.ask.com_0.localstorage-journal http_calendarspark.dl.tb.ask.com_0.localstorage Calendarspark.exe 310,048 602097e5efa71f01dca1ad60ba108730 %UserProfile%\Local Settings\Application Data\Google\Chrome\User Data\Default\Extensions\lacjhcgjigifchcapcccoippjdnkbagj %LOCALAPPDATA%\Google\Chrome\User Data\Default\Extensions\lacjhcgjigifchcapcccoippjdnkbagj www.calendarspark[1].xml %LOCALAPPDATA%\Google\Chrome\User Data\Default\Local Extension Settings\lacjhcgjigifchcapcccoippjdnkbagj Registry: HKEY_CURRENT_USER\Software\CalendarSpark HKEY_CURRENT_USER\Software\Microsoft\Internet Explorer\LowRegistry\DOMStorage\calendarspark.com HKEY_CURRENT_USER\Software\Microsoft\Internet Explorer\LowRegistry\DOMStorage\calendarspark.dl.myway.com HKEY_CURRENT_USER\Software\Wow6432Node\CalendarSpark HKEY_CURRENT_USER\Software\Google\Chrome\PreferenceMACs\Default\extensions.settings, value: lacjhcgjigifchcapcccoippjdnkbagj HKEY_LOCAL_MACHINE\Software\[APPLICATION]\Microsoft\Windows\CurrentVersion\Uninstall..Uninstaller CalendarSparkTooltab Uninstall Internet Explorer
Read More
New focus sessions in Windows 11
focus session
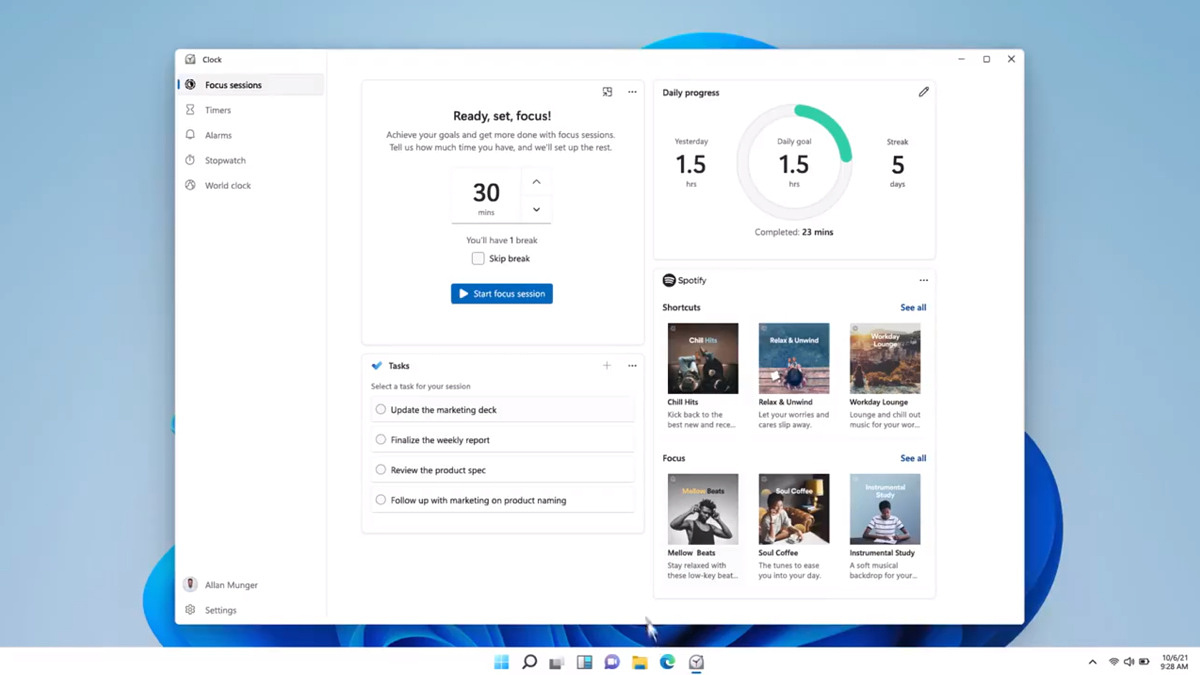
Windows and Devices chief Panos Panay has revealed new focus sessions feature that will be in Windows 11 on his Twitter account today. He himself is referring to it as a game-changer especially with Spotify integration.

So what is a focus session?

From the video clip provided on Twitter, we can see that focus session users will be able to choose a specific task from the previously made task list, choose songs that will play in the background while the task is active, and set a timer for the chosen task with breaks. Maybe the best comparison and explanation would be a desktop google calendar task with music, basically, that’s it. A neat and good organizer inside your Windows 11 operating system. I think that this is generally a good idea and for sure it will find its audience.
Read More
Fix INVALID_POINTER_READ_c0000005 atidxx64.dll
If your Microsoft Edge browser encountered a Stop Error that says, “INVALID_POINTER_READ_c0000005 (atidxx64.dll)” in your Windows 10 computer, then this indicates that your Graphics card driver is outdated. According to security experts, Microsoft has already acknowledged the problem and stated that this issue exists with Windows 10 v1809, Windows Server 2019, and Windows Server version 1809. Although there is no direct way to resolve the problem, there are still some workarounds you can try. If you are using a RadeonHD2000 or HD4000 series video card, the update will be blocked for you. Some users also claim to experience performance issues with the lock screen or the ShellExperienceHost. However, if you are using AMD, the problem is that it no longer supports Radeon HD2000 and HD4000 series graphics processing units or GPUs. Even though Microsoft is already working for a way to resolve the problem, here are some alternative solutions you can check out:

Option 1 – Update your Graphics card drivers

  • First, boot your computer into Safe Mode.
  • After that, tap the Win + R keys to launch Run.
  • Type in devmgmt.msc into the box and tap Enter or click OK to open the Device Manager.
  • After that, a list of device drivers will be displayed. From there, look for the Display Adapters and click on them.
  • After that, right-click on each entry under the Display Adapters and select the “Uninstall Device” option from the menu.
  • Now restart your computer.
  • After restarting your computer, go to the Settings app and Check for Updates in the Windows Update section.
Note: You also have the option to go directly to the website of your graphics card manufacturers like NVIDIA, Intel or AMD and go to the section called Drivers then check if there’s a new available update – if there is, download and install it.

Option 2 – Try removing AMD Radeon HD2000 and HD4000 drivers

Although this is not exactly a perfect solution, removing AMD drivers will make the operating system fall back to the default GPU available on your motherboard. You also have the option to completely disable the hardware.
  • Tap the Win + X + M keys to open the Device Manager.
  • Next, look for your Graphics card drive, and under Display Adapters, right click on them and click Uninstall device or Disable device.
  • After that, restart your computer. This will disable the AMD drivers so you won’t be able to find them. It will also release the Windows 10 v1809 update on your computer and in case your operating system tries to prompt you with the “New Device found” message, simply ignore it.

Option 3 – Try to use another browser

You might want to use another browser especially when you already updated your computer and Microsoft Edge still keeps on crashing. You can use Google Chrome, Mozilla Firefox, and other browsers as alternatives until you sort out the problem.

Option 4 – Try to remove the Graphics card physically

You might also want to try removing both AMD Radeon HD2000 and HD4000 as they are very old graphics cards. And since AMD is not going to roll out anything, at least on its own if your motherboard has an onboard GPU, it would be best to get rid of the cards. After that, install the Windows v1809 update and then put them back in. You also have the option to install the driver but just don’t use Microsoft Edge.
Read More
How to Fix UNEXPECTED_KERNEL_MODE_TRAP error
It is a fact that Blue Screen of Death errors can give you a headache for you will have a hard time fixing it as it is one of the most difficult errors you can encounter on your Windows computer. One of these BSOD errors is the UNEXPECTED KERNEL MODE TRAP error. If you receive this kind of error then it means that the operating system was not able to catch a trap or an exception generated by the CPU. This BSOD error has an error code 0x00000007F and indicates that the Intel CPU generated a trap that the kernel failed to catch. One of the most likely causes is hardware failure due to faulty memory. Aside from this cause, you also have to track down other probable causes for this problem like corrupted system files, incompatible drivers or programs, faulty hardware, and even dusty components, and so on. To fix the UNEXPECTED KERNEL MODE TRAP BSOD error, here are some suggestions that might help.

Option 1 – Uninstall the programs you installed recently

Chances are, some programs that you just installed might be the one that’s causing the BSOD error. Thus, you need to uninstall the program to resolve the problem.
  • In the search box, type in “control” and then click on Control Panel (desktop app) among the search results.
  • After that, select Programs and Features from the list which will give you a list of all the programs installed on your computer.
  • From there, look for the concerned program and select it and then uninstall it.
Note: If you have downloaded the app from the Windows Store, you can simply right-click on it from the application list and then uninstall it. In addition, you might also want to check the hardware components of your computer that might not support the operating system itself. You can disconnect all the external devices like USB drives, scanners, printers, etc., and then reboot your PC. After that, add the devices again one after the other and check if the BSOD error is now fixed or not. Moreover, you can also perform a clean boot to make things easier for you.
  • Log onto your PC as an administrator.
  • Type in MSConfig in the Start Search to open the System Configuration utility.
  • From there, go to the General tab and click “Selective startup”.
  • Clear the “Load Startup items” checkbox and make sure that the “Load System Services” and “Use Original boot configuration” options are checked.
  • Next, click the Services tab and select the “Hide All Microsoft Services” checkbox.
  • Click Disable all.
  • Click on Apply/OK and restart your PC. (This will put your PC into a Clean Boot State. And configure Windows to use the usual startup, just simply undo the changes.)

Option 2 – Update your device drivers

  • Tap the Win + R keys to launch Run.
  • Type in devmgmt.msc into the box and tap Enter or click OK to open the Device Manager.
  • After that, a list of device drivers will be displayed. Look for the device driver you and then select either “Update driver” or “Uninstall device”. And if you find any “Unknown device”, you need to update it as well.
  • Select the “Search automatically for updated driver software” option and then follow the instructions to complete the process.
  • If you have chosen to uninstall the driver, follow the screen options to complete the process and then restart your PC.
  • Connect the device and Scan for hardware changes – you can see this option under Device Manager > Action.

Option 3 – Use the Blue Screen Troubleshooter

The Blue Screen troubleshooter is a built-in tool in Windows 10 that helps users in fixing BSOD errors like UNEXPECTED KERNEL MODE TRAP. It can be found on the Settings Troubleshooters page. To use it, refer to these steps:
  • Tap the Win + I keys to open the Settings panel.
  • Then go to Update & Security > Troubleshoot.
  • From there, look for the option called “Blue Screen” on your right-hand side and then click the “Run the troubleshooter” button to run the Blue Screen Troubleshooter and then follow the next on-screen options. Note that you might have to boot your PC into Safe Mode.

Option 4 – Run the Windows Memory Diagnostic tool

You can use the Memory Diagnostic tool in Windows to check RAM. Before you use this tool, make sure you save all your important work.
  • Tap the Win + R keys to open the Run dialog box.
  • Next, type in “mdsched.exe” in the field and hit Enter to open Memory Diagnostic.
  • After that, the Windows Memory Diagnostic will give out two options such as:
  1. Restart now and check for problems (recommended)
  2. Check for problems the next time I start my computer
  • Select any of the given options. After that, your computer will restart and check for memory-based issues upon the restart. If there are any issues, it will automatically them.

Option 5 – Disable Memory caching in the BIOS

You can also disable memory caching in the BIOS to fix the UNEXPECTED KERNEL MODE TRAP error.
  • Open the BIOS Setup screen.
  • Next, go to Advanced > Cache Memory and then disable it.
  • Tap the F10 key to save the changes made and restart your computer.

Option 6 – Run System File Checker

  • Tap Win + R to launch Run.
  • Type in cmd in the field and tap Enter.
  • After opening Command Prompt, type in sfc /scannow
  • Restart your computer once the scan is completed.

Option 7 – Clean your hardware components for dust

Cleaning your computer’s hardware components for dust might also help in resolving the UNEXPECTED KERNEL MODE TRAP error. Make sure to use a soft cloth in cleaning the hardware as well as a small blower. Moreover, ensure that you do not damage any parts with moisture or cause harm to any circuits while you’re at it.
Read More
How to Turn Bluetooth ON in Windows 11
Windows 11 Bluetooth
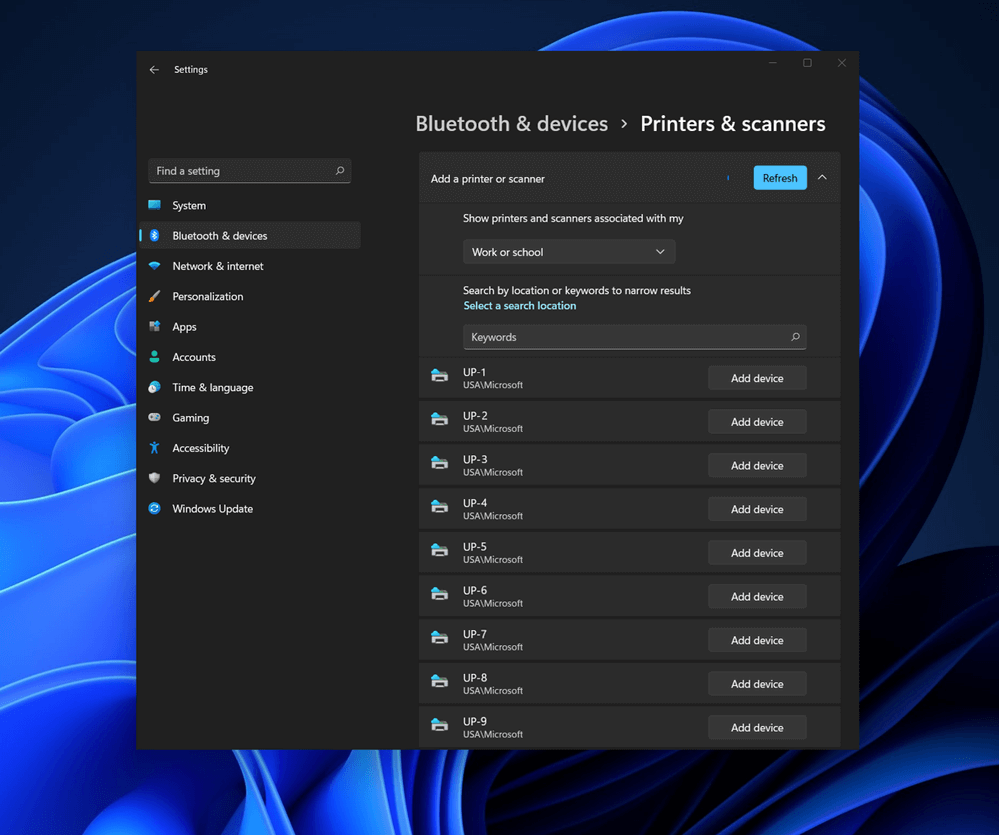
Bluetooth perhaps is slowly becoming an outdated feature but sometimes you can really used it and need it. By default, in Windows 11 Bluetooth is turned OFF so if you need it, you will need to turn it ON first. Luckily turning it ON is easy and we will guide you through the process

Turning Bluetooth using the Quick Settings menu

The easiest and fastest way to turn the Bluetooth ON is using the quick setting menu:
  1. Click on indicator icons located left of date and time in Taskbar
  2. Click on the Bluetooth icon (if the icon is not displayed, click on the pencil icon, then click on Add and add Bluetooth icon from the list)
  3. Right-click on the Bluetooth icon and select go to Settings
  4. Go to Adding a Bluetooth Device to Windows 11 section

Switch it ON via Windows Settings

  1. Open Windows settings by using ⊞ WINDOWS + I combination
  2. Click on Bluetooth & Devices
  3. Inside settings turn Switch to ON beside Bluetooth
  4. Click + Add Device large button on top
  5. Click Bluetooth
  6. Select device in the list of found devices (make sure device is turned ON, it has Bluetooth sharing ON, and that it is in pairing mode)
  7. If the device needs the password, type it in
  8. When the message Your device is ready to go is showed on the screen click on the Done

Advice on Bluetooth devices

Note that the Bluetooth devices you connect to Windows 11 stay linked to your PC unless you pair them with a different PC, smartphone, or tablet later. After a time, most Bluetooth devices power down automatically to save battery life. To continue where you left off, either power the Bluetooth device up (if it has a power button) or press a button on a keyboard or mouse, and it should automatically turn on and reconnect with your PC. If you’re having trouble connecting your Bluetooth device, make sure that Windows 11 is fully updated and that you’ve installed any drivers that came with your device. Make sure that the device is fully charged or that it has a fresh set of batteries. while Windows is searching. You’ll need to remove the device from Windows 11 first and then attempt to pair it with your PC again.

Removing devices

If you need to remove (un-pair) a Bluetooth device, just open Windows Settings and navigate to Bluetooth & Devices. Locate the name of the device that you want to remove, click the three dots button in the corner of its square and select Remove Device.
Read More
How to Repair Windows 10 Upgrade Error Code 0x80070070 – 0x50011

Repair Windows 10 Upgrade Error Code 0x80070070 – 0x50011

Code 0x80070070 – 0x50011 – What is it?

If you’ve recently tried installing Windows 10, you might have encountered error code 0x80070070 – 0x50011 or its alternatives (error code 0x80070070 – 0x50012 and 0x80070070 – 0x60000). Whatever formats this error code presents itself in, it's usually accompanied by a barrage of other errors, as underscored on Microsoft’s official site. If you’ve encountered this error code, it simply means that your computer system might not have the required or required space to install the upgrade.

Likely, if you’ve experienced error code 0x80070070 – 0x50011, it’ll likely appear in the formats highlighted below:

  • 0x80070070 – 0x50011
  • 0x80070070 – 0x50012
  • 0x80070070 – 0x60000

Solution

Restoro box imageError Causes

At present, this Windows 10 upgrade error is triggered or caused by various factors:

  • Lack of computer resources or space
  • Virus/malware infestation
  • A clogged registry

Further Information and Manual Repair

Whilst new, not much information has been propagated regarding this error. However, there are some manual / practical steps you can take to have your Windows 10 upgrade up and running. Since the primary aspect of solving this problem is to make space on your computer system, here are some ways in which you can do so manually.

Method 1: Get more space

  • Check the current space on your computer  

Before making attempts to create space on your computer, it’s vital that you check to decipher how much free space you have available.

  • Make use of Disk Clean-up 

Since there’s a free service available on your computer to create space, why not use it and save time? If the Disk Cleanup tool is employed regularly, this will free up hard drive space and optimize your computer to work better.

  • Remove unwanted desktop apps 

There are several apps lying around on your computer that you simply don’t use, uninstall those and make space to elude error code 0x80070070 – 0x50011 or its alternatives (Code 0x80070070 – 0x50012, Code 0x80070070 – 0x60000)

  • Remove or archive files  

If you have lots of photos, media, documents (files), videos, etc, that you don’t use or will only need in the future, try cloud storage. You’ll still have those files within your possession but just not in a physical location. However, they’re still accessible. Another suggestion: If you use programs such as One Drive or Google Drive for desktop, limit your use to only the online application.

  • Add more storage

If you’re not able to implement the above steps to clear some space to accommodate your Windows 10 upgrade due to error code 0x80070070 – 0x50011, acquire more storage. This can be expanded by incorporating storage devices such as USB flash drives, CDs, cloud storage, and SD Cards.

Method 2: Scan your computer for virus/malware

If you regularly download stuff, especially software on the Internet from ‘not so secured’ sites, you might have picked up something. You might have downloaded malware or virus (along with other legit programs).

To resolve this issue, it’s advised and very important that you download a powerful antivirus and perform a complete scan of your computer system. After you’ve detected and removed the suspected malware/virus, you’ll then be able to eliminate error code 0x80070070 – 0x50011 and resume with your Windows 10 upgrade.

Method 3: Clean up your computer’s registry

If you do not clean your computer’s registry often, it could become congested or clogged by .XML files, junk files, and cookies. To resolve this problem, clean your registry by using a powerful and user-friendly tool to clean up the problem.

Click here to download Restoro.

Read More
How to Fix Error Code 0x8007007B on Your PC
[vc_row][vc_column][vc_column_text]

How to Fix Error Code 0x8007007B on Your PC

Error Code 0x8007007B (Code 0x8007007B) – What is it?

Error code 0x8007007B (Code 0x8007007B) is an error that occurs when you attempt to activate Windows 10, as well as Windows Server 2008, Windows Vista, Windows 7, Windows 8, or Windows Server 2012.

Common symptoms include:

  • You will see an error message like this: “Error 0x8007007B 'The filename, directory name, or volume label syntax is incorrect”.
  • If you are using volume-licensed media to install: Windows 7, Windows 8, Windows Vista Business, Windows Vista Enterprise, Windows Server 2008 R2, Windows Server 2008, Windows Server 2012, Windows 10.
  • Your computer is not connecting the activation wizard to a Key Management Service (KMS) host computer.

Solution

Restoro box imageFurther Information and Manual Repair

Error Code 0x8007007B usually occurs when a product key has been activated too many times. Blocking activation aids in avoiding abuse of the key. If abuse of the key is not the case, it is possible to get the key reset, or you may receive a new key altogether. When you are not sure that you can complete these methods yourself, as they do contain advanced steps, it would be wise to consult a computer repair technician to avoid making the problem any worse.

Generally, the solution can be simple; it is just dependent on how comfortable you are with getting technical in your computer. Volume licensed media means that the media has a preset number of times that it is allowed to be activated. This helps to avoid misuse of the product. Some people install the Windows 10 program multiple times on their computer if they are software developers or do certain types of software testing. It is important to know the cause in order to effectively find the solution.

Method One:

  1. From the desktop screen, press the Windows key and S, type “Command Prompt”. Then, right-click on Command Prompt in the results. Select Run as Administrator.  Click Yes when asked about requesting permission.
  2. In the Command Prompt box, enter the command: slmgr.vbs -ipk xxxxx-xxxxx-xxxxx-xxxxx-xxxxx
  3. The x's represent the product key. Replace these with your unique product key.
  4. Type in the following command into the “Command Prompt” window: slmgr.vbs -ato
  5. Click Enter
  6. Restart your computer and try to activate windows again. It should not show the error code anymore.

Method Two:

  1. While on the desktop, press the Windows key and R.
  2. A window saying Run should open.
  3. Type in the following command: Slui 3
  4. Press ENTER and a window should appear.
  5. This window asks for you to enter the operating system activation product key.
  6. Enter this key in the space provided.
  7. After entering this, click Activate.
  8. Restart your computer now.
  9. Check for activation. The Error code should be gone now.

Method Three:

  1. Open the Command Prompt with access as administrator just as in Method One, and enter the following command: sfc /scannow
  2. The command will complete the tasks. This will take some time so just let the computer do its thing and work. Let the sfc finish the scan.
  3. When the scan is complete, restart the computer.
  4. Check for the activation. The error code should be gone at this point.
  5. If it is gone, revisit Method One or move on the Method Four.

Method Four:

Call the Microsoft Support Team and explain the problem in as much detail as you can give. Give the team the error code 0x8007007B and ask to have a different product key. When they give you the new product key, repeat Method 2. The Microsoft Support Team will either change your product key, or they will reset your current product key so that it can be used for activation again.

Congratulations, you have just fixed Error Code 0x8007007B in Windows 10 all by yourself. If you would like to read more helpful articles and tips about various software and hardware visit errortools.com daily. Now that’s how you fix Error Code 0x8007007B in Windows 10 on a computer. On the other hand, if your computer is going through some system-related issues that have to get fixed, there is a one-click solution known as Restoro you could check out to resolve them. This program is a useful tool that could repair corrupted registries and optimize your PC’s overall performance. Aside from that, it also cleans out your computer for any junk or corrupted files that help you eliminate any unwanted files from your system. This is basically a solution that’s within your grasp with just a click. It’s easy to use as it is user-friendly. For a complete set of instructions in downloading and using it, refer to the steps below Perform a full system scan using Restoro. To do so, follow the instructions below.
      1. Download and install Restoro from the official site.
      2. Once the installation process is completed, run Restoro to perform a full system scan.
      3. After the scan is completed click the “Start Repair” button.
[/vc_column_text][/vc_column][/vc_row]
Read More
How to Fix Error Code 0xc0000001 on Windows 10

Error Code 0xc0000001 – What Is It?

Error code 0xc0000001 on Windows 10 has been reported by some users when attempting to install Windows 10. When you encounter this error, the setup will be in a loop and the error message will keep popping up.

Solution

Restoro box imageError Causes

If you encounter the error code 0xc0000001 while trying to install Windows 10, it most probably be due to corrupted installation file. However, it can also be caused by any of the following:”

  • Damaged SAM file
  • Damaged system files
  • File system integrity compromised
  • Damaged RAM

Further Information and Manual Repair

Here are some methods that will help you fix the error code 0xc0000001 while trying to install Windows 10. Do not perform these methods unless you’re absolutely confident you can do it properly. Otherwise, you might make things worse.

If you’re not that confident, consider seeking advice from a technical expert. If you can’t afford one, you may want to consider getting an automated software to fix the job.

Method 1: Convert drive/partition to GPT

If you need to manually wipe the drive and then convert it to GPT, follow these steps:

  • Step 1: Power down your computer and put your Windows 10 installation DVD or USB drive
  • Step 2: Boot your computer to the USB or DVD key in UEFI mode.
  • Step 3: Once you’re at the Windows 10 Setup, press the Shift+F10 keys. This will open the command prompt window.
  • Step 4: Open diskpart tool from CMD. Just type diskpart and enter.
  • Step 5: Then, type the list disk on CMD again. Press enter. This will allow you to identify your computer’s drive that you want to reformat.
  • Step 6: Choose the drive and reformat it by typing the following on the command prompt:

select disk <disk number> (press enter)

clean (press enter)

convert gpt (press enter)

exit (press enter)

  • Step 7: Proceed with the Windows 10 Setup installation.

Note: when you’re prompted to choose the installation type, make sure to choose Custom. Then, choose unallocated space and click Next. This will automatically start the installation of Windows 10.

Method 2: Use Media Creation Tool to Perform Automatic Repair

Automatic Repair is a Windows feature/utility that allows you to fix certain system problems preventing you from installing or starting Windows. It works by scanning your computer system for any potential problem and tries to fix it.

  • Step 1: Download the Media Creation Tool
  • Step 2: Boot your computer using the Windows 10 DVD, or the System Repair disc. When you’re asked to press any key to boot, just press any key on your keyboard.
  • Step 3: Choose the right time and the keyboard type.
  • Step 4: Click Repair your computer. You’ll see this in the lower-left corner of your screen.
  • Step 5: Choose Troubleshoot from Choose an option screen
  • Step 6: Click Advanced options
  • Step 7: Choose an automatic repair

This will automatically run the utility.

Method 3: Check Hardware Devices

Another possible reason why you are getting this error while installing Windows 10 is due to the connected external hard drives. To fix this, power down your computer. Afterward, unplug and remove all connected external hard drives. If you’re using USB device to install Windows 10, ensure your BIOS is set to boot your computer from the USB.

Method 4: Create New Copy of Windows 10 Installer

Another possible reason why you experience this error is that your copy of the Windows 10 installer is corrupted. To fix this, it’s better to create a new copy of the Windows 10 installer.

  • Step 1: Go to this link
  • Step 2: Click the Download tool now. Choose Run with admin privileges
  • Step 3: On What do you want to do? section, choose installation media for another PC. Click Next.
  • Step 4: Select edition, language, and architecture (32-bit or 64-bit).
  • Step 5: Choose the media you want to use. If you want to use a USB flash drive, make sure the device at least has 5GB of free space. If you’re using an ISO file, you need to save the file first on your computer and then burn the file to a DVD.

Method 5: Use a Powerful Automated Tool

If you still encounter these errors after performing the above methods, find a trustworthy automated tool. As long as the automated tool is powerful and reliable, it will help you fix this error.

Read More
Operation did not complete successfully
It is common knowledge that when you open a file that contains viruses, it will automatically infect the operating system. This is why most antivirus programs like Windows Defender won’t allow the opening of a file or execution of any associated program if they detected that the file or program could potentially harm the computer. In situations like this, you may get an error stating, “Operation did not complete successfully because the file contains a virus”. In addition, it is also possible that this error message can pop up even for known programs. To open the program or file that triggered the error, you will be given a couple of options in this post but make sure that the program or file is really safe to open and does not contain any virus. You can open the file or execute the program by disabling the Windows Defender or any antivirus program temporarily. You could also try to add an exclusion in your antivirus program or repair File Explorer or run the Disk Cleanup tool. For more details, refer to each one of the options provided below.

Option 1 – Try to temporarily disable the Windows Defender program

Although you could encounter this error with any antivirus program, it is more common in Windows Defender. Thus, you can try to disable it for a while when you open the file or execute the program. To do so, follow these steps:
  • First, click on the Start button and go to Settings > Update and Security > Windows Security.
  • Here, select the “Open Windows Security” option located in the right pane.
  • After that, click on the “Virus and threat protection” option.
  • Next, click on Manage settings under the Virus and threat protection settings.
  • Then turn off the switch for both Real-time protection and Cloud-delivered protection.
  • Now restart your computer and try to open the file or execute the program again and see if it works.
  • Note: Do not forget to enable the Real-time protection and Cloud-delivered protection back in Windows Defender.

Option 2 – Try adding an exclusion in the Windows Defender program

  • Open the Windows Defender Security Center from the system tray area.
  • Next, click the “Virus & threat protection” option and then open the “Virus and threat protection settings”.
  • After that, scroll down until you find the “Exclusions” and click on the “Add or remove exclusions” option.
  • Then click the plus button and select the type of exclusion you want to add and from the drop-down list, select Folder.
  • Next, navigate to the path where the file or program is located.
  • When a User Account Control or UAC prompt, just click on Yes to proceed.
  • Now try to run the program or file again and see if it worked. If it did, then make sure to turn on your antivirus. However, if it didn’t work, proceed to the next given options below.

Option 3 – Try to run a System File Checker scan

System File Checker or SFC is a built-in command utility that helps in restoring corrupted files as well as missing files. It replaces bad and corrupted system files with good system files that might be the cause why you’re getting the errors 0x8024a11a and 0x8024a112. To run the SFC command, follow the steps given below.
  • Type “cmd” in the Start search and then right-click on the appropriate search result.
  • Next, select “Run as administrator” to open Command Prompt with admin privileges.
  • After opening Command Prompt, type in sfc /scannow
The command will start a system scan which will take a few whiles before it finishes. Once it’s done, you could get the following results:
  1. Windows Resource Protection did not find any integrity violations.
  2. Windows Resource Protection found corrupt files and successfully repaired them.
  3. Windows Resource Protection found corrupt files but was unable to fix some of them.
 Now restart your computer and see if the problem is fixed or not.

Option 4 – Run the Disk Cleanup tool

You can also try using the Disk Cleanup tool. To use it, refer to these steps:
  • Tap the Win + R keys to open the Run dialog box and then type “cleanmgr” in the field and hit Enter to open the Disk Cleanup window.
  • After that, select the drive you want to clean.
  • Now click OK to clean the disk and restart your computer.
Read More
1 2 3 162
Logo
Copyright © 2022, ErrorTools. All Rights Reserved
Trademarks: Microsoft Windows logos are registered trademarks of Microsoft. Disclaimer: ErrorTools.com is not affiliated with Microsoft, nor claim direct affiliation.
The information on this page is provided for information purposes only.
DMCA.com Protection Status