Steam updates including storage management

Valve has released a big update to its online store and distribution platform Steam. Among typical bugs fixing and making the user experience a little more fluid, we have received some major updates as well. Please take note that you need to update Steam itself to the latest version in order to get new features.

steam libraryStorage management Page update

The storage management page has received a complete redesign and UX overhaul and it is now much easier to manage your game libraries and create new ones. The page itself looks and feels a little console more like but thanks to that it offers a much easier and clearer look and feel.

steam storage manager
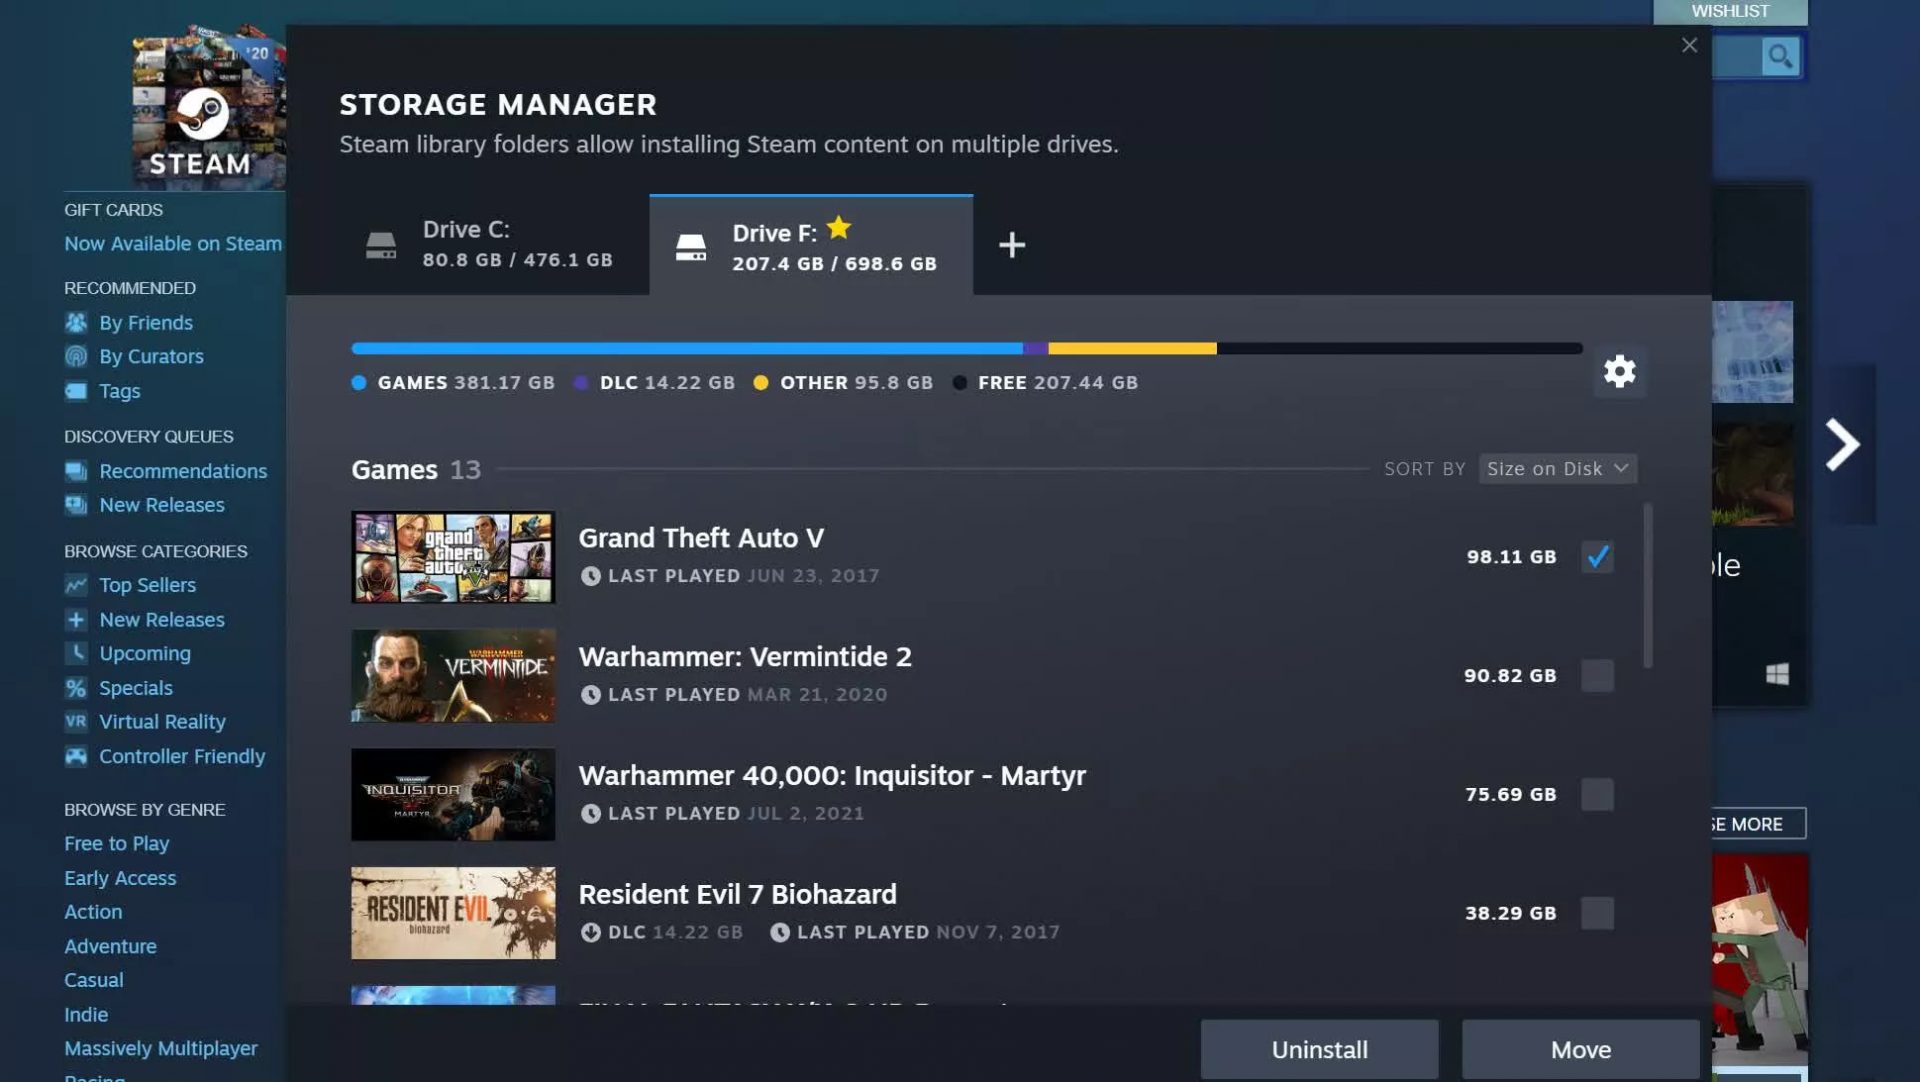
Another thing with the Steam store management page is the ability to move installation files from one location to another. Let’s say that you have two or more hard disk drivers in your machine and that you have SSD that you use for running stuff since it is fast and larger and slower one for storage. Now you can easily and quickly move one installation from one to another in order to take advantage of your faster SSD for quicker LOAD game times without making a new installation.

Steam Download page improvements

The download page has also received some love from Valve by enabling us to now see the installation progress. So far on the download page of Steam, you would only get download progress but it has been updated to show installation progress after download as well now making it more straightforward and giving you a general idea of how much more time there is to wait in order to start gaming.

steam download page
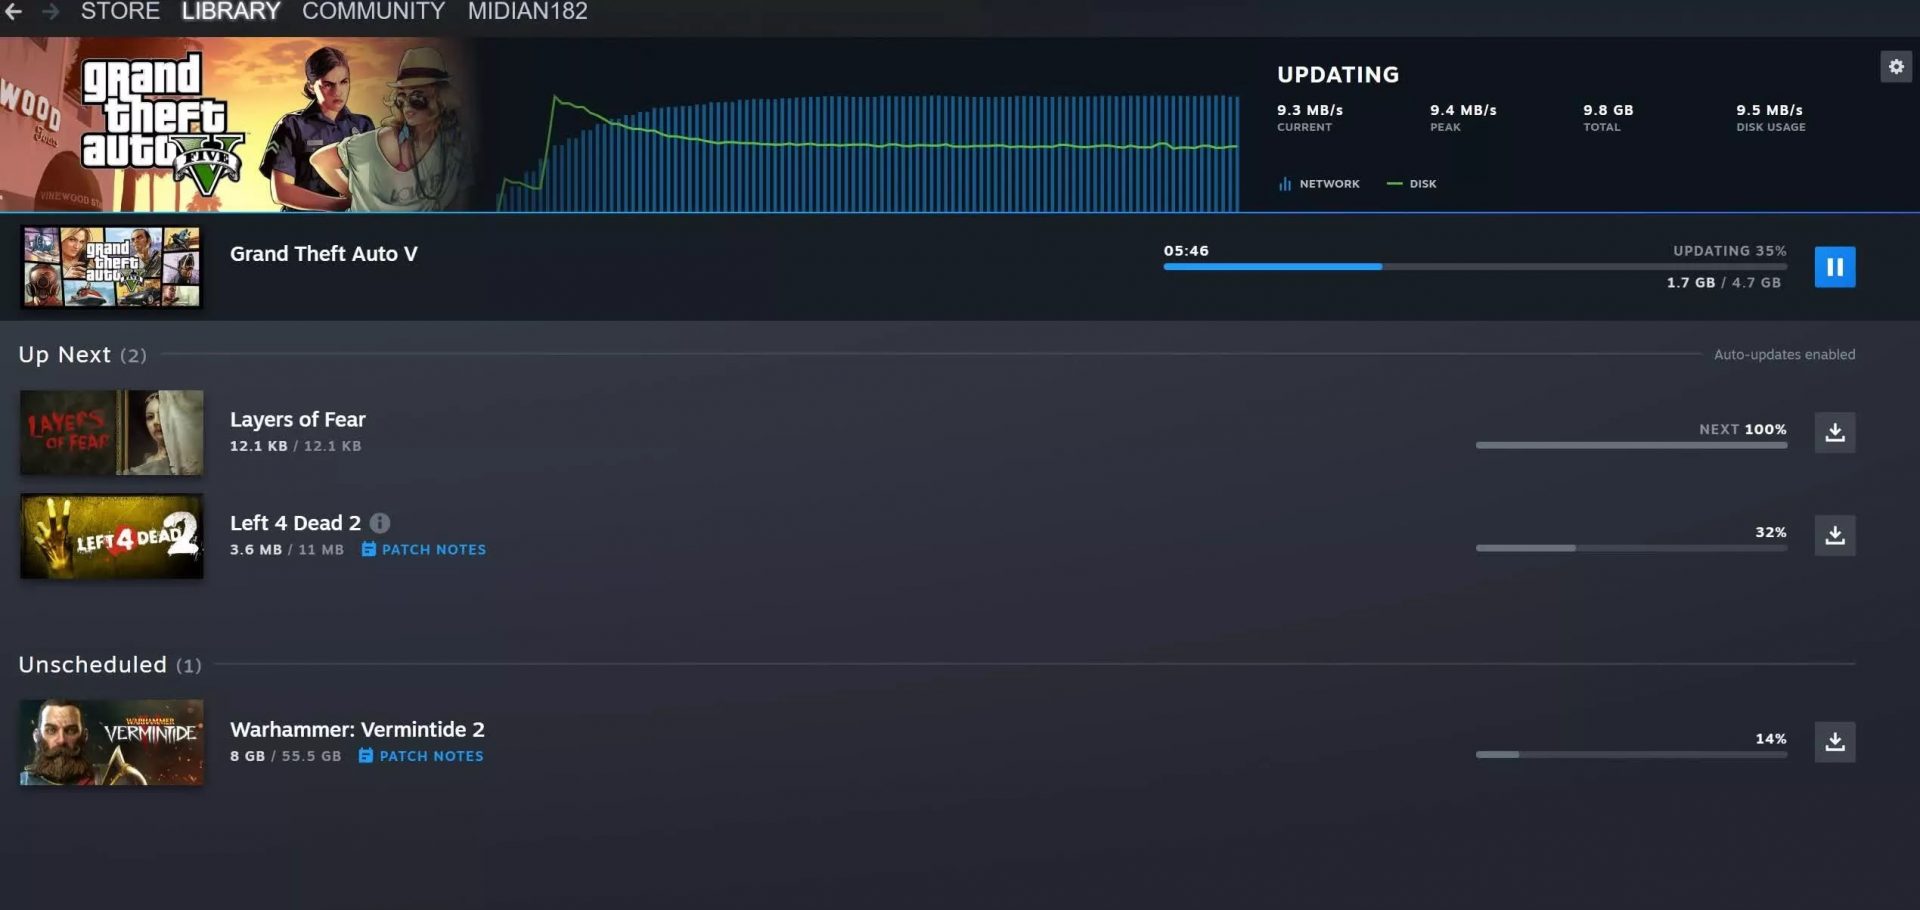
Also, you can now drag and drop items in the download bracket to reorder download orders or place them as active downloads to start downloading right away.

If you like to learn and find out more about various Windows errors, and how to repair them go to our vast archive or use search to find articles that will explain and help you in solving your issue.
However, if you prefer to do things fast and with automatization then we are proposing to use an automated solution for your issues. The application that we are recommending is Advanced System Repair Pro
Advanced System Repair utilizes multiple tools all in one to give you a quick, simple, reliable, and very thorough diagnosis of your PC. It brings you all the tools you need in one program to clean, fix, protect, optimize and boost your PC!
1-Click Maintenance
All the tools to make it simple and easy! It's like having a professional technician at the click of a mouse.

Junk Cleaner
Keeping your computer free from unnecessary clutter also helps make your computer last longer. Like any other machine, if you keep it clean and take care of it, it will serve you better for longer!

Optimize background apps
Optimize applications background activity with the built-in Application Optimizer feature.

Disk Defrag
With a simple 1-click, Advanced System Repair speeds up your PC by assembling fragmented files on your machine and organizing them more efficiently.

Malware Removal
Finds and removes all types of harmful malware including trojans, worms, bots, adware, spyware, PUPs, and more!

Privacy Cleaner
The all-in-one privacy suite to Clean Your Tracks & Protect Your Privacy! Make your computer safe, secure, and more efficient!

System Tweak/Optimizer
ASR will analyze your complete system and settings to adjust your PC to function at its maximum performance.

Registry Cleaner
Over time, as you install and uninstall applications, the registry can become cluttered with old entries and broken settings which can result in program crashes, and annoying messages and slow the computer down.
Visit our Advanced System Repair Pro Download page to inform yourself about all the benefits of this software and get a free trial copy of it.
advanced system repair pro

Advanced System Repair Pro

One-click automated PC repair solution
ASR logo
With Advanced System Repair Pro you can easily
Replace damaged files
Restore performance
Free disk space
Remove Malware
Protects WEB browser
Remove Viruses
Stop PC freezing
DOWNLOAD
Privacy Policy | Terms of Use | Uinstall
Advanced System Repair Pro is compatible with all versions of Microsoft Windows including Windows 11

Share this article:

You might also like

Renaming items in the Win+X menu
As you know, the Win + X menu, which is the shortcut context menu, is a useful way to launch several utilizes in Windows such as Power Options, Windows PowerShell, Event Viewer, Device Manager, and so on. However, there are times when you might experience difficulty in identifying the required utility. This is actually a part of the Windows 10 shell that goes out of scope in the customization of Windows 10. However, there is an easy trick you can use to do that. So in this post, you will be guided on how you can rename the options in the Win + X menu in Windows 10. In case you don’t know, the context menu is divided into three groups. Microsoft has categorized the bottom-most part as Group 1, while the middle part is categorized as Group 2 and the first part as Group 3. To rename these options, you need to use File Explorer and follow the instructions laid out below. Step 1: First, tap the Win + E keys to open File Explorer. Step 2: Next, navigate to this path: %LocalAppdata%MicrosoftWindowsWinX Step 3: From there, you should see three folders as Group 1, Group 2, and Group 3. Open the appropriate folder of your choice. Step 4: After that, right-click on the shortcut option you want to rename and then select Properties. Step 5: Next, navigate to the Shortcut tab under the Properties window. Step 6: Now in the text field of Comment, enter the new name of the option you selected. Step 7: Click on the Apply and OK buttons to save the changes made. Note: You can now either Sign back in or sign out of your Windows 10 User Account to see the result of the changes you’ve made. You could also restart the process of File Explorer via Task Manager. This will close the File Explorer as well as the shell components and then only launch the shell components again. In addition, you can check the Win + X menu to see the customized name that you’ve just set for a particular option. As you can see, even though it does not add anything extra, it is still a lot better in knowing how you can customize it.
Read More
Software review series: KRITA
Krita Desktop is a free and open-source painting application. Krita is a full-featured free digital painting studio for artists who want to create professional work from start to end. Krita is used by comic book artists, illustrators, concept artists, matte and texture painters, and in the digital VFX industry. Krita has been in development for over 10 years and has had an explosion in growth recently. It offers many common and innovative features to help the amateur and professional alike. Krita has a user-friendly interface. The dockers and panels can be moved and customized for your specific workflow. Once you have your setup, you can save it as your own workspace. You can also create your own shortcuts for commonly used tools. In addition to painting, Krita comes with vector, filter, group, and file layers. Combine, order, and flatten layers to help your artwork stay organized. There are also three different views on how to see the layers. Krita supports full color management through LCMS for ICC and OpenColor IO for EXR, allowing you to incorporate Krita into your existing color management pipeline. Open PSD files that even Photoshop cannot open. Load and save to PSD when you need to take your artwork across different programs. Krita is the only dedicated painting application that lets you open, save, edit and author HDR and scene-referred images. Furthermore, with OCIO and OpenEXR support, you can manipulate the view to examine HDR images, and use it in the most cutting-edge workflows from the film and visual effects industries.
Read More
How to Fix Error Code 22

How to Fix Error Code 22

Error Code 22 - What is it?

Code 22 is a type of Device Manager Error code. Device manager errors are reported by the drivers causing the problem. It indicates that the devices are disabled in the Device Manager. This error code is displayed in the following format:
This device is disabled. (Code 22)
It looks like a very simple matter to enable a device from the Device Manager interface but if the device fails to load then there are likely greater underlying problems with the drivers. Drivers allow hardware devices to communicate with other hardware devices and the operating system. Drivers contain instructions and operating procedures for devices. Without a driver, a hardware device will not function and may not even appear in the Device Manager.

Solution

driverfix boxError Causes

Common causes of error code 22 are:
  • Device is disabled
  • Driver is outdated
  • The driver is missing or corrupt
  • The previous attempt to update the driver failed
  • Device is damaged
  • The device is not configured as the default device
This means that though the error code 22 typically indicates that the device reporting the error is disabled but other causes can also be associated with the error occurrence.

Further Information and Manual Repair

Here are some of the best and easy do-it-yourself methods to resolve error 22 on your PC. Try these methods to repair the issue.

Method 1

If the error code 22 is triggered due to a disabled device, then all you need to do to resolve the issue is enable the device. To enable the disabled device, follow these steps. Simply go to the start menu and type Device Manager in the search bar. Now click on the Device Manager and then click Actions. After you Click Actions, double click Enable Device. The Enable Device Wizard will pop up. Follow all the prompts from the Enable Device Wizard. This will hopefully resolve the issue.

Method 2

If method 1 doesn’t work then this means the problem is deeper than you think.  The problem can be triggered by the missing, corrupted, or outdated driver for the device reporting the error. In such a situation it is advisable to reinstall the driver for the device. To do this first uninstall the driver for the device reporting error code 22 then reinstall the driver.
  • For this simply click the Start menu, go to the control panel and then click Performance and Maintenance, and then System.
  • In the new window, you will then see a tab called Hardware and the Device Manager.
  • Double click on the device whose driver you need to uninstall.
  • Click on the properties window with a tab marked driver. Then click on the driver you want to uninstall.
To activate changes reboot your PC. Now reinstall the latest and updated version of the driver uninstalled using the Plug and Play feature.

Method 3

Sometimes devices can also get damaged due to registry issues. In such an event, install Restoro. It is a PC Fixer deployed with a registry cleaner. The registry cleaner wipes out all the unnecessary and obsolete files damaging the registry and repairs them in a few minutes. Click here to download Restoro.
Read More
Software review series: Visual studio code
Visual Studio codeVisual studio code is a code editor available for Windows, Linux, and macOS. It is a completely free tool offering you to code in any language without the need to switch to another editor. Visual Studio Code is part of Microsoft Visual Studio which is a complete integrated development environment (IDE). Take notice that Visual studio itself has more advanced tools for developing and testing, it has 24/7 support, training, and Azure for WEB apps. Visual Studio Code is an editor lacking in some advanced features Visual Studio offers.

Visual Studio code Price and royalty

As mentioned Visual Studio code is completely free licensed under the MIT license agreement giving you the tool free to use and sell your product. How it supports Linux, Windows, and macOS, all you need it to go to its official page https://code.visualstudio.com/, download it and start using it. How this is free project backside is that there is no official support, you will have to rely on various articles and community in order to get needed information or problem solution.

Features

Syntax highlighting has become standard and norm for any editor but besides this function VS code offers us also IntelliSense option which goes a step further with code completion, code hinting, and parameter info. This means that VS code is aware of many things going on inside your code and will offer you as you type a menu with options for autocomplete along with variables referenced, function names, etc. VS code offers extensions inside its extensions marketplace where you can add extensions in order to implement new languages, add debuggers, change the layout, etc. This is one of the great features it allows you to easily switch from one project to another, one language to another not leaving your code editor. Working with version control systems like Git is easy with VS Code. You’ll be able to stage files and make commits, then push and pull changes to your remote code repository of choice, right from the editor.

Conclusion about Visual Studio code

Visual Studio Code is one of if not the most flexible and extensible code editors currently on the market that I have ever tried and used. IT has become my code editor of choice simply for reasons that there is really not much it cannot do and it is constantly updated and taken care of. You can really tune it to look and feels how you want with extensions and you really cannot beat the free price tag. I would highly recommend this editor for daily use especially since its biggest competitors like Atom and sublime text have not seen many updates lately.
Read More
How to Fix Low FPS in Apex Legends
  • In your Graphics Settings, select r5apex.exe and change the Graphics performance preference to Classic App, set it to High Performance, and then launch the game as an administrator when you want to play.
  • Inside the Nvidia Control Panel, click “Manage 3D Settings”, and select Apex Legends and change it to “Prefer Maximum Power”
  • You can also change “pre-rendered frames” to 1, but it will make you lag just a tiny, tiny bit.
  • Turning the shader cache on can help improve FPS, but on some systems, it may cause additional negative performance changes.
  • If you have the ability to use G-Sync, use that as well (Only available on some monitors and graphics cards)
  • From the task manager, change the priority of r5apex.exe to “High” and close out of other applications.
  • Update your graphics drivers.
  • Ensure your PC complies with the games minimum system requirements:
    • OS: 64-bit Windows 10
    • CPU: Intel Core i3-6300 3.8GHz / AMD FX-4350 4.2 GHz Quad-Core Processor
    • RAM: 6GB
    • GPU: NVIDIA GeForce GT 640 / Radeon HD 7700
    • GPU RAM: 1 GB
    • HARD DRIVE: Minimum 30 GB of free space
  • Check to see if your system has the game’s recommended hardware requirements:
    • OS: 64-bit Windows 10
    • CPU: Intel i5 3570K or equivalent
    • RAM: 8GB
    • GPU: Nvidia GeForce GTX 970 / AMD Radeon R9 290
    • GPU RAM: 8GB
    • HARD DRIVE: Minimum 30 GB of free space
  • Within the game, try to set the settings to:
    • Full Screen
    • Disable V-Sync
    • Anti-Aliasing to Disabled/TSAA (slight performance difference)
    • Use Native Resolution
    • Keep Field of View at around 80-100
    • Texture Streaming Budget to High
    • Texture filtering as low as possible while still being playable
    • Ambient occlusion as low as possible
    • Shadow all to Low / Lowest
    • Model detail low
    • Effects detail low
    • Volumetric lighting / Dynamic spot shadows Disabled
    • Ragdolls low
    • Impact marks the lowest
  • Make sure other applications are not placing overlays (Discord, GeForce, Xbox Gaming)
  • Clean your temporary files and uninstall other games to give your PC room to have the game run.
  • Don’t use products like CCleaner as they may remove necessary files from your computer.
  • Closeout of Chrome when you’re playing the game or follow our guide on Optimizing Chrome Performance
Read More
Fix VSS Error Code 0x8004231f in Windows 10
VSSControl: 2147467259 Backup jobs failed. Cannot create a shadow copy of the volumes containing the writer’s data. VSS asynchronous operation is not completed. Code: [0x8004231f]
This message pops up when you are creating a snapshot system restore, usually, the issue is tied with insufficient space or service stopping. We will go into detail about how to fix both so you can finish the operation without any issue.
  1. Check Volume Shadow Copy Services

    Easier and faster fix than the next one. Launch Services from the Start Menu, look for Volume Shadow Copy, double-click on it, and check the Service status. If it is stopped, click on the Start button. If it’s running, restart it by clicking Stop > Start.
  2. Increase Shadow Storage Space

    If the first fix didn’t resolve the issue then you need to increase Shadow Storage Space. Launch Command Prompt as an administrator. Now, type the following command to check your Shadow Storage Space. vssadmin list shadowstorage Now, type the following command to allocate more storage (you can change 10GB with the amount of space you want to allocate) vssadmin resize shadowstorage /For=C: /On=C: /MaxSize=10GB
Read More
How to Fix Modem Error 633
[vc_row][vc_column][vc_column_text]

Easy Modem Error 633 Fix

Modem Error 633 - What is it?

Modem Error 633 error is a dial-up error that usually occurs when using a USB modem with a Windows computer. The Modem Error 633 error message is displayed as the following:

“Error 633: The Modem is already in use or not configured properly.”

Solution

Restoro box imageError Causes

This error can be triggered due to several reasons such as:
  • A software program conflicts with the USB modem
  • The modem is not configured properly
  • The Telephon.ini file is missing or damaged
  • There is some issue with the way Windows is managing the communication (COM) ports on your computer.

Further Information and Manual Repair

If you experience the Modem Error 633 on your PC, you don’t have to panic. Though this error does not pose any major threats like data loss, it may hamper your ability to use the internet therefore it is advisable to resolve the error. Repairing the Modem Error 633 is quite easy. There are a number of ways to fix this error. So, let’s get started:

Solution 1: Delete Incompatible Software and Non-Present Modems

  • Click on the start menu and go to the ‘Control Panel’. Now choose the option ‘Phone and Modem’.
  • Here you will see three tabs, the dialing rules, modems, and advanced. Choose the tab ‘Modems’. As you click on it, you will see modems installed on your PC. To repair the Modem Error 633, select and remove all the incompatible software and modems that are not present and click ‘OK’.
  • Now to bring the changes into effect, restart your system with the modem plugged in and try connecting to the internet again.

Solution 2: Change the Communication Ports

If the error occurs because the modem is not properly configured, then this solution is possibly the best way to resolve this error. Here’s what you need to do:
  • Click on the Start menu and choose My Computer.
  • Now click on the option ‘Manage’ to open the Computer Management Window.
  • Once it opens, click the option ‘Device Manager and then expand the option modems. Click on Properties, then the Advanced tab, and the Advanced Port Settings button.
  • As you click on the Advanced Port Settings, then click on the COM Port Number drop-down box.
  • Choose a new Communication Port. However, make sure it is not already in use.
  • Once you make changes, click ‘OK’ and then restart your PC.
  • Now Open Device Manager again. Open the Modern Properties Window and then Click the Diagnostics tab.
  • After that view the command response window to verify if the error is fixed. If yes, then create a new dial-up connection and connect to the internet with ease.

Solution 3: Disable the Startup items

  • Another way to resolve Modem Error 633 on your PC is to go to the start menu and type ‘msconfig’ into the search box and then press ‘enter’.
  • Open the misconfig.exe program. As you open it, you will see 4 tabs, General, Boot, Service, Start-up, and Tools.
  • Now click on the ‘Start-up’, ‘Disable All’, and then press Apply.
  • After you press Apply, a window will pop up asking to restart the computer.
  • Confirm it and click restart.
  • Once the computer restarts now try connecting to the internet again. This will hopefully resolve the Modem Error 633.
[/vc_column_text][/vc_column][/vc_row]
Read More
A Guide to Fixing Error 0x80070652 Windows 10

Error Code 0x80070652 – What is it?

Error code 0x80070652 occurs when Windows users attempt to upgrade their operating system while another program is in the process of being downloaded. It may also occur due to problems related to previously failed update attempts within Window Update. When this Windows 10 upgrade occurs, Windows users fail to access the version of Windows they are attempting to download. Instead, a message box occurs stating that error code 0x80070652 has occurred on the device. If this error message is not rectified, it could give birth to other Windows 10 errors such as error code 0x80072EE2.

Solution

Restoro box imageError Causes

Error code 0x80070652 may result from Windows 10 users attempting to download another program while upgrading their operating system. It may also be caused by an issue related to previous installations of updates. For instance, in some cases, your previous installation of the Windows process may have been interrupted or it was simply not completed properly. This causes any other upgrade process that follows to result in error code 0x80070652.

Further Information and Manual Repair

But what can be done in such a situation to resolve the error code? Windows users have several options available. For instance, they can wait on any additional program that may be in the process of downloading to complete the process before attempting to upgrade Windows. They may also troubleshoot problems related to any failed updates or select a system restore point in which the error code was not present.

The manual repair methods Windows 10 users choose may involve any of the solutions mentioned previously. The choice is largely dependent on the user and his determination to fix the error code. However, note that automated tools or Windows repair technicians may also provide solutions to PC issues like error code 0x80070652.

Method One: Verify and Troubleshoot Failed Upgrades

Since previously failed updates within Windows Update can lead to the occurrence of error code 0x80070652, Windows 10 users will need to verify which of these failed updates occurred by checking the history section of the Windows Update tool. Once you’ve been able to verify that failed updates have occurred in the recent past, you’ll need to troubleshoot these problems to rectify the error code. Follow the instructions below to check for updates that have failed to install properly via Windows Update.

  • Step one: Type Windows Update in the Search box near Start Menu
  • Step two: Select Windows Update settings
  • Step three: Select Update history
  • Step four: Review updates from the most recent to least recent to see which updates have failed
  • Step five: Click failed updates for more details and troubleshoot accordingly.

Once you’ve completed the troubleshooting of any updates which failed, proceed by rebooting your device. You may then reattempt to upgrade to the latest version of Windows 10 once no other program is in the process of being downloaded.

If the problem causing error code 0x80070652 was related to failed updates of the past, these issues will likely be resolved once you successfully troubleshoot them. However, if the error code reoccurs, apply the next manual repair solution mentioned in this article.

Method Two: Download Updates Manually via Microsoft Download Center

Another option available to users is simply downloading updates manually by visiting the official Microsoft website, specifically the Windows section which provides downloads. To successfully complete this process, ensure you look for stand-alone packages of these downloads available on the website. You will need to know the Microsoft Knowledge Base (KB) article number related to the specific update(s) which failed.

Once a Windows user has verified the KB article number of the specific update, download it from the Microsoft website, then select Run to install the update. Reboot your PC, then check Windows Update to see if you are able to successfully complete the Windows 10 upgrade.

If the upgrade fails, you may need to implement the next manual repair method as is mentioned below.

Method Three: Use Windows System Restore

One of the best options for Windows 10 users facing certain PC problems is to apply System Restore. This allows them to reset their machine for a period of time in which the problem was not present. This is known as the restore point. To apply this manual repair method, follow the steps below.

  • Step one: In the search box beside the Start Menu, type System Restore
  • Step two: Select Create a restore point
  • Step three: Select the System Protection tab then Configure or Create
  • Step four: Provide details regarding a system restore point of your choice
  • Step five: Select Create, then OK.

Method Four: Download an Automated Tool

If you wish to always have at your disposal a utility tool to fix these Windows 10 and other related issues when they do arise, download and install a powerful automated tool.

Read More
Blue Screen of Death in Windows
[vc_row][vc_column][vc_column_text]

How to fix 'Blue Screen of Death' Errors in Windows XP, Vista, 7 and 8

Symptoms of Blue Screen of Death Errors

Symptoms of a blue screen of death problem are easy to identify: if you have a blue screen error, then your computer will display a blue screen. Also known as the infamous “Blue Screen of Death”, this screen will pop up when something goes horribly wrong with your computer. The screen displays cryptic information about the problem before automatically restarting the system.

Bluescreen Of Death Errors Solution

Download Available To Completely Repair Blue Screen of Death Errors

Recommended: Download the Automatic Repair Utility to correct this and other PC performance issues.

Restoro box imageBluescreen Error Causes

This one can be a bit more complex: blue screens are caused by hundreds of different things. In fact, any miscommunication between the hardware and software of the computer can lead to the dreaded Blue Screen of Death, blue screens reference a communication problem between the Windows operating system and the hardware in your PC.

Why do computer blue screens of death errors occur?

Most computer users have experienced a blue screen of death at least once in their life. But have you ever stopped to wonder why they occur? Blue screens of death can occur for a number of different reasons, but the most common reason is that your PC’s hardware failed to properly communicate with its software, resulting in a fatal error. If your video card, processor, hard drive, or any other vital system component encountered a serious communication error with your operating system, then your PC may automatically display the blue screen and shut down for its own safety. Blue screens can also occur as a self-protection mechanism if the PC is overheated.

Further Information and Manual Repair

Where do Windows blue screen errors come from?

Blue screen errors come from many different sources on your computer. However, the majority of blue screen errors seem to come from the Windows Registry, which contains important configuration information about the programs, data, and personal files on your PC. Windows constantly rely on the registry in order to operate normally, but since the registry is incredibly complex (it holds hundreds of thousands of files), errors naturally develop over time. Fortunately, registry errors are fixable. They can be repaired using special registry cleaning software. During a scan, registry cleaning software looks for any registry entries that have errors. Once these entries are found, the software automatically repairs each entry. In many cases, this can permanently repair the blue screen error and prevent blue screens from ever appearing again.

Blue screen Windows 7

Windows 7, despite being Microsoft’s most popular operating system to date, is not immune to blue screen errors. It’s more stable than previous versions of Windows, although many users will inevitably encounter blue screen errors in Windows 7. No matter which version of Windows you’re currently using, the error remains the same: the hardware on your computer has trouble communicating with the software, forcing the system to display the blue error message we all love to hate.

“Blue Screen of Death”

There’s a reason this error message is famously called the “blue screen of death.” Immediately after displaying a blue screen, the Windows computer will ‘die’, which means that it restarts itself. Another reason why the error could be called the blue screen of death is that it is often displayed at the end of a PC’s life cycle. As PCs get older and their hardware starts to fail, blue screen errors become more and more common. In real life, death isn’t reversible. In the computer world, blue screens of death certainly are. With the right software support – like Restoro – even the most novice computer technician can fix their blue screen errors and restore their PC to healthy working conditions.

Benefits Of Using Restoro, BSOD Error Codes

Restoro is one of the world’s most popular PC optimization programs. Used by professional PC technicians around the world, Restoro is a feature-rich software suite that has helped many PC users breathe new life into an old PC. Restoro optimizes computer performance in hundreds of different ways. It looks through the registry and repairs any erroneous entries it finds. It also hunts down and eliminates malware and goes to work with the press of a button. And most importantly for you – it’s also amazingly effective at repairing blue screen errors. Ready to experience the Restoro difference? Here are a few more advantages of our favorite software program:
  • Easy for anyone to use: A few years ago, only the most tech-savvy individuals could optimize their computer’s performance.  Everybody else had to pay for expensive tech support or simply buy a new computer. Thankfully, the software development community has come up with innovations like Restoro which are easy for anyone to use. Just click a button and your computer will be clean within minutes. The process could not be easier.
  • Surprisingly fast: There are hundreds of thousands of files in the Windows Registry. In spite of that fact, Restoro goes to work incredibly quickly. It scans the depths of your PC in an effort to uncover whatever is causing your blue screen errors. The entire scan is complete within just a few minutes, making it easy for anyone to scan their computer on a regular basis.
  • Free trial: It’s good to be skeptical. And if you don’t think Restoro will fix any of the errors your computer is experiencing, then that’s okay. However, when you download the free Restoro, you can instantly scan your computer for errors. If any errors are found during this scan, then you can repair these problems with the click of a button.
  • Fixes frustrating errors: Blue screen errors are incredibly frustrating. You can’t get any work done on your computer when experiencing a blue screen problem. For that reason, Restoro helps alleviate some of the most frustrating PC problems in the world today.
  • More than just blue screen repairs: Sure, blue screens are annoying. But they’re only one of many different errors that a PC can develop over time. Fortunately, Restoro does more than just fix blue screen errors. The software also identifies and repairs other problem areas on your PC, making it easy to optimize performance.
Ready to get rid of your blue screen errors – permanently? Restoro today![/vc_column_text][/vc_column][/vc_row]
Read More
Fix 0x800f0982, PSFX E MATCHING COMPONENT
If you encounter an error saying, “0x800f0982 – PSFX_E_MATCHING_COMPONENT_NOT_FOUND”, when you try to install a Windows 10 cumulative update, then you’ve come to the right place as this post will help you sort this problem out. According to the reports, computers with Asian language packs installed are the ones that are mostly affected by this error. In fact, the same error code was also found with two KB4493509, KB4495667 and KB4501835. These cumulative updates are released as part of Patch Tuesday. However, it appears that it brought on issues. Thus, to fix the error, you can try to uninstall and reinstall any language packs you’ve added recently. You can also try to uninstall older KB updates or delay Windows Update, as well as reset Windows 10.

Option 1 – Try to uninstall and reinstall the language packs you’ve recently added

If you have installed a language pack recently, you have to uninstall it, restart your computer, and then reinstall it.
  • Go to the Settings app and select Time & Language.
  • Next, click on the Language option and select the language you have to uninstall.
  • After selecting the language, it will enable two-button namely the Options and Remove buttons.
  • Click on the Remove button and then reboot your PC.
  • Once your computer has restarted, install the language pack again.

Option 2 – Try to uninstall the KB updates

Microsoft has actually offered a solution, an odd one which is to install the April 2019 cumulative update. You have to uninstall the older KB4495667 and KB4501835 update from your Windows 10 computer. And after you’ve uninstalled them, click on the Update button and then install the April 2019 cumulative update.
  • Go to Settings and select Update and Security > Windows Update.
  • From there, click on the “View update history” option and then click on the “Uninstall Updates” option.
  • This will open a new window that contains the list of installed Windows Updates.
  • Now right click on the Windows Update you wish to uninstall and click Uninstall.
  • Once you’ve uninstalled the update, click the Update button and install the April 2019 cumulative update.

Option 3 – Try to delay Windows Update

If you have not installed the Windows 10 cumulative update KB4493509 yet and the Asian language is a must for you, then you have to delay or pause the Windows Update for at least a couple of days.

Option 4 – Reset your computer

  • Tap the Win key or click on the Start button located in the Taskbar.
  • Then click on the Power button at the bottom right portion of the screen.
  • Next, press and hold the Shift key on your keyboard and then click on Restart. This will restart your Pc into the Advanced Startup options.
Note: Once you have access to the Advanced Startup options, you have to go to the setting which allows you to Reset your Windows 10 PC. All you have to do is select Troubleshoot > Reset this PC to reach the following screen
  • Afterward, select either the “Keep my files” option and then proceed to the next on-screen instructions that follow to reset your Windows 10 computer without losing your files.
Read More
1 2 3 162
Logo
Copyright © 2022, ErrorTools. All Rights Reserved
Trademarks: Microsoft Windows logos are registered trademarks of Microsoft. Disclaimer: ErrorTools.com is not affiliated with Microsoft, nor claim direct affiliation.
The information on this page is provided for information purposes only.
DMCA.com Protection Status