Steam proton to run Windows games on Linux

Steam proton
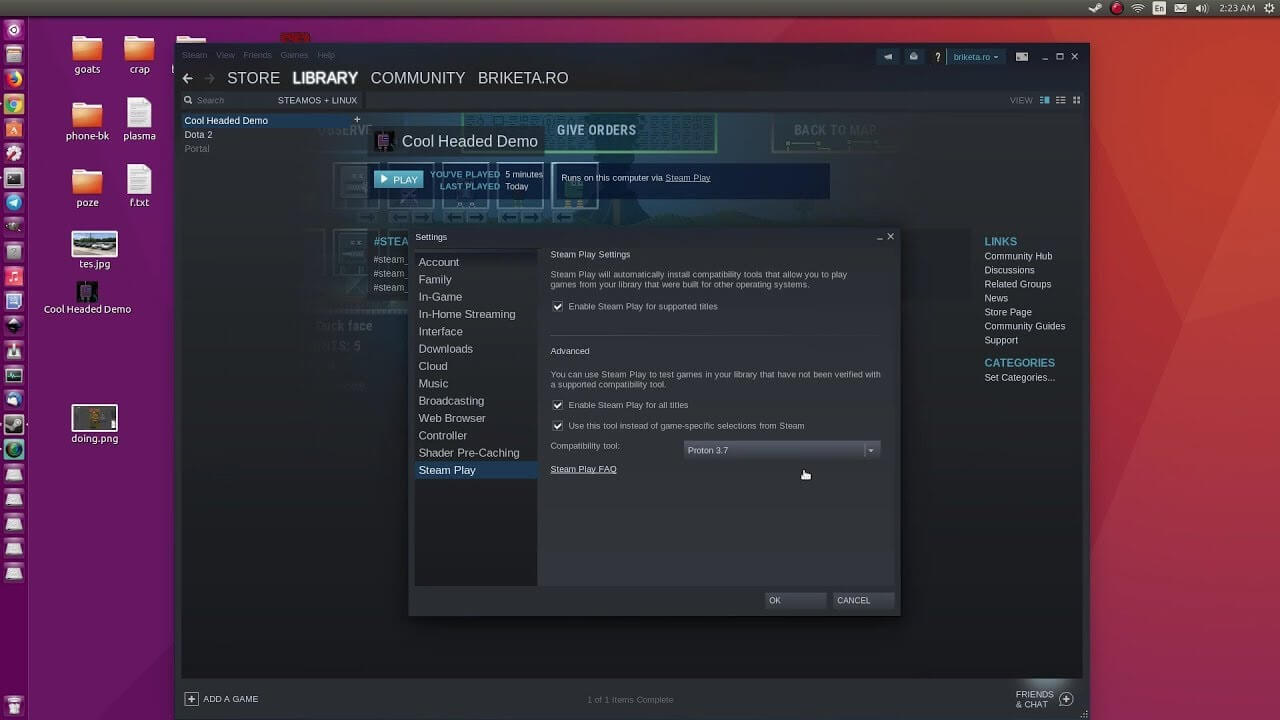
Despite popular belief, there are a lot of users running Linux OS. Linux offers great security and working environment and 96.3% of the world's top 1 million servers run on Linux. 90% of all cloud infrastructure operates on Linux and practically all the best cloud hosts use it. But gaming on Linux is limited, enter Steam proton a Valve’s gaming solution.

What is Steam proton?

Proton is a WINE fork with some extra capabilities, to play games and run applications not native and not made to run natively under Linux OS. It is supposed to bridge the Gaming issues for PC users and let them more freedom in choosing an operating system to game on.

Find out if your game supports Proton

Although there are a lot of titles that nowadays run natively on Linux some will still need proton in order to run at all and sadly some of them will not be able to run on Linux even via proton but seeing how Valve is busy and it is trying to push its ideas and technology slowly this gap is closing.

In order to see how the game you want to play performs and behaves on Linux and proton environment visit https://www.protondb.com/ and find out. As soon as the site loads you will be greeted with statistics and a search option to find out the status of the desired game with one of the given statuses: Borked, Bronze, Silver, Gold, Platinum, and Native.

As you probably guessed native means that the game will work on Linux out of the box and borked will probably not work at all. Platinum and gold status means that game will run on proton without any input or tweaks from the user while silver and bronze means that it will work but might need some tweaks in order to make it work.

How to get Steam proton?

In order to run games under proton inside Linux, you will need firstly a Steam client which luckily works naturally on Linux. Unlocking/activating Steam Proton on your Linux-based system is easy. Just head over to Steam > Settings > Steam Play and toggle the option “Enable Steam Play for Supported Titles”.

Valve has tested and fixed some Steam titles and you will now be able to play those titles. However, if you wish to go even further beyond, and play titles that even Valve has not tested, toggle the option “Enable Steam Play for all titles”.

Conclusion

Even we are not there yet, native gaming on Linux is gaining a foothold each day. Will Steam’s OS with proton technology be one that will turn the tide from Windows or some other tech we cannot tell but one thing is for sure, more choices mean better products so I am hopeful for a bright future.

If you like to learn and find out more about various Windows errors, and how to repair them go to our vast archive or use search to find articles that will explain and help you in solving your issue.
However, if you prefer to do things fast and with automatization then we are proposing to use an automated solution for your issues. The application that we are recommending is Advanced System Repair Pro
Advanced System Repair utilizes multiple tools all in one to give you a quick, simple, reliable, and very thorough diagnosis of your PC. It brings you all the tools you need in one program to clean, fix, protect, optimize and boost your PC!
1-Click Maintenance
All the tools to make it simple and easy! It's like having a professional technician at the click of a mouse.

Junk Cleaner
Keeping your computer free from unnecessary clutter also helps make your computer last longer. Like any other machine, if you keep it clean and take care of it, it will serve you better for longer!

Optimize background apps
Optimize applications background activity with the built-in Application Optimizer feature.

Disk Defrag
With a simple 1-click, Advanced System Repair speeds up your PC by assembling fragmented files on your machine and organizing them more efficiently.

Malware Removal
Finds and removes all types of harmful malware including trojans, worms, bots, adware, spyware, PUPs, and more!

Privacy Cleaner
The all-in-one privacy suite to Clean Your Tracks & Protect Your Privacy! Make your computer safe, secure, and more efficient!

System Tweak/Optimizer
ASR will analyze your complete system and settings to adjust your PC to function at its maximum performance.

Registry Cleaner
Over time, as you install and uninstall applications, the registry can become cluttered with old entries and broken settings which can result in program crashes, and annoying messages and slow the computer down.
Visit our Advanced System Repair Pro Download page to inform yourself about all the benefits of this software and get a free trial copy of it.
advanced system repair pro

Advanced System Repair Pro

One-click automated PC repair solution
ASR logo
With Advanced System Repair Pro you can easily
Replace damaged files
Restore performance
Free disk space
Remove Malware
Protects WEB browser
Remove Viruses
Stop PC freezing
DOWNLOAD
Privacy Policy | Terms of Use | Uinstall
Advanced System Repair Pro is compatible with all versions of Microsoft Windows including Windows 11

Share this article:

You might also like

How to Fix ntdll.dll crash Error on Windows
DLL files, also known as Dynamic Link Libraries are external parts of applications that run on Windows as well as other operating systems. Almost all applications are not complete in themselves and store code in different files. In this post, we will be discussing one DLL file called ntdll.dll. It is described as “NT Layer DLL” which means that it contains some Kernel functions that help in the normal functioning of the Windows operating system. It is created by Windows in the System32 folder when the OS gets installed. This file can serve different programs simultaneously by providing them with different Kernel functions which support the programs’ performance. However, if you encounter the ntdll.dll file error on your Windows 10 computer, read on as this post will guide you in fixing the problem.

Option 1 – Try to re-register the ntdll.dll file

You may have to re-register the ntdll.dll file using the regsvr32.exe before you can successfully install the program and fix ntdll.dll file crash error. The Regsvr32 tool is a command-line utility that can be used to register and un-register the OLE controls like DLL and ActiveX (OCX) control in the Windows operating system. Follow the steps below to use it.
  • Open Command Prompt as admin from the WinX menu.
  • Next, type the following commands in the elevated Command Prompt and hit Enter to execute the command. This will re-register the affected DLL file using the Windows operating system tool, regsvr32.exe.
    • exe /u ntdll.dll
    • exe ntdll.dll
  • You should see a message saying, “DllRegisterServer in vbscript.dll succeeded” if the Regsvr32 tool was able to run successfully. After that, try to install the program again and see if it now works.

Option 2 – Disable problematic Internet Explorer add-ons

There are instances when some add-ons in the Internet Explorer browser can cause the ntdll.dll file crash error. Thus, you need to disable some add-ons in Internet Explorer and then check if it fixes the problem.

Option 3 – Try running the DISM tool

You might want to repair potentially corrupted files in your system as having them could also trigger the ntdll.dll file crash error. To repair these corrupted system files, you can run the DISM commands:
  • Tap the Win + X keys and click on the “Command Prompt (Admin)” option.
  • After that, input each one of the commands listed below sequentially to execute them:
    • Dism /Online /Cleanup-Image /CheckHealth
    • Dism /Online /Cleanup-Image /ScanHealth
    • Dism /Online /Cleanup-Image /RestoreHealth
  • Once you’ve executed the commands given above, restart your computer and check if the DCOM error is now fixed.

Option 4 – Try to run the Program Compatibility Troubleshooter

You might also want to run the Program Compatibility Troubleshooter. This built-in troubleshooter is available in the Windows Update & Security section. From there, select Troubleshoot. This will find a list of programs for you and since you have already downloaded the driver files, just click on Not Listed located at the top of the program list. After that, browse and select the driver files and then let the program do its job.

Option 5 – Try to replace the DLL file with a trusted source

  • First, you need to get the new DLL file from another computer with preferably the same file version number.
  • After that, you need to boot your PC into Safe Mode and navigate to the paths listed below and then replace the file using a USB drive or other external storage devices.
    • x86: This PC > C:WindowsSystem32
    • x64: This PC > C:WindowsSysWOW64
  • Next, type “cmd” in the Cortana search box and right-click on Command Prompt, and select “Run as administrator” to open it with administrator privileges.
  • Now type the “regsvr32 ntdll.dll” command and hit Enter.
  • Restart your PC and check if the error is now fixed.

Option 6 – Try scanning your computer using Windows Defender

The ntdll.dll file crash error might also be infected with malware or virus and to eliminate it, you have to scan your computer using security programs like Windows Defender.
  • Tap the Win + I keys to open Update & Security.
  • Then click on the Windows Security option and open Windows Defender Security Center.
  • Next, click on Virus & threat protection > Run a new advanced scan.
  • Now make sure that Full Scan is selected from the menu and then click the Scan Now button to get started.
Read More
What to do if the Windows Wireless Service in Windows 10 is not running
When experiencing internet connection problems, most users run the built-in troubleshooter to fix the problem. However, you might come across another problem when instead of fixing the problem, the troubleshooter throws up an error message saying, “The Windows Wireless Service is not running on this computer”. After displaying this error message, the troubleshooter would exit. Usually, this kind of error indicates that Windows has failed to initialize the wireless service so it can start searching for broadcast signals and try to connect to them. So in this post, we have prepared some workarounds that might help you resolve the issue.

Option 1 – Try to check the WLAN Status

You have to make sure that the wireless service is enabled in your computer before you proceed to the other troubleshooting options below as this error could occur for a simple reason as the wireless capability is turned off from your PC either on some built-in settings or physically. This is why you need to make sure that Wireless is enabled. And if it turns out that it is disabled, you need to turn it back on and then reconnect to the wireless network again. You should now be able to connect to the internet without any issue.

Option 2 – Try to check the WLAN AutoConfig Service

The WLAN AutoConfig service is the one that provides the logic and functionality required to discover, connect and configure wireless networks with your PC. Aside from that, it also contains the module that allows your PC to be discoverable to other systems on a network. Thus, you need to verify if the WLAN AutoConfig service is on or not.
  • Tap the Win + R keys to open the Run dialog box.
  • And in the field, type in “services.msc” and hit Enter to open Services.
  • After opening the Services window, look for the entry named “WLAN AutoConfig” and then right-click on it and select Properties from the context menu.
  • Next, click on the Start button to turn on the service and then set the startup type as “Automatic”.
  • Then try to connect to your Wireless network again and check if the issue has been resolved.

Option 3 – Try to reset the Network Configurations

Resetting the Network Configurations can also help you in fixing the Windows Wireless service as the network settings often get disrupted or corrupted in a variety of different cases every now and then. Note that this module will reset all the network settings stored on your computer.
  • Tap the Win + S keys to open Search and then type in “command prompt” in the field.
  • From the search results that appear, right-click on Command Prompt and select the “Run as administrator” option.
  • After opening Command Prompt, copy and paste the following command and hit Enter to execute it:
netsh winsock reset
  • The command given will reset the Winsock data. Once it is executed, restart your PC for the changes to take effect and then check if the internet connection is now fine.
Note: Do make sure that the WiFi drivers are up to date. To do that, follow these steps:
  • Tap the Win + R keys to launch Run.
  • Type in devmgmt.msc into the box and tap Enter or click OK to open the Device Manager.
  • After that, a list of device drivers will be displayed. If you see a red or yellow sign that shows up against the driver, right-click on the driver’s name and select “Update Driver Software” or “Uninstall”. And if you find any “Unknown device”, you need to update it as well.
  • Select the “Search automatically for updated driver software” option and then follow the instructions to complete the process.
  • Restart your PC.
Note: You also have the option to go directly to the website of your graphics card manufacturer and check if there’s a new update – if there is, download it.

Option 4 – Perform System Restore

Recently, a lot of issues have resurfaced after users installed the latest Windows update. So the wireless service issue might also be related to it. To fix the problem, you can perform System Restore to roll back your Windows to the last time when it was working just fine. It automatically creates backups in time whenever you install a new update or periodically. Follow the steps below to perform System Restore.
  • Tap the Win + S keys to open Search and then type in “restore” in the field and select the topmost result.
  • Once you’ve opened the restore settings, click on System Restore located at the beginning of the window under the System Protection tab.
  • After that, a wizard will appear that will guide you through all the steps needed to restore the system. You can choose either the recommended restore point or a different one.
  • After you select the restore point, click Next to proceed to the next on-screen instructions.
  • Then select the restore point where the Windows Update was installed on your computer. If you have more than one restore point, you can just select the latest restore point and check the functionality from there. If it doesn’t work, you can just try another restore point.
  • Another prompt will appear and will ask you to confirm your actions. Click OK and wait for the system to be restored. Once it’s done, check if the problem’s now fixed.
Read More
A Guide to Resolving Error Code 35

Guide on Resolving Error Code 35

Error Code 35 - What is it?

Error Code 35 is a typical Device Manager error. It indicates information missing to properly configure your device.  Error code 35 is usually displayed in the following format:

“Your computer's system firmware does not include enough information to properly configure and use this device. To use this device, contact your computer manufacturer to obtain a firmware or BIOS update. Code 35”

Solution

driverfix boxError Causes

The 2 common reasons for Device Manager error code 35 are:

  • Outdated BIOS
  • Mis-configured, corrupted, or outdated Drivers

No matter what the reason may be, it is advisable to resolve the problem immediately without any delay otherwise you will be unable to use your hardware device.

Further Information and Manual Repair

Below is the list of the most effective and easy to perform solutions to resolve error code 35 on your PC. These solutions do not require any technical knowledge or understanding. Simply follow the instructions to resolve this error code.

Method 1 - Update the BIOS

BIOS (Basic Input/Output System) is the embedded software on the computer’s motherboard.

Though not all PCs have the same BIOS manufacturer, but the steps for updating the BIOS are similar for all versions. Before you get started with the updating process, first identify your current BIOS version.

  • For this, go to the start menu and type msinfo32, and press enter.
  • Now click System Summary to view your BIOS version. Here you will see the version number and date.
  • Now check your PC motherboard manufacturer’s website to download the BIOS update for the model you own. Also, download any Read Me Files and documentation. These contain guidelines and precautions that you should know before you update.
  • Backup all your data and existing BIOS before you update the BIOS version. This will keep your data protected in case the attempt to update BIOS fails.
  • Also, when updating, make sure to use an uninterruptible power supply. Remember power outage or even a small power fluctuation can corrupt the BIOS which is something you don’t want.
  • Now it’s time to perform the update. Run the downloaded installer for the BIOS updating software. Double click on the executable file.
  • Look for a button names Update, Flash, or Run.
  • Click on it to start updating the new version
  • After the update is complete, your computer will restart automatically.

This will hopefully resolve the problem. However, if the error still persists then there is a possibility that the error code is related to outdated drivers. To resolve, try method 2.

Method 2 - Download Driver Assist to Update Drivers Automatically

Update drivers to repair error code 35 on your PC by simply downloading DriverFIX. This is a cutting-edge program deployed with an intelligent programming system.

It is compatible with all Windows versions.

It scans your PC for problematic drivers and updates them with the latest and compatible versions automatically and in a few seconds thereby repairing all Device Manager error codes including error code 35 generated due to outdated/corrupted drivers.

In addition to this, it updates all device drivers on a regular basis, so you don’t have to stress over and keep a track of what drivers on your PC need to be updated and when.

Click here to download DriverFIX to resolve Device Manager error code 35 today!

Read More
Fix INVALID_POINTER_READ_c0000005 atidxx64.dll
If your Microsoft Edge browser encountered a Stop Error that says, “INVALID_POINTER_READ_c0000005 (atidxx64.dll)” in your Windows 10 computer, then this indicates that your Graphics card driver is outdated. According to security experts, Microsoft has already acknowledged the problem and stated that this issue exists with Windows 10 v1809, Windows Server 2019, and Windows Server version 1809. Although there is no direct way to resolve the problem, there are still some workarounds you can try. If you are using a RadeonHD2000 or HD4000 series video card, the update will be blocked for you. Some users also claim to experience performance issues with the lock screen or the ShellExperienceHost. However, if you are using AMD, the problem is that it no longer supports Radeon HD2000 and HD4000 series graphics processing units or GPUs. Even though Microsoft is already working for a way to resolve the problem, here are some alternative solutions you can check out:

Option 1 – Update your Graphics card drivers

  • First, boot your computer into Safe Mode.
  • After that, tap the Win + R keys to launch Run.
  • Type in devmgmt.msc into the box and tap Enter or click OK to open the Device Manager.
  • After that, a list of device drivers will be displayed. From there, look for the Display Adapters and click on them.
  • After that, right-click on each entry under the Display Adapters and select the “Uninstall Device” option from the menu.
  • Now restart your computer.
  • After restarting your computer, go to the Settings app and Check for Updates in the Windows Update section.
Note: You also have the option to go directly to the website of your graphics card manufacturers like NVIDIA, Intel or AMD and go to the section called Drivers then check if there’s a new available update – if there is, download and install it.

Option 2 – Try removing AMD Radeon HD2000 and HD4000 drivers

Although this is not exactly a perfect solution, removing AMD drivers will make the operating system fall back to the default GPU available on your motherboard. You also have the option to completely disable the hardware.
  • Tap the Win + X + M keys to open the Device Manager.
  • Next, look for your Graphics card drive, and under Display Adapters, right click on them and click Uninstall device or Disable device.
  • After that, restart your computer. This will disable the AMD drivers so you won’t be able to find them. It will also release the Windows 10 v1809 update on your computer and in case your operating system tries to prompt you with the “New Device found” message, simply ignore it.

Option 3 – Try to use another browser

You might want to use another browser especially when you already updated your computer and Microsoft Edge still keeps on crashing. You can use Google Chrome, Mozilla Firefox, and other browsers as alternatives until you sort out the problem.

Option 4 – Try to remove the Graphics card physically

You might also want to try removing both AMD Radeon HD2000 and HD4000 as they are very old graphics cards. And since AMD is not going to roll out anything, at least on its own if your motherboard has an onboard GPU, it would be best to get rid of the cards. After that, install the Windows v1809 update and then put them back in. You also have the option to install the driver but just don’t use Microsoft Edge.
Read More
How to Fix Error Code 0xC004C020

How to Fix Error Code 0xC004C020

Error Code 0xC004C020 (Code 0xC004C020) – What is it?

Error code 0xC004C020 (Code 0xC004C020) is an error that occurs when you attempt to activate a copy of Windows 7 with a key, but the key has already been activated multiple times. When receiving this error code, it means that you are trying to exceed the number of times that the Windows 7 key is allowed to be activated. Common symptoms include:
  • Attempting to install Windows 7 with a key and a dialog box with the code 0xC004C020 is displayed.
  • The computer is unable to install Windows 7 with the key.
  • Certain features will refrain from working until the correct key has been entered.

Solution

Restoro box imageError Causes

Error Code 0xC004C020 occurs when you are not able to install Windows 7 using a previously purchased key code that has been installed numerous times previously on the same computer.
  • You are not able to use your previously used key to install Windows 7.
  • You have used the Windows 7 key the maximum number of times allowed.
Error code 0xC004C020 simply means that the Windows 7 code that you are trying to use to install Windows 7 has already been used the maximum number of times allowed, even when installing it on the same computer that it was previously used on. This would indicate that the key is what is known as a volume key- meaning that there is a cap on the number of uses.

Further Information and Manual Repair

Many people encounter this problem when they are doing software development or testing and need to reinstall Windows 7. Some people might also encounter this error code when installing Windows 7 with a key that was used too many times previously. It should be noted that there are several ways to fix this problem, but if nothing is working, you should contact a computer repair technician.

Method One

Activate by phone- the long method.
  1. Click the start button, right-click Computer, click Properties, and then click Activate Windows.  This will open Windows Activation.
  2. Click on “Show me other ways to activate”.
  3. Find and enter the Windows 7 key, then click Next.
  4. Click on “Use the automated phone system”. If you are prompted for an administrator password or a confirmation, confirm or type the password now.
  5. Select the location nearest to you and then click the Next button.
  6. There will be a list of available phone numbers, choose one and call it. There will be an automated system that will guide the activation process.
  7. Enter the installation ID when prompted, it will be listed on your computer screen.
  8. The phone system will give you a confirmation ID, write this down.
  9. Type this confirmation ID into the space that is provided by step 3. This will be in the activation dialogue. Then, click NEXT and follow the instruction.
  10. If this is not successful, stay on the line and be transferred to a customer service representative that will assist you.

Method Two

Activate by phone- this is a much simpler method.
  1. Click on Start, type: slui.exe 4 into the Search box
  2. Press Enter on the keyboard.
  3. Pick your country.
  4. Choose the Phone Activation option; stay on hold to speak with a customer service representative.

Method Three

Error code 0xC004C020 occurs if you have used your Windows 7 activation key on multiple computers, or multiple times on the same computer. You are not allowed to exceed the uses of the key—you should consider purchasing a new key if this is the case. A Windows 7 key is available for purchase online through the Microsoft website, in the shop section. The new product key must then be activated within 30 days, or it becomes no longer valid. It can be activated online or through the telephone. If it is not activated on time, features will stop working until the new key has been activated. This should be the last resort method, as you should not have to purchase a new Windows 7 key code if it is not necessary. If you wish to always have at your disposal a utility tool to fix these Windows 10 and other related issues when they do arise, download and install a powerful automated tool.
Read More
Enable Touch Keyboard in Windows 11
Touch Keyboard
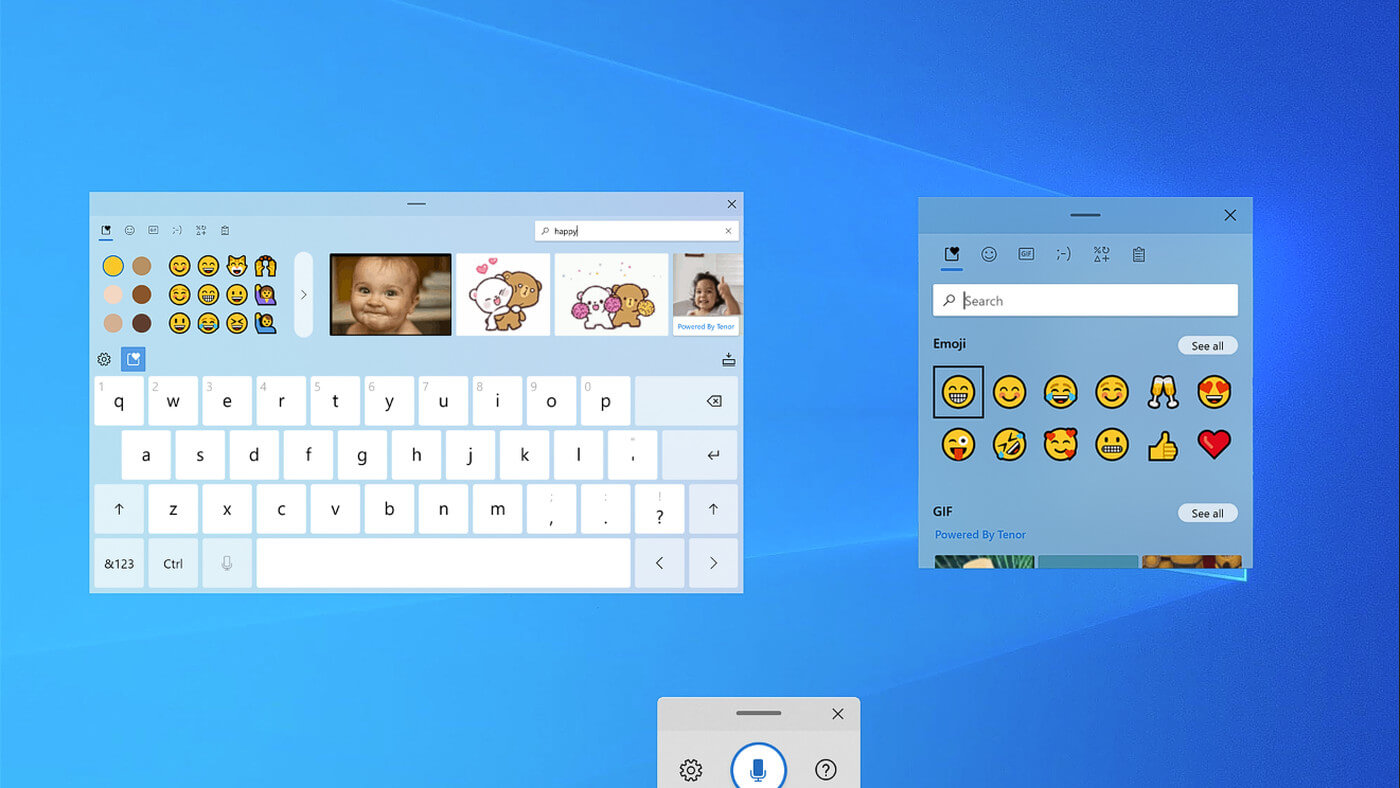
If by any chance you are working on a touchscreen PC, tablet, or any similar device and have no access to a hardware keyboard there is a way to place Touch Keyboard on your screen for easy typing, and you can enable icon on the taskbar for easy access.

Enabling the Touch Keyboard

  1. Right-click on the Taskbar
  2. Select Taskbar Settings
  3. Go to Personalization > Taskbar
  4. Click on Taskbar Corner Icons to expand it
  5. Click on the switch next to Touch Keyboard to turn it ON
  6. Close settings
The icon will immediately appear on the Taskbar in the lower right corner. Clicking the icon virtual keyboard will appear on the lower part of the screen. You can use this keyboard to type in applications the same as you were typing on hardware one. By taping on X in the upper right corner, you will hide the keyboard. Tap on the icon in Taskbar to bring it up again.

Hide the Taskbar icon

If you do not want to use Touch Keyboard anymore you can easily hide the icon:
  1. Right-click on the Taskbar
  2. Select Taskbar Settings
  3. Go to Personalization > Taskbar
  4. Click on Taskbar Corner Icons to expand it
  5. Click on the switch next to Touch Keyboard to turn it OFF
  6. Close settings
Read More
Calibrating Windows 10 display for HDR video
High Dynamic Range or HDR is a technique that’s used to create lifelike videos which have improved and better dynamic range, especially when it comes to details. And as you know, Windows 10 supports the steaming of HDR videos as long as the display supports it and it comes with the option to enable the HDR Playback for Windows 10 Video Streaming apps. However, before you can get the best viewing experience, you need to calibrate the display further for HDR video on your Windows 10 PC. Take note that even when you have the HDR Playback feature enabled on your computer, you still need a display that supports it. To make sure that your display supports this feature, you can use the DirectX Diagnostic Tool to have the display correctly wired and have the latest WDDM 2.4 drivers installed as well as set the other settings properly. Once you’ve made sure that your computer’s display really supports HDR and you’ve already enabled the HDR Playback feature, now it’s time for you to calibrate. Remember that when you calibrate the display, you should make an external monitor your primary display if you are using it for HDR and then adjust the settings to your liking. And if you are calibrating for primary display, you need to disconnect all other displays.

Follow the given steps below to calibrate the display of your PC.

  • Step 1: You need to open the Video Playback first. To do so, navigate to Settings > Apps > Video Playback.
  • Step 2: Under the Video Playback settings, uncheck the “Don’t increase display brightness when watching HDR video on battery” checkbox or plug in your PC.
  • Step 3: Next, click the “Change calibration settings for HDR video on my built-in display” link located on the right side.
  • Step 4: After that, click on the Play button located on the left side to play the video. Then move the sliders to the left or right so you can start to calibrate. Once you see that the quality of the image is to your preference, stop.
Note: Just a tip when calibrating – you just have to find the right balance between the details in the darker parts of a scene. For instance, you have Mountains in the background and buildings in the front – you need to drag the slider to the right to add more details to the snow on the mountain or drag the slider to the left to add more details to the buildings. After that, you can pause the video and exit the full-screen mode. Keep in mind that the quality of HDR depends on you as it is a personal choice. Some users might like a brighter shade while other ones want the darker shade so it really depends on your taste. If you are not satisfied with how your HDR turned out, you can just try calibrating the display again. Simply go back to the default HDR video calibration and click or tap the Reset calibration button. Another thing to remember. First, you can only see HDR content on the full screen and if you’re using a laptop, you need to make sure to watch videos when plugged in and check that the battery settings won't’ lower the brightness.
Read More
Blizzard caught destroying evidence
Blizzard employeesCalifornia's Department of Fair Employment & Housing has widened its anti-discrimination lawsuit against Activision Blizzard and claims the publisher has been shredding vital documents relevant to the ongoing investigation. A recent report from Kotaku described the department as offering poorly paid, highly insecure positions, with a culture of hostility towards LGBTQ+ testers. The DFEH's rewording of "employees" to "workers" now hopes to take these contractors' experiences into account. "As a contract employee, I feel there's a lot of pressure to excel, impress, and move through the ranks as fast as you can before your contract ends and you're forced to go 3 months without income or find another job," Axios reports one worker saying. "I take pride in what I do, but it feels like it's never enough." Activision's contentious hiring of union-busting third-party law firm WilmerHale "directly interferes" with its own investigation, it says. By going to WilmerHale, Activision appears to be claiming that all work related to the investigation is privileged and can't be shared with DFEH. The suit also claims that Activision HR shredded documents related to "investigations and complaints", against its legal obligation to retain them during the investigation. The relevant parts of the updated lawsuit were shared by Axios reporters Stephen Totilo and Megan Farokhmanesh, the former also noting that the DFEH "fixed their misspelling of Bill Cosby's name". "DFEH is also informed and aware that documents and records have not been maintained as required by law or by the DFEH's Document Retention Notice," the complaint reads, "including but not limited to documents related to investigations and complaints were shredded by human resource personnel and emails are deleted thirty days after an employees separation."

Speculation and answer from Activision Blizzard

Blizzard employee Jessica Gonzalez suspects that the costs of fines associated with destroying these documents may have been an easier blow for Blizzard to take than any penalties drawn from their existence in helping the lawsuit go through. In an email to Kotaku, Activision denied the shredding allegations and issued a statement outlining steps it had taken to improve company culture—including the ousting of high-level executives like Blizzard president J. Allen Brack. The full statement reads: "Throughout our engagement with the DFEH, we have complied with every proper request in support of its review even as we had been implementing reforms to ensure our workplaces are welcoming and safe for every employee. Those changes continue today, and include:
  •     Several high-level personnel changes
  •     Revamped hiring and recruiting practices requiring diverse interview panels
  •     Greater transparency on pay equity
  •     Expanded and improved training and investigative capabilities for human resource and compliance staff
  •     Created investigation teams outside of business units to support greater independence
  •     Restructured divisions to support greater accountability
  •     Enhanced review processes to include evaluation of managers by employees
  •     Clear boundaries on workplace behavior with a zero-tolerance approach to harassment and other actions that diminish or marginalize.
"We strive to be a company that recognizes and celebrates the diverse talents and perspectives that lead to the creation of great, globally appealing entertainment. We have provided the DFEH with clear evidence that we do not have gender pay or promotion disparities. Our senior leadership is increasingly diverse, with a growing number of women in key leadership roles across the company. "We share DFEH’s goal of a safe, inclusive workplace that rewards employees equitably and is committed to setting an example that others can follow."

California and RIOT

Beyond Activision Blizzard, California's DFEH has also probed into League of Legends creator Riot Games, accusing the studio of dragging its heels over sexual harassment allegations dating back to 2019. Riot denied the allegations, telling us that it "will never retaliate against anyone for talking to any government agency".
Read More
How to Fix Can’t start your Camera, 0xa00f429f
If you are using the Camera app on your Windows 10 computer but encountered an error code 0xa00f429f with an error message that says, “Can’t start your camera”, read on as this post will guide you in fixing this problem. This kind of error in the Camera app could be due to a recent update gone wrong or it could also be due to a corrupted driver. If you are certain that the camera is connected and is properly installed, you can try to check for updated drivers. The error code signifies that the drivers have to be updated. However, that isn’t always the case sometimes as the problem could also have something to do with corruption in the driver. The effective ways to troubleshoot this problem would be trying to reinstall or reset the Windows Camera app, or update, rollback or uninstall some device drivers as well as use the Registry Editor. Before you proceed with the instructions provided below, make sure that you have admin privileges and don’t forget to create a System Restore point.

Option 1 – Try to reset or reinstall the Windows Camera app

As pointed out earlier, you can also reset the Camera app to fix the error. To do so, follow the steps below.
  • The first thing you have to do is go to the My Pictures folder under the C: drive of the File Explorer and then delete the Camera Roll folder.
  • Once you’re done, right-click on an empty area on your screen and create a new folder and name it “Camera Roll”.
  • Then from the Start menu open the Settings app and select System.
  • From there, navigate to the Apps and features section.
  • Now go to Camera and click on the Advanced Options and click the Reset button.

Option 2 – Try to reinstall the Camera app

If resetting the Camera app didn’t help, you might want to reinstall it by following these steps:
  • Tap the Win + X keys and select the “Windows PowerShell (Admin)” option from the menu to open Windows PowerShell as admin.
  • Next, type this command to uninstall the Camera app: Get-AppxPackage *camera* | Remove-AppxPackage
  • Once done, exit the Windows PowerShell and restart your computer and then try to install the latest version of the Camera app from Microsoft Store.

Option 3 – Try to rollback, update or disable drivers

The next thing you can do to fix the error code 0xa00f429f in the Camera app is to roll back, or update, or disable device drivers. It is most likely that after you updated your Windows computer that your driver also needs a refresh. On the other hand, if you have just updated your device drivers then you need to roll back the drivers to their previous versions. Whichever applies to you, refer to the steps below.
  • Open the Devices Manager from the Win X Menu.
  • After opening the Device Manager, look for the device drivers which have a yellow exclamation mark.
  • Then right-click on each one of them. If you haven’t updated this driver in a while, select the “Update Driver” option. On the other hand, if you’ve just updated this driver, then select the Uninstall Device option.
  • Next, follow the screen option to update or uninstall it.
  • Finally, restart your computer. It will just reinstall the device drivers automatically if you have chosen to uninstall them.
Note: You can install a dedicated driver on your computer in case you have it or you could also look for it directly from the website of the manufacturer.

Option 4 – Try to use the Registry Editor

  • Tap the Win + R keys to open the Run dialog box and type “Regedit” in the field and then hit Enter to open the Registry Editor.
  • Next, navigate to this registry key: ComputerHKEY_LOCAL_MACHINESOFTWAREWOW6432NodeMicrosoftWindows Media FoundationPlatform
  • From there, right-click on any empty space on the right side part of the window and select New > DWORD (32-bit) Value.
  • Then name it as “EnableFrameServerMode” and double click on it.
  • Now set its value data to “0” and its base value as Hexadecimal and then click on OK.
  • After that, restart your computer and see if it helped in fixing the problem or not.
Read More
Run Windows 10 from your USB drive
Windows 10 to goMany Linux users if not all of them can run their distros from a USB drive but did you know you can run Windows 10 from a USB drive as well? Microsoft has introduced all the way back to Windows 8 one feature called Windows To Go and it kept it in Windows 8.1 and in Windows 10 as well. This feature is intended as a convenient way for workers to carry their corporate environments with them, but having your own copy of Windows on a thumb drive could be handy for backup purposes, too, or if you frequently use public machines that lack your preferences/applications or that have a restricted OS.

What you will need?

In order to actually make Windows 10 run from a USB drive you will need the following things:
  1. USB drive with a minimum size of 20GB
  2. Working computer with Windows 10 running on it
  3. Rufus or another ISO to UBS tool, get Rufus here: https://rufus.ie/en_US/
  4. Windows 10 ISO file

Making Windows 10 UBS drive

Install Rufus on your Windows 10 and run it. Stick USB in PC and open Rufus. On the screen that follows choose your Windows 10 ISO image and under Image options choose Windows To Go. Click on ready and you are finished, that’s it. After Rufus finishes you have now fully working Windows 10 bootable drive which you can use on another PC for whatever reason.
Read More
1 2 3 162
Logo
Copyright © 2022, ErrorTools. All Rights Reserved
Trademarks: Microsoft Windows logos are registered trademarks of Microsoft. Disclaimer: ErrorTools.com is not affiliated with Microsoft, nor claim direct affiliation.
The information on this page is provided for information purposes only.
DMCA.com Protection Status