Samsung Odyssey Neo G9 monitor review

samsung Odyssey Neo G9Odyssey Neo G9 is a successor to Odyssey G9 curved gaming monitor and it is aimed again at the gaming community with its specifications but of course, it can be used for work as well.

Gapping at a stunning $2500 USD price it is not really a cheap piece of hardware so it is normal to see what do you get for this kind of price and do features justify it, so let’s dive in.

Size and resolution

The first thing that you can notice about the screen is that it is big and curved, 49 inches big which is pretty big, and with it, I believe you can forget about using 2 or 3 screens because this single one will cover everything you need really.

Going as far as 5120 X 1440 resolution is the strange definition, basically, this is 5K which is kind of nice but I do not see the advantage. Sure it is larger than 4K, but for the price of $2500 I expected an 8K monstrosity so if the resolution is not the main price justification then what is? Let’s move on and find out.

Odyssey tech specs

The monitor comes with HDR and 240Hz refresh rate which is very nice and coupled with 1ms pixel response time, adaptive sync, and Variable Refresh Rate you get pretty good other tech specs.

All of this is very nice but the monitor's strongest selling point is Mini Led tech. Mini Led is a next-gen tech currently found only in high-end TVs. With this technology, monitors can produce truer blacks sort of speak thanks to a greater number of dimming zones.

Odyssey Neo G9 is rated at 2000 nits in the brightness values and local dimming zones go to stunning 2048. It comes also with Quantum HDR that supports 10+, Freesync, and G-Sync capability. In connection, the department monitor comes with a single display 1.4 port and two HDMI 2.1 ports. It also includes a headphone jack along with two USB 3.0 ports.

Conclusion

While the resolution of the monitor is nothing impressive for the given price, its size and the rest of the tech specs surely are. Now I will not lie, the price is still a little too high but if you could afford it easily I think you should.

If you like to learn and find out more about various Windows errors, and how to repair them go to our vast archive or use search to find articles that will explain and help you in solving your issue.
However, if you prefer to do things fast and with automatization then we are proposing to use an automated solution for your issues. The application that we are recommending is Advanced System Repair Pro
Advanced System Repair utilizes multiple tools all in one to give you a quick, simple, reliable, and very thorough diagnosis of your PC. It brings you all the tools you need in one program to clean, fix, protect, optimize and boost your PC!
1-Click Maintenance
All the tools to make it simple and easy! It's like having a professional technician at the click of a mouse.

Junk Cleaner
Keeping your computer free from unnecessary clutter also helps make your computer last longer. Like any other machine, if you keep it clean and take care of it, it will serve you better for longer!

Optimize background apps
Optimize applications background activity with the built-in Application Optimizer feature.

Disk Defrag
With a simple 1-click, Advanced System Repair speeds up your PC by assembling fragmented files on your machine and organizing them more efficiently.

Malware Removal
Finds and removes all types of harmful malware including trojans, worms, bots, adware, spyware, PUPs, and more!

Privacy Cleaner
The all-in-one privacy suite to Clean Your Tracks & Protect Your Privacy! Make your computer safe, secure, and more efficient!

System Tweak/Optimizer
ASR will analyze your complete system and settings to adjust your PC to function at its maximum performance.

Registry Cleaner
Over time, as you install and uninstall applications, the registry can become cluttered with old entries and broken settings which can result in program crashes, and annoying messages and slow the computer down.
Visit our Advanced System Repair Pro Download page to inform yourself about all the benefits of this software and get a free trial copy of it.
advanced system repair pro

Advanced System Repair Pro

One-click automated PC repair solution
ASR logo
With Advanced System Repair Pro you can easily
Replace damaged files
Restore performance
Free disk space
Remove Malware
Protects WEB browser
Remove Viruses
Stop PC freezing
DOWNLOAD
Privacy Policy | Terms of Use | Uinstall
Advanced System Repair Pro is compatible with all versions of Microsoft Windows including Windows 11

Share this article:

You might also like

Software review series: QuickLook
QuickLook app is one of the best options to preview files without opening them in Windows 10. It works similar to the Quick Look feature of macOS. This Microsoft Store app has some really interesting features. It lets you preview images, documents, and media files. Also, just a hotkey is needed to preview the content of a file. There is no interface for the app. Only a preview window is visible. You can also expand the preview window to full size. Apart from that, it lets you keep the preview window on top of the other opened applications. For image files, it also provides the EXIF data. After installing this app, just select some file that you want to preview, and press the Spacebar key. That’s it! The preview window will open immediately to view the file content. If you would like to read more helpful articles and tips about various software and hardware visit errortools.com daily.
Read More
How to Fix the AVFoundationCF.dll Error on Your PC

AVFoundationCF.dll - What is it?

AVFoundationCF.dll is a type of Dynamic Link Library file. This DLL file is associated with AVFoundationCF and is developed by Apple Computer Inc. for Windows PC. This file functions similarly to any other DLL files. It comprises of small programs. This DLL file is typically needed to load and start the Apple iTunes utility. The inability to call this file or the files to load triggers the AVFoundationCF.dll error message on your system. The error message can be displayed in either of the formats on your PC:
“The program can’t start because AVFoundationCF.dll is missing from your computer. Try reinstalling the program to fix this problem.” "This application failed to start because avfoundationcf.dll was not found.” "Cannot find %COMMONFILES%AppleApple Application Supportavfoundationcf.dll." "Cannot start AVFoundationCF. A required component is missing: avfoundationcf.dll.” “Avfoundationcf.dll Access Violation." "Cannot register avfoundationcf.dll."

Solution

Restoro box imageError Causes

AVFoundationCF.dll error can occur due to numerous reasons. However, the most common reasons for this error code include:
  • Viral infection
  • Corrupt or invalid registry entries
  • Apple Computer Inc. hardware failure such as bad hard drive
  • Missing or deleted Avfoundationcf.dll file
It is recommended to resolve the error as soon as you experience it virtually because if the error code is related to viral infection on your system, it can expose your PC to privacy errors and data security risk. And if the error is triggered by registry issues, it can lead to serious threats like system crash, failure, and data loss. Therefore, the AVFoundationCF.dll error not only hampers your ability to access and start Apple iTunes program but it also puts your PC at serious risk.

Further Information and Manual Repair

To fix the error AVFoundationCF.dll on your PC, here are some of the best and easy to do solutions that you can try:

Check your Recycle Bin

Since dll files are shared files, there is a possibility that this file accidentally got deleted when you were uninstalling some other program on your system. If you experience missing AVFoundationCF dll file error message after performing any program on your PC, then chances are that it got deleted and maybe in your recycle bin. So, first, check your recycle bin and search for the dll file. If you find it, restore it to fix the error.

Update Device Driver

To resolve the issue, try performing a driver update. This can be done by downloading the latest drivers from the hardware manufacturer’s website. Now open Device Manager from the Control Panel and locate the hardware device that you want to update the driver for. Once you find the hardware you are updating the driver for, right-click on the hardware icon and choose properties. In the properties windows, click the driver tab. Now click the update driver button. To activate changes, restart your PC. To automatically update your computer's drivers when necessary, download and install DriverFIX.

Try Re-installing Apple iTunes Program

To do this, simply go to the control panel, select programs and then uninstall a program and then select iTunes.  Uninstall it and then repeat the same program and install the Apple iTunes program again on your PC by downloading the program from Apple’s official website.

Scan for Viruses

If the error still persists, then it is advisable to scan your PC for viruses. This can be easily done by running a powerful antivirus on your PC. However, please note anti-viruses are notorious for slowing down PC performance. So, may have to compromise on the speed of your system.

Clean and Repair the Registry

If the error is caused by invalid and corrupt registry entries and damaged Avfoundationcf dll file, then the best way to resolve is to download a powerful registry cleaner. We advise you to install Restoro on your PC. This is an advanced and a multi-functional PC Fixer integrated with multiple powerful utilities including a high functional registry cleaner, an antivirus and a system optimizer. The registry cleaning utility scans all the registry issues and removes all errors triggered by the registry immediately. It cleans the registry by wiping out all the unnecessary, obsolete and redundant files including invalid entries and bad registry keys. Furthermore, it also fixes the damaged and corrupt dll files including Avfoundationcf dll file. Thereby resolving the error right away. Furthermore, the antivirus deployed in this software scans for all types of malicious codes like viruses, Trojans, spyware, and malware and removes them. To ensure you don’t compromise on your PC performance, it is deployed with a system optimizer utility that boosts the speed of your computer dramatically. This tool is bug free, has a user-friendly interface and compatible with all Windows versions. Click here to download Restoro and resolve Avfoundationcf.dll error on your PC today!
Read More
Patch for Windows Error Code 41

Repair Windows Error Code 41

Code 41 - What is it?

Poor PC maintenance can lead to error message pop-ups like error code 41. Code 41 is one of the several Device Manager Error codes.

This error indicates 2 things: issues with the device driver for the hardware you wish to use, or the hardware device is not properly attached to your system.

The error code 41 is usually displayed in the following format:

“Windows successfully loaded the device driver for this hardware but cannot find the hardware device.” Code 41

Solution

driverfix boxError Causes

For successful installation of a new hardware piece, it is imperative to follow the installation routine correctly and allow it to complete properly, especially with USB devices.

This is important largely because if installation is not followed and executed properly, code 41 can pop up.

Code 41 is also related to device driver problems. It can occur if your system device drivers are outdated. Also, if the device is a CD/DVD drive, code 41 can occur due to conflicts with 3rd party disc burning software.

Although Device Manager Error code 41 is not detrimental, it is still advisable to repair it as quickly as you can. Code 41 can negatively affect your PC. It can:

  • Lower your PC’s Performance
  • Limit your ability to use your desired piece of hardware device

Further Information and Manual Repair

As compared to the blue screen of death errors, Device Manager Error codes are much easier to resolve.

Here are some of the best, effective and easy-to-resolve methods to help you fix code 41 on your PC, in a few minutes.

To work around these methods, you don’t have to be a technical whiz or a computer programmer. Simply follow these steps to resolve:

Method 1 - Uninstall Faulty Drivers and then Reinstall

To repair code 41 on your system, try uninstalling problematic drivers and then reinstalling new drivers. To do this, follow these instructions:

  • Click the start button
  • Then type Device Manager in the search bar and press enter
  • Once the Device Manager opens, look for problematic devices
  • Click on the device whose driver you wish to uninstall
  • Double click to uninstall
  • Windows will prompt you to confirm the device removal
  • Accept changes and confirm by clicking on OK
  • Now reboot your PC to activate changes
  • The next step is to reinstall the driver properly. To do this, simply follow the same steps. Once you access the Device Manager,
  • Click on the Action tab in the toolbar
  • After that select the option ‘Scan for Hardware Changes’

This will hopefully resolve error code 41 on your system and you will be able to use your desired hardware device without any hassle. Nonetheless, if the error code continues to persist, try other methods illustrated below.

Method 2 - Replace the Hardware or Try Reattaching it to your System

Sometimes the error may pop up due to poorly configured devices. This is common if it is a plug-and-play device. The best way to resolve is to remove the device, reattach it properly, and then try using it again.

However, if the problem is with the hardware, then it is advisable to replace the hardware with a new device compatible with your Windows version.

Method 3 - Update the Drivers Manually

If the underlying cause for error code 41 is outdated or corrupted drivers, then it is advisable to update the drivers.

However, when updating drivers and ensuring that the newly installed drivers work perfectly, make sure you install versions that are compatible with your device and Windows. Incompatible drivers are no good.

You will continue to face Device Manager Errors if you install incompatible drivers.

To update drivers, here’s what you have to do:

  • Identify the problematic drivers
  • Go to the Device Manager and locate all drivers with yellow exclamation marks
  • Now install new and compatible driver versions from the manufacturers’ site

Method 4 - Download Driver Assist to Update Drivers Automatically

Updating drivers manually will take time, so perform this task when you are free and have nothing else on your mind. However, if you wish to resolve the issue immediately and have the time to invest in manual updates, then consider downloading DriverFIX.

DriverFIX is a feature-rich and an innovative software program deployed with an intelligent programming system and intuitive technology.

It is exclusively designed to resolve PC device driver problems. Once installed on your system, it scans your PC and identifies problematic drivers.

After that it matches latest and compatible driver versions and updates them  immediately within a few seconds. DriverFIX updates drivers both automatically and on a regular basis.

Click here to download DriverFIX to update drivers and repair error code 41.

Read More
Word icon is not showing on .doc & .docx
Recently, a number of users reported seeing plain white icons on their “.docx” files instead of the Word icon. This kind of issue is mostly caused by a conflict with the default program settings in Windows which is why you may not see any Microsoft Word icon on your .docx files. So if you suddenly find that the Microsoft Word icon is either blank or missing and does not show properly on .doc and .docx document files of Office on your Windows 10 computer, then you can check out the potential solutions outlined below. Before you proceed, you can try to restart your computer as there are instances when a simple system restart can resolve some issues like this one. However, if it does not help, create a System Restore point first. This is to ensure that you can always undo the changes you are about to make in case something goes wrong. Once you have that covered, proceed to the following options.

Option 1 – Try to configure .docx files to open with “winword.exe”

You can try configuring the .docx files to open with the winword.exe in order to fix the problem.
  • Right-click on a .docx file and select the “Open with…” option.
  • After that, if a prompt appears with a message saying, “How do you want to open this file”, select the “More apps” option to proceed.
  • Next, scroll down and check the checkbox that says, “Always use this app to open .docx files” option.
  • Then click on the “Look for another app on this PC” link and choose the WINWORD.exe application from one of the following paths based on the installed Office version in your computer and click Open:
    • Word 2016 (64-bit): C:/Program Files/Microsoft Office/root/Office16
    • Word 2016 (32-bit): C:/Program Files (x86)/Microsoft Office/root/Office16
  • Now check if you can now see the Word icon on the .doc or .docx files.

Option 2 – Try changing the default Word icon via Registry Editor

  • Tap the Win + R keys to open the Run utility.
  • Then type “Regedit” in the field and hit Enter to open the Registry Editor.
  • Next, navigate to this path located in the left pane: HKEY_CLASSES_ROOTWord.Document.12DefaultIcon
  • From there, double click on the default value at the right pane and based on the Word version you are using as well as the architecture (32 bit or 64 bit) and then copy-paste the corresponding value in the Value data box:
    • For Word 2016 (64-bit) keep it as C:/Program Files/Microsoft Office/root/Office16/wordicon.exe,13
    • For Word 2016 (32-bit) Keep it as C:/Program Files (x86)/Microsoft Office/root/Office16/wordicon.exe,13
  • Once you’re done, tap Enter and then close the Registry Editor.
  • Restart your computer and see if the problem’s fixed.

Option 3 – Try to rebuild the Icon cache

You may want to rebuild the Icon cache as it could also help fix the issue.
  • Tap Win + E to open File Explorer and then click Folder Options and click Views to show Hidden System Files.
  • After that, go to C:Users%username%AppDataLocal folder and look for a file named Iconcache.db and delete it.
  • Next, go to C:Users%username%AppDataLocalMicrosoftWindowsExplorer.
  • From there, look for the following files and delete them.
    • iconcache_32.db
    • iconcache_48.db
    • iconcache_96.db
    • iconcache_256.db
    • iconcache_1024.db
    • iconcache_1280.db
    • iconcache_1600.db
    • iconcache_1920.db
    • iconcache_2560.db
    • iconcache_exif.db
    • iconcache_idx.db
    • iconcache_sr.db
    • iconcache_wide.dd
    • iconcache_wide_alternate.db
  • Restart your computer. This will purge and rebuild the icon cache.

Option 4 – Try fixing Office apps

Fixing the Office apps can help you resolve the Word icon issue. All you have to do is open Settings > Apps. From the app list, look for the Microsoft Office Desktop apps and select it and then click on the Advanced options and click Fix. After that, wait until the process is completed and restart your PC. However, if the problem still persists, repeat the steps again but this time, click on Reset instead of Fix.

Option 5 – Try to repair Office Installation

If the options given above didn’t work, you can try to repair the Office installation and see if it can fix the problem.
  • Open Control Panel and click on Programs and Features.
  • Next, right-click on the Office program that you want to repair which in this case is, Word.
  • Select Change and click Repair > Continue. After that, Office will start to repair Microsoft Word.
  • Wait until the process is done and then reboot your computer.
Read More
How to Fix Drwtsn32.exe Application Error

Guide to Resolving Drwtsn32.exe Application Error

What is Drwtsn32.exe Application Error?

Drwtsn32.exe (DrWatson Postmortem Debugger) is a process file from Microsoft Corporation that runs on Microsoft Windows Operating System. This file is digitally signed from Microsoft Windows Component Publisher- Microsoft Timestamping Service. This file is a type of executable file. It is useful to debug and creates log files when an error occurs during running or program execution. The information logged by DrWatson is used by technical support personnel to diagnose a program error for a computer running Windows. It creates log files in the following location C:Documents and SettingsAll UsersApplication DataMicrosoftDr Watson. However, when using Internet Explorer, MS Outlook or any other application on Windows, you can experience drwtsn32.exe application error. This error occurs when the drwtsn32.exe file crashes. The error is displayed as:
“DrWatson Postmortem Debugger has encountered a problem and needs to close” "drwtsn32.exe - DLL Initialization Failed" when shutting down

Solution

Restoro box imageError Causes

The ultimate reason behind ‘drwtsn32.exe application error’ is malware and viral infection. Malicious software can enter your PC through downloaded files , browsing on unsafe websites and phishing emails. These viruses can disguise themselves as DrWatson utility. Plus theymay have the same name as this process. However, the best way to detect if it is a virus is to track its location. Malicious software will usually hide in some other location instead of its standard location. However, other reasons for this error also include incompatible software and damaged system files.

Further Information and Manual Repair

a) Scan PC with an Anti-Virus

It is advisable to repair this issue right away especially if the underlying cause is a viral infection typically because viruses can expose you to privacy errors and risks such as cybercrime, identity theft, and data security issues. To resolve it, download a powerful antivirus. Scan your PC with it and remove all the viruses immediately. However, when doing so, you may have to compromise PC performance and halt other PC activities. Anti-viruses are notorious for slowing down PC speed. In addition to this, sometimes you may have to stop other activities on your PC for the antivirus to scan for viruses.

b) Repair Registry Errors with Restoro

Nonetheless, if the drwtsn32.exe application error is related to system file corruption, then this indicates registry issues where all the system data is stored. Registry issues occur if you don’t maintain your PC properly and let invalid, wasted and obsolete files accumulate on your PC. This damages and corrupts the system files and generates such error messages. To repair it, download a registry cleaner. However, the best alternative to resolve drwtsn32.exe application error in seconds whether the error is linked to registry issues or viral infection is to download Restoro. This is a multi functional PC fixer embedded with multiple utilities including a powerful antivirus, a registry cleaner and a system optimizer. It wipes out all the unnecessary files stored in the registry, repairs the damaged and corrupt system files and restores the registry. With the help of the antivirus, all privacy errors and viruses are scanned on your PC and removed immediately. And to ensure your system’s speed is not compromised, it also functions as a system optimizer and increases your PC’s speed significantly. The software is safe and efficient. It has simple navigations and a user-friendly interface which makes it very easy for all levels of users to work around. It is compatible with all Windows versions. Click here to download Restoro and resolve drwtsn32.exe application error today!
Read More
How to Fix Error Code 0xc004f210 in Windows 8

Error Code 0xc004f210 – What is it?

Error code 0xc004f210 occurs when Windows 8 users fail to activate their Windows operating system. Users will be able to identify error code 0xc004f210 because of the following common symptoms which occur:

Solution

Restoro box imageError Causes

If you enter an invalid product key or do not have a digital entitlement for the edition of Windows you are attempting to activate, you may experience error code 0xc004f210. Since this error usually occurs due to these main reasons, you will most likely find success resolving this issue by ensuring you use a valid product key or activate an appropriate edition of Windows based on the edition of your digital entitlement.

Further Information and Manual Repair

Error codes can be resolved through manual repair procedures that seek to fix the underlying issues causing the error. In the case of error code 0xc004f210, you should be able to resolve this error by using the methods below. You may also consider contacting a Windows repair technician if you have difficulty resolving the error code.

Method One: Enter Valid Product Key

To successfully activate your operating system and resolve error code 0xc004f210, you will need to enter a valid product key in the Update & security section of Windows. Follow the instructions below to enter the product key.

  • Step one: Click the Start button then select Settings
  • Step two: Select Update & security then Activation
  • Step three: Click the Change product key
  • Step four: Enter a valid product key

If the issue causing error code 0xc004f210 is related to the use of an invalid product key, you should be able to successfully activate your Windows operating system. Should the problem persist, however, you will need to attempt the next manual repair method explained below? Note: Failure to fix this error code might result in other Windows 10 error messages.

Method Two: Ensure Edition of Windows Matches Your Digital Entitlement

Digital entitlement allows Windows users to access activation without using a product key. This digital entitlement only affects Windows 8 users who are attempting to activate versions of Windows 10 that include Windows 10 Pro. Once you are using a genuine copy of Windows 8.1 and your edition of Windows matches your entitlement, you may proceed with the instructions below.

  • Step one: Click the Start button then select Settings
  • Step two: After selecting Settings, click Update & Security
  • Step three: Select Windows Update then the Check for updates tab
  • Step four: Click activate Windows 10 update

You should be able to activate your Windows update once you follow the instructions above. Remember error code 0xc004f210 is an activation code related to product keys or your digital entitlement so once these issues are rectified, you should have no problem activating your operating system of choice and enjoying the benefits it offers. If, however, the problem remains unresolved after you have attempted both manual repair methods, there may be unusual issues affecting your system. Contact Microsoft to rectify the issue or get help from a Windows repair technician.

Method Three: Download an Automated Tool

If you wish to always have at your disposal a utility tool to fix these Windows 8 and other related issues when they do arise, download and install a powerful automated tool.

Read More
IW Unicorn and Scorpion PC Chair cockpits
Recently on errortools.com, we were talking about Cooler Master’s Orb X gaming chair that is an absolute beast and an amazing product. One downside of Orb X is its price. IW product line is somewhat competing with Orb X with a much more affordable price aiming to probably take customer base with lower income but offering them a great experience as well. The first thing you will notice is a different design and somewhat feeling of cheaper quality if you compare it to Orb X but that is quite reasonable considering the chair itself is around 3.5 times cheaper than Orb X which really puts it in range of everyone can get it. But does a much cheaper price means low quality? Let’s explore.

IW Unicorn

IW unicorn
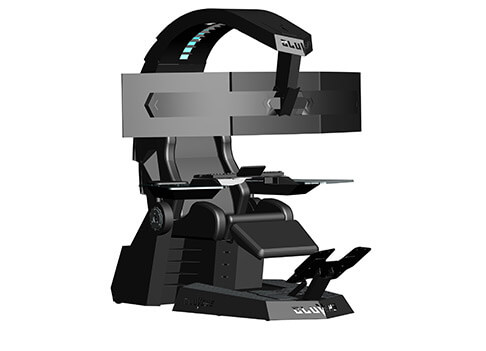
The 2021 CLUVENS BRAND newly issued model UNICORN has fully electrical tilting capabilities to 160 degrees, Reading light-two LED & RGB illumination lighting, manual open/close keyboard tray, and armrests. This model is suitable for home and office, and also gaming computer work environments. It offers functions that enable the user to experience unprecedented comfort and quasi total immersion through strategically positioned 1-3 monitors, audio systems, and accessories. The result is a complete computer office, ergonomically optimized, with a minimal footprint that improves overall performance and productivity and health and comfort. Sitting on a chair can help a lot for relieving health problems like lower back pain, herniated discs, sciatica, and neck pain and also enhance performance and viewing effects.

More Luxury and More comfortable:

Equipped with Luxury feeling reclining Gaming chair made with high-density Mold Shaping Foam and superior quality PU leather with very comfortable texture, electrical recline to 128 degrees, and more to 160 degrees for the flat position for the user.

More High-End Setting and more High-tech:

Manual push for open / close of big sized (87x34cm) Self-Balancing Keyboard tray, adjustable with 20cm distance range with Electrical control for the height of roof arm & monitors. Electrical control for reclining Zero Gravity position or even flat position, Manual adjusted Feet pedal for a more comfortable position for feet. Using a High-Quality PU leather Gaming chair that has Heat/Massage functions with it! The IW-Unicorn monitor mounts allow the use of a single monitor up to Ultra-wide 49” or 43” in size or triple monitor setups up to 3 x 29” other monitors configurations are available upon request. (VESA standard)

IW Scorpion

IW scorpion
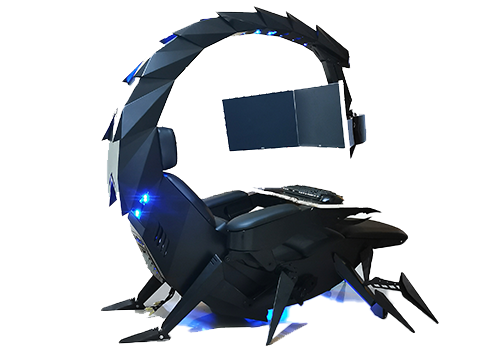
Scorpion is basically a premium version of Unicorn with being able to hold more weight, having cup holders on the armrest, etc. The look is also similar with Scorpion being more sinister-looking but overall Steel frame and chair are the same.

Conclusion

Sadly I have not personally experienced neither of these products including Orb X but from all information I have found and looked over, I would say these products are not trying to compete with each other. Although Products are similar in nature, Orb X is aimed at hi end-users focusing on privacy and robustness while IW is filling the gap of users that would like an advanced chair but are not willing or ready to shell hi amount of money for it offering advanced chairs with advanced features in somewhat affordable price.
Read More
Fix Windows Update Error 0x8024500C
If you encounter error 0x8024500C after a Windows Update or when you were trying to update Windows Store apps, read on as this post will guide you in fixing the problem. This kind of Windows Update error indicates that the Windows Update service has been blocked. Here are some suggestions you could check out to resolve the Windows Update error 0x8024500C on your Windows 10 computer.

Option 1 – Try checking the status of all the Windows Update Services

You need to check if all the Windows Update Services are up and running or not. To do so, follow the steps below.
  • Tap the Win + R keys to open the Run dialog box.
  • Next, type “services.msc” in the field and hit Enter to open Windows Services.
  • From the list of Services, look for the following services that support Windows Update:
    • Background Intelligent Transfer Service (BITS)
    • Delivery Optimization
    • Windows Update
    • Windows Update Medic Service
  • Once you’ve found them, check if they are running just fine or not. if not, you can right-click on each entry and click on Start.

Option 2 – Run the Windows Update Troubleshooter

You might also want to run the Windows Update Troubleshooter as it could also help in fixing Windows Update Error 0x8024500C. To run it, go to Settings and then select Troubleshoot from the options. From there, click on Windows Update and then click the “Run the troubleshooter” button. After that, follow the next on-screen instructions and you should be good to go.

Option 3 – Try downloading and installing the Windows Updates manually

Error 0x8024500C might be due to a Windows Update that has failed. So if it is not a feature update and only a cumulative update, you can download the Windows Update and install it manually. But first, you need to find out which update has failed, and to do so, refer to the following steps:
  • Go to Settings and from there go to Update and Security > View Update History.
  • Next, check which particular update has failed. Note that Updates that have failed to install will be displayed under the Status column which has a label of “Failed”.
  • After that, go to the Microsoft Download Center and look for that update using its KB number and once you find it, download and then install it manually.
Note: You can also use the Microsoft Update Catalog, a service from Microsoft that provides a list of software updates that can be distributed over a corporate network. With the help of this service, it can be easier for you to find Microsoft software updates, drivers as well as fixes.

Option 4 – Try checking the Registry settings

  • Tap the Win + R keys to open the Run dialog box.
  • Then type “Regedit” in the field and hit Enter to open the Registry Editor.
  • After that, navigate to this registry path: HKEY_LOCAL_MACHINESoftwarePoliciesMicrosoftWindowsWindowsUpdate
  • Then double click on “DisableWindowsUpdateAccess” located at the right side of the panel and make sure that its value is set to “0”. If not, you have to change it to “0”.
  • Now restart your computer and check if error 0x8024500C is now fixed or not

Option 5 – Disable the Proxy server

  • Tap the Win + R keys to open the Run dialog box.
  • Then type “inetcpl.cpl” in the field and hit Enter to pull up the Internet Properties.
  • After that, go to the Connections tab and select the LAN settings.
  • From there. Uncheck the “Use a Proxy Server” option for your LAN and then make sure that the “Automatically detect settings” option is checked.
  • Now click the OK and the Apply buttons.
  • Restart your PC.
Note: If you are using a third-party proxy service, you have to disable it.

Option 6 – Try to reset the Microsoft Store cache

Just like browsers, Microsoft Store also caches as you view apps and games so it is most likely that the cache is no longer valid and must be removed. To do so, follow the steps below.
  • Right-click on the start button and click on Command Prompt (administrator).
  • Next, type in the command, “exe” and tap Enter. Once you do, the command will clear the cache for the Windows Store app.
  • Now restart your PC and afterward, try opening Microsoft Store again.

Option 7 – Perform a System Restore

Performing System Restore might help you in fixing the Windows Update error 0x8024500C. You can do this option either by booting into Safe Mode or in System Restore. If you are already in the Advanced Startup Options, just directly select System Restore and proceed with the next steps. And if you have just booted your PC into Safe Mode, refer to the steps below.
  • Tap the Win + R keys to open the Run dialog box.
  • After that, type in “sysdm.cpl” in the field and tap Enter.
  • Next, go to the System Protection tab then click the System Restore button. This will open a new window where you have to select your preferred System Restore point.
  • After that, follow the on-screen instructions to finish the process and then restart your computer and check if the problem is fixed or not.
Read More
Remove EmailAccountLogin PUP Removal Tutorial

EmailAccountLogin is a browser extension for Google Chrome, Mozilla, and Internet Explorer. This extension enables you one-click access to your favorite email providers, allowing you to easily check your email without typing the web address.

From the author: One-Click Access to quick links to the most popular email providers.

The Email Account Login new tab extension provides convenient, one-click access to several popular email services including Gmail, Yahoo, Facebook, Outlook, and Live mail along with providing direct access to a web search.

EmailAccountLogin is a browser hijacker, this extension hijacks your home page and replaces it with its own search engine. While active this extension monitors your website visits, links, clicks, and personal information. This information is later sold/forwarded to better server ads across its network. While using EmailAccountLogin you will see additional unwanted ads injected into your search results, sponsored links, and even sometimes pop-up ads. Several anti-virus scanners have categorized EmailAccountLogin as a Browser Hijacker and therefore, for security reasons, it is not recommended to keep it on your computer.

About Browser Hijackers

Browser hijack is a very common type of online fraud where your internet browser configuration settings are modified to make it do things you don’t intend. Browser hijacker malware is developed for many different reasons. It redirects you to the sponsored sites and inserts advertisements on the browser that helps its developer generate earnings. It may seem harmless, but most of these sites are not legitimate and could present a significant threat to your online safety. As soon as the program attacks your laptop or computer, it starts to mess things up a whole that slows your PC down to a crawl. In the worst-case scenario, you may be pushed to tackle serious malware threats as well.

Browser hijacking signs and symptoms

Signs that your internet browser is hijacked include: 1. your homepage has been reset to some mysterious webpage 2. when you key in a URL, you find yourself regularly directed to a different webpage than the one you actually meant 3. default web engine is modified 4. you’re getting new toolbars you haven’t witnessed before 5. you notice numerous ads pop up on your browsers or display screen 6. your web browser starts running slowly or displays frequent errors 7. you are blocked to access the websites of computer security solution providers.

How they get into your PC

Browser hijackers may use drive-by downloads or file-sharing networks or perhaps an e-mail attachment in order to reach a targeted computer. Many browser hijackings originate from add-on applications, i.e., toolbars, browser helper objects (BHO), or extensions added to web browsers to provide them additional functionality. A browser hijacker may also come bundled up with some freeware that you inadvertently download to your computer, compromising your internet security. A good example of some notorious browser hijackers includes Anyprotect, Conduit, Babylon, SweetPage, DefaultTab, Delta Search, and RocketTab, but the names are constantly changing. Browser hijacking can bring about severe privacy issues and even identity theft, disrupt your browsing experience by taking control over outbound traffic, considerably slows down your computer by depleting lots of resources and result in system instability also.

How to repair a browser hijack

Certain hijackers can be removed by simply uninstalling the corresponding free software or add-ons from the Add or Remove Programs in the Microsoft Windows control panel. Yet, some hijackers are far harder to find or get rid of as they might get themselves connected with some critical system files which allow it to operate as a necessary operating-system process. Furthermore, manual removal demands you to execute several time-consuming and complex actions which are very difficult to do for novice computer users. Browser hijackers can be effectively removed by installing and running anti-malware software on the affected PC. Safebytes Anti-Malware has a cutting-edge anti-malware engine to help you avoid browser hijacking in the first place, and mop up any existing issues. Along with anti-virus software, a PC optimizer tool, for example, Restoro, will help you repair Windows registry errors, eliminate unwanted toolbars, secure your internet privacy, and improve overall system performance.

Find Out How To Install Safebytes Anti-Malware On An Infected Computer system

All malware is bad and the effects of the damage can vary according to the specific type of malware. Some malware variants modify browser settings by adding a proxy server or change the PC’s DNS configurations. In these cases, you will be unable to visit some or all of the websites, and thus unable to download or install the necessary security software to get rid of the malware. So what should you do if malicious software keeps you from downloading or installing Safebytes Anti-Malware? Follow the instructions below to get rid of malware through alternate methods.

Install the anti-malware in Safe Mode

In Safe Mode, you may adjust Windows settings, un-install or install some software, and eradicate hard-to-delete malware. In the event, the malware is set to load automatically when the PC starts, shifting to this mode may well prevent it from doing so. To start the computer into Safe Mode, hit the “F8” key on the keyboard just before the Windows logo screen comes up; Or right after normal Windows boot up, run MSConfig, look over the Safe Boot under the Boot tab, and then click Apply. After you restart into Safe Mode with Networking, you may download, install, as well as update the anti-malware program from there. At this point, you could run the antivirus scan to eliminate viruses and malware without any interference from another application.

Utilize an alternate internet browser to download security software

Some malware might target vulnerabilities of a specific browser that obstruct the downloading process. When you suspect that your Internet Explorer happens to be hijacked by a virus or otherwise compromised by online hackers, the most effective plan of action is to switch over to a different web browser such as Chrome, Firefox, or Safari to download your chosen computer security software – Safebytes Anti-Malware.

Install and run anti-virus from your flash drive

Another option is to save and run an antivirus software program entirely from a USB drive. Do these simple measures to clear up your affected PC using portable anti-malware. 1) On a virus-free PC, install Safebytes Anti-Malware. 2) Plug the Flash drive into the uninfected computer. 3) Double-click the Setup icon of the antivirus program to run the Installation Wizard. 4) Choose the drive letter of the pen drive as the location when the wizard asks you where you would like to install the anti-virus. Follow activation instructions. 5) Transfer the flash drive from the uninfected computer to the infected computer. 6) Double-click the antivirus software EXE file on the thumb drive. 7) Click on “Scan Now” to run a complete scan on the infected computer for malware. If no other method of downloading and installing an anti-malware program works, then you’ve no other choice than to hit the final resort: a full Windows reinstallation, which can get rid of that nasty virus and help you regain internet access. If you’re unsure which method to use, simply contact our toll-free number 1-844-377-4107 to speak to our technical team. Our experts will take you step-by-step through the malware removal process on the phone and also restore your computer remotely.

SafeBytes Anti-Malware: Lightweight Malware Protection for Windows PC

If you’re looking to download an anti-malware application for your computer, there are numerous tools out there to consider nonetheless, you just cannot trust blindly anyone, irrespective of whether it is paid or free software. Some of them are excellent, some are ok types, and some will harm your PC themselves! You need to choose one that is dependable, practical, and has a strong reputation for its malware source protection. On the list of recommended software programs is SafeBytes Anti-Malware. SafeBytes has a very good history of top-quality service, and customers are very happy with it. SafeBytes anti-malware is a very effective and easy-to-use protection tool that is made for end-users of all levels of IT literacy. With its cutting-edge technology, this application can help you get rid of multiples types of malware including computer viruses, worms, PUPs, trojans, adware, ransomware, and browser hijackers. There are numerous great features you will get with this particular security product. The following are some of the features you might like in SafeBytes. Robust Anti-malware Protection: This deep-cleaning antimalware software goes much deeper than most anti-virus tools to clean your computer system. Its critically acclaimed virus engine locates and disables hard to remove malware that conceals deep inside your computer. Real-time Active Protection: SafeBytes offers real-time active monitoring and protection from all known computer viruses and malware. This software will always keep track of your computer for any suspicious activity and updates itself regularly to keep current with the latest threats. Fast Scan: This computer software has one of the fastest and most efficient virus scanning engines in the industry. The scans are highly accurate and take a little time to complete. Internet Security: SafeBytes gives an instant safety rating on the web pages you are going to check out, automatically blocking harmful sites and making sure that you’re certain of your safety while browsing the net. Lightweight: This application is not “heavy” on the computer’s resources, so you’ll not notice any overall performance problems when SafeBytes is operating in the background. 24/7 Guidance: You can obtain high levels of support round the clock if you’re using their paid software.

Technical Details and Manual Removal (Advanced Users)

If you wish to manually remove EmailAccountLogin without the use of an automated tool, it may be possible to do so by removing the program from the Windows Add/Remove Programs menu, or in cases of browser extensions, going to the browsers AddOn/Extension manager and removing it. You will likely also want to reset your browser. To ensure the complete removal, manually check your hard drive and registry for all of the following and remove or reset the values accordingly. Please note that this is for advanced users only and may be difficult, with incorrect file removal causing additional PC errors. In addition, some malware is capable of replicating or preventing deletion. Doing this in Safe Mode is advised.

The following files, folders, and registry entries are created or modified by EmailAccountLogin

Files: C:Program FilesEmail Account Login C:UserAppDataRoamingEmail Account Login C:ProgramDataEmail Account Login C:UsersUserAppDataLocalEmail Account Login %TEMP%CF49E01A-6F41-4B56-9743-DBC375176677emailaccountlogin.exe %LOCALAPPDATA%MicrosoftInternet ExplorerRecoveryHighActiveRecoveryStore.E2864823-7CB8-11E7-989D-0A00278A626A.dat %LOCALAPPDATA%MicrosoftInternet ExplorerRecoveryHighActiveE2864824-7CB8-11E7-989D-0A00278A626A.dat %LOCALAPPDATA%MicrosoftInternet Explorerframeiconcache.dat %TEMP%CF49E01A-6F41-4B56-9743-DBC375176677Commondbg.js %TEMP%CF49E01A-6F41-4B56-9743-DBC375176677Commonimggreen-btn.png %TEMP%CF49E01A-6F41-4B56-9743-DBC375176677Commonimggrey-btn.png %TEMP%CF49E01A-6F41-4B56-9743-DBC375176677Commonjquery.min.js %TEMP%CF49E01A-6F41-4B56-9743-DBC375176677Commonjson3.min.js %TEMP%CF49E01A-6F41-4B56-9743-DBC375176677Commonstats.js %TEMP%CF49E01A-6F41-4B56-9743-DBC375176677Finish.zip %TEMP%CF49E01A-6F41-4B56-9743-DBC375176677Finishindex.html %TEMP%CF49E01A-6F41-4B56-9743-DBC375176677Finishscript.js %TEMP%CF49E01A-6F41-4B56-9743-DBC375176677Finishstyles.css %TEMP%CF49E01A-6F41-4B56-9743-DBC375176677IES.zip %TEMP%CF49E01A-6F41-4B56-9743-DBC375176677IESie.png Registry: HKEY_LOCAL_MACHINESYSTEMCurrentControlSetServicesWpm HKCUSoftwareMicrosoftWindowsCurrentVersionInternet Settingsrandom HKEY_LOCAL_MachineSoftwareClasses[adware name] HKEY_CURRENT_USERSoftwareMicrosoftWindowsCurrentVersionRun .exe HKEY_CURRENT_USERSoftwareMicrosoftWindowsCurrentVersionInternet Settings CertificateRevocation = 0 HKEY_LOCAL_MACHINESOFTWAREMicrosoftWindowsCurrentVersionrunrandom HKEY_CURRENT_USERSoftwareMicrosoftInternet ExplorerMain Default_Page_URL
Read More
DISM Error 14098, component store corrupted
As you know, one of the useful and efficient utilities in Windows 10 is the DISM tool. It can be used with the Command Prompt command line which allows users to carry out various tasks. However, there are instances when the DISM tool could encounter some errors when you try to execute a command. One of these errors is the one that states, “The component store has been corrupted”. This kind of DISM error is due to an error in the image file. When you encounter the DISM Error 14098 when running the DISM tool, you will see the following content in the command line:
“C:>Dism /Online /Cleanup-Image /RestoreHealth /Source:c:testmountwindows /LimitAccess Deployment Image Servicing and Management tool Version: 10.0.10586.0 Image Version: 10.0.10586.0 [==========================100.0% Error: 14098 The component store has been corrupted. The DISM log file can be found at C:WINDOWSLogsDISMdism.log C:>”
There are several fixes you can check out to fix the DISM Error 14098, “The component store has been corrupted”. You can try to run the Restore Health command or reset the Windows Update components, or whitelist the dism.exe in your antivirus program, as well as try to uninstall any recently installed updates. Follow the options provided below for more details.

Option 1 – Run the Restore Health command in a Clean Boot State

  • First, you need to put your computer in a Clean Boot State.
  • Type in MSConfig in the Start Search to open the System Configuration utility.
  • From there, go to the General tab and click “Selective startup”.
  • Clear the “Load Startup items” check box and make sure that the “Load System Services” and “Use Original boot configuration” options are checked.
  • Next, click the Services tab and select the “Hide All Microsoft Services” check box.
  • Click Disable all.
  • Click on Apply/OK and restart your PC. (This will put your PC into a Clean Boot State. And configure Windows to use the usual startup, just simply undo the changes.)
  • Now open Command Prompt with admin privileges.
  • Then type and enter this command to execute it: Dism /Online /Cleanup-Image /RestoreHealth
  • Wait until the process is completed and restart your computer.
Note: If the Restore Health command fails, you can use the “/StartComponentCleanup parameter” by executing this command: Dism /Online /Cleanup-Image /StartComponentCleanup

Option 2 – Try to reset the Windows Update components

If by any chance that the second option didn’t work, resetting the Windows Update components could also help you resolve the problem. How? Refer to the following steps:
  • Open Command Prompt with admin privileges.
  • After that, type each one of the following commands and hit Enter after you key in one after the other.
    • net stop wuauserv
    • net stop cryptsvc
    • net stop bits
    • net stop msiserver
Note: The commands you entered will stop the Windows Update components such as Windows Update service, Cryptographic services, BITS, and MSI Installer.
  • After disabling WU components, you need to rename both the SoftwareDistribution and Catroot2 folders. To do that, type each one of the following commands below, and don’t forget to hit Enter after you type one command after the other.
    • ren C:/Windows/SoftwareDistribution/SoftwareDistribution.old
    • ren C:/Windows/System32/catroot2/Catroot2.old
  • Next, restart the services you’ve stopped by entering another series of commands. Don’t forget to hit Enter after you key in one command after the other.
    • net start wuauserv
    • net start cryptsvc
    • net start bits
    • net start msiserver
  • Close Command Prompt and reboot your PC.

Option 3 – Whitelist the “dism.exe” in your antivirus program

The DISM error 14098 might also be caused by your antivirus program which could be interfering it from running. To fix this, you have to whitelist dism.exe. How? Refer to these steps:
  • Open the Windows Defender Security Center from the system tray area.
  • Next, click the “Virus & threat protection” option and then open the “Virus and threat protection settings”.
  • After that, scroll down until you find the “Exclusions” and click on the “Add or remove exclusions” option.
  • Then click the plus button and select the type of exclusion you want to add and from the drop-down list, select Folder.
  • Next, navigate to this path and select the WinSxS folder: C:/Windows/WinSxS
  • When a User Account Control or UAC prompt, just click on Yes to proceed.

Option 4 – Try to uninstall recently installed updates

There are times when some Windows Updates affect some mechanism internally when you update your Windows 10 computer. As a result, it causes issues with other components of the operating system which could be the reason why you’re getting the DISM error 14098.
  • Go to Settings and select Update and Security > Windows Update.
  • From there, click on the “View update history” option and then click on the “Uninstall Updates” option.
  • This will open a new window that contains the list of installed Windows Updates.
  • Now right click on the Windows Update you wish to uninstall and click Uninstall.
Read More
1 2 3 162
Logo
Copyright © 2022, ErrorTools. All Rights Reserved
Trademarks: Microsoft Windows logos are registered trademarks of Microsoft. Disclaimer: ErrorTools.com is not affiliated with Microsoft, nor claim direct affiliation.
The information on this page is provided for information purposes only.
DMCA.com Protection Status