Intel's open-source Clear Linux* Project

clear linux project
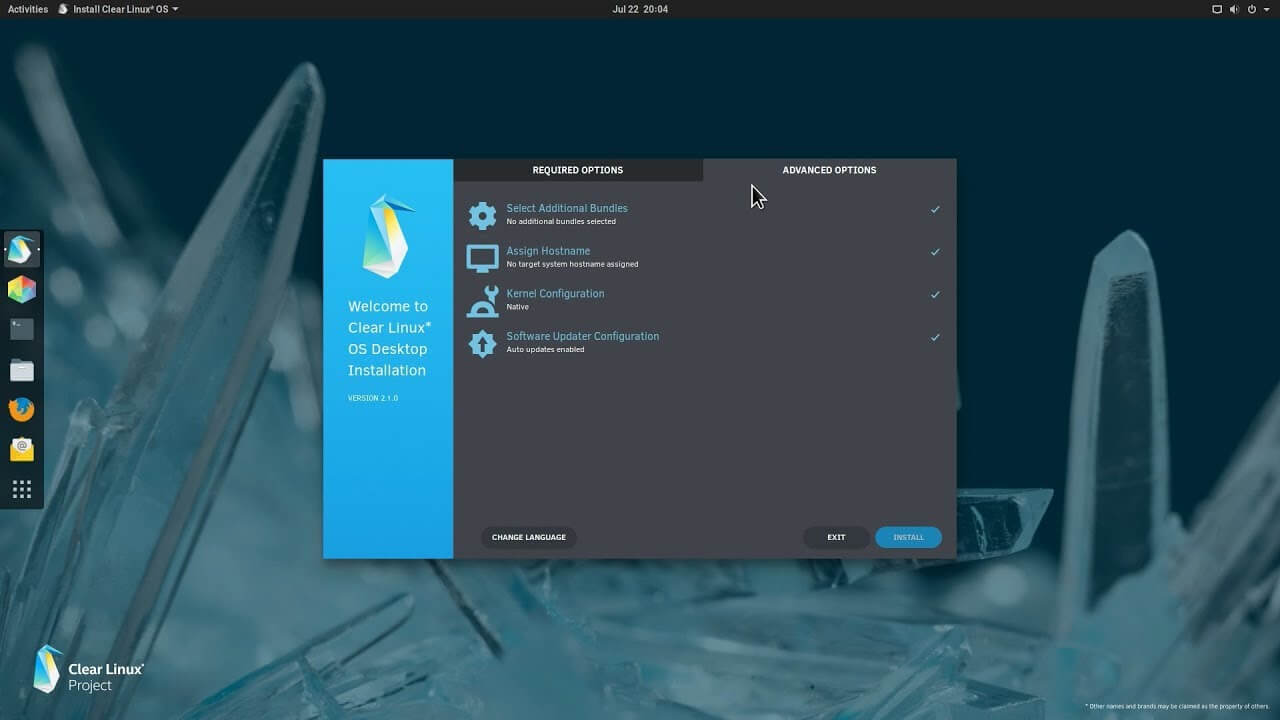
The Clear Linux Project creates an operating system and software stack that offers highly optimized performance, security, versatility, and manageability.

Clearly optimized for Intel CPUs and based on GNOME it will offer you incredible speeds if you are on Intel CPU.

The big news, though, is that Clear Linux sports the shiny new Gnome 40. This is a fresher Gnome than you'll find even on Ubuntu's more experimental 21.04 release. The only big names that let you test drive Gnome 40 are Fedora and Arch Linux.

Packages only when you need them

Installation of packages is used by Swupd, a Clear Linux* package management tool. It is easy to use and pretty straightforward.

  • "bundle-list" for showing what's installed
  • "bundle-info" for details on installed bundles (such as owned files via the "‑‑files" flag)
  • "search" for repository searching
  • "bundle-add" for installation
  • "bundle-remove" for uninstallation

The only problem here is the packages themselves. Clean Linux* has been imagined as a developer distro focusing mostly on well-development tolls. In intel’s words: “A Linux OS built for Linux developers”, so some things will be left out. Strangely enough some things as FFmpeg which if you want to have and blast some youtube videos while you work will have to complete manually by yourself.

Clear Linux* modular philosophy

Everything in Clear Linux* is based on a modular philosophy approach. There is no /etc/fstab file, the /boot directory is totally empty. Every partition to be mounted is enabled as a systemd "mount unit."

Intel reaping the benefits of systemd's modular philosophy, where everything is a unit. If you know your way around systemd, intermediate-level configuration tasks should be straightforward. Any advanced configuration likely demands deep systemd knowledge.

Clear Linux* performance

As stated earlier this is Intel’s distro, optimized for Intel hardware meaning that Intel as the developer has every possible tool at its disposal to make use of hardware to its maximum potential and it shows.

Distro almost leaves other ones two times in speed performance. So if you are looking for a distribution that will deliver you speed and it is aimed for developer Clear Linux* is for you.

Conclusion

Clear Linux* is a really interesting distro and seeing how Intel is adding new software packages on its official website it might have a bright future.

But as always, be the judge for yourself and see if it can fit your needs. Go get it at: https://clearlinux.org/

If you like to learn and find out more about various Windows errors, and how to repair them go to our vast archive or use search to find articles that will explain and help you in solving your issue.
However, if you prefer to do things fast and with automatization then we are proposing to use an automated solution for your issues. The application that we are recommending is Advanced System Repair Pro
Advanced System Repair utilizes multiple tools all in one to give you a quick, simple, reliable, and very thorough diagnosis of your PC. It brings you all the tools you need in one program to clean, fix, protect, optimize and boost your PC!
1-Click Maintenance
All the tools to make it simple and easy! It's like having a professional technician at the click of a mouse.

Junk Cleaner
Keeping your computer free from unnecessary clutter also helps make your computer last longer. Like any other machine, if you keep it clean and take care of it, it will serve you better for longer!

Optimize background apps
Optimize applications background activity with the built-in Application Optimizer feature.

Disk Defrag
With a simple 1-click, Advanced System Repair speeds up your PC by assembling fragmented files on your machine and organizing them more efficiently.

Malware Removal
Finds and removes all types of harmful malware including trojans, worms, bots, adware, spyware, PUPs, and more!

Privacy Cleaner
The all-in-one privacy suite to Clean Your Tracks & Protect Your Privacy! Make your computer safe, secure, and more efficient!

System Tweak/Optimizer
ASR will analyze your complete system and settings to adjust your PC to function at its maximum performance.

Registry Cleaner
Over time, as you install and uninstall applications, the registry can become cluttered with old entries and broken settings which can result in program crashes, and annoying messages and slow the computer down.
Visit our Advanced System Repair Pro Download page to inform yourself about all the benefits of this software and get a free trial copy of it.
advanced system repair pro

Advanced System Repair Pro

One-click automated PC repair solution
ASR logo
With Advanced System Repair Pro you can easily
Replace damaged files
Restore performance
Free disk space
Remove Malware
Protects WEB browser
Remove Viruses
Stop PC freezing
DOWNLOAD
Privacy Policy | Terms of Use | Uinstall
Advanced System Repair Pro is compatible with all versions of Microsoft Windows including Windows 11

Share this article:

You might also like

MS Mariner, new OS for servers based on Linux
mariner installerWell if anyone told me just a few years ago that I will see the day when Microsoft releases a new OS based on Linux I would be very amused, but that day has come. Mariner is the newest OS out of nowhere. Microsoft’s new Linux Distro, dubbed Common Base Linux (CBL)-Mariner, isn’t the type of distro you’d want to install directly on any old machine. It’s primarily meant for cloud infrastructure and edge products. Specifically Microsoft’s Cloud and Edge products. But if you are curious, it’s possible to run. Juan Manuel Rey, a Microsoft Senior Program Manager for Azure VMware, recently published a guide to ISO CBL-Mariner image. With that, you can easily get it up and running. And you can build CBL-Mariner on an Ubuntu 18.04 desktop. So you can try it out since it is free. You can get it from here: https://github.com/microsoft/CBL-Mariner It is obvious that Microsoft aims to set itself as a leader in enterprise server environments with this move and it is very likely that it may succeed or at least give a good shake to its competitors, mainly red hat and Suse which are two dominant distros in that field. Many believe that they can win over by providing regular updates and package delivery via their already established system and that feature could be a turning point for some. In any case, time will tell and we shall see.
Read More
How to Enable Last Active Click feature
Microsoft has started to use group along with every open window in the Taskbar ever since the release of Windows 10. Early on, they used to show an individual entry for each one of the windows after grouping them which makes the taskbar look cleaner and organized. However, the main issue lies in the fact that you have to hover on your desired window to get on to them. At the time of writing, you need to tap the Ctrl key and click on the taskbar icon to open the last active window but you have to only click on the program’s taskbar icon after you apply the tweak given in this post for the last active window to open. Take note that the “Last Active” windows feature will only work if the taskbar buttons are combined. Before you get started doing the instructions given below, you need to create a System Restore Point first since you will be dealing with registry files and modifying some of the critical settings in Windows 10. Once you’ve done this, proceed to the given steps below. Step 1: Tap the Win + R keys to open the Run dialog box and then type “Regedit” in the field and hit Enter to open the Registry Editor. Step 2: If a User Account Control or UAC prompt appears, just click on Yes to proceed to open the Registry Editor. Step 3: Next, navigate to the following registry path:
HKEY_CURRENT_USERSoftwareMicrosoftWindowsCurrentVersionExplorerAdvanced
Step 4: From there, right-click on the right side of the panel and select New > DWORD (32-bit) and then name it “LastActiveClick”. Step 5: After that, double click on the newly created DWORd to modify its value. Put “1” as its value data. Step 6: Then click OK and close the Registry Editor. Step 7: Now restart your computer to successfully apply the changes made. Note: In case you want to revert back to the default configuration, all you have to do is set the value data of LastActiveClick to “0” or simply delete that DWORD and restart your computer to successfully apply the changes made.
Read More
Win 11 update brings one click browser change
After a lot of backlash about choosing the default Windows browser, Microsoft has officially backed up and brought back a one-click browser change into Windows 11. default browser inside windows 11
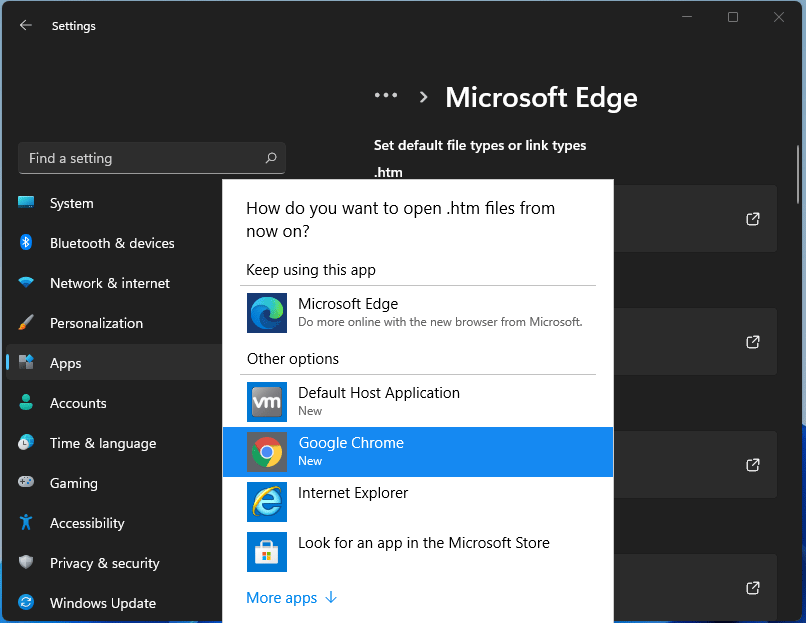
For anyone who is not aware, when Windows 11 was released if you wanted to switch to another browser you had to go into the settings app and choose the default browser for different types of file extensions like HTML, HTM, PDF for opening on the web, etc. Of course, this was completely unnecessary and it was not well received by users. So after some time, Microsoft backpedaled to standard one click, choose your default browser solution that existed in the previous version of Windows OS. Altho sometimes Microsoft knows how to irritate its users base, it is good to know that they can also listen and fix things that are required.
Read More
Software review series: RocketDock
RocketDock is one of the most popular app launchers as it has been used excessively back in several windows versions. This was modeled based on the Mac OS X launch bar and offers an animated response when you hover the mouse over the apps gathered on the Dock. This is perched at the top of your screen, and you can easily drag your favorite app icons to have them in one place. The dock keeps all your most favorite shortcuts intact for faster and easy access. Like other apps, you can easily customize the dock with skins and other add-ons. If you would like to read more helpful articles and tips about various software and hardware visit errortools.com daily.
Read More
Steam 2021 Winter sale official date
Each year Steam makes a couple of large sales, and each year there are speculations and leaks on the date when the sale is going to happen and when it is starting. It seemed that Steam has become aware that these leaks will not stop and that store really cannot hide that kind of important date from the public so in the latest news Steam Purley has just given the date of this year's big winter sale. steam winter saleProbably tired of even trying to hide it, Steam has released that this year's big Steam Winter sale is officially starting on December 22nd, 2021, and closing on January 5th, 2022. So if you have someone to buy a gift or just want to drop a few great games in your library at a low price this is the time when you should do it.
Read More
Edge and Store apps are not connecting
If your Microsoft Edge browser and Windows Store apps are now unable to connect to the internet after you have just installed the newly released Windows 10 v1809 October 2018 update, then this post might help. As you know, Microsoft has made a change recently and because of this, some users are getting the “Hmm, we can’t reach this page” error when they try to open Microsoft Edge as well as other pre-installed apps like News, Mail, and so on. Aside from that, you also won’t be able to connect the Microsoft Store apps to the internet. What’s strange is that you can connect to the internet using other programs like Google Chrome, Internet Explorer, and many more. Apart from checking your internet connection, there are other things you can to resolve the problem. If your Windows Store apps are not able to connect to the internet and you’re only getting the Error 80072EFD, then you might have to enable IPv6 as the new Windows 10 v1809 requires IPv6 to be enabled so that you can use the UWP apps. And so you have to enable IPv6 in the network card along with IPv4. To do so, follow the steps below. Step 1: Tap the Win + R keys to open the Run dialog box. Step 2: After that, type “ncpa.cpl” and hit Enter or click OK to open Network Connections. From there, you will see your currently connected network profile. Step 3: Right-click on your network profile and select Properties and then go to the Networking tab and look for the “Internet Protocol Version 6 (TCP/IPv6)” and select its corresponding checkbox. Step 4: Now click the OK button to save the changes made and restart your computer.
Read More
Recover or set a BIOS or UEFI Password
If you have been using Windows for quite some time now then you’re probably aware of the BIOS or UEFI password. This password lock is the one that ensures you enter the set password even before your Windows PC boots up. However, there’s just one downside with the BIOS or UEFI password – there is no recovery option, unlike your Microsoft account. Worry not though for this post will guide you on how you can set or recover a BIOS or UEFI password on your Windows computer. The BIOS or UEFI passwords are stored at the hardware level which means that unless the OEM wants or has configured a way to recover the password, it is pretty much impossible to reset it. There are times when they are so strict that the only way to get through it by contacting customer care. Note that any Windows computer with this lock can’t be unlocked by trying to reinstall Windows. In this post, you’re going to have to remove the CMOS battery temporarily, clear unknown BIOS/UEFI passwords using the bios-PW website as well as call customer care. For more details, refer to the options provided below.

Option 1 – Remove the CMOS battery temporarily

In case you didn’t know, every motherboard comes with a CMOS battery which helps the computer system to keep the clock ticking and in making sure that the BIOS settings are not lost when the computer is powered down. Every time a computer is turned on, the CMOS battery ensures that the information is available for the computer to boot up. So when you remove the CMOS battery temporarily, say about 30 seconds or a minute, the settings will be lost. There are some motherboards that are built-in ways that when you remove the battery for long, it will reset everything including the password for the BIOS or UEFI.

Option 2 – Clear the unknown BIOS or UEFI passwords using a bios-PW website

If the first option didn’t work, you can try using this BIOS Password website at http://bios-pw.org/ to clear the password.
  • When prompted by the BIOS, enter the wrong password a couple of times as doing so will lock you out of the system.
  • After that, you will see a new number or code on the screen which will include a message about System Disabled [XXXXX] Service TAG [YYYYY].
  • Next, open the BIOS Password website and enter the XXXXX code in it and make sure to tap the Shift + Enter keys or just enter.
  • Now it will open multiple unlock keys which you can use to clear out the BIOS or UEFI lock on your Windows PC.

Option 3 – Call the customer care

If the second option still didn’t work, you have to call customer care and follow their suggestions for they will walk you through fixing the problem using the service tag or might suggest that you visit a service center to make things easier for you. Note: You also have the option to set a BIOS or UEFI password. Although it isn’t recommended, you still can do it if you really want to. Remember that the BIOS or UEFI interface varies from OEM to OEM so you must find something related to either PASSWORD or SECURITY. You will have the following similar options:
  • Supervisor password – it’s the same as the master password that can change important system settings.
  • User password – with this password, any user can change minor settings.
  • Master password – you can use this password for a hard drive or as a general password.
There are several OEMs that offer micro-control where you have to enter the BIOS password. For instance, you’ll have the option to skip for a normal restart, or when you select a boot device while you might have to enter the password for unattended reboots or when your PC is powered on, etc. And if you are here to remove the password, you need to find a remove password option in the same section. You will be prompted to enter the set password once and if it’s correct, it will remove the BIOS password. After that, you have to save and exit the BIOS then restart your computer and check if the settings are properly applied.
Read More
Disable Speech Recognition feature in Windows
Speech Recognition is a technology used to control computers using voice commands. Through this feature, you can say commands that your computer will respond to, and aside from that, you can also dictate text to your computer which eliminates the need to type words in any word processing program or text editor. All in all, the Speech Recognition feature allows you to communicate with your computer and improves your computer’s ability to understand your own voice better as well as improve its diction accuracy. However, before you can improve its accuracy, you need to “train the feature” first. And if so far you are not satisfied with its performance, you actually have the option to disable it. So in this post, you will be guided on how you can disable the Speech Recognition feature in Windows 10 v1809.

To disable Speech Recognition on your computer, follow the steps below.

Step 1: Go to Settings > Ease of Access. Step 2: From there, go to Speech. Step 3: Now switch off the toggle button for Speech Recognition to disable this feature. On the other hand, you can also disable the Online Speech Recognition feature if you really don’t want to have anything to do with it. You have two options to do that – you can either do it using Settings or using the Registry Editor.

Disable Online Speech Recognition feature via Settings:

  • Click on the Start button and select Settings.
  • Next, go to the Privacy section and click on the Speech option located at the right pane.
  • Then switch the toggle button off to turn off the Online Speech Recognition feature.
Note: Speech services exist on your computer and even in the cloud since Microsoft collects essential information from these services in order to enhance user experience and if you want to stop this, you have to turn off the “Getting to know you” option under the “Inking and typing Personalization” section.

Disable Online Speech Recognition feature via Registry Editor:

Before you proceed, you need to create a System Restore Point first.
  • Tap the Win + R keys to open the Run dialog box.
  • Then type “Regedit” in the field and hit Enter to open the Registry Editor.
  • Next, navigate to the following registry path:
HKEY_CURRENT_USERSoftwareMicrosoftSpeech_OneCoreSettingsOnlineSpeechPrivacy
  • After that, check the default value of the “HasAccepted” key located in the right pane. As you can see its value is set to “1” which means that the Speech Recognition feature is enabled. And so to change it, you have to set “0” as its new value to permanently disable the feature.
  • Just double click on the key and change the value from “1” to “0”. Keep in mind that even if you are using a 64-bit Windows 10 computer, you still have to create a 32-bit DWORD value.
  • After that, restart your computer to apply the changes made.
Read More
Mapi32.dll Outlook Error - Quick Fix

Mapi32.dll Outlook Error

What is Mapi32.dll Outlook Error?

Mapi32.dll is a Windows Messaging Application Programming Interface that enables Windows to perform various email functions and launch messaging programs like Microsoft Outlook and Microsoft Office. The inability of the interface to execute email functions properly results in the Mapi32.dll Outlook Error. This error occurs mostly when you are attempting to upgrade the operating system to a new version.

Solution

Restoro box imageError Causes

The common causes of the Mapi32.dll Outlook Error during the OS upgrade are:
  • Damaged or Corrupt Outlook user profile
  • The software is overwritten by some other program
  • Outlook PST file corruption
The Mapi32.dll Outlook Error message is displayed in either of the following forms:
  • Mapi32.dll is missing
  • Cannot start Microsoft Office Outlook. Mapi32.dll is corrupt or the wrong version.
  • Mapi32.dll was not found
  • Mail is not installed

Further Information and Manual Repair

So, what if you experience this issue and how do you fix it? Well, first there is no need to panic as Microsoft has recognized this issue and provided adequate solutions to fix this problem in no time. However, to ensure the Mapi32.dll Outlook error is a quick fix, you must first understand the cause of the issue and the message displayed on the screen.
  1. Let’s say the errors occur because your Outlook profile is corrupt. In this scenario, the best solution is to create a new Outlook profile. Regardless of whether you have Windows Vista or XP, to create your new Outlook profile, first, you will have to click on the Control Panel, then User Account, and then Mail. Once you click on the Mail tab, the mail set up dialog box will open. In this dialog box there will be a ‘Show Profiles’ tab, click and then click the Add tab that appears next. Now type the name for your new Outlook profile and then click ‘OK’. After that, add an email account to go with the profile.
  2. If Mapi32.dll is missing or corrupt, you will have to run ‘Fixmapi.exe’ to resolve the problem. It is located in the System32 folder inside the Windows directory in Windows Explorer.
  • Therefore, first start Windows Explorer and then locate the following folder on your computer: C: /Program Files/Common Files/System/Msmapi1033
  • Now find Fixmapi.exe and double click it
  • After that locate the Mapi32.dll file and rename it to MSmapi32.old and press enter.
  • Restart your computer when finished.
A word of advice for computer users is to scan for viruses with an antivirus program or a registry cleaner regularly to prevent the Mapi32.dll Outlook error from occurring in the first place. Viruses often latch onto .dll files and corrupt them. It’s always best to have a forward-looking approach.
Read More
Virtual desktop with different wallpapers
Virtual desktop
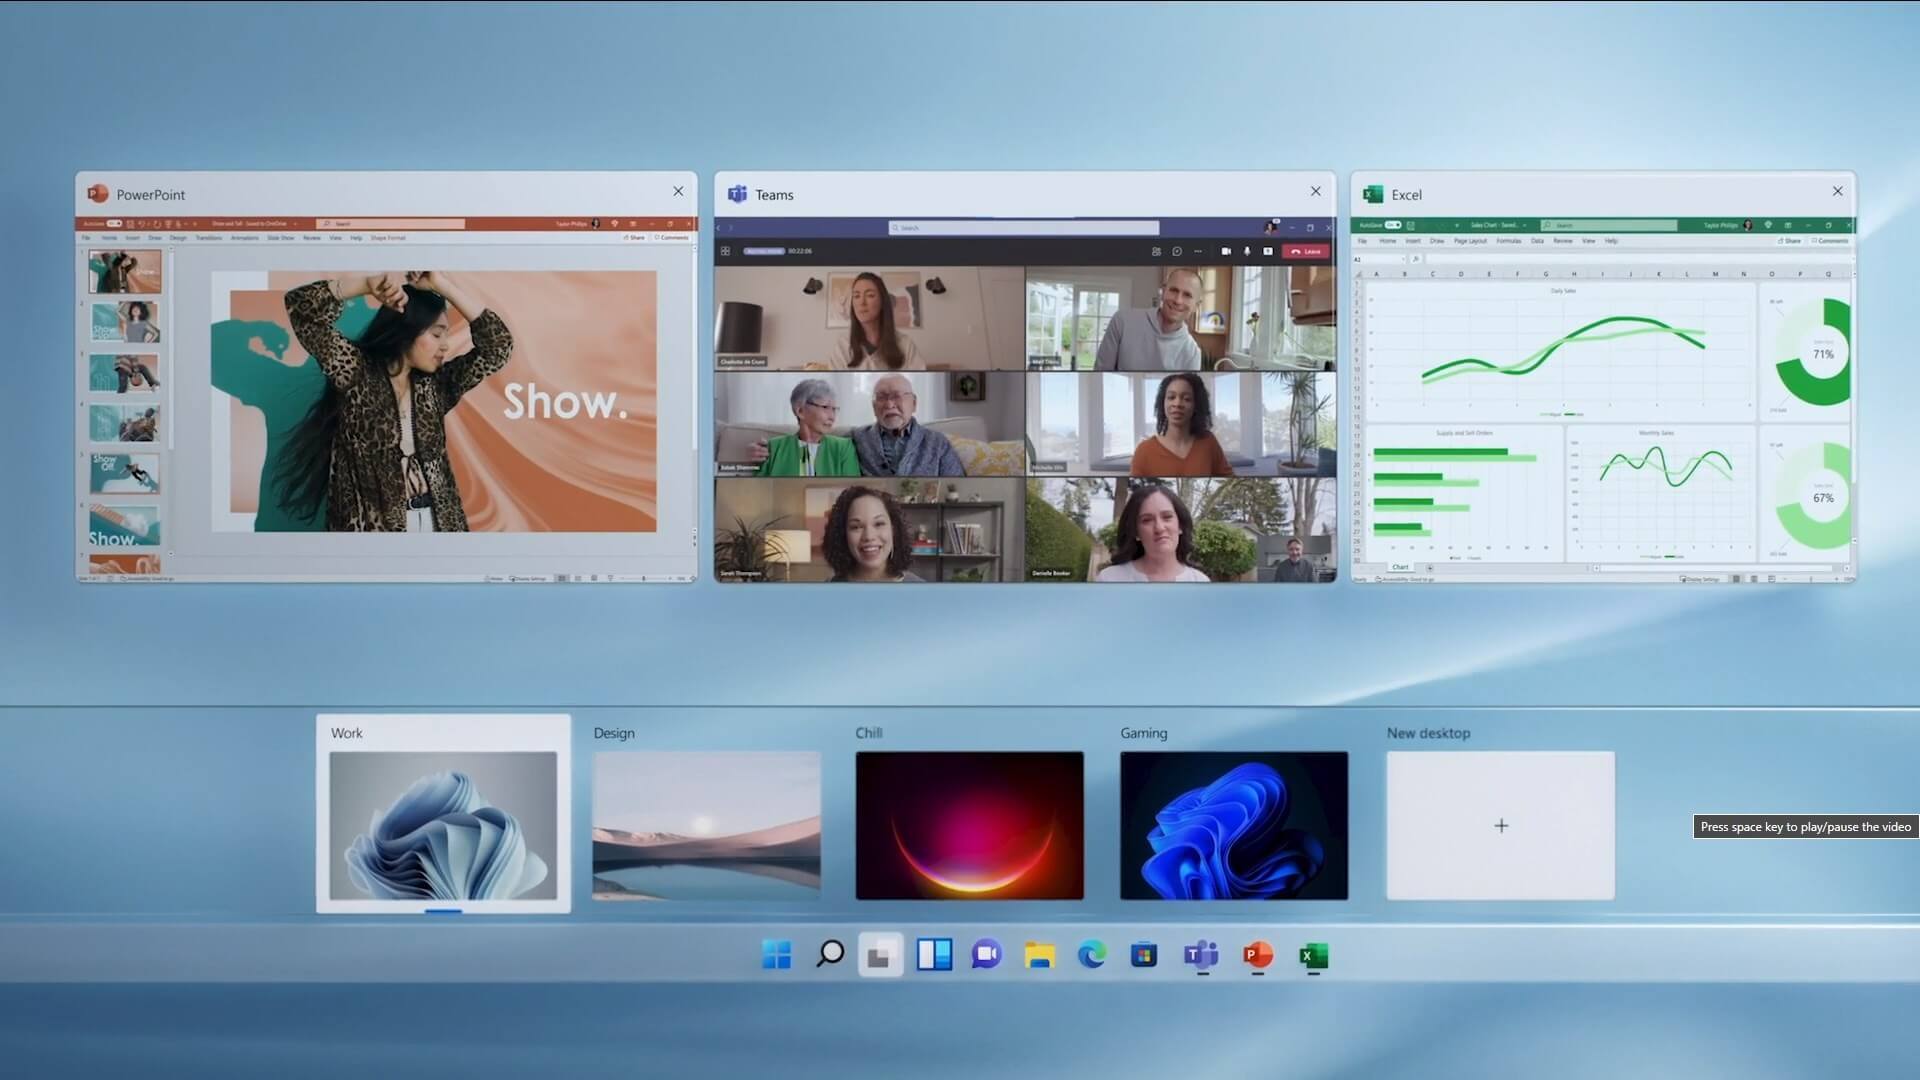
The feature that was originally planned for now scrapped Windows 10X is included in Windows 11. You will be able to customize your Virtual desktop with different wallpapers for each screen. In order to fully customize your virtual desktops with different wallpapers follow this easy step-by-step guide.
  1. Click on the Task View button in the taskbar
  2. When the Task View opens, select the desktop on which you want to set wallpaper
  3. The view will switch to the selected desktop. Right-click anywhere on the desktop and select personalize
  4. In personalization settings, click on the background
  5. Select wallpaper which you would like to have on the desktop by clicking on browse and navigating to the desired one
  6. Close the settings
  7. Repeat for each virtual desktop you would like to customize
Read More
1 2 3 162
Logo
Copyright © 2022, ErrorTools. All Rights Reserved
Trademarks: Microsoft Windows logos are registered trademarks of Microsoft. Disclaimer: ErrorTools.com is not affiliated with Microsoft, nor claim direct affiliation.
The information on this page is provided for information purposes only.
DMCA.com Protection Status