How to Resolve HP Printer Spooler Not Running Error

HP Printer Spooler Not Running Error

HP Printer Spooler Not Running - What is it?

If you have the HP printer, then you may come across this error. HP Printer Spooler not running errors does not mean there is anything wrong with your printer. It indicates printer driver issues.

Solution

Restoro box imageError Causes

There can be multiple causes behind the HP printer Spooler not running error code such as:

  • The poor or unsuccessful printer driver installation
  • Invalid registry entries

Though this is not a critical error code as it does not pose serious damage threats to your PC, however, it is advisable to resolve it as it can cause you a great deal of inconvenience especially if you want to take out printouts every now and then.

Further Information and Manual Repair

Here are some ways you can try to resolve HP Printer Spooler Not Running Error on your system:

1. Reinstall the HP Printer driver on Your System

  • Simply go to the control panel and then click on the Device Manager option
  • Once you click it you will see details pane with a list of devices. Now simply click on the printer, to reinstall the driver software.
  • Double click on it to open the properties dialog box
  • After that click on the driver tab and then click update driver

Once you update the driver, try using the Printer to see if it works. Sometimes you may come across a pop-up displaying the following message: ‘Driver installed correctly, Device is ready to use however, you may not see the printer under the printer’s pane. This triggers registry issues.

2. To resolve registry issues, install Restoro on your system.

This is a highly functional registry cleaner integrated with a powerful antivirus. It helps resolve registry issues, malware, and guarantees system optimization. This feature-filled tool is the answer to all your PC-related issues.

Restoro is a next-generation PC repair software that extends outstanding usability and helps PC users resolve errors efficiently.

Its simple navigation and user-friendly interface make it so easy to use that even novice users can also work around it and repair issues without any hassle or difficulty.

It’s a smart and intuitive in-built registry cleaner that wipes out all the unnecessary and obsolete files on your hard disk. This includes junk files, internet history, invalid registry keys, and files from the uninstalled old program versions.

Sometimes the files from the uninstalled programs hamper your ability to update new program versions thus leading to unsuccessful driver installation. Nonetheless, all such files are removed in seconds with this helper and you are then ready to reinstall the driver.

This registry cleaner cleans the clutter from your hard disk and optimizes your system's speed, lowering your PC boot time significantly. Total System Care can be used on all Windows versions

To fix the HP printer spooler not running error on your computer, simply click here to install Restoro. Run it to scan for the error and fix it in seconds. Once the issue is resolved, update the printer driver. You’ll see the driver will be updated successfully and the HP printer will also appear in the printer’s panel.

By installing Restoro on your system, you can also resolve several other issues like privacy errors triggered by malware and virus infections. With this tool, you will not have to download and run a separate anti-virus on your system.

If you like to learn and find out more about various Windows errors, and how to repair them go to our vast archive or use search to find articles that will explain and help you in solving your issue.
However, if you prefer to do things fast and with automatization then we are proposing to use an automated solution for your issues. The application that we are recommending is Advanced System Repair Pro
Advanced System Repair utilizes multiple tools all in one to give you a quick, simple, reliable, and very thorough diagnosis of your PC. It brings you all the tools you need in one program to clean, fix, protect, optimize and boost your PC!
1-Click Maintenance
All the tools to make it simple and easy! It's like having a professional technician at the click of a mouse.

Junk Cleaner
Keeping your computer free from unnecessary clutter also helps make your computer last longer. Like any other machine, if you keep it clean and take care of it, it will serve you better for longer!

Optimize background apps
Optimize applications background activity with the built-in Application Optimizer feature.

Disk Defrag
With a simple 1-click, Advanced System Repair speeds up your PC by assembling fragmented files on your machine and organizing them more efficiently.

Malware Removal
Finds and removes all types of harmful malware including trojans, worms, bots, adware, spyware, PUPs, and more!

Privacy Cleaner
The all-in-one privacy suite to Clean Your Tracks & Protect Your Privacy! Make your computer safe, secure, and more efficient!

System Tweak/Optimizer
ASR will analyze your complete system and settings to adjust your PC to function at its maximum performance.

Registry Cleaner
Over time, as you install and uninstall applications, the registry can become cluttered with old entries and broken settings which can result in program crashes, and annoying messages and slow the computer down.
Visit our Advanced System Repair Pro Download page to inform yourself about all the benefits of this software and get a free trial copy of it.
advanced system repair pro

Advanced System Repair Pro

One-click automated PC repair solution
ASR logo
With Advanced System Repair Pro you can easily
Replace damaged files
Restore performance
Free disk space
Remove Malware
Protects WEB browser
Remove Viruses
Stop PC freezing
DOWNLOAD
Privacy Policy | Terms of Use | Uinstall
Advanced System Repair Pro is compatible with all versions of Microsoft Windows including Windows 11

Share this article:

You might also like

Fix Windows 11 Black Screen Error
A black screen error inside Windows 11 is a typical screen turning to solid black without any error message. This can be very annoying since it can randomly appear out of nowhere and it will appear while you are using the computer. Worry not, this is not a serious error and we have several solutions for it, so please keep reading and try them as presented in order.

Black screenRestart graphic driver

This is the first thing to check if the issue is due to software or driver malfunctioning, there is a shortcut for rebooting graphic driver inside Windows 11. Press WINDOWS + CTRL + SHIFT + B to reboot the graphic driver and see if this fixes the issue. A beep sound should be heard during this process and the screen should turn back to normal.

Check connections

Sometimes the screen can go black due to a faulty connection or cable. If you have it at your hand try a different cable or slightly and gently nudge the existing one to see will screen flicker. If you are on a laptop try gently moving the lid from back to front and pay attention to the screen. If screen flickers or picture returns with this method, cable or connector needs to be replaced.

Clean your computer

The black screen can be because the computer is overheating. If this is the case either fan inside is not working properly or there is a lot of dirt and dust that needs to be removed so airflow can be established again for proper cooling. We have an article on errortools.com on how to properly clean your PC but if you are not technical enough maybe the best solution would be to call someone who is or to take the PC to service for cleaning.

Change The Projection Settings

Press WINDOWS + P to open projection settings, check to see if PC is set to PC screen only. If any other option is selected change it to PC screen only since this can cause random black screen issues.

Uninstall latest updates

If this problem has started to manifest itself during the latest update, go to setting and roll back from the latest update to fix this issue.

Scan system for malware

The black screen can also be caused by various viruses and malware. IF you have anti-virus software, run a full system scan to check it for malware. If you do not have one, download a free one and run a system scan, we recommend Bitdefender.
Read More
How to fix Windows 10 Error 0x803f7000

How to fix Windows 10 Error 0x803f7000

Error code 0x803f7000 -What is it?

Error code 0x803f7000 refers to an issue in Windows 10 with downloading apps through Windows Store. When you choose the app or game to download, it heads to Downloads in the Store app. Then it says it is acquiring a license but then fails. When you click the “See details” link, you see the error code 0x803F7000. It could mean that the date and time or region settings in your Windows 10 are incorrect or there are some problems with the Windows Store Cache.

Symptoms

  • This error appears when you are running Windows 10 and trying to download an app through the Microsoft store. The error code may appear with this message: Something went wrong. The error code is 0x803f7000, in case you need it
  • You might also see this message along with the error code: "It looks like you've reached your device limit for installing apps and games from the Store on your Windows 10 device. If you want to install apps and games from the Store on another Windows 10 device, remove a device from the device list."

Solution

Restoro box imageError Causes

There may be several reasons for this error:
  1. This problem may arise if the date and time in Windows 10 are incorrect.
  2. If the region has been set incorrectly.
  3. Problems with Windows store cache.
  4. Windows store server overloaded.
  5. The Windows version you are using is pirated.

Further Information and Manual Repair

Method 1:

Correcting date and time:
  • Open up Control Panel > Clock, Language, and Region.
  • Then click on Date & Time.
  • Now click on Change date & time to correct your time.

Method 2:

Correcting region:
  • Navigate to Control Panel > Clock, Language, and Region.
  • Then click on Region.
  • Then click on the Location tab.
  • Now set your actual region from Home location section.
  • Click Apply & OK.

Method 3:

Resetting Windows Store:
  • Press Windows Flag Key + X from your keyboard. Then select Command Prompt (Admin). It will launch Command prompt as administrator.
  • Then type wsreset and hit Enter.
  • Wait for a few seconds. It will automatically open Windows Store.
  • Then try to download any apps.

Method 4:

  1. Open Command prompt in local machine and type in the Windows Store reset tool exe
  2. Activate Windows by going to Settings>Updates and Security
  3. Run the Modern UI/metro app troubleshooter from Microsoft
  4. Keep trying it several times.
  5. Try changing locale and time zone to the United States as shown below
  6. Go to control panel, Language settings
  7. Select location to the United States
  8. This will reset the language to US English. After this try downloading the apps again.
  9. Try restarting the Windows Updater service or restart the machine once.
You must make sure that you have a good internet connection. You need that for the updates and downloads complete without disruption.

Method 5:

Make sure the app isn’t blocked by the Windows firewall: To make your PC more secure, some apps are blocked by Windows Firewall by default. For proper functioning, you might need to enable an app to receive info through the firewall. For more info, see the "Allow an app to receive info through the firewall," and follow the procedure from start to finish.

Method 6:

Check with your system admin: If your PC is part of a network in an organization, like a business, school, or government agency, your system administrator might have turned off the use of certain apps using the Group Policy. Contact your system admin if you believe that Group Policy is preventing you from using an app.

Method 7:

Make sure your apps are up-to-date: To make the apps working properly, you must keep your apps up-to-date. This could be done by turning on automatic updates in the Windows Store.

Method 8:

Contact the app publisher To view the publisher’s app support info, follow these steps:
  1. On the Start screen, tap or click Store to open the Windows Store.
  2. Search or browse for the app, and then tap or click it.
  3. Scroll to the Details section of the app's description page, and then tap or click the support link for the app under Learn more. The link will open an email message for you to contact support or will take you to a support website.
If you do not possess the technical expertise required to accomplish this yourself or do not feel comfortable doing so, download and install a powerful automated tool to get the job done.
Read More
MyImageConverter Removal Guide for Windows

This toolbar/web browser extension is ad/search-supported that is typically installed as an optional offer, users generally have this bundled with 3rd party software. During setup, this toolbar will modify the home page and new tab pages to the affiliate search portal MyWay.com using a primary search engine to collect shared search revenue. It will also modify the default search provider as well. While this extension is installed users will experience a display of additional ads and sponsored content throughout their browsing sessions, as well as the possibility of pop-up ads. Several anti-virus scanners have marked this extension as a Browser Hijacker and it is recommended to remove it from your computer.

About Browser Hijackers

Browser hijacking means that a malicious code has taken control over and altered the settings of your internet browser, without your consent. They are designed to interfere with browser programs for a variety of purposes. Usually, it’ll drive users to predetermined websites that are looking to increase their advertising campaign income. Though it may seem naive, all browser hijackers are damaging and thus always regarded as security risks. In a worst-case scenario, your internet browser can be hijacked to download malicious software that can do a great deal of damage to your laptop or computer.

How to know if your internet browser has been hijacked

The common symptoms that indicate having this malicious software on your PC are: 1. home page is modified 2. bookmark and the new tab are likewise modified 3. default online search engine is changed 4. you’re getting new toolbars you have never found before 5. your internet browser displays endless pop-up ads 6. your web browser has become unstable or starts running slowly 7. you can’t visit certain websites like homepages of anti-malware software.

Exactly how browser hijacker finds its way onto your computer system

Browser hijackers can enter a computer by some means or other, including via downloads, file sharing, and e-mail also. They may also come from any BHO, extension, add-on, toolbar, or plug-in with malicious intent. Browser hijackers sneak into your pc in addition to free software application downloads that you unintentionally install alongside the original. Some of the most popular hijackers are MyImageConverter, Conduit Search, Babylon Toolbar, Sweet Page, OneWebSearch, and CoolWebSearch.

Learn how to get rid of browser hijackers

Certain hijackers could be removed by just uninstalling the related freeware or add-ons through the Add or Remove Programs in the Windows control panel. In some cases, it could be a difficult job to find and remove the malicious piece because the associated file could be running as part of the operating system process. Besides, browser hijackers can modify the Windows registry so it can be quite tough to restore all the values manually, especially when you are not a very tech-savvy person. You can choose automatic browser hijacker removal by just installing and running an efficient anti-malware program. SafeBytes Anti-Malware detects all types of hijackers – including MyImageConverter – and eliminates every trace quickly and efficiently. In addition to anti-virus software, a PC optimizer program, like Total System Care, can help you fix Windows registry errors, remove unwanted toolbars, secure your internet privacy, and boost overall computer performance.

What to Do if Virus Stops You From Downloading Or Installing Antivirus?

Practically all malware is bad, but certain types of malware do much more damage to your PC than others. Some malware variants alter web browser settings by adding a proxy server or change the PC’s DNS configuration settings. In such cases, you’ll be unable to visit some or all of the websites, and therefore not able to download or install the required security software to clear out the computer virus. If you are reading this now, you might have perhaps realized that virus infection is a reason behind your blocked net connectivity. So how to proceed if you need to install an anti-virus software like Safebytes? Follow the instructions below to remove malware by alternate methods.

Download the software in Safe Mode with Networking

The Windows operating system comes with a special mode referred to as “Safe Mode” in which only the minimum required programs and services are loaded. In the event the malware is blocking internet connection and affecting your computer, running it in Safe Mode enables you to download anti-virus and run a diagnostic scan whilst limiting potential damage. To get into Safe Mode or Safe Mode with Networking, press F8 while the system is booting up or run MSCONFIG and locate the “Safe Boot” options in the “Boot” tab. Once you are in safe mode, you can try to install your anti-malware application without the hindrance of the malware. Now, you can run the antivirus scan to get rid of viruses and malware without hindrance from another malicious application.

Download the security software using an alternate internet browser

Some malware only targets particular web browsers. If this sounds like your situation, utilize another web browser as it might circumvent the virus. If you seem to have a trojan attached to Internet Explorer, then switch to an alternate web browser with built-in safety features, such as Firefox or Chrome, to download your preferred anti-malware program – Safebytes.

Install anti-malware on a USB drive

Another option would be to make a portable antivirus program on your USB flash drive. To run anti-malware from a USB pen drive, follow these simple measures: 1) On a virus-free computer, download and install Safebytes Anti-Malware. 2) Plug the USB drive into the clean computer. 3) Double-click on the downloaded file to open the installation wizard. 4) Select the drive letter of the flash drive as the location when the wizard asks you exactly where you want to install the antivirus. Follow the on-screen instructions to finish the installation process. 5) Transfer the flash drive from the uninfected computer to the infected computer. 6) Double-click the Safebytes Anti-malware icon on the USB drive to run the software. 7) Hit the “Scan” button to run a full computer scan and remove viruses automatically.

Protect Your PC and Privacy With SafeBytes Anti-Malware

Are you looking to install the best anti-malware software program for your PC? You can find many applications on the market which come in free and paid versions for Windows systems. A few of them do a great job in eradicating malware threats while some will affect your PC themselves. You should look for a product that has obtained a good reputation and detects not only viruses but other types of malware as well. While considering the highly regarded applications, Safebytes AntiMalware is certainly the highly recommended one. SafeBytes anti-malware is trustworthy software that not only secures your PC completely but is also quite user-friendly for people of all ability levels. Through its cutting-edge technology, this software will help you protect your computer against infections caused by various kinds of malware and similar internet threats, including adware, spyware, viruses, worms, trojans, keyloggers, ransomware, and potentially unwanted program (PUPs).

SafeBytes anti-malware offers an array of advanced features which sets it aside from all others. Let’s take a look at a few of them below:

Real-time Threat Response: SafeBytes provides real-time active supervision and protection from all known computer viruses and malware. It’ll inspect your personal computer for suspicious activity regularly and its unrivaled firewall protects your computer from illegal access by the outside world. World-class AntiMalware Protection: Using a critically acclaimed anti-malware engine, SafeBytes offers multilayered protection which is designed to catch and get rid of viruses and malware that are hidden deep inside your computer’s operating system. Web protection: SafeBytes inspects the hyperlinks present on a webpage for possible threats and notifies you if the site is safe to visit or not, through its unique safety ranking system. Light-weight: This application is not “heavy” on the computer’s resources, so you’ll not see any performance troubles when SafeBytes is working in the background. 24/7 Customer Support: Support service is readily available 24 x 7 x 365 days through email and chats to answer your concerns. SafeBytes has developed a great anti-malware solution to help you conquer the latest malware threats and virus attacks. You can be sure that your computer will be protected in real-time once you put this tool to use. So if you’re looking for the absolute best malware removal application out there, and if you don’t mind paying out a few bucks for it, opt for SafeBytes Anti-Malware.

Technical Details and Manual Removal (Advanced Users)

To get rid of MyImageConverter manually, navigate to the Add or Remove programs list in the Control Panel and choose the program you want to get rid of. For web browser extensions, go to your browser’s Addon/Extension manager and choose the plug-in you intend to disable or remove. You may also want to reset your home page and search engine providers, and also delete temporary files, browsing history, and cookies. If you opt to manually delete the system files and Windows registry entries, utilize the following checklist to make sure you know precisely what files to remove before performing any actions. But bear in mind, editing the Windows registry is usually a difficult task that only advanced users and professionals should attempt to fix the problem. In addition, some malware is capable of replicating or preventing removal. It is highly recommended that you carry out the removal procedure in Windows Safe Mode.
Files: %PROGRAMFILES(x86)%4zUninstall MyImageConverter.dll %SystemDrive%\Users\wsierra\AppData\Roaming\Mozilla\Firefox\Profiles\pe3eufs0.default\extensionszffxtbr-bs@MyImageConverter_4z.com\content\MyImageConverter.exe %LOCALAPPDATA%\MyImageConverter_4z %PROGRAMFILES%\MyImageConverter_4z %UserProfile%\Local Settings\Application Data\amailnkkmeeoijlkjdgloiclaiifpojf %LOCALAPPDATA%\amailnkkmeeoijlkjdgloiclaiifpojf %ProgramFiles%\MyImageConverter %UserProfile%\Local Settings\Application Data\Google\Chrome\User Data\Default\Sync Extension Settings\oeabadoffdnkmmecmhpknaklgmabippp %ProgramFiles(x86)%\MyImageConverter %UserProfile%\Local Settings\Application Data\Google\Chrome\User Data\Default\Extensions\ikgjglmlehllifdekcggaapkaplbdpje %LOCALAPPDATA%\Google\Chrome\User Data\Default\Extensions\ikgjglmlehllifdekcggaapkaplbdpje %LOCALAPPDATA%\Google\Chrome\User Data\Default\Sync Extension Settings\ikgjglmlehllifdekcggaapkaplbdpje %UserProfile%\Local Settings\Application Data\Google\Chrome\User Data\Default\Sync Extension Settings\ikgjglmlehllifdekcggaapkaplbdpje %UserProfile%\Local Settings\Application Data\MyImageConverterTooltab %LOCALAPPDATA%\MyImageConverterTooltab Registry: HKEY_CURRENT_USER\HKEY_CURRENT_USER\Software\ HKEY_CURRENT_USER\Software\AppDataLow\Software\MyImageConverter_4z HKEY_CURRENT_USER\Software\MyImageConverter_4z HKEY_LOCAL_MACHINE\SOFTWARE\Classes\MyImageConverter_4z.DynamicBarButton HKEY_LOCAL_MACHINE\SOFTWARE\Classes\MyImageConverter_4z.DynamicBarButton.1 HKEY_LOCAL_MACHINE\SOFTWARE\Classes\MyImageConverter_4z.FeedManager HKEY_LOCAL_MACHINE\SOFTWARE\Classes\MyImageConverter_4z.HTMLPanel HKEY_LOCAL_MACHINE\SOFTWARE\Classes\MyImageConverter_4z.HTMLPanel.1 HKEY_LOCAL_MACHINE\SOFTWARE\Classes\MyImageConverter_4z.MultipleButton HKEY_LOCAL_MACHINE\SOFTWARE\Classes\MyImageConverter_4z.MultipleButton.1 HKEY_LOCAL_MACHINE\SOFTWARE\Classes\MyImageConverter_4z.PseudoTransparentPlugin HKEY_LOCAL_MACHINE\SOFTWARE\Classes\MyImageConverter_4z.PseudoTransparentPlugin.1 HKEY_LOCAL_MACHINE\SOFTWARE\Classes\MyImageConverter_4z.Radio HKEY_LOCAL_MACHINE\SOFTWARE\Classes\MyImageConverter_4z.ScriptButton HKEY_LOCAL_MACHINE\SOFTWARE\Classes\MyImageConverter_4z.ScriptButton.1 HKEY_LOCAL_MACHINE\SOFTWARE\Classes\MyImageConverter_4z.SettingsPlugin HKEY_LOCAL_MACHINE\SOFTWARE\Classes\MyImageConverter_4z.SettingsPlugin.1 HKEY_LOCAL_MACHINE\SOFTWARE\Classes\MyImageConverter_4z.SkinLauncher HKEY_LOCAL_MACHINE\SOFTWARE\Classes\MyImageConverter_4z.SkinLauncher.1 HKEY_LOCAL_MACHINE\SOFTWARE\Classes\MyImageConverter_4z.SkinLauncherSettings HKEY_LOCAL_MACHINE\SOFTWARE\Classes\MyImageConverter_4z.SkinLauncherSettings.1 HKEY_LOCAL_MACHINE\SOFTWARE\Classes\MyImageConverter_4z.ToolbarProtector HKEY_LOCAL_MACHINE\SOFTWARE\Classes\MyImageConverter_4z.ToolbarProtector.1 HKEY_LOCAL_MACHINE\SOFTWARE\Classes\MyImageConverter_4z.UrlAlertButton HKEY_LOCAL_MACHINE\SOFTWARE\Classes\MyImageConverter_4z.UrlAlertButton.1 HKEY_LOCAL_MACHINE\SOFTWARE\Classes\MyImageConverter_4z.XMLSessionPlugin HKEY_LOCAL_MACHINE\SOFTWARE\Classes\MyImageConverter_4z.XMLSessionPlugin.1 HKEY_CURRENT_USER\Software\Microsoft\Internet Explorer\Approved Extensions, value: 312F84FB-8970-4FD3-BDDB-7012EAC4AFC9 HKEY_CURRENT_USER\Software\Microsoft\Internet Explorer\Approved Extensions, value: 48586425-6BB7-4F51-8DC6-38C88E3EBB58 HKEY_LOCAL_MACHINE\SOFTWARE\Wow6432Node\Google\Chrome\Extensions\adldappccjhelkmbkpiibilgnnjakieg HKEY_LOCAL_MACHINE\SOFTWARE\Wow6432Node\Microsoft\Internet Explorer\Low Rights\ElevationPolicy\3d429207-4689-492d-a0e5-cdc5dfbb5005 HKEY_LOCAL_MACHINE\SOFTWARE\Wow6432Node\Microsoft\Internet Explorer\Low Rights\ElevationPolicy\66d59105-fe06-43a4-b292-eb0097e9eb74 HKEY_LOCAL_MACHINE\SOFTWARE\Wow6432Node\Microsoft\Internet Explorer\Low Rights\ElevationPolicy\9103c314-c4e2-4463-8934-b19bcb46236d HKEY_LOCAL_MACHINE\SOFTWARE\Wow6432Node\Microsoft\Internet Explorer\Low Rights\ElevationPolicy\97cef41c-5055-474a-855a-892d4fe3e596 HKEY_LOCAL_MACHINE\SOFTWARE\Wow6432Node\Microsoft\Internet Explorer\Low Rights\ElevationPolicy\d375ee64-f893-498a-a0e9-0e9829c88c3d HKEY_LOCAL_MACHINE\SOFTWARE\Wow6432Node\Microsoft\Tracing\MyImageConverterCrxSetup_RASAPI32 HKEY_LOCAL_MACHINE\SOFTWARE\Wow6432Node\Microsoft\Tracing\MyImageConverterCrxSetup_RASMANCS HKEY_LOCAL_MACHINE\SOFTWARE\Wow6432Node\Microsoft\Windows\CurrentVersion\Ext\PreApproved\1f6f39c1-00a8-4752-a94c-d0ea92d978b6 HKEY_LOCAL_MACHINE\SOFTWARE\Wow6432Node\Microsoft\Windows\CurrentVersion\Ext\PreApproved\38122a36-83b2-46b8-b39a-ec72a4614a07 HKEY_LOCAL_MACHINE\SOFTWARE\Wow6432Node\Microsoft\Windows\CurrentVersion\Ext\PreApproved\5354d921-3f52-47c5-938d-77a2fb6defe7 HKEY_LOCAL_MACHINE\SOFTWARE\Wow6432Node\Microsoft\Windows\CurrentVersion\Ext\PreApproved\71144427-1368-4D18-8DC9-2AE3CC4C4F83 HKEY_LOCAL_MACHINE\SOFTWARE\Wow6432Node\Microsoft\Windows\CurrentVersion\Ext\PreApproved\99e1f6fd-2e94-4cf6-8344-1ba63cd3bd9b HKEY_LOCAL_MACHINE\SOFTWARE\Wow6432Node\Microsoft\Windows\CurrentVersion\Ext\PreApproved\a86782d8-7b41-452f-a217-1854f72dba54 HKEY_LOCAL_MACHINE\SOFTWARE\Wow6432Node\Microsoft\Windows\CurrentVersion\Ext\PreApproved\ed345812-2722-4dca-9976-d01832db44ee HKEY_LOCAL_MACHINE\SOFTWARE\Wow6432Node\MozillaPlugins\@MyImageConverter_4z.com/Plugin HKEY_LOCAL_MACHINE\SOFTWARE\Microsoft\Internet Explorer\Low Rights\ElevationPolicy\9103c314-c4e2-4463-8934-b19bcb46236d HKEY_LOCAL_MACHINE\SOFTWARE\Microsoft\Internet Explorer\Low Rights\ElevationPolicy\97cef41c-5055-474a-855a-892d4fe3e596 HKEY_LOCAL_MACHINE\SOFTWARE\Microsoft\Internet Explorer\Low Rights\ElevationPolicy\d375ee64-f893-498a-a0e9-0e9829c88c3d HKEY_LOCAL_MACHINE\SOFTWARE\Microsoft\Tracing\MyImageConverterCrxSetup_RASAPI32 HKEY_LOCAL_MACHINE\SOFTWARE\Microsoft\Tracing\MyImageConverterCrxSetup_RASMANCS HKEY_LOCAL_MACHINE\SOFTWARE\Microsoft\Windows\CurrentVersion\explorer\Browser Helper Objects\312f84fb-8970-4fd3-bddb-7012eac4afc9 HKEY_LOCAL_MACHINE\SOFTWARE\Microsoft\Windows\CurrentVersion\explorer\Browser Helper Objects\c547c6c2-561b-4169-a2a5-20ba771ca93b HKEY_LOCAL_MACHINE\SOFTWARE\Microsoft\Windows\CurrentVersion\Ext\PreApproved\1f6f39c1-00a8-4752-a94c-d0ea92d978b6 HKEY_LOCAL_MACHINE\SOFTWARE\Microsoft\Windows\CurrentVersion\Ext\PreApproved\71144427-1368-4D18-8DC9-2AE3CC4C4F83 HKEY_LOCAL_MACHINE\SOFTWARE\Microsoft\Windows\CurrentVersion\Ext\PreApproved\99e1f6fd-2e94-4cf6-8344-1ba63cd3bd9b HKEY_LOCAL_MACHINE\SOFTWARE\Microsoft\Windows\CurrentVersion\Ext\PreApproved\a86782d8-7b41-452f-a217-1854f72dba54 HKEY_LOCAL_MACHINE\SOFTWARE\Microsoft\Windows\CurrentVersion\Ext\PreApproved\ed345812-2722-4dca-9976-d01832db44ee HKEY_LOCAL_MACHINE\SOFTWARE\MozillaPlugins\@MyImageConverter_4z.com/Plugin HKEY_LOCAL_MACHINE\SOFTWARE\Microsoft\Windows\CurrentVersion\Run, value: MyImageConverter Search Scope Monitor HKEY_LOCAL_MACHINE\SOFTWARE\Wow6432Node\Microsoft\Windows\CurrentVersion\Uninstall\VDC_is1 HKEY_LOCAL_MACHINE\SOFTWARE\Google\Chrome\Extensions\adldappccjhelkmbkpiibilgnnjakieg HKEY_LOCAL_MACHINE\SOFTWARE\MyImageConverter HKEY_LOCAL_MACHINE\SOFTWARE\Wow6432Node\MyImageConverter_4z HKEY_LOCAL_MACHINE\SOFTWARE\Classes\MyImageConverter.ScriptHelper HKEY_LOCAL_MACHINE\SOFTWARE\Classes\MyImageConverter.ScriptHelper.1 HKEY_LOCAL_MACHINE\SOFTWARE\Wow6432Node\Microsoft\Internet Explorer\SearchScopes\cf6e4b1c-dbde-457e-9cef-ab8ecac8a5e8 HKEY_LOCAL_MACHINE\SOFTWARE\Wow6432Node\Microsoft\Windows\CurrentVersion\Uninstall\MyImageConverter HKEY_LOCAL_MACHINE\SOFTWARE\MozillaPlugins\@MyImageConverter_ScriptHelper.com/Plugin HKEY_LOCAL_MACHINE\SOFTWARE\Microsoft\Windows\CurrentVersion\Run, value: MyImageConverter_4z Browser Plugin Loader HKEY_LOCAL_MACHINE\SOFTWARE\Wow6432Node\Microsoft\Windows\CurrentVersion\Run, value: MyImageConverter_4z Browser Plugin Loader HKEY_LOCAL_MACHINE\SOFTWARE\Microsoft\Internet Explorer\LowRegistry\DOMStorage\MyImageConverter.dl.tb.ask.com HKEY_CURRENT_USER\Software\Microsoft\Internet Explorer\DOMStorage\MyImageConverter.dl.myway.com HKEY_LOCAL_MACHINE\SOFTWARE\Microsoft\Internet Explorer\DOMStorage\MyImageConverter.com HKEY_LOCAL_MACHINE\SOFTWARE\Microsoft\Internet Explorer\LowRegistry\DOMStorage\www.MyImageConverter.com HKEY_CURRENT_USER\Software\Microsoft\Internet Explorer\DOMStorage\free.MyImageConverter.com HKEY_LOCAL_MACHINE\HKEY_CURRENT_USER\Software\[APPLICATION]\Microsoft\Windows\CurrentVersion\Uninstall..Uninstaller
Read More
Do-It-Yourself Guide to Fixing Runtime Error 5

Troubleshoot Runtime Error 5

Runtime Error 5 - What Is It?

Runtime Error 5 is one of those errors that Windows users encounter at least once in their life. Generally, when Runtime Error 5 occurs, the message that appears says ‘Invalid Procedure Call or Argument’. Runtime Error 5 occurs because the Quality Analyst function that resides within the Operating System behaves in an abnormal manner and the user receives a warning.

Solution

Restoro box imageError Causes

As explained above, Runtime Error 5 is caused because of the unexplained behavior of the Quality Analyst function. The problem occurs when the function is lost and is not mapped to any drive. As a result, Windows is unable to find and load it and displays the error message. Runtime Error 5 is also caused by other reasons listed below as follows.
  • When files of programs like Visual Basic use bad entries in the registry.
  • When a user attempts to load Internet Explorer and a global cash of browser occurs, this also causes Runtime Error 5.
Since these types of errors can easily be fixed, it is strongly advised that a user takes the necessary actions to keep them from occurring in the future.

Further Information and Manual Repair

Some instructions for users to fix Runtime Error 5 as soon as it appears are listed below as follows.
  1. Users are recommended to restart their computers. However, prior to doing so, it is advised that any programs that are opened are closed and work is saved to prevent data loss. Once the computer restarts, users should load the program that triggered Runtime Error 5 once again to determine whether or not the error recurs.
  2. If the problem persists, the best approach is to uninstall the program causing the error. This can be accomplished by going to the ‘Control Panel’ and selecting the ‘Add/Remove programs’ option if one is using Windows XP or Windows 95. However, if a user is running Windows 7, the same task can be accomplished in the ‘Program and Features’ option. If there’s an option that allows you to clear personal settings and preferences, the box should be checked.
  3. Now reinstall the program using the latest version of the installer to stop encountering this error. Use any patch for the program if available. Run installer while following the instructions on the screen. Check the default settings as well.  It is suggested to instantly install any patches if available.
  4. Another piece of advice is to simultaneously press ‘Ctrl, Shift, and Esc’. Windows task manager will appear. Go to the “processes” tab and select a process that doesn’t look familiar to you. Note the filename and click on the ‘End Process’ button. Load the program again and find out if the error occurs. Once the program causing the error is identified, the user can perform the steps listed above to resolve the problem.
Read More
Windows is unable to run Automatic Maintenance
As you know, Windows has a built-in Automatic Maintenance feature that takes care of important tasks such as security scanning and updating, Windows software updates, Disk Defragmentation, System Diagnostics, Disk Volume Errors, and many more. So if you receive an error message saying, “Windows is unable to run automatic maintenance, The maintenance schedule is unavailable”, then this post will guide you in what you can do to resolve this issue. Here are some suggestions you can try if the Automatic Maintenance in your Windows 10 PC is not able to run.

Option 1 – Enable Automatic Maintenance

It is possible that Automatic Maintenance has been disabled so you can try enabling Automatic Maintenance on your Windows 10 PC. To do so, follow these steps:
  • Go to Control Panel.
  • From there, select System and Security > Security and Maintenance > Automatic Maintenance.
  • After that, set the time you want to run the Automatic Maintenance and then check the checkbox saying, “Allow scheduled maintenance to wake up my computer at the scheduled time”.
  • Click OK to save the changes.
On the other hand, you can also enable Automatic Maintenance via the Registry Editor. But before you proceed, you need to create a System Restore Point first.
  • Tap the Win + R keys to open the Run dialog box.
  • After that, type “Regedit” in the field and hit Enter to open the Registry Editor.
  • Navigate to the following path:
HKEY_LOCAL_MACHINESOFTWAREMicrosoftWindows NTCurrentVersionScheduleMaintenance
  • Next, look for the “MaintenanceDisabled” key and then double click on it to open it and then set its value to “0”.
  • Click OK and exit the Registry Editor.
  • Restart your computer.

Option 2 – Check the Task Scheduler Services status

Majority of the tasks in Windows 10 run via services. So it is most likely that either the Service has been stopped or is set to the manual which is why Windows is unable to run Automatic Maintenance. Thus, you need to change it to automatic mode.
  • Tap the Win + R keys to open Run.
  • Type “services.msc” in the field and hit Enter to open Services.
  • Next, look for the Task Scheduler service and tap the T key on your keyboard which should take you to the services that start with T.
  • Double click on the Task Scheduler service and select the Automatic option under the Startup Type.
  • If it is not started yet, click on the Start button.
  • Then click Apply and OK to save the changes.

Option 3 – Check the Status in Task Scheduler

You can also try checking the status in the Task Scheduler. Just open the Task Scheduler > Task Scheduler Library > Microsoft > Windows > TaskScheduler. From there, make sure that Idle Maintenance, Maintenance Configurator, and Regular Maintenance are enabled.

Option 4 – Run the System File Checker

The SFC or System File Checker scan could detect and automatically repair damaged system files that could be causing the Automatic Maintenance issue. SFC is a built-in command utility that helps in restoring corrupted files as well as missing files. It replaces bad and corrupted system files with good system files. To run the SFC command, follow the steps given below.
  • Tap Win + R to launch Run.
  • Type in cmd in the field and tap Enter.
  • After opening Command Prompt, type in sfc /scannow and hit Enter.
The command will start a system scan which will take a few whiles before it finishes. Once it’s done, you could get the following results:
  1. Windows Resource Protection did not find any integrity violations.
  2. Windows Resource Protection found corrupt files and successfully repaired them.
  3. Windows Resource Protection found corrupt files but was unable to fix some of them.

Option 5 – Run the DISM tool

The DISM tool is another command-line tool in the Windows operating system that could help users fix various corrupted system files. To use it, follow these steps:
  • Open the Command Prompt as admin.
  • Then type in this command: DISM /Online /Cleanup-Image /RestoreHealth
  • The DISM command you entered will repair the corrupted system image. Do not close the window if the process takes a while as it will probably take a few minutes to finish.
  • Restart your PC.
Read More
Fix UTCSVC high CPU and Disk usage in Windows
There is a lot of high resource utilization by any process that slows down a Windows operating system and one of the services that could cause such a thing is the utcsvc.exe process. This particular process at times can cause high CPU and disk usage. So if you are currently facing this problem, read on as this post will guide you on how you can resolve the problem. UTC which stands for Universal Telemetry Client is a software that runs a service named Diagnostic Tracking Service or DiagTrak. This service is used by Microsoft to collect customer feedback, analyze customer’s problems, and push resolution via updates in order to make the Windows 10 operating system better. This service is an executable file that could be translated to Service Host and even though the process does not usually cause problems, there are actually times when it does especially if it results in high resource utilization. In such cases, you might want to consider disabling it to fix its high CPU and disk usage.

According to Microsoft:

“We collect information about you, your devices, applications and networks, and your use of those devices, applications, and networks. Examples of data we collect include your name, email address, preferences, and interests; browsing, search and file history; phone call and SMS data; device configuration and sensor data; and application usage.”
There are several ways you can disable the utcsvc.exe process. You can disable it using the Service Manager, Registry Editor, and Group Policy Editor. For more details, refer to the instructions laid out below.

Option 1 – Disable the Connected User Experience & Telemetry Service via Service Manager

Note that this option is for standalone systems, so if you’re not using one, refer to the next given options below.
  • Tap the Win + R keys to open the Run dialog box.
  • Then type “services.msc” in the field and tap Enter or click OK to open the Services Manager.
  • From the given list of services, look for the Connected User Experience service. Once you found it, click on it and you’ll see its description which states:
“The Connected User Experiences and Telemetry service enables features that support in-application and connected user experiences. Additionally, this service manages the event-driven collection and transmission of diagnostic and usage information (used to improve the experience and quality of the Windows Platform) when the diagnostics and usage privacy option settings are enabled under Feedback and Diagnostics.”
  • Next, right-click on it and select Properties.
  • Now, change its Startup Type to Disabled and click on the Apply and OK buttons to save the changes made.

Option 2 – Disable the Connected User Experience & Telemetry Service via Registry Editor

  • Tap the Win + R keys to launch the Run utility and type “Regedit” in the field and click OK to open the Registry Editor.
  • Next, navigate to this registry path: HKEY_LOCAL_MACHINESOFTWAREPoliciesMicrosoftWindowsDataCollection
  • After that, right-click on the folder named “DataCollection” and select New > DWORD (32-bit) Value.
  • Now name the new value “AllowTelemetry” and make sure that its Value data is “0” and then click on OK to save the changes made.
  • Restart your computer.

Option 3 – Disable the Connected User Experience & Telemetry Service via Group Policy Editor

If you have to disable the service related to the Universal Telemetry Client for company-managed systems, then you can do that using the Group Policy Editor.
  • Tap the Win + R keys to open the Run utility and type “gpedit.msc” in the field and hit Enter to open the Group Policy Editor.
  • Next, navigate to this path: Computer Configuration > Administrative Templates > Windows Components> Data Collection and Preview Build
  • After that, double-click on Data Collection and Preview Build to open its settings.
  • From there, look for the “Allow Telemetry” item and double click on it to open its Properties.
  • Next, set the radio button to Disabled and then click on the Apply button to save the changes made.
  • Restart your computer.

Option 4 – Run the Hardware and Devices Troubleshooter or the Performance Troubleshooter

Hardware and Devices Troubleshooter:

  • The first thing you need to do is click on Start and then on the gear-like icon to pull up the window for Settings.
  • After opening Settings, look for the Update and Security option and select it.
  • From there, go to the Troubleshoot option located on the left-hand side of the list.
  • Next, select Hardware and Devices from the list and open the Troubleshooter and run it. Once it is doing its job, wait for it to complete the process and then restart the system.
  • After the system restarts, check if the problem’s now fixed. If not, refer to the next option given below.

Performance Troubleshooter:

  • Tap the Win + R keys to open the Run dialog box.
  • Type “exe /id PerformanceDiagnostic” in the field and hit Enter to open the Performance troubleshooter.
  • Then click on Next to get started. Wait until the process is completed.
Read More
How to Fix ISDone.dll Error in Windows
As you know, games with good graphics and fast play are definitely resource-intensive and can consume a lot of storage space on your computer. Because of that, they have to be compressed before it gets downloaded to your computer and then unpacked to the hard drive before it gets installed. However, if an error occurs in your computer’s RAM during the installation process or if your hard disk does not have enough memory to handle the process, then you might encounter the isDone.dll error which states:
“An error occurred when unpacking, Unarc.dll returned error code -1, ERROR: archive data corrupted (decompression fails).”
If you encounter the isDone.dll error message on your Windows 10 computer, then read on as this post will show you how you can fix it. This error has something to do with the incomplete installation of PC games or files of larger size. The ISDone.dll error appears due to faulty Unarc.dll file residing in the System32 folder on 32-bit operating systems and the SysWOW64 folder on 64-bit systems. So, if you see this error message, then, it means your computer was not able to read installation archive files.

What is Unarc.dll file?

Unarc.dll is a dynamic link library for Windows. Some applications or games require this file to function properly. So, if it goes missing or, an error occurs when you start a game or an application, you may get various kinds of errors. ISDone.dll error while playing games on PC

Option 1 – Try to reinstall the game

The isDone.dll error could also be caused by the installation of an unknown application. Or it could also be caused by an outdated or corrupted application. In other words, if the game you are trying to install is broken or corrupted, then it’s no wonder why you’re getting the isDone.dll error. To fix this, make sure that you download the latest updated version of the game and then try to install it again and see if the problem is resolved or not.

Option 2 – Try to re-register the .dll file using the Regsvr32 tool

  • The first thing you have to do is to locate the DLL file named dll on your computer and rename it to Unarc-bak.dll.
  • Next, copy the Unarc.dll file from another well-functioning computer and save it on your desktop.
  • After that, move the DLL file you just copied to the System32 folder if you are using a 32-bit operating system, or the SysWOW64 folder if you are using a 64-bit operating system.
  • Now you have to register the new DLL file and you can do that using Windows PowerShell.
  • Open Windows PowerShell and then execute this command if you have placed the DLL file in the System32 folder: regsvr32 %systemroot%System32unarc.dll
  • On the other hand, if you have placed the DLL file in the SysWOW64 folder, then execute this command: regsvr32 %systemroot%SysWOW64unarc.dll
  • Once you’re done, a message will be displayed saying that the DLL file was registered.
  • Restart your computer and check if the problem is now fixed.

Option 3 – Troubleshoot the isDone.dll error in a Clean Boot State

You can also troubleshoot the isDone.dll error in a Clean Boot state. It could be that there are some third-party applications in your computer that're preventing the application from getting installed and to isolate this possibility, you need to boot your computer in a Clean Boot State and then try installing the program again. Putting your computer in this state can help you identify which program is the culprit and thus isolates the problem. In a Clean Boot state, your computer will start using only the pre-selected minimal set of drivers and startup programs. Note that you have to disable and enable one process at a time.
  • Log onto your PC as an administrator.
  • Type in MSConfig in the Start Search to open the System Configuration utility.
  • From there, go to the General tab and click “Selective startup”.
  • Clear the “Load Startup items” check box and make sure that the “Load System Services” and “Use Original boot configuration” options are checked.
  • Next, click the Services tab and select the “Hide All Microsoft Services” check box.
  • Click Disable all.
  • Click on Apply/OK and restart your PC. (This will put your PC into a Clean Boot State. And configure Windows to use the usual startup, just simply undo the changes.)
  • After you’ve set your computer into a Clean Boot State, make sure that you’re signed in as administrator and then try to install the application again.

Option 4 – Try updating or reinstalling your Graphics drivers

Updating or reinstalling the Graphics drivers in your computer can also help in resolving compatibility issues between the operating system and the driver that might have caused the isDone.dll error.
  • First, boot your computer into Safe Mode.
  • After that, tap the Win + R keys to launch Run.
  • Type in devmgmt.msc into the box and tap Enter or click OK to open the Device Manager.
  • After that, a list of device drivers will be displayed. From there, look for the Display Adapters and click on them.
  • After that, right-click on each entry under the Display Adapters and select the “Uninstall Device” option from the menu.
  • Now restart your computer.
  • After restarting your computer, go to the Settings app and Check for Updates in the Windows Update section.
Note: You also have the option to go directly to the website of your graphics card manufacturers like NVIDIA, Intel, or AMD and go to the section called Drivers then check if there’s a new available update – if there is, download and install it.

Option 5 – Try scanning your computer using Windows Defender

The isDone.dll error might also be infected with malware or virus and to eliminate it, you have to scan your computer using security programs like Windows Defender.
  • Tap the Win + I keys to open Update & Security.
  • Then click on the Windows Security option and open Windows Defender Security Center.
  • Next, click on Virus & threat protection > Run a new advanced scan.
  • Now make sure that Full Scan is selected from the menu and then click the Scan Now button to get started.
Read More
Stop showing browser tabs when alt+tab, Win11
windows browser tabs removed alt tab
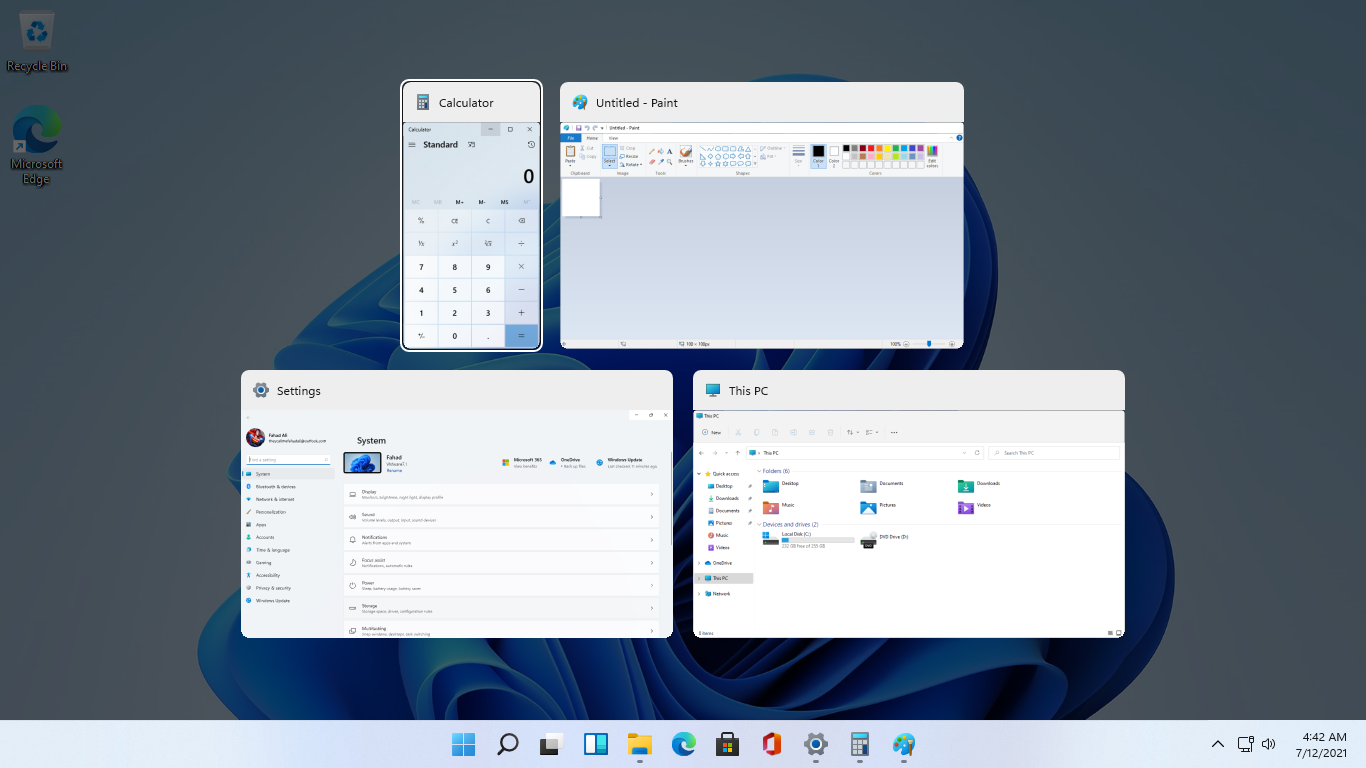
As in previous Windows 10, inside Windows 11 also when you press the ALT + TAB key combination you will get a preview of all running applications along with all Browser tabs so you can go through them and pick the one you want to switch to. Alto, I personally am a big fan of alt-tabbing, I must admit that I am not a big fan of having multiple browsers tabs on screen when I do press key combo. Luckily there is a very easy way to turn this feature off. Turning browsers tabs thumbnails off
  1. Press ⊞ WINDOWS + I to open settings
  2. Click on System in the sidebar
  3. Scroll down and select Multitasking
  4. Find Alt + Tab section and click on the drop-down menu
  5. Pick Open Windows Only
  6. Close settings
Now when you press the ALT + TAB key combination you will still see your browser but only an active tab in it instead of all tabs as different preview thumbnails.
Read More
How to remove ListenToTheRadioNow from your PC

ListenToTheRadioNow is a Browser Extension that allegedly lets you listen to radio from your browser. However, all this extension does is add links to the popular radio stations on your home page. This extension hijacks your home page and changes your default search provides to MyWay. While running it monitors browsing data from your browser, mining information such as website visits, clicked links, and sometimes even personal information. This information is later used to display targeted ads through your browser. Several anti-virus scanners have marked this extension as a possible Browser Hijackers, and due to its data mining nature, it is not recommended to keep it on your computer.

About Browser Hijackers

Browser hijacking is a type of unwanted software, commonly a browser add-on or extension, which then causes modifications in the web browser’s settings. Browser hijackers could do more than just modifying homepages. In most cases, browser hijacking is used for earning ad revenue that comes from forced advert clicks and website visits. Even though it may seem naive, all browser hijackers are dangerous and therefore always regarded as security threats. They don’t just ruin your internet browsers, but browser hijackers could also modify the system registry to make your PC susceptible to other malicious programs.

How you can know whether the browser is hijacked?

There are several symptoms of browser hijacking: 1. home-page is changed 2. new bookmarks pointing to porn websites have been added to your bookmarks 3. the default internet search engine and/or the default web browser settings are altered 4. find new toolbars that you did not add 5. unstoppable flurries of popup ads show up on your PC screen 6. webpages load very slowly and often incomplete 7. you have prohibited entry to certain web pages, for example, the site of an anti-malware software firm like SafeBytes.

So how does a browser hijacker infect a PC

A browser hijacker could be installed on your computer or laptop if you visit an infected website, click on an e-mail attachment, or download something from a file-sharing website. They also come from add-on programs, also referred to as browser helper objects (BHO), browser plug-ins or toolbars. Also, some shareware and freeware can put the hijacker inside your computer through “bundling”. A good example of some popular browser hijackers includes Babylon, Anyprotect, Conduit, SweetPage, DefaultTab, Delta Search, and RocketTab, but the names are regularly changing.

Tips on how to get rid of a browser hijacker

Some hijackers can be removed by uninstalling the freeware they were included with or by eliminating any extension you’ve recently added to your computer. However, most hijacking codes are not very easy to eliminate manually, since they go deeper into your operating system. Furthermore, manual removal expects you to perform several time-consuming and tricky actions that are hard to do for new computer users. Professionals always recommend users to get rid of any malicious software including browser hijacker with an automatic malware removal tool, which is simpler, safer, and faster than the manual removal technique. One of the top tools for correcting browser hijacker malware is SafeBytes Anti-Malware. It can help you eliminate any pre-existing malicious software in your computer and provides you real-time monitoring and protection from the latest internet threats. Employ a pc optimizer (such as Restoro) along with your anti-malware software to correct various registry problems, remove computer vulnerabilities, and improve your computer overall performance.

Help! Malware Preventing Antivirus Installation And Access To The Internet

All malware is bad, but certain kinds of malware do a lot more damage to your computer than others. Some malware sits in between the computer and the net connection and blocks some or all internet sites that you want to check out. It will also prevent you from installing anything on your system, especially anti-virus applications. If you’re reading this, chances are you’re stuck with a malware infection that is preventing you to download and install the Safebytes Anti-Malware program on your computer. Do as instructed below to get rid of the malware by alternate methods.

Install the anti-malware in Safe Mode

Safe Mode is actually a special, basic version of Windows in which just minimal services are loaded to counteract viruses and other troublesome programs from loading. In the event, the malicious software is set to load automatically when the computer boots, switching to this mode may well prevent it from doing so. To start the computer into Safe Mode, hit the “F8” key on your keyboard just before the Windows logo screen comes up; Or right after normal Windows boot up, run MSConfig, check Safe Boot under Boot tab, and click Apply. Once you’re in Safe Mode, you can attempt to download and install your antivirus software application without the hindrance of the virus. After installation, run the malware scanner to get rid of most standard infections.

Download the security program using an alternate web browser

Some malware mainly targets particular browsers. If this sounds like your case, use another web browser as it could circumvent the virus. If you appear to have a virus attached to Internet Explorer, then switch over to an alternate browser with built-in security features, such as Firefox or Chrome, to download your preferred anti-malware program – Safebytes.

Install and run anti-virus from the Thumb drive

Another solution is to store and operate an anti-malware program entirely from a Pen drive. Do these simple steps to clear up your affected PC using a portable antivirus. 1) Download the anti-malware on a virus-free PC. 2) Insert the USB drive onto the same system. 3) Run the setup program by double-clicking the executable file of the downloaded software, with a .exe file format. 4) Choose the drive letter of the pen drive as the place when the wizard asks you where you would like to install the antivirus. Follow the instructions on the computer screen to complete the installation process. 5) Unplug the pen drive. You may now utilize this portable anti-virus on the affected computer. 6) Double-click the EXE file to open the Safebytes software right from the pen drive. 7) Click the “Scan” button to run a full system scan and remove viruses automatically.

Protect Your PC and Privacy With SafeBytes Anti-Malware

To help protect your laptop or computer from many different internet-based threats, it’s important to install an anti-malware program on your laptop. However, with so many antimalware companies in the marketplace, nowadays it is hard to decide which one you should buy for your laptop. Some of them are great and some are scamware applications that pretend as genuine anti-malware software waiting to wreak havoc on your computer. While looking for an anti-malware tool, choose one that offers dependable, efficient, and complete protection against all known computer viruses and malware. On the list of recommended software by industry analysts is SafeBytes Anti-Malware, a popular security application for Windows computers. SafeBytes anti-malware is really a powerful, highly effective protection software made to assist users of all levels of computer literacy in finding and removing harmful threats from their computer. Through its cutting-edge technology, this software protects your computer against infections caused by different kinds of malware and similar threats, including spyware, adware, viruses, worms, trojans, keyloggers, ransomware, and potentially unwanted program (PUPs). SafeBytes anti-malware provides a myriad of advanced features that sets it apart from all others. Below are some of the great features included in the tool. Robust Anti-malware Protection: Built on a highly acclaimed anti-virus engine, this malware removal application can find and get rid of many obstinate malware threats like browser hijackers, PUPs, and ransomware that other common antivirus applications will miss. Live Protection: SafeBytes provides complete and real-time security for your computer. This software will continuously keep track of your computer for suspicious activity and updates itself continuously to keep current with the latest threats. Web Filtering: Through its unique safety rating, SafeBytes informs you whether a site is safe or not to visit it. This will make sure that you’re always certain of your safety when browsing the web. Faster Scanning: SafeBytes Anti-Malware possesses a multi-thread scan algorithm that works up to five times faster than any other antivirus software. Lightweight Application: SafeBytes gives you complete protection from online threats at a fraction of the CPU load due to its enhanced detection engine and algorithms. 24/7 Live Expert Support: You will get 24/7 technical support to promptly resolve any issue with your security application. SafeBytes can keep your PC safe from most advanced malware threats automatically, thus keeping your online experience secure and safe. Malware issues can become a thing of the past when you put this application to use. If you want sophisticated forms of protection features & threat detections, buying SafeBytes Anti-Malware will be worth the dollars!

Technical Details and Manual Removal (Advanced Users)

If you do not wish to use malware removal software and like to get rid of ListenToTheRadioNow manually, you might accomplish this by going to the Windows Add/Remove Programs menu in the control panel and deleting the offending software; in cases of web browser plug-ins, you could remove it by visiting the browser’s Add-on/Extension manager. You will likely also want to reset your web browser. Finally, check your hard drive for all of the following and clean your Windows registry manually to get rid of leftover application entries after uninstalls. Please keep in mind that only experienced users should attempt to manually edit the system files because removing any single critical registry entry results in a serious problem or even a system crash. In addition, certain malware is capable of replicating or preventing removal. It is highly recommended that you carry out the removal process in Safe Mode.
Files: %LOCALAPPDATA%\Google\Chrome\User Data\Default\Sync Extension Settings\mlpfmcjpkbijcpegdbkplcddgacjlgpf %UserProfile%\Local Settings\Application Data\Google\Chrome\User Data\Default\Sync Extension Settings\mlpfmcjpkbijcpegdbkplcddgacjlgpf %LOCALAPPDATA%\Google\Chrome\User Data\Default\Extensions\mlpfmcjpkbijcpegdbkplcddgacjlgpf %UserProfile%\Local Settings\Application Data\Google\Chrome\User Data\Default\Extensions\nhpggpakfcgbidnmlheodkbccemlenag %LOCALAPPDATA%\Google\Chrome\User Data\Default\Extensions\nhpggpakfcgbidnmlheodkbccemlenag %USERPROFILE%\AppData\Local\Google Registry: HKEY_LOCAL_MACHINE\Software\ListenToTheRadioNow\Microsoft\Windows\CurrentVersion\Uninstall..Uninstaller ListenToTheRadioNow
Read More
Tutorial on how to Remove TelevisionFanatic

TelevisionFanatic is a potentially unwanted browser hijacking extension developed by Mindspark Interactive Network. It is marketed to enjoy one-click access to local TV listings, watch recently-aired episodes of your favorite shows and viral web videos, plus TV news and show recaps. However, all of these services require registration and sensitive personal data, that is later sold/forwarded to serve ads.

Upon installation, this extension adds registry entries that allow it to run each time the computer is started. It also changed your default search engine to MyWebSearch and hijacks your default new tab behavior opening MyWebSearch instead. These search results display unwanted ads, and clutter pages with sponsored links that negatively affect your browsing experience. Multiple anti-virus scanners have detected TelevisionFanatic as a browser hijacker, and therefore it is flagged for optional removal.

About Browser Hijackers

Browser hijacking is amongst the web’s constant problems that target browsers. It’s a kind of malware program that alters your web browser’s configuration settings and redirects you to sites or pages that you had no intention of visiting. Browser hijackers could do a variety of things on your PC. It redirects you to the sponsored internet sites and injects ads on the web browser that helps its creator generate income. While it might appear naive, all browser hijackers are damaging and thus always regarded as security risks. Some browser hijackers are designed to make certain modifications beyond the browsers, like altering entries on the computer registry and letting other types of malware further damage your PC.

Browser hijacking signs and symptoms

When your browser is hijacked, the following could happen: 1. home-page is changed 2. new bookmarks pointing to porn sites have been added to your favorite pages 3. the default online search engine and/or the default browser settings are modified 4. you see unwanted new toolbars added 5. you may see many pop-up ads on your computer screen 6. your internet browser starts running slowly or displays frequent glitches 7. you are blocked to access those sites of antivirus solution providers.

Exactly how browser hijacker finds its way to your computer

Browser hijackers may use drive-by downloads or file-sharing websites or an e-mail attachment to reach a targeted PC. Many internet browser hijackings come from add-on software, i.e., browser helper objects (BHO), toolbars, or plug-ins added to web browsers to provide the extra features. Browser hijackers sneak into your pc in addition to free software application downloads that you unwittingly install alongside the original. Common examples of browser hijackers include Conduit, CoolWebSearch, Coupon Server, OneWebSearch, RocketTab, Snap.do, Delta Search, and Searchult.com. Browser hijackers can record user keystrokes to collect potentially important information leading to privacy concerns, cause instability on systems, severely disrupt user’s browsing experience, and finally slow down the system to a stage where it will become unusable.

Removing browser hijackers

Some hijackers can be removed by uninstalling the freeware they came with or by deleting any extension you’ve recently added to your browser. However, most hijackers are hard to get rid of manually. Irrespective of how much you try to remove it, it might return over and over again. And there is no denying the very fact that manual repairs and removal can certainly be a difficult job for an inexperienced PC user. Besides, there are various risks connected with tinkering around with the system registry files.

What To Do When You Cannot Download Safebytes Anti-Malware?

Viruses can cause plenty of damage to your personal computer. Some malware sits in between your computer and your internet connection and blocks a few or all sites that you would like to visit. It might also block you from the installation of anything on your system, particularly antivirus applications. So what you should do if malicious software prevents you from downloading or installing Anti-Malware? There are some steps you can take to get around this issue.

Make use of Safe Mode to fix the issue

In Safe Mode, you may modify Windows settings, uninstall or install some software, and remove hard-to-delete viruses. In the event the malware is obstructing internet connection and affecting the computer, launching it in Safe Mode allows you to download anti-malware and run a diagnostic scan whilst limiting potential damage. To start the computer into Safe Mode, hit the “F8” key on the keyboard right before the Windows boot screen comes up; Or right after normal Windows boot up, run MSCONFIG, check the Safe Boot under Boot tab, and click Apply. Once you are in safe mode, you can attempt to download and install your anti-malware program without the hindrance of malicious software. Following installation, run the malware scanner to eliminate standard infections.

Switch over to an alternate web browser

Malicious program code could exploit vulnerabilities on a specific web browser and block access to all antivirus software websites. If you suspect that your Internet Explorer has been hijacked by malware or otherwise compromised by online hackers, the most effective thing to do would be to switch to an alternate web browser such as Firefox, Chrome, or Safari to download your favorite computer security program – Safebytes Anti-Malware.

Run anti-malware from your USB drive

Here’s another solution which is utilizing a portable USB anti-virus software that can check your system for malware without the need for installation. To run anti-virus using a thumb drive, follow these simple steps: 1) Download Safebytes Anti-Malware or Windows Defender Offline onto a clean PC. 2) Plug the USB drive into the clean PC. 3) Double-click the Setup icon of the antivirus software to run the Installation Wizard. 4) Select the drive letter of the flash drive as the location when the wizard asks you where you want to install the antivirus. Do as instructed on the screen to finish off the installation process. 5) Disconnect the flash drive. Now you can utilize this portable anti-virus on the infected computer system. 6) Double-click the anti-malware software EXE file on the pen drive. 7) Press the “Scan” button to run a full system scan and remove malware automatically.

A Look at the Best Anti-Malware Program

Do you want to download the best anti-malware program for your laptop or computer? There are many applications in the market that comes in free and paid versions for Microsoft Windows computers. A few of them are good and some are scamware applications that pretend as genuine anti-malware software waiting around to wreak havoc on your PC. You need to select one that is dependable, practical, and has a strong reputation for its malware source protection. One of the highly recommended software programs is SafeBytes Anti-Malware. SafeBytes carries a superb reputation for top-quality service, and customers seem to be happy with it. SafeBytes anti-malware is a trustworthy tool that not only secures your computer completely but is also very user-friendly for people of all skill levels. With its outstanding protection system, this software will automatically detect and get rid of the majority of the security threats, which include adware, viruses, browser hijackers, ransomware, PUPs, and trojans. SafeBytes anti-malware provides a plethora of enhanced features which sets it aside from all others. Let’s check out some of them below: Anti-Malware Protection: Safebytes is built on the best virus engine within the industry. These engines will identify and remove threats even during the early stages of a malware outbreak. Real-time Active Protection: Malware programs looking to get into the computer are discovered and stopped as and when detected by the SafeBytes active protection shields. This utility will continuously monitor your PC for suspicious activity and updates itself regularly to keep abreast of the constantly changing threat situation. Internet Security: SafeBytes gives an instant safety rating on the pages you are about to visit, automatically blocking dangerous sites and ensuring that you are certain of your safety while browsing the web. High-Speed Malware Scanning Engine: SafeBytes Anti-Malware has got a multi-thread scan algorithm that works up to 5 times faster than any other antivirus software. Minimal CPU and Memory Usage: SafeBytes is well-known for its low influence on processing power and great detection rate of numerous threats. It works quietly and efficiently in the background so you’re free to use your computer or laptop at full power all of the time. 24/7 Guidance: SafeBytes provides you with 24/7 technical support, automatic maintenance, and updates for the best user experience.

Technical Details and Manual Removal (Advanced Users)

If you wish to manually remove TelevisionFanatic without the use of an automated tool, it may be possible to do so by removing the program from the Windows Add/Remove Programs menu, or in cases of browser extensions, going to the browsers AddOn/Extension manager and removing it. You will likely also want to reset your browser. To ensure the complete removal, manually check your hard drive and registry for all of the following and remove or reset the values accordingly. Please note that this is for advanced users only and may be difficult, with incorrect file removal causing additional PC errors. In addition, some malware is capable of replicating or preventing deletion. Doing this in Safe Mode is advised.

The following files, folders, and registry entries are created or modified by TelevisionFanatic

Files: %APPDATA%TelevisionFanatic %PROGRAMFILES%TelevisionFanatic %PROGRAMFILES%TelevisionFanaticEI %PROGRAMFILES%TelevisionFanaticEITelevisionFanaticauxstb.dll %PROGRAMFILES%TelevisionFanaticEITelevisionFanaticbar.dll %PROGRAMFILES%TelevisionFanaticEITelevisionFanaticbarsvc.exe %PROGRAMFILES%TelevisionFanaticEITelevisionFanaticbprtct.dll %PROGRAMFILES%TelevisionFanaticEITelevisionFanaticbrmon.exe %PROGRAMFILES%TelevisionFanaticEITelevisionFanaticbrstub.dll %PROGRAMFILES%TelevisionFanaticEITelevisionFanaticdatact.dll %PROGRAMFILES%TelevisionFanaticEITelevisionFanaticdlghk.dll %PROGRAMFILES%TelevisionFanaticEITelevisionFanaticdyn.dll %PROGRAMFILES%TelevisionFanaticEITelevisionFanaticfeedmg.dll %PROGRAMFILES%TelevisionFanaticEITelevisionFanatichighin.exe %PROGRAMFILES%TelevisionFanaticEITelevisionFanatichkstub.dll %PROGRAMFILES%TelevisionFanaticEITelevisionFanatichtmlmu.dll %PROGRAMFILES%TelevisionFanaticEITelevisionFanatichttpct.dll %PROGRAMFILES%TelevisionFanaticEITelevisionFanaticidle.dll %PROGRAMFILES%TelevisionFanaticEITelevisionFanaticieovr.dll %PROGRAMFILES%TelevisionFanaticEITelevisionFanaticimpipe.exe %PROGRAMFILES%TelevisionFanaticEITelevisionFanaticmedint.exe %PROGRAMFILES%TelevisionFanaticEITelevisionFanaticmlbtn.dll %PROGRAMFILES%TelevisionFanaticEITelevisionFanaticmsg.dll %PROGRAMFILES%TelevisionFanaticEITelevisionFanaticPlugin.dll %PROGRAMFILES%TelevisionFanaticEITelevisionFanaticradio.dll %PROGRAMFILES%TelevisionFanaticEITelevisionFanaticregfft.dll %PROGRAMFILES%TelevisionFanaticEITelevisionFanaticreghk.dll %PROGRAMFILES%TelevisionFanaticEITelevisionFanaticregiet.dll %PROGRAMFILES%TelevisionFanaticEITelevisionFanaticscript.dll %PROGRAMFILES%TelevisionFanaticEITelevisionFanaticskin.dll %PROGRAMFILES%TelevisionFanaticEITelevisionFanaticsknlcr.dll %PROGRAMFILES%TelevisionFanaticEITelevisionFanaticskplay.exe %PROGRAMFILES%TelevisionFanaticEITelevisionFanaticSrcAs.dll %PROGRAMFILES%TelevisionFanaticEITelevisionFanaticSrchMn.exe %PROGRAMFILES%TelevisionFanaticEITelevisionFanatictpinst.dll %PROGRAMFILES%TelevisionFanaticEITelevisionFanaticuabtn.dll %PROGRAMFILES%TelevisionFanaticEITelevisionFanaticAppIntegrator64.exe %PROGRAMFILES%TelevisionFanaticEITelevisionFanaticAppIntegratorStub64.dll %PROGRAMFILES%TelevisionFanaticEITelevisionFanaticBOOTSTRAP.JS %PROGRAMFILES%TelevisionFanaticEITelevisionFanaticffxtbr.jar %PROGRAMFILES%TelevisionFanaticEITelevisionFanaticCHROME.MANIFEST %PROGRAMFILES%TelevisionFanaticEITelevisionFanaticCREXT.DLL %PROGRAMFILES%TelevisionFanaticEITelevisionFanaticCrExtP64.exe %PROGRAMFILES%TelevisionFanaticEITelevisionFanaticDPNMNGR.DLL %PROGRAMFILES%TelevisionFanaticEITelevisionFanaticEXEMANAGER.DLL %PROGRAMFILES%TelevisionFanaticEITelevisionFanaticHpg64.dll %PROGRAMFILES%TelevisionFanaticEITelevisionFanaticINSTALL.RDF %PROGRAMFILES%TelevisionFanaticEITelevisionFanaticinstallKeys.js %PROGRAMFILES%TelevisionFanaticEITelevisionFanaticLOGO.BMP %PROGRAMFILES%TelevisionFanaticEITelevisionFanaticNP64Stub.dll %PROGRAMFILES%TelevisionFanaticEITelevisionFanaticT8EXTEX.DLL %PROGRAMFILES%TelevisionFanaticEITelevisionFanaticT8EXTPEX.DLL %PROGRAMFILES%TelevisionFanaticEITelevisionFanaticT8HTML.DLL %PROGRAMFILES%TelevisionFanaticEITelevisionFanaticT8RES.DLL %PROGRAMFILES%TelevisionFanaticEITelevisionFanaticT8TICKER.DLL %PROGRAMFILES%TelevisionFanaticEITelevisionFanaticVERIFY.DLL %PROGRAMFILES%TelevisionFanaticEITelevisionFanaticEIPlug.dll %PROGRAMFILES%TelevisionFanaticEITelevisionFanaticEZSETP.dll %PROGRAMFILES%TelevisionFanaticEITelevisionFanaticNP64EISb.dll %PROGRAMFILES%TelevisionFanaticEITelevisionFanatic%APPDATA%TelevisionFanatic %PROGRAMFILES%TelevisionFanatic %PROGRAMFILES%TelevisionFanaticEI %PROGRAMFILES%TelevisionFanaticEITelevisionFanaticauxstb.dll %PROGRAMFILES%TelevisionFanaticEITelevisionFanaticbar.dll %PROGRAMFILES%TelevisionFanaticEITelevisionFanaticbarsvc.exe %PROGRAMFILES%TelevisionFanaticEITelevisionFanaticbprtct.dll %PROGRAMFILES%TelevisionFanaticEITelevisionFanaticbrmon.exe %PROGRAMFILES%TelevisionFanaticEITelevisionFanaticbrstub.dll %PROGRAMFILES%TelevisionFanaticEITelevisionFanaticdatact.dll %PROGRAMFILES%TelevisionFanaticEITelevisionFanaticdlghk.dll %PROGRAMFILES%TelevisionFanaticEITelevisionFanaticdyn.dll %PROGRAMFILES%TelevisionFanaticEITelevisionFanaticfeedmg.dll %PROGRAMFILES%TelevisionFanaticEITelevisionFanatichighin.exe %PROGRAMFILES%TelevisionFanaticEITelevisionFanatichkstub.dll %PROGRAMFILES%TelevisionFanaticEITelevisionFanatichtmlmu.dll %PROGRAMFILES%TelevisionFanaticEITelevisionFanatichttpct.dll %PROGRAMFILES%TelevisionFanaticEITelevisionFanaticidle.dll %PROGRAMFILES%TelevisionFanaticEITelevisionFanaticieovr.dll %PROGRAMFILES%TelevisionFanaticEITelevisionFanaticimpipe.exe %PROGRAMFILES%TelevisionFanaticEITelevisionFanaticmedint.exe %PROGRAMFILES%TelevisionFanaticEITelevisionFanaticmlbtn.dll %PROGRAMFILES%TelevisionFanaticEITelevisionFanaticmsg.dll %PROGRAMFILES%TelevisionFanaticEITelevisionFanaticPlugin.dll %PROGRAMFILES%TelevisionFanaticEITelevisionFanaticradio.dll %PROGRAMFILES%TelevisionFanaticEITelevisionFanaticregfft.dll %PROGRAMFILES%TelevisionFanaticEITelevisionFanaticreghk.dll %PROGRAMFILES%TelevisionFanaticEITelevisionFanaticregiet.dll %PROGRAMFILES%TelevisionFanaticEITelevisionFanaticscript.dll %PROGRAMFILES%TelevisionFanaticEITelevisionFanaticskin.dll %PROGRAMFILES%TelevisionFanaticEITelevisionFanaticsknlcr.dll %PROGRAMFILES%TelevisionFanaticEITelevisionFanaticskplay.exe %PROGRAMFILES%TelevisionFanaticEITelevisionFanaticSrcAs.dll %PROGRAMFILES%TelevisionFanaticEITelevisionFanaticSrchMn.exe %PROGRAMFILES%TelevisionFanaticEITelevisionFanatictpinst.dll %PROGRAMFILES%TelevisionFanaticEITelevisionFanaticuabtn.dll %PROGRAMFILES%TelevisionFanaticEITelevisionFanaticAppIntegrator64.exe %PROGRAMFILES%TelevisionFanaticEITelevisionFanaticAppIntegratorStub64.dll %PROGRAMFILES%TelevisionFanaticEITelevisionFanaticBOOTSTRAP.JS %PROGRAMFILES%TelevisionFanaticEITelevisionFanaticffxtbr.jar %PROGRAMFILES%TelevisionFanaticEITelevisionFanaticCHROME.MANIFEST %PROGRAMFILES%TelevisionFanaticEITelevisionFanaticCREXT.DLL %PROGRAMFILES%TelevisionFanaticEITelevisionFanaticCrExtP64.exe %PROGRAMFILES%TelevisionFanaticEITelevisionFanaticDPNMNGR.DLL %PROGRAMFILES%TelevisionFanaticEITelevisionFanaticEXEMANAGER.DLL %PROGRAMFILES%TelevisionFanaticEITelevisionFanaticHpg64.dll %PROGRAMFILES%TelevisionFanaticEITelevisionFanaticINSTALL.RDF %PROGRAMFILES%TelevisionFanaticEITelevisionFanaticinstallKeys.js %PROGRAMFILES%TelevisionFanaticEITelevisionFanaticLOGO.BMP %PROGRAMFILES%TelevisionFanaticEITelevisionFanaticNP64Stub.dll %PROGRAMFILES%TelevisionFanaticEITelevisionFanaticT8EXTEX.DLL %PROGRAMFILES%TelevisionFanaticEITelevisionFanaticT8EXTPEX.DLL %PROGRAMFILES%TelevisionFanaticEITelevisionFanaticT8HTML.DLL %PROGRAMFILES%TelevisionFanaticEITelevisionFanaticT8RES.DLL %PROGRAMFILES%TelevisionFanaticEITelevisionFanaticT8TICKER.DLL %PROGRAMFILES%TelevisionFanaticEITelevisionFanaticVERIFY.DLL %PROGRAMFILES%TelevisionFanaticEITelevisionFanaticEIPlug.dll %PROGRAMFILES%TelevisionFanaticEITelevisionFanaticEZSETP.dll %PROGRAMFILES%TelevisionFanaticEITelevisionFanaticNP64EISb.dll %PROGRAMFILES%TelevisionFanaticEITelevisionFanatic%#MANIFEST#%18369B.exe %PROGRAMFILES%TelevisionFanaticauxstb.dll %PROGRAMFILES%TelevisionFanaticbar.dll %PROGRAMFILES%TelevisionFanaticbarsvc.exe %PROGRAMFILES%TelevisionFanaticbprtct.dll %PROGRAMFILES%TelevisionFanaticbrmon.exe %PROGRAMFILES%TelevisionFanaticbrstub.dll %PROGRAMFILES%TelevisionFanaticdatact.dll %PROGRAMFILES%TelevisionFanaticdlghk.dll %PROGRAMFILES%TelevisionFanaticdyn.dll %PROGRAMFILES%TelevisionFanaticfeedmg.dll %PROGRAMFILES%TelevisionFanatichighin.exe %PROGRAMFILES%TelevisionFanatichkstub.dll %PROGRAMFILES%TelevisionFanatichtmlmu.dll %PROGRAMFILES%TelevisionFanatichttpct.dll %PROGRAMFILES%TelevisionFanaticidle.dll %PROGRAMFILES%TelevisionFanaticieovr.dll %PROGRAMFILES%TelevisionFanaticimpipe.exe %PROGRAMFILES%TelevisionFanaticmedint.exe %PROGRAMFILES%TelevisionFanaticmlbtn.dll %PROGRAMFILES%TelevisionFanaticmsg.dll %PROGRAMFILES%TelevisionFanaticPlugin.dll %PROGRAMFILES%TelevisionFanaticradio.dll %PROGRAMFILES%TelevisionFanaticregfft.dll %PROGRAMFILES%TelevisionFanaticreghk.dll %PROGRAMFILES%TelevisionFanaticregiet.dll %PROGRAMFILES%TelevisionFanaticscript.dll %PROGRAMFILES%TelevisionFanaticskin.dll %PROGRAMFILES%TelevisionFanaticsknlcr.dll %PROGRAMFILES%TelevisionFanaticskplay.exe %PROGRAMFILES%TelevisionFanaticSrcAs.dll %PROGRAMFILES%TelevisionFanaticSrchMn.exe %PROGRAMFILES%TelevisionFanatictpinst.dll %PROGRAMFILES%TelevisionFanaticuabtn.dll %PROGRAMFILES%TelevisionFanaticAppIntegrator64.exe %PROGRAMFILES%TelevisionFanaticAppIntegratorStub64.dll %PROGRAMFILES%TelevisionFanaticBOOTSTRAP.JS %PROGRAMFILES%TelevisionFanaticffxtbr.jar %PROGRAMFILES%TelevisionFanaticCHROME.MANIFEST %PROGRAMFILES%TelevisionFanaticCREXT.DLL %PROGRAMFILES%TelevisionFanaticCrExtP64.exe %PROGRAMFILES%TelevisionFanaticDPNMNGR.DLL %PROGRAMFILES%TelevisionFanaticEXEMANAGER.DLL %PROGRAMFILES%TelevisionFanaticHpg64.dll %PROGRAMFILES%TelevisionFanaticINSTALL.RDF %PROGRAMFILES%TelevisionFanaticinstallKeys.js %PROGRAMFILES%TelevisionFanaticLOGO.BMP %PROGRAMFILES%TelevisionFanaticNP64Stub.dll %PROGRAMFILES%TelevisionFanaticT8EXTEX.DLL %PROGRAMFILES%TelevisionFanaticT8EXTPEX.DLL %PROGRAMFILES%TelevisionFanaticT8HTML.DLL %PROGRAMFILES%TelevisionFanaticT8RES.DLL %PROGRAMFILES%TelevisionFanaticT8TICKER.DLL %PROGRAMFILES%TelevisionFanaticVERIFY.DLL %PROGRAMFILES%TelevisionFanaticEIPlug.dll %PROGRAMFILES%TelevisionFanaticEZSETP.dll %PROGRAMFILES%TelevisionFanaticNP64EISb.dll %PROGRAMFILES%TelevisionFanatic%#MANIFEST#%18369B.exe %APPDATA%TelevisionFanaticauxstb.dll %APPDATA%TelevisionFanaticbar.dll %APPDATA%TelevisionFanaticbarsvc.exe %APPDATA%TelevisionFanaticbprtct.dll %APPDATA%TelevisionFanaticbrmon.exe %APPDATA%TelevisionFanaticbrstub.dll %APPDATA%TelevisionFanaticdatact.dll %APPDATA%TelevisionFanaticdlghk.dll %APPDATA%TelevisionFanaticdyn.dll %APPDATA%TelevisionFanaticfeedmg.dll %APPDATA%TelevisionFanatichighin.exe %APPDATA%TelevisionFanatichkstub.dll %APPDATA%TelevisionFanatichtmlmu.dll %APPDATA%TelevisionFanatichttpct.dll %APPDATA%TelevisionFanaticidle.dll %APPDATA%TelevisionFanaticieovr.dll %APPDATA%TelevisionFanaticimpipe.exe %APPDATA%TelevisionFanaticmedint.exe %APPDATA%TelevisionFanaticmlbtn.dll %APPDATA%TelevisionFanaticmsg.dll %APPDATA%TelevisionFanaticPlugin.dll %APPDATA%TelevisionFanaticradio.dll %APPDATA%TelevisionFanaticregfft.dll %APPDATA%TelevisionFanaticreghk.dll %APPDATA%TelevisionFanaticregiet.dll %APPDATA%TelevisionFanaticscript.dll %APPDATA%TelevisionFanaticskin.dll %APPDATA%TelevisionFanaticsknlcr.dll %APPDATA%TelevisionFanaticskplay.exe %APPDATA%TelevisionFanaticSrcAs.dll %APPDATA%TelevisionFanaticSrchMn.exe %APPDATA%TelevisionFanatictpinst.dll %APPDATA%TelevisionFanaticuabtn.dll %APPDATA%TelevisionFanaticAppIntegrator64.exe %APPDATA%TelevisionFanaticAppIntegratorStub64.dll %APPDATA%TelevisionFanaticBOOTSTRAP.JS %APPDATA%TelevisionFanaticffxtbr.jar %APPDATA%TelevisionFanaticCHROME.MANIFEST %APPDATA%TelevisionFanaticCREXT.DLL %APPDATA%TelevisionFanaticCrExtP64.exe %APPDATA%TelevisionFanaticDPNMNGR.DLL %APPDATA%TelevisionFanaticEXEMANAGER.DLL %APPDATA%TelevisionFanaticHpg64.dll %APPDATA%TelevisionFanaticINSTALL.RDF %APPDATA%TelevisionFanaticinstallKeys.js %APPDATA%TelevisionFanaticLOGO.BMP %APPDATA%TelevisionFanaticNP64Stub.dll %APPDATA%TelevisionFanaticT8EXTEX.DLL %APPDATA%TelevisionFanaticT8EXTPEX.DLL %APPDATA%TelevisionFanaticT8HTML.DLL %APPDATA%TelevisionFanaticT8RES.DLL %APPDATA%TelevisionFanaticT8TICKER.DLL %APPDATA%TelevisionFanaticVERIFY.DLL %APPDATA%TelevisionFanaticEIPlug.dll %APPDATA%TelevisionFanaticEZSETP.dll %APPDATA%TelevisionFanaticNP64EISb.dll %APPDATA%TelevisionFanatic%#MANIFEST#%18369B.exe Registry: Key HKLMSOFTWARETelevisionFanatic Key HKLMSOFTWAREMicrosoftWindowsCurrentVersionUninstallTelevisionFanaticbar Uninstall Internet Explorer Key HKLMSOFTWAREMicrosoftWindowsCurrentVersionUninstallTelevisionFanaticbar Uninstall Firefox Key HKLMSOFTWAREMicrosoftWindowsCurrentVersionExplorerBrowser Helper Objectscb41fc95-f1b3-4797-8bb6-1012ff62abba Key HKLMSOFTWAREMicrosoftWindowsCurrentVersionExplorerBrowser Helper Objects5d79f641-c168-40df-a32f-bacea7509e75 Key HKLMSOFTWAREClassesTelevisionFanatic.XMLSessionPlugin.1CLSID Key HKLMSOFTWAREClassesTelevisionFanatic.XMLSessionPlugin.1 Key HKLMSOFTWAREClassesTelevisionFanatic.XMLSessionPluginCurVer Key HKLMSOFTWAREClassesTelevisionFanatic.XMLSessionPluginCLSID Key HKLMSOFTWAREClassesTelevisionFanatic.XMLSessionPlugin Key HKLMSOFTWAREClassesTelevisionFanatic.UrlAlertButton.1CLSID Key HKLMSOFTWAREClassesTelevisionFanatic.UrlAlertButton.1 Key HKLMSOFTWAREClassesTelevisionFanatic.UrlAlertButtonCurVer Key HKLMSOFTWAREClassesTelevisionFanatic.UrlAlertButtonCLSID Key HKLMSOFTWAREClassesTelevisionFanatic.UrlAlertButton Key HKLMSOFTWAREClassesTelevisionFanatic.ToolbarProtector.1CLSID Key HKLMSOFTWAREClassesTelevisionFanatic.ToolbarProtector.1 Key HKLMSOFTWAREClassesTelevisionFanatic.ToolbarProtectorCurVer Key HKLMSOFTWAREClassesTelevisionFanatic.ToolbarProtectorCLSID Key HKLMSOFTWAREClassesTelevisionFanatic.ToolbarProtector Key HKLMSOFTWAREClassesTelevisionFanatic.ThirdPartyInstaller.1CLSID Key HKLMSOFTWAREClassesTelevisionFanatic.ThirdPartyInstaller.1 Key HKLMSOFTWAREClassesTelevisionFanatic.ThirdPartyInstallerCurVer Key HKLMSOFTWAREClassesTelevisionFanatic.ThirdPartyInstallerCLSID Key HKLMSOFTWAREClassesTelevisionFanatic.ThirdPartyInstaller Key HKLMSOFTWAREClassesTelevisionFanatic.SkinLauncherSettings.1CLSID Key HKLMSOFTWAREClassesTelevisionFanatic.SkinLauncherSettings.1 Key HKLMSOFTWAREClassesTelevisionFanatic.SkinLauncherSettingsCurVer Key HKLMSOFTWAREClassesTelevisionFanatic.SkinLauncherSettingsCLSID Key HKLMSOFTWAREClassesTelevisionFanatic.SkinLauncherSettings Key HKLMSOFTWAREClassesTelevisionFanatic.SkinLauncher.1CLSID Key HKLMSOFTWAREClassesTelevisionFanatic.SkinLauncher.1 Key HKLMSOFTWAREClassesTelevisionFanatic.SkinLauncherCurVer Key HKLMSOFTWAREClassesTelevisionFanatic.SkinLauncherCLSID Key HKLMSOFTWAREClassesTelevisionFanatic.SkinLauncher Key HKLMSOFTWAREClassesTelevisionFanatic.SettingsPlugin.1CLSID Key HKLMSOFTWAREClassesTelevisionFanatic.SettingsPlugin.1 Key HKLMSOFTWAREClassesTelevisionFanatic.SettingsPluginCurVer Key HKLMSOFTWAREClassesTelevisionFanatic.SettingsPluginCLSID Key HKLMSOFTWAREClassesTelevisionFanatic.SettingsPlugin Key HKLMSOFTWAREClassesTelevisionFanatic.ScriptButton.1CLSID Key HKLMSOFTWAREClassesTelevisionFanatic.ScriptButton.1 Key HKLMSOFTWAREClassesTelevisionFanatic.ScriptButtonCurVer Key HKLMSOFTWAREClassesTelevisionFanatic.ScriptButtonCLSID Key HKLMSOFTWAREClassesTelevisionFanatic.ScriptButton Key HKLMSOFTWAREClassesTelevisionFanatic.RadioSettings.1CLSID Key HKLMSOFTWAREClassesTelevisionFanatic.RadioSettings.1 Key HKLMSOFTWAREClassesTelevisionFanatic.RadioSettingsCurVer Key HKLMSOFTWAREClassesTelevisionFanatic.RadioSettingsCLSID Key HKLMSOFTWAREClassesTelevisionFanatic.RadioSettings Key HKLMSOFTWAREClassesTelevisionFanatic.Radio.1CLSID Key HKLMSOFTWAREClassesTelevisionFanatic.Radio.1 Key HKLMSOFTWAREClassesTelevisionFanatic.RadioCurVer Key HKLMSOFTWAREClassesTelevisionFanatic.RadioCLSID Key HKLMSOFTWAREClassesTelevisionFanatic.Radio Key HKLMSOFTWAREClassesTelevisionFanatic.PseudoTransparentPlugin.1CLSID Key HKLMSOFTWAREClassesTelevisionFanatic.PseudoTransparentPlugin.1 Key HKLMSOFTWAREClassesTelevisionFanatic.PseudoTransparentPluginCurVer Key HKLMSOFTWAREClassesTelevisionFanatic.PseudoTransparentPluginCLSID Key HKLMSOFTWAREClassesTelevisionFanatic.PseudoTransparentPlugin Key HKLMSOFTWAREClassesTelevisionFanatic.MultipleButton.1CLSID Key HKLMSOFTWAREClassesTelevisionFanatic.MultipleButton.1 Key HKLMSOFTWAREClassesTelevisionFanatic.MultipleButtonCurVer Key HKLMSOFTWAREClassesTelevisionFanatic.MultipleButtonCLSID Key HKLMSOFTWAREClassesTelevisionFanatic.MultipleButton Key HKLMSOFTWAREClassesTelevisionFanatic.HTMLPanel.1CLSID Key HKLMSOFTWAREClassesTelevisionFanatic.HTMLPanel.1 Key HKLMSOFTWAREClassesTelevisionFanatic.HTMLPanelCurVer Key HKLMSOFTWAREClassesTelevisionFanatic.HTMLPanelCLSID Key HKLMSOFTWAREClassesTelevisionFanatic.HTMLPanel Key HKLMSOFTWAREClassesTelevisionFanatic.HTMLMenu.1CLSID Key HKLMSOFTWAREClassesTelevisionFanatic.HTMLMenu.1 Key HKLMSOFTWAREClassesTelevisionFanatic.HTMLMenuCurVer Key HKLMSOFTWAREClassesTelevisionFanatic.HTMLMenuCLSID Key HKLMSOFTWAREClassesTelevisionFanatic.HTMLMenu Key HKLMSOFTWAREClassesTelevisionFanatic.FeedManager.1CLSID Key HKLMSOFTWAREClassesTelevisionFanatic.FeedManager.1 Key HKLMSOFTWAREClassesTelevisionFanatic.FeedManagerCurVer Key HKLMSOFTWAREClassesTelevisionFanatic.FeedManagerCLSID Key HKLMSOFTWAREClassesTelevisionFanatic.FeedManager Key HKLMSOFTWAREClassesTelevisionFanatic.DynamicBarButton.1CLSID Key HKLMSOFTWAREClassesTelevisionFanatic.DynamicBarButton.1 Key HKLMSOFTWAREClassesTelevisionFanatic.DynamicBarButtonCurVer Key HKLMSOFTWAREClassesTelevisionFanatic.DynamicBarButtonCLSID Key HKLMSOFTWAREClassesTelevisionFanatic.DynamicBarButton18369B.exe %PROGRAMFILES%TelevisionFanaticauxstb.dll %PROGRAMFILES%TelevisionFanaticbar.dll %PROGRAMFILES%TelevisionFanaticbarsvc.exe %PROGRAMFILES%TelevisionFanaticbprtct.dll %PROGRAMFILES%TelevisionFanaticbrmon.exe %PROGRAMFILES%TelevisionFanaticbrstub.dll %PROGRAMFILES%TelevisionFanaticdatact.dll %PROGRAMFILES%TelevisionFanaticdlghk.dll %PROGRAMFILES%TelevisionFanaticdyn.dll %PROGRAMFILES%TelevisionFanaticfeedmg.dll %PROGRAMFILES%TelevisionFanatichighin.exe %PROGRAMFILES%TelevisionFanatichkstub.dll %PROGRAMFILES%TelevisionFanatichtmlmu.dll %PROGRAMFILES%TelevisionFanatichttpct.dll %PROGRAMFILES%TelevisionFanaticidle.dll %PROGRAMFILES%TelevisionFanaticieovr.dll %PROGRAMFILES%TelevisionFanaticimpipe.exe %PROGRAMFILES%TelevisionFanaticmedint.exe %PROGRAMFILES%TelevisionFanaticmlbtn.dll %PROGRAMFILES%TelevisionFanaticmsg.dll %PROGRAMFILES%TelevisionFanaticPlugin.dll %PROGRAMFILES%TelevisionFanaticradio.dll %PROGRAMFILES%TelevisionFanaticregfft.dll %PROGRAMFILES%TelevisionFanaticreghk.dll %PROGRAMFILES%TelevisionFanaticregiet.dll %PROGRAMFILES%TelevisionFanaticscript.dll %PROGRAMFILES%TelevisionFanaticskin.dll %PROGRAMFILES%TelevisionFanaticsknlcr.dll %PROGRAMFILES%TelevisionFanaticskplay.exe %PROGRAMFILES%TelevisionFanaticSrcAs.dll %PROGRAMFILES%TelevisionFanaticSrchMn.exe %PROGRAMFILES%TelevisionFanatictpinst.dll %PROGRAMFILES%TelevisionFanaticuabtn.dll %PROGRAMFILES%TelevisionFanaticAppIntegrator64.exe %PROGRAMFILES%TelevisionFanaticAppIntegratorStub64.dll %PROGRAMFILES%TelevisionFanaticBOOTSTRAP.JS %PROGRAMFILES%TelevisionFanaticffxtbr.jar %PROGRAMFILES%TelevisionFanaticCHROME.MANIFEST %PROGRAMFILES%TelevisionFanaticCREXT.DLL %PROGRAMFILES%TelevisionFanaticCrExtP64.exe %PROGRAMFILES%TelevisionFanaticDPNMNGR.DLL %PROGRAMFILES%TelevisionFanaticEXEMANAGER.DLL %PROGRAMFILES%TelevisionFanaticHpg64.dll %PROGRAMFILES%TelevisionFanaticINSTALL.RDF %PROGRAMFILES%TelevisionFanaticinstallKeys.js %PROGRAMFILES%TelevisionFanaticLOGO.BMP %PROGRAMFILES%TelevisionFanaticNP64Stub.dll %PROGRAMFILES%TelevisionFanaticT8EXTEX.DLL %PROGRAMFILES%TelevisionFanaticT8EXTPEX.DLL %PROGRAMFILES%TelevisionFanaticT8HTML.DLL %PROGRAMFILES%TelevisionFanaticT8RES.DLL %PROGRAMFILES%TelevisionFanaticT8TICKER.DLL %PROGRAMFILES%TelevisionFanaticVERIFY.DLL %PROGRAMFILES%TelevisionFanaticEIPlug.dll %PROGRAMFILES%TelevisionFanaticEZSETP.dll %PROGRAMFILES%TelevisionFanaticNP64EISb.dll %PROGRAMFILES%TelevisionFanatic%APPDATA%TelevisionFanatic %PROGRAMFILES%TelevisionFanatic %PROGRAMFILES%TelevisionFanaticEI %PROGRAMFILES%TelevisionFanaticEITelevisionFanaticauxstb.dll %PROGRAMFILES%TelevisionFanaticEITelevisionFanaticbar.dll %PROGRAMFILES%TelevisionFanaticEITelevisionFanaticbarsvc.exe %PROGRAMFILES%TelevisionFanaticEITelevisionFanaticbprtct.dll %PROGRAMFILES%TelevisionFanaticEITelevisionFanaticbrmon.exe %PROGRAMFILES%TelevisionFanaticEITelevisionFanaticbrstub.dll %PROGRAMFILES%TelevisionFanaticEITelevisionFanaticdatact.dll %PROGRAMFILES%TelevisionFanaticEITelevisionFanaticdlghk.dll %PROGRAMFILES%TelevisionFanaticEITelevisionFanaticdyn.dll %PROGRAMFILES%TelevisionFanaticEITelevisionFanaticfeedmg.dll %PROGRAMFILES%TelevisionFanaticEITelevisionFanatichighin.exe %PROGRAMFILES%TelevisionFanaticEITelevisionFanatichkstub.dll %PROGRAMFILES%TelevisionFanaticEITelevisionFanatichtmlmu.dll %PROGRAMFILES%TelevisionFanaticEITelevisionFanatichttpct.dll %PROGRAMFILES%TelevisionFanaticEITelevisionFanaticidle.dll %PROGRAMFILES%TelevisionFanaticEITelevisionFanaticieovr.dll %PROGRAMFILES%TelevisionFanaticEITelevisionFanaticimpipe.exe %PROGRAMFILES%TelevisionFanaticEITelevisionFanaticmedint.exe %PROGRAMFILES%TelevisionFanaticEITelevisionFanaticmlbtn.dll %PROGRAMFILES%TelevisionFanaticEITelevisionFanaticmsg.dll %PROGRAMFILES%TelevisionFanaticEITelevisionFanaticPlugin.dll %PROGRAMFILES%TelevisionFanaticEITelevisionFanaticradio.dll %PROGRAMFILES%TelevisionFanaticEITelevisionFanaticregfft.dll %PROGRAMFILES%TelevisionFanaticEITelevisionFanaticreghk.dll %PROGRAMFILES%TelevisionFanaticEITelevisionFanaticregiet.dll %PROGRAMFILES%TelevisionFanaticEITelevisionFanaticscript.dll %PROGRAMFILES%TelevisionFanaticEITelevisionFanaticskin.dll %PROGRAMFILES%TelevisionFanaticEITelevisionFanaticsknlcr.dll %PROGRAMFILES%TelevisionFanaticEITelevisionFanaticskplay.exe %PROGRAMFILES%TelevisionFanaticEITelevisionFanaticSrcAs.dll %PROGRAMFILES%TelevisionFanaticEITelevisionFanaticSrchMn.exe %PROGRAMFILES%TelevisionFanaticEITelevisionFanatictpinst.dll %PROGRAMFILES%TelevisionFanaticEITelevisionFanaticuabtn.dll %PROGRAMFILES%TelevisionFanaticEITelevisionFanaticAppIntegrator64.exe %PROGRAMFILES%TelevisionFanaticEITelevisionFanaticAppIntegratorStub64.dll %PROGRAMFILES%TelevisionFanaticEITelevisionFanaticBOOTSTRAP.JS %PROGRAMFILES%TelevisionFanaticEITelevisionFanaticffxtbr.jar %PROGRAMFILES%TelevisionFanaticEITelevisionFanaticCHROME.MANIFEST %PROGRAMFILES%TelevisionFanaticEITelevisionFanaticCREXT.DLL %PROGRAMFILES%TelevisionFanaticEITelevisionFanaticCrExtP64.exe %PROGRAMFILES%TelevisionFanaticEITelevisionFanaticDPNMNGR.DLL %PROGRAMFILES%TelevisionFanaticEITelevisionFanaticEXEMANAGER.DLL %PROGRAMFILES%TelevisionFanaticEITelevisionFanaticHpg64.dll %PROGRAMFILES%TelevisionFanaticEITelevisionFanaticINSTALL.RDF %PROGRAMFILES%TelevisionFanaticEITelevisionFanaticinstallKeys.js %PROGRAMFILES%TelevisionFanaticEITelevisionFanaticLOGO.BMP %PROGRAMFILES%TelevisionFanaticEITelevisionFanaticNP64Stub.dll %PROGRAMFILES%TelevisionFanaticEITelevisionFanaticT8EXTEX.DLL %PROGRAMFILES%TelevisionFanaticEITelevisionFanaticT8EXTPEX.DLL %PROGRAMFILES%TelevisionFanaticEITelevisionFanaticT8HTML.DLL %PROGRAMFILES%TelevisionFanaticEITelevisionFanaticT8RES.DLL %PROGRAMFILES%TelevisionFanaticEITelevisionFanaticT8TICKER.DLL %PROGRAMFILES%TelevisionFanaticEITelevisionFanaticVERIFY.DLL %PROGRAMFILES%TelevisionFanaticEITelevisionFanaticEIPlug.dll %PROGRAMFILES%TelevisionFanaticEITelevisionFanaticEZSETP.dll %PROGRAMFILES%TelevisionFanaticEITelevisionFanaticNP64EISb.dll %PROGRAMFILES%TelevisionFanaticEITelevisionFanatic%#MANIFEST#%18369B.exe %PROGRAMFILES%TelevisionFanaticauxstb.dll %PROGRAMFILES%TelevisionFanaticbar.dll %PROGRAMFILES%TelevisionFanaticbarsvc.exe %PROGRAMFILES%TelevisionFanaticbprtct.dll %PROGRAMFILES%TelevisionFanaticbrmon.exe %PROGRAMFILES%TelevisionFanaticbrstub.dll %PROGRAMFILES%TelevisionFanaticdatact.dll %PROGRAMFILES%TelevisionFanaticdlghk.dll %PROGRAMFILES%TelevisionFanaticdyn.dll %PROGRAMFILES%TelevisionFanaticfeedmg.dll %PROGRAMFILES%TelevisionFanatichighin.exe %PROGRAMFILES%TelevisionFanatichkstub.dll %PROGRAMFILES%TelevisionFanatichtmlmu.dll %PROGRAMFILES%TelevisionFanatichttpct.dll %PROGRAMFILES%TelevisionFanaticidle.dll %PROGRAMFILES%TelevisionFanaticieovr.dll %PROGRAMFILES%TelevisionFanaticimpipe.exe %PROGRAMFILES%TelevisionFanaticmedint.exe %PROGRAMFILES%TelevisionFanaticmlbtn.dll %PROGRAMFILES%TelevisionFanaticmsg.dll %PROGRAMFILES%TelevisionFanaticPlugin.dll %PROGRAMFILES%TelevisionFanaticradio.dll %PROGRAMFILES%TelevisionFanaticregfft.dll %PROGRAMFILES%TelevisionFanaticreghk.dll %PROGRAMFILES%TelevisionFanaticregiet.dll %PROGRAMFILES%TelevisionFanaticscript.dll %PROGRAMFILES%TelevisionFanaticskin.dll %PROGRAMFILES%TelevisionFanaticsknlcr.dll %PROGRAMFILES%TelevisionFanaticskplay.exe %PROGRAMFILES%TelevisionFanaticSrcAs.dll %PROGRAMFILES%TelevisionFanaticSrchMn.exe %PROGRAMFILES%TelevisionFanatictpinst.dll %PROGRAMFILES%TelevisionFanaticuabtn.dll %PROGRAMFILES%TelevisionFanaticAppIntegrator64.exe %PROGRAMFILES%TelevisionFanaticAppIntegratorStub64.dll %PROGRAMFILES%TelevisionFanaticBOOTSTRAP.JS %PROGRAMFILES%TelevisionFanaticffxtbr.jar %PROGRAMFILES%TelevisionFanaticCHROME.MANIFEST %PROGRAMFILES%TelevisionFanaticCREXT.DLL %PROGRAMFILES%TelevisionFanaticCrExtP64.exe %PROGRAMFILES%TelevisionFanaticDPNMNGR.DLL %PROGRAMFILES%TelevisionFanaticEXEMANAGER.DLL %PROGRAMFILES%TelevisionFanaticHpg64.dll %PROGRAMFILES%TelevisionFanaticINSTALL.RDF %PROGRAMFILES%TelevisionFanaticinstallKeys.js %PROGRAMFILES%TelevisionFanaticLOGO.BMP %PROGRAMFILES%TelevisionFanaticNP64Stub.dll %PROGRAMFILES%TelevisionFanaticT8EXTEX.DLL %PROGRAMFILES%TelevisionFanaticT8EXTPEX.DLL %PROGRAMFILES%TelevisionFanaticT8HTML.DLL %PROGRAMFILES%TelevisionFanaticT8RES.DLL %PROGRAMFILES%TelevisionFanaticT8TICKER.DLL %PROGRAMFILES%TelevisionFanaticVERIFY.DLL %PROGRAMFILES%TelevisionFanaticEIPlug.dll %PROGRAMFILES%TelevisionFanaticEZSETP.dll %PROGRAMFILES%TelevisionFanaticNP64EISb.dll %PROGRAMFILES%TelevisionFanatic%#MANIFEST#%18369B.exe %APPDATA%TelevisionFanaticauxstb.dll %APPDATA%TelevisionFanaticbar.dll %APPDATA%TelevisionFanaticbarsvc.exe %APPDATA%TelevisionFanaticbprtct.dll %APPDATA%TelevisionFanaticbrmon.exe %APPDATA%TelevisionFanaticbrstub.dll %APPDATA%TelevisionFanaticdatact.dll %APPDATA%TelevisionFanaticdlghk.dll %APPDATA%TelevisionFanaticdyn.dll %APPDATA%TelevisionFanaticfeedmg.dll %APPDATA%TelevisionFanatichighin.exe %APPDATA%TelevisionFanatichkstub.dll %APPDATA%TelevisionFanatichtmlmu.dll %APPDATA%TelevisionFanatichttpct.dll %APPDATA%TelevisionFanaticidle.dll %APPDATA%TelevisionFanaticieovr.dll %APPDATA%TelevisionFanaticimpipe.exe %APPDATA%TelevisionFanaticmedint.exe %APPDATA%TelevisionFanaticmlbtn.dll %APPDATA%TelevisionFanaticmsg.dll %APPDATA%TelevisionFanaticPlugin.dll %APPDATA%TelevisionFanaticradio.dll %APPDATA%TelevisionFanaticregfft.dll %APPDATA%TelevisionFanaticreghk.dll %APPDATA%TelevisionFanaticregiet.dll %APPDATA%TelevisionFanaticscript.dll %APPDATA%TelevisionFanaticskin.dll %APPDATA%TelevisionFanaticsknlcr.dll %APPDATA%TelevisionFanaticskplay.exe %APPDATA%TelevisionFanaticSrcAs.dll %APPDATA%TelevisionFanaticSrchMn.exe %APPDATA%TelevisionFanatictpinst.dll %APPDATA%TelevisionFanaticuabtn.dll %APPDATA%TelevisionFanaticAppIntegrator64.exe %APPDATA%TelevisionFanaticAppIntegratorStub64.dll %APPDATA%TelevisionFanaticBOOTSTRAP.JS %APPDATA%TelevisionFanaticffxtbr.jar %APPDATA%TelevisionFanaticCHROME.MANIFEST %APPDATA%TelevisionFanaticCREXT.DLL %APPDATA%TelevisionFanaticCrExtP64.exe %APPDATA%TelevisionFanaticDPNMNGR.DLL %APPDATA%TelevisionFanaticEXEMANAGER.DLL %APPDATA%TelevisionFanaticHpg64.dll %APPDATA%TelevisionFanaticINSTALL.RDF %APPDATA%TelevisionFanaticinstallKeys.js %APPDATA%TelevisionFanaticLOGO.BMP %APPDATA%TelevisionFanaticNP64Stub.dll %APPDATA%TelevisionFanaticT8EXTEX.DLL %APPDATA%TelevisionFanaticT8EXTPEX.DLL %APPDATA%TelevisionFanaticT8HTML.DLL %APPDATA%TelevisionFanaticT8RES.DLL %APPDATA%TelevisionFanaticT8TICKER.DLL %APPDATA%TelevisionFanaticVERIFY.DLL %APPDATA%TelevisionFanaticEIPlug.dll %APPDATA%TelevisionFanaticEZSETP.dll %APPDATA%TelevisionFanaticNP64EISb.dll %APPDATA%TelevisionFanatic%#MANIFEST#%18369B.exe Key HKLMSOFTWARETelevisionFanatic Key HKLMSOFTWAREMicrosoftWindowsCurrentVersionUninstallTelevisionFanaticbar Uninstall Internet Explorer Key HKLMSOFTWAREMicrosoftWindowsCurrentVersionUninstallTelevisionFanaticbar Uninstall Firefox Key HKLMSOFTWAREMicrosoftWindowsCurrentVersionExplorerBrowser Helper Objectscb41fc95-f1b3-4797-8bb6-1012ff62abba Key HKLMSOFTWAREMicrosoftWindowsCurrentVersionExplorerBrowser Helper Objects5d79f641-c168-40df-a32f-bacea7509e75 Key HKLMSOFTWAREClassesTelevisionFanatic.XMLSessionPlugin.1CLSID Key HKLMSOFTWAREClassesTelevisionFanatic.XMLSessionPlugin.1 Key HKLMSOFTWAREClassesTelevisionFanatic.XMLSessionPluginCurVer Key HKLMSOFTWAREClassesTelevisionFanatic.XMLSessionPluginCLSID Key HKLMSOFTWAREClassesTelevisionFanatic.XMLSessionPlugin Key HKLMSOFTWAREClassesTelevisionFanatic.UrlAlertButton.1CLSID Key HKLMSOFTWAREClassesTelevisionFanatic.UrlAlertButton.1 Key HKLMSOFTWAREClassesTelevisionFanatic.UrlAlertButtonCurVer Key HKLMSOFTWAREClassesTelevisionFanatic.UrlAlertButtonCLSID Key HKLMSOFTWAREClassesTelevisionFanatic.UrlAlertButton Key HKLMSOFTWAREClassesTelevisionFanatic.ToolbarProtector.1CLSID Key HKLMSOFTWAREClassesTelevisionFanatic.ToolbarProtector.1 Key HKLMSOFTWAREClassesTelevisionFanatic.ToolbarProtectorCurVer Key HKLMSOFTWAREClassesTelevisionFanatic.ToolbarProtectorCLSID Key HKLMSOFTWAREClassesTelevisionFanatic.ToolbarProtector Key HKLMSOFTWAREClassesTelevisionFanatic.ThirdPartyInstaller.1CLSID Key HKLMSOFTWAREClassesTelevisionFanatic.ThirdPartyInstaller.1 Key HKLMSOFTWAREClassesTelevisionFanatic.ThirdPartyInstallerCurVer Key HKLMSOFTWAREClassesTelevisionFanatic.ThirdPartyInstallerCLSID Key HKLMSOFTWAREClassesTelevisionFanatic.ThirdPartyInstaller Key HKLMSOFTWAREClassesTelevisionFanatic.SkinLauncherSettings.1CLSID Key HKLMSOFTWAREClassesTelevisionFanatic.SkinLauncherSettings.1 Key HKLMSOFTWAREClassesTelevisionFanatic.SkinLauncherSettingsCurVer Key HKLMSOFTWAREClassesTelevisionFanatic.SkinLauncherSettingsCLSID Key HKLMSOFTWAREClassesTelevisionFanatic.SkinLauncherSettings Key HKLMSOFTWAREClassesTelevisionFanatic.SkinLauncher.1CLSID Key HKLMSOFTWAREClassesTelevisionFanatic.SkinLauncher.1 Key HKLMSOFTWAREClassesTelevisionFanatic.SkinLauncherCurVer Key HKLMSOFTWAREClassesTelevisionFanatic.SkinLauncherCLSID Key HKLMSOFTWAREClassesTelevisionFanatic.SkinLauncher Key HKLMSOFTWAREClassesTelevisionFanatic.SettingsPlugin.1CLSID Key HKLMSOFTWAREClassesTelevisionFanatic.SettingsPlugin.1 Key HKLMSOFTWAREClassesTelevisionFanatic.SettingsPluginCurVer Key HKLMSOFTWAREClassesTelevisionFanatic.SettingsPluginCLSID Key HKLMSOFTWAREClassesTelevisionFanatic.SettingsPlugin Key HKLMSOFTWAREClassesTelevisionFanatic.ScriptButton.1CLSID Key HKLMSOFTWAREClassesTelevisionFanatic.ScriptButton.1 Key HKLMSOFTWAREClassesTelevisionFanatic.ScriptButtonCurVer Key HKLMSOFTWAREClassesTelevisionFanatic.ScriptButtonCLSID Key HKLMSOFTWAREClassesTelevisionFanatic.ScriptButton Key HKLMSOFTWAREClassesTelevisionFanatic.RadioSettings.1CLSID Key HKLMSOFTWAREClassesTelevisionFanatic.RadioSettings.1 Key HKLMSOFTWAREClassesTelevisionFanatic.RadioSettingsCurVer Key HKLMSOFTWAREClassesTelevisionFanatic.RadioSettingsCLSID Key HKLMSOFTWAREClassesTelevisionFanatic.RadioSettings Key HKLMSOFTWAREClassesTelevisionFanatic.Radio.1CLSID Key HKLMSOFTWAREClassesTelevisionFanatic.Radio.1 Key HKLMSOFTWAREClassesTelevisionFanatic.RadioCurVer Key HKLMSOFTWAREClassesTelevisionFanatic.RadioCLSID Key HKLMSOFTWAREClassesTelevisionFanatic.Radio Key HKLMSOFTWAREClassesTelevisionFanatic.PseudoTransparentPlugin.1CLSID Key HKLMSOFTWAREClassesTelevisionFanatic.PseudoTransparentPlugin.1 Key HKLMSOFTWAREClassesTelevisionFanatic.PseudoTransparentPluginCurVer Key HKLMSOFTWAREClassesTelevisionFanatic.PseudoTransparentPluginCLSID Key HKLMSOFTWAREClassesTelevisionFanatic.PseudoTransparentPlugin Key HKLMSOFTWAREClassesTelevisionFanatic.MultipleButton.1CLSID Key HKLMSOFTWAREClassesTelevisionFanatic.MultipleButton.1 Key HKLMSOFTWAREClassesTelevisionFanatic.MultipleButtonCurVer Key HKLMSOFTWAREClassesTelevisionFanatic.MultipleButtonCLSID Key HKLMSOFTWAREClassesTelevisionFanatic.MultipleButton Key HKLMSOFTWAREClassesTelevisionFanatic.HTMLPanel.1CLSID Key HKLMSOFTWAREClassesTelevisionFanatic.HTMLPanel.1 Key HKLMSOFTWAREClassesTelevisionFanatic.HTMLPanelCurVer Key HKLMSOFTWAREClassesTelevisionFanatic.HTMLPanelCLSID Key HKLMSOFTWAREClassesTelevisionFanatic.HTMLPanel Key HKLMSOFTWAREClassesTelevisionFanatic.HTMLMenu.1CLSID Key HKLMSOFTWAREClassesTelevisionFanatic.HTMLMenu.1 Key HKLMSOFTWAREClassesTelevisionFanatic.HTMLMenuCurVer Key HKLMSOFTWAREClassesTelevisionFanatic.HTMLMenuCLSID Key HKLMSOFTWAREClassesTelevisionFanatic.HTMLMenu Key HKLMSOFTWAREClassesTelevisionFanatic.FeedManager.1CLSID Key HKLMSOFTWAREClassesTelevisionFanatic.FeedManager.1 Key HKLMSOFTWAREClassesTelevisionFanatic.FeedManagerCurVer Key HKLMSOFTWAREClassesTelevisionFanatic.FeedManagerCLSID Key HKLMSOFTWAREClassesTelevisionFanatic.FeedManager Key HKLMSOFTWAREClassesTelevisionFanatic.DynamicBarButton.1CLSID Key HKLMSOFTWAREClassesTelevisionFanatic.DynamicBarButton.1 Key HKLMSOFTWAREClassesTelevisionFanatic.DynamicBarButtonCurVer Key HKLMSOFTWAREClassesTelevisionFanatic.DynamicBarButtonCLSID Key HKLMSOFTWAREClassesTelevisionFanatic.DynamicBarButton18369B.exe %APPDATA%TelevisionFanaticauxstb.dll %APPDATA%TelevisionFanaticbar.dll %APPDATA%TelevisionFanaticbarsvc.exe %APPDATA%TelevisionFanaticbprtct.dll %APPDATA%TelevisionFanaticbrmon.exe %APPDATA%TelevisionFanaticbrstub.dll %APPDATA%TelevisionFanaticdatact.dll %APPDATA%TelevisionFanaticdlghk.dll %APPDATA%TelevisionFanaticdyn.dll %APPDATA%TelevisionFanaticfeedmg.dll %APPDATA%TelevisionFanatichighin.exe %APPDATA%TelevisionFanatichkstub.dll %APPDATA%TelevisionFanatichtmlmu.dll %APPDATA%TelevisionFanatichttpct.dll %APPDATA%TelevisionFanaticidle.dll %APPDATA%TelevisionFanaticieovr.dll %APPDATA%TelevisionFanaticimpipe.exe %APPDATA%TelevisionFanaticmedint.exe %APPDATA%TelevisionFanaticmlbtn.dll %APPDATA%TelevisionFanaticmsg.dll %APPDATA%TelevisionFanaticPlugin.dll %APPDATA%TelevisionFanaticradio.dll %APPDATA%TelevisionFanaticregfft.dll %APPDATA%TelevisionFanaticreghk.dll %APPDATA%TelevisionFanaticregiet.dll %APPDATA%TelevisionFanaticscript.dll %APPDATA%TelevisionFanaticskin.dll %APPDATA%TelevisionFanaticsknlcr.dll %APPDATA%TelevisionFanaticskplay.exe %APPDATA%TelevisionFanaticSrcAs.dll %APPDATA%TelevisionFanaticSrchMn.exe %APPDATA%TelevisionFanatictpinst.dll %APPDATA%TelevisionFanaticuabtn.dll %APPDATA%TelevisionFanaticAppIntegrator64.exe %APPDATA%TelevisionFanaticAppIntegratorStub64.dll %APPDATA%TelevisionFanaticBOOTSTRAP.JS %APPDATA%TelevisionFanaticffxtbr.jar %APPDATA%TelevisionFanaticCHROME.MANIFEST %APPDATA%TelevisionFanaticCREXT.DLL %APPDATA%TelevisionFanaticCrExtP64.exe %APPDATA%TelevisionFanaticDPNMNGR.DLL %APPDATA%TelevisionFanaticEXEMANAGER.DLL %APPDATA%TelevisionFanaticHpg64.dll %APPDATA%TelevisionFanaticINSTALL.RDF %APPDATA%TelevisionFanaticinstallKeys.js %APPDATA%TelevisionFanaticLOGO.BMP %APPDATA%TelevisionFanaticNP64Stub.dll %APPDATA%TelevisionFanaticT8EXTEX.DLL %APPDATA%TelevisionFanaticT8EXTPEX.DLL %APPDATA%TelevisionFanaticT8HTML.DLL %APPDATA%TelevisionFanaticT8RES.DLL %APPDATA%TelevisionFanaticT8TICKER.DLL %APPDATA%TelevisionFanaticVERIFY.DLL %APPDATA%TelevisionFanaticEIPlug.dll %APPDATA%TelevisionFanaticEZSETP.dll %APPDATA%TelevisionFanaticNP64EISb.dll %APPDATA%TelevisionFanatic%APPDATA%TelevisionFanatic %PROGRAMFILES%TelevisionFanatic %PROGRAMFILES%TelevisionFanaticEI %PROGRAMFILES%TelevisionFanaticEITelevisionFanaticauxstb.dll %PROGRAMFILES%TelevisionFanaticEITelevisionFanaticbar.dll %PROGRAMFILES%TelevisionFanaticEITelevisionFanaticbarsvc.exe %PROGRAMFILES%TelevisionFanaticEITelevisionFanaticbprtct.dll %PROGRAMFILES%TelevisionFanaticEITelevisionFanaticbrmon.exe %PROGRAMFILES%TelevisionFanaticEITelevisionFanaticbrstub.dll %PROGRAMFILES%TelevisionFanaticEITelevisionFanaticdatact.dll %PROGRAMFILES%TelevisionFanaticEITelevisionFanaticdlghk.dll %PROGRAMFILES%TelevisionFanaticEITelevisionFanaticdyn.dll %PROGRAMFILES%TelevisionFanaticEITelevisionFanaticfeedmg.dll %PROGRAMFILES%TelevisionFanaticEITelevisionFanatichighin.exe %PROGRAMFILES%TelevisionFanaticEITelevisionFanatichkstub.dll %PROGRAMFILES%TelevisionFanaticEITelevisionFanatichtmlmu.dll %PROGRAMFILES%TelevisionFanaticEITelevisionFanatichttpct.dll %PROGRAMFILES%TelevisionFanaticEITelevisionFanaticidle.dll %PROGRAMFILES%TelevisionFanaticEITelevisionFanaticieovr.dll %PROGRAMFILES%TelevisionFanaticEITelevisionFanaticimpipe.exe %PROGRAMFILES%TelevisionFanaticEITelevisionFanaticmedint.exe %PROGRAMFILES%TelevisionFanaticEITelevisionFanaticmlbtn.dll %PROGRAMFILES%TelevisionFanaticEITelevisionFanaticmsg.dll %PROGRAMFILES%TelevisionFanaticEITelevisionFanaticPlugin.dll %PROGRAMFILES%TelevisionFanaticEITelevisionFanaticradio.dll %PROGRAMFILES%TelevisionFanaticEITelevisionFanaticregfft.dll %PROGRAMFILES%TelevisionFanaticEITelevisionFanaticreghk.dll %PROGRAMFILES%TelevisionFanaticEITelevisionFanaticregiet.dll %PROGRAMFILES%TelevisionFanaticEITelevisionFanaticscript.dll %PROGRAMFILES%TelevisionFanaticEITelevisionFanaticskin.dll %PROGRAMFILES%TelevisionFanaticEITelevisionFanaticsknlcr.dll %PROGRAMFILES%TelevisionFanaticEITelevisionFanaticskplay.exe %PROGRAMFILES%TelevisionFanaticEITelevisionFanaticSrcAs.dll %PROGRAMFILES%TelevisionFanaticEITelevisionFanaticSrchMn.exe %PROGRAMFILES%TelevisionFanaticEITelevisionFanatictpinst.dll %PROGRAMFILES%TelevisionFanaticEITelevisionFanaticuabtn.dll %PROGRAMFILES%TelevisionFanaticEITelevisionFanaticAppIntegrator64.exe %PROGRAMFILES%TelevisionFanaticEITelevisionFanaticAppIntegratorStub64.dll %PROGRAMFILES%TelevisionFanaticEITelevisionFanaticBOOTSTRAP.JS %PROGRAMFILES%TelevisionFanaticEITelevisionFanaticffxtbr.jar %PROGRAMFILES%TelevisionFanaticEITelevisionFanaticCHROME.MANIFEST %PROGRAMFILES%TelevisionFanaticEITelevisionFanaticCREXT.DLL %PROGRAMFILES%TelevisionFanaticEITelevisionFanaticCrExtP64.exe %PROGRAMFILES%TelevisionFanaticEITelevisionFanaticDPNMNGR.DLL %PROGRAMFILES%TelevisionFanaticEITelevisionFanaticEXEMANAGER.DLL %PROGRAMFILES%TelevisionFanaticEITelevisionFanaticHpg64.dll %PROGRAMFILES%TelevisionFanaticEITelevisionFanaticINSTALL.RDF %PROGRAMFILES%TelevisionFanaticEITelevisionFanaticinstallKeys.js %PROGRAMFILES%TelevisionFanaticEITelevisionFanaticLOGO.BMP %PROGRAMFILES%TelevisionFanaticEITelevisionFanaticNP64Stub.dll %PROGRAMFILES%TelevisionFanaticEITelevisionFanaticT8EXTEX.DLL %PROGRAMFILES%TelevisionFanaticEITelevisionFanaticT8EXTPEX.DLL %PROGRAMFILES%TelevisionFanaticEITelevisionFanaticT8HTML.DLL %PROGRAMFILES%TelevisionFanaticEITelevisionFanaticT8RES.DLL %PROGRAMFILES%TelevisionFanaticEITelevisionFanaticT8TICKER.DLL %PROGRAMFILES%TelevisionFanaticEITelevisionFanaticVERIFY.DLL %PROGRAMFILES%TelevisionFanaticEITelevisionFanaticEIPlug.dll %PROGRAMFILES%TelevisionFanaticEITelevisionFanaticEZSETP.dll %PROGRAMFILES%TelevisionFanaticEITelevisionFanaticNP64EISb.dll %PROGRAMFILES%TelevisionFanaticEITelevisionFanatic%#MANIFEST#%18369B.exe %PROGRAMFILES%TelevisionFanaticauxstb.dll %PROGRAMFILES%TelevisionFanaticbar.dll %PROGRAMFILES%TelevisionFanaticbarsvc.exe %PROGRAMFILES%TelevisionFanaticbprtct.dll %PROGRAMFILES%TelevisionFanaticbrmon.exe %PROGRAMFILES%TelevisionFanaticbrstub.dll %PROGRAMFILES%TelevisionFanaticdatact.dll %PROGRAMFILES%TelevisionFanaticdlghk.dll %PROGRAMFILES%TelevisionFanaticdyn.dll %PROGRAMFILES%TelevisionFanaticfeedmg.dll %PROGRAMFILES%TelevisionFanatichighin.exe %PROGRAMFILES%TelevisionFanatichkstub.dll %PROGRAMFILES%TelevisionFanatichtmlmu.dll %PROGRAMFILES%TelevisionFanatichttpct.dll %PROGRAMFILES%TelevisionFanaticidle.dll %PROGRAMFILES%TelevisionFanaticieovr.dll %PROGRAMFILES%TelevisionFanaticimpipe.exe %PROGRAMFILES%TelevisionFanaticmedint.exe %PROGRAMFILES%TelevisionFanaticmlbtn.dll %PROGRAMFILES%TelevisionFanaticmsg.dll %PROGRAMFILES%TelevisionFanaticPlugin.dll %PROGRAMFILES%TelevisionFanaticradio.dll %PROGRAMFILES%TelevisionFanaticregfft.dll %PROGRAMFILES%TelevisionFanaticreghk.dll %PROGRAMFILES%TelevisionFanaticregiet.dll %PROGRAMFILES%TelevisionFanaticscript.dll %PROGRAMFILES%TelevisionFanaticskin.dll %PROGRAMFILES%TelevisionFanaticsknlcr.dll %PROGRAMFILES%TelevisionFanaticskplay.exe %PROGRAMFILES%TelevisionFanaticSrcAs.dll %PROGRAMFILES%TelevisionFanaticSrchMn.exe %PROGRAMFILES%TelevisionFanatictpinst.dll %PROGRAMFILES%TelevisionFanaticuabtn.dll %PROGRAMFILES%TelevisionFanaticAppIntegrator64.exe %PROGRAMFILES%TelevisionFanaticAppIntegratorStub64.dll %PROGRAMFILES%TelevisionFanaticBOOTSTRAP.JS %PROGRAMFILES%TelevisionFanaticffxtbr.jar %PROGRAMFILES%TelevisionFanaticCHROME.MANIFEST %PROGRAMFILES%TelevisionFanaticCREXT.DLL %PROGRAMFILES%TelevisionFanaticCrExtP64.exe %PROGRAMFILES%TelevisionFanaticDPNMNGR.DLL %PROGRAMFILES%TelevisionFanaticEXEMANAGER.DLL %PROGRAMFILES%TelevisionFanaticHpg64.dll %PROGRAMFILES%TelevisionFanaticINSTALL.RDF %PROGRAMFILES%TelevisionFanaticinstallKeys.js %PROGRAMFILES%TelevisionFanaticLOGO.BMP %PROGRAMFILES%TelevisionFanaticNP64Stub.dll %PROGRAMFILES%TelevisionFanaticT8EXTEX.DLL %PROGRAMFILES%TelevisionFanaticT8EXTPEX.DLL %PROGRAMFILES%TelevisionFanaticT8HTML.DLL %PROGRAMFILES%TelevisionFanaticT8RES.DLL %PROGRAMFILES%TelevisionFanaticT8TICKER.DLL %PROGRAMFILES%TelevisionFanaticVERIFY.DLL %PROGRAMFILES%TelevisionFanaticEIPlug.dll %PROGRAMFILES%TelevisionFanaticEZSETP.dll %PROGRAMFILES%TelevisionFanaticNP64EISb.dll %PROGRAMFILES%TelevisionFanatic%#MANIFEST#%18369B.exe %APPDATA%TelevisionFanaticauxstb.dll %APPDATA%TelevisionFanaticbar.dll %APPDATA%TelevisionFanaticbarsvc.exe %APPDATA%TelevisionFanaticbprtct.dll %APPDATA%TelevisionFanaticbrmon.exe %APPDATA%TelevisionFanaticbrstub.dll %APPDATA%TelevisionFanaticdatact.dll %APPDATA%TelevisionFanaticdlghk.dll %APPDATA%TelevisionFanaticdyn.dll %APPDATA%TelevisionFanaticfeedmg.dll %APPDATA%TelevisionFanatichighin.exe %APPDATA%TelevisionFanatichkstub.dll %APPDATA%TelevisionFanatichtmlmu.dll %APPDATA%TelevisionFanatichttpct.dll %APPDATA%TelevisionFanaticidle.dll %APPDATA%TelevisionFanaticieovr.dll %APPDATA%TelevisionFanaticimpipe.exe %APPDATA%TelevisionFanaticmedint.exe %APPDATA%TelevisionFanaticmlbtn.dll %APPDATA%TelevisionFanaticmsg.dll %APPDATA%TelevisionFanaticPlugin.dll %APPDATA%TelevisionFanaticradio.dll %APPDATA%TelevisionFanaticregfft.dll %APPDATA%TelevisionFanaticreghk.dll %APPDATA%TelevisionFanaticregiet.dll %APPDATA%TelevisionFanaticscript.dll %APPDATA%TelevisionFanaticskin.dll %APPDATA%TelevisionFanaticsknlcr.dll %APPDATA%TelevisionFanaticskplay.exe %APPDATA%TelevisionFanaticSrcAs.dll %APPDATA%TelevisionFanaticSrchMn.exe %APPDATA%TelevisionFanatictpinst.dll %APPDATA%TelevisionFanaticuabtn.dll %APPDATA%TelevisionFanaticAppIntegrator64.exe %APPDATA%TelevisionFanaticAppIntegratorStub64.dll %APPDATA%TelevisionFanaticBOOTSTRAP.JS %APPDATA%TelevisionFanaticffxtbr.jar %APPDATA%TelevisionFanaticCHROME.MANIFEST %APPDATA%TelevisionFanaticCREXT.DLL %APPDATA%TelevisionFanaticCrExtP64.exe %APPDATA%TelevisionFanaticDPNMNGR.DLL %APPDATA%TelevisionFanaticEXEMANAGER.DLL %APPDATA%TelevisionFanaticHpg64.dll %APPDATA%TelevisionFanaticINSTALL.RDF %APPDATA%TelevisionFanaticinstallKeys.js %APPDATA%TelevisionFanaticLOGO.BMP %APPDATA%TelevisionFanaticNP64Stub.dll %APPDATA%TelevisionFanaticT8EXTEX.DLL %APPDATA%TelevisionFanaticT8EXTPEX.DLL %APPDATA%TelevisionFanaticT8HTML.DLL %APPDATA%TelevisionFanaticT8RES.DLL %APPDATA%TelevisionFanaticT8TICKER.DLL %APPDATA%TelevisionFanaticVERIFY.DLL %APPDATA%TelevisionFanaticEIPlug.dll %APPDATA%TelevisionFanaticEZSETP.dll %APPDATA%TelevisionFanaticNP64EISb.dll %APPDATA%TelevisionFanatic%#MANIFEST#%18369B.exe Key HKLMSOFTWARETelevisionFanatic Key HKLMSOFTWAREMicrosoftWindowsCurrentVersionUninstallTelevisionFanaticbar Uninstall Internet Explorer Key HKLMSOFTWAREMicrosoftWindowsCurrentVersionUninstallTelevisionFanaticbar Uninstall Firefox Key HKLMSOFTWAREMicrosoftWindowsCurrentVersionExplorerBrowser Helper Objectscb41fc95-f1b3-4797-8bb6-1012ff62abba Key HKLMSOFTWAREMicrosoftWindowsCurrentVersionExplorerBrowser Helper Objects5d79f641-c168-40df-a32f-bacea7509e75 Key HKLMSOFTWAREClassesTelevisionFanatic.XMLSessionPlugin.1CLSID Key HKLMSOFTWAREClassesTelevisionFanatic.XMLSessionPlugin.1 Key HKLMSOFTWAREClassesTelevisionFanatic.XMLSessionPluginCurVer Key HKLMSOFTWAREClassesTelevisionFanatic.XMLSessionPluginCLSID Key HKLMSOFTWAREClassesTelevisionFanatic.XMLSessionPlugin Key HKLMSOFTWAREClassesTelevisionFanatic.UrlAlertButton.1CLSID Key HKLMSOFTWAREClassesTelevisionFanatic.UrlAlertButton.1 Key HKLMSOFTWAREClassesTelevisionFanatic.UrlAlertButtonCurVer Key HKLMSOFTWAREClassesTelevisionFanatic.UrlAlertButtonCLSID Key HKLMSOFTWAREClassesTelevisionFanatic.UrlAlertButton Key HKLMSOFTWAREClassesTelevisionFanatic.ToolbarProtector.1CLSID Key HKLMSOFTWAREClassesTelevisionFanatic.ToolbarProtector.1 Key HKLMSOFTWAREClassesTelevisionFanatic.ToolbarProtectorCurVer Key HKLMSOFTWAREClassesTelevisionFanatic.ToolbarProtectorCLSID Key HKLMSOFTWAREClassesTelevisionFanatic.ToolbarProtector Key HKLMSOFTWAREClassesTelevisionFanatic.ThirdPartyInstaller.1CLSID Key HKLMSOFTWAREClassesTelevisionFanatic.ThirdPartyInstaller.1 Key HKLMSOFTWAREClassesTelevisionFanatic.ThirdPartyInstallerCurVer Key HKLMSOFTWAREClassesTelevisionFanatic.ThirdPartyInstallerCLSID Key HKLMSOFTWAREClassesTelevisionFanatic.ThirdPartyInstaller Key HKLMSOFTWAREClassesTelevisionFanatic.SkinLauncherSettings.1CLSID Key HKLMSOFTWAREClassesTelevisionFanatic.SkinLauncherSettings.1 Key HKLMSOFTWAREClassesTelevisionFanatic.SkinLauncherSettingsCurVer Key HKLMSOFTWAREClassesTelevisionFanatic.SkinLauncherSettingsCLSID Key HKLMSOFTWAREClassesTelevisionFanatic.SkinLauncherSettings Key HKLMSOFTWAREClassesTelevisionFanatic.SkinLauncher.1CLSID Key HKLMSOFTWAREClassesTelevisionFanatic.SkinLauncher.1 Key HKLMSOFTWAREClassesTelevisionFanatic.SkinLauncherCurVer Key HKLMSOFTWAREClassesTelevisionFanatic.SkinLauncherCLSID Key HKLMSOFTWAREClassesTelevisionFanatic.SkinLauncher Key HKLMSOFTWAREClassesTelevisionFanatic.SettingsPlugin.1CLSID Key HKLMSOFTWAREClassesTelevisionFanatic.SettingsPlugin.1 Key HKLMSOFTWAREClassesTelevisionFanatic.SettingsPluginCurVer Key HKLMSOFTWAREClassesTelevisionFanatic.SettingsPluginCLSID Key HKLMSOFTWAREClassesTelevisionFanatic.SettingsPlugin Key HKLMSOFTWAREClassesTelevisionFanatic.ScriptButton.1CLSID Key HKLMSOFTWAREClassesTelevisionFanatic.ScriptButton.1 Key HKLMSOFTWAREClassesTelevisionFanatic.ScriptButtonCurVer Key HKLMSOFTWAREClassesTelevisionFanatic.ScriptButtonCLSID Key HKLMSOFTWAREClassesTelevisionFanatic.ScriptButton Key HKLMSOFTWAREClassesTelevisionFanatic.RadioSettings.1CLSID Key HKLMSOFTWAREClassesTelevisionFanatic.RadioSettings.1 Key HKLMSOFTWAREClassesTelevisionFanatic.RadioSettingsCurVer Key HKLMSOFTWAREClassesTelevisionFanatic.RadioSettingsCLSID Key HKLMSOFTWAREClassesTelevisionFanatic.RadioSettings Key HKLMSOFTWAREClassesTelevisionFanatic.Radio.1CLSID Key HKLMSOFTWAREClassesTelevisionFanatic.Radio.1 Key HKLMSOFTWAREClassesTelevisionFanatic.RadioCurVer Key HKLMSOFTWAREClassesTelevisionFanatic.RadioCLSID Key HKLMSOFTWAREClassesTelevisionFanatic.Radio Key HKLMSOFTWAREClassesTelevisionFanatic.PseudoTransparentPlugin.1CLSID Key HKLMSOFTWAREClassesTelevisionFanatic.PseudoTransparentPlugin.1 Key HKLMSOFTWAREClassesTelevisionFanatic.PseudoTransparentPluginCurVer Key HKLMSOFTWAREClassesTelevisionFanatic.PseudoTransparentPluginCLSID Key HKLMSOFTWAREClassesTelevisionFanatic.PseudoTransparentPlugin Key HKLMSOFTWAREClassesTelevisionFanatic.MultipleButton.1CLSID Key HKLMSOFTWAREClassesTelevisionFanatic.MultipleButton.1 Key HKLMSOFTWAREClassesTelevisionFanatic.MultipleButtonCurVer Key HKLMSOFTWAREClassesTelevisionFanatic.MultipleButtonCLSID Key HKLMSOFTWAREClassesTelevisionFanatic.MultipleButton Key HKLMSOFTWAREClassesTelevisionFanatic.HTMLPanel.1CLSID Key HKLMSOFTWAREClassesTelevisionFanatic.HTMLPanel.1 Key HKLMSOFTWAREClassesTelevisionFanatic.HTMLPanelCurVer Key HKLMSOFTWAREClassesTelevisionFanatic.HTMLPanelCLSID Key HKLMSOFTWAREClassesTelevisionFanatic.HTMLPanel Key HKLMSOFTWAREClassesTelevisionFanatic.HTMLMenu.1CLSID Key HKLMSOFTWAREClassesTelevisionFanatic.HTMLMenu.1 Key HKLMSOFTWAREClassesTelevisionFanatic.HTMLMenuCurVer Key HKLMSOFTWAREClassesTelevisionFanatic.HTMLMenuCLSID Key HKLMSOFTWAREClassesTelevisionFanatic.HTMLMenu Key HKLMSOFTWAREClassesTelevisionFanatic.FeedManager.1CLSID Key HKLMSOFTWAREClassesTelevisionFanatic.FeedManager.1 Key HKLMSOFTWAREClassesTelevisionFanatic.FeedManagerCurVer Key HKLMSOFTWAREClassesTelevisionFanatic.FeedManagerCLSID Key HKLMSOFTWAREClassesTelevisionFanatic.FeedManager Key HKLMSOFTWAREClassesTelevisionFanatic.DynamicBarButton.1CLSID Key HKLMSOFTWAREClassesTelevisionFanatic.DynamicBarButton.1 Key HKLMSOFTWAREClassesTelevisionFanatic.DynamicBarButtonCurVer Key HKLMSOFTWAREClassesTelevisionFanatic.DynamicBarButtonCLSID Key HKLMSOFTWAREClassesTelevisionFanatic.DynamicBarButton18369B.exe Key HKLMSOFTWARETelevisionFanatic Key HKLMSOFTWAREMicrosoftWindowsCurrentVersionUninstallTelevisionFanaticbar Uninstall Internet Explorer Key HKLMSOFTWAREMicrosoftWindowsCurrentVersionUninstallTelevisionFanaticbar Uninstall Firefox Key HKLMSOFTWAREMicrosoftWindowsCurrentVersionExplorerBrowser Helper Objectscb41fc95-f1b3-4797-8bb6-1012ff62abba Key HKLMSOFTWAREMicrosoftWindowsCurrentVersionExplorerBrowser Helper Objects5d79f641-c168-40df-a32f-bacea7509e75 Key HKLMSOFTWAREClassesTelevisionFanatic.XMLSessionPlugin.1CLSID Key HKLMSOFTWAREClassesTelevisionFanatic.XMLSessionPlugin.1 Key HKLMSOFTWAREClassesTelevisionFanatic.XMLSessionPluginCurVer Key HKLMSOFTWAREClassesTelevisionFanatic.XMLSessionPluginCLSID Key HKLMSOFTWAREClassesTelevisionFanatic.XMLSessionPlugin Key HKLMSOFTWAREClassesTelevisionFanatic.UrlAlertButton.1CLSID Key HKLMSOFTWAREClassesTelevisionFanatic.UrlAlertButton.1 Key HKLMSOFTWAREClassesTelevisionFanatic.UrlAlertButtonCurVer Key HKLMSOFTWAREClassesTelevisionFanatic.UrlAlertButtonCLSID Key HKLMSOFTWAREClassesTelevisionFanatic.UrlAlertButton Key HKLMSOFTWAREClassesTelevisionFanatic.ToolbarProtector.1CLSID Key HKLMSOFTWAREClassesTelevisionFanatic.ToolbarProtector.1 Key HKLMSOFTWAREClassesTelevisionFanatic.ToolbarProtectorCurVer Key HKLMSOFTWAREClassesTelevisionFanatic.ToolbarProtectorCLSID Key HKLMSOFTWAREClassesTelevisionFanatic.ToolbarProtector Key HKLMSOFTWAREClassesTelevisionFanatic.ThirdPartyInstaller.1CLSID Key HKLMSOFTWAREClassesTelevisionFanatic.ThirdPartyInstaller.1 Key HKLMSOFTWAREClassesTelevisionFanatic.ThirdPartyInstallerCurVer Key HKLMSOFTWAREClassesTelevisionFanatic.ThirdPartyInstallerCLSID Key HKLMSOFTWAREClassesTelevisionFanatic.ThirdPartyInstaller Key HKLMSOFTWAREClassesTelevisionFanatic.SkinLauncherSettings.1CLSID Key HKLMSOFTWAREClassesTelevisionFanatic.SkinLauncherSettings.1 Key HKLMSOFTWAREClassesTelevisionFanatic.SkinLauncherSettingsCurVer Key HKLMSOFTWAREClassesTelevisionFanatic.SkinLauncherSettingsCLSID Key HKLMSOFTWAREClassesTelevisionFanatic.SkinLauncherSettings Key HKLMSOFTWAREClassesTelevisionFanatic.SkinLauncher.1CLSID Key HKLMSOFTWAREClassesTelevisionFanatic.SkinLauncher.1 Key HKLMSOFTWAREClassesTelevisionFanatic.SkinLauncherCurVer Key HKLMSOFTWAREClassesTelevisionFanatic.SkinLauncherCLSID Key HKLMSOFTWAREClassesTelevisionFanatic.SkinLauncher Key HKLMSOFTWAREClassesTelevisionFanatic.SettingsPlugin.1CLSID Key HKLMSOFTWAREClassesTelevisionFanatic.SettingsPlugin.1 Key HKLMSOFTWAREClassesTelevisionFanatic.SettingsPluginCurVer Key HKLMSOFTWAREClassesTelevisionFanatic.SettingsPluginCLSID Key HKLMSOFTWAREClassesTelevisionFanatic.SettingsPlugin Key HKLMSOFTWAREClassesTelevisionFanatic.ScriptButton.1CLSID Key HKLMSOFTWAREClassesTelevisionFanatic.ScriptButton.1 Key HKLMSOFTWAREClassesTelevisionFanatic.ScriptButtonCurVer Key HKLMSOFTWAREClassesTelevisionFanatic.ScriptButtonCLSID Key HKLMSOFTWAREClassesTelevisionFanatic.ScriptButton Key HKLMSOFTWAREClassesTelevisionFanatic.RadioSettings.1CLSID Key HKLMSOFTWAREClassesTelevisionFanatic.RadioSettings.1 Key HKLMSOFTWAREClassesTelevisionFanatic.RadioSettingsCurVer Key HKLMSOFTWAREClassesTelevisionFanatic.RadioSettingsCLSID Key HKLMSOFTWAREClassesTelevisionFanatic.RadioSettings Key HKLMSOFTWAREClassesTelevisionFanatic.Radio.1CLSID Key HKLMSOFTWAREClassesTelevisionFanatic.Radio.1 Key HKLMSOFTWAREClassesTelevisionFanatic.RadioCurVer Key HKLMSOFTWAREClassesTelevisionFanatic.RadioCLSID Key HKLMSOFTWAREClassesTelevisionFanatic.Radio Key HKLMSOFTWAREClassesTelevisionFanatic.PseudoTransparentPlugin.1CLSID Key HKLMSOFTWAREClassesTelevisionFanatic.PseudoTransparentPlugin.1 Key HKLMSOFTWAREClassesTelevisionFanatic.PseudoTransparentPluginCurVer Key HKLMSOFTWAREClassesTelevisionFanatic.PseudoTransparentPluginCLSID Key HKLMSOFTWAREClassesTelevisionFanatic.PseudoTransparentPlugin Key HKLMSOFTWAREClassesTelevisionFanatic.MultipleButton.1CLSID Key HKLMSOFTWAREClassesTelevisionFanatic.MultipleButton.1 Key HKLMSOFTWAREClassesTelevisionFanatic.MultipleButtonCurVer Key HKLMSOFTWAREClassesTelevisionFanatic.MultipleButtonCLSID Key HKLMSOFTWAREClassesTelevisionFanatic.MultipleButton Key HKLMSOFTWAREClassesTelevisionFanatic.HTMLPanel.1CLSID Key HKLMSOFTWAREClassesTelevisionFanatic.HTMLPanel.1 Key HKLMSOFTWAREClassesTelevisionFanatic.HTMLPanelCurVer Key HKLMSOFTWAREClassesTelevisionFanatic.HTMLPanelCLSID Key HKLMSOFTWAREClassesTelevisionFanatic.HTMLPanel Key HKLMSOFTWAREClassesTelevisionFanatic.HTMLMenu.1CLSID Key HKLMSOFTWAREClassesTelevisionFanatic.HTMLMenu.1 Key HKLMSOFTWAREClassesTelevisionFanatic.HTMLMenuCurVer Key HKLMSOFTWAREClassesTelevisionFanatic.HTMLMenuCLSID Key HKLMSOFTWAREClassesTelevisionFanatic.HTMLMenu Key HKLMSOFTWAREClassesTelevisionFanatic.FeedManager.1CLSID Key HKLMSOFTWAREClassesTelevisionFanatic.FeedManager.1 Key HKLMSOFTWAREClassesTelevisionFanatic.FeedManagerCurVer Key HKLMSOFTWAREClassesTelevisionFanatic.FeedManagerCLSID Key HKLMSOFTWAREClassesTelevisionFanatic.FeedManager Key HKLMSOFTWAREClassesTelevisionFanatic.DynamicBarButton.1CLSID Key HKLMSOFTWAREClassesTelevisionFanatic.DynamicBarButton.1 Key HKLMSOFTWAREClassesTelevisionFanatic.DynamicBarButtonCurVer Key HKLMSOFTWAREClassesTelevisionFanatic.DynamicBarButtonCLSID Key HKLMSOFTWAREClassesTelevisionFanatic.DynamicBarButton
Read More
1 2 3 162
Logo
Copyright © 2022, ErrorTools. All Rights Reserved
Trademarks: Microsoft Windows logos are registered trademarks of Microsoft. Disclaimer: ErrorTools.com is not affiliated with Microsoft, nor claim direct affiliation.
The information on this page is provided for information purposes only.
DMCA.com Protection Status