How To Speed Up PC Startup

[vc_row][vc_column][vc_column_text]

Boost PC Bootup

Hello and welcome to How To Speed Up PC Startup where we will explore how to make your PC boot-up system faster. When your computer gets older, you'll see a decrease in your PC's load time. This can be very annoying and frustrating, especially if you're not accustomed to exercising patience.

Your computer's boot time does not need to be sluggish, even if it's old.

While there are reasons why your computer is acting up and giving you the 'slow' sign, there are ways that you can optimize how fast your PC starts up at the beginning. Once you start speeding things up, you’ll never look back!

Start With your BIOS

You may need to tweak your PC’s start-up menu. Since the majority of issues encountered on your PC might not be related to the software running in the back end, you can focus on your computer's hardware.

The ideal way to speed up your PC startup is to access your computer's BIOS when booting up. This can be accessed by holding the DEL key or whichever button is used to tap into your BIOS.

You can change where your computer boots from. You can opt to put your hard disk right at the top which would elude searching for CDs and other storage media devices when your PC starts up.

Tweak Startup Programs

There are many programs that execute when your computer starts up. These programs normally run in the back end. Most times back-end programs are unnecessary and do not contribute to the productivity or performance of your computer when in use.

Instead of allowing these programs to execute when your PC boots up, why not disable them?  By deactivating these programs, you'll be reducing the amount of CPU usage which will accelerate your PC performance.

Additionally, there are some installed programs that you never use. Instead of leaving these programs to occupy needed space on your computer system, you can uninstall these to create more room on your computer. This actually increases your PC startup speed.

Put Malware on a Leash

Malware and spyware can cause problems for your start-up. A slow computer is an indication that your computer is plagued by malware.

This affects your computer's boot time and whether or not it'll startup as quickly as you intend it to. If your computer gives you the 'virus alert', you need to download an antivirus program that will be able to eradicate all virus threats.

Be mindful of where you download antivirus programs since many of them are viruses or have viruses attached to them. Some viruses are tough on your computer.

This means that if an antivirus works for your best friend, it may not work for you. Since malware differs in functions and the havoc they cause, it's best to know what you're up against by doing research.

Clean Your Registry

You should also clean out your registry. The fewer unused registry keys you have lying around on your computer, the faster your computer will go.

Getting a good registry cleaner from a clean source can help tremendously, but be careful; registry cleaners have the potential to be very dangerous so make sure you backup everything on your computer and only download registry cleaners from a reliable source.

By implementing the above tips, you'll see quick improvements when using your computer.

On the other hand, if your computer is going through some system-related issues that have to get fixed, there is a one-click solution known as Restoro you could check out to resolve them.

This program is a useful tool that could repair corrupted registries and optimize your PC’s overall performance. Aside from that, it also cleans out your computer for any junk or corrupted files that help you eliminate any unwanted files from your system. This is basically a solution that’s within your grasp with just a click. It’s easy to use as it is user-friendly. For a complete set of instructions in downloading and using it, refer to the steps below

Perform a full system scan using Restoro. To do so, follow the instructions below.

  1. Download and install Restoro from the official site.
  2. Once the installation process is completed, run Restoro to perform a full system scan.
    restoro application screen
  3. After the scan is completed click the “Start Repair” button.
    restoro application screen

[/vc_column_text][/vc_column][/vc_row]

If you like to learn and find out more about various Windows errors, and how to repair them go to our vast archive or use search to find articles that will explain and help you in solving your issue.
However, if you prefer to do things fast and with automatization then we are proposing to use an automated solution for your issues. The application that we are recommending is Advanced System Repair Pro
Advanced System Repair utilizes multiple tools all in one to give you a quick, simple, reliable, and very thorough diagnosis of your PC. It brings you all the tools you need in one program to clean, fix, protect, optimize and boost your PC!
1-Click Maintenance
All the tools to make it simple and easy! It's like having a professional technician at the click of a mouse.

Junk Cleaner
Keeping your computer free from unnecessary clutter also helps make your computer last longer. Like any other machine, if you keep it clean and take care of it, it will serve you better for longer!

Optimize background apps
Optimize applications background activity with the built-in Application Optimizer feature.

Disk Defrag
With a simple 1-click, Advanced System Repair speeds up your PC by assembling fragmented files on your machine and organizing them more efficiently.

Malware Removal
Finds and removes all types of harmful malware including trojans, worms, bots, adware, spyware, PUPs, and more!

Privacy Cleaner
The all-in-one privacy suite to Clean Your Tracks & Protect Your Privacy! Make your computer safe, secure, and more efficient!

System Tweak/Optimizer
ASR will analyze your complete system and settings to adjust your PC to function at its maximum performance.

Registry Cleaner
Over time, as you install and uninstall applications, the registry can become cluttered with old entries and broken settings which can result in program crashes, and annoying messages and slow the computer down.
Visit our Advanced System Repair Pro Download page to inform yourself about all the benefits of this software and get a free trial copy of it.
advanced system repair pro

Advanced System Repair Pro

One-click automated PC repair solution
ASR logo
With Advanced System Repair Pro you can easily
Replace damaged files
Restore performance
Free disk space
Remove Malware
Protects WEB browser
Remove Viruses
Stop PC freezing
DOWNLOAD
Privacy Policy | Terms of Use | Uinstall
Advanced System Repair Pro is compatible with all versions of Microsoft Windows including Windows 11

Share this article:

You might also like

Star Wars movies & series, chronological order
Besides Star Trek, Star Wars was one of my favorite movie franchises, as a kid, it was the first movie I have seen in Theatre and over the years I have rewatched and reached each entry in the franchise. It has significantly grown over the years, sometimes for worse, sometimes for better but what it always did is explored and expanded lore, characters and brought stories interesting and original enough. The Series has always been original and innovative enough with interesting characters and locations and it managed to capture the imagination of many viewers around the globe. If you or someone else is watching the franchise for the first time it is recommended actually to watch everything how it was released because of some information that is spoiled in prequels that could spoil some interesting revelations later. But if you have already watched everything and would like to follow the story from the beginning to end we are presenting you with the list of all TV series and movies in tar Wars canon in their chronological order so you can enjoy some good character developments and see the whole story unfold how it was meant to be. In the following list, as told, we are including TV series (both released and currently in production) in the Star Wars canon.

Chronological order of Star Wars franchise:

Star Wars: The Acolyte Acolyte is upcoming TV series exploring times in the old republic and the rise of the dark side within Star Wars Episode I: The Phantom Menace The first movie entry in the franchise introducing some key characters who will go through various adventures yet to come Star Wars Episode II: Attack of the Clones Continuation of story and deepening of the plot laid out in the previous movie Star Wars: The Clone Wars Animated TV series exploring war in more detail, set in the period between episodes 2 and 3, before series there is clone wars full length animated movie titles simply as Star wars clone wars serving as a pilot to series. Star Wars Episode III: Revenge of the Sith Last movie in so-called prequel trilogy finishing some stories and finalizing some character arcs Star Wars: The Bad Batch Upcoming animated series Bad batch will focus on few troopers find their way in changing the galaxy Solo: A Star Wars Story Story of everyone loved Han Solo character, this origin story will introduce you to some key characters in the later entry of series Obi-Wan Kenobi Upcoming series that will focus on everyone's favorite JEDI master Obi-Wan Star Wars Rebels Animated series exploring first sparks of forming rebel alliance against dreaded empire Andor Upcoming series set five years before the events of Rogue One, the series follows rebel spy Cassian Andor during the formative years of the Rebellion. Star Wars Rogue One Full feature movie setting up events for episode 4 Star Wars Episode IV: A New Hope First Star Wars movie, little outdated today with special effects but with a strong story and introducing some new characters which will become main icons of franchise Star Wars Episode V: The Empire Strikes Back Arguably the best movie in the whole series, leaning more to serious note and darker than previous entries. Besides Episode 3 this is the most serious and dark movie of the series. Star Wars Episode VI: Return of the Jedi Last movie entry in the so-called original trilogy, finishing some stories and wrapping up one era. Star Wars The Mandalorian Set after episode 6 show focuses on a Mandalorian bounty hunter character following his adventures in the galaxy. The Book of Boba Fett Upcoming Mandalorian spin-off TV series focusing on Bobba Fet, one of most loved bounty hunter characters in the Star Wars universe Ahsoka Star Wars: Ahsoka is an upcoming live-action television limited series exploring the character of Ashoka Tano first seen in Clone Wars Rangers of the New Republic Set within the timeline of The Mandalorian, Rangers of the New Republic is a new upcoming live-action series. Star Wars: Resistance Animated series exploring resistance against first-order setting up events to be followed in the newest trilogy of movies. Star Wars Episode VII: The Force Awakens First full feature movie set in the post-empire era introducing new characters and bringing back some fan favorites. Star Wars Episode VIII: The Last Jedi The second movie in the last order trilogy, continuing stories of previously establishes characters Star Wars Episode IX: The Rise of Skywalker Last entry in new order trilogy of movies, finishing some open stories and concluding arcs for characters previously introduced in Force Awakens. That's it, chronological order of canon TV shows and movies of the Star Wars franchise. We are sure there will be more movies and shows in the future and someday we will revisit this list to include them as well. Until then, may the force be with you. If you would like to read more helpful articles and tips about various software and hardware visit errortools.com daily.
Read More
Ordinal not found, dynamic link library Error
If you encounter an error message saying, “The ordinal xxx could not be located in the dynamic link library C:/Program Files (x86)/Microsoft VS Code Insiderscode – insiders.exe“ and you see a reference of a missing DLL file, then this indicates that the software is trying to locate the related DLL file, however, it is missing, hence the error. The error mentioned “Ordinal” which refers to the order of a number mathematically, e.g. 1st, 2nd, etc. And in this error message, the ordinal is referring to an Xth file of an XX.DLL file which is missing which is why you’re getting this kind of error. When you get this particular error, it means that your computer is missing the Microsoft Visual C++ Redistributable program. As per the error message, XXX is a number that in turn is the Ordinal. There is also another common error related to Ordinal which says, “The ordinal 12404 could not be located in the dynamic link library mfc90u.dl”. The error message could be referring to any DLL in the message. And since all these DLL files are part of the package, the error changes quite a bit as the Visual Studio looks for that DLL file. To fix this error, here are some suggestions that might be of help.

Option 1 – Try installing Microsoft Visual C++ Redistributable

As pointed out earlier, the error pops up when the Microsoft Visual C++ Redistributable program is missing on your computer. Thus, you need to download it from the official website of Microsoft. Once you’ve downloaded the Microsoft Visual C++ Feature Pack Redistributable Package, install it and then check if the error is now fixed.

Option 2 – Try to install OpenSSL

If you encounter the same error message but it points out that the LIBEAY32.DLL file is missing, then you have to install OpenSSL. In such a case, you will see the following error message:
“Ordinal not found. The Ordinal [Xxxx] could not be located in the Dynamic Link Library Libeay32.dll.”
 Make sure that when you install OpenSSL, you do it into the Windows system directory since the Libeay32.dll file is related to security.

Option 3 – Try to check Windows Updates

There are instances when Microsoft rolls out the framework and related updates via Windows Updates. It could be that an update related to DLL is still pending which is why you need to check Windows Updates. To do so, go to Settings > Update and Security and from there check if there is any pending update. If there is, you need to install that update and then restart your computer if needed.
Read More
How to add Windows Store games to Steam
  1. Open the Steam app and select Add a Game.
  2. Click Add a Non-Steam Game and choose Browse.
  3. Access: C:\Windows\
  4. Then, scroll down, open explorer.exe, and click Add Selected Programs.
  5. Hold Windows + R keyboard shortcut, type shell:AppsFolder, then press Enter.
  6. Select the game you want to add, right-click on it, and choose Create Shortcut.
  7. Right-click on the desktop shortcut, go to Properties, type in Target Type or Target, delete the shortcut.
  8. Go to Steam, access Library, select Games, right-click on the game explorer, choose Properties, choose the name of the game you want to add.
  9. Choose Select Launch Options, write: shell:AppsFolder\<Target Type or Target Here>
  10. Click OK, then Close.
If you would like to read more helpful articles and tips about various software and hardware visit errortools.com daily.
Read More
Fix oobesettings error inside Windows 11
oobesettings
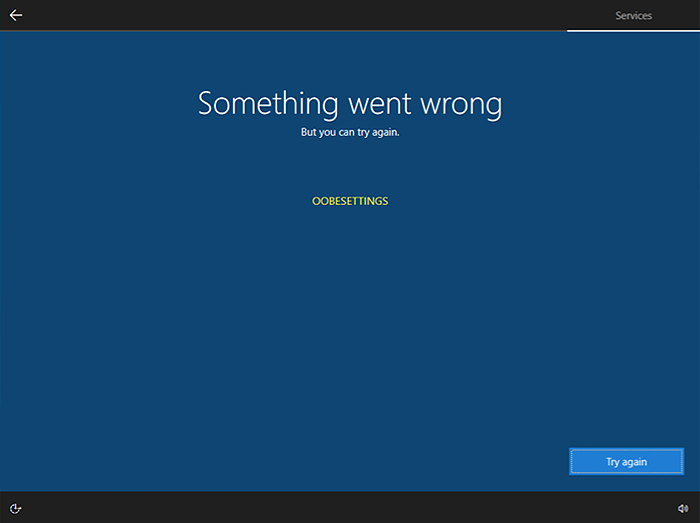
Oobesttings error is the blue screen of death error caused by some faulty settings inside the Windows registry. The good news is that this is not a hard error to fix and if by any chance you are one of the unfortunate people getting this dreaded annoying error, please do keep reading because we have several things that you can do in order to eliminate this issue from your computer.

Reboot your system

This is the easiest and straightforward solution and can work sometimes since if the system has not been properly rebooted in a while memory could be filled with various processes and it can trigger oobesettings error. A simple restart of the system can solve the issue by decluttering files and emptying memory.

Scan and repair with SFC

If rebooting the system was not helpful and sadly you still receive an error then let's scan and repair system files by using Windows built-in tool SFC. In order to use this, we will have to run the command prompt in elevated administrator mode. Follow instructions closely. First click on the search icon on the taskbar and type in CMD The command prompt will show as a search result, on the right side click on Run as administrator. Once it opens type in following command: sfc /scannow and press ENTER Wait for the process to finish completely and restart your device after.

Repair the system registry

If the SFC scan has not repaired the issue then we will move to the next solution that involves repairing the system registry itself. Please note that you need to follow step-by-step for provided instructions since playing with the system registry can cause some serious issues if not done properly and can even render the system unstable. That being said, let's begin: Press ⊞ WINDOWS + R to open Windows run dialog Type inside regedit and press ENTER Inside registry editor locate the following key: HKEY_LOCAL_MACHINE/SYSTEM/CurrentControlSet/Control/Session Manager/ Memory Management. and click on it to see properties Inside the properties right-click on CommitLimit value and choose delete. Confirm with yes. Close registry editor and reboot your computer.

Reset Windows 11

If even clearing key inside the registry editor has not helped next step would be to reset the system itself. Press ⊞ WINDOWS + I to open Windows settings and click on System on the left. Inside on the right part click on Recovery In recovery click on the button next to Reset this PC that says Reset PC Choose between keep my files and remove everything (a better option is remove everything, but be sure that you have all your files on a separate drive backed up) Choose between Cloud Download or Local reinstall. Click on next to confirm choices and after that on Reset to start the reset process. Follow onscreen instructions until it is fully done.
Read More
Fix Err_Connection_Closed in Windows
If you suddenly encounter an error message that says, “This webpage is not available, Err_Connection_Closed” while browsing the internet or visiting a website and the website fails to load, then it means that there is some problem with your network connection. Similarly, you may also get other error messages like “Err_Network_Changed”, “Err_Connection_Reset” and “Err_Internet_Disconnected” errors in different browsers like Chrome, Firefox, and Edge. The problem lies in your Windows 10 computer and your internet connection since this is a network issue. So before you troubleshoot the problem using the suggestions given below, you need to refresh your browser first or you could also tap Ctrl + F5 on your keyboard to hard reload the webpage. If you’re still getting the same error message, then proceed to the guide below.

Option 1 – Try removing the Proxy

Removing the Proxy might also help you in fixing the “This webpage is not available, Err_Connection_Closed” error. Here’s how you can do it:
  • Tap the Win + R keys to open the Run dialog box.
  • Then type “inetcpl.cpl” in the field and hit Enter to pull up the Internet Properties.
  • After that, go to the Connections tab and select the LAN settings.
  • From there. Uncheck the “Use a Proxy Server” option for your LAN and then make sure that the “Automatically detect settings” option is checked.
  • Now click the OK and the Apply buttons.
  • Restart your PC.
Note: If you are using a third-party proxy service, you have to disable it.

Option 2 – Try using Google Public DNS

If the first option didn’t resolve the issue, you can try to use the Public DNS by Google and see if it can help fix the problem. You have to modify the DNS settings in your system explicitly and use the DNS IP addresses.
  • The first thing you have to do is right-click on the network icon in the Taskbar and select Network and Sharing Center.
  • Next, click on the “Change Adapter Settings” option.
  • After that, search for the network connection that you are using to connect to the internet. Note that the option might be “Wireless Connection” or “Local Area Connection”.
  • Right-click on your network connection and click on Properties.
  • Then select the new window to choose the “Internet Protocol 4 (TCP/IPv4)” option.
  • After that, click on the Properties button and click the checkbox in the new window for the option “Use the following DNS server addresses”.
  • Type in “8.8.8.8” and “8.8.4.4” and click OK and exit.

Option 3 – Reset Winsock, TCP/IP & Flush DNS

Resetting Winsock, TCP/IP, and flushing DNS might help you resolve the Err_Connection_Closed error. To do so, follow these steps:
  • Right-click on the Start button and click on Command Prompt (administrator) so you can pull up an elevated Command Prompt.
  • After that, execute each one of the commands listed below. And after you typed in one after the other, you have to hit Enter.
  1. netsh winsock reset – type in this command to reset Winsock
  2. netsh int ip reset resettcpip.txt – type in this command to reset TCP/IP
  3. ipconfig /flushdns – type in this command to flush the DNS cache
  • Next, restart your PC and check if the problem’s fixed.

Option 4 – Disable both the Antivirus program and Firewall temporarily

There are times when antivirus programs and the firewall blocks a website that they consider to be malicious or even because of false-positive effects which is why you have to disable these programs temporarily as it might be the reason why you’re getting the “This webpage is not available, Err_Connection_Closed” error when trying to browse the internet.

Option 5 – Try to check the network cables and then restart your router

The most obvious thing you can do first is to try checking if the network cables connected to your computer or router are properly connected or not. If it turns out that some network cables are not connected properly, then it’s probably why you’re getting this error.

Option 6 –Try a Network Reset

When all else fails, you might have to consider resetting your entire network settings. Simply follow the steps below to do so.
  • Click on the Start button and then click on the gear-like icon for Settings to open it.
  • Next, select Network and Internet.
  • Then scroll down and look for “Network Reset” – click on it and then click on the Reset now button.
Read More
uTorrent is not responding on Windows
As you probably know, uTorrent is one of the best software you can use to download torrents over the web. It has been around for many years now and is trusted by lots of users despite having competition here and there. Over the years, uTorrent has changed as it is now packed with tons of features. What’s more, is that this program is no longer the smallest client when it comes to file size. However, just like other software, it is not always working smoothly as there are instances when it’s not responding even when it’s already running. The first thing you can do is to close all the processes of uTorrent and then try opening it again. There are various reasons why your uTorrent program fails to respond. However, it is most likely caused by some virus that was brought on by the file you’ve just downloaded. On the other hand, it could also be caused by other factors as well but whichever the case is, here are some fixes you can check out to resolve the uTorrent issue.

Option 1 – Delete the file you’ve downloaded

As pointed out earlier, uTorrent might have failed to respond due to some file you’ve just downloaded which is why you have to delete it since there really is no point in keeping a file that’s causing this kind of issue. After deleting the file, try opening uTorrent again and see if it now works or not.

Option 2 – Allow uTorrent to run via Windows Defender Firewall

  • Click on the Cortana or the Start button and type “firewall” in the field.
  • From the search results that appear, click on the “Allow an app through Windows firewall”.
  • After that, a new window will pop up and from there, you will see a list of apps that can be allowed or disallowed using a Windows firewall. From this list, you have to search for uTorrent and once you find it, set it to Publick if you are on a public network or Private if you’re in a private network.

Option 3 – Uninstall or reinstall uTorrent software

You can also try to completely uninstall uTorrent from your computer and then reinstall it right back. to do so, follow the steps below.
  • In the search box, type in “control” and then click on Control Panel (desktop app) among the search results.
  • After that, select Programs and Features from the list which will give you a list of all the programs installed on your computer.
  • From there, look for uTorrent and select it and then uninstall it.
  • Once uTorrent is uninstalled, go to uTorrent’s official website and download its latest version.

Option 4 – Try scanning your computer using Windows Defender

  • Tap the Win + I keys to open Update & Security.
  • Then click on the Windows Security option and open Windows Defender Security Center.
  • Next, click on Virus & threat protection > Run a new advanced scan.
  • Now make sure that Full Scan is selected from the menu and then click the Scan Now button to get started.
Read More
What to do when you can't format SD card
SD memory cards have surfaced as standard cards for digital cameras and microSD as phone standard memory cards. Most people have and use at least one daily, so naturally copying files and even formatting SD cards is a natural thing to do, but what if you cannot copy files or format SD cards? SD cardsFear not because we had this issue and tried several things in order to overcome the problem and after some time here is a list of what can you do if you are facing this exact issue. The list is written from most simple solutions to more complex ones and it is advisable to follow it as presented. That being said, let's dive into solving the problem.

1. Remove Write Protection on SD card

First and in my experience the most usual thing preventing deleting, copying files, and formating SD card is due to write protection. Take an SD card out of the laptop, camera, or card reader and visually inspect it. On side of almost every SD card, there is a hardware lock switch and mark where it needs to be positioned in order to be locked. Even if the switch is positioned on unlocked state, switch it to locked and then back to unlocked. Sometimes this easy moving of switch can resolve some contact issues and the card will start working normally. Another type of lock that could be turned ON is a software one. If for any kind of reason data protection has been turned ON, you will need to turn it off in order to be able to format an SD card. In order to do this follow this guide:
  1. Press ⊞ WINDOWS + R to open the Run dialog
  2. In run dialog type in diskpart and press ENTER
  3. Once diskpart is opened in command prompt type in: list disk and press ENTER
  4. Locate your SD card and type in select disk x, where x is disk number followed by ENTER
  5. After the SD card is selected type in: attributes disk clear read-only and press ENTER
This process will clear the software lock on the SD card, after following this method try to format the card again, if the problem still exists go to the next solution.

2. Format SD card using Command prompt

Command prompt is a great tool and can perform some commands that are not been able to be completed using file explorer or another tool inside Windows.
  1. In the taskbar search box, search for cmd and select the Command prompt
  2. On the right part select run as administrator
  3. If needed click on YES on UAC prompt
  4. Inside command prompt type in diskpart and press ENTER
  5. type in list disk followed by ENTER
  6. Select your SD card by locating its number in the list and typing select disk X, where is X SD cards number in list and press ENTER
  7. Once SD card is selected type in format fs=ntfs quick and press ENTER
This should format SD card but if for reason even this step is provided as unproductive, go to the next solution.

3. Format your card with the Disk Management tool

  1. Go into the taskbar and search for Disk Management and open it
  2. Select SD card partition that you wish to format
  3. Right-click on the partition and select format
  4. After the format is done, enter the volume label, file system, and allocation unit size. Confirm with OK
  5. Press OK again to confirm the formatting process.
If you have not managed to format your SD card even with this method go to the next solution.

4. Repartition card with Disk part

If all previous solutions have failed there is a chance that the SD card has bad sectors on it. If this is the case that we will need to partition cards in order to isolate bad sectors and use healthy ones.
  1. Press ⊞ WINDOWS + R to open the Run dialog
  2. In run dialog type in diskpart and press ENTER
  3. Once diskpart is opened in command prompt type in: list disk and press ENTER
  4. Locate your SD card and type in select disk x, where x is disk number followed by ENTER
  5. Type in Clean and press ENTER
  6. Type in Create partition primary and press ENTER
  7. To select a new partition type select partition 1 followed by ENTER
  8. Make partition active by typing active and pressing ENTER
  9. Format the drive by typing format fs=ntfs label=SDCard quick followed with ENTER
  10. Assign a letter to drive by typing assign letter=h followed with ENTER
  11. Type exit to close Command prompt followed again by ENTER and open File Explorer to check if the drive is active

5. Try a dedicated SD card formating fool

If anything failed so far, one last thing you could do is to download and try a dedicated SD card formatting tool. One that I would recommend is SD Memory Card Formatter, which is free software make specifically for formatting SD memory cards.
Read More
Repair Windows 10 Error Code 0xC1900200, 0x20008

Repair Windows 10 Error Code 0xC1900200, 0x20008

Code 0xC1900200, 0x20008, What is it?

Error Code 0xC1900200, 0x20008 (Code 0xC1900202 – 0x20008)  is an error that occurs when you attempt to upgrade to Microsoft Windows 10, but the minimum requirements have not been met by your computer. You will therefore be unable to upgrade to Microsoft Windows 10 until your computer is updated or upgraded to meet those requirements. Common symptoms include:
  • When attempting to upgrade a dialog box with Code 0xC1900200 – 0x20008 (Code 0xC1900202 – 0x20008) is displayed.
  • Your computer is unable to begin the Microsoft Windows 10 upgrade process.

Solution

Restoro box imageError Causes

Error Code 0xC1900200 – 0x20008 (Code 0xC1900202 – 0x20008)  occurs when you are unable to begin the Microsoft Windows 10 upgrade because your computer does not meet the minimum requirements to run Microsoft Windows 10.
  • You are unable to begin the upgrade because your computer does not meet the required system or hardware specifications.
  • You are not running the correct version of Microsoft Windows to be able to begin the upgrade.
  • You are not running the latest updated version of Microsoft Windows 7 SP1 or Microsoft Windows 8.1. Error Code 0xC1900200 – 0x20008 (Code 0xC1900202 – 0x20008) as stated, simply means your computer does not meet the requirements to update and does not indicate a permanent problem or inability to continue to use your computer. This error only means that you will not be able to upgrade to Microsoft Windows 10 until your computer is made to meet these requirements.

Further Information and Manual Repair

There are several solutions that the user can complete at home that should fix the problem resulting in a manifestation of Error Code 0xC1900200 – 0x20008 (Code 0xC1900202 – 0x20008). Below are several options that should resolve this error.

Method 1:

Verify what version of Microsoft Windows you are currently running, older, outdated, or no longer supported versions of Microsoft Windows are not able to upgrade to Microsoft Windows 10. If you are not running one of the following versions you will have to update before being able to upgrade.
  • The most current version of Microsoft Windows 7 SP1
  • The most current version of Microsoft Windows 8.1

Method 2:

Your computer's system specifications do not meet the requirements to be able to upgrade to and run Microsoft Windows 10. To check your system specifications do the following.
  • Click on the start button in the bottom left corner, then locate the control panel on the menu, click on it to open.
  • Once it opens, locate system and security on the menu and click to open, click on system and this will show you your amount of RAM and processor speed.
  • Find device manager on the left-hand side click this then select display adapter, and it will show you your current video card.
  • Click on the start button again, then click on the computer in the menu, this will show you your hard drive size, and available space.
If you have the option available you can simply run the get Microsoft Windows 10 app to check compatibility. Once you have your system specs make sure they meet or exceed the following.
  • 1 GHz or higher processor or SoC
  • 1 gig of RAM for 32 bit and 2 gigs of RAM for 64 bit
  • 16 GB available hard drive space for 32 bit, 20 GB for 64 bit
  • Minimum of DirectX9 that has 1.0 WDDM
  • At least an 800x600 display
If your computer does not meet these minimum requirements, upgrade the components necessary to meet them. If you do not possess the technical expertise required to accomplish this yourself or do not feel comfortable doing so, download and install a powerful automated tool to get the job done.

Method 3:

Your computer might not meet the aforementioned requirements to make an upgrade because of insufficient hard drive space or resources. Learn how to create space on your computer.

Method 4:

Many people hold on to and use the same computer for a very long time. It is possible that your computer cannot be upgraded to meet the requirements, or that the cost to do so would be so high that a new computer would be cheaper. If that is the case, your only option may be to replace your computer.
Read More
Disable WEB camera with PowerShell in Windows
Windows PowerShell is a powerful tool inside the Windows environment often overlooked by typical users which is a great mistake since it can offer a large array of functionality and usability and if used well can offer a unique working experience. Today we will be using PowerShell to turn the WEB camera off so it can not be accessed, completely disabling it for use. You might want to do this for security reasons or just want to learn few new things. Whatever your reason might be, I am welcoming you to this tutorial and please do keep reading.

Finding device ID

In order to disable the WEB camera first thing we need to do is to find a matching device ID. We will find this value inside the device manager, so press ⊞ WINDOWS + X to open the secret menu. keyboard with windows and x marked
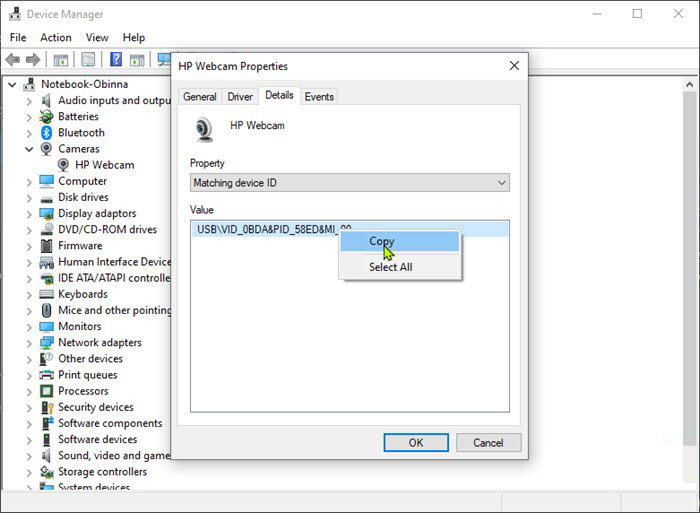
In the menu choose device manager and click on it. Windows menu device managerWhen the device manager opens, expand the Imaging devices or Cameras section. Right-click Integrated Camera or the primary webcam, and click Properties. Go to the Details tab. Under the Property section, click to select Matching device ID from the drop-down. Right-click the value and select Copy camera device managerThe next step is to download and install Windows Driver Kit (WDK)

PowerShell script

Create and run a PowerShell script with the following parameters/values to disable the camera. Substitute the <FOLDER> placeholder with the actual name of the folder where your copy of Devcon is residing
$id = (Get-CimInstance Win32_PnPEntity |

where caption -match '<PRIMARY CAMERA>').pnpDeviceID

$ppid = "{0}{1}" -f '@',$id

Set-Location c:\<FOLDER>

Devcon status $ppid

Devcon disable $ppid

Devcon status $ppid
To enable the camera device, run the command below in PowerShell:
devcon enable $ppid
Read More
How to remove Search Donkey

Search Donkey is a Potentially Unwanted Program for Windows developed by Western Web Applications, LLC. This program may inject ads into your browsing sessions, giving you false search results and advertisements.

As described by Western Web Applications: “Search Donkey is entirely free to use. To keep Search Donkey free, we’ve partnered with high-quality ad providers and you may see additional ads when Search Donkey is installed.

While installed, Search Donkey will keep track of your web search queries, allowing it to let you know what pages you already visited, however, this data is also used to better target personal unwanted ads.

Search Donkey has been flagged as a Potentially Unwanted Program (PUP) by several anti-virus scanners, and their website is blacklisted by Google, giving warning to whoever visits it, and due to the nature of this application, it is not recommended to keep on your computer.

About Adware

Exactly what is Adware? If you have ever owned a computer, then you’ve probably heard the word numerous times, but it is still beneficial to define it. The term “adware” is actually a short form of advertising-supported software and it includes programs that are solely designed to display ads on a computer. A kind of malware, it will come bundled right in with the software package that a user either installs or accesses. Shareware or freeware programs are often times packaged with adware. If adware penetrates your system without you knowing and sends information about you or your PC to 3rd parties, then it is spyware. Quite often, adware changes your web browser settings to open pop-up adverts or modifies browser homepage and default internet search engine to some unwanted website. Adware is a common problem that affects a large number of PCs around the globe. If your computer doesn’t have any anti-malware software then it’s very likely it could get infected with adware as well as other malware.

Adware and its effects on your PC:

Adware could generate and display plenty of ads of all sorts which in turn disrupt the functions of your personal computer while browsing the net. Pop-ups might also show up on your computer’s desktop even when you’re not online. Adware results in a reduction of available memory and processing power, or resources. It also causes a slow net connection because adware consumes bandwidth whenever it retrieves adverts from the internet. Adware was originally created to support companies to generate income when they offer the software away free of charge. However, adware nowadays displays hundreds of adverts which will cause your PC to slow down and even crash.

Adware prevention:

As we discussed, adware could potentially be harmful to your computer, generally not by itself, but by bringing other problems to you. A top-quality antivirus program has the capability of permanently removing adware. We recommend Safebytes Anti-Malware, one of the top-rated anti-malware programs by world-renowned industry experts. It will act either as a preventative tool stopping websites or software installations that contain adware or as a removal tool for an already infected computer. To prevent adware, download software from websites that you trust. Never download from websites that you have never been aware of or tried before; Always study the end-user license agreement (EULA) of any application you want to install; You need to avoid freeware and shareware where possible; Lastly, watch out for ActiveX, since many adware and spyware companies make use of the technology to install their wares onto your computer system

Malware Blocking Internet And All Anti-Malware Software? Do This!

All malware is bad and the consequences of the damage will vary based on the specific type of malware. Some malware variants alter browser settings by adding a proxy server or modify the PC’s DNS settings. In these instances, you will be unable to visit some or all internet sites, and thus not able to download or install the required security software to eliminate the malware. So what to do when malicious software prevents you from downloading or installing Anti-Malware? There are a few options you could try to get around with this problem.

Remove viruses in Safe Mode

In Safe Mode, you can actually change Windows settings, un-install or install some program, and eliminate hard-to-delete viruses and malware. If the malware is blocking access to the internet and affecting the computer, launching it in Safe Mode will let you download antivirus and run a diagnostic scan while limiting possible damage. To enter into Safe Mode or Safe Mode with Networking, press the F8 key while the PC is starting up or run MSConfig and look for the “Safe Boot” options under the “Boot” tab. Once you’re in safe mode, you can attempt to install your anti-malware program without the hindrance of the malicious software. At this point, you could run the anti-malware scan to eliminate viruses and malware without hindrance from another application.

Switch over to an alternate browser

Some malware only targets certain browsers. If this sounds like your case, use another web browser as it could circumvent the malware. If you suspect that your Internet Explorer has been hijacked by malware or otherwise compromised by hackers, the ideal approach is to switch over to a different internet browser like Firefox, Chrome, or Safari to download your chosen computer security software – Safebytes Anti-Malware.

Create a portable USB antivirus for eliminating malware

Another solution is to make a portable antivirus program on your USB flash drive. Adopt these measures to run the anti-malware on the affected computer system. 1) Download the anti-malware program on a virus-free PC. 2) Connect the flash drive to a USB slot on the clean computer. 3) Run the setup program by double-clicking the executable file of the downloaded software, which has a .exe file format. 4) Select the flash drive as the destination for saving the software file. Follow the directions to complete the installation process. 5) Transfer the pen drive from the clean computer to the infected computer. 6) Double-click the Safebytes Anti-malware icon on the thumb drive to run the software. 7) Hit the “Scan Now” button to start the virus scan.

Detect And Remove Viruses With SafeBytes Anti-Malware

Today an anti-malware tool can protect the computer from different types of online threats. But wait, how to decide on the best one amongst countless malware protection application that’s available out there? As you might be aware, there are many anti-malware companies and products for you to consider. A few are well worth your money, but many aren’t. You need to choose one that is reliable, practical, and has a strong reputation for its malware source protection. Amongst few good applications, SafeBytes Anti-Malware is the strongly recommended software for the security-conscious individual. SafeBytes anti-malware is a trustworthy tool that not only secures your PC permanently but is also very easy to use for people of all ability levels. With its outstanding protection system, this tool will easily detect and remove most of the security threats, including adware, viruses, browser hijackers, ransomware, trojans, worms, and PUPs.

SafeBytes has outstanding features when compared to other anti-malware programs. Below are some of the great ones:

Real-time Threat Response: SafeBytes provides 100 % hands-free real-time protection and is set to check, block, and eliminate all threats at its very first encounter. They’re very effective in screening and getting rid of different threats because they’re constantly revised with new updates and safety measures. Robust, Anti-malware Protection: With its enhanced and sophisticated algorithm, this malware removal tool can identify and get rid of the malware threats hiding in the PC effectively. Internet Security: SafeBytes gives an instant safety rating about the pages you’re about to visit, automatically blocking harmful sites and ensure that you’re certain of your safety while browsing the world wide web. “Fast Scan” Abilities: SafeBytes’s virus scan engine is one of the fastest and most efficient within the industry. It's targeted scanning seriously increases the catch rate for viruses which is embedded in various computer files. Low CPU and Memory Usage: This program is not “heavy” on your computer’s resources, so you’ll not see any overall performance issues when SafeBytes is working in the background. 24/7 Customer Support: You can obtain totally free 24/7 technical support from their computer experts on any product queries or computer security concerns. Overall, SafeBytes Anti-Malware is a solid program as it has lots of features and could identify and remove any potential threats. Malware problems will become a thing of the past once you put this software to use. So if you’re searching for the best malware removal application out there, and if you don’t mind paying out some money for it, opt for SafeBytes Anti-Malware.

Technical Details and Manual Removal (Advanced Users)

If you don’t want to use malware removal software and prefer to get rid of Search Donkey manually, you could do so by going to the Windows Add/Remove Programs menu in the control panel and deleting the offending program; in cases of web browser plug-ins, you may remove it by visiting the browsers Add-on/Extension manager. You’ll probably also want to reset your internet browser. To ensure the complete removal, manually examine your hard disk and registry for all of the following and remove or reset the values accordingly. But bear in mind, editing the Windows registry can be a complicated job that only experienced users and professionals should attempt to fix it. Furthermore, some malware keeps replicating which makes it tough to eliminate. It is advised that you do the removal procedure in Windows Safe Mode.
Files: % Program Files% \Search Donkey.exe %UserProfile%\Desktop\ Search Donkey.lnk %UserProfile%\Start Menu \ Search Donkey C:\Users\%CurrentUserName%\AppData\Local\Temp\nst2A8A.tmp\nsDialogs.dll (21 bytes) C:\ProgramData\SearchDonkey\Firefox\chrome\content\overlay.xul (391 bytes) C:\Users\%CurrentUserName%\AppData\Local\Temp\nst2A8A.tmp\System.dll (23 bytes) C:\ProgramData\SearchDonkey\IE\common.dll (11359 bytes) C:\ProgramData\SearchDonkey\Chrome\common.crx (5843 bytes) C:\Users\%CurrentUserName%\AppData\Local\Temp\nst2A8A.tmp\modern-wizard.bmp (4232 bytes) C:\Users\%CurrentUserName%\AppData\Local\Temp\nst2A8A.tmp\util_ex.dll (21609 bytes) C:\ProgramData\SearchDonkey\Firefox\chrome\content\main.js (17 bytes) C:\ProgramData\SearchDonkey\app.dat (172455 bytes) C:\Users\%CurrentUserName%\AppData\Local\Temp\nst2A8A.tmp\Helper.dll (27542 bytes) C:\Users\%CurrentUserName%\AppData\Local\Temp\nst2A8A.tmp\version.dll (14 bytes) C:\Users\%CurrentUserName%\AppData\Local\Temp\nst2A8A.tmp\Processes.dll (1772 bytes) C:\ProgramData\SearchDonkey\Firefox\chrome.manifest (196 bytes) C:\ProgramData\SearchDonkey\Uninstall.exe (12729 bytes) C:\ProgramData\SearchDonkey\Firefox\install.rdf (955 bytes) C:\ProgramData\SearchDonkey\SearchDonkey.ico C:\ProgramData\SearchDonkey\Chrome\common.crx C:\ProgramData\SearchDonkey\Firefox\chrome.manifest C:\ProgramData\SearchDonkey\Firefox\chrome\content\main.js C:\ProgramData\SearchDonkey\Firefox\chrome\content\overlay.xul C:\ProgramData\SearchDonkey\Firefox\install.rdf C:\ProgramData\SearchDonkey\IE\common.dll C:\ProgramData\SearchDonkey\SearchDonkey.ico C:\ProgramData\SearchDonkey\Uninstall.exe C:\ProgramData\SearchDonkey\app.dat Registry: HKEY_CURRENT_USER\Software\Microsoft\Windows\CurrentVersion\Uninstall\SearchDonkey \DisplayIcon %AppData%\%RANDOM CHARACTERS%\%RANDOM CHARACTERS%.exe,0 HKEY_CURRENT_USER\Software\Microsoft\Windows\CurrentVersion\Uninstall\SearchDonkey HKEY_CURRENT_USER\Software\Microsoft\Windows\CurrentVersion\Uninstall\SearchDonkey\UninstallString %AppData%%RANDOMCHARACTERS%\%RANDOM CHARACTERS%.exe
Read More
1 2 3 162
Logo
Copyright © 2022, ErrorTools. All Rights Reserved
Trademarks: Microsoft Windows logos are registered trademarks of Microsoft. Disclaimer: ErrorTools.com is not affiliated with Microsoft, nor claim direct affiliation.
The information on this page is provided for information purposes only.
DMCA.com Protection Status