Business Email Etiquette

[vc_row][vc_column][vc_column_text]

Business Email Etiquette

Hello and welcome to our Business Email Etiquette. Most people have experience in writing emails at some point before in their lives. However, the emails an average person writes are probably personal emails and not mails for work purposes.

Emails you send to friends are incredibly different in content and context to business emails you would send to customers or employers or even other colleagues in your workforce.

So, if you have a job that involves you writing emails to people in business style, learning business email etiquette is an absolute must for you.

 1. Heading layouts

When you are sending emails to friends, you generally lay them out like a memo. This means there is very little detail in the layout besides basic greetings and paragraphs, usually starting with the greetings.

However, with a business email, it is best to lay it out exactly like you would lay out a formal letter. You need to put the company’s address in the right-hand corner and the date as well. Only then must you go on to the greetings.

This will make your email look more formal, making you seem like a professional who knows what they are doing as opposed to someone who just couldn’t be bothered spending the extra time to get the layout right.

 2. Proper greetings

 When you are sending an email to a friend, you usually greet them informally. If their name was Mary Johnson, you’d probably start your letter with a ‘Hey Mary’ or a ‘Hello Mary.’

However, this is not considered a professional way to write an email to a customer or other important person in your business. Again, you must use the proper method that you would greet someone with were you writing them a formal letter instead.

If your customer is Mary Johnson again, you should greet her with respect. ‘Dear Ms. Johnson’ would be the most appropriate way to start off your letter’s actual body in this case. If you do not know the recipient’s name, then you should start with a simple ‘Dear Sir or Madam.’

Politeness will always get you incredibly far, no matter what line of work you are in.

 3. Informal language

 You should get straight to the point with your email. Don’t dawdle on with it like you would if chatting to a friend and don’t write it how you would speak either.

You use language that sounds impressive and smart while not using such obscure language that your recipient doesn’t know what you are saying. All the time, you must keep it informal where possible, possible even impersonal as well.

It will make you seem very professional in the long run.

 4. Signing off

When you are ending your email, you must end it as you would with a letter also. Don’t just say ‘Bye’ and your first name; that is too personal.

You need to say ‘yours sincerely if you know the name of the recipient and ‘yours faithfully’ if you do not. Then you should end with your full name and whatever position you have at the company. (CEO, technical staff etc.)

So there you have it! All you need to do now is to show your boss that you can handle the emails from now on![/vc_column_text][/vc_column][/vc_row]

If you like to learn and find out more about various Windows errors, and how to repair them go to our vast archive or use search to find articles that will explain and help you in solving your issue.
However, if you prefer to do things fast and with automatization then we are proposing to use an automated solution for your issues. The application that we are recommending is Advanced System Repair Pro
Advanced System Repair utilizes multiple tools all in one to give you a quick, simple, reliable, and very thorough diagnosis of your PC. It brings you all the tools you need in one program to clean, fix, protect, optimize and boost your PC!
1-Click Maintenance
All the tools to make it simple and easy! It's like having a professional technician at the click of a mouse.

Junk Cleaner
Keeping your computer free from unnecessary clutter also helps make your computer last longer. Like any other machine, if you keep it clean and take care of it, it will serve you better for longer!

Optimize background apps
Optimize applications background activity with the built-in Application Optimizer feature.

Disk Defrag
With a simple 1-click, Advanced System Repair speeds up your PC by assembling fragmented files on your machine and organizing them more efficiently.

Malware Removal
Finds and removes all types of harmful malware including trojans, worms, bots, adware, spyware, PUPs, and more!

Privacy Cleaner
The all-in-one privacy suite to Clean Your Tracks & Protect Your Privacy! Make your computer safe, secure, and more efficient!

System Tweak/Optimizer
ASR will analyze your complete system and settings to adjust your PC to function at its maximum performance.

Registry Cleaner
Over time, as you install and uninstall applications, the registry can become cluttered with old entries and broken settings which can result in program crashes, and annoying messages and slow the computer down.
Visit our Advanced System Repair Pro Download page to inform yourself about all the benefits of this software and get a free trial copy of it.
advanced system repair pro

Advanced System Repair Pro

One-click automated PC repair solution
ASR logo
With Advanced System Repair Pro you can easily
Replace damaged files
Restore performance
Free disk space
Remove Malware
Protects WEB browser
Remove Viruses
Stop PC freezing
DOWNLOAD
Privacy Policy | Terms of Use | Uinstall
Advanced System Repair Pro is compatible with all versions of Microsoft Windows including Windows 11

Share this article:

You might also like

Copy & Paste text between devices
If you have multiple products with Windows on them, Copy & Paste text between them is easy as 1,2,3 and we will be happy to tell you how can you do it. Hello and welcome everyone, today we will see how can we share text information between 2 devices using Windows 10 in instant. In order for you to be able to share text information between devices, there are two prerequisites that you must meet. The first is that all devices must be connected to the internet, the second is that you must have a Microsoft account. If you have both of these things continue with the tutorial, if you do not have a Microsoft account go to Microsoft website and create one for free. Also, know that this option needs to be turned ON on all devices in order to work. So steps we will explain will have to be done on each device, if you already have some device logged in and connected to Microsoft account, you can skip setting it up. Click on ⊞ WINDOWS and click on settings. Windows 10 Star menu with marked settings iconThen click on System. Windows settings system markedOnce you are in the system, on the left tabs find and click on Clipboard. windows settings clipboardIf you are not logged in to your Microsoft account do so on the right panel by locating Sync across devices and click on sign in. clipboard sign inWhen you are signed in click on the option to turn it on. sync across devicesOne option is turned ON, you will be greeted with two choices, to copy everything from the clipboard automatically or to choose text which you want to sync and paste it with ⊞ WINDOWS + V. Choose whatever better suits your needs, and you are done. Repeat these steps for other devices and you are done.
Read More
How to Resolve Error Code 0x80070422 on Windows 10

How to Resolve Error Code 0x80070422 on Windows 10

Error Code 0x80070422

Error code 0x80070422 is a Windows-based error code occurring in various versions of Windows including Windows 7, Windows 8 and Windows 8.1, and Windows 10. It usually occurs when users attempt to update Windows. A message box will appear stating that the error code has occurred.  Users will notice the following common symptoms:

  • Inability to complete Windows updates
  • Error message occurring during use of Windows Update service

The error code, if left unresolved, can cause serious problems for PC users as they will be unable to access the latest updates to the Windows operating system. Such a situation can expose their system to vulnerabilities. Thus, fixing Windows 10 error code is of utmost importance.

Solution

Restoro box imageError Causes

Among the many reasons Error code 0x80070422  is encountered includes:

  • Corrupted or missing registry and DLL files
  • Badly or poorly installed software. The software could also be infected by a virus or Trojan
  • Outdated or poorly installed drivers

Further Information and Manual Repair

Fixing Windows-based error codes can be a simple process. However, in some cases, it requires specialized skills. In the case of Windows 10 error code 0x80070422 consider the two (2) main solutions available through manual repair. You may also need to consider help from a certified Windows repair technician or the use of an automated tool if you are not confident you have the skills to perform the solutions below.

Method 1: Check if Windows Update is Running Properly

One of the main reasons for error code 0x80070422 is a Windows Update service that is not running on the right settings. To verify if an issue with your Windows Update service is the source of the problem applies the following steps:

  1. Type “Windows Update” in the search bar near the Windows home button.
  2. Select “Windows Update settings” when this option appears. (You may also click the home button, then “Settings” followed by “Update and Security”.)
  3. Select “Advanced Options”
  4. (You will be given an option to choose how updates are installed.) Select Automatic.
  5. Save settings and restart the computer.

Once these settings are in place Windows will be able to download updates automatically. This enables your machine to run more smoothly. However, if after applying the steps above, Windows 10 error code 0x80070422 is not resolved, you may proceed to solution two (2).

Method 2: Disable Internet Protocol Version 6 (IPv6)

IPv6 is the latest or most current version of Internet Protocol (IP). This provides your machine with an IP address, a crucial aspect of all communications related to the Internet. By disabling this IP some users have been able to successfully resolve Windows 10 error code 0x80070422.

Like many tasks involving Windows, there are more than one ways in which you can attempt to disable IPv6. These require different types of skills and must be approached with care, as mistakes can lead to serious issues with your machine. Methods include using Command Prompt, Registry Editor, or Control Panel.

If your experience with Windows 10 is quite limited and you are not certain of your skills choose the simplest approach as listed below.

  1. Select Control Panel.
  2. Choose “Network and Internet”, then “Network and Sharing Center”.
  3. Right-click your Internet Connection. The name of your connection will be listed underneath the heading – “View your basic network connection and set up connections”.
  4. Select “Properties” then uncheck Internet Protocol version 6 (IPv6)
  5. Save settings by clicking OK.
  6. Restart the computer and check if the 0x80070422 error code has been corrected.

Method 3: Using An Automated Tool

If the issue persists despite following the solutions above, the best step to take is to use an automated tool. This may not be your preferred course of action, especially since it can be difficult to ascertain the safety of certain tools found online. For this reason, choose a reputable source offering automated tools which are designed to specifically fix Windows 10 error code including error code 0x80070422.

Download and install a powerful automated tool to access the best Windows 10 error code solutions. The process is simple and includes clear instructions which enable even average Windows users to completely resolve complicated errors on their machine.

How to Stop Future Error Codes from Occurring

Though it is hard to predict when an error code will occur, each Windows 10 user can take precautionary steps to prevent other errors from occurring. This includes the following:

  • Ensure you download software from reputable sources to avoid viruses and other forms of malware.
  • Clean your registry often. The registry stores settings across all applications. Regular cleaning will your machine function more efficiently as it reduces the likelihood of issues such as crashes or system errors.
Read More
The server did not register with DCOM
There are times when after you upgrade your Windows operating system, the System Logs under the Event Viewer will display an error message saying, “Event ID 10010 error – The server did not register with DCOM within the required timeout”. What is DCOM? DCOM stands for “Distributed Component Object Model”. It is a proprietary Microsoft technology that allows the Component Object Model or COM software to communicate across a network. You can consider it as an extension of COM which is equipped with the capability of solving a couple of inherent problems related to the COM model to the better use over a network. COM is a tool that’s used for advanced configuration and troubleshooting in Windows 10. Developers usually use it to configure routine components and application behavior like participation in transactions and object pooling and so on. The Component Services needs the DCOM wire protocol in order to communicate with the Component Object Model components on other computers. By default, in a Windows-based system, the network computers are configured initially to enable DCOM. There are also some components in Windows that might require registering themselves with DCOM. However, if they fail to do so, you will encounter the “The server did not register with DCOM within the required timeout” error. To fix this, here are some suggestions you can check out.

Option 1 – Try to use the Component Services

  • Tap the Win + R keys to open the Run dialog box.
  • Then type “dcomcnfg” in the field and tap Enter to pull up Component Services.
  • Next, double click on the Computers folder located in the right pane and right-click on My Computer, and select the Properties option.
  • After that, switch to the COM Security tab under My Computer Properties and then go to the Access Permissions section.
  • From there, click the Edit Default button and in the new window that appears, apply the correct permission to objects under the Group or user names section.
  • Once you’re done, click OK and exit. This should fix the error.

Option 2 – Make sure that Function Discovery Resource Publication Properties Services is running

  • In the Cortana search box, type “services” and click on the Services icon to open the Services Manager. Alternatively, you can also tap the Win + R keys to launch the Run prompt and then type “services.msc” in the field and hit Enter to open the Services Manager.
  • Next, scroll down and look for the “Function Discovery Resource Publication” entry and double click on it.
  • Then switch to the General tab and from there, make sure that the Startup Type is set to “Manual (Triggered).
  • You also have to make sure that the service is running so if it’s not, just click on the Start button to start the service.
  • Now click on Apply to save the changes made.

Option 3 – Try resetting the default DCOM permissions

  • Tap the Win + R keys to open the Run dialog box.
  • Then type “dcomcnfg” in the field and tap Enter to pull up Component Services.
  • After that, expand Component Services > Computers and right-click on My Computer, and then select Properties.
  • Next, go to the Default Properties tab, and in the Default Distributed COM Communication Properties section, make sure that:
    • Default Authentication Level is set to Connect
    • Default Impersonation Level is set to Identify.
Read More
How to get Dynamic Wallpapers in Windows 10
Dynamic Wallpapers introduced with Mojave Update in macOS are pretty cool. Dynamic Desktop is a feature introduced in macOS Mojave (10.14), in which the desktop background changes according to the time of Mac's current location. If Location Services are turned off the Privacy pane of the System Preferences, then the time zone specified in the Date & Time preferences will be used. To apply macOS Dynamic Wallpaper on Windows 10 we need to download & use WinDynamicDesktop, a free application that lets you apply macOS Dynamic Wallpaper. After the installation, you will be asked to Configure the Schedule. While doing that you need to make sure that you enter your location correctly. You can even set specific sunrise and sunset timing by selecting “Use specific sunrise and sunset times” and changing the Sunrise and Sunset times manually. Now, you will be greeted with some of the coolest dynamic wallpapers in the market. Select a theme of your choice, click on the Download button (file size can range between 20-200 MB), and click Apply to enjoy macOS Dynamic Wallpaper on Windows 10. If for some reason you want to go back to the default Windows theme but not necessarily delete the application then right-click on the WinDynamicWallpaper icon from the taskbar, click Select Theme, select None (from the theme section) and click Apply.
Read More
Fix The selected boot device failed in Windows
If you suddenly receive an error message that says, “The selected boot device failed, Press <Enter> to Continue” during an installation on your Windows 10 computer, you should know that this kind of error can occur when you use a USB stick as well as a DVD Disk to boot from. This error indicates that some settings inside your BIOS are not compatible with the bootable device that you have created. Note that fixing this kind of error does not vary from device to device at all. All you have to do is change some settings in the BIOS and create a proper bootable disk. Follow the options given below to fix the “The selected boot device failed, Press <Enter> to Continue” error. The options below do not have to be necessarily followed in the same sequence since you can create a bootable USB drive before you change some settings in the BIOS.

Option 1 – Disable the Secure Boot in the BIOS

Disabling the Secure Boot in the BIOS settings is definitely recommended to resolve the issue. To disable Secure Boot, here’s what you have to do:
  • First, boot your computer into Windows 10.
  • Next, go to Settings > Windows Update. From there, check if there is anything that you have to download and install if you see any available updates. Usually, OEMs send and update the list of trusted hardware, drivers, and operating systems for your computer.
  • After that, go to the BIOS of your computer.
  • Then go to Settings > Update & Security > Advanced Startup options. If you click on Restart Now, it will restart your computer and give you all the advanced options.
  • Next, select Troubleshoot > Advanced Options. As you can see, this screen offers you further Options including System Restore, Startup repair, Go back to the previous version, Command Prompt, System Image Recovery, and UEFI Firmware Settings.
  • Select the UEFI Firmware Settings which will take you to the BIOS.
  • From there, go to the Security > Boot > Authentication tab where you should see Secure Boot. Note that every OEM has its own way of implementing the options so it varies.
  • Next, set Secure Boot to Disabled and set Legacy Support to On or Enabled.
  • Save the changes made and exit. Afterward, your computer will reboot.

Option 2 – Make a proper bootable USB Drive/Stick

To make a proper bootable USB drive, you need to use the Windows Media Creation tool. The Media Creation tool in Windows allows you to use the ISO installation file to make a bootable device that you can use to install Windows on your PC. Note that this is kind of different from the usual installation process as it could erase your computer’s current settings and data on the primary drive. Thus, before you proceed, you need to backup all your data into some removable drive and then use the Media Creation Tool to make a bootable drive.
  • After making the bootable drive, you need to plug it into your computer and then reboot.
  • Next, tap the F10 or Esc key to open the boot options.
  • Now set the boot priority of the removable drive the highest. Once the setup comes forth, follow the next onscreen instructions and install Windows without any problems.
Read More
Samsung Odyssey Neo G9 monitor review
samsung Odyssey Neo G9Odyssey Neo G9 is a successor to Odyssey G9 curved gaming monitor and it is aimed again at the gaming community with its specifications but of course, it can be used for work as well. Gapping at a stunning $2500 USD price it is not really a cheap piece of hardware so it is normal to see what do you get for this kind of price and do features justify it, so let’s dive in.

Size and resolution

The first thing that you can notice about the screen is that it is big and curved, 49 inches big which is pretty big, and with it, I believe you can forget about using 2 or 3 screens because this single one will cover everything you need really. Going as far as 5120 X 1440 resolution is the strange definition, basically, this is 5K which is kind of nice but I do not see the advantage. Sure it is larger than 4K, but for the price of $2500 I expected an 8K monstrosity so if the resolution is not the main price justification then what is? Let’s move on and find out.

Odyssey tech specs

The monitor comes with HDR and 240Hz refresh rate which is very nice and coupled with 1ms pixel response time, adaptive sync, and Variable Refresh Rate you get pretty good other tech specs. All of this is very nice but the monitor's strongest selling point is Mini Led tech. Mini Led is a next-gen tech currently found only in high-end TVs. With this technology, monitors can produce truer blacks sort of speak thanks to a greater number of dimming zones. Odyssey Neo G9 is rated at 2000 nits in the brightness values and local dimming zones go to stunning 2048. It comes also with Quantum HDR that supports 10+, Freesync, and G-Sync capability. In connection, the department monitor comes with a single display 1.4 port and two HDMI 2.1 ports. It also includes a headphone jack along with two USB 3.0 ports.

Conclusion

While the resolution of the monitor is nothing impressive for the given price, its size and the rest of the tech specs surely are. Now I will not lie, the price is still a little too high but if you could afford it easily I think you should.
Read More
How to Fix Error 0x80073712 in Windows
There are times when system files get corrupted and if the Windows Update process finds the system’s integrity questionable, chances are, the update, upgrade or the installation may fail and you will only be getting an error code 0x80073712 instead of completing the process. The error code 0x80073712 indicates that a file needed by the Windows setup or the Windows Update is most likely missing or damaged. To resolve the problem, here are some suggestions you can try.

Option 1 – Try running the DISM Tool

Running the DISM Tool helps in repairing the Windows System Image as well as the Windows Component Store in Windows 10. Using this built-in tool, you have various options such as the “/ScanHealth”, “/CheckHealth”, and “/RestoreHealth”.
  • Open the Command Prompt as admin.
  • Then type in this command: exe /Online /Cleanup-image /Restorehealth
  • Do not close the window if the process takes a while as it will probably take a few minutes to finish.
After you run this tool, a log file is created at C:WindowsLogsCBSCBS.log. On the other hand, if the Windows Update client is already broken, you will be prompted to use a running Windows installation as the repair source or use a Windows side-by-side folder from a network share, as the source of the files. Although the chances of this happening are less, if it turns out to be the case, you need to run an advanced command in the DISM tool to repair a broken Windows Update. Just repeat the process above but use the following command instead:
DISM.exe /Online /Cleanup-Image /RestoreHealth /Source:C:RepairSourceWindows /LimitAccess

Option 2 – Try running the System File Checker

System File Checker or SFC is a built-in command utility that helps in restoring corrupted files as well as missing files. It replaces bad and corrupted system files with good system files that might be causing the error 0x80073712. To run the SFC command, follow the steps given below.
  • Tap Win + R to launch Run.
  • Type in cmd in the field and tap Enter.
  • After opening Command Prompt, type in sfc /scannow
The command will start a system scan which will take a few whiles before it finishes. Once it’s done, you could get the following results:
  1. Windows Resource Protection did not find any integrity violations.
  2. Windows Resource Protection found corrupt files and successfully repaired them.
  3. Windows Resource Protection found corrupt files but was unable to fix some of them.

Option 3 – Try running the Chkdsk utility

You can also try running the Chkdsk utility to resolve the Windows Update error 0x80073712. If your hard drive has issues with integrity, the update will really fail as the system will think that it’s not healthy and that’s where the Chkdsk utility comes in. The Chkdsk utility repairs hard drive errors that might be causing the problem.
  • Open Command Prompt with admin privileges.
  • After opening Command Prompt, execute the commands listed below, and don’t forget to hit Enter right after you type in each one of them and if you have installed Windows to some different directory, you must replace “C” with the name of the drive you’ve installed Windows with.
  • chkdsk C: /r /x
  • chkdsk C: /f
Note: The Chkdsk function might take a while before it finishes its operations so you need to be patient and wait until the entire process is completed.

Option 4 – Try running the Windows Update Troubleshooter

Running the built-in Windows Update troubleshooter could also help you resolve the Windows Update error 0x80073712. To run it, go to Settings and then select Troubleshoot from the options. From there, click on Windows Update and then click the “Run the troubleshooter” button.

Option 5 – Try running Microsoft’s online troubleshooter

You also have the option to run Microsoft’s online troubleshooter which could help you fix Windows Update errors.
Read More
Different types of computer viruses
Computer viruses are malicious applications that have the ability to self replicate and spread over the system and various devices, just like viruses in organisms. We all know that computer viruses are bad and that you should avoid them however you can. So in this spirit, we are taking a deeper dive into what kind of viruses exist and how they function.

viruses types1. File-infecting Virus

A virus that attached itself to an executable program. It is also called a parasitic virus which typically infects files with .exe or .com extensions. Some file infectors can overwrite host files and others can damage your hard drive’s formatting.

2. Macro Virus

This type of virus is commonly found in programs such as Microsoft Word or Excel. These viruses are usually stored as part of a document and can spread when the files are transmitted to other computers, often through email attachments.

3. Browser Hijacker

This virus targets and alters your browser setting. It is often called a browser redirect virus because it redirects your browser to other malicious websites that you don’t have any intention of visiting. This virus can pose other threats such as changing the default home page of your browser.

4. Web Scripting Virus

A very sneaky virus that targets popular websites. What this virus does is overwrite code on a website and insert links that can install malicious software on your device. Web scripting viruses can steal your cookies and use the information to post on your behalf on the infected website.

5. Boot Sector Virus

These viruses are once common back when computers are booted from floppy disks. Today, these viruses are found distributed in forms of physical media such as external hard drives or USB. If the computer is infected with a boot sector virus, it automatically loads into the memory enabling control of your computer.

6. Polymorphic Virus

This virus has the capability to evade anti-virus programs since it can change codes every time an infected file is performed.

7. Resident Virus

A resident virus stores itself on your computer’s memory which allows it to infect files on your computer. This virus can interfere with your operating system leading to file and program corruption.

8. Multipartite Virus

A type of virus that is very infectious and can easily spread on your computer system. It can infect multiple parts of a system including memory, files, and boot sector which makes it difficult to contain.
Read More
Steam Deck, a modern PC handheld console
steam deck
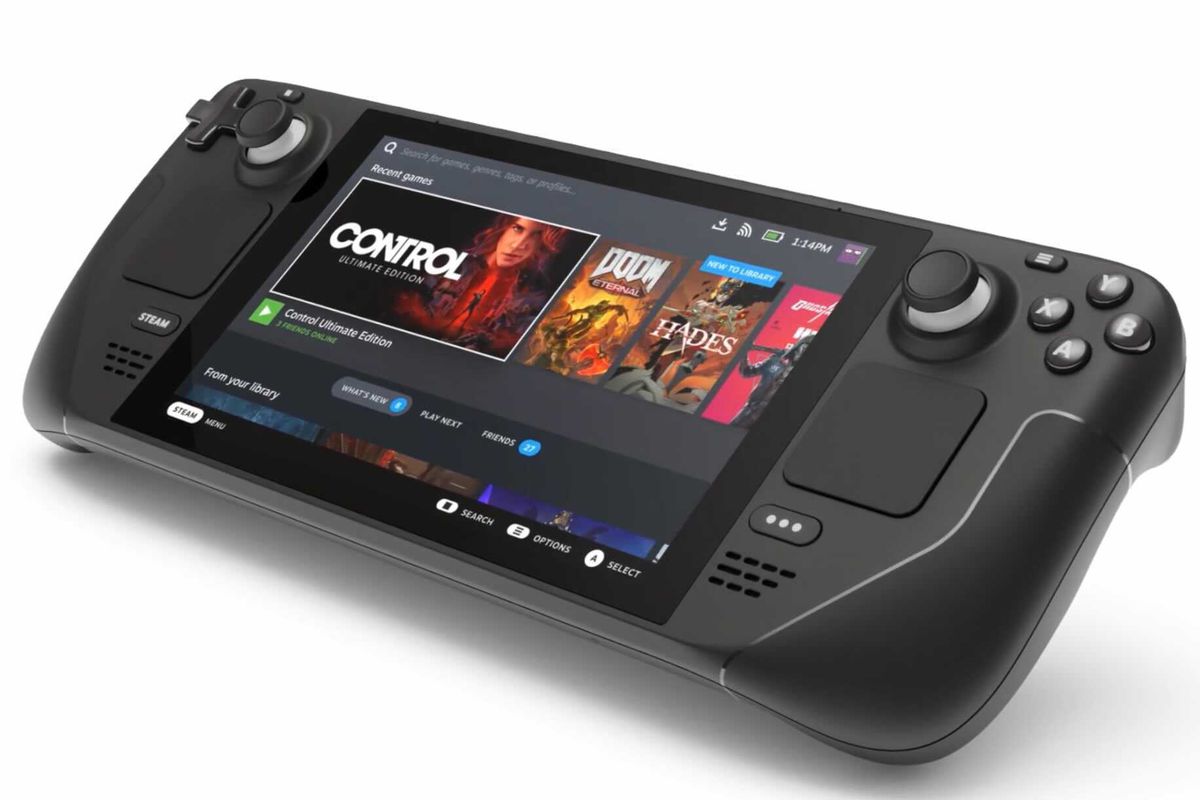
Valve has announced the first gaming PC handheld console: Steam Deck. At its core, Stead Deck is just a portable, small PC in little casing. It uses AMD Zen 2 CPU and RDNA 2 GPU architecture, has 16GB of RAM, Wi-Fi, and Bluetooth. It is a portable device with both a touchpad and joystick packing a seven-inch screen with a resolution of 1280x800 (16:10 aspect ratio). The screen has an ambient light sensor for automatic light adjustments same as your modern mobile device. Stating to Valve battery will hold up from two to eight hours depending on the activity of the user and what exactly he is doing. The handheld comes also with a carrying case.

Steam Deck operating system and software

Out of the box, Steam Dock comes with the latest Valve’s version of SteamOS 3. Just for comparing, the steam box was coming SteamOS 2, so this new Linux-based OS is aimed to provide better performance and better compatibility. Naturally, all Linux games in your Steam library will work right out of the box but Valve has something called PROTON inside OS, it is emulation software based on Wine that will supposedly let you play all of your Library games on a given OS. One big thing to mention here is that this is PC after all meaning that if you do not like having SteamOS on it you can install Windows instead and so far as we know it will support Windows 11. Now with Windows 11, you will be able to play all of your Steam games and run any kind of Windows software on it including EPIC store, battle.net, and others.

Cost and release date

The initial release date is set for December 2021 and today on July 16th Valve is opening you can reserve your copy if you want to pre-purchase. Follow this link if you want to reserve your copy. Reserve your Steam Deck device The price of the device will depend on the memory capacity which you would like to have. Please note that each of the 3 offered devices will have the same hardware, the only difference will be in memory available, and the most expensive version will also have anti-glare screen, everything else is identical. 64GB model will be $399, 256GB model will have the price of $529 and largest one with whooping 512GB will be $649

Conclusion

Valve ventures into the digital hardware domain again but it is unsure will they make it this time. Both Steam machine and their controller were in long run failed and later unsupported products so perhaps some customer caution is advised. Although having a handheld PC is tempting I would advise seeing how the overall market will accept this contraption before throwing money into it.
Read More
Fix fatal device hardware error on Windows
This post will help you fix the request that failed due to a fatal device hardware error on your Windows 10 PC. You can encounter this error when that hard drive/SSD on your computer is damaged physically and the system is either unable to access or perform read/write operations in it. Aside from hard drive/SSD, this error can also happen to removable drives. This kind of error is not uncommon and in most cases, the hardware is physically damaged due to which you are not able to perform operations. However, there are a couple of fixes that you can try to resolve the problem before you go ahead and back up your data and move them to a different drive. What exactly causes this error? It’s actually self-explanatory and it gives you an idea that the drive is either corrupted or in a bad state. To resolve the error, follow the given options below carefully and see which one worked best for you.

Option 1 – Verify the hard drive using SMART attributes

In case you don’t know, Windows has a built-in feature of SMART analysis which analyzes the hard drive/SSD and checks all the parameters by performing some minor operations. To use it, follow these steps:
  • Tap the Win + S keys and type “command prompt” in the field then right-click on the related search result and select the “Run as administrator” option.
  • After opening Command Prompt as admin, type the “wmic diskdrive get status” command and hit Enter.
  • You should get a result after that, and if you see that it’s “normal”, proceed to the next option below.

Option 2 – Use the CHKDSK utility

When it comes to some issues concerning the hard drive or removable devices, there is a utility in Windows that might help which is called “chkdsk”. This error check utility can help with several issues in the system.
  • Tap the Win + S keys to open the Search box.
  • Then type “command prompt” in the field and from the search results that appear, right-click on Command Prompt and select “Run as administrator”.
  • After opening an elevated command prompt, copy and paste the following command and hit Enter:
CHKDSK [volume [[path] filename]] [/F] [/V] [/R] [/X] [/C] [: size]]
Note: In the command given above, “[/F]” will try to fix the system errors while “[/R]” will be the one to fix the bad sectors.
  • Now if you are prompted to run CHKDSK after your reboot your PC, just tap Y and reboot your PC.
  • If CHKDSK is not able to find any errors, tap the Win + E keys and navigate the access window. From there, right-click on the concerned drive and click on Properties.
  • After opening Properties, click on the tab Tools and then click on the “Check” button under the Error-checking section.
  • Wait until the process is completed and then restart your computer.

Option 3 – Format your drive

You can try formatting your drive since this problem also occurs on removable hard drives. In addition, if your drive is not properly initialized, this error will really pop up. Thus, you need to make sure that the hard drive is initialized and that the correct partition style is selected.
  • To get started formatting your drive, tap the Win + E keys and then go to the access page of the drive.
  • Next, right-click on the drive and select Format.
  • After that, uncheck the “Quick Format” option and then format your drive properly.
  • Now once the formatting process is finished, unplug the drive and plug it back in afterward.
  • Check if the error is already fixed. If the drive is not initialized, tap the Win + R keys and hit Enter.
  • After opening the Run dialog box, type “diskmgmt.msc” and hit Enter to open Disk Management.
  • From there, right-click on the drive volume and select Initialize Disk.
  • Next, select the correct partition type and proceed.
That should fix the problem, if not, follow the next advanced option below.
Read More
1 2 3 162
Logo
Copyright © 2022, ErrorTools. All Rights Reserved
Trademarks: Microsoft Windows logos are registered trademarks of Microsoft. Disclaimer: ErrorTools.com is not affiliated with Microsoft, nor claim direct affiliation.
The information on this page is provided for information purposes only.
DMCA.com Protection Status