Best fitness trackers for your health needs

fitness trackerIf this unfortunate COVID-19 worldwide pandemic has managed to teach us, I would argue it is that our health is the most important thing. So in that spirit, we will continue in this article reviewing some of the best fitness trackers that can be found in the time of writing this article in 2021.

Now the market for fitness trackers is not small by any means and offerings are also not small, from no-name manufacturers costing only a few bucks to more serious one’s going slightly over 100 USD there is a fitness tracker for everyone.

In this particular article, we will not focus on cheap few dollars no-name ones, instead, we will be offering top ones in the field among some in the middle range simply because we can stand behind them considering quality and precision.

Fitbit Charge 4 fitness and activity tracker

Fitbit is not a pioneer company in the world of fitness trackers and it shows. Charge 4 model offers maybe the best quality, performance, and features for its price. It stands out with implemented GPS meaning that you will need your phone for tracking workouts. It also offers step tracking, sleep tracking, automatic workout-tracking, active zone minutes, etc.

It weighs 30g and has 1 inch grayscale OLED. Battery life is said to hold up to 4 days if you use built-in GPS regularly, if you decide to use GPS constantly device will last only 5 hours. Without GPS it can last up to 7 days and it is water-resistant and waterproof up to 50 meters.

Amazfit Band 5

Amazon’s offering of fitness tracker is aimed at beginners and as such, it is lacking some advanced features including an automated working tracker or GPS, also the model does not have replaceable bands so customization is not an option.

It does however offer activity and sleep tracking, heart rate monitoring and it is the only model that integrates with Alexa. The manufacturer states that the battery can last up to 15 days depending on usage which places Amazfit Band 5 as a device that has a longer life of use.

The device itself is packed with a 1.1-inch color OLED and it weights 12g. It is splash-resistant, not water-resistant.

Xiaomi Mi Band 6

Xiaomi tracker is the best budget version on this list including in it 30 sport modes like running, cycling, yoga, swimming, and more. Battery life is not bad also packing up to 14 days of life but only if the device is not used constantly.

It has activity and sleep tracking, a heart rate monitor, sleep tracking, customizable replicable bands and it is water-resistant up to 50m.

It comes in a 1.56 inch AMOLED color display and it weighs 63g. The device also has menstrual health tracking making it a great device for women.

Samsung Galaxy Fit 2 fitness tracker

Now we are getting into serious and little more expensive ones. Galaxy Fit 2 is among the top-notch trackers currently on the market. It of course can work along with Samsung’s smartwatches and mobile phones. Packed in the military-grade 1.1-inch casing with color AMOLED and weighing 91g with battery life up to 21 days and water resistance up to 50m this bracelet is an absolute beast.

It comes packed with features from standard sleep tracking to automated workout-tracking but it also has a connection to Samsung’s Health mobile app to choose from over 90 workouts, it monitors heart rate and stress levels making it really one of the complete solutions for serious fitness enthusiasts.

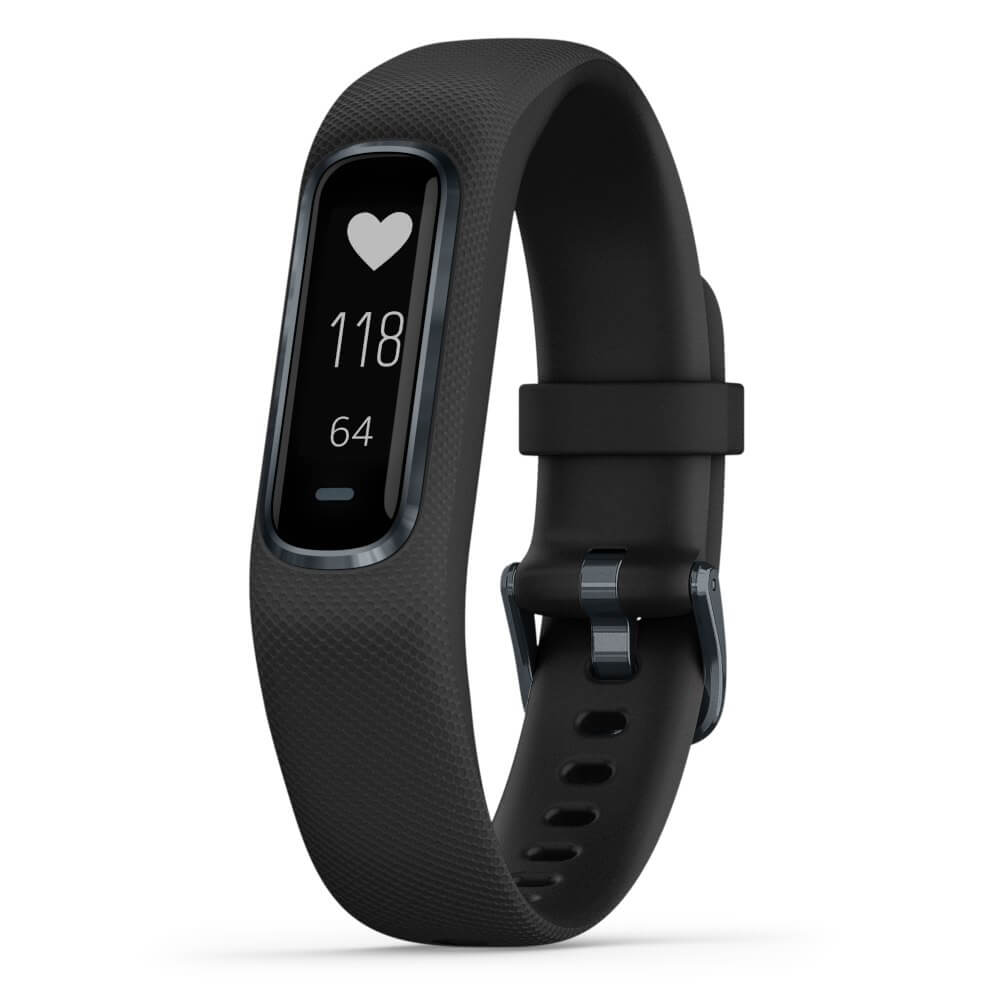
Garmin Vivosmart 4 fitness tracker

Last on our list is Garmin vivosmart 4. The device itself is not very impressive, 7 days battery life with 0.7 inch OLED display and 17g weight packed with 50m water resistance is nothing spectacular, Samsung’s model is packing better hardware and way more battery life but all of the mentioned devices fall flat if we compare software to Garvin.

Garvin’s Vivosmart 4 software is best on the list, it keeps track of your steps, sleep, calories burned, floors climbed, various exercises, and heart rate as standard features but you'll have advanced sleep tracking with REM sleep. It can also gauge blood oxygen saturation levels during the night with its wrist-based Pulse Ox sensor. In addition, a relaxation breathing timer complements the all-day stress tracking feature. Lastly, the "Body Battery" monitor helps optimize your daily activities based on your energy levels making it truly the only complete tracking solution on this list.

That's it for our review of fitness trackers of today, be sure to come back each day to find more interesting articles and tips for your everyday digital life.

If you like to learn and find out more about various Windows errors, and how to repair them go to our vast archive or use search to find articles that will explain and help you in solving your issue.
However, if you prefer to do things fast and with automatization then we are proposing to use an automated solution for your issues. The application that we are recommending is Advanced System Repair Pro
Advanced System Repair utilizes multiple tools all in one to give you a quick, simple, reliable, and very thorough diagnosis of your PC. It brings you all the tools you need in one program to clean, fix, protect, optimize and boost your PC!
1-Click Maintenance
All the tools to make it simple and easy! It's like having a professional technician at the click of a mouse.

Junk Cleaner
Keeping your computer free from unnecessary clutter also helps make your computer last longer. Like any other machine, if you keep it clean and take care of it, it will serve you better for longer!

Optimize background apps
Optimize applications background activity with the built-in Application Optimizer feature.

Disk Defrag
With a simple 1-click, Advanced System Repair speeds up your PC by assembling fragmented files on your machine and organizing them more efficiently.

Malware Removal
Finds and removes all types of harmful malware including trojans, worms, bots, adware, spyware, PUPs, and more!

Privacy Cleaner
The all-in-one privacy suite to Clean Your Tracks & Protect Your Privacy! Make your computer safe, secure, and more efficient!

System Tweak/Optimizer
ASR will analyze your complete system and settings to adjust your PC to function at its maximum performance.

Registry Cleaner
Over time, as you install and uninstall applications, the registry can become cluttered with old entries and broken settings which can result in program crashes, and annoying messages and slow the computer down.
Visit our Advanced System Repair Pro Download page to inform yourself about all the benefits of this software and get a free trial copy of it.
advanced system repair pro

Advanced System Repair Pro

One-click automated PC repair solution
ASR logo
With Advanced System Repair Pro you can easily
Replace damaged files
Restore performance
Free disk space
Remove Malware
Protects WEB browser
Remove Viruses
Stop PC freezing
DOWNLOAD
Privacy Policy | Terms of Use | Uinstall
Advanced System Repair Pro is compatible with all versions of Microsoft Windows including Windows 11

Share this article:

You might also like

Find files fast using command prompt
Finding files via File Explorer can be a really slow and tedious process and if you are searching often it can accumulate a lot of time loss. I am a person which often has assets for projects in several different folders and altho I am trying my best to be tidy and organized sometimes I can not remember where I have placed certain assets that I need, in this case in order for me to find a required asset I usually search it via command prompt because it is lightning fast and gives results in second not minutes compared to File Explorer. If you are in a similar position and you need fast results please read on as we dive deeper into the command prompt and its usage. To quickly open the command prompt press ⊞ WINDOWS + X to bring Windows secret menu and choose the command prompt, you can also choose the admin version but for sake of this specific task, there is no difference. keyboard with windows and x markedin the command prompt you need to type the next command:
dir \search term* /s
where search term* is well, what are you searching for. Now if you are looking for a specific file this command is straightforward, you just change search term* with file_name.extension and there you go, but know that this command can be used to be more powerful, for example, you can find all JPG files in your drive by typing dir \*.jpg /s or all files named work by typing dir \work.* /s " * " is a so-called joker sign, it replaces several characters with any in a given string, meaning that dr*s will give you all results with the first 2 letters dr and last one s. Use this to specify better search results and you will get your files in no time.
Read More
A Quick Guide to Resolving Uncdms.dll Error Code

How for Fix Uncdms.dll Error Code

Uncdms.dll Error Code - What is it?

Uncdms.dll is a Dynamic Link Library file and a crucial part of the Windows Desktop Search Software. It is used to search emails, documents, photos, videos, and folders instantly. However, the Uncdms.dll error pops on the screen, when the Windows Desktop Search Software fails to start. The error message is displayed in one of the following formats:
  • “Uncdms.dll cannot be found.”
  • “Windowssearch.exe – cannot find the component. This application has failed to start because uncdms.dll was not found. Reinstalling the application may fix the problem.”
  • “The file uncdms.dll is missing.”

Solution

Restoro box imageError Causes

Uncdms.dll error code may pop on your screen due to multiple reasons. These usually include but are not limited to:
  • Viral infection
  • Issues with Windows Desktop Search
  • Registry corruption
  • Uncdms.dll accidentally deleted during program un-installation

Further Information and Manual Repair

If you experience an Uncdms.dll error code on your system, fix it right away. This error is easy to resolve. You don’t have to be technically sound to resolve the uncdms.dll error code. Try the methods listed below to resolve without any hassle:

Method 1 - Check Your Recycle Bin and Restore the Deleted Uncdms.dll File

Since DLL files are shared files, there is a possibility that you accidentally deleted them while uninstalling some other program. To fix the issue, simply go to the recycle bin and look for the file. If you locate it, reinstall it. If you can’t, then it is advisable to download the Uncdms.dll file from a trusted DLL file website.

Method 2 - Uninstall and Then Re-install Windows Desktop Search

If the error code is related to issues with the Window Desktop Search application, then simply uninstall this software and re-install to resolve. To do this, click the start button, go to the control panel and then add/ remove programs. Now choose Windows Desktop Search from the list of programs and click Remove. After that, reboot your PC to activate changes. Now download the software and follow the same process and reinstall the Windows Desktop Search program on your PC. To activate changes, reboot. This will hopefully resolve the issue.

Method 3 - Update Windows

As this file is included in the service pack, try updating the Windows Utility to resolve the Uncdms.dll error code. To get started, click start and then go to the control panel, now choose Windows update. Follow the instructions to install Active X and then click install to update Windows Utility. Restart your system to bring the changes into effect.

Method 4 - Scan for Viruses and Repair the Registry

Whether the underlying cause of the Uncdms.dll error code is viral infection or registry corruption, it is advisable to download Restoro. It is an advanced and multi-functional PC Repair Tool integrated with 6 powerful utilities including antivirus and a registry cleaner. It scans and removes all types of viruses. The registry cleaning utility works simultaneously and removes all the unnecessary files corrupting the registry including cookies, temporary files, internet history, and junk files, and repairs it in seconds, thereby resolving the Uncdms.dll error immediately. Click here to download Restoro - PC Fixer
Read More
How to Fix Windows 8 Error Code 0x80070422

How to Fix Windows 8 Error Code 0x80070422

Error Code 0x80070422 - What is it?

Error Code 0x80070422 can be found on many versions of the Windows operating system including Windows 7, Windows 8, and 8.1, and Windows 10. The reason for its occurrence may vary, however, depending on the version of the operating system that you use.

In the case of error code 0x80070422 in Windows 8, it often occurs when users attempt to update their firewall or download apps from the Windows store. When this error occurs the user is unable to complete the updates and will need to apply different solutions to correct the issue.

Solution

Restoro box imageError Causes

Whenever error code 0x80070422 is encountered on Windows 8 or 8.1, it might be a result of various factors. These error codes include:

  • Registry errors – This occurs when new programs are installed over old ones
  • Malicious software such as adware, spyware, and or viruses

Further Information and Manual Repair

You do not need to be a Windows expert to attempt to solve errors like the 0x80070422 Windows 8 error code. Simply try the solutions below. If however, you feel you need a professional’s help, contact a certified Windows technician.

  • Check for any viruses or malicious software

Viruses and other malicious software are often the cause of various issues within the PC. For this reason, be sure to check your machine for a possible virus infestation. If you are unable to use your anti-virus software or if none is present you might need to download an automated tool that offers overall repair and other solutions.

  • Disable third-party security apps

Another step you can take is to disable third-party security apps. When these apps are downloaded onto your device, it can lead to the disabling of your Firewall and the inability of your device to download other apps. If this is the source of the 0x80070422 error code on your machine, the issue will be resolved after you disable the third-party apps and reboot your computer.

  • Disable Firewall

If error code 0x80070422 in Windows 8 or 8.1 occurred while you attempted to update Windows firewall, one of the best solutions you can try is to disable the firewall. Note however that disabling your firewall should be temporary as it protects your computer from worms as well as hackers that might infect or compromise your PC. Access the firewall by swiping right on the screen then searching for “firewall”. Click “Windows firewall” then select “Turn off Windows firewall”.

  • Performs a clean boot

Another option is for you to perform a clean boot. This simply refers to a reboot in Windows where only a minimum set of drivers and programs are used. A clean boot can help resolve issues related to software conflict which can occur when Windows users install programs or updates or simply run a program. Note that you must log on to the computer as an administrator. Otherwise, you will not be able to perform the clean boot.

  • Clean registry

The source of many errors related to Windows can lie within the registry. This is because the registry is involved in every aspect of a Windows computer’s operation. If there is an issue in the files of the registry or if it has been hacked, your computer will not function. For this reason, begin by cleaning the registry regularly. To clean our registry, use a powerful tool that is both reputable and user-friendly. Research your option before you make a selection as choosing the wrong tool could lead to even more errors or computer malfunctions.

  • Set Windows Update to Automatic

Another important method to solve issues related to error code 0x80070422 in Windows 8 or 8.1 is your Windows Update service. Though you may have never noticed this feature before now, the Windows Update services allow PC owners to access updates to their operating system automatically. This leads to a properly functioning PC as your machine will always have the latest features and tools available. However, if the setting is not correct, your computer may end up experiencing error code 0x80070422. Check if this is the source of your problems by verifying if your Windows Update settings are automatic. Once the settings are on automatic, reboot your machine to ensure your computer responds to the changes.

  • Download an Automate Tool

Always be prepared for the possibility of other errors. You can do this by downloading powerful software. This enables users to regularly check for issues that may cause errors on their Windows device.

Read More
What to do if Windows 10 PC turns on by itself
A PC that turns on by itself every so often can get quite annoying. Many users have faced this problem countless times. There are lots of possible reasons why your Windows 10 PC turns on by itself, wakes up from sleep, standby, or even when it’s shut down. To find out what exactly woke your computer, simply open Command Prompt as admin and type the following command:
powercfg –lastwake
Once you enter the command given above, it will show you the last device that woke your PC up. After that, you need to type in the next command:
powercfg –devicequery wake_armed
After entering the command, it will show you a list of all the devices that could wake your PC up. The goal in running these commands is to understand the reason what’s really causing your PC to turn on and see the reason is on the hardware level or not. Here are a couple of options you can try if your Windows 10 PC turns on by itself.

Option 1 – Try disabling Fast Startup

As you know, Windows 10 comes with a mode called Fast Startup which does not turn off the computer in the usual manner. This mode keeps your computer in a mixed state so that when you turn it on again, it will be a lot faster. However, as useful as this feature appear to be, some security experts find this an issue, for numerous reasons – for one, it can turn on your Windows 10 PC by itself. Thus, you need to disable this feature to fix the problem.

Option 2 – You need to stop the Task Scheduler from waking up your computer

There are times when the issue has something more to do with the software than hardware. It could be that you are using a Scheduled Task to get some work done on your computer at a particular time of the day or many times a day. That’s why if you really are using Task Scheduler, you need to change the Power settings of Windows to make sure that it ignores those tasks rather than deleting them instead when your computer is either on Hybrid or Standby mode.
  • Open the Power Options and then click on “Change Plan Settings”.
  • After that, make sure to choose the correct power plan and then select the “Change advanced power settings” option.
  • Next, look for the Sleep tree and expand it to view the “Allow Wake Timers” option and then disable it. Disabling this option will make sure that none of the program that could wake your PC up when it’s either on shutdown or sleep mode. However, this only applies to laptops.

Option 3 – Try to disable Automatic Restart

There are instances when the computer crashes and the system restarts itself. This is actually by design – when your computer has been left on standby, the computer will restart and if the program repeats, it will keep on waking your PC up.
  • In the Search bar, type in “system”.
  • Once it appears from the search results, click on it.
  • Next, select Advanced system settings on the left side and then go to the Advanced tab.
  • From there, click on Settings under Startup and Recovery.
  • Then unmark “Automatically Restart” and click on OK.

Option 4 – Adjust the Power Management option of both the Keyboard and Mouse

As you know, two of the culprits in waking your PC up are the keyboard and the mouse. If they’re slightly moved or hit, your PC turns on. To prevent these two from waking your computer up, you need to make some adjustments to their power management option since they have one. You can disable this option to ensure that they won’t wake your PC up unless you really want it to.
  • Tap the Win + X keys and then tap M to open the Device Manager and list all the hardware on your computer. From there, select your keyboard or mouse.
  • Next, right-click and then go to Properties and go to the Power Management tab.
  • In this tab, uncheck the “Allow this device to wake the computer” box.
Note: Aside from the keyboard and mouse, if you are also using any gaming rig to play games on your computer, then you might have to disable their power options as well as they could also wake your computer. Just make sure that either the keyboard or the mouse has the ability to wake your computer up at the very least as it can be quite inconvenient to tap the Power button every time you want to turn on your computer.

Option 5 – Modify Wake On Lan

The Wake On Lan feature can bring back your computer online if it is connected to a network. This feature is useful especially when a computer wants to communicate or to send data or files to a network computer which should come online only when it’s requested. Wake On Lan is built into the hardware, i.e. network adapter so it is one of the possible reasons why your PC turns on by itself.
  • Tap the Win + x keys then hit M to open the Device Manager and then under the Network adapters, look for the one that was listed above. Take note that you must not change anything with the ones that are listed as Miniport.
  • Next, right-click and select Properties and then go to Power management and from there, uncheck the “Allow this device to wake up the computer” option. This will ensure that no PC on the network can ever wake your computer up.

Option 6 – Prevent any scheduled Windows Update and Automatic maintenance

It is also possible that the Windows Update has restarted your PC to complete the update. This depends on your active hours or a predefined schedule. AS you know Windows has a built-in Automatic Maintenance mode which wakes the computer up at the scheduled time and performs the system update. This could be one of the possible reasons why your computer turns on by itself. so to prevent any scheduled updates and maintenance, you can simply change the time for Automatic maintenance. How? Follow these steps:
  • Open Settings then go to Windows Update and Security >Windows Update and select Active Hours.
  • After that, type in “Automatic maintenance” in the search bar to change the time for Automatic maintenance.
  • From there, you can adjust the timing or just uncheck the “Allow scheduled maintenance to wake up my computer at the scheduled time” box.
Read More
Fix Windows Update Error 0x80240020
There are instances when the Windows 10 installation needs interaction before it reaches the file process. And so if you suddenly encounter the Windows Update Installation Failure 0x80240020 error under the Windows Update History, then you need to get it fixed. When you encounter this kind of Windows Update Error, you will see an error message that says, “The operation did not complete because there is no logged-on interactive user”. This error also indicates the “WU_E_NO_INTERACTIVE_USER” code. To resolve this issue, in this post we’ll walk you through a couple of steps but before you get started, know that you don’t have to run any troubleshooter or delete any file just to fix this error since all you have to do is enable one option that can automatically login with your account and complete the installation for you. With that said, just make sure to only try running Windows Update once you’re told to do so. There are two ways you can enable the option that could resolve the Windows Update Installation Failure 0x80240020 error. One is via Settings while the second one is via Registry Editor.

Option 1 – via Settings

Step 1: Go to Settings > Accounts > Sign-in Options. Step 2: From there, toggle on the “Use my sign-in info to automatically finish setting up my device and reopen my apps after an update or restart” option. Step 3: After that, it will make sure that the interaction part is removed from the Windows Update process. Note: If your device is joined in a domain or if some work or email policies are applied to your device by your company or organization, then you wouldn’t be able to see this option in Settings and that’s where the Registry Editor comes in. Just make sure that you’re logged in as an administrator and that you create a System Restore Point first since registry hacks are sensitive and could highly impact how your computer behaves or functions. Once you have that covered, follow the steps below.

Option 2 – via Registry Editor

Step 1: In the Start search, type “Regedit” and hit Enter to open the Registry Editor. Step 2: Navigate to the following registry key:
HKEY_LOCAL_MACHINESOFTWAREMicrosoftWindowsCurrentVersionWindowsUpdateOSUpgrade
Note: If the above-given registry key does not exist, you can simply create it. All you have to do is right-click on the WindowsUpdate key and then select the New Key option and type “OSUpgrade” as its name. Afterward, create a new DWORD (32-bit) Value and name it “AllowOSUpgrade” and set its value to 0x00000001. Step 3: Restart your computer and check if the error is now fixed. And then try to update your Windows 10 computer again and while you’re at it, make sure that you’re around your computer to interact with the prompts needed to complete the installation process.
Read More
Quick Fix Guide to Error 2032

Repair Error 2032

What Is Error 2032?

Error 2032 is essentially the hexadecimal format of the error caused. This error code is actually a code format used by the Windows operating system. Manufacturers use this code to determine the cause behind the problem. This error is usually the result of the issues that arise with different applications. When this error occurs, individuals are not able to view multimedia content on their PC. They may also experience system crashes and this makes it crucial to resolve it.

Solution

Restoro box imageError Causes

Error 2032 is caused by problems in Windows system files. Improper registry entries may also cause this problem. Some of the common causes that trigger Error 2032 are improper deletion of hardware or applications. Similarly, incomplete hardware or application installations or uninstallations may also cause issues. These file errors are actually caused when a computer has recently been attacked by a virus, spyware, or malware or if the system is trying to recover from an unanticipated shutdown. Such activities often result in the corruption or deletion of registry entries in Windows system files. The corrupt files will obviously cause problems and the application will fail to perform correctly.

Further Information and Manual Repair

While there are several ways to solve this problem, some of the most useful and practical solutions are listed below as follows.
  • If you are an advanced user, this workaround is for you. First and foremost, restart your computer and log on to it as the administrator. Now click on the ‘Start’ button.  Now follow this path: All programs ->Accessories-> System Tools->System Restore. Once you choose to perform System Restore, you will come across options where you can select to ‘Restore your computer to an earlier time’. This option will appear in a new window. Click on it and then click Next. Click on the Next button again that appears in the confirmation window. Restart your computer after the restoration is finished. You have just resolved the error.
  • Another easier alternative to fix Error 2032 is for novice users. Download an Error 2032 repair utility. Install this program as you are most likely to come across a Scan button. If there is an option to fix and repair an error, select it after the scan is complete. You can then restart your computer again. Look for the error and you will realize that it has disappeared and that your system is now ready to use.
Read More
Fix Realtek HD audio driver issue
Realtek sound device not playing sound is a common Windows issue.  It happens occasionally and luckily it can be solved with a little effort and in a short time period. Today in this article we will explore the most common reasons and solutions for driver malfunction for Realtek inside Windows 10. If you have this particular problem, go from step 1 to the last step since all steps are meant to go from simplest to the most complex. All of that being said let us fix your Realtek driver issue.
  1. Check Speakers or/and Headphones first

    The first thing would in any troubleshooting be to check are your speakers turned on or are your headphones connected and the volume or switch on them is set properly. Nothing more embarrassing than spending an hour or so troubleshooting only to find out that issue was in a malfunction of speakers or them not being turned on.
  2. Check the Volume control in Windows

    Same as the previous step where you have checked hardware, now it is time to check to see if the volume control is set properly and not by any chance muted or volume is brought all the way down.
  3. Check if the Device Manager is reporting an error and update the driver

    If both hardware is functioning properly and volume control in Windows is set correctly then the issue might be in Windows not detecting device or driver malfunction. In any case, the Device Manager will be the one who will report this problem. In order to check to see if the driver is properly working press ⊞ WINDOWS + X to open the hidden start menu. keyboard with windows and x marked Once it opens, click on Device Manager to open it, realtek audio driver in device menager If you have a driver device error inside Windows, you should see it immediately when entering the Device Manager, it will have a yellow exclamation mark beside it. Right-click on it and choose update driver.
  4. Reinstall driver

    If driver update failed or you already have the latest drivers, reinstalling them could fix the issue since drivers might have corrupted during installation of some update or application. Follow steps from point 3 to get to the driver in Device Manager, then right-click on it but instead of update choose to uninstall. Reboot Windows once the driver is uninstalled and Windows will install a new one.
  5. Check Windows update

    Check to see if the latest Windows update is installed, update your Windows if needed
  6. Fix driver issue with DRIVERFIX

    If everything else fails, get DRIVERFIX, a premium solution for your PC issues, and fix driver errors.
Read More
A Guide to Quick Fixing the Error Code 1723

Repair Error Code 1723

What is Error 1723?

Error Code 1723 is a peculiar error type common in Windows PC. It is related to the Windows Installer package. This error is displayed in the following format:
"Error 1723- There is a problem with this Windows Installer package. A DLL required for this install could not be run. Contact your support personnel or package vendor...”
You are most likely to come across the error code 1723 if the Java installation is not completed successfully. In other words, the error indicates that the installation process has failed.

Solution

Restoro box imageError Causes

The 1723 error may occur due to several reasons, the most common being:
  • Corrupted installers
  • Files are not extracted successfully
  • Registry problems
  • Missing DLL files

Further Information and Manual Repair

To resolve this issue on your PC, you don’t always have to hire a professional technician and pay hundreds of dollars to get it fixed. The error code 1723 may not be a common Windows PC error but it is easy to fix. Here we have listed some of the best and easiest DIY ways to resolve this error on your system. These solutions are so easy to perform that even if you are not a computer programmer or technically adept, you can work through them and resolve the error in just a few simple clicks. So, let’s get started:

Solution 1: Install the latest Java Version

If the Java version previously installed on your system is not working properly and showing 1723 error messages then it is advisable to install the latest Java version. However, to do this first you will have to uninstall the old version and then download the latest Java version on your PC from a trusted website to ensure it does not contain malicious viruses and malware.

Solution 2: Ensure the Required Files are extracted in the ‘Temp’ Folder for Installers

Another method to resolve the 1723 error code is to check whether the required files are extracted in the temp folder for installers or not. The error may occur if the location is incorrect and the account is not permitted to extract files in the temp folder. In this scenario, the best way to resolve the issue is to change the permissions of the temp folder. This can be done by logging in to your account and opening file explorer or ‘My Computer’. Now copy and paste this link address in the address bar: DL:UsersUSERNAMEAppDataLocal. Please note, here DL is the drive letter of the Windows drive, and in the username insert the username of the account that you are using. Now right-click the ‘temp’ folder. Select properties and click on the Security tab. After that click edit below the list and press add. Again type the username here and click OK. The next step is to select the added account from the list and tick ‘FULL CONTROL’ box under ‘Permissions for Username’. Click OK and then close the properties. Once this process is complete, now try running the installer again. This will most likely resolve the issue. Nonetheless, if the error still persists, then this means the underlying cause of the error is deeper than you think. The error may be related to registry issues. In such situations, try solution 3 to fix the error 1723 on your system.

Solution 3: Download Restoro.

When the error code 1723 is triggered due to registry issues, then it is advisable to scan your PC with Restoro. Registry issues should be resolved immediately because they pose serious threats to your system. It can lead to system failure, crash and valuable data loss. Registry basically saves practically all the information and activities performed on your PC including the unnecessary and obsolete files like junk files, cookies, temporary files, and invalid entries. If these files are not removed they can corrupt the registry, damage dll files and installers thereby generating error codes like 1723 on your system. The easiest way to repair and clean the registry in seconds is to run Restoro on your PC. It is a smart, intuitive, advanced, and multi-functional PC repair tool. It is embedded with multiple powerful utilities and is a one-stop solution for all PC related issues. This software is compatible with all Windows versions. It is deployed with a highly functional registry cleaner that scans and detects all registry issues on your PC and removes them right away. It wipes out the unwanted files, repairs the damaged dll files and restores the registry. Other powerful utilities that are embedded in this software include an antivirus, a system optimizer and Active X controls and class modules. To resolve 1723 error code on your PC today, click here to download Restoro.
Read More
Manually cleaning your PC registry
[vc_row][vc_column][vc_column_text]

Manually cleaning your PC registry

Manually cleaning your PC registry may be the worst or best thing you ever decide to do. Registry keys that lie around on your computer, unused, can cause your computer to lag. This can end up in your computer not being able to load the easiest of programs and being slow at loading anything, let alone something that would take up a decent amount of memory. If your computer has slowed to almost an absolute stop, it is most probably the registry’s fault and the only option then is to clean it. You can get programs to do this for you, but they can be riddled with inaccuracies and viruses that could harm your computer even more. This is why some people choose to manually edit their computer. However, this is not without its flaws.

Registry Keys

Registry keys tend to have really long names. These names will be full of numbers and hyphens and will most likely give you no indication of what they do. Even some computer experts find it hard to understand what every computer’s registry keys do. This can make it very hard to see which ones are causing the problem; and if you don’t know what’s causing the problem, then there is no way you will be able to fix it. Some registry keys will be completely menial in what they do but some could be vital to even allow Windows to work on your computer.

Manual Registry Repair

Registry keys can also cause huge problems if you manually delete the wrong one. A lot of registry cleaners have the option to revive a key that they have deleted on you, which means that fixing an error that they made would be easy enough to do. However, when you manually delete registry keys, it will be an awful lot harder to get them back to work again afterward. This can cause your computer many problems and if you delete even one wrong key it is possible your computer will not even start. With the horrid naming system they have as well, it makes it very hard to determine what is important and what is not, which means it is all too likely that you will delete something important. However, those are the risks you have to take when you are cleaning out your registry. A registry cleaner has the same likelihood of messing with your computer and deleting something wrong that you have, so it is the same either way however a registry cleaner will do it with less hassle. But, some people say that if you do it yourself, it’s more likely to be right; that is why they prefer to do it manually and that is alright.

Conclusion

So, if you are manually deleting your registry keys that are unused, you’ll have to use a program that comes with Windows known as ‘regedit.exe’ which is incredibly difficult to use but may just be worth the hassle in the end. So, you don’t really need to put up with a slow computer, but be careful when messing with your registry manually! To repair and resolve this and other PC-related issues Click Here to download Restoro.[/vc_column_text][/vc_column][/vc_row]
Read More
Can’t drag and drop files or folders
Why Can’t drag and drop files or folders happens? In case you don’t know, there is a feature in Windows 10 called drag and drop that can help you move or copy files or even folders from one location to another. This feature is useful and can help you move or copy folders and files easier and quicker. However, if you encounter some problem while using this feature, worry not for this post will guide you on what you can do to resolve the problem. There are several suggestions you can check out to fix the problem. You can try to simply tap the Esc key or you could also troubleshoot the problem in a Clean Boot State. Aside from that, changing the drag height and width or disabling the User Account Control via Registry Editor might also help. For more details, refer to the instructions laid out below.

Option 1 – Try to tap the Esc key

According to some users who experienced the same dilemma, by simply tapping the Esc key, they were able to resolve the problem. All they did was tap the Esc key before they drag and drop the folder or files. Thus, you can try doing the same thing as it might also work for you. After you tap the Esc key, you have to check all the background applications and if you see some that could be related to the hotkeys or keyboard, you might have to disable or remove them. Once done, check if the problem is fixed or not.

Option 2 – Try troubleshooting the problem in a Clean Boot State

There are some instances that some conflicting programs installed in your computer might be the reason why you’re having trouble using the drag and drop feature in Windows 10. To identify which program is causing the problem, you need to put your computer in a Clean Boot State. To do so, follow the steps below.
  • Log onto your PC as an administrator.
  • Type in MSConfig in the Start Search to open the System Configuration utility.
  • From there, go to the General tab and click “Selective startup”.
  • Clear the “Load Startup items” checkbox and make sure that the “Load System Services” and “Use Original boot configuration” options are checked.
  • Next, click the Services tab and select the “Hide All Microsoft Services” check box.
  • Click Disable all.
  • Click on Apply/OK and restart your PC. (This will put your PC into a Clean Boot State. And to configure Windows to use the usual startup, just simply undo the changes.)
  • From there, start to isolate the problem by checking which one of the programs you installed recently is the root cause of the problem.

Option 3 – Try changing the drag height and width

The next thing you can do to resolve the issue is to try changing drag height and width by following these steps:
  • Tap the Win + R keys to launch the Run utility and type “Regedit” in the field and then tap Enter to open the Registry Editor.
  • Next, navigate to this registry key: HKEY_CURRENT_USERControl PanelDesktop
  • From there, choose to modify both the “DragHeight” and “DragWidth” located on the right pane.
  • After that, change the value to a very high number. Note that these values are nothing but pixel size to drag and drop folders or files.

Option 4 – Try disabling the User Account Control or UAC via Registry Editor

  • Tap the Win + R keys to launch the Run utility and type “Regedit” in the field and then tap Enter to open the Registry Editor.
  • After that, navigate to this registry key: HKEY_LOCAL_MACHINESOFTWAREMicrosoftWindowsCurrentVersionPoliciesSystem
  • From this path, modify the value of “EnableLUA” from 1 to 0. This should disable the UAC in your Windows 10 computer.
Read More
1 2 3 162
Logo
Copyright © 2022, ErrorTools. All Rights Reserved
Trademarks: Microsoft Windows logos are registered trademarks of Microsoft. Disclaimer: ErrorTools.com is not affiliated with Microsoft, nor claim direct affiliation.
The information on this page is provided for information purposes only.
DMCA.com Protection Status