8 Android Apps that threaten your security

Security on your PC and on your accounts is the important thing. Security on your phone device is also very very important. That is why we are bringing you a list of 8 applications that are marked by the cybersecurity team as ones that could be used to steal data from you. If you have by any chance any of these applications installed, uninstall them immediately.

List is as follows:

  • Cake VPN (com.lazycoder.cakevpns)
  • Pacific VPN (com.protectvpn.freeapp)
  • eVPN (com.abcd.evpnfree)
  • BeatPlayer (com.crrl.beatplayers)
  • QR/Barcode Scanner MAX (com.bezrukd.qrcodebarcode)
  • Music Player (com.revosleap.samplemusicplayers)
  • tooltipnatorlibrary (com.mistergrizzlys.docscanpro)
  • QRecorder (com.record.callvoicerecorder)

If you would like to read more helpful articles and tips about various software and hardware visit errortools.com daily.

If you like to learn and find out more about various Windows errors, and how to repair them go to our vast archive or use search to find articles that will explain and help you in solving your issue.
However, if you prefer to do things fast and with automatization then we are proposing to use an automated solution for your issues. The application that we are recommending is Advanced System Repair Pro
Advanced System Repair utilizes multiple tools all in one to give you a quick, simple, reliable, and very thorough diagnosis of your PC. It brings you all the tools you need in one program to clean, fix, protect, optimize and boost your PC!
1-Click Maintenance
All the tools to make it simple and easy! It's like having a professional technician at the click of a mouse.

Junk Cleaner
Keeping your computer free from unnecessary clutter also helps make your computer last longer. Like any other machine, if you keep it clean and take care of it, it will serve you better for longer!

Optimize background apps
Optimize applications background activity with the built-in Application Optimizer feature.

Disk Defrag
With a simple 1-click, Advanced System Repair speeds up your PC by assembling fragmented files on your machine and organizing them more efficiently.

Malware Removal
Finds and removes all types of harmful malware including trojans, worms, bots, adware, spyware, PUPs, and more!

Privacy Cleaner
The all-in-one privacy suite to Clean Your Tracks & Protect Your Privacy! Make your computer safe, secure, and more efficient!

System Tweak/Optimizer
ASR will analyze your complete system and settings to adjust your PC to function at its maximum performance.

Registry Cleaner
Over time, as you install and uninstall applications, the registry can become cluttered with old entries and broken settings which can result in program crashes, and annoying messages and slow the computer down.
Visit our Advanced System Repair Pro Download page to inform yourself about all the benefits of this software and get a free trial copy of it.
advanced system repair pro

Advanced System Repair Pro

One-click automated PC repair solution
ASR logo
With Advanced System Repair Pro you can easily
Replace damaged files
Restore performance
Free disk space
Remove Malware
Protects WEB browser
Remove Viruses
Stop PC freezing
DOWNLOAD
Privacy Policy | Terms of Use | Uinstall
Advanced System Repair Pro is compatible with all versions of Microsoft Windows including Windows 11

Share this article:

You might also like

Best Free Stock Photo WEB sites of 2021
The Internet has become an essential human right as stated in many countries around the world. Among many benefits that the internet offers are various sites selling Stock photographs for all of your needs. No matter are you working in the design industry or just want to make something for yourself there is a high chance that you will eventually need some photos for your work. Stock photo workIn this article we are going to go through the best Stock Photo sites BUT, we will focus on ones that give you royalty-free Photos, so no paying stuff here, just the best of the free world.

Adobe Stock free collection

https://tracker.tradedoubler.com In the last year of 2020, Adobe has made more than 70000 photos, videos, illustrations, and templates completely free. You are free to use provided material for personal, commercial, and creative work. Since this is adobe’s collection, well part of it, all of the given material is of high quality. You can also upload pictures to do a visual search to find similar ones.

Unsplash

https://unsplash.com/ Unsplash is a place where you will go if you want to find free-quality pictures. Since a lot of photographers are donating their selected work there you will find always consistently high-quality work there. Unsplash also has applications for Android and iOS so you can go through their stock on your mobile device as well. Photos are organized into categories that make searching much easier.

Pixabay

https://pixabay.com/ Pixabay is maybe well known due to its huge collection of both images and illustrations. There are tons and tons of stuff in there all royalty-free for use. The bad side is due to its strongest one, since there are so many images on its site, quality is not always top-notch like on Unsplash for comparison but you might find stuff here that you will not be able to do it anywhere else.

Pexels

https://www.pexels.com/ This is a great choice for web or app developers since you can find various UI ideas and designs on it. Many UI ideas ready for implementation will be found here and a decent amount of photos as well. The overall site is great for that purpose but please do read the license on each image since some of them are limited in use and cannot be used in commercial projects.

Pikwizard Stock

https://www.pikwizard.com/ Stock photography from Pikwizard is a place where you will go if you need high-quality pictures of people. There are a lot of images of people in natural poses doing things, nothing cheesy or unnatural, just pure and great-looking ones. Among other things is also a vast selection of cityscapes. Sadly as in the case of Pexels, not all pictures have the the same license so make sure to check terms of use before using one.

Gratisography Stock photos

http://gratisography.com/ Last on our list is a Stock site with a strange name and if you visit it you will see that it is not just the name that is strange. Gratisography is a stock site that aims to provide you with high-quality photographs but in different take from another site. These images are more artistic and surreal than other competitor sites. Images are uploaded almost on daily basis but since thematic is somewhat niche collection itself is relatively small.

Conclusion

That’s it, we hope that we have helped you in any way to find some material for your next project and I hope to see you soon back on errortools.com. Take care and all the best.
Read More
Fix Setup has failed Error in Windows
If you encounter the “Setup has failed to determine supported install choices” error when trying to downgrade or upgrade your Windows 10 computer, this signifies that there are some compatibility issues with the installation process and that Windows was not able to either downgrade or upgrade to another version. Usually, this error occurs when you are using the built-in options in Windows 10 upgrade or downgrade to another version of Windows. This option is mostly used as it keeps the user settings as well as data intact. Thus, you need to keep in mind a lot of parameters before you proceed with the installation because if there is any conflict in the process, you certainly won’t be able to downgrade or upgrade your Windows computer. To resolve the issue, here are some suggestions that might help.

Option 1 – Try running in Compatibility mode

This is the first thing you can try to resolve the issue instead of going right ahead on making a bootable device. So if you are downgrading Windows, you can try to run the installer in the compatibility mode for that specific Windows version.
  • Look for the setup file.
  • Once you find it, right-click on it and select Properties from the context menu.
  • After that, go to the Compatibility tab and mark the checkbox for “Run this program in compatibility mode for:” and from the drop-down list, select either Windows 7 or Windows 8.
  • You also have to check the “Run as administrator” option.
  • Now click the Apply button and then click OK to save the changes made and check if it has resolved the issue or not.

Option 2 – Option 2 – Try troubleshooting compatibility

This option is almost the same as the first one except it is an alternative way of fixing the “Setup has failed to determine supported install choices” error in case the first one didn’t work. In this option, you will troubleshoot the compatibility issue.
  • Look for the setup file.
  • Then right-click on it and select the “Troubleshoot compatibility” from the context menu.
  • After that, click on the “Try recommended setting” option. Once the process is done, the error message should be gone.

Option 3 – Try to use the setup file instead of an image

If you are running the Windows ISO image for the installation, you can try running the setup file instead. This is because when you try to install Windows from an image file directly, it has to be loaded into a virtual CD drive first, and then from there, further operations are carried out. And so, you can just bypass this mechanism to avoid getting the “Setup has failed to determine supported install choices” error.
  • First, you need to extract the disk file to an accessible location.
  • After that, go to Sources > Setup.exe.
  • Now run the setup file to upgrade or downgrade the Windows version. Just make sure that you do run the setup file as an administrator.

Option 4 – Try to do the upgrade or downgrade in a Clean Boot state

Putting your PC in a Clean Boot state can also help when you want to upgrade or downgrade your version of Windows without any trouble because, during this state, you can start the system with a minimum number of drivers and startup programs that will surely help you in isolating the root cause of the issue.
  • Log onto your PC as an administrator.
  • Type in MSConfig in the Start Search to open the System Configuration utility.
  • From there, go to the General tab and click “Selective startup”.
  • Clear the “Load Startup items” checkbox and make sure that the “Load System Services” and “Use Original boot configuration” options are checked.
  • Next, click the Services tab and select the “Hide All Microsoft Services” checkbox.
  • Click Disable all.
  • Click on Apply/OK and restart your PC. (This will put your PC into a Clean Boot State. And configure Windows to use the usual startup, just simply undo the changes.)
  • After that, try to install the Windows Updates or upgrade again.

Option 5 – Try to use the Media Creation tool

The Media Creation tool in Windows allows you to use the ISO installation file to make a bootable device that you can use to install Windows on your PC. Note that this is kind of different from the usual installation process as it could erase your computer’s current settings and data on the primary drive. Thus, before you proceed, you need to backup all your data into some removable drive and then use the Media Creation Tool to make a bootable drive.
  • After making the bootable drive, you need to plug it into your computer and then reboot.
  • Next, tap the F10 or Esc key to open the boot options.
  • Now set the boot priority of the removable drive the highest. Once the setup comes forth, follow the next onscreen instructions and install Windows without any problems.
Read More
An Easy Guide to Fixing Mingwm10.dll Error Code

An Easy Guide to Fixing Mingwm10.dll Error Code

Mingwm10.dll Error Code - What is it?

Mingwm10.dll is a dynamic link library file. This file is associated with the gaming program called the Adventures of Tintin developed for Windows OS by Ubisoft. Like all other DLL files, Mingwm10.dll file also contains small programs that are used to load and run this gaming program on your PC and several other programs developed by Ubisoft. Mingwm10.dll error code may occur when this file fails to run and load the Adventures of Tintin, the game on your PC. This error may appear on your PC in different formats such as:
  • "Mingwm10.dll not found."
  • "The file mingwm10.dll is missing."
  • "Cannot register mingwm10.dll."
  • "Cannot find C:\Windows\System32\mingwm10.dll."
  • "Mingwm10.dll Access Violation."
  • "Cannot start The Adventures of Tintin The Game. A required component is missing: mingwm10.dll.Please install The Adventures of Tintin The Game again."
  • "This application failed to start because mingwm10.dll was not found. Re-installing the application may fix this problem."

Solution

Restoro box imageError Causes

Mingwm10.dll error code is triggered due to a plethora of reasons. These include causes like:
  • Registry damage or corruption
  • Viral infection
  • Hardware failure
  • Corrupt or missing Mingwm10.dll file
Though this error is not fatal nonetheless it is advisable to fix it promptly to ensure you are able to access your desired program successfully without any restriction. Please note, this error can become a major PC threat as the underlying causes are registry corruption or viral infection.

Further Information and Manual Repair

Listed below are some of the best, proven, and easy DIY methods to help you resolve the Mingwm10.dll error code on your system. These are simple methods and require no technical expertise or know-how.

Method 1 - Restore the Missing File

As mentioned above DLL are shared files, there is a possibility that you accidentally deleted the Mingwm10.dll file on your system while uninstalling a program developed by Ubisoft. In such an event, the best and the easiest way to fix the error is to check your recycle bin and restore the deleted Mingwm10.dll file on your system.

Method 2 - Download Mingwm10.dll File from a Reliable Website

If you are unable to locate the missing Mingwm10.dll file in the recycle bin, then another method to fix the issue can be to download the Mingwm10.dll file from a trusted website. The reason why we say trusted is that viruses often enter computer systems when users download files from unreliable websites. So, to avoid bigger problems first make sure the site you select to download the Mingwm10.dll file is authorized and trusted.

Method 3 - Update Outdated Drivers

Hardware failure is related to outdated drivers. If the cause of the Mingwm10.dll error code is hardware failure, simply update the outdated drivers to resolve. Since the Mingwm10.dll file is used to run and load Adventures of Tintin, a gaming software program, then most probably the error is caused because of the outdated video card driver. Therefore update it to fix the issue. For this, go to the start menu, type Device Manager in the search bar. Once it opens use the driver update wizard to make updates. The wizard will walk you through the entire process, making the driver update task easy.

Method 4 - Repair the Corrupt Registry

The registry is the part that stores all the information and activities performed on your system. From important files to obsolete files it saves everything. If the obsolete files like the junk files, bad entries, invalid registry keys, and cookies are not removed from the registry frequently, these files accumulate in the registry and corrupt important system files like DLL files, popping error codes like Mingwm10.dll error. To resolve, download Restoro. It is a PC Fixer embedded with a  registry cleaner. The registry cleaner scans and removes all the obsolete files. It cleans the registry and the corrupted system files in just a few clicks, thereby fixing the problem. Click here to download Restoro to resolve the Mingwm10.dll error code on your PC
Read More
How to get rid of Gardening Enthusiast Toolbar

The Gardening Enthusiast toolbar is another product that is advertised as a helpful addition to your browsing experience when it is really nothing more than the software you should remove as soon as possible. It is touted as a toolbar that will provide you with a lot of useful gardening tips. That is the hook to get you to install it. But, in truth, the only thing that it does is provide you with links to popular gardening websites that you can easily find on any search engine.

When installed the extension will change your default search engine and home page to MyWay.com

While browsing the internet with this extension you will see additional sponsored ads and links throughout your browsing session.

Anti-virus applications have marked this extension as a Browser Hijacker and are therefore marked for removal. While not considered malware, the fact that many users find it to hinder browser performance has led to its detection and flag for optional removal.

About Browser Hijackers

Browser hijacking means a malicious program code has control over and modified the settings of your browser, without your permission. Practically all browser hijackers are made for marketing or advertising purposes. Usually, hijackers will force hits to internet sites of their preference either to increase web traffic producing higher ad earnings, or to obtain a commission for every user visiting there. Nevertheless, it isn’t that harmless. Your internet safety is jeopardized and it is extremely annoying. Once the malware attacks your laptop or computer, it starts to mess things up a whole that slows your PC down to a crawl. In the worse case, you will be forced to tackle serious malware threats too.

Browser hijacking symptoms

The typical symptoms that suggest having this malware on your PC are: your home page has been reset to some unfamiliar website; you see new unwanted favorites or bookmarks added, usually directed to ad-filled or pornography sites; the default online search engine has been changed and the web browser security settings have been lowered without your knowledge; find new toolbars that you didn’t add; you notice lots of pop-up ads on your screen; your web browser gets sluggish, buggy, crashes quite often; Inability to navigate to certain sites, especially anti-malware and also other security software webpages.

Exactly how browser hijacker finds its way to your PC

A browser hijacker can be installed on your computer when you go to an infected site, click an e-mail attachment, or download something from a file-sharing website. They could be included with toolbars, BHO, add-ons, plug-ins, or browser extensions. Other times you might have accidentally accepted a browser hijacker as part of a software program package (generally freeware or shareware). Examples of popular browser hijackers are Fireball, Ask Toolbar, GoSave, CoolWebSearch, Babylon Toolbar, and RocketTab. Browser hijackers can record user keystrokes to gather potentially invaluable information that leads to privacy issues, cause instability on computers, significantly disrupt user’s browsing experience, and ultimately slow down the PC to a point where it will become unusable.

Removing browser hijackers

Certain browser hijacking could be easily reversed by identifying and eliminating the corresponding malware application from your control panel. Unfortunately, many of the software products used to hijack an internet browser are deliberately designed to be hard to detect or get rid of. You should think of undertaking manual fixes only if you are a tech-savvy person, as risks are associated with tinkering with the computer registry and HOSTS file. Browser hijackers can be effectively removed by installing anti-malware software on the affected PC. If you need to remove persistent hijackers effectively, install the award-winning anti-malware tool Safebytes Anti-Malware. And employ a system optimizer, like Total System Care, to eliminate all related files in the registry and fix browser issues.

How To Get Eliminate Malware That Is Preventing Anti-Malware Installation?

All malware is inherently harmful, but certain kinds of malicious software do more damage to your computer or laptop than others. Certain malware types alter internet browser settings by including a proxy server or change the computer’s DNS configuration settings. When this happens, you’ll be unable to visit certain or all of the sites, and thus unable to download or install the necessary security software to get rid of the computer virus. If you are reading this, chances are you’re stuck with a virus infection that is preventing you to download and/or install Safebytes Anti-Malware software on your computer. Even though this sort of problem can be harder to get around, there are some steps you can take.

Remove viruses in Safe Mode

Safe Mode is a special, basic version of Microsoft Windows where only the bare minimum services are loaded to prevent viruses as well as other problematic applications from loading. In the event, the malware is set to load immediately when PC boots, shifting to this particular mode can prevent it from doing so. To enter into Safe Mode or Safe Mode with Networking, press F8 while the PC is starting up or run MSCONFIG and locate the “Safe Boot” options under the “Boot” tab. Once you reboot into Safe Mode with Networking, you could download, install, as well as update anti-malware software from there. At this point, you can run the antivirus scan to eliminate viruses and malware without any interference from another application.

Switch over to an alternate internet browser

Malicious code might exploit vulnerabilities on a specific browser and block access to all antivirus software websites. In the event you suspect that your Internet Explorer happens to be hijacked by a virus or otherwise compromised by cybercriminals, the most effective thing to do would be to switch over to a different browser like Firefox, Chrome, or Safari to download your chosen computer security software – Safebytes Anti-Malware.

Install security software on a flash drive

To successfully get rid of the malware, you need to approach the problem of installing the anti-malware program on the affected computer system from a different perspective. To run antivirus from a USB drive, follow these simple measures: 1) Make use of another virus-free computer to download Safebytes Anti-Malware. 2) Plug the USB drive into the clean computer. 3) Double click on the downloaded file to open the installation wizard. 4) When asked, select the location of the pen drive as the place in which you want to store the software files. Follow the activation instructions. 5) Unplug the pen drive. You may now use this portable antivirus on the infected computer. 6) Double-click the anti-malware program EXE file on the pen drive. 7) Click on “Scan Now” to run a complete scan on the affected computer for viruses.

Benefits and Features of SafeBytes Security Suite

If you’re planning to purchase anti-malware for your desktop, there are numerous brands and utilities for you to consider. Some are well worth your money, but most aren’t. You must select a company that creates industry-best anti-malware and has earned a reputation as trustworthy. Among few good applications, SafeBytes Anti-Malware is the highly recommended software program for security-conscious people. SafeBytes anti-malware is a very effective and easy-to-use protection tool that is designed for end-users of all levels of IT literacy. Using its cutting-edge technology, this application will help you get rid of several types of malware like viruses, worms, PUPs, trojans, adware, ransomware, and browser hijackers.

SafeBytes anti-malware takes PC protection to a totally new level with its enhanced features. Here are some of the features you will like in SafeBytes.

Anti-Malware Protection: Built upon a highly acclaimed anti-virus engine, this malware removal tool can detect and remove several stubborn malware threats such as browser hijackers, potentially unwanted programs, and ransomware that other typical antivirus programs will miss. Real-time Threat Response: SafeBytes offers real-time active supervision and protection from all known viruses and malware. It will constantly monitor your computer for hacker activity and also gives end-users sophisticated firewall protection. Safe Browsing: Safebytes allots all sites a unique safety ranking that helps you to have an idea of whether the website you’re about to visit is safe to browse or known to be a phishing site. Lightweight: SafeBytes is renowned for its low impact on processing power and great detection rate of countless threats. It works silently and efficiently in the background so you are free to make use of your personal computer at full power all the time. 24/7 Premium Support: You will get 24/7 technical support to quickly resolve any issue with your security software. SafeBytes will keep your personal computer safe from the latest malware threats automatically with hardly any input needed from you again. Malware problems will become a thing of the past once you put this software to use. You’ll get the best all-around protection for the money you spend on SafeBytes Anti-Malware subscription, there is no doubt about it.

Technical Details and Manual Removal (Advanced Users)

If you do not wish to use malware removal software and like to remove Gardening Enthusiast manually, you could do so by going to the Add/Remove Programs menu in the Control Panel and deleting the offending program; in cases of browser add-ons, you may uninstall it by visiting the browsers Add-on/Extension manager. You might also want to reset your home page and search engine providers, and also delete browsing history, temporary files, and internet cookies. To make sure of complete removal, find the following Windows registry entries on your computer and remove them or reset the values appropriately. However, editing the Windows registry is really a difficult job that only experienced computer users and professionals should attempt to fix the problem. In addition, certain malware keeps replicating which makes it difficult to eliminate. Completing this task in Safe Mode is advised.
Folders: C:\Program Files\GardeningEnthusiast_7j Files: Search and Delete: 7jbar.dll 7jhighin.exe 7jmedint.exe 7jregfft.dll 7jregiet.dll 7jhkstub.dll 7jreghk.dll 7jSrcAs.dll 7jSrchMn.exe NP7jStub.dll 7jPlugin.dll 7jauxstb.dll 7jbprtct.dll 7jdlghk.dll 7jradio.dll 7jieovr.dll INSTALL.RDF
Read More
How to Fix Windows 10 Error 0x80072ee7

How to Fix Windows 10 Error 0x80072ee7

Error Code 0x80072ee7 - What is it?

Error Code 0x80072ee7 is an error code that is most commonly associated with Windows 10 and the use of the Windows Store. Several things can cause this error, which has been present as an error message in Windows 10 and all the way back through Windows 8.

Common symptoms include:

  • An error message when you attempt to connect to the Windows Store.
  • Inability to download or install purchases from the Windows Store.

Fortunately, there are several simple methods that can be used to attempt to resolve Error Code 0x80072ee7 on your Windows machine. These methods don’t require advanced computer knowledge or familiarity with high-level tools, so the average user should be able to complete them without help. However, if you feel like you need assistance in resolving Error Code 0x80072ee7, always contact a qualified Windows repair technician who can assist you.

Solution

Restoro box imageError Causes

There are four basic things that can cause Error Code 0x80072ee7 to appear on a Windows device. The first is that the connection to the Internet is limited in some manner, either due to a system or equipment error. Secondly, some parts of the update components could be missing. Next, an error within the DNS can be a cause. Finally, having any kind of compatibility errors on the machine (for example, between the antivirus software that you run and the Windows Update tool) can lead to the appearance of Error Code 0x80072ee7.

Further Information and Manual Repair

There are a few different methods that you can try in order to resolve the appearance of Error Code 0x80072ee7 on your Windows machine. These are fairly simple to complete, but if you do not feel confident in your ability to carry them out successfully, you may want to get in touch with a qualified computer repair technician to help you.

Here are the best methods to employ as you seek to resolve Error Code 0x80072ee7 on your Windows device:

Method One: Check Your Connection

Make sure that you are able to connect to the Internet by visiting several common sites like Google in order to ensure that your issue is not related to your Internet service provider or the equipment that you are using to access the Internet.

Method Two: Use an Alternative DNS

If you believe that your DNS connection may be the problem, you can change the specific DNS that you are using to one that is provided by Google. This can resolve any conflicts that may occur because of the IP address detected on your device. In order to do this, simply follow these steps:

  • Step One: Go into your control panel and click on the option for “Network and Internet,” then select “Network and Sharing Center.” You’ll want to find the option to “change adapter settings,” which is normally located on the left bar of the navigation panel.
  • Step Two: Find the connection method that you are employing (i.e. Wi-Fi network).
  • Step Three: Right-click and find the connection properties menu. Under the TCP/IPV4 menu, click on the option to change your DNS numbers to manual entry and set your preferred DNS server to “8.8.8.8” and your alternate server to “8.8.4.4”.

Once these steps are complete, you can reattempt to connect to the Windows Store. You may need to restart your computer before connecting.

Method Three: Run the Fix It Tool from Windows

Microsoft has created a great tool that can automatically scan your computer for a number of common errors and attempt to fix them as they are encountered. This can be downloaded directly from the Windows site and can be used to try to fix not only Error Code 0x80072ee7 but also many other error messages that may pop up on your computer.

After you have run the Fix It tool, it is always a good idea to restart your computer to allow any changes that have been made to fully take effect.

Method Four: Use An Automated Tool

If you wish to always have at your disposal a utility tool to fix these Windows 10 and other related issues when they do arise, download and install a powerful automated tool.

Read More
Fixing the We can’t find a USB flash drive
One of the preferred ways to upgrade Windows 10 is by creating a bootable USB drive. However, you might change your mind when you encounter an error during the Windows 10 Setup that says, “We can’t find a USB flash drive”. Worry not for this error can be fixed using some suggestions that will be provided in this post. The funning thing about this error in Windows setup is that the computer says it’s not there when it’s clearly there. To fix this problem, you need to check if the USB device is accessible on your computer or you can also try a different USB device. In addition, you could check if there are any issues with both the USB 3.0 and USB 2.0 ports as it could be the reason why you’re getting the error or fix the bad sectors in the USB drive as well as see if the USB drive is set as the primary drive.

Option 1 – Try to check if the USB is accessible on your PC

The first thing you can do to resolve the problem is to check if you can access your USB device from your computer. All you have to do is open File Explorer and check if the USB device is listed there or not.

Option 2 – Try to connect a different USB device

The next thing you can do to fix the error is to try connecting a different USB device, specifically the one that has more significant storage space. You also have to make sure that it’s working on a different PC.

Option 3 – Fix any issues with the USB 3.0 and 2.0 ports

Although the USB 3.0 ports are compatible with the USB 2.0 ports, it does not necessarily mean that there wouldn’t be any problem when you use them which is why it’s best to fix any issues in them or better yet, use a compatible drive.

Option 4 – Try to fix the bad sectors in the USB drive via CHKDSK

When it comes to some issues concerning the hard drive or removable devices, there is a utility in Windows that might help which is called “chkdsk”. To use it, follow the steps below.
  • Tap the Win + S keys to open the Search box.
  • Then type “command prompt” in the field and from the search results that appear, right-click on Command Prompt and select “Run as administrator”.
  • After opening an elevated command prompt, copy and paste the following command and hit Enter:
CHKDSK [volume [[path] filename]] [/F] [/V] [/R] [/X] [/C] [: size]]
Note: In the command given above, “[/F]” will try to fix the system errors while “[/R]” will be the one to fix the bad sectors.
  • Now if you are prompted to run CHKDSK after your reboot your PC, just tap Y and reboot your PC.
  • If CHKDSK is not able to find any errors, tap the Win + E keys and navigate the access window. From there, right-click on the concerned drive and click on Properties.
  • After opening Properties, click on the tab Tools and then click on the “Check” button under the Error-checking section.
  • Wait until the process is completed and then restart your computer.

Option 5 – Try checking if the USB is set as the primary drive

You might also want to check if the USB drive is set as the primary drive because if it is, then it won’t appear on the list. It could also be that the USB drive has a primary disk in it. To undo it, you need to use the DISKPART utility.
  • In the Start Search, type “command prompt” and right-click on Command Prompt from the search results, and then select the “Run as administrator” option.
  • Next, execute the “diskpart” command to initiate the DISKPART utility.
  • After that, type the “list disk” command and tap Enter to display the list of disks on the computer. You have to take note of the drive number or letter of the concerned USB drive.
  • Once done, type the “select disk <X>” command where X is the drive letter or number and tap Enter.
  • Then execute the “list partition” command to see the list of all the partitions in your computer. It should be listed as 0, 1, or 2. 0 is the primary partition.
  • Now type the “select partition 0” command and tap Enter and then type “delete partition” to delete the selected partition.
  • You can do the same to the other partitions as well and when you’re done, execute the format command to turn the USB drive into a standard one.
Read More
How to map a network drive in Windows 11
windows 11 network drive
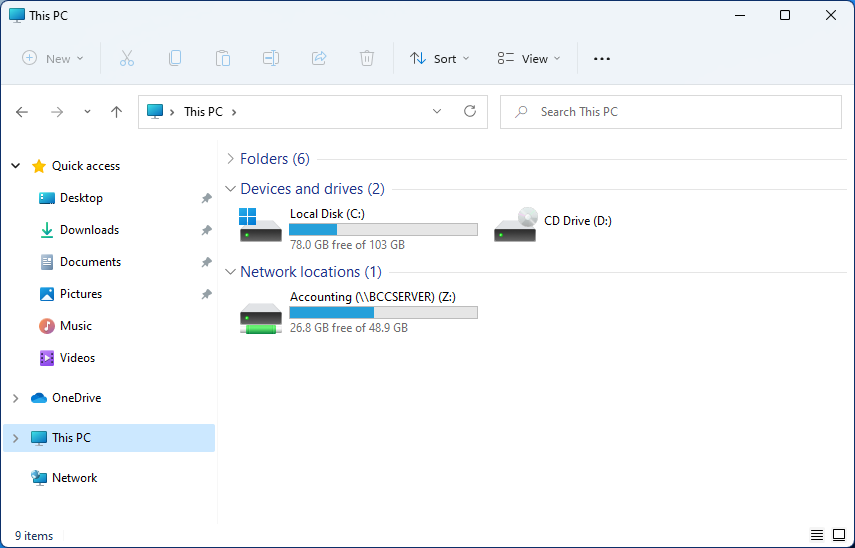
Mapping network drive has many benefits in terms of speed and ease of access of files via network. It lets you access the hard drive over the whole network like it was the hard drive inside your PC case. In order to easily and quickly map a folder as a network drive follow the guide below.
  1. Open File Explorer
  2. Click on the three dots icon in the Toolbar
  3. Select Map Network Drive
  4. Click the Drive drop-down menu
  5. Select a driver letter that you wish to assign as a network drive
  6. In the folder field enter network device and share name (click on browse to see all devices on local network)
  7. Check the box beside Reconnect at sign-in if you wish to automatically connect to a network drive on Windows startup
  8. Check Connect Using Different Credentials if you wish to connect to a network drive using different credentials that one used to login into Windows.
  9. Click Finish
After finishing setting Windows 11 will try to connect to the network drive and if successful drive icon will appear inside File Explorer and the drive will open up to see its content. If for any reason it cannot connect try checking user credentials, cables, network adapters, etc.
Read More
Automatically restart apps when you sign back
If you wish to continue where you have left off when you signed out of Windows follow this guide and learn how to continue your work after signing in, restart apps in your Windows. You can set Windows 10 to Automatically save your restartable apps when you sign out and restart them after you sign in. Here’s how:
  1. Right-click on the Windows logo to open the secret menu
  2. Select Settings
  3. Click open Accounts
  4. From the left side, select Sign-in options
  5. Scroll down till you see Restart apps setting
  6. Toggle the Automatically save your restartable apps when you sign out and restart them after you sign in setting to On position
Read More
How to Fix Windows 10 Error Code 0x8024001b

How to Fix Windows 10 Error Code 0x8024001b

Error Code 0x8024001b- What is it?

At its most basic level, Error Code 0x8024001b is an error that can cause problems with the installation and updates of software and operating system updates. The most common version of this error appears in Windows 10, but a similar error with a matching code number has been present in previous versions of the operating system, back through Windows 7.

Common symptoms include:

  • Programs freezing or locking up during use
  • The appearance of an error message regarding installation difficulties
  • Computer shutting down or freezing during operation
  • Difficulty in running multiple programs at the same time

Solution

Restoro box imageError Causes

There are two main causes for Error Code 0x8024001b, both of which are fairly simple:  Updates needed for the Windows Update tool itself and software that causes Windows Update to fail during installations through conflicts in system files. While these may seem like technical issues, these problems are actually easily resolved with a few simple steps. The average user can use the methods listed below to fix the problems on their own.

Further Information and Manual Repair

For users who want to address Error Code 0x8024001b for themselves, the steps below can be followed to address the two primary causes for the error. If you have difficulty in completing these steps or are not confident in your computing skills and ability to follow the listed steps, contact a Windows repair technician.

Here are the top methods to resolve Error Code 0x8024001b on your own:

Method One:  Check for Updates to Windows Update

In some cases, the Windows Update tool may need an update for itself. When you attempt to run updates or install wizards for other software, it can cause conflicts with the Windows Update process, slowing down your computer or causing it to freeze.

If you are attempting to run multiple installations or updates at the same time, it may also cause Error Code 0x8024001b to arise on your computer.

To resolve this issue, close out all programs, with the exception of the Windows Update tool. Within the tool, select “Check for Updates” and install any updates that are needed. When finished, you should restart your computer to ensure that all updates have been fully applied before attempting any other installations or updates.

Method Two:  Uninstall Conflicting Software

Another problem that can cause Error Code 0x8024001b is the presence of conflicting software. If Error Code 0x8024001b has only recently appeared on your computer, consider removing any software that has been added to your computer, running the Windows Update process, and restarting your computer before attempting to reinstall the problem software.

With any method that you use, it is important to remember to keep your Windows Updates current at all times. This is the best way to avoid the appearance of Error Code 0x8024001b and similar errors in the future, as stacked up updates are more likely to cause issues and conflicts with your other installed software and operating system.

While there are some tools out there that claim to be able to fix Error Code 0x8024001b for you, it is important to always thoroughly investigate the publisher and distributor of such software, as some of the tools available on the Internet will actually introduce malware and adware on your computer in the name of “protecting” your computer or resolving an error.

If you have tried to use both methods above and have not fully resolved Error Code 0x8024001b, get in touch with someone who is a qualified computer repair professional and is familiar with your particular version of the Windows operating system to assist you in finalizing your resolution.

Method Three: Use An Automated Tool

If you wish to always have at your disposal a utility tool to fix these Windows 10 and other related issues when they do arise, download and install a powerful automated tool.

Read More
Fix Logitech Blue Yeti mic not working in W11
Blue Yeti has gained popularity among streamers and users that want a high-quality mic for their setup. Without going into details of the hardware itself I will say it is a pretty good mic. Now the issues that have been reported with it are that Windows 11 can have issues with it resulting in the microphone not being recognized by the operating system. If you are one of the unfortunate Blue Yeti users and have this issue, do not despair because we have a solution for you, several to be more precise so you can easily fix the issue and get back to talking.

logitech blue yetiCheck cables

Sometimes it is not a software problem at all. First thing is to check if by any chance cable of the mic is disconnected, damaged, or similar. If the cable seems fine next step is to plug in the mic into another port in order to eliminate faulty jack on the computer. If nothing happened the last thing to try is to connect the mic to another computer so we can be sure that the mic itself is in working order so we can focus on software. If by any chance mic is not working on another computer that some hardware inspection of it will be required.

Set Blue Yeti as a default device

There is a chance that Windows 11 has not set Blue Yeti as a default audio device for recording and therefore you can not use it. In order to eliminate and fix this issue, right-click on the speaker icon on the taskbar in the far-right part of it and choose sound settings. Go down to the input section and pick Blue Yeti beside Choose device for speaking or recording.

Update driver

More often than not device not working is tied to malfunctioning or a bad driver. In order to eliminate and resolve this issue right click on the Start icon and choose device manager. Inside device manager expand the Sound, video and game controllers section. Right-click on each device in the section and choose update driver. Wait for the update to complete and restart your system.

Run the troubleshooter

Press ⊞ WINDOWS + I to open Windows settings. Go to System in the left pane and click on it. In the right panel choose and click on troubleshoot. Inside troubleshoot click on Other. Scroll down and locate the Recording Audio troubleshooter and then click on Run next to it. Wait for the troubleshooter to finish and follow on-screen instructions to resolve the issue.

Check Blue Yeti microphone privacy setting

Not very often, but sometimes privacy settings can be the issue even when everything else is working perfectly. In order to check privacy settings press ⊞ WINDOWS + I to open Windows settings and go to Privacy & Security on the left panel and click on it. On the right panel click on the microphone. Make sure that toggle next to Let apps access your microphone is ON.
Read More
1 2 3 162
Logo
Copyright © 2022, ErrorTools. All Rights Reserved
Trademarks: Microsoft Windows logos are registered trademarks of Microsoft. Disclaimer: ErrorTools.com is not affiliated with Microsoft, nor claim direct affiliation.
The information on this page is provided for information purposes only.
DMCA.com Protection Status