There is insufficient disk space to ...

If you are trying to copy a folder or file in your Windows 10 computer but encountered an error that says, “There is insufficient disk space to complete operation”, then you’ve come to the right place as this post will walk you through how you can fix the error. This kind of problem could be due to lack of disk space, corrupted disk, and many more. In such cases, this error usually pops up when you move or copy a file or folder to a particular location.

There are several potential fixes you can check out to fix this error. You can try to run the Storage Sense or Disk Cleanup or try copying or moving the file in a Clean Boot State. You could also try formatting the given partition to NTFS. For more information, refer to each one of the options provided below.

Option 1 – Try to delete the temporary files

The error could be caused by some temporary or junk files in your computer and so you need to clear them up to fix the problem. You can achieve that using the Storage Sense feature.

  • Open Setting > System > Storage from the WinX Menu.
  • From there, you will see a list of all the local and connected storage devices along with the details on the free space. Make sure that Storage Sense is on.
  • Next, find a link that says “Free Up Space” and click it to open.
  • After that, a screen which is the built-in program in Windows 10 will appear and will scan your computer for the following junk files so you can free up disk space:
    • Windows Upgrade Log Files
    • The system created Windows Error Reporting Files
    • Thumbnails
    • Temporary Internet Files
    • Previous Windows Installation Files
    • Delivery Optimisation Files
    • DirectX Shader Cache
  • Choose the files you want to get rid of and then click on the remove files option. Note that you’ll have an idea of the total size as you select any of the junk files listed above.
  • Now go to the “Free Up Space Now” section and click the Clean now button. This will get rid of all the temporary or junk files in your computer and should hopefully fix the “There is insufficient disk space to complete operation” error.

Option 2 – Restart your computer in a Clean Boot State

If the first options didn’t work and you still see the “There is insufficient disk space to complete operation” error when you copy folder or files, you can try putting your computer in a Clean Boot State and then again.

  • Log onto your PC as an administrator.
  • Type in MSConfig in the Start Search to open the System Configuration utility.
  • From there, go to the General tab and click “Selective startup”.
  • Clear the “Load Startup items” check box and make sure that the “Load System Services” and “Use Original boot configuration” options are checked.
  • Next, click the Services tab and select the “Hide All Microsoft Services” check box.
  • Click Disable all.
  • Click on Apply/OK and restart your PC. (This will put your PC into a Clean Boot State. And configure Windows to use the usual startup, just simply undo the changes.)
  • Now try to connect copy the folder or file once more and check if the error is now gone.

Option 3 – Try formatting the given partition to NTFS

Even though this option may take a lot of your time, it is proven to fix the “There is insufficient disk space to complete operation” error as reported by many users who also went through the same dilemma. So if the removable disk is showing the same error message no matter which computer you insert it, you might have to format the drive with the help of Command Prompt. But before you do that, you must know that all the contents of your drive will be permanently deleted after you format it.

  • Tap Win + R to launch Run.
  • Type in cmd and then tap Enter or click OK to open the Command Prompt.
  • And in the elevated window of Command Prompt, type in the following command:

format F: /fs:ntfs

In the command given above, “F” is the drive letter and “NTFS” is the file system you want. Just remember to replace “F” with the drive letter you want to format as well as the file system you prefer. Brace yourself as this process might take quite a while even if you only have a 4 GB USB drive – so you must not close the window under any circumstances as the drive might get corrupted and wait for the process to finish.

If you like to learn and find out more about various Windows errors, and how to repair them go to our vast archive or use search to find articles that will explain and help you in solving your issue.
However, if you prefer to do things fast and with automatization then we are proposing to use an automated solution for your issues. The application that we are recommending is Advanced System Repair Pro
Advanced System Repair utilizes multiple tools all in one to give you a quick, simple, reliable, and very thorough diagnosis of your PC. It brings you all the tools you need in one program to clean, fix, protect, optimize and boost your PC!
1-Click Maintenance
All the tools to make it simple and easy! It's like having a professional technician at the click of a mouse.

Junk Cleaner
Keeping your computer free from unnecessary clutter also helps make your computer last longer. Like any other machine, if you keep it clean and take care of it, it will serve you better for longer!

Optimize background apps
Optimize applications background activity with the built-in Application Optimizer feature.

Disk Defrag
With a simple 1-click, Advanced System Repair speeds up your PC by assembling fragmented files on your machine and organizing them more efficiently.

Malware Removal
Finds and removes all types of harmful malware including trojans, worms, bots, adware, spyware, PUPs, and more!

Privacy Cleaner
The all-in-one privacy suite to Clean Your Tracks & Protect Your Privacy! Make your computer safe, secure, and more efficient!

System Tweak/Optimizer
ASR will analyze your complete system and settings to adjust your PC to function at its maximum performance.

Registry Cleaner
Over time, as you install and uninstall applications, the registry can become cluttered with old entries and broken settings which can result in program crashes, and annoying messages and slow the computer down.
Visit our Advanced System Repair Pro Download page to inform yourself about all the benefits of this software and get a free trial copy of it.
advanced system repair pro

Advanced System Repair Pro

One-click automated PC repair solution
ASR logo
With Advanced System Repair Pro you can easily
Replace damaged files
Restore performance
Free disk space
Remove Malware
Protects WEB browser
Remove Viruses
Stop PC freezing
DOWNLOAD
Privacy Policy | Terms of Use | Uinstall
Advanced System Repair Pro is compatible with all versions of Microsoft Windows including Windows 11

Share this article:

You might also like

Razer Iskur gaming chair for healthy gaming
Razer Iskur
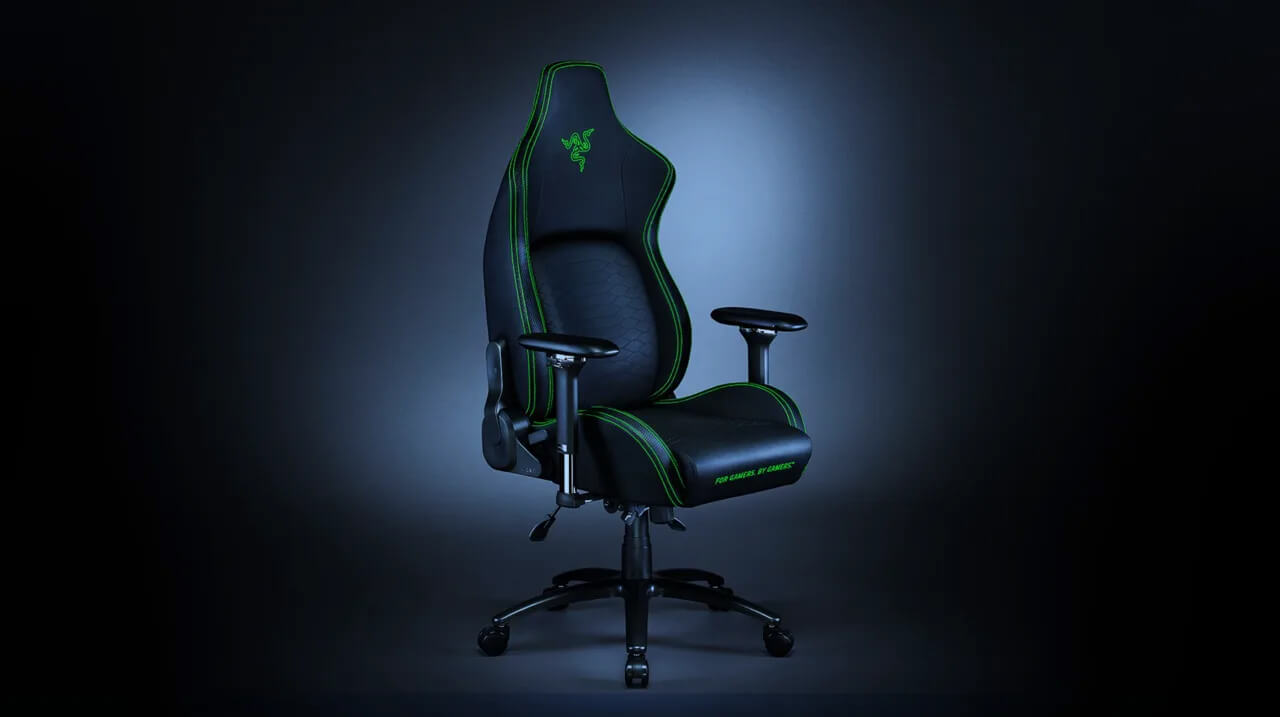
It seems that last few days we were riding some Razer bandwagon but rest assured that we are not sponsored by them in any way, truth is that simply they come up with some interesting accessories which I believe are worth covering. Gaming Chair itself comes in two colors, fully black and green black combination and it is not really an entry-level chair if we are talking about price. The chair itself is around 600USD depending on the distributor and considering that price range it is placed in more top cream of gaming chairs but it is worth every dime.

Iskur Specifications

Iskur is made of a steel frame with a reinforced plywood lumbar support frame for added weight tolerance. Frame and lumbar support are surrounded with memory foam and all of that is wrapped in cotton and polyester layer which is again wrapped in multi-layer synthetic leather making the chair very durable for long hours of daily use. The chair also comes with a memory foam head cushion which is detachable and removable if you do not wish to use it. On the Razer website among specifications, it stands that the chair is best suited for persons from 5’6” – 6’2” (170 – 190cm) height and up to 299lbs (136kg).

Features

The chair has, of course, height adjustment as any gaming chair and surprisingly it has great control for the armrest. The armrest can be adjusted in 4 different ways: up & down, left & right, forward & backward, and inward & outward. The backrest can be also tilted up to 26 degrees angle. All of these features are great and good but there is one more feature that really makes this chair stand out from rest and it is Lumbar support. Iskur has an adjustable lumbar support system on the lower part of the backrest. With your lumbar support secured, you can then make the necessary tweaks to optimize the rest of your posture using the Razer Iskur’s adjustable height, backrest, and armrests.

Conclusion

Razer Iskur is neither cheapest nor perhaps the best gaming chair you can buy, but it is a really good one. It is well manufactured and made to feel and look like a premium product that actually it is.
Read More
Fixing the No such interface supported
If you are using File Explorer but suddenly encountered an error saying, “No such interface supported”, read on as this post will guide you on how to fix the problem. This kind of error occurs due to the corruption in the system files which supports several tasks in the system that works with the Windows File Explorer process or File Explorer. This kind of error can give you a hard time in browsing the files on your computer, or when you open important utilities like the Control Panel, or when you copy files and other inconveniences. Needless to say, it won’t bring you any productivity at all and can only leave you frustrated. To fix this problem, there are several options you can try. You can try to run the System File Checker scan or the DISM tool. You could also try to re-register the potentially corrupted DLL files or fix the User Profile. For more details, refer to each one of the given options below.

Option 1 – Try to run System File Checker

System File Checker or SFC is a built-in command utility that helps in restoring corrupted files as well as missing files. It replaces bad and corrupted system files to good system files that might be the cause why you’re getting the errors 0x8024a11a and 0x8024a112. To run the SFC command, follow the steps given below.
  • Type “cmd” in the Start search and then right-click on the appropriate search result.
  • Next, select “Run as administrator” to open Command Prompt with admin privileges.
  • After opening Command Prompt, type in sfc /scannow
The command will start a system scan which will take a few whiles before it finishes. Once it’s done, you could get the following results:
  1. Windows Resource Protection did not find any integrity violations.
  2. Windows Resource Protection found corrupt files and successfully repaired them.
  3. Windows Resource Protection found corrupt files but was unable to fix some of them.
  • Now restart your computer and see if the problem is fixed or not.

Option 2 – Try to fix the User Profile

The next thing you can do to fix the problem is to fix the User Profile. All you have to do is migrate to a new User Profile in Windows 10 by creating a new User Account and migrating all your personal files from the current user profile folder in the C:/Users location to the new user profile folder which is also located in the same folder.

Option 3 – Run the DISM tool

You can try running the Deployment Imaging and Servicing Management or DISM tool to fix the “No such interface supported” error. Using this built-in tool, you have various options such as the “/ScanHealth”, “/CheckHealth”, and “/RestoreHealth”.
  • Open the Command Prompt with admin privileges.
  • Then type in the following commands and make sure to hit Enter right after you type each one of them:
    • Dism /Online /Cleanup-Image /CheckHealth
    • Dism /Online /Cleanup-Image /ScanHealth
    • exe /Online /Cleanup-image /Restorehealth
  • Do not close the window if the process takes a while as it will probably take a few minutes to finish. Once it’s done, restart your computer.

Option 4 – Try to re-register the problematic DLL file

You may have to re-register the ntdll.dll file using the regsvr32.exe before you can successfully install the program and fix the error. The Regsvr32 tool is a command-line utility that can be used to register and unregister OLE controls like DLL and ActiveX (OCX) controls in the Windows operating system. Follow the steps below to use it.
  • Open Command Prompt as admin from the WinX menu.
  • Next, type the following command in the elevated Command Prompt and hit Enter to execute it. This will re-register the affected DLL file using the Windows operating system tool, regsvr32.exe.
regsvr32 c:windowssystem32actxprxy.dll
  • After you execute the given command, you should see a message saying, “DllRegisterServer in vbscript.dll succeeded” if the Regsvr32 tool was able to run successfully. If it didn’t work, you can try to execute this command instead: FOR /R C: %G IN (*.dll) DO "%systemroot%system32regsvr32.exe" /s "%G"
  • Once it’s done, restart your computer.
Read More
How to Fix Installation Error 1628

Repair Error 1628

What Is Installation Error 1628?

Installation Error 1628 is, as the name suggests, an installation error. When it occurs, a generic 1628 message is displayed to the user. When this message appears, it is either a problem with the install files or an issue with the InstallShield.

Solution

Restoro box imageError Causes

Installation Error 1628 is caused because every Windows-based program or application has been designed that such that it has to be installed on the computer for use. This installation process is important because it not only moves files to the appropriate location on one’s hard drive but also because the process creates registry entries in Windows System files. A vast majority of these programs and applications have a built-in tool that’s responsible for aptly performing this installation. This built-in tool is the InstallShield. This establishes that when this error occurs, it is either because of some unforeseen issue that occurred during the installation process or because of some problem with the InstallShield.

Further Information and Manual Repair

In order to keep this error from occurring in the future, some recommendations are outlined below.
  • Check the installation disc and determine if there are any smudges, scratches, or fingerprints on it. If the system is unable to read data from the disc, Installation Error 1628 will be generated. In order to ensure that the Installation Disc is clean, use a microfiber cloth. Dampen it lightly with water and clean the disc. Wipe the inside of the disc lightly in an outward direction, making sure that it is not wiped in a circular pattern. Try to reinstall the application or program after cleaning the disc. The issue should be resolved. However, if it persists, some problems may be with the InstallShield.
  • The alternative solution is to repair the InstallShield and the procedure goes as follows.
  1. Stop InstallShield’s running process. It may have been crashed and simply needs to be restarted. Now access task manager. Press Ctrl+Alt+Del and the task manager will open. Now go to the processes tab and disable ‘idriver.exe’ and ‘msiexec.exe’ from here.
  2. Now go to ‘C: Program Files/Common Files’. Here you will find the ‘InstallShield’ folder. Select ‘rename’ and modify the folder name to ‘InstallShield1’. Confirm rename and start the installation process again. Now Windows will try to re-install any InstallShield files one needs.
  3. If the error persists after renaming the InstallShield folder, download the Windows Installer from Microsoft’s website. This file will determine whether or not your version is valid. Old versions often have bugs that cause problems. Your system is now ready to be used.
Read More
How to Fix Slow file copy speed in Windows 10
We tend to move and copy tons of files on our PCs and mostly, the process of copying or moving files, especially if the file has the size of 1GB or up, tends to take quite long. This may be caused by some issues which is why you face slow copy or move speed. So if you are experiencing this issue on your Windows 10 computer, then read on as this post will give you a couple of solutions you can try to increase the speed in copying or moving files. Follow the given instructions below.

Option 1 – Try to change the USB port

You might want to change the USB port since modern computers have a variety of USB ports. So if your USB drive supports USB 3.0 or 3.1, make sure that you plug it inside a USB 3.0 or 3.1 ports. If you’re not sure which port, just keep in mind that the USB 3 port is usually blue or you can also use your computer’s documentation or manual as a reference to locate it. It may sound nothing but changing the USB port can actually improve the copying or moving speeds drastically so this should be the first thing you can try to speed up the process of copying or moving files.

Option 2 – Update the USB Controller Drivers

  • First, click the Start button and type “device manager”.
  • Then click on the “Device Manager” from the search results to open it.
  • From there, look for the “Universal Serial Bus controllers” option and then right-click on each one of the USB drivers and select the Update Driver from the menu.
  • Restart your PC and then click the “Search automatically for updated driver software” option.
You also have the option to update the motherboard and the USB driver from the manufacturer’s official website.

Option 3 – Check for any hard disk errors

  • On your desktop, right-click on the “This PC” or computer icon and then select Manage to open the Disk Management. Here you get to check your drive’s health.
  • Next, click on Disk Management on the left side panel.
  • From there, check the state of your drives. If it shows that all your partitions are healthy then it means all is good and that the problem may have something to do with some physical issues with your hard drive.
You might also want to run the CHKDSK utility to help you fix any issues with your hard disk. If your hard drive has issues with integrity, the update will really fail as the system will think that it’s not healthy and that’s where the CHKDSK utility comes in. The CHKDSK utility repairs hard drive errors that might be causing the problem.
  • Open Command Prompt with admin privileges.
  • After opening Command Prompt, execute the following command and hit Enter:
chkdsk /f /r
  • Wait for the process to be completed and then restart your computer.

Option 4 – Try to disable Windows Auto Tuning

Disabling Windows Auto-Tuning can also help in increasing the copying or moving of files in your computer. It is said that this feature improves the performance of programs that receive TCP data over a network by adjusting the receive buffer size dynamically throughput and latency of the link. Thus, if you are trying to copy some data over the network, then the Auto Tuning feature is playing a role here. And in some cases, disabling this feature completely resulted in a lot faster copy speeds over the network.

Option 5 – Try changing the USB Removal Policy

  • First, plug your USB drive or external device into your PC and then open This PC.
  • Next, right-click on your device and select Properties.
  • After that, go to the hardware tab and select the storage media that you want to enhance and then click on the Properties button.
  • From there, you can select the Better performance option if you wish for your device to have a better performance. Once you select this option, it will enable write caching in your Windows 10 computer but you need to use the “Safely Remove Hardware” option from the notification area to safely disconnect the device otherwise it may result in data corruption.

Option 6 – Format your drive

  • To get started formatting your drive, tap the Win + E keys and then go to the access page of the drive.
  • Next, right-click on the drive and select Format.
  • After that, uncheck the “Quick Format” option and then format your drive properly.
  • Now once the formatting process is finished, unplug the drive and plug it back in afterward.
  • Check if the error is already fixed. If the drive is not initialized, tap the Win + R keys and hit Enter.
  • After opening the Run dialog box, type “diskmgmt.msc” and hit Enter to open Disk Management.
  • From there, right-click on the drive volume and select initialize disk.
  • Next, select the correct partition type and proceed.
Read More
Attempt was made to reference a token
If you were trying to open File Explorer but it suddenly stopped working and you encounter an error message that states, “An attempt was made to reference a token that does not exist”, read on as this post will guide you in fixing this problem. This problem was initially reported after the April Update and Microsoft was able to fix it right after correcting the build. However, this effort seems futile for some users as recently, some reported getting the same error when they try to open not just Windows File Explorer but also with utilities like Microsoft Management Console or MMC, Visual Studio, Task Manager, Printer, Recycle Bin, etc. Two of the most likely causes of this error are a troublesome Windows Update and corrupted system files. Whatever the cause is, here are some suggestions you can follow to fix the “An attempt was made to reference a token that does not exist” error.

Option 1 – Try to re-register the problematic DLL file

You may have to re-register the ntdll.dll file using the regsvr32.exe before you can successfully install the program and fix the ntdll.dll file crash error. The Regsvr32 tool is a command-line utility that can be used to register and unregister OLE controls like DLL and ActiveX (OCX) control in the Windows operating system. Follow the steps below to use it.
  • Open Command Prompt as admin from the WinX menu.
  • Next, type the following commands in the elevated Command Prompt and hit Enter to execute the command. This will re-register the affected DLL file using the Windows operating system tool, regsvr32.exe.
    • exe /[DLL file]
    • exe [DLL file]
Note: Replace “[DLL file]” with the name of the DLL file that was pointed out in the error.
  • After you execute the given commands, you should see a message saying, “DllRegisterServer in vbscript.dll succeeded” if the Regsvr32 tool was able to run successfully. After that, try to install the program again and see if it now works.

Option 2 – Replace the DLL file from a trusted source

  • First, you need to get the new DLL file from another computer with preferably the same file version number.
  • After that, you need to boot your PC into Safe Mode and navigate to the paths listed below and then replace the file using a USB drive or other external storage devices.
    • x86: This PC > C:/Windows/System32
    • x64: This PC > C:/Windows/SysWOW64
  • Next, type “cmd” in the Cortana search box and right-click on Command Prompt, and select “Run as administrator” to open it with administrator privileges.
  • Now type the “regsvr32 ntdll.dll” command and hit Enter.
  • Restart your PC and check if the error is now fixed.

Option 3 – Perform a System File Checker scan

The System File Checker or SFC scan could detect and automatically repair damaged system files that could be causing the “An attempt was made to reference a token that does not exist” error to pop up. SFC is a built-in command utility that helps in restoring corrupted files as well as missing files. It replaces bad and corrupted system files with good system files. To run the SFC command, follow the steps given below.
  • Tap Win + R to launch Run.
  • Type in cmd in the field and tap Enter.
  • After opening Command Prompt, type in sfc /scannow and hit Enter.
The command will start a system scan which will take a few whiles before it finishes. Once it’s done, you could get the following results:
  1. Windows Resource Protection did not find any integrity violations.
  2. Windows Resource Protection found corrupt files and successfully repaired them.
  3. Windows Resource Protection found corrupt files but was unable to fix some of them.

Option 4 – Try reverting back to the previous build of Windows

This kind of error might have something to do with a Feature Update so you can try to revert your computer to a previous build of Windows 10 as it could help you fix the problem. In this case, it would better if you refrain from updating your Windows 10 computer until this problem is completely resolved by Microsoft.
Read More
Fix DISM Error: The scratch directory size ...
One of the most useful and powerful built-in utility in Windows 10 is the DISM tool. This tool can be used with the Command Prompt command line as well as for other purposes. However, it is not without flaws and there are times when you may encounter some issues while using it. One of the problems you can get while using the DISM tool is the following error:
“The scratch directory size might be insufficient to perform this operation”
This kind of error in DISM occurs when the DISM command is executed from the Windows Recovery Environment due to the limited size permissions of a delivery where the operating is being performed. To fix this DISM error, you need to follow the instructions laid out below. Step 1: First, tap the Win + R keys to open the Run utility and then type “cmd” in the field and tap Enter to open Command Prompt. Step 2: Next, you have to specify a scratch directory that contains the Windows folder and to do that, you can either use the DIR command or the BCEDIT command. So in the elevated command prompt type and enter “dir” or “bcedit”. Step 3: After that, you will see a list of folders inside the C: partition. Now you have to create a folder named “scratch” inside the partition. To do so, execute the following command:
mkdir C:Scratch
Note: The command you just entered will create a directory inside the root of the C: partition named Scratch. Step 4: Now that you’ve created the Scratch folder, note that each time you run any of the DISM commands, you have to enter the following code snippet in them:
/ScratchDir:C:Scratch
 Note: For instance, if you are using the DISM tool to repair the offline Windows image, instead of executing the “Dism /Online /Cleanup-Image /RestoreHealth” command, you now have to execute the “DISM /Image:C: /ScratchDir:C: Scratch /Cleanup-Image /Restorehealth” command. And if you want to remove a selected installed update package, you can use the “DISM /image:C: /ScratchDir:C:Scratch /Remove-Package /PackageName:Package_for_RollupFix~31bf3856ad364e75~amd64~~16299.196.4.9” command. Keep in mind that the mentioned package is only an example. And lastly, you also have to replace the drive letter in the new code snippet when you execute the commands given above.
Read More
Fix Unsupported video type/invalid file path
The MP4 MIME-type is a video type that is mainly configured in IIS or Internet Information console. It is the one that instructs a web browser to use the default video application when running MP4 files from websites. MIME which stands for Multipurpose Internet Mail Extensions which offers a way to identify files on the Internet-based on their format and nature. For example, when a content-type header value like MP4 is defined in an HTTP response, the browser can be configured to open the file with the proper plugin. However, there are some servers that don’t have an associated MIME type to support MP4 files and so they fail to play these files. In such cases, you will encounter the “Unsupported video type or invalid file path” error, especially when you use the Internet Explorer browser in Windows 10. To fix this problem, you may have to configure the MP4 MIME type in IIS but you might find that IIS is not enabled in Windows 10 which is why you need to turn it on or enable it first. For more details, refer to the following instructions below.

Step 1 – Enable IIS:

  • Open Control Panel and go to Programs > Programs and Features.
  • From there, select “Turn Windows features on or off” to mark its checkbox.
  • After that, select “Web Management Tools” and expand its menu and look for “IIS Management Console”.
  • Click the OK button and then wait for a couple of seconds to allow Windows to successfully apply the changes made.

Step 2 – Configure the MP4 MIME type in IIS:

  • Go to Control Panel and from there, access Administrative Tools.
  • Next, click “Internet Information Services Manager” from the list of given options.
  • Once confirmed, it will open the IIS console where you have to click the name of your IIS Server located on the left panel. This will enable several options in the central details section.
  • Now double click on the icon with the label “MIME Types”.
  • After that, you should see an “Add” link option on the right panel. Click on the link to open a configuration dialog box.
  • Then type “.mp4” in the File Name Extension field and enter “video/mp4” in the textbox of the MIME Type.
  • Click the OK button to save the changes made. This should fix the “Unsupported video type or invalid file path” error on your Windows 10 computer.

Step 3 – Reset your browsers:

Mozilla Firefox

  • Open Firefox and click the icon that looks like three stacked lines located at the top-right section of the browser.
  • Next, select the question mark icon from the drop-down menu.
  • Then select “Troubleshooting information” from the slide-out menu.
  • After that, click on the “Reset Firefox” button located at the top-right section of the newly opened web page.
  • Now select “Reset Firefox” in the confirmation pop-up window that appears.

Google Chrome

  • Open Google Chrome, then tap the Alt + F keys.
  • After that, click on Settings.
  • Next, scroll down until you see the Advanced option, once you see it, click on it.
  • After clicking the Advanced option, go to the “Restore and clean up option and click on the “Restore settings to their original defaults” option to reset Google Chrome.
  • Now restart Google Chrome.

Internet Explorer

  • Launch Internet Explorer.
  • Next, click the wrench icon for Settings.
  • Then click Internet Options.
  • After that, go to the Advanced tab.
  • From there, click the Reset button. This will reset Internet Explorer’s settings to their default condition.
  • Now click OK to save the changes made.
Read More
Edge and Store apps are not connecting
If your Microsoft Edge browser and Windows Store apps are now unable to connect to the internet after you have just installed the newly released Windows 10 v1809 October 2018 update, then this post might help. As you know, Microsoft has made a change recently and because of this, some users are getting the “Hmm, we can’t reach this page” error when they try to open Microsoft Edge as well as other pre-installed apps like News, Mail, and so on. Aside from that, you also won’t be able to connect the Microsoft Store apps to the internet. What’s strange is that you can connect to the internet using other programs like Google Chrome, Internet Explorer, and many more. Apart from checking your internet connection, there are other things you can to resolve the problem. If your Windows Store apps are not able to connect to the internet and you’re only getting the Error 80072EFD, then you might have to enable IPv6 as the new Windows 10 v1809 requires IPv6 to be enabled so that you can use the UWP apps. And so you have to enable IPv6 in the network card along with IPv4. To do so, follow the steps below. Step 1: Tap the Win + R keys to open the Run dialog box. Step 2: After that, type “ncpa.cpl” and hit Enter or click OK to open Network Connections. From there, you will see your currently connected network profile. Step 3: Right-click on your network profile and select Properties and then go to the Networking tab and look for the “Internet Protocol Version 6 (TCP/IPv6)” and select its corresponding checkbox. Step 4: Now click the OK button to save the changes made and restart your computer.
Read More
How to Fix Windows Error 0x8024402f

How to Fix Windows Error 0x8024402f

Error Code 0x8024402f What is it?

Error code 0x8024402f is a Windows Update error indicating some sort of connectivity issue. Windows may show you the Error 0x8024402f in Windows 10 whenever you try to download and install new updates. This error is caused by small interruptions in communications between the computer to be updated and the update to be downloaded. These issues usually resolve themselves. Windows Firewall settings may also be blamed for this problem. Common symptoms
  • Error code 0x8024402f prevents you from installing the latest version of Windows 10
  • This Error prevents you from downloading new and latest updates from Microsoft

Solution

Restoro box imageError Causes

  • This error is caused by a problem with the Microsoft .NET Framework 4 Client Profile.
  • This error can occur even if no changes are made to network settings.
  • Your Firewall settings may cause this problem.
  • A high number of update requests on the Windows Update server may cause this problem.

More Information and Manual Repair

Method 1:

  1. Exit Windows Update. Wait for 10 to 15 minutes, and then restart Windows Update to check for updates. OR
  2. Turn on Windows Automatic Update so that updates are installed automatically every 24 hours.

Method 2:

Uninstall the Microsoft .NET Framework 4 Client Profile:
  1. Click Start>Control Panel>Programs and Features
  2. Locate the Microsoft .NET Framework 4 Client Profile
  3. Right-click and then select Uninstall/Change
  4. Confirm that you want this component to be uninstalled. This may take a few minutes.
  5. Reboot your computer
  6. When the system has restarted, re-run Windows Update as you normally would.

Method 3:

Check your internet connection: As mentioned earlier the error code 0x8024402f is related to connection problems with Windows Update. It means that your computer isn’t able to connect with the Microsoft Update server; therefore you’re unable to receive any new updates. So, you either have a problem with the internet connection or the Microsoft Update server is corrupted. If the problem is caused by the Microsoft Update server, you just need to wait a while because Microsoft staff will most probably solve the problem quickly.

Method 4:

But, if the issue isn’t related to your internet connection, you should perform the following method:
  1. Got to Search and enter Identify and Repair
  2. Open Identify and repair network problems
  3. Click on the Search Result.
  4. It should automatically Start the identifying process
  5. If your network has any issue then it will show you and ask you to fix it.
Now, establish your internet connection. The problem 0x8024402 should be solved by now and you’ll be able to update your Windows 10 Technical Preview to the latest 10049 builds.

Method 5:

Turn on Windows Firewall: If you have some anti-malware or antivirus on your Windows 10 PC, then it might turn off Windows Firewall on its own or create its own Firewall as default. If this is the case, you will need to turn on Windows Firewall.
  • Search for "Firewall" OR
  • Click on Windows Firewall from Control Panel.
  • On the left pane, Click on Turn Windows Firewall ON or OFF.
  • Click on Turn on Windows Firewall then Click Ok.
  • That is it. Now, try again and see if you are still getting Windows Update Error 0x8024402f in your Windows 10.

Method 6:

This is an advanced method:
  • If the above steps fail, then you might surely want to try this advanced method, which is Enabling ActiveX in your Router Firewall settings.
  • If you had turned off ActiveX in your Router Firewall settings then this must be the culprit and so Error 0x8024402f is shown whenever you try to get Windows Update.
  • All you need to do is Enable ActiveX by going to your Router Firewall settings and that should do it. The Error should be gone for good now and you will be easily able to install the Updates in your Windows 10.
If you do not possess the technical expertise required to accomplish this yourself or do not feel comfortable doing so, download and install a powerful automated tool to get the job done.
Read More
File or directory is corrupted and unreadable
If you encounter an error message that says, “<Drive>: is not accessible, The File or directory is corrupted and unreadable” when you try to connect your USB or external device, then the File System could have been corrupted or the external device might be infected with malware. On the other hand, it is also possible that the device might have some physical damage. To fix the “The file or directory is corrupted and unreadable” error, you can try to run Check Disk or scan your computer for malware or you could also format the destination drive. For more details, refer to each one of the given options below.

Option 1 – Run the Check Disk utility

You can also run the Check Disk utility to fix the error when you connect your USB or external device.
  • In the Windows Search box, type “command prompt” and from the search results, right click on Command Prompt and select “Run as administrator”.
  • After opening Command Prompt, type this command and tap Enter: chkdsk <Partition Letter>: /f /r /x /b
  • The command you entered will start to check for errors and fix them automatically. Else, it will throw an error message saying, “Chkdsk cannot run because the volume is in use by another process. Would you like the schedule this volume to be checked the next time the system restarts? (Y/N)”.
  • Tap the Y key to schedule Disk Check the next time your computer restarts.

Option 2 – Try to format the destination drive

Formatting the drive can also help you resolve the error. To format it, follow these steps:
  • To get started formatting your drive, tap the Win + E keys and then go the access page of the drive.
  • Next, right click on the drive and select Format.
  • After that, uncheck the “Quick Format” option and then format your drive properly.
  • Now once the formatting process is finished, unplug the drive and plug it back in afterwards.
  • Check if the error is already fixed. If the drive is not initialized, tap the Win + R keys and hit Enter.
  • After opening the Run dialog box, type “diskmgmt.msc” and hit Enter to open Disk Management.
  • From there, right click on the drive volume and select initialize Disk.
  • Next, select the correct partition type and proceed.
Option 3 – Try scanning your computer for malware using Windows Defender Your computer could be infected with malware which might have triggered the “The file or directory is corrupted and unreadable” error. To fix this, you need to scan your computer using a reliable program like Windows Defender.
  • Tap the Win + I keys to open Update & Security.
  • Then click on the Windows Security option and open Windows Defender Security Center.
  • Next, click on Virus & threat protection > Run a new advanced scan.
  • Now make sure that Full Scan is selected from the menu and then click the Scan Now button to get started.
Read More
1 2 3 162
Logo
Copyright © 2022, ErrorTools. All Rights Reserved
Trademarks: Microsoft Windows logos are registered trademarks of Microsoft. Disclaimer: ErrorTools.com is not affiliated with Microsoft, nor claim direct affiliation.
The information on this page is provided for information purposes only.
DMCA.com Protection Status