How to Fix Can’t start your Camera, 0xa00f429f

If you are using the Camera app on your Windows 10 computer but encountered an error code 0xa00f429f with an error message that says, “Can’t start your camera”, read on as this post will guide you in fixing this problem. This kind of error in the Camera app could be due to a recent update gone wrong or it could also be due to a corrupted driver. If you are certain that the camera is connected and is properly installed, you can try to check for updated drivers.

The error code signifies that the drivers have to be updated. However, that isn’t always the case sometimes as the problem could also have something to do with corruption in the driver. The effective ways to troubleshoot this problem would be trying to reinstall or reset the Windows Camera app, or update, rollback or uninstall some device drivers as well as use the Registry Editor. Before you proceed with the instructions provided below, make sure that you have admin privileges and don’t forget to create a System Restore point.

Option 1 – Try to reset or reinstall the Windows Camera app

As pointed out earlier, you can also reset the Camera app to fix the error. To do so, follow the steps below.

  • The first thing you have to do is go to the My Pictures folder under the C: drive of the File Explorer and then delete the Camera Roll folder.
  • Once you’re done, right-click on an empty area on your screen and create a new folder and name it “Camera Roll”.
  • Then from the Start menu open the Settings app and select System.
  • From there, navigate to the Apps and features section.
  • Now go to Camera and click on the Advanced Options and click the Reset button.

Option 2 – Try to reinstall the Camera app

If resetting the Camera app didn’t help, you might want to reinstall it by following these steps:

  • Tap the Win + X keys and select the “Windows PowerShell (Admin)” option from the menu to open Windows PowerShell as admin.
  • Next, type this command to uninstall the Camera app: Get-AppxPackage *camera* | Remove-AppxPackage
  • Once done, exit the Windows PowerShell and restart your computer and then try to install the latest version of the Camera app from Microsoft Store.

Option 3 – Try to rollback, update or disable drivers

The next thing you can do to fix the error code 0xa00f429f in the Camera app is to roll back, or update, or disable device drivers. It is most likely that after you updated your Windows computer that your driver also needs a refresh. On the other hand, if you have just updated your device drivers then you need to roll back the drivers to their previous versions. Whichever applies to you, refer to the steps below.

  • Open the Devices Manager from the Win X Menu.
  • After opening the Device Manager, look for the device drivers which have a yellow exclamation mark.
  • Then right-click on each one of them. If you haven’t updated this driver in a while, select the “Update Driver” option. On the other hand, if you’ve just updated this driver, then select the Uninstall Device option.
  • Next, follow the screen option to update or uninstall it.
  • Finally, restart your computer. It will just reinstall the device drivers automatically if you have chosen to uninstall them.

Note: You can install a dedicated driver on your computer in case you have it or you could also look for it directly from the website of the manufacturer.

Option 4 – Try to use the Registry Editor

  • Tap the Win + R keys to open the Run dialog box and type “Regedit” in the field and then hit Enter to open the Registry Editor.
  • Next, navigate to this registry key: ComputerHKEY_LOCAL_MACHINESOFTWAREWOW6432NodeMicrosoftWindows Media FoundationPlatform
  • From there, right-click on any empty space on the right side part of the window and select New > DWORD (32-bit) Value.
  • Then name it as “EnableFrameServerMode” and double click on it.
  • Now set its value data to “0” and its base value as Hexadecimal and then click on OK.
  • After that, restart your computer and see if it helped in fixing the problem or not.
If you like to learn and find out more about various Windows errors, and how to repair them go to our vast archive or use search to find articles that will explain and help you in solving your issue.
However, if you prefer to do things fast and with automatization then we are proposing to use an automated solution for your issues. The application that we are recommending is Advanced System Repair Pro
Advanced System Repair utilizes multiple tools all in one to give you a quick, simple, reliable, and very thorough diagnosis of your PC. It brings you all the tools you need in one program to clean, fix, protect, optimize and boost your PC!
1-Click Maintenance
All the tools to make it simple and easy! It's like having a professional technician at the click of a mouse.

Junk Cleaner
Keeping your computer free from unnecessary clutter also helps make your computer last longer. Like any other machine, if you keep it clean and take care of it, it will serve you better for longer!

Optimize background apps
Optimize applications background activity with the built-in Application Optimizer feature.

Disk Defrag
With a simple 1-click, Advanced System Repair speeds up your PC by assembling fragmented files on your machine and organizing them more efficiently.

Malware Removal
Finds and removes all types of harmful malware including trojans, worms, bots, adware, spyware, PUPs, and more!

Privacy Cleaner
The all-in-one privacy suite to Clean Your Tracks & Protect Your Privacy! Make your computer safe, secure, and more efficient!

System Tweak/Optimizer
ASR will analyze your complete system and settings to adjust your PC to function at its maximum performance.

Registry Cleaner
Over time, as you install and uninstall applications, the registry can become cluttered with old entries and broken settings which can result in program crashes, and annoying messages and slow the computer down.
Visit our Advanced System Repair Pro Download page to inform yourself about all the benefits of this software and get a free trial copy of it.
advanced system repair pro

Advanced System Repair Pro

One-click automated PC repair solution
ASR logo
With Advanced System Repair Pro you can easily
Replace damaged files
Restore performance
Free disk space
Remove Malware
Protects WEB browser
Remove Viruses
Stop PC freezing
DOWNLOAD
Privacy Policy | Terms of Use | Uinstall
Advanced System Repair Pro is compatible with all versions of Microsoft Windows including Windows 11

Share this article:

You might also like

VirtualBox FATAL:No bootable medium found!
If you continuously encountered the “VirtualBox FATAL: No bootable medium found, System halted” error when you try to install Windows 10 in VirtualBox, read on as this post will give you some potential fixes to resolve the problem – you will be guided on how to choose the ISO image to fix this error in VirtualBox. This kind of error is a very common one especially if you have a corrupted ISO file or if you have not selected an ISO file for your virtual machine. Like pointed out, this error pops up when you have a corrupted ISO file or if the ISO file is not attached to the virtual machine. You have to select the ISO file while you create the virtual hard disk, else, you will most likely face this problem, and to fix it, you need to download fresh Windows ISO, create a new IDE Controller, assign Windows ISO to the IDE Controller and then boot your virtual machine. For detailed steps, follow the instructions below but before you start, make sure that you have a valid and uncorrupted Windows ISO. Step 1: First, you need to open the VirtualBox program on your computer and select the virtual machine. Step 2: Next, click on the Settings button or you can also right-click on the virtual machine and select Settings from the context menu. Step 3: Once you’re in the Settings panel, go to the Storage section and from there, create a Controller: IDE. Step 4: To create a Controller: IDE, click the Add new storage controller icon and select the “Add IDE Controller” option. Step 5: After that, click the Add optical drive icon and click on the Choose disk button. You will then see all the attached and non-attached ISO files. However, you have to add the new ISO file that you just downloaded. Step 6: To add the new ISO file, click the Add button and select the ISO file and then select the .iso file from the Non Attached section. Step 7: Now click the Choose button and afterward, make a checkmark in the Live CD/DVD checkbox and then select the IDE Primary Master from the drop-down menu of the Optical Drive. Step 8: Once you’re done, save the changes made and try booting into your virtual machine again.
Read More
Access Denied, You don’t have permission
When you try to open a website but instead encounter an “Access Denied, You don’t have permission to access on this server” error message along with the ULR which you aren’t able to access with a reference number, then it is most likely caused by some network-related issue in your browser. Note that this error mostly occurs on Firefox browsers. The “Access Denied” error appears when your Mozilla Firefox browser uses a different proxy setting or VPN instead of what’s really set on your Windows 10 PC. Thus, when a website detected that there is something wrong with your browser cookies or your network, it blocks you which is why you can’t open it. To resolve this error, here are some suggestions you can try. And if you got the same error message on a different browser, you can still follow the possible solutions given below.

Option 1 – Try clearing everything about the website

  • Open your browser and tap the Ctrl + H keys on your keyboard.
  • After that, look for the listing of the website from your browser history and right-click on it.
  • Then select the “Forget about this site” option. This will get rid of all the data such as browsing history, cache, cookies, and passwords. Thus, if you have a password saved or other important data of the website, you have to save it first before you tap the Ctrl + H keys.

Option 2 – Try disabling the VPN

As pointed out earlier, if you are using VPN, this could be the reason why you’re getting the “Access Denied” error so the most obvious thing to do is for you to turn off the VPN and try to run the Windows Update once more. And if you use a VPN software that works using their software, you can just completely exit or log-off from its account. On the other hand, if you are using a built-in Windows 10 VPN, you can simply turn it off or delete all the settings you have created there.

Option 3 – Uninstall the VPN service you are using or use a different provider

If you disabling the VPN service worked in fixing the “Access Denied” error, you might want to uninstall it. As mentioned, website administrator blocks IP ranges if they notice any malicious activities and because of this, your IP address might fall into the banned range even if you didn’t do anything at all. To uninstall the VPN service, follow the steps below.
  • Tap the Win + R keys to open the Run dialog box
  • Then type “appwiz.cpl” in the field and hit Enter to open the Programs and Features in Control Panel.
  • From there, look for the VPN service you are using, select it and then click on Uninstall to remove it.
  • After that, restart your computer and try to install the latest version of the program again. It should work now. If not, proceed to the next available option below.

Option 4 – Try disabling the proxy server for your LAN

If your PC was just attacked by some adware or malware as of late, it is possible that it has changed the network settings in the system and might display spam advertisements. Thus, you have to disable the proxy server for your LAN. To do that, refer to these steps:
  • Tap the Win + R keys to open the Run dialog box.
  • Then type “inetcpl.cpl” in the field and hit Enter to pull up the Internet Properties.
  • After that, go to the Connections tab and select the LAN settings.
  • From there. Uncheck the “Use a Proxy Server” option for your LAN and then make sure that the “Automatically detect settings” option is checked.
  • Now click the OK and the Apply buttons.
  • Restart your PC.
Note: If you are using a third-party proxy service, you have to disable it.
Read More
Not enough storage is available to process...
Each time you execute a command on your computer, it takes into account a number of files and space for the code in the background for the command to be executed. Thus, executing the command is not that easy which is why you could encounter some errors along the way due to various limitations or poor allocation of memory, and so on. One of the errors you might encounter when executing a command on Windows 10 and Windows Server is the “Not enough storage is available to process this command”. There are several potential fixes you can check out to fix this error. To fix this error, you can try to delete the temporary files in your computer, run the DISM tool or apply some registry tweaks. For more details, refer to each one of the given options below.

Option 1 – Try to delete the temporary files

The error could be caused by some temporary or junk files in your computer and so you need to clear them up to fix the problem. You can achieve that using the Storage Sense feature.
  • Open Setting > System > Storage from the WinX Menu.
  • From there, you will see a list of all the local and connected storage devices along with the details on the free space. Make sure that Storage Sense is on.
  • Next, find a link that says “Free Up Space” and click it to open.
  • After that, a screen which is the built-in program in Windows 10 will appear and will scan your computer for the following junk files so you can free up disk space:
    • Windows Upgrade Log Files
    • System created Windows Error Reporting Files
    • Thumbnails
    • Temporary Internet Files
    • Previous Windows Installation Files
    • Delivery Optimisation Files
    • DirectX Shader Cache
  • Choose the files you want to get rid of and then click on the remove files option. Note that you’ll have an idea of the total size as you select any of the junk files listed above.
  • Now go to the “Free Up Space Now” section and click the Clean now button. This will get rid of all the temporary or junk files in your computer and should hopefully fix Error 1310.

Option 2 – Run the DISM tool

You can also run the DISM Tool as it could also help in fixing the “Not enough storage is available to process this command” error in Windows 10. Using this built-in tool, you have various options such as the “/ScanHealth”, “/CheckHealth”, and “/RestoreHealth” that could help in fixing error 0x80246019.
  • You can run the DISM tool via Advanced Startup Options or you could boot your computer into a Clean Boot State and then select Command Prompt.
  • Open the Command Prompt with admin privileges.
  • Then type in the following commands and make sure to hit Enter right after you type each one of them:
    • Dism /Online /Cleanup-Image /CheckHealth
    • Dism /Online /Cleanup-Image /ScanHealth
    • exe /Online /Cleanup-image /Restorehealth
  • Do not close the window if the process takes a while as it will probably take a few minutes to finish. Once it’s done, restart your computer and try again. If it didn’t work, you can try to use the “/StartComponentCleanup” parameter: Dism /Online /Cleanup-Image /StartComponentCleanup

Option 3 – Try to use the Registry Editor

The memory range allocated for the tasks and commands to be executed is associated with the IRPStackSize DWORD. Thus, to fix the error, you need to extend the range by applying some registry tweak. Before you proceed, make sure that you create a System Restore point first. Once you’re done, follow these steps:
  • Tap the Win + R keys to open the Run dialog box and type “Regedit” in the field and tap Enter to open the Registry Editor.
  • Next, navigate to this registry key: ComputerHKEY_LOCAL_MACHINESYSTEMCurrentControlSetServicesLanmanServerParameters
  • From there, look for the DWORD named “IRPStackSize” and right-click on it. If you can’t find this DWORD, just right-click on any empty space and select New > DWORD (32-bit) Value.
  • Input “IRPStackSize” as the DWORD name and double click on it and set its Value data to be greater than its default value. Note that the maximum value allowed is “0xc” and the range starts from “0x1”.
  • Now click on OK and exit the Registry Editor and then restart your computer and see if the error is fixed.
Read More
Steam proton to run Windows games on Linux
Steam proton
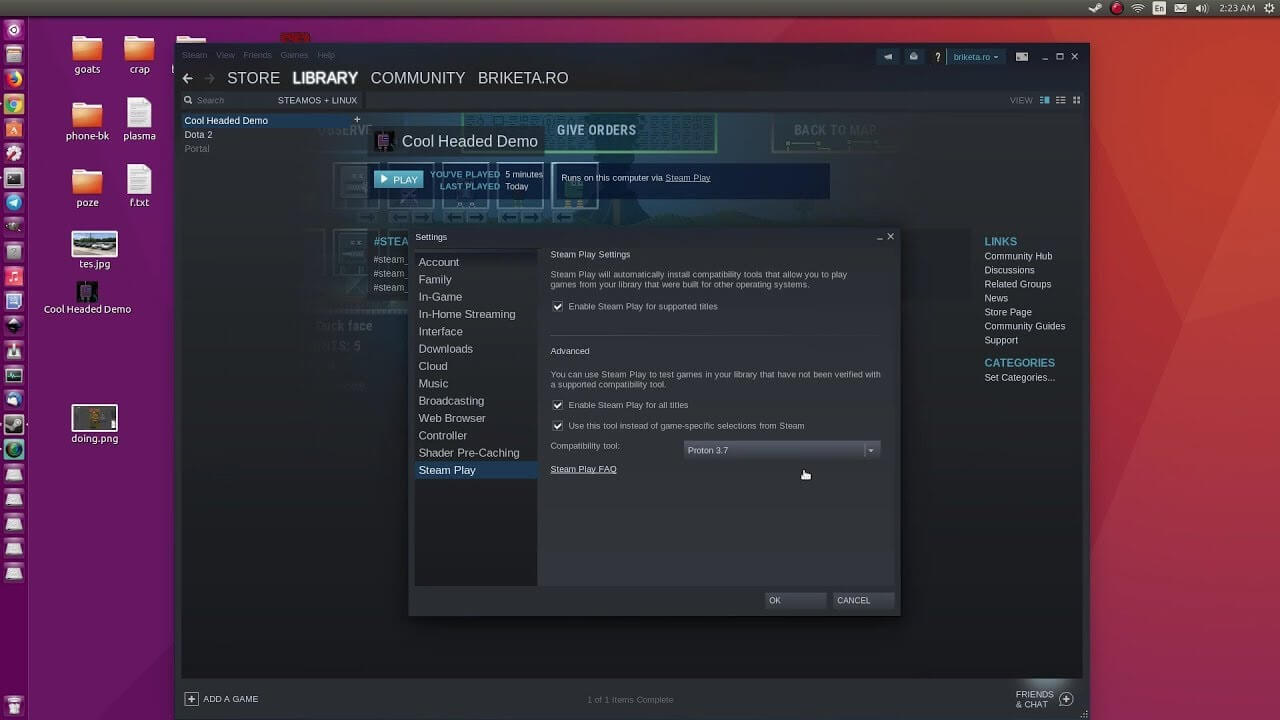
Despite popular belief, there are a lot of users running Linux OS. Linux offers great security and working environment and 96.3% of the world's top 1 million servers run on Linux. 90% of all cloud infrastructure operates on Linux and practically all the best cloud hosts use it. But gaming on Linux is limited, enter Steam proton a Valve’s gaming solution.

What is Steam proton?

Proton is a WINE fork with some extra capabilities, to play games and run applications not native and not made to run natively under Linux OS. It is supposed to bridge the Gaming issues for PC users and let them more freedom in choosing an operating system to game on.

Find out if your game supports Proton

Although there are a lot of titles that nowadays run natively on Linux some will still need proton in order to run at all and sadly some of them will not be able to run on Linux even via proton but seeing how Valve is busy and it is trying to push its ideas and technology slowly this gap is closing. In order to see how the game you want to play performs and behaves on Linux and proton environment visit https://www.protondb.com/ and find out. As soon as the site loads you will be greeted with statistics and a search option to find out the status of the desired game with one of the given statuses: Borked, Bronze, Silver, Gold, Platinum, and Native. As you probably guessed native means that the game will work on Linux out of the box and borked will probably not work at all. Platinum and gold status means that game will run on proton without any input or tweaks from the user while silver and bronze means that it will work but might need some tweaks in order to make it work.

How to get Steam proton?

In order to run games under proton inside Linux, you will need firstly a Steam client which luckily works naturally on Linux. Unlocking/activating Steam Proton on your Linux-based system is easy. Just head over to Steam > Settings > Steam Play and toggle the option “Enable Steam Play for Supported Titles”. Valve has tested and fixed some Steam titles and you will now be able to play those titles. However, if you wish to go even further beyond, and play titles that even Valve has not tested, toggle the option “Enable Steam Play for all titles”.

Conclusion

Even we are not there yet, native gaming on Linux is gaining a foothold each day. Will Steam’s OS with proton technology be one that will turn the tide from Windows or some other tech we cannot tell but one thing is for sure, more choices mean better products so I am hopeful for a bright future.
Read More
Steps to Fixing Error Code 38

Repair and Solve Error Code 38

Error Code 38 – What is it?

Error Code 38 is a device driver error that users encounter on any Windows 2000 operating system and its following versions.

It occurs when the peripheral device that you connect to your PC cannot be accessed due to an inability of the Windows system to acknowledge the driver as a previous record of the driver being loaded is found in its memory.

It is a common error that users come across and appears on your PC with the following message:

“Windows cannot load the device driver for this hardware because a previous instance of the device driver is still in memory. (Code 38)”

Solution

driverfix boxError Causes

Error Code 38 is prompted when incomplete program files are left in the Windows system which damage or corrupt its files. There are various factors that contribute to this, some of which are:

  • An incomplete program installation
  • An incomplete program uninstallation
  • Hardware is not removed properly
  • System recovery from viruses
  • An improper system shut down

The above triggers are very likely to create incomplete files within the Windows registry thereby leading to its damage and corruption.

This is especially true in the case of your PC when it has recovered from viruses when using anti-virus software. The anti-virus in its effort to remove the virus also could remove the files which contain them thereby increasing the risk of the error code.

These damaged files can severely impact the health of your PC and are imperative to fix it immediately to prevent further problems.

Further Information and Manual Repair

Although this error code may pose serious problems for your PC, thankfully, it is very similar to other PC driver errors and thus is an easy one to get rid of. Here are various methods that you can use to get your PC running smoothly again.

Method 1 – Restart your PC

The easiest method you can use to solve your PC error code is to simply restart your PC. It may be that the error prompted upon connecting the device you have connected is merely a temporary problem, and upon restart, will resume functioning smoothly.

Method 2 – Run the Troubleshooting Wizard

If restarting your PC does not help, you will have to find the exact nature of the problem by running the troubleshooting wizard for the device and then address the problem accordingly. To do this, proceed with the following steps:

  1. Run Device Manager on your PC
  2. Click on the program under the installed programs that is creating problems for you
  3. Click on the ‘General’ Tab
  4. Click ‘Troubleshoot’
  5. Upon opening, the Troubleshooting Wizard will ask a series of questions regarding the error. Answer the questions and follow its directions for solving the error code.

After following the directions of the Troubleshooting wizard, make sure to restart your PC for the changes to take effect. Now check if your device is still causing problems.

Method 3 – Use System Restore

If the error persists, you can use system restore to eliminate the problem. Here is how to do so:

  1. Log in using an Administrator account
  2. Click ‘Start’ button and select All Programs > Accessories > System Tools > System Restore
  3. Click ‘Restore my computer to an earlier time’ and click ‘Next’
  4. Select the last Windows to restore point from the ‘On this list, click a restore point’ list, and click ‘Next’
  5. Click ‘Next’ on the confirmation window to proceed
  6. Restart your PC after restoration is complete

By restoring the system via a last saved system checkpoint, you can obtain undamaged Windows system files that can help resolve the error code.

Method 4 – Manually uninstall and reinstall the device driver

If using system restore does not work either, you may have to resort to manually uninstalling and then reinstalling the device driver causing the problem.

This would be necessary since the remaining incomplete files due to a partial removal or installation of programs are responsible for the error code. By uninstalling and reinstalling the device driver program, it would lead to the completion of the files.

You can do this by firstly logging in as Administrator and opening Device Manager. Select the device that is causing the problem and double click it; make sure that the peripheral is connected properly to the PC.

Upon opening, click on the ‘Driver’ tab and then select ‘Update Driver’. Make sure to refer to the system documentation that you received with your PC or computer to check for the motherboard details and driver specifics.

Method 5 – Use software to automatically download the driver

Manually uninstalling and reinstalling the driver will do the trick; however, it may be time-consuming especially when you would have to resort to your hardware user manual.

Using a program such as DriverFIX can save you a lot of time and frustration in having your device to work properly on your computer.

DriverFIX, with its user-friendly approach to help you fix your PC issues, comes with an integrated database that detects which drivers you need to reconfigure within just a few seconds and downloads it automatically.

It further ensures that your drivers are installed in their entirety leaving no room for any incomplete files to remain that create Error Code 38, or any other driver-related errors for that matter.

It also has the added advantage of being able to backup and restores your files should there be the slightest possibility of system file damage. DriverFIX is the answer to fixing your PC error codes accurately and quickly.

Click here to download DriverFIX to fix Error Code 38 quickly and effectively!

Read More
My device used to work, but now it doesn’t
So you just have turned your computer ON only to find out that your device which was working perfectly yesterday is not working anymore. This situation can be very stressful and disappointing but do not despair, before you toss your device through the window know that this kind of behavior can be traced back to a software issue. In this article, we will give you hints on what to do and where to pay attention when something like this happens so you get the device back in working order.
  1. Check if it not a hardware malfunction

    To save yourself time and unnecessary frustration with juggling through Windows first inspect the device to be sure that indeed it is working properly, check all led lamps which could indicate that the device is working and receiving power, and if it is an internal device try opening the case and visually check if there are signs of working like rotating fans or led lamps on it.
  2. Check Cables

    If it is an external device that has stopped working try checking power cables and cables which go to your computer, see if they are tightly connected. If it is an internal device also check cables, nudge them and if possible disconnect and clean them.
  3. Disconnect and reconnect the device

    Try this solution to see will Windows register the device again and start it.
  4. Update Windows

    If there is a Windows update not installed, install it and see if the device will start working.
  5. Update device drivers

    Go to device manager and update the device driver to its latest version or go to the manufacturer's site and download the latest driver version.
  6. Reinstall the device

    In the device manager, uninstall the device driver and reboot Windows. When Windows boots it will recognize the device and install the necessary drivers for it.
  7. Disable antivirus and firewall

    Sometimes antivirus can prevent certain devices from working properly, especially if they rely on some system files to which antivirus or firewall has cut access. Try disabling your PC protection to see if this will resolve the issue.
  8. Use dedicated error software

    Use DRIVERFIX to automatically search and fix driver issues.
Read More
Fix Windows Update error 0xC1900209
What is Windows Update Error 0xC1900209? Before you can install any updates on your Windows 10 computer, there are a lot of conditions that have to be fulfilled and one of these conditions is software compatibility. It is one of the important factors in installing Windows Updates. So if one of the software in your computer is not compatible with the new Windows Update for your OS, then the Windows 10 setup will not proceed and will block the installation of the new update. This both applies to the cumulative updates and feature updates. In such cases, you will get the following error message when you run Windows Update:
“0xC1900209, Incompatible software is blocking the upgrade process. Uninstall the application and try the upgrade again.”
This error message comes under the umbrella of the Windows 10 pre-upgrade validation using Setup.exe. And for you to identify the incompatible app, you need to grab a Windows 10 install image using the Windows Media Creation tool to download the suitable Windows 10 version and mount it. After that, execute the setup.exe file that’s located in the root folder of the Windows 10 install image. Once you execute the setup file, the upgrade wizard will give you a list of incompatible apps. Once you have determined which software is not compatible with the Windows Update, there are two options you can try to resolve the Windows Update error 0xC1900209 – you can either try to update the conflicting software or uninstall it. For more details, follow the given options below.

Option 1 – Try to update the conflicting software

If you are using an older version of the software that’s in conflict with the Windows Update, you might want to update it to its latest version and then try to apply the updates again to your Windows 10 computer. You can update the concerned software by visiting the official website of the software or any of its distribution sources. On the other hand, you can also use the Check for updates feature of that particular software if it’s available.

Option 2 – Try to uninstall the conflicting software

If updating the problematic program didn’t work, the next option you can try is to uninstall it. All you have to do is follow these steps to uninstall it successfully:
  • Tap the Win + R keys to open the Run dialog box.
  • Then type “appwiz.cpl” in the field and tap Enter to open the Programs and Features in Control Panel.
  • Next, arrange the list of installed programs in the order of the installation date.
  • After that, look for the problematic program and right-click on it, and then select Uninstall.
  • Once the uninstallation process is done, restart your computer and see if the Windows Update error 0xC1900209 is fixed or not.
Read More
What to do if JPEG files won’t open in Windows 10
As you know, “JPEG” is one of the commonly used formats for image files which is a compression of digital images. It is one of the topmost used file formats by mobile phones and digital cameras and usually achieves a 10:1 compression with little visible loss in the quality of the image. There are tons of cases as of late, most particularly after the latest Windows 10 update where users were not able to open JPEG files on their PCs. Every time they try to open any JPEG file, they either get an error or nothing happens at all. This issue could be due to the default handler application for JPEG applications not being set or there could be some third-party image viewer not working properly. To fix this issue with JPEG files, refer to the troubleshooting options below.

Option 1 – Try to change the file type association

You need to check if the file type association of the JPEG files are correctly set or not since there are tons of third party programs that change the file type association automatically to themselves without your permission the instant they are installed and so if any of these third-party programs are broken, then naturally, your JPEG files won’t really open. That’s why you can try changing the setting to the default photo viewer instead of the third-party one. To do so, follow the steps below.
  • Tap the Win + R keys to open the Run dialog box.
  • Then type in “control panel” in the field and hit Enter to open the Control Panel.
  • After opening Control Panel, click on the Programs category and select the “Default Programs” option from the menu.
  • Next, select the second option “Associate a file type or protocol with a program” and then select the “Choose default apps by file type” option.
  • After that, click on the .jpg file extension and choose the option from the pop-up.
  • Now restart your PC to refresh all your programs and then see if it has fixed the problem or not.

Option 2 – Try to update your computer

Microsoft frequently releases updates to target bugs and improve users’ experience. And this particular error where JPEG files won’t open is already acknowledged by Microsoft so you need to make sure that your Windows 10 PC is updated to the latest released update and that there are no pending updates.
  • Tap the Win + S keys to open Search and then type in “update” in the field and open the system setting from the search results.
  • After that, check for updates and then download and install them if needed.
  • Now restart your PC once the update is done and check if you can now open JPEG files.

Option 3 – Try to reset the Photos app via Settings

Resetting the Photos app could also help you in fixing the problem. Note that this option will reset all the configurations and your data associated with your Photos and makes the application go into a state when you first started using it and that this option will fix any discrepancies that your application might be experiencing right now.
  • Tap the Win + S keys to open the search bar.
  • Then type in “settings” in the field to open the Settings application.
  • After opening Settings, click the “Apps” category.
  • From there, a list of applications installed on your computer will appear.
  • Navigate through these applications until you find the Photos app and then click on the Advanced options.
  • Afterward, click the Reset button that appears on the next screen. Then a new pop-up comes up and will warn you that all the preferences, as well as sign-in information, will be lost. Click on “Reset” anyway to proceed in resetting the Photos app.
  • Restart your PC once the reset is done.

Option 4 – Try to reinstall the Photos app

Before you start using other third-party image viewers just yet, you can try to reinstall the Photos app first. Thus, if there is something wrong with it, it will instantly get fixed right after it reinstalls. Just take note that this option requires administrative privileges so you need to be logged in as an administrator.
  • The first thing you have to do is tap the Windows + S keys and type in “PowerShell”.
  • Next, right-click on the file and click on the “Run as administrator” option from the context menu.
  • Once PowerShell is opened, execute this command: get-appxpackage *Microsoft.Windows.Photos* | remove-appxpackage
  • The command you just entered will remove the Photos app. After the process is done, go to the Microsoft Store and look for Microsoft Photos then download and install it again.
Read More
How to Fix Error Code 0x8007041d on Your PC

How to Fix Error Code 0x8007041d on Your PC

Error Code 0x8007041d - What is It?

Error Code 0x8007041d is an error that arises during the Windows 10 Update process. In some cases, this error code can also arise during the Windows 10 Activation process. It is an error code that has been present in multiple versions of the software but usually arises when antivirus or registry issues interfere with the Windows Update or Activation software.

Common symptoms include:

  • Inability to download the needed Windows 10 updates
  • Inability to complete the Windows 10 Update process

If you are experiencing the Error Code 0x8007041d on your machine, there are several methods that you can use to attempt to resolve the problem. Several of the steps that are most successful for the resolution of this error require familiarity with registry and antivirus tools, so if you are unsure of your ability to complete these steps on your own, contact a qualified computer repair technician to assist you.

Solution

Restoro box imageError Causes

In most cases, Error Code 0x8007041d arises when there is a conflict between multiple antivirus or malware tools on the computer, if there is an issue in the Windows registry, or if your Windows Defender software is out of date. During the Windows Update process, the system checks to ensure that there are not any factors that are present that could introduce viruses to the system, so if there are any indicators that could present issues to the software, Error Code 0x8007041d will often arise.

Further Information and Manual Repair

For users who experience Error Code 0x8007041d, there are several steps that can be taken to resolve the issue. If the following methods are not successful for you or if you are unsure of your ability to undertake them on your own, contact a qualified Windows 10 computer technician.

Here are the best ways to attempt to fix Error Code 0x8007041d on your computer:

Method 1:  Remove Additional Security Software Apart from Windows Defender

In some cases, having multiple versions of malware or antivirus software installed on your computer can cause the Windows system to create conflicts between them, which can interfere with your ability to update. During the update process, the system may attempt to determine if there is any malware present, and having multiple kinds of antivirus software present on the same machine may return mixed results.

If you currently are running antivirus software that is separate from Windows Defender, consider removing it from your computer prior to running the update software. This may allow you to successfully complete your update process without conflict. Additional software can be reinstalled after the update is complete, but make sure to keep both sets of software up to date in order to lessen the chances of encountering this error code again during future updates.

Method 2:  Update Your Windows Defender Software

If you currently have Windows Defender as your primary antivirus software, check to see whether it is fully up to date. Out of date antivirus software can cause conflicts with the Windows Update process since the update to Windows 10 will not be able to be completed unless the system is free from viruses or malware.

If you are unsure of whether or not your Windows Defender is up to date, open it and run the process to check for updates, then re-attempt to run Windows Update. In some cases, you may want to restart your computer before running the Windows 10 Update process a second time.

Method 3:  Run the Registry Repair Tool

Another issue that could cause Error Code 0x8007041d is a problem in the system registry. If you believe that this may be the case, run the Windows Registry Repair Tool on your machine to check for and resolve any issues. This is a fairly simple and straightforward tool to use, but it can help you to resolve any number of problems that may interfere with your ability to update your Windows 10 software.

If you have taken the steps listed above, restart your computer before attempting to proceed with the Windows Update process. If the three methods listed above are not successful in completely resolving Error Code 0x8007041d on your machine or if you are not comfortable in your ability to implement these steps on your own, contact a qualified Windows repair technician who is familiar with the Windows Update process to assist you.

If you wish to always have at your disposal a utility tool to fix these Windows 10 and other related issues when they do arise, download and install a powerful automated tool.

Read More
Fix mfewfpk.sys, Epfwwfp.sys Errors in Windows
If you suddenly encounter a Blue Screen error that points out to either the mfewfpk.sys and epfwwfp.sys files, then this post might help. Both of these files are created by third-party software. The mfewfpk.sys file is created by the McAfee security software while the epfwwfp.sys is created by the ESET Antivirus. These files are residual files and sometimes it blocks upgrading Windows 10. Aside from blocking Windows 10 upgrade/update, these files can also cause a Blue Screen error after an upgrade which leaves your Windows 10 computer useless. When you get a Blue Screen error caused by any of these files, you will see an accompanying error message that states, “DRIVER IRQL NOT LESS OR EQUAL”. To fix this Blue Screen error, you can check out the suggestions laid out below but before you do that, you need to create a System Restore point first as it can help you undo any unwanted changes. In addition, make sure to also boot your computer into Safe Mode with Networking before you troubleshoot.

Option 1 – Try to remove the epfwwfp.sys file

You can try to remove the epfwwfp.sys file using Command Prompt. To do so, refer to the following steps:
  • Right-click on the Start button and click on Command Prompt (Admin) from the menu to open Command Prompt with admin privileges.
  • Next, type the following command and hit Enter to delete the epfwwfp.sys file:
DEL /F /S /Q /A “%systemroot%System32driversepfwwfp.sys”
  • After the scan is completed, restart your computer and see if it fixed the Blue Screen error.
Note: You can also use the ESET AV Remover tool to uninstall Eset security software to remove the epfwwfp.sys file.

Option 2 – Try to remove the mfewfpk.sys file

The same with the first option, you can remove the mfewfpk.sys file using CMD.
  • First, right-click on the Start button and click on Command Prompt (Admin) from the menu to open Command Prompt with admin privileges.
  • After, type the following command and hit Enter to delete the epfwwfp.sys file:
DEL /F /S /Q /A “%systemroot%System32driversmfewfpk.sys”
  • Once the scan is completed, restart your computer and see if it fixed the Stop error.

Note: You also have the option to remove the mfewfpk.sys file using McAfee Product Removal tool to uninstall the McAfee security software. All you have to do is download the McAfee Product Removal tool and run it and then follow the onscreen instructions to install it. Once it is installed, click on Next. After you select the radio button to agree to the terms of use, click on Next once again. Finally, restart your computer and check if it is able to resolve the problem or not.

Option 3 – Run the Blue Screen Troubleshooter

Troubleshooting Blue Screen of Death errors wouldn’t be complete without the Blue Screen troubleshooter. As you know, it is a built-in tool in Windows 10 that helps users in fixing BSOD errors. It can be found on the Settings Troubleshooters page. To use it, refer to these steps:
  • Tap the Win + I keys to open the Settings panel.
  • Then go to Update & Security > Troubleshoot.
  • From there, look for the option called “Blue Screen” on your right-hand side and then click the “Run the troubleshooter” button to run the Blue Screen Troubleshooter and then follow the next on-screen options. Note that you might have to boot your PC into Safe Mode.

Option 4 – Try running the DISM tool

You can try running the Deployment Imaging and Servicing Management or DISM tool to fix the Blue Screen error. Using this built-in tool, you have various options such as the “/ScanHealth”, “/CheckHealth”, and “/RestoreHealth”.
  • Open the Command Prompt with admin privileges.
  • Then type in the following commands and make sure to hit Enter right after you type each one of them:
    • Dism /Online /Cleanup-Image /CheckHealth
    • Dism /Online /Cleanup-Image /ScanHealth
    • exe /Online /Cleanup-image /Restorehealth
  • Do not close the window if the process takes a while as it will probably take a few minutes to finish.
Read More
1 2 3 162
Logo
Copyright © 2022, ErrorTools. All Rights Reserved
Trademarks: Microsoft Windows logos are registered trademarks of Microsoft. Disclaimer: ErrorTools.com is not affiliated with Microsoft, nor claim direct affiliation.
The information on this page is provided for information purposes only.
DMCA.com Protection Status